MAZDA 323 1992 Workshop Manual Suplement
Manufacturer: MAZDA, Model Year: 1992, Model line: 323, Model: MAZDA 323 1992Pages: 279, PDF Size: 24.15 MB
Page 121 of 279

P CONVENTIONAL BRAKE SYSTEM
FRONT BRAKE (DISC)
t nspection (on-ve hicte)
Disc pad
t. Jack up the front of the vehicle and support it with safety
stands.
2. Remove the wheels.
3. Sight through the caliper inspection hole and inspect the
remaining thickness of the pads.
1
Thickness: 2.Omm f 0.08 in ] min.
I LlL”r *-cl , a 4. Replace the pads as a set (right and left wheels) if either
is at br ‘less than the mintmum thickness.
Removal / inspection I installation
1. Remove in the order shown in the figure.
2. Inspect all parts and repair or replace as necessary.
3. Install in the reverse order of removal, referring to InstaHation Note.
4. After installation, perform the following.
(1) Add fluid and bleed the air.
(2) Check for fluid leakage.
(3) Depress the pedal a few times, then verify that the brakes do not drag while rotating the wheel by hand.
102-137 (10.4-14.0,
22-29 (2.2-3.0, 16-21)
75.3-1011
1. Flexible hose 7. Outer shim
2. Bolt 8. Inner shim
3. Callper 9. Guide plate
Disassembly I t nspection / IO. Mounting support
Assembly . _. . . . . _. ._. . . . . . . . . . . . , i.. . . ,:, . page P-l 2 t 1. Disc plate
4. Boot Inspection . . . . . . . . . . . . . . . . . . . . . . . . .,......_.. page P-1 2
5. V-spring
6. Disc pad
Inspection . . . . . . . . . . . . . . . . . . . . .._.__....._........... above InstaUation Note . . . . . . . . . . . . . . . . . .._...... page P-l 1 DlSC PAC
Reptacem
I. Remove
2. tnstatl in
1; Em
2. V-spring
3. Disc paa
fnstatle
Page 122 of 279

CONVENTIONAL BRAKE SYSTEM
- P
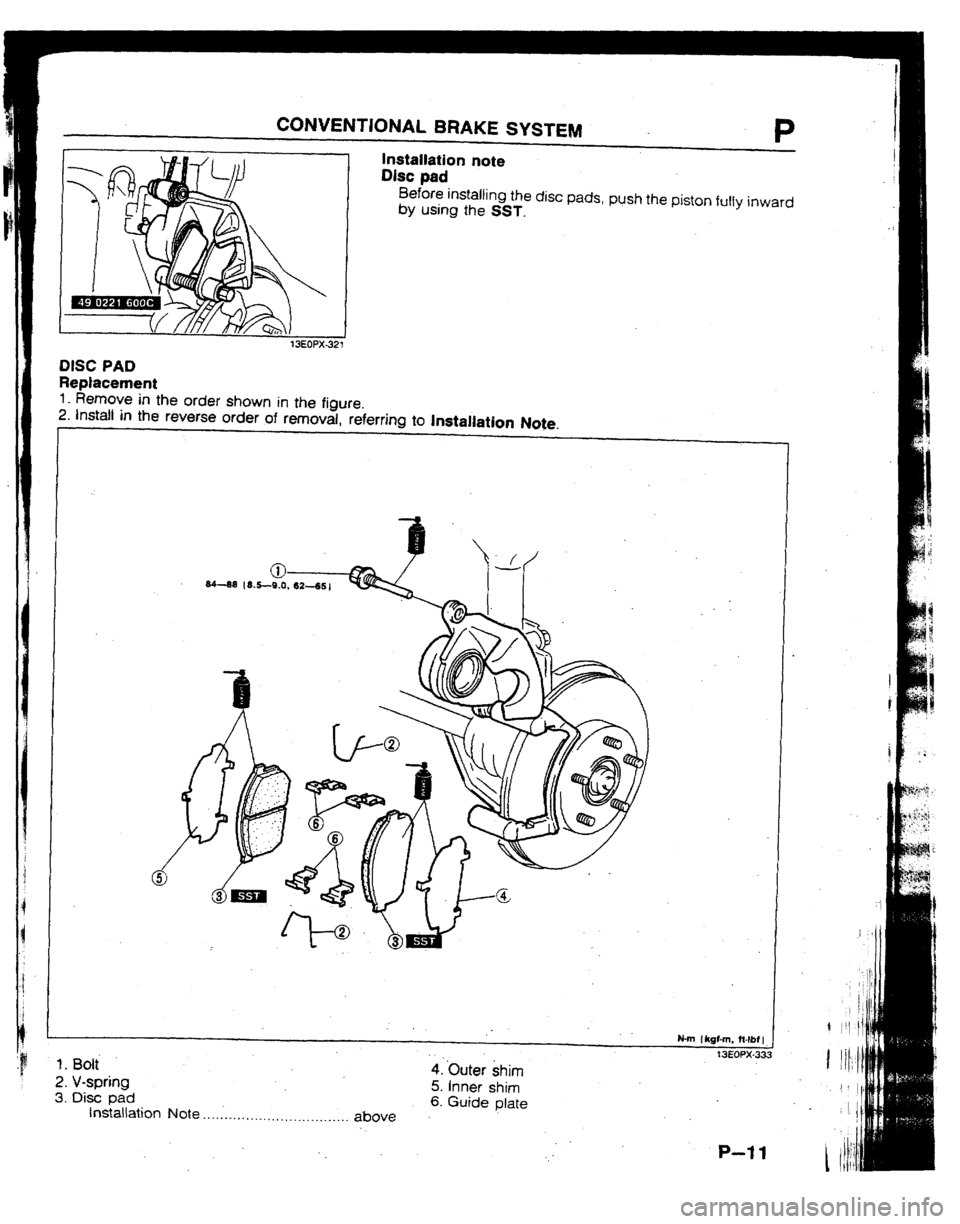
Installation note
I
I Disc pad
Before installing the disc pads, push the piston
fully inward by using the
SST.
13EOPX DISC PAD
Replacement
I_ Remove in the order shown in the
figure. 2. Instalt in the reverse order of removal, referring to Installation Note.
N-m fltgfm, ft4bf 1 1. Bolt t 3EOPX-33: 2. V-spring
4. ‘Outer shim
3. Disc pad 5. tnner shim
Installation Note . 6. Guide plate
. . . . . . . . . . . . . . . . . . . . ..l._.........
above -
P-1 I
Page 123 of 279
![MAZDA 323 1992 Workshop Manual Suplement P CONVENTIONAL BRAKE SYSTEM
16EOPX-066
I
CALIPER DISC PLATE
Jnspection
Disc plate thickness
1. Measure the thickness of the disc plate.
Standard: 24mm (0.94 in)
Minimum: 22mm (0.87 in]
2- If MAZDA 323 1992 Workshop Manual Suplement P CONVENTIONAL BRAKE SYSTEM
16EOPX-066
I
CALIPER DISC PLATE
Jnspection
Disc plate thickness
1. Measure the thickness of the disc plate.
Standard: 24mm (0.94 in)
Minimum: 22mm (0.87 in]
2- If](/img/28/57055/w960_57055-122.png)
P CONVENTIONAL BRAKE SYSTEM
16EOPX-066
I
CALIPER DISC PLATE
Jnspection
Disc plate thickness
1. Measure the thickness of the disc plate.
Standard: 24mm (0.94 in)
Minimum: 22mm (0.87 in]
2- If the
thickness is not within specification, replace the disc
plate.
Disc plate runout
Caution
l There must be no wheet bearing looseness.
4. Measure the runout at the outer edge of the contact sur-
face of the disc pad.
Runout: 0.1 mm [ 0.004 in ) max.
2. If the runout is not within specification, repair or replace the
disc plate.
Uisassembly I Inspection I Assembly
I, Disassemble in the order shown in the figure, referring to Disassembly Note.
2. Inspect ail parts and repair of replace as necessary.
3$ Assemble in the reverse order of disassemblv. referring to Assembly Note.
REPLACE
1, Dust seal
tnspect for damage and poor seating
2. Piston
Disassembly Note.:. .,._..... . . . . . . . . . . . page P-13
Inspect for wear
and rust
3. Piston seat
N-m 1 kgfcm, In-lbf I
13EOqX-32: 4. Bleeder cap, bleeder screw
Disassembly Note.. . . . . . . . . . . . . , . . . ._. . . page P-l 3
.. Assembly Note ..*.*......-*...*.........;
5. Caliper
body page P-13
Inspect for damage, wear and rust
Disassembly Note.. . . . . _. . . . . . . . . . . . . . page P-l 3
P-12 - G
Page 124 of 279

CONVENTIONAL BRAKE SYSTEM P
13EOPX-324
I %EOPX-071
Disassembly note
Piston
Caution
l Blow the compressed air slowly to prevent the pis-
ton from popping out.
I. Place a piece of wood in the caliper.
2. Blow compressed air through the pipe hole to force the pis-
ton out of the caLper.
Piston seal
Remove the piston seal from the caliper by using the SST.
I
Bleeder screw
Loosen the bleeder screw by using the SST.
Assembly note
Bleeder screw
Tightening the bteeder screw by using the SST.
Tightening torque:
5.9-8.8 Nom (60-90 kgfcm, 53-78 in&f ]
Page 125 of 279

P CONVENTIONAL BRAKE SYSTEM
f 6EOPX-073
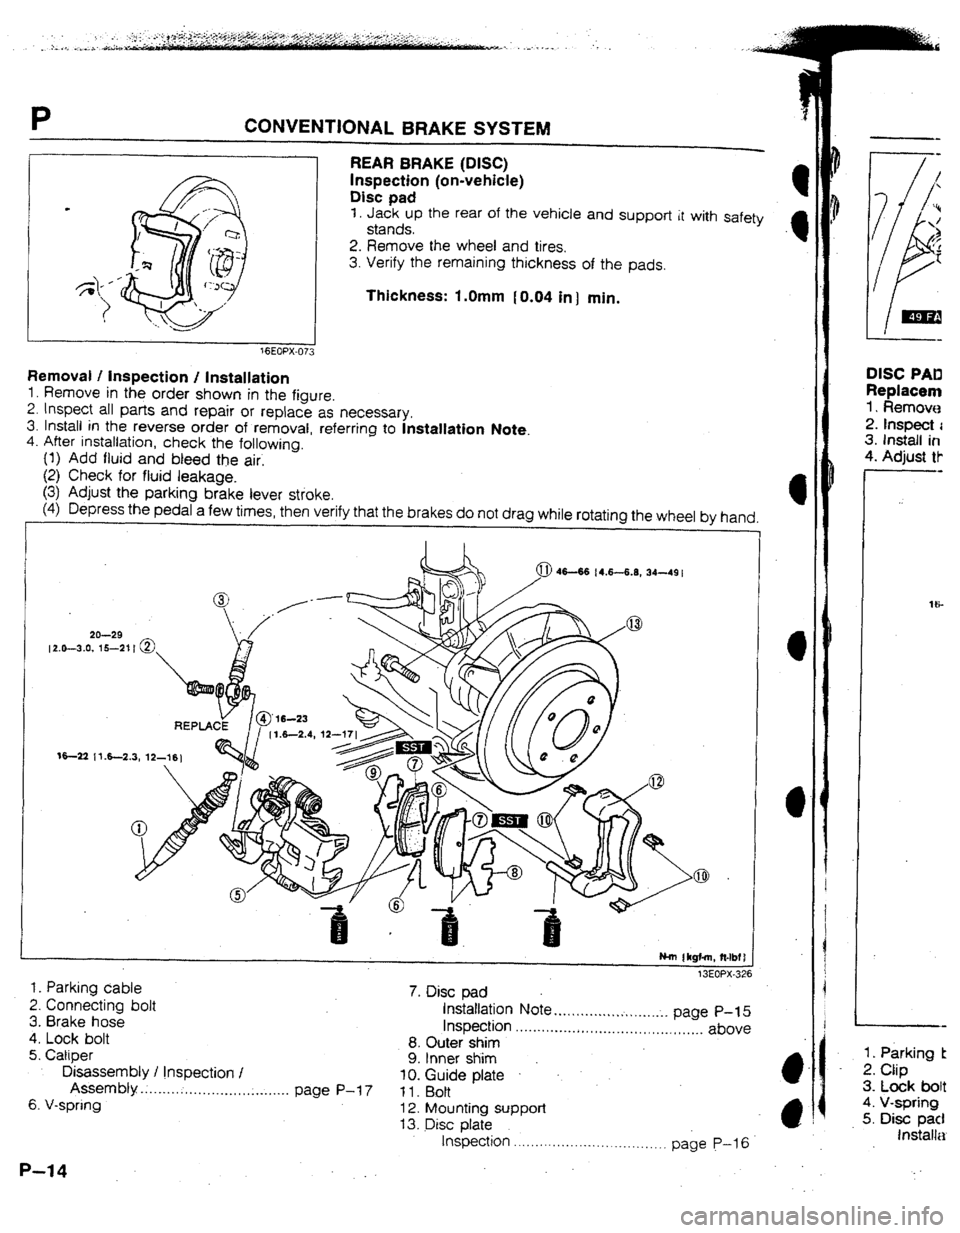
REAR BRAKE (DISC)
inspection (on-vehicle)
Disc pad
1, Jack up the rear of the vehicle and support it with safety
stands.
2, Remove the wheel and tires.
3. Verify the remaining thickness of the pads.
Thickness: f .Omm fU.04 in) min.
Removal I Inspection / Installation
1. Remove in the order shown in the figure.
2. Inspect all parts and repair or replace as necessary.
3. Install in the reverse order of removal, referring to Installation Note.
4. After instaHation, check the following.
(1) Add fluid and bteed the air.
(2) Check for fluid leakage.
(3) Adjust the parking brake lever stioke.
(4) Depress the pedal a few times, then verify that the brakes do not drag while rotating the wheel bv hand,
1. Parking cable
7. Disc pad
13EOPX-32f page P-15 ,..
. . ..I...... above 2. Connecting bolt installation
3. Brake hose Note . ..*. 1 ,...... I.r. . . . . .
4. Lock bolt Inspection . ..-f...........III.I.......,,.
8. Outer shim
5. Caliper 9. Inner shim
Disassembly I Inspection I
Assem bty IO. Guide plate .
-. . . _. . . . . . . . . . . . . . . . . , . . . . . . . . . . . page P-l 7
Il. Bolt
6, V-spring 12. Mounting support
I 3. Disc plate
Inspection . . . . . . . . . . . . . . . . . . . .._...._.~
P-1 4 . . . page p-16 DISC PAD
Replacem
1 s Remove
2. Inspect
i 3. Install in
4. Adjust tF
1. Parking t
2. Ciip
3. Lock bolt
4. V-spring
5. Disc pad
Installa
Page 126 of 279

CONVENTIONAL BF?AKE SYSTEM P
InstaHation note
Disc pad
Install the piston with the SST by turning it clockwise until
it stops.
13EOPX-327
DISC PAD Replacement
1. Remove in the order shown in the figure.
2. Inspect all parts and repair or replace as necessary.
3, Install in the reverse order of removal, referring to hstallation Note.
4. Adjust the parking brake lever stroke.
f . Parking
brake cable 2. Clip
3. Lock bolt
4. V-spring
5. Disc pad 6. Outer shim
7, lhner shim -
8. Guide plate
lnstaflation note . . . , . .._. . .I . . . . . . . . . . . . . . _. . . . . . . above . _’
.
P-1 5
Page 127 of 279

P CONVENTIONAL BRAKE SYSTEM
DtSC PLATE
Inspection
Disc plate thickness
I. Measure the thickness of the disc plate.
Standard: IOmm [ 0.39 in)
MInimum: 8mm (0.31 in 1
2, if the thickness is not within specification, replace the disc
plate.
Disc plate runout
Caution
l There must be not wheel bearing looseness.
I. Measure the runout at the outer edge of the contact sur-
face of the disc pad.
Runout: U.lmm [ 0.004 in) max.
2. If the runout is not within specification, repair or replace the
disc plate. CALIPE,
Disasstt
1. Disass
2. lnspec
3. Assem
i
1. Sleeve
2. Boot
I
1 3. Boot
4. RetainhI
5. Dust se2
i 6. Piston
Disaa
1 ASSen
i i InsP% InsP% 7. Piston st St
Disass E
8. Snap rin rl
9, stopper r
IO. Adjuster !r
. ’
tnspec
P-l 6
Page 128 of 279

CONVENTIONAL BRAKE SYSTEM P
CALIPER
Disassembly / fnspection / Assembly
Csation
l Replace the caliper assembly if a problem is found.
1. Disassemble in the order shown in the figure, referring to Disassembly Note.
2, Inspect all parts and repair or replace as necessary.
3. Assemble in the reverse order of disassemblv. referrina to Assembly Note.
REPL A
3 Hm 1 kgtm, ?btbl I
lC#EOPX-32
’ 1,
Sleeve 1 I. O-ring
2. Boot 12. Connecting link
i 3. Boot Inspect for damage and wear
4. Retaining ring 13. Return spring
5, Dust seal 34. Operating Iever
6. Piston 15. Boot
a* *
Disassembly Note . . . . . . .- . . . . . . . I*.- ,... page P-16
Assembly Note . . . . . . . . . . . . . . . . . . . . . . ..I.. page P-19
Inspect for wear and
rust 7. Piston seat
Disassembly Note *........ s . . . . . . . . . . -.. page P-1 8
8. Snap ring
9. stopper
IO. Adjuster spindle Inspect for damage and wear 16. Neeare oearrng
Disassembly Note ..........*...I..... ..* page P-l 8
Assembly Note .*.............*........e.* page P-19
17. Bleeder screw and rubber cap
Disassembly Note . . . . . . . . . . . . . . . . . . . . . . . page P-18
Assembly Note . . ..*.................*....
page P-18
.I& Cable bracket
19. Caliper body inspect for damage, wear and rust
Page 129 of 279

CONVENTfONAt BRAKE SYSTEM
13EOPX-33C
16EOPX-7 16
1
3
J
13EOPX 331
Disassembly note
Piston
Remove the piston with the SST.
Note
l The piston is removed by turning the SST counter-
clockwise.
Piston seal
Remove the piston seal with the SST.
Needle bearing
1. Secure the catiper in a vise.
Caution
l Do not remove the needle bearing if not necessary.
l Insert a soft, protective material (such as copper
ptates) in the jaws of the vise.
2. Remove the needle bearing from the caliper with the SST.
Bleeder screw
Loosen the bleeder screw by using the SST.
Assembly note
Bleeder screw
Tighten the bleed screw by using the SST.
Tightening torque:
5.9-8.8 Narn f 60-90 kgfcm, 53.-78 in4bf )
.
c
P-1 8
Page 130 of 279

I- CONVENTIONAL BRAKE SYSTEM
P
I f3EOFX-33,
Needle bearing
1. Set the new needle bearing in the caliper with the needle
bearing hole facing the caliper cylinder.
2. Press the needle bearing into the caliper with the SST until
the SST bottoms against the caliper.
Piston
Assemble the piston with the SST.
Note
l The piston is assembled by turning the SST
clockwise.
16EOPX-718
P--t9 . .