light MAZDA MODEL 6 2014 Smart Start Guide (in English)
[x] Cancel search | Manufacturer: MAZDA, Model Year: 2014, Model line: MODEL 6, Model: MAZDA MODEL 6 2014Pages: 42, PDF Size: 3.75 MB
Page 15 of 42
14
Headlightswww.MazdaUSA.com
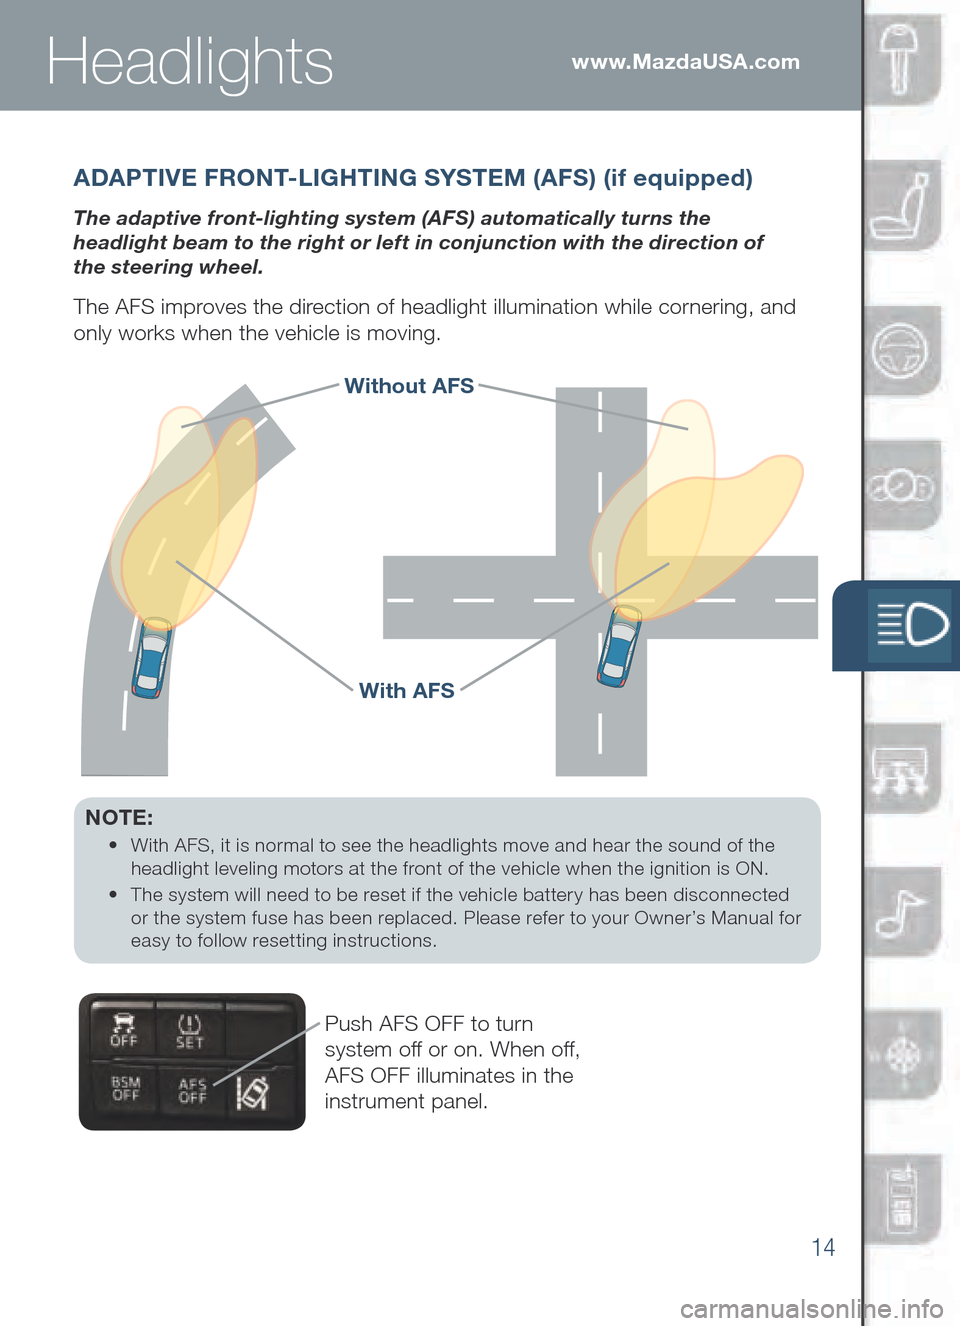
Push AFS OFF to turn
system off or on. When off,
AFS OFF illuminates in the
instrument panel.
With AFS
Without AFS
ADAPTIVE FRONT-LIGHTING SYSTEM (AFS) (if equipped)
The adaptive front-lighting system (AFS) automatically turns the
headlight beam to the right or left in conjunction with the direction of
the steering wheel.
The AFS improves the direction of headlight illumination while cornering, and
only works when the vehicle is moving.
NOTE:
• With AFS, it is normal to see the headlights move and hear the sound of the
he adlight leveling motors at the front of the vehicle when the ignition is ON.
•
The system will need to be reset if the vehicle battery has been disconnected
or the system fuse has been replaced. Please refer to your Owner’s Manual for
easy to follow resetting instructions.
Page 17 of 42

16
www.MazdaUSA.com
FORWARD O BST RUC TION WAR NING (FOW)
Forward Obstruction Warning (FOW) is a system which
alerts the driver of a possible collision using an indicator
and warning sound in the instrument cluster while the
vehicle is being driven at about 10 mph or faster (15 km/h
or faster) and the system’s radar sensor determines that
your vehicle may hit a vehicle or obstruction ahead.
HOW TO SET THE SPEE D
1 Adjust the vehicle speed to the desired setting using the
acce lerator pedal.
2 Hea dway control begins when the SET + or SET – switch is pushed.
The set speed and the inter-vehicle distance display flled with white
lines is displayed. The Mazda Radar Cruise Control (MRCC) indicator
light (green) is indicated simultaneously.
Travel StatusDuring travel at
constant speed During travel under
headway control
Display
50 mph50 mph
HOW TO SET THE DIST ANCE BETW EEN VE HICLES
The distance between vehicles is set to a shorter distance each time the\
switch is pushed. The distance between vehicles is set to a longer dista\
nce
by pushing the
switch. The distance-between-vehicles can be set to 4
levels; Long, medium, short, and extremely short distance.
Distance between
vehicles guideline
(at 50mph
(80km/h)Long (a\bout
164ft (50m)) Medium (a\bout
131ft (40m)) Short (a\bout
98ft (30m)) Extremely
short (a\bout 82ft (25m))
Display
50 mph50 mph50 mph50 mph
CAUTION: Do not rely completely on the MRCC system and always
drive carefully. Mazda does not encourage driving over the posted
speed limit.
Page 18 of 42
17
LDWS
LANE DE PA RTU R E WARNING SYSTE M (LDWS) (if equipped)
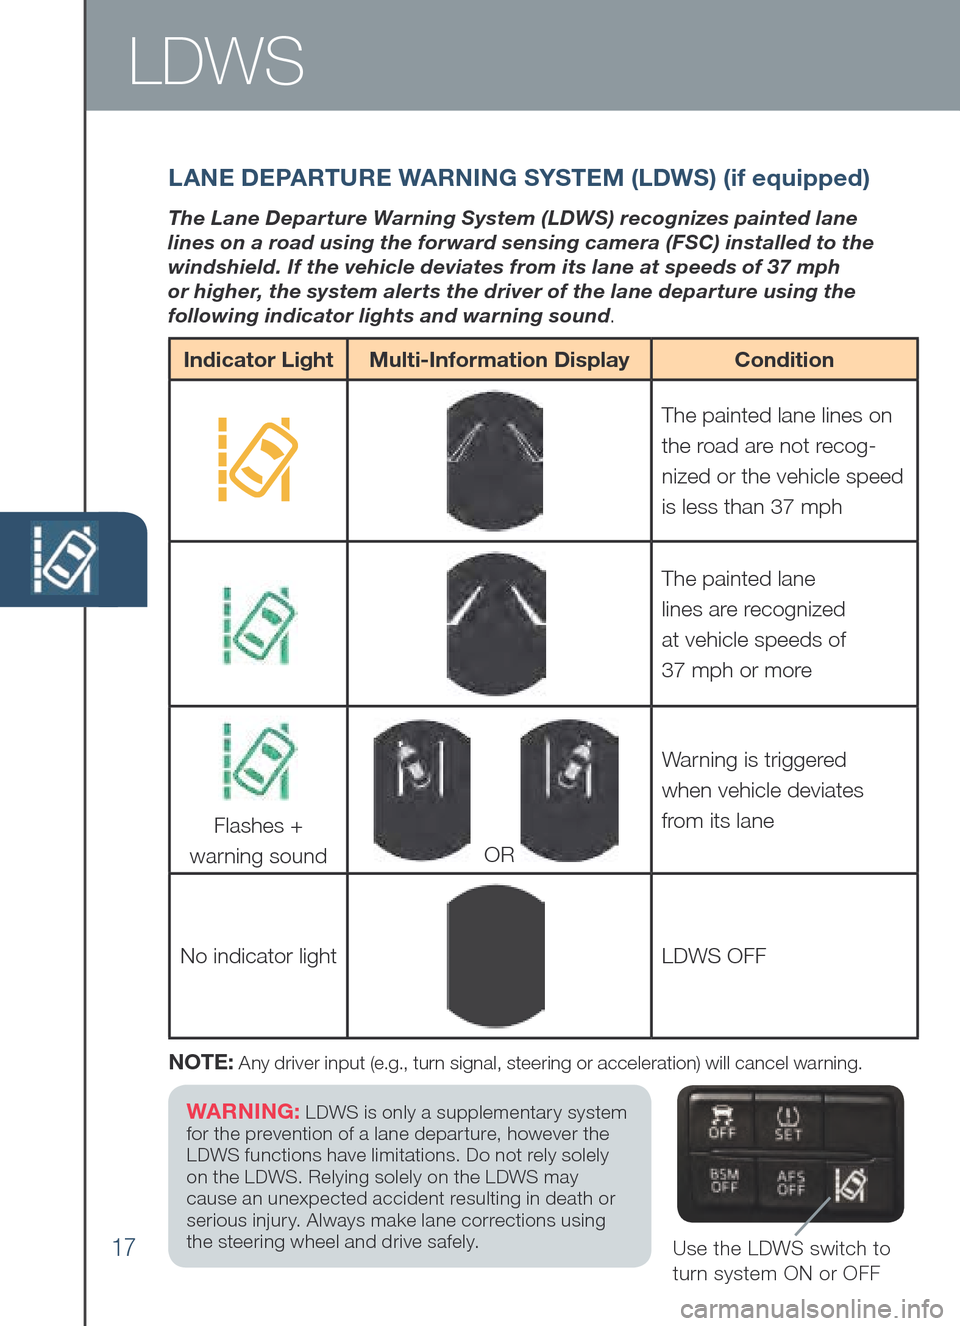
The Lane Departure Warning System (LDWS) recognizes painted lane
lines on a road using the forward sensing camera (FSC) installed to the
windshield. If the vehicle deviates from its lane at speeds of 37 mph
or higher, the system alerts the driver of the lane departure using the
following indicator lights and warning sound .
Use the LDWS switch to
turn system ON or OFF
NOTE: Any driver input (e.g., turn signal, steering or acceleration) will cancel warning.
Indicator Light Multi-Information Display Condition
The painted lane lines on
the road are not recog-
nized or the vehicle speed
is less than 37 mph
The painted lane
lines are recognized
at vehicle speeds of
37 mph or more
Flashes +
warning sound
OR
Warning is triggered
when vehicle deviates
from its lane
No indicator light
LDWS OFF
WARNING: LDWS is only a supplementary system
for the prevention of a lane departure, however the
LDWS functions have limitations. Do not rely solely
on the LDWS. Relying solely on the LDWS may
cause an unexpected accident resulting in death or
serious injury. Always make lane corrections using
the steering wheel and drive safely.
Page 19 of 42
18
Tireswww.MazdaUSA.com
TIRE PRESSURE MONI TORING SYSTE M (TP MS)
Your vehicle is equipped with a Tire Pressure Monitoring System (TPMS)
that detects low tire pressure in one or more tires. In the following cases,
the TPMS must be “initialized” so the system can operate normally.
• The tire pressure is adjusted (up or down) in one or more tires.
• A tire ro tation is pe rformed.
• Any ti re or wh eel is re placed.
•
The ve hicle’s ba tter y is di sconnected, re placed or co mpletely de ad.
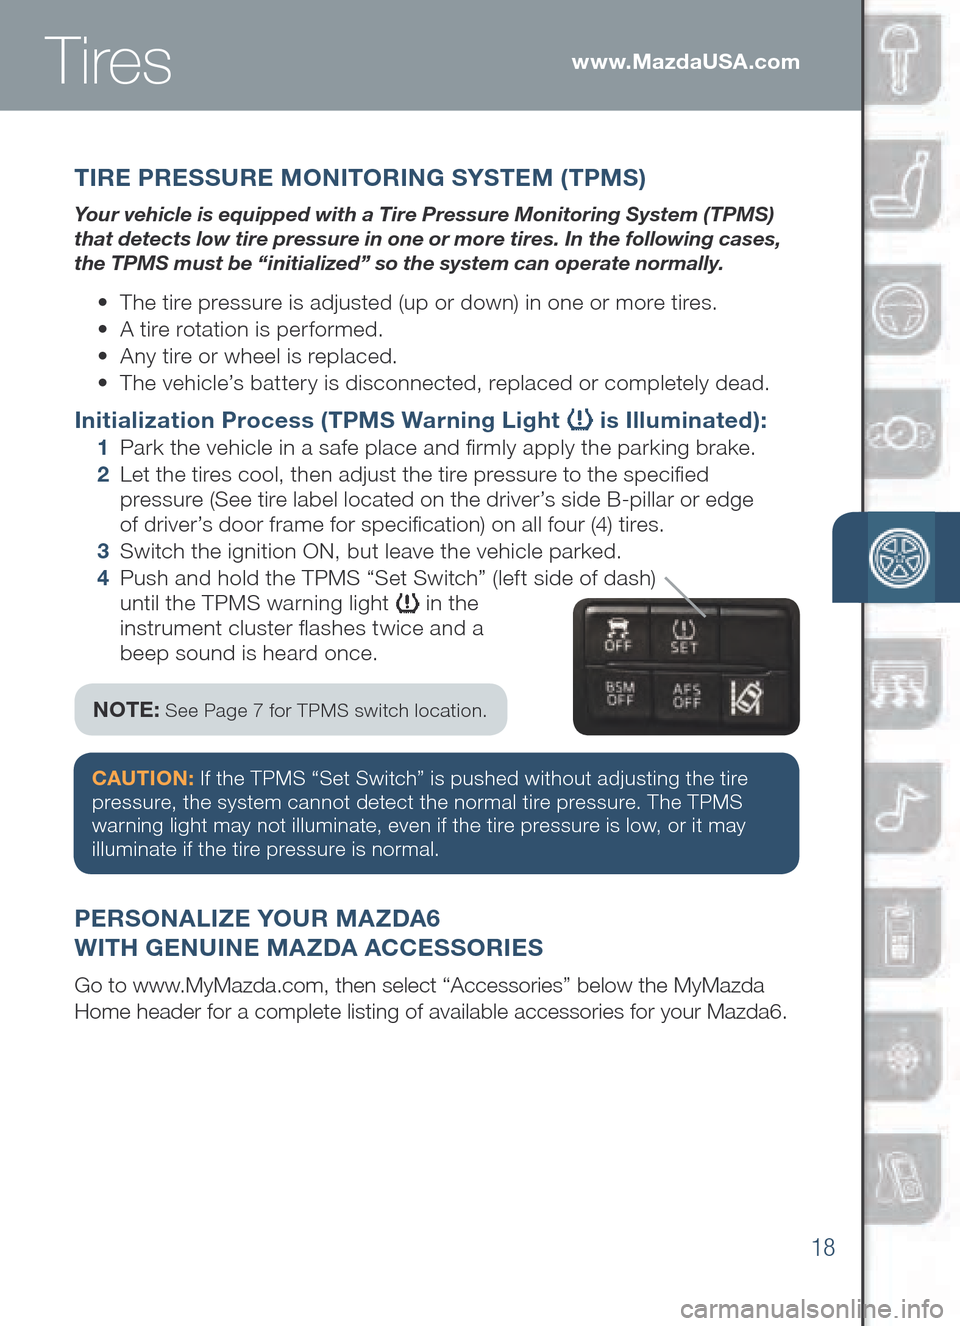
Initialization Process (TPMS Warning Light is Illuminated):
1 Park the vehicle in a safe place and frmly apply the parking brake.
2 Let t he tires cool, then adjust the tire pressure to the specifed
pressure (S ee ti re la bel lo cated on th e dr i ve r’s si de B- pillar or ed ge
of dr iver’s door frame for specifcation) on all four (4) tires.
3 Swi tch the ignition ON, but leave the vehicle parked.
4 Pus h and hold the TPMS “Set Switch” (left side of dash)
until the TPMS warning light
in the
instrument cluster fashes twice and a
beep sound is heard once.
PERSONALI ZE YOU R MAZD A6
WI TH G ENUINE MAZD A A CCES SORIES
Go to www.MyMazda.com, then select “Accessories” below the MyMazda
Home header for a complete listing of available accessories for your Maz\
da6.
NOTE: See Page 7 for TPMS switch location.
CAUTION: If the TPMS “Set Switch” is pushed without adjusting the tire
pressure, the system cannot detect the normal tire pressure. The TPMS
warning light may not illuminate, even if the tire pressure is low, or it may
illuminate if the tire pressure is normal.
Page 20 of 42

19
Transmission
MANUAL SHIFT MODE (if eq uipped)
The Manual Shift Mode gives you the feel of driving a manual transmission
by allowing you to manually shift to control engine rpm and torque when
more control is desired.
To Use Steering Shift Switches:
• Shift the lever from D or M.
To Shift Up To A
Higher Gear:
• Pull the steering
UP switch (+) once.
To Shift D own To A
Lower Gear:
• Pull the steering
DOWN switch (-) once.
- D OWN Shift
Switch+ UP Shift Switch
NOTE: Steering Shift Switches
can be used in “D” or “M”.
ACTIVE A DAPTI VE SHIFT (A AS) CONTROL
A AS will automatically adjust how and when the transmission shifts gears
based on road conditions and your driving style.
The transmission may stay in a lower gear longer than usual when going up or
down hills or driving around corners. This feature gives you better control and
a more connected driving experience.
(if equipped)
SPORT MOD E (if equipped)
SPORT mode allows greater response and
control when driving on mountain roads
as well as on freeways by adjusting the
transmission shift schedule.
Fuel consumption increases slightly because
higher engine speeds (i.e., lower gear position) are used in
Sports mode compared to normal mode. Use Sports mode
and normal mode depending on the road conditions and
situation. The SPORT mode indicator light in the instrument
cluster is illuminated while in SPORT mode and is not illuminated
while in normal mode.
Page 22 of 42

21
HomeLink®
Refer to your Owner’s Manual for programming details.NOTE:
Genuine Mazda Accessory Auto-Dimming Mirror with Compass and
Homelink is available at your Authorized Mazda Dealer.
A UTO -DIMMING MIRROR AN D H OME LINK® (if equipped)
Auto- Dimming
In dicator LightAuto- Dimming
On
Hom
eLinkRear
Light
SensorAuto- Dimming
Off
Mirrors
R EAR VIEW MONI TOR (if eq uipped)
Placing the gearshift lever into Reverse automatically operates the Rear
View Parking Camera and is viewable via the 5.8” LCD screen.
Rear View Parking Camera
Rear View Monitor
NOTE: When using the Rear View Parking Camera, please check your
surroundings as objects may be closer than they appear.
Page 26 of 42

25
Blind Spot Monitoring System
BLIND SPOT MONI TORING (B SM) (if equipped)
The Blind Spot Monitoring (BSM) system is designed to assist the driver
by monitoring blind spots on both sides of the vehicle to the rear in
certain situations such as when changing lanes on roads and freeways or
reversing the vehicle from a parking garage.
The Blind Spot Monitoring (BSM) System consists of the Blind Spot Monitoring
(BSM) and Rear Cross Traffic Alert (RCTA).
Turning BSM System Off
Turning the BSM system off will turn off both the light and sound
indicators. To manually turn the BSM system off, push the BSM
OFF switch on the dash. The BSM OFF indicator will illuminate
in the instrument cluster when the BSM system is off. The BSM
system will automatically turn on the next time the vehicle is started.
• If your vehicle speed is 6.7 mph (10.8 km/h) or more, the BSM will warn
you of vehicles in the detection area by illuminating the BSM warning
lights located on the left and right door mirrors.
•
If you operate a turn signal in the direction of an illuminated BSM warning
light, the system will also warn you with a beep and warning light fash.
•
BSM sensors are located under the left and right rear bumper areas. The
BSM system may not operate properly if the rear bumper gets too dirty,
so keep the rear bumper area clean.
Your Vehicle
Detection Areas
Please refer to
your Owner’s
Manual for
complete details.
NOTE: Do not rely completely on the BSM system and be sure to look
over your shoulder before changing lanes:
• The BSM ca n as sist the dr iver in co nfirming the sa fety of th e surroundings, but
is no t a complete substitute.
• The driver is re sponsible for en suring safe lane changes and ot her ma neuvers.
• Alw ays pay at tention to th e direction in wh ich the ve hicle is traveling and th e
vehicle’s surroundings.
• The BSM do es no t op erate when th e ve hicle speed is lo wer than ab out 6.7 mph
(10 .8 km/h).
Page 29 of 42

28
Automatic Climate Control
Driver Temperature
Con trol Dial
AUT O ON: Push dial
to turn Automatic Air
Conditioning system
on (indicator light on).
Rotate dial to select your
desired set temperature
(shown above). The
airfow mode and the
amount of airfow will be
automatically controlled
in accordance with the
set temperature.
Push to defrost
the windshield.
Push to defrost
the rear window.
Push to
manually turn
air conditioning
on or off.Passenger
Temperature
Control Dial
Push to turn DUAL
mode ON/OFF.
• With DUAL mode
ON (indicator on),
rotate the dial to
set passenger
side temperature
separate from
the driver’s side
(shown above).
• With DUAL mode
OFF (indicator off),
driver controls the
temperature setting
on both sides.
Push to select the
following airfow mode:
NOTE: Automatic climate
control will allow you to
maintain individual preset
cabin temperatures for the
driver and passenger when
DUAL mode is selected.
Push to recirculate
cabin air to reduce
outside odors and
improve cooling.
Push for fresh
air circulation.
Dashboard vents
Dashboard
and foor vents
Floor vents
Defroster and
foor vents
NOTE: Automatic
temperature control
always works even
if the AUTO indicator
turns off by changing
the fan speed or the
airfow mode.
Fan Control Dial
• Rotate the dial to
select the desired
fan speed.
• Push OFF to turn
climate control
system of f.
Page 40 of 42
Keyless Entry
..............................1-2
• Advanced Keyless Entry*
• Do or Re quest Sw itch*
Starting the Engine
.....................3-4
• Push Button Start System
• Acc elerated Wa rm-Up Sy stem (A WS)
• Em ergency Ve hicle En tr y/
Engin e Start/Stop
Seats
..............................................5
Information
Displa y ......................6
• Personalization Features*
D
river ’s View ...............................7- 8
• Location of Sw itches an d Co ntrols
Instrument Cluster
...................9 -10
• Review of Wa rning an d In dicator
Ligh t Function and Location
Li ghts ............................................11
Wiper/Washer
...............................12
Hig h Beam Control ......................13
Ada
ptive Front
Lighting System (AFS)* ...............14
Mazda Radar Cruise Control*
..15 -16
Forward Obstruction Warning*
..16
Lan e Depar ture
Warning System (L DWS) ...............17
Tire Pressure Monitor System
...18
• Initialize TP MS be fore de livery
Transmission
............................19 -20
Rear View Monitor* ......................21
Customer Delivery Checklist
Commander Switch*
...................22
i- ELOOP ........................................23
Smart City B
rake Support* .........24
B
lin d Spot Monitoring* ................25
Rear Cross Traffc Alert*
.............26
Climate Control
........................2 7-2 8
• Manual • Automatic*
Audio Controls
.........................29-32
• Bluetooth Au dio*
Set
Clock ......................................30
B
lue tooth®* ...............................33-34
• Pair Phone • To l l -Free
• Mak e/Receive Customer Se rvice
Call 800-430-0153
Navigation System*
.................35-36
• SD Card
• Pla nning a Route
US
B & AU X Input ..........................37
S CHE DULE D MAINTENANCE
When replacing or topping off engine
oil, use Mazda Genuine oil. For optimal
engine performance, use SAE 0W-20
engine oil. Please consult an Authorized
Mazda Dealer for additional information.
*if equipped
SALES CONSULTANT DAT ECUSTOMER DAT E
All items in the Customer Deliver y Checklist have been reviewed with the
customer and the �rst maintenance appointment has been scheduled:
Signed copy must be placed in dealer jacket
V EHICLE PRESENTATION :
Refer to the Smart Start Guide during presentation
Page 41 of 42
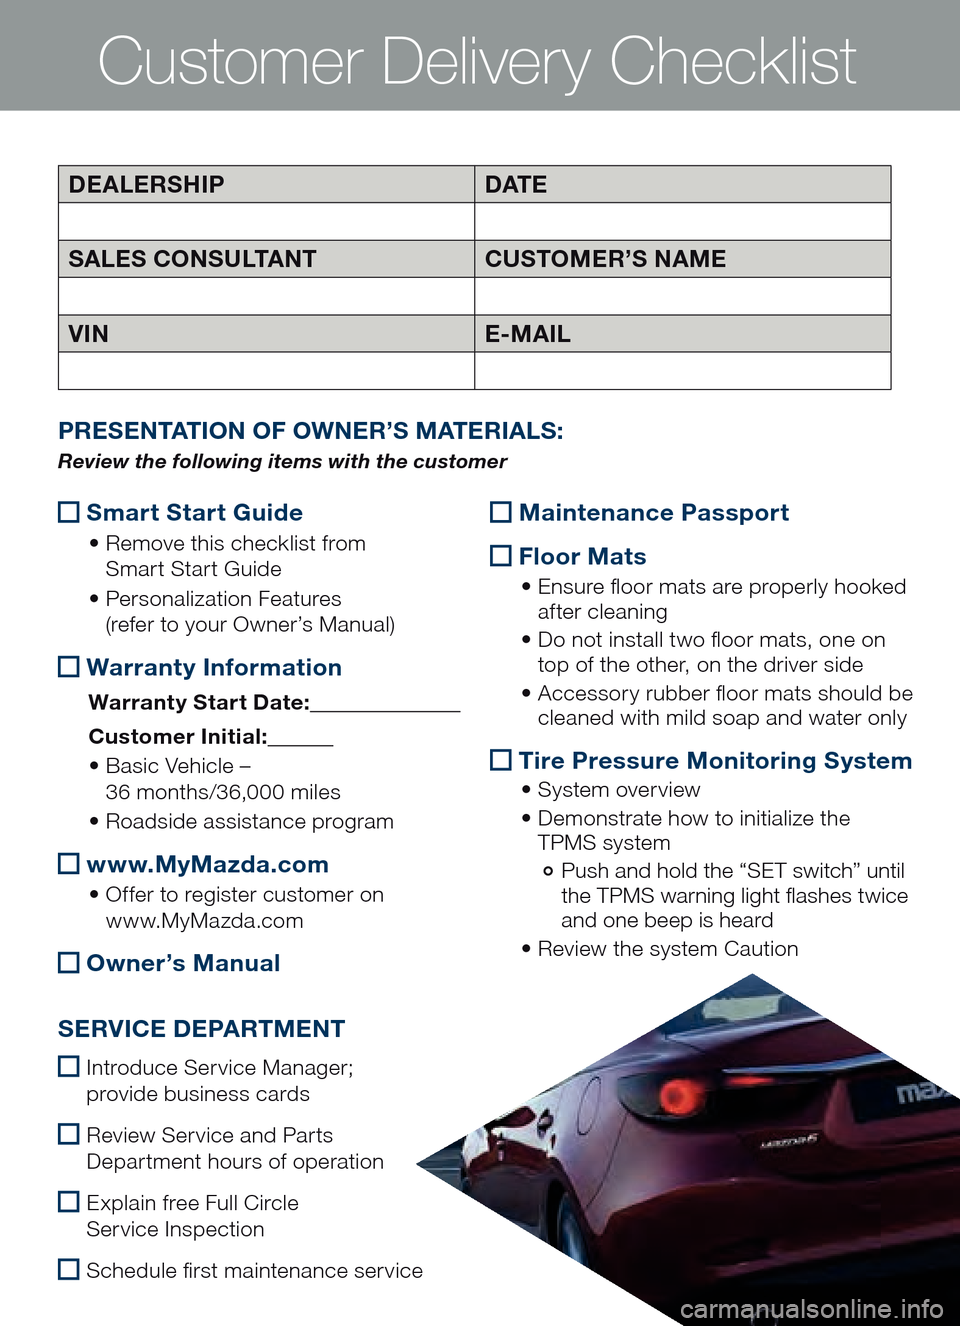
Customer Delivery Checklist
Smart Start Guide
•
Remove th is ch ecklist fr om
Sma rt Start Guide
• Per sonalization Fe atures
(re fer to your Owner’s Manual)
War
ranty Information
Warranty Start Date :
Cus tomer Ini tial:
• Basic Ve hicle –
36 mo nths/36,000 miles
• Ro adside as sistance pr ogram
www.MyMazda.com
•
Offer to re gister customer on
www .MyMazda.com
Owner’s Manual
P
RES ENTATION OF OWNER ’S MAT ERIALS :
Review the following items with the customer
SERVICE DEPARTMENT
Introduce Service Manager;
provide business cards
Review Service and Parts
Department hours of operation
Explain free Full Circle
Service Inspection
Schedule frst maintenance service
D EALERSHIP DAT E
SA LES CONSULTANT CUSTOMER’S NAME
VIN E-MAIL
Maintenance Passport
Floor Mats
•
E nsure foor mats are properly hooked
af ter cleaning
• Do no t in stall two floor ma ts, one on
top o f the other, on the driver side
• Acc essory ru bber flo or ma ts sh ould be
cle aned with mild soap and water only
Tire Pressure Monitoring System
•
System overview
• Dem onstrate ho w to in itialize th e
TPM S system
Push and hold the “SET switch” until
the TPMS warning light fashes twice
and one beep is heard
• Rev iew th e sy stem Caution