audio MAZDA MODEL 6 2014 Smart Start Guide (in English)
[x] Cancel search | Manufacturer: MAZDA, Model Year: 2014, Model line: MODEL 6, Model: MAZDA MODEL 6 2014Pages: 42, PDF Size: 3.75 MB
Page 7 of 42
6
www.MazdaUSA.com
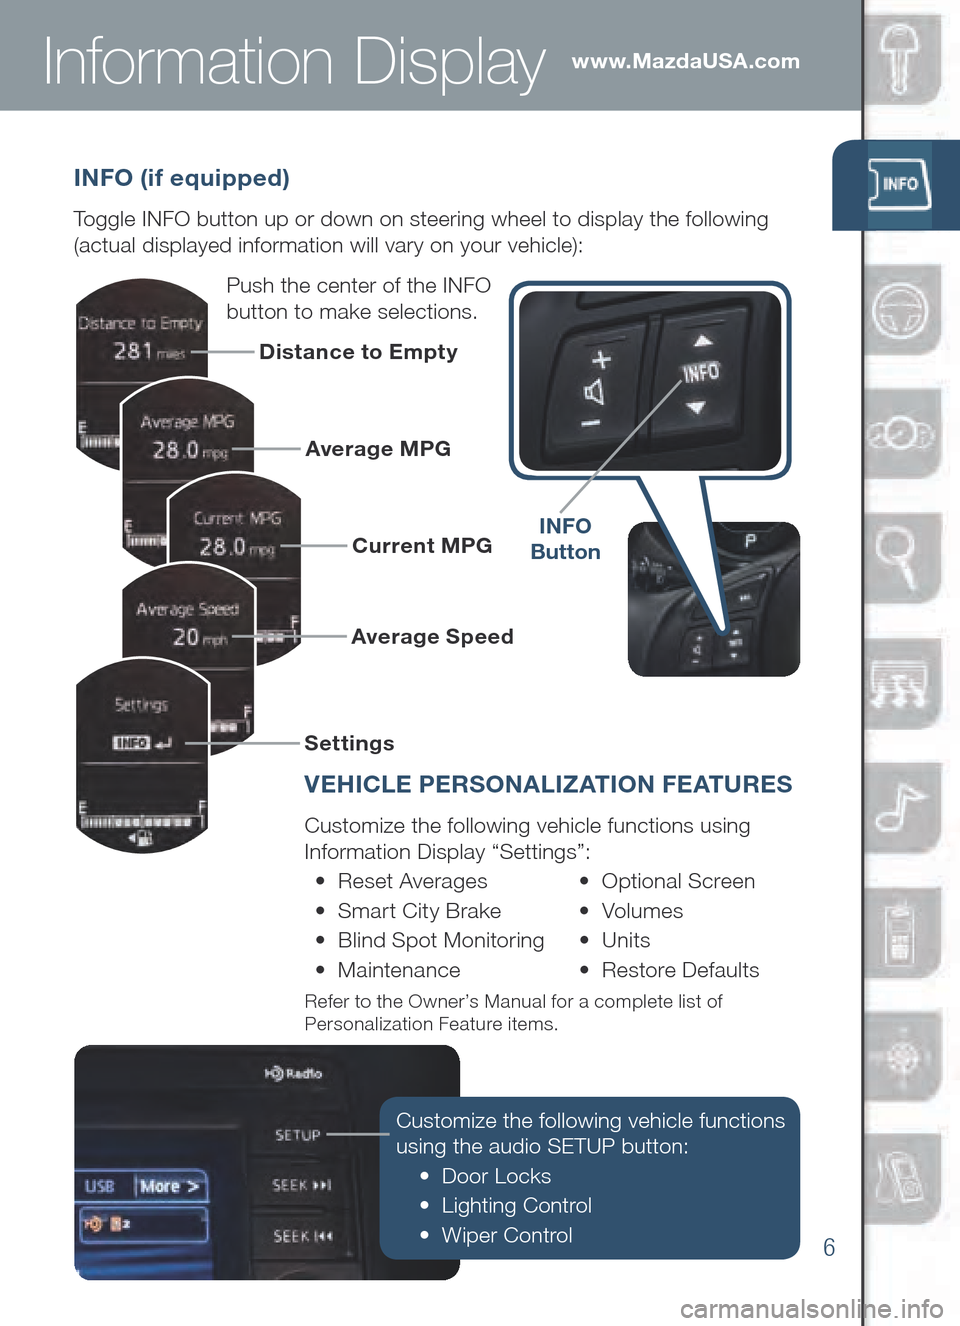
INFO (if equipped)
Toggle INFO button up or down on steering wheel to display the following
(actual displayed information will vary on your vehicle):
Push the center of the INFO
button to make selections.
INFO
B utton
Customize the following vehicle functions
using the audio SETUP button:
• Door Locks
• Lighting Control
• Wiper Control
Distance to Empty
Average MPG
Current MPG
Average Speed
Settings
Information Display
V EHICLE PERSO NALIZAT I O N F E AT URES
Customize the following vehicle functions using
Information Display “Settings”:
• Re set Av erages • Optional Sc reen
• Sm art Ci ty Br ake • Volumes
• Bl ind Spot Mo nitoring • Units
• Maintenance • Re store De faults
Refer to the Owner’s Manual for a complete list of
Personalization Feature items.
Page 23 of 42
22
Commander Switch
1 Tilt and/or turn the commander
kn ob to move the cursor to the
desired on-screen location.2 Push the commander ENTER
bu tton to select your choice on
the screen.
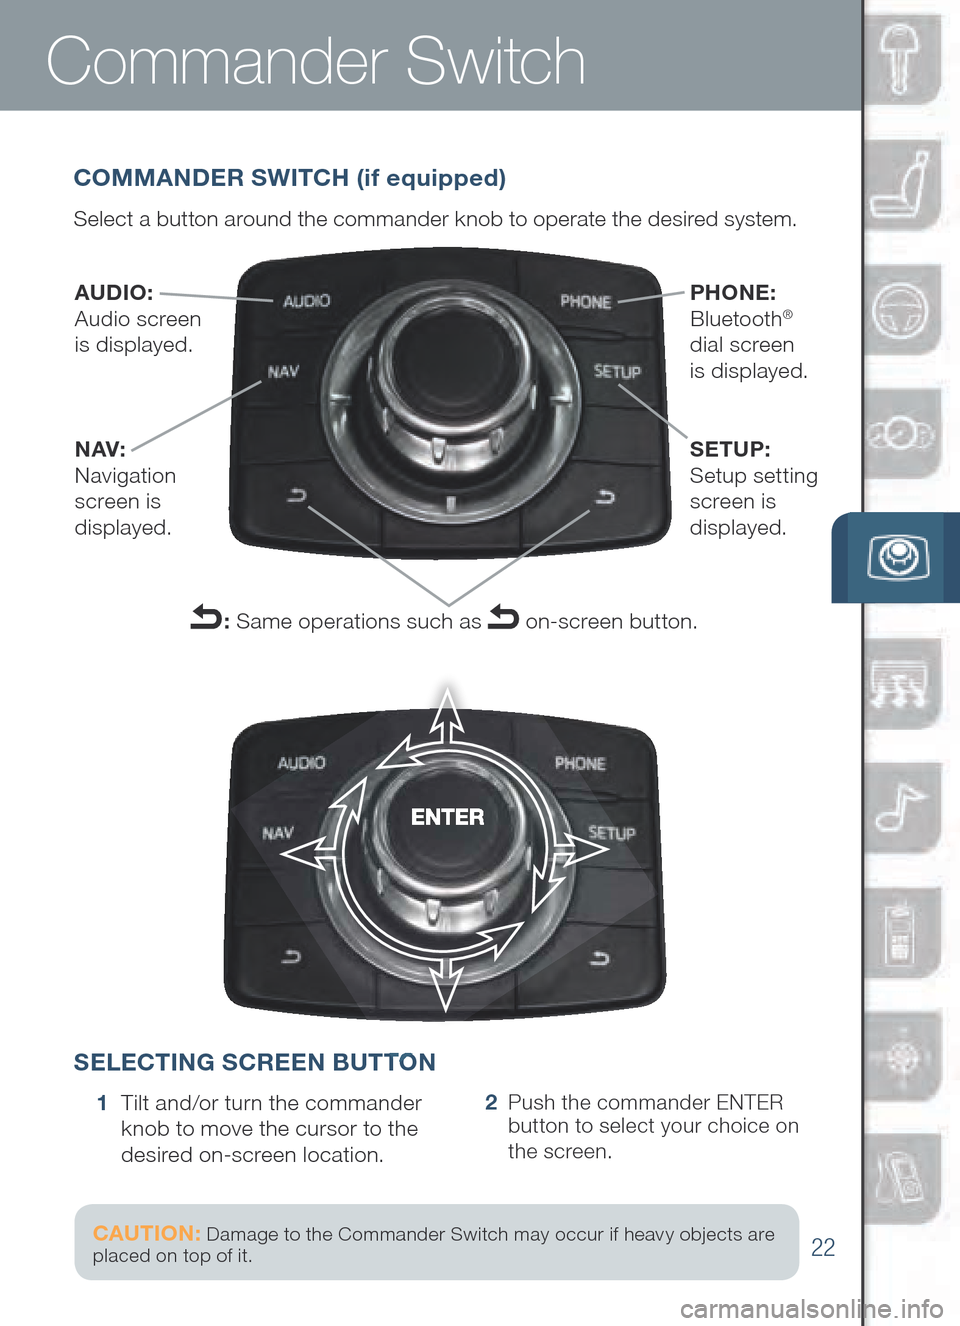
COMMAN DER SWI TCH (if equipped)
Select a button around the commander knob to operate the desired system.
SELECTIN G SCREEN BUTT ON
AUDIO:
Audio screen
is displayed.
NAV:
Navigation
screen is
displayed. PHONE:
Bluetooth®
dial screen
is displayed.
SETUP:
Setup setting
screen is
displayed.
: Same operations such as on-screen button.
ENTER
UTTON
ENTER
CAUTION: Damage to the Commander Switch may occur if heavy objects are
placed on top of it.
Page 30 of 42
29
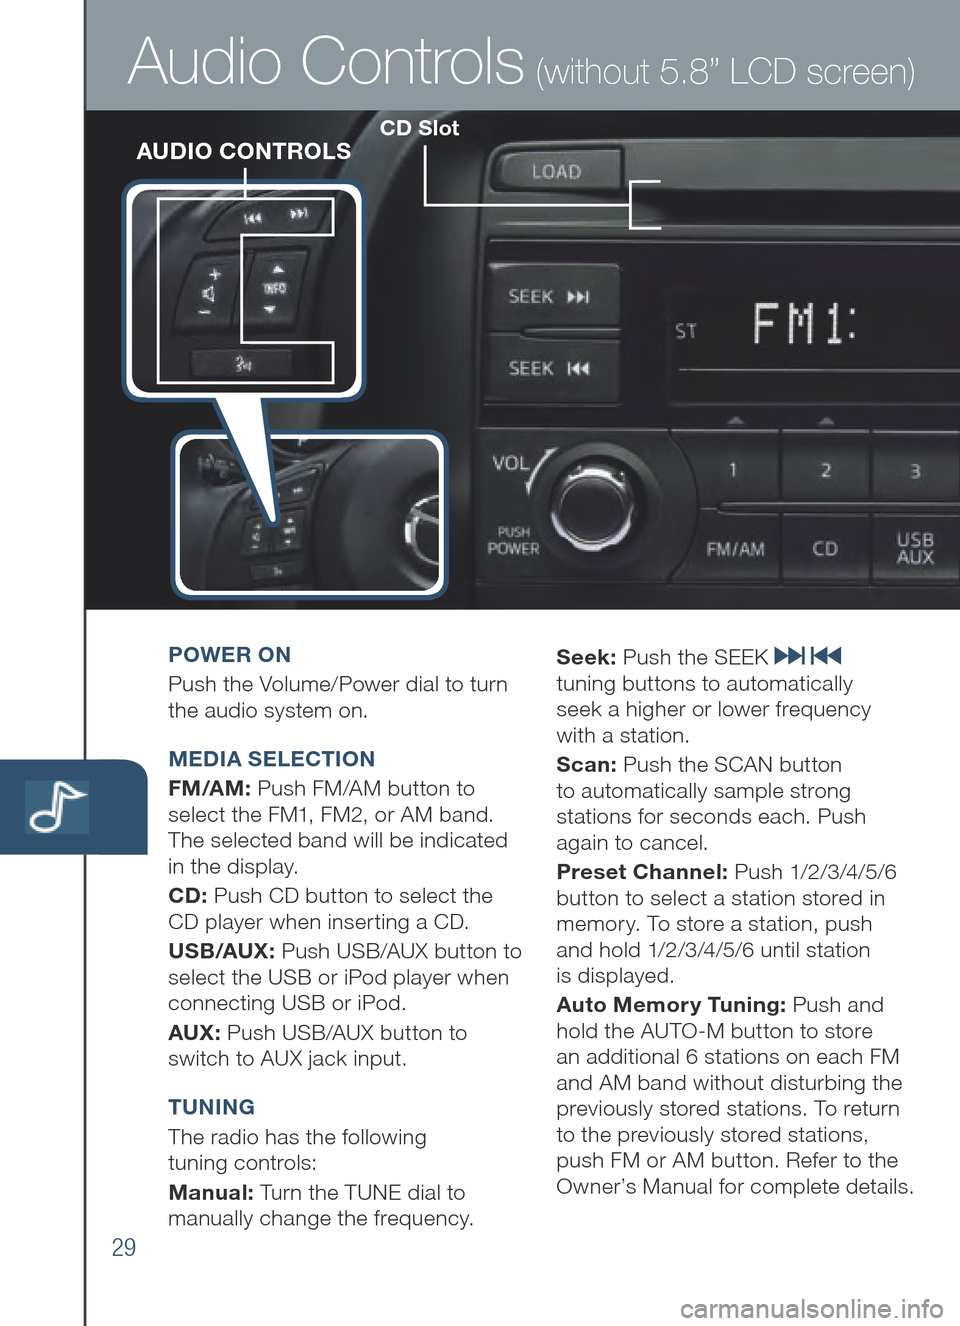
CD SlotAUDIO CONTROLS
Audio Controls (without 5.8” LCD screen)
POWER O N
Pus h the Volume/Power dial to turn
the audio system on.
MEDIA SELE CTION
FM /A M: Push FM/AM button to
select the FM1, FM2, or AM band.
The selected band will be indicated
in the display.
CD: Pus h CD button to select the
CD player when inserting a CD.
US B/AUX : Pu sh US B /AU X bu tton to
sel ect th e US B or iP od player wh en
connecting US B or iP od.
AUX: Pu sh US B /AU X bu tton to
swi tch to AUX jack input.
T UNING
The r adio has the following
tuning controls:
M anual: Turn the TUNE dial to
manually change the frequency. S
eek: Push the SEEK
tuning buttons to automatically
seek a higher or lower frequency
with a station.
S can: Push the SCAN button
to automatically sample strong
stations for seconds each. Push
again to cancel.
Preset Channel: P u s h 1/2 /3 /4 /5 /6
button to select a station stored in
memory. To store a station, push
and hold 1/2/3/4/5/6 until station
is displayed.
Auto Memor y Tuning: Push and
hold the AUTO-M button to store
an additional 6 stations on each FM
and AM band without disturbing the
previously stored stations. To return
to the previously stored stations,
push FM or AM button. Refer to the
Owner’s Manual for complete details.
Page 31 of 42
30
www.MazdaUSA.com
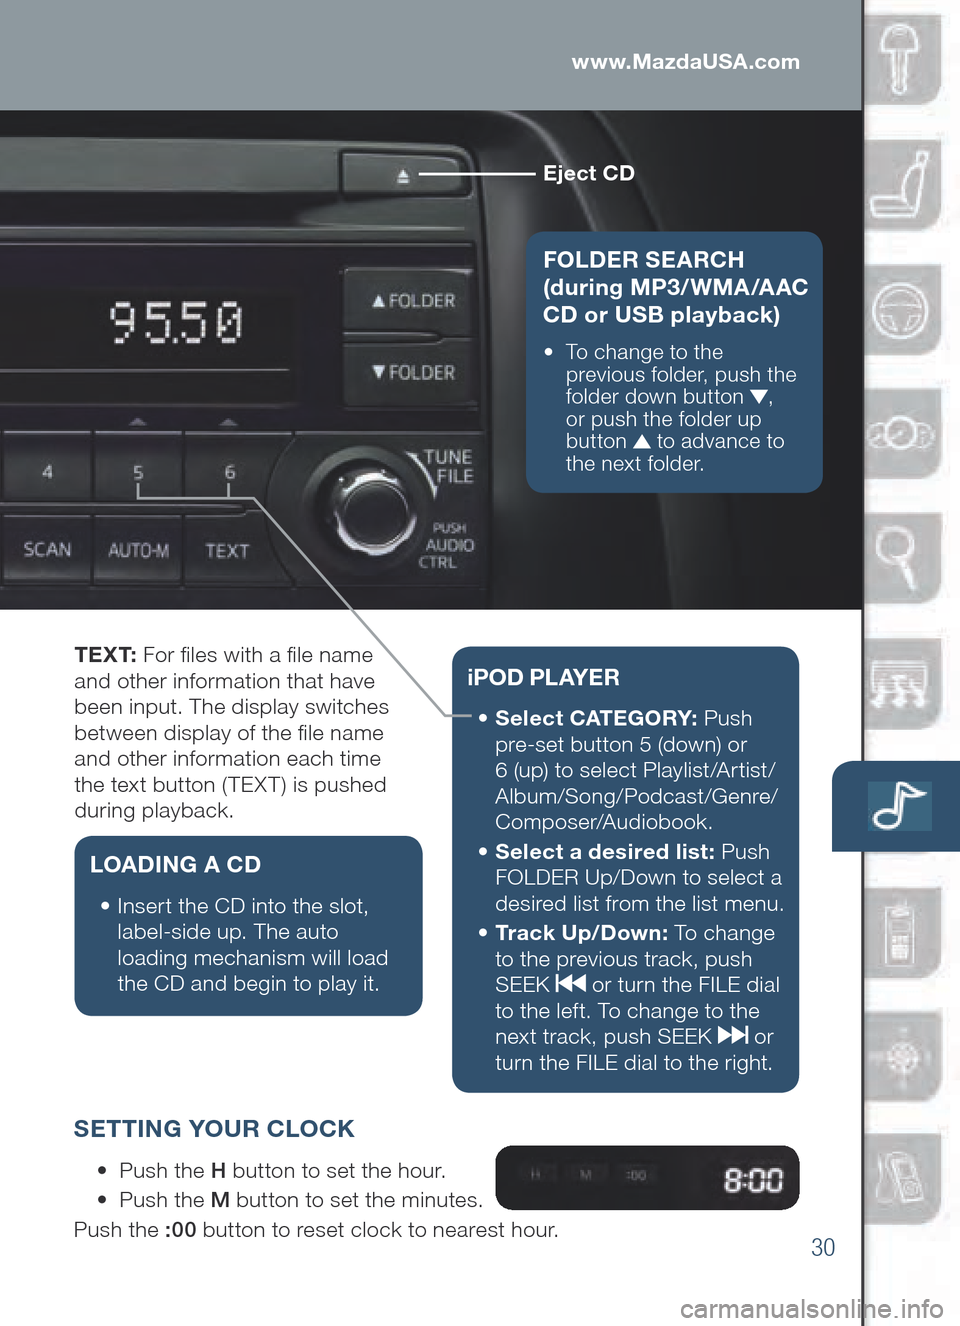
Eject CD
FOL DER SEARCH
(d uring MP3/WMA/AAC
CD or U SB playback)
•
To change to th e
previous folder, push the
folder down button
,
or push the folder up
button
to advance to
the next folder.
T E X T: For fles with a fle name
and other information that have
been input. The display switches
between display of the fle name
and other information each time
the text button (TEXT) is pushed
during playback.
L OA DING A CD
•
Insert the CD in to th e sl ot,
labe l-side up. The auto
loading mechanism will load
the CD and begin to play it.
iPO D P L AY E R
•
Select CATEGORY: Push
pre-set button 5 (down) or
6 (up) to select Playlist/Artist/
Album/Song/Podcast/Genre/
Composer/Audiobook.
•
Sel ect a desired list: Push
FOLDER Up/Down to select a
desired list from the list menu.
•
Tr a c k Up/ Down : To change
to the previous track, push
SEEK
or turn the FILE dial
to the left. To change to the
next track, push SEEK
or
turn the FILE dial to the right.
S ETTING YOU R CLO CK
• Push the H bu tton to set the hour.
• Push the M button to set the minutes.
Push the :00 button to reset clock to nearest hour.
Page 32 of 42
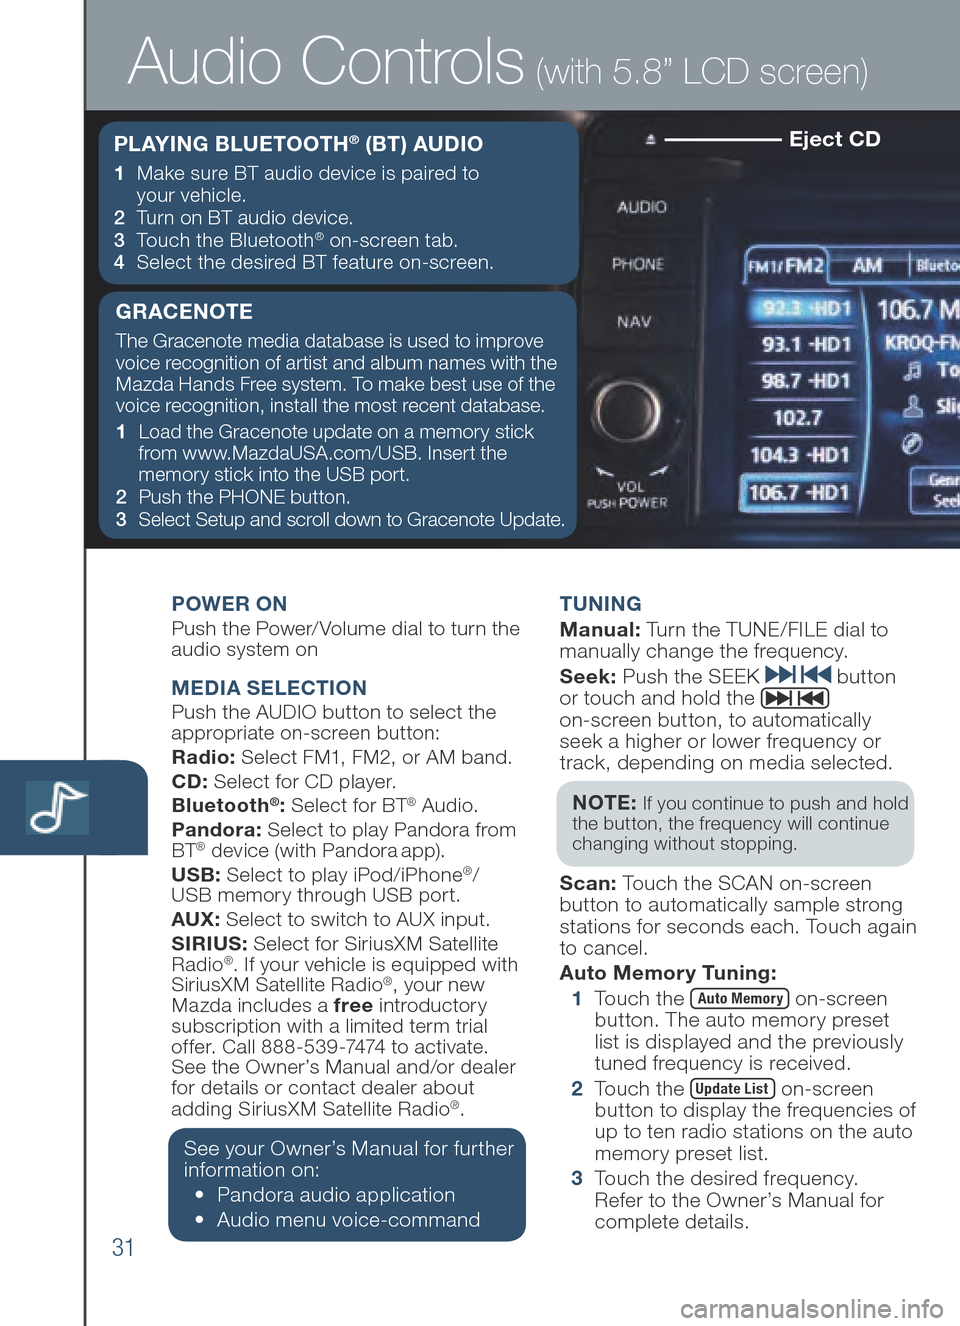
31
Eject CD
POWER ONPush the Power/Volume dial to turn the
audio system on
MEDIA SELE CTIONPush the AUDIO button to select the
appropriate on-screen button:
Radio: Select FM1, FM2, or AM band.
CD: Select for CD player.
B luet ooth
®: Select for BT® Audio.
Pandora: Select to play Pandora from
BT
® device (with Pandora app).
US B: Se lect to play iPod/iPhone®/
USB memory through USB port.
AUX: Select to switch to AUX input.
SIRIUS: Select for SiriusXM Satellite
Radio
®. If your vehicle is equipped with
SiriusXM Satellite Radio®, your new
Mazda includes a free introductory
subscription with a limited term trial
offer. Call 888-539-7474 to activate.
See the Owner’s Manual and/or dealer
f o
r details or contact dealer about
adding SiriusXM Satellite Radio
®.
See your Owner’s Manual for further
information on:
• Pandora au dio ap plication
• Audio me nu voi ce-command T
UNING
M anual : Turn the TUNE/FILE dial to
manually change the frequency.
S eek: Push the SEEK
button
or touch and hold the
on-screen button, to automatically
seek a higher or lower frequency or
track, depending on media selected.
NOT E:
If you continue to push and hold
the button, the frequency will continue
changing without stopping.
S can: Touch the SCAN on-screen
button to automatically sample strong
stations for seconds each. Touch again
to cancel.
Auto Memor y Tuning:
1 To u ch the
Auto Memory on-screen
button. The auto memory preset
list is displayed and the previously
tuned frequency is received.
2 To u ch the
Update List on-screen
button to display the frequencies of
up to ten radio stations on the auto
memory preset list.
3 To u ch the desired frequency.
Refer to the Owner’s Manual for
complete details.
Audio Controls (with 5.8” LCD screen)
P L AY I N G BLUETOOTH® (B T ) AU DIO
1 Make sure BT au dio de vice is pa ired to
your vehicle.
2 Tu r n on BT au dio de vice.
3 To u ch th e Bl uetooth
® on-screen tab.
4 Sel ect th e de sired BT feature on -screen.
GRACENOTE
The Gracenote media database is used to improve
voice recognition of artist and album names with the
Mazda Hands Free system. To make best use of the
voice recognition, install the most recent database.
1 Loa d the Gracenote update on a memory stick
from www.MazdaUSA.com/USB. In sert th e
mem ory st ick in to th e US B por t.
2 Push the PHONE button.
3 Sel ect Setup and scroll down to Gracenote Update.
Page 33 of 42
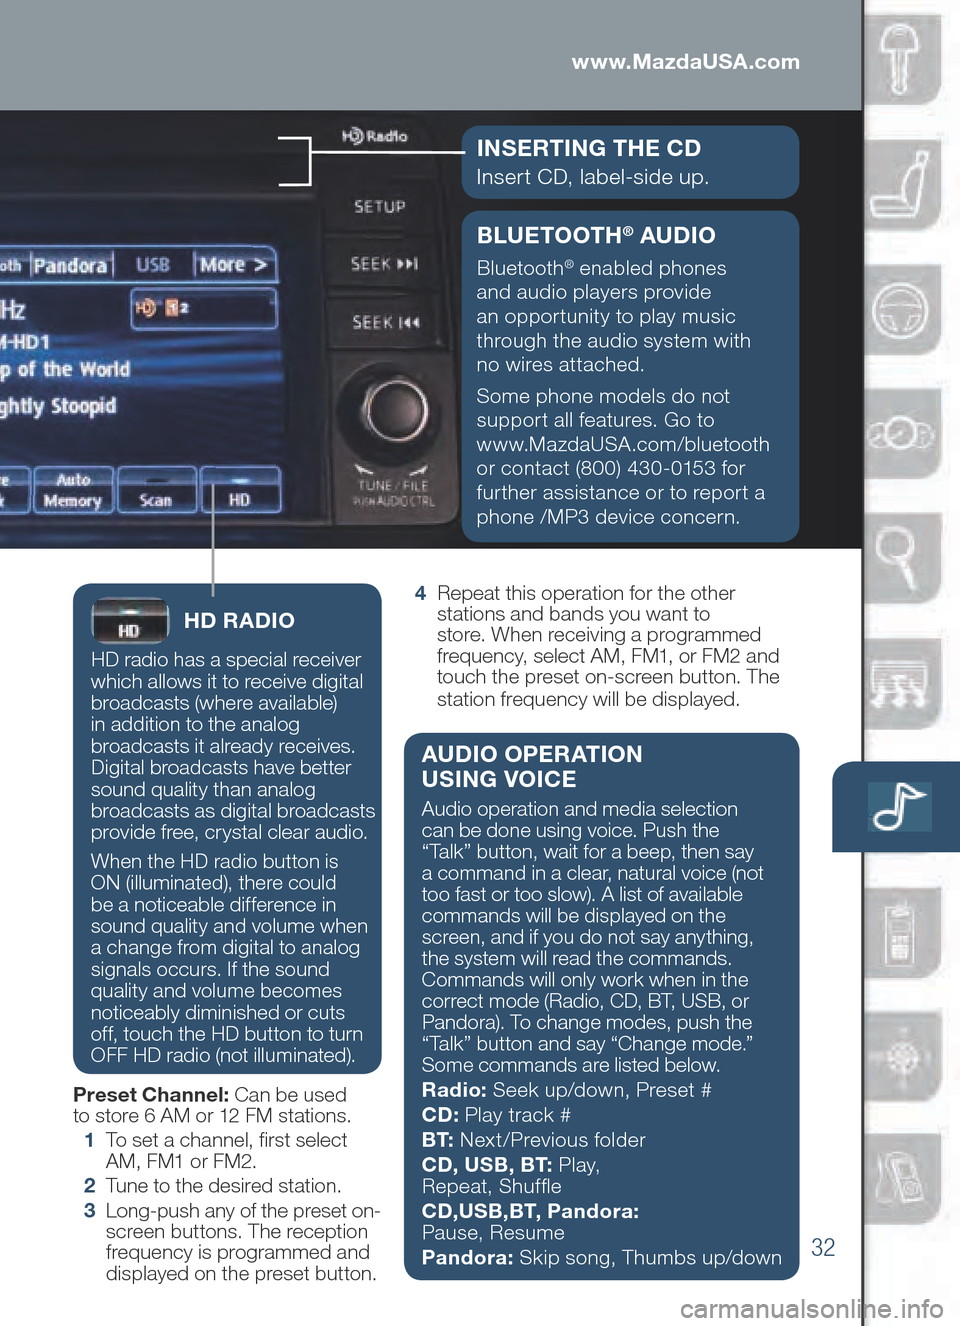
32
BLUETOOTH® AU DIO
Bluetooth® enabled phones
and audio players provide
an opportunity to play music
through the audio system with
no wires attached.
Some phone models do not
support all features. Go to
www.MazdaUSA.com/bluetooth
or contact (800) 430-0153 for
further assistance or to report a
phone /MP3 device concern.
www.MazdaUSA.com
I NSERTING TH E C D
Insert CD, label-side up.
HD RA DIO
HD radio has a special receiver
which allows it to receive digital
broadcasts (where available)
in addition to the analog
broadcasts it already receives.
Digital broadcasts have better
sound quality than analog
broadcasts as digital broadcasts
provide free, crystal clear audio.
When the HD radio button is
ON (illuminated), there could
be a noticeable difference in
sound quality and volume when
a change from digital to analog
signals occurs. If the sound
quality and volume becomes
noticeably diminished or cuts
off, touch the HD button to turn
OFF HD radio (not illuminated).
Preset Channel: Can be used
to store 6 AM or 12 FM stations.
1 To s e t a channel, frst select
AM, FM1 or FM2.
2 Tu n e to the desired station.
3 Lon g-push any of the preset on-
screen buttons. The reception
frequency is programmed and
displayed on the preset button. 4
Rep eat this operation for the other
stations and bands you want to
store. When receiving a programmed
frequency, select AM, FM1, or FM2 and
touch the preset on-screen button. The
station frequency will be displayed.
AU DIO OPERATION
USING VOICE
Audio operation and media selection
can be done using voice. Push the
“Talk” button, wait for a beep, then say
a command in a clear, natural voice (not
too fast or too slow). A list of available
commands will be displayed on the
screen, and if you do not say anything,
the system will read the commands.
Commands will only work when in the
correct mode (R adio, CD , BT , US B, or
Pan dora). To change modes, push the
“Talk” button and say “Change mode.”
Some commands are listed below.
Radio: Seek up/down, Preset #
CD: Play t rack #
B T: Nex t/Previous folder
CD , US B, B T: P l a y,
Repeat, Shuffe
CD ,US B,B T, P andora:
Pause, Resume
Pandora: Skip song, Thumbs up/down
Page 34 of 42
33
PAIRING YOUR BLUETOOTH® PHONE OR AU DIO DEV ICE
Bluetooth
®
NOTE:
• For safety reasons, you cannot pair a phone while driving.
•
Bef ore pa iring yo ur ce ll phone or au dio de vice, yo u mu st ma nually tu rn on
the Bl uetooth
® function on the device. Refer to your d ev i c e’s Bluetooth® for
steps to tu rn on Bl uetooth®.
•
For customer service and device compatibility:
Toll-free call: 800-430-0153
Website: www.MazdaUSA.com/bluetooth
•
IMPORTANT: Set the volume level on your cell phone or audio device to the highest
level before distortion starts, then adjust the volume on the vehicle’s audio system.
•
Whe n in ra nge of an other Wi -Fi de vice, the Bl uetooth co nnection be tween yo ur
pho ne and the system may disconnect for a short time if you have Wi-Fi enabled
Turn off Wi-Fi on your phone if needed.
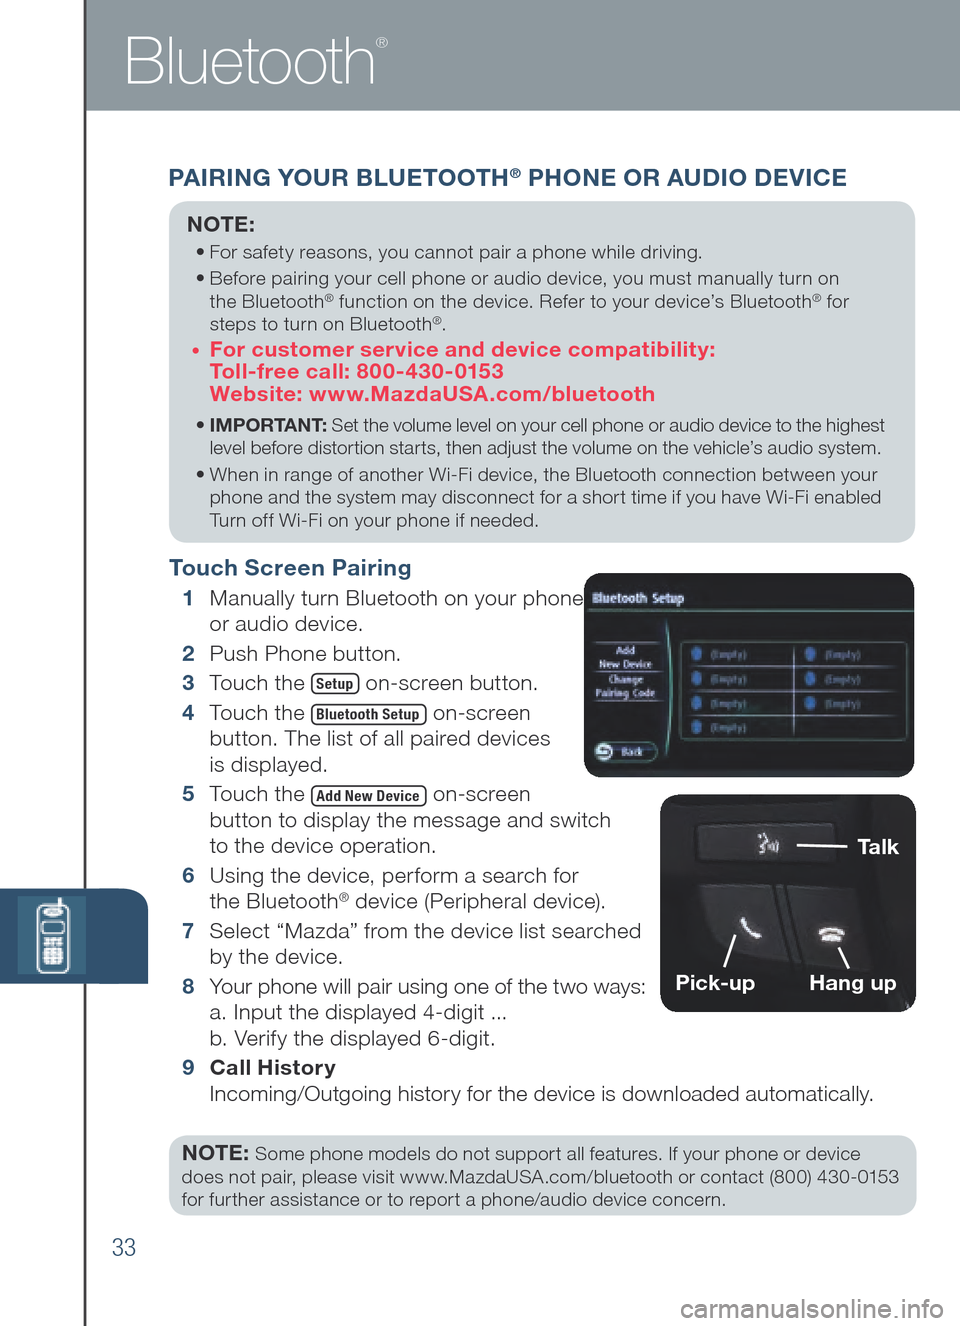
Touch Screen Pairing
1 Manually tu rn Bl uetooth on yo ur phone
or a udio device.
2 Push Phone button.
3 To uch the
Setup on-screen button.
4 To uch the
Bluetooth Setup on-screen
button. The list of all paired devices
is displayed.
5 To uch the
Add New Device on-screen
button to display the message and switch
to the device operation.
6 Usi ng the device, perform a search for
the Bl uetooth
® device (Peripheral device).
7 Sel ect “Mazda” from the device list searched
by the device.
8 Yo u r phone will pair using one of the two ways:
a. Input the displayed 4-digit ...
b. Verify the displayed 6-digit.
9
Ca ll History
Incoming/Outgoing history for the device is downloaded automatically.
NOTE:
Some phone models do not support all features. If your phone or device
does not pair, please visit www.MazdaUSA.com/bluetooth or contact (800) 430-0153
for further assistance or to report a phone/audio device concern.
Talk
Pick-upHang up
Page 36 of 42
35
Navigation System
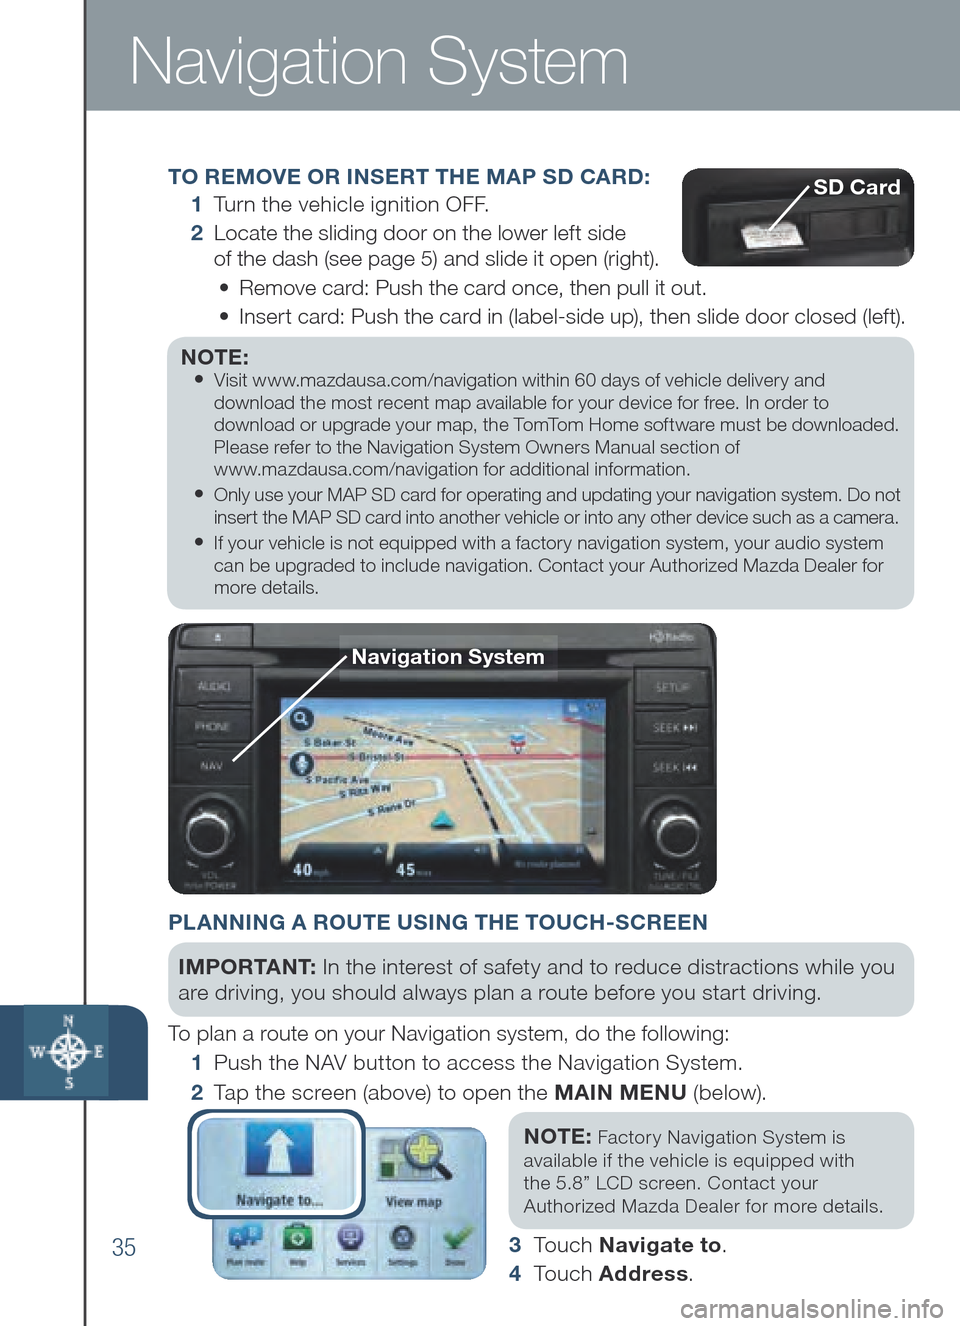
TO REMOVE OR INSERT THE MAP SD CA RD:
1 Tu r n the vehicle ignition OFF.
2 Loc ate the sliding door on the lower left side
of the dash (see page 5) and slide it open (right).
• Remove card: Push the card once, then pull it out.
• Ins ert card: Push the card in (label-side up), then slide door closed (left).
NOTE:
•
Visit www.mazdausa.com/navigation within 60 days of vehicle delivery and
download the most recent map available for your device for free. In order to
download or upgrade your map, the TomTom Home software must be downloaded.
Please refer to the Navigation System Owners Manual section of
www.mazdausa.com/navigation for additional information.
• Only use your MAP SD card for operating and updating your navigation system. Do not
insert the MAP SD card into another vehicle or into any other device such as a camera.
• If your vehicle is not equipped with a factory navigation system, your audio system
can be upgraded to include navigation. Contact your Authorized Mazda Dealer for
more details.
Navigation System
SD Card
PLANNING A ROUTE USING THE TOUCH-SCREEN
IMPO R TA N T : In the interest of safety and to reduce distractions while you
are driving, you should always plan a route before you start driving.
To plan a route on your Navigation system, do the following:
1 Pus h the NAV button to access the Navigation System.
2 Ta p the screen (above) to open the MAI N M ENU (below).
NOT E:
Fact ory Navigation System is
ava ilable if the vehicle is equipped with
the 5.8” LCD screen. Contact your
Aut horized Mazda Dealer for more details.
3 To u c h Navigate to .
4 To u ch Address .
Page 38 of 42
37
IMPORTANT:
• Set the volume level on your portable audio player to the highest level before
distortion starts, then use the vehicle’s audio system to adjust the volume.
• Unplug an y de vice fr om th e US B port an d ac cessory so cket be fore tu rning of f
the vehicle. Leaving devices plugged in can drain the battery and cause issues
during th e Bl uetooth pa iring pr ocess at star tup. Wa it ab out 15 se conds af ter
starting th e ve hicle be fore pl ugging an ything in to th e US B por t.
NOTE: You will need an audio cable with an 1/8 inch (3.5 mm)
mini stereo plug (available as a Genuine Mazda accessory) to
connect your portable audio player into the aux jack.
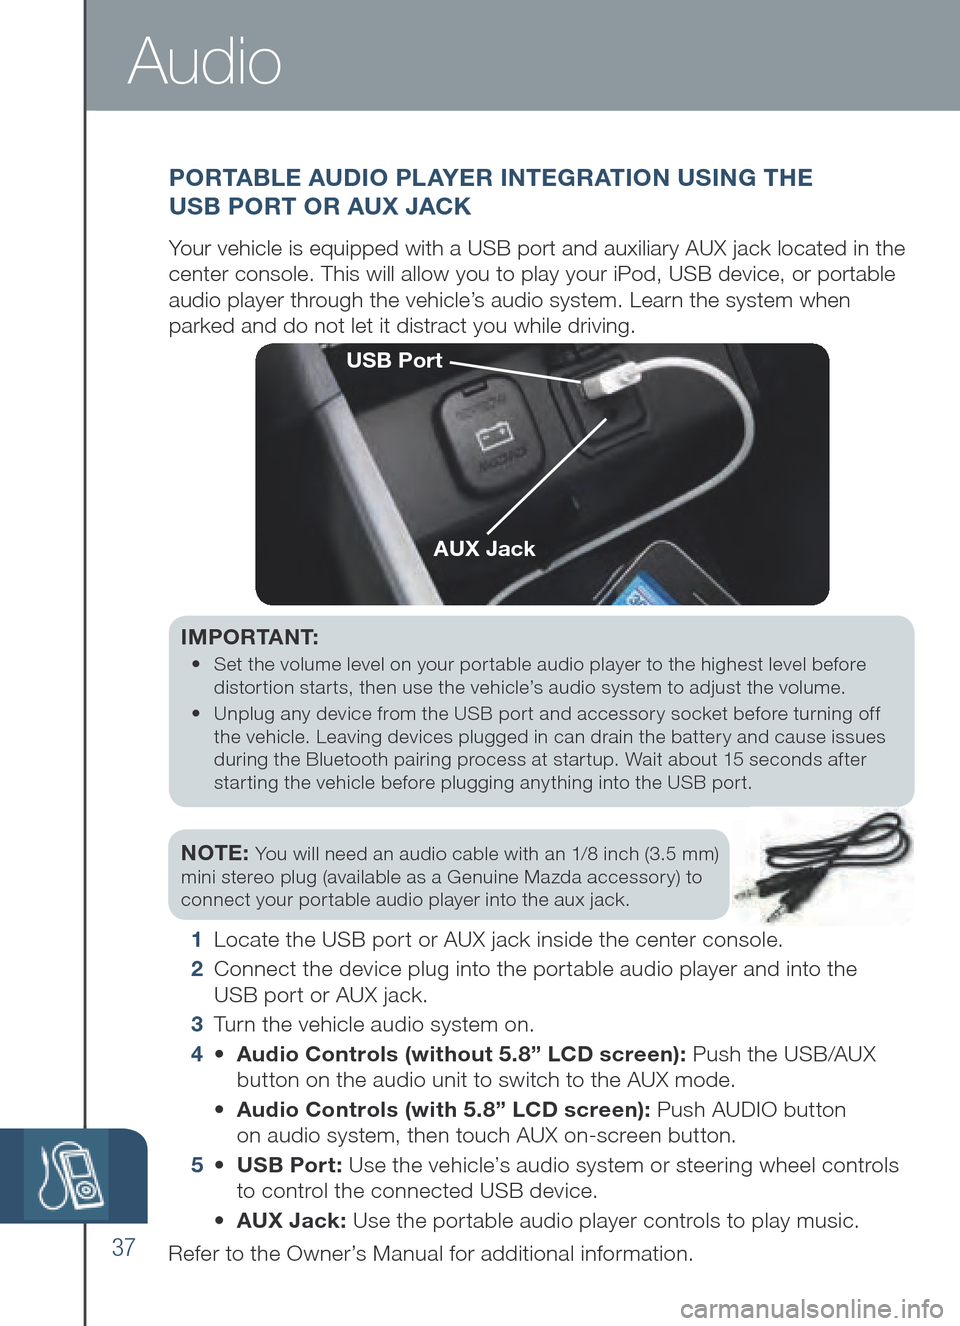
1 L o c a t e the US B po rt or AU X ja ck inside th e ce nter console.
2 Connect the device plug into the portable audio player and into the
USB po rt or AU X ja ck.
3 Tu r n the vehicle audio system on.
4 • Audio Controls (without 5.8” LC D sc reen): Pu sh th e US B /AU X
but ton on the audio unit to switch to the AUX mode.
• Audio Co ntrols (w ith 5. 8” LC D sc reen): Push AUDIO button
on audio system, then touch AUX on-screen button.
5 • USB Po rt: Use the vehicle’s audio system or steering wheel controls
t o control the co nnected US B de vice.
• AUX Jack: Use the portable audio player controls to play music.
Refer to the Owner’s Manual for additional information.
P O R TA BLE AU DIO PL AYER INTEGRATION USING THE
US B PO RT OR AUX JACK
Your vehicle is equipped with a USB port and auxiliary AUX jack located in the
center console. This will allow you to play your iPod, USB device, or portable
audio player through the vehicle’s audio system. Learn the system when
parked and do not let it distract you while driving.
USB Port
AUX Jack
Audio
Page 40 of 42
Keyless Entry
..............................1-2
• Advanced Keyless Entry*
• Do or Re quest Sw itch*
Starting the Engine
.....................3-4
• Push Button Start System
• Acc elerated Wa rm-Up Sy stem (A WS)
• Em ergency Ve hicle En tr y/
Engin e Start/Stop
Seats
..............................................5
Information
Displa y ......................6
• Personalization Features*
D
river ’s View ...............................7- 8
• Location of Sw itches an d Co ntrols
Instrument Cluster
...................9 -10
• Review of Wa rning an d In dicator
Ligh t Function and Location
Li ghts ............................................11
Wiper/Washer
...............................12
Hig h Beam Control ......................13
Ada
ptive Front
Lighting System (AFS)* ...............14
Mazda Radar Cruise Control*
..15 -16
Forward Obstruction Warning*
..16
Lan e Depar ture
Warning System (L DWS) ...............17
Tire Pressure Monitor System
...18
• Initialize TP MS be fore de livery
Transmission
............................19 -20
Rear View Monitor* ......................21
Customer Delivery Checklist
Commander Switch*
...................22
i- ELOOP ........................................23
Smart City B
rake Support* .........24
B
lin d Spot Monitoring* ................25
Rear Cross Traffc Alert*
.............26
Climate Control
........................2 7-2 8
• Manual • Automatic*
Audio Controls
.........................29-32
• Bluetooth Au dio*
Set
Clock ......................................30
B
lue tooth®* ...............................33-34
• Pair Phone • To l l -Free
• Mak e/Receive Customer Se rvice
Call 800-430-0153
Navigation System*
.................35-36
• SD Card
• Pla nning a Route
US
B & AU X Input ..........................37
S CHE DULE D MAINTENANCE
When replacing or topping off engine
oil, use Mazda Genuine oil. For optimal
engine performance, use SAE 0W-20
engine oil. Please consult an Authorized
Mazda Dealer for additional information.
*if equipped
SALES CONSULTANT DAT ECUSTOMER DAT E
All items in the Customer Deliver y Checklist have been reviewed with the
customer and the �rst maintenance appointment has been scheduled:
Signed copy must be placed in dealer jacket
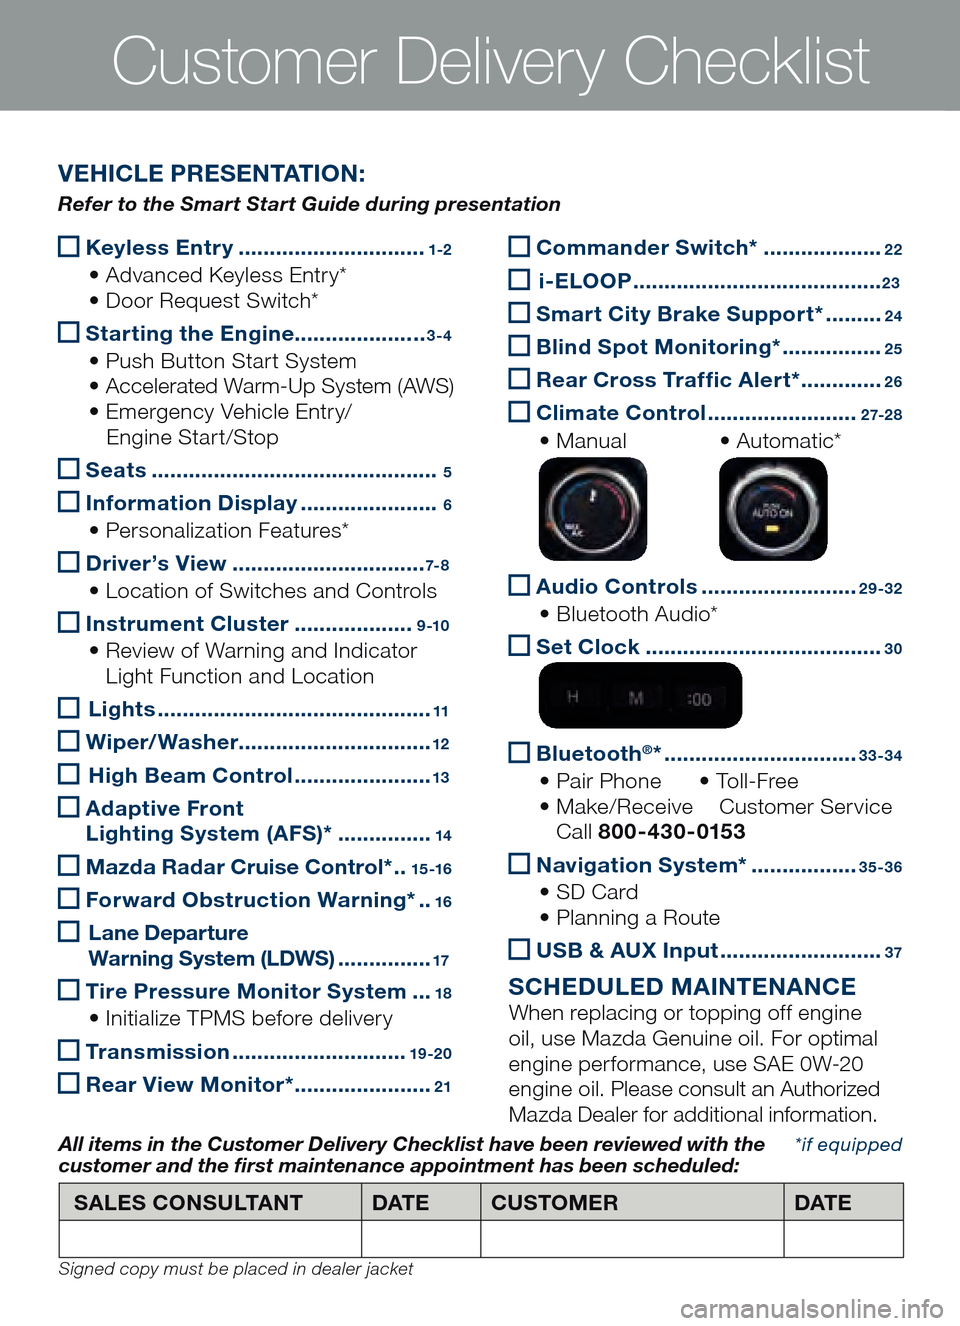
V EHICLE PRESENTATION :
Refer to the Smart Start Guide during presentation