clock MAZDA MODEL CX-5 2017 - RHD (UK, Australia) (in English) User Guide
[x] Cancel search | Manufacturer: MAZDA, Model Year: 2017, Model line: MODEL CX-5, Model: MAZDA MODEL CX-5 2017Pages: 772, PDF Size: 19.35 MB
Page 466 of 772
Basic Operation Method
NOTE
The explanation of functions described in this manual may differ from the actual operation,
and the shapes of screens and buttons and the letters and characters displayed may also
differ from the actual appearance.
Additionally, depending on future software updates, the content may successively change
without notice.
Audio Set (Type B) has three different human interfaces.
•Commander switch
•Touch panel
•Voice recognition with steering switch and microphone
Refer to Voice Recogn ition on page 5-118.
▼Commander switch operation
NOTE
For safety reasons, some operations are disabled while the vehicle is being driven.
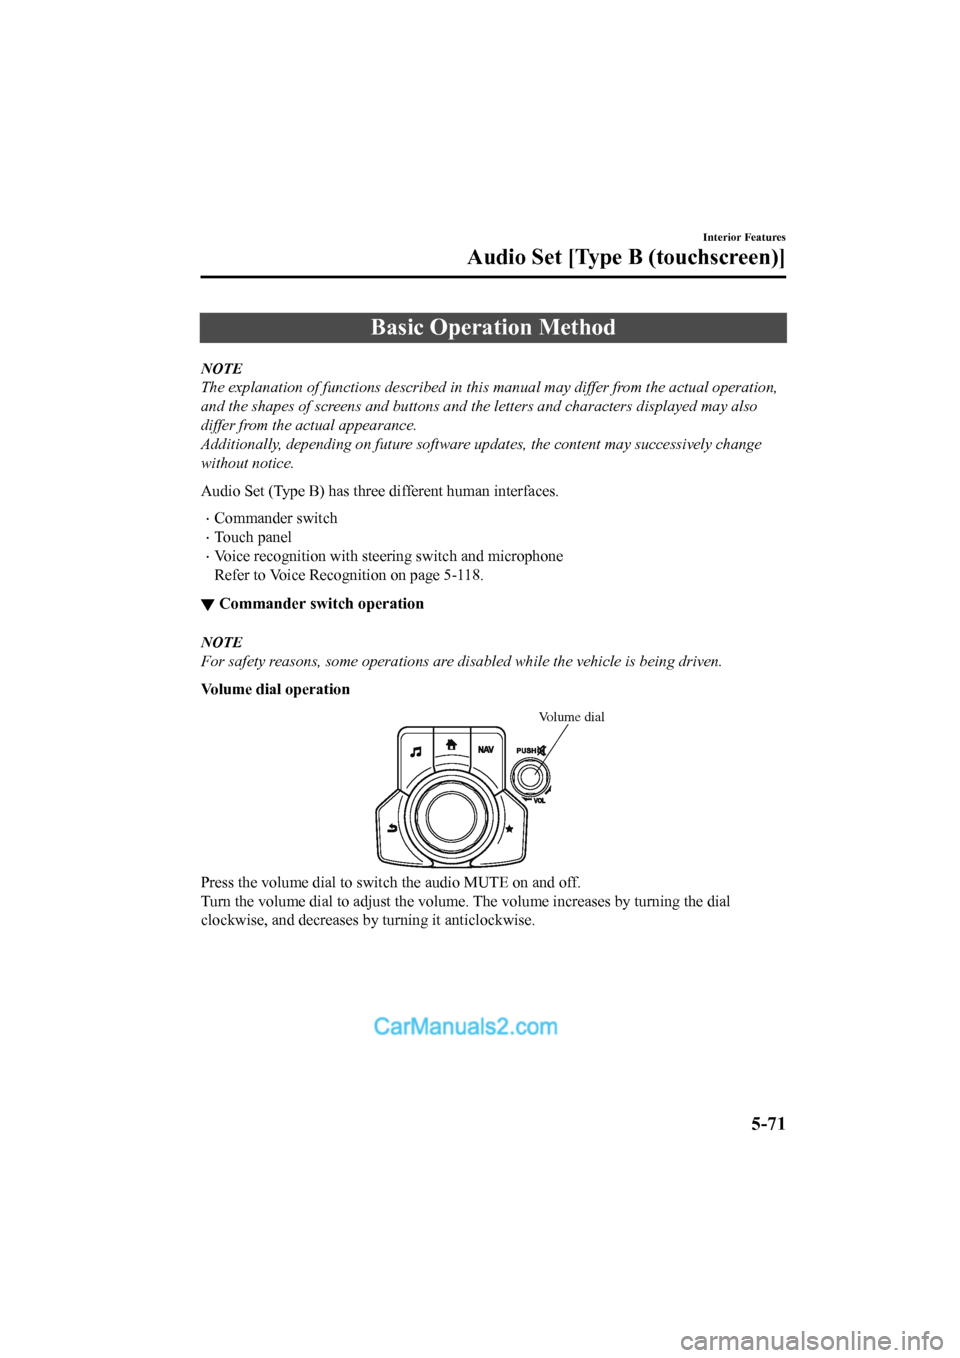
Volume dial operation
Volume dial
Press the volume dial to switch the audio MUTE on and off.
Turn the volume dial to adjust t
he volume. The volume increases by turning the dial
clockwise, and decreases by turning it anticlockwise.
Interior Features
Audio Set [Type B (touchscreen)]
5-71
2017-6-7 7:51:19 Form No. CX-5 8FY4-EE-17E+L_Edition2
Page 471 of 772
Volume/Display/Sound Controls
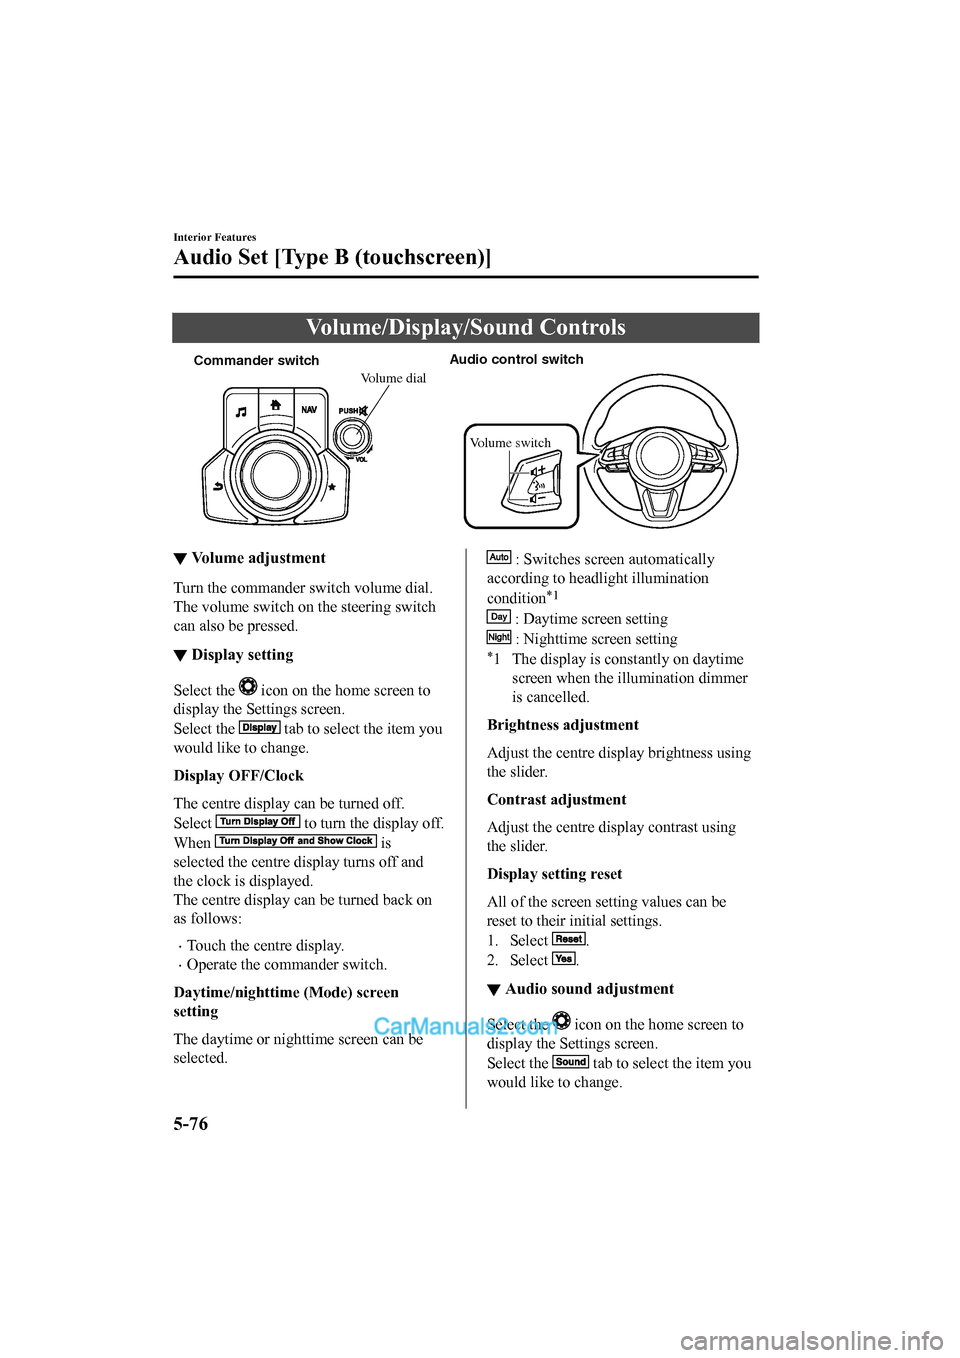
Commander switchAudio control switch
Volume switch
Volume dial
▼Volume adjustment
Turn the commander switch volume dial.
The volume switch on the steering switch
can also be pressed.
▼Display setting
Select the icon on the home screen to
display the Settings screen.
Select the
tab to select the item you
would like to change.
Display OFF/Clock
The centre display can be turned off.
Select
to turn the display off.
When
is
selected the centre display turns off and
the clock is displayed.
The centre display can be turned back on
as follows:
•Touch the centre display.
•Operate the commander switch.
Daytime/nighttime (Mode) screen
setting
The daytime or nighttime screen can be
selected.
: Switches scr een automatically
according to headlight illumination
condition
*1
: Daytime screen setting
: Nighttime screen setting
*1 The display is constantly on daytime screen when the il lumination dimmer
is cancelled.
Brightness adjustment
Adjust the centre display brightness using
the slider.
Contrast adjustment
Adjust the centre display contrast using
the slider.
Display setting reset
All of the screen setting values can be
reset to their initial settings.
1. Select
.
2. Select
.
▼ Audio sound adjustment
Select the icon on the home screen to
display the Settings screen.
Select the
tab to select the item you
would like to change.
Interior Features
Audio Set [Type B (touchscreen)]
5-76
2017-6-7 7:51:19 Form No. CX-5 8FY4-EE-17E+L_Edition2
Page 517 of 772
Settings
NOTE
Depending on the grade and specification, the screen display may differ.
Select the
icon on the home screen and display the Settings screen.
Switch the tab and select the setting item you want to change.
You can customize settings in the setup display as follows:
Tab Item Function
AD-Disp Height
Brightness Control
Other
Refer to Active Driving Display on page 4-39.
Display Refer to Volume/Display/Sound Controls on page 5-76. Safety Distance Recognitio
n Support System
SBS/SCBS
Other Refer to Personalisation Features on page 9-
12.
Sound Refer to Volume/Display/Sound Controls on page 5-76.
Clock Adjust Time
Displays the currently s
et time is displayed.
Press
to advance the hour /minute, and select to move the hour/minute back.
AM/PM can only be selected with the 12-hour
clock display.
GPS Sync Synchronizes with GPS when turned on.
When turned off, the time can be changed
from “Adjust Time”.
Time Format Changes the display between 12 and 24-hour
clock time.
Time Zone Select When it's not synchr
onized with GPS, select
the region you want to specify.
Daylight Savings Time Turns the daylight savin
g time setting on/off.
When ON, the time advances 1 hour. When
OFF, it returns to normal time.
Ve h i c l e Rain Sensing Wiper
Door Locks
Other Refer to Personalisation Features on page 9-
12.
Devices Bluetooth
Refer to Bluetooth
® Preparation on page 5-98.
Network Management Wi-Fi™ is used to obtain Navi POI/Real Time
Traffic function (Such as gas prices, weather,
nearest restaurant)
Interior Features
Audio Set [Type B (touchscreen)]
5-122
2017-6-7 7:51:19 Form No. CX-5 8FY4-EE-17E+L_Edition2
Page 596 of 772
▼Replacing Exterior Light Bulbs
Headlights, Running lights/Position
lights (Type A), Ru
nning lights (Type
A), Front fog lights*, Side direction
indicator lights, Bra ke lights (Type A),
Brake lights/Tail lights (Type A),
Reverse lights, High-mount brake light
The LED bulb cannot be replaced as a
single unit because it is an integrated unit.
The LED bulb has to be replaced with the
unit. We recommend an Authorised Mazda
Repairer when the replacement is
necessary.
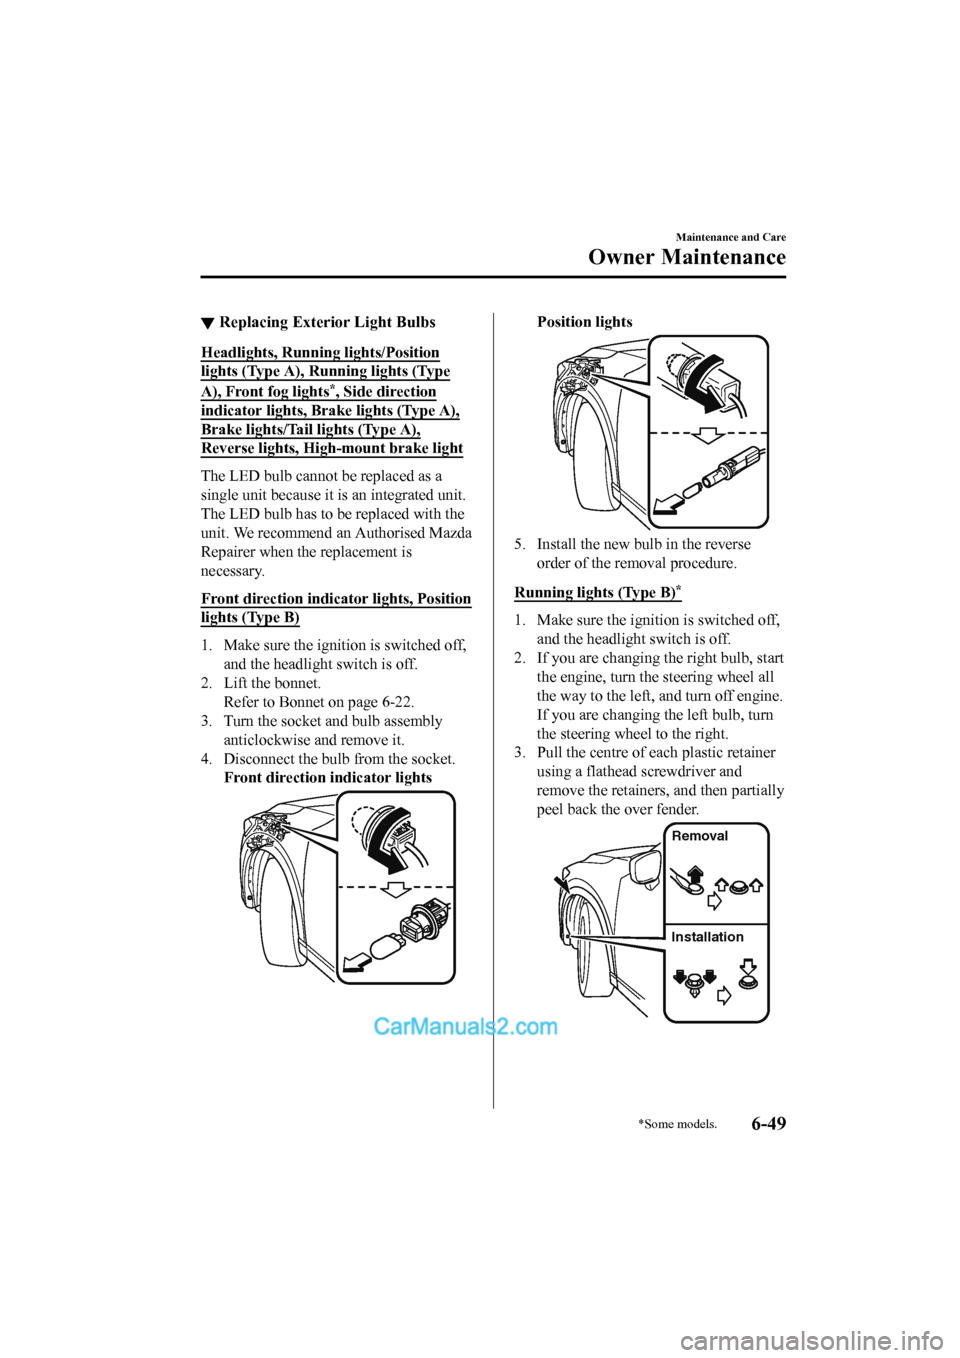
Front direction indicator lights, Position
lights (Type B)
1. Make sure the ignition is switched off,
and the headlight switch is off.
2. Lift the bonnet. Refer to Bonnet on page 6-22.
3. Turn the socket and bulb assembly anticlockwise and remove it.
4. Disconnect the bulb from the socket. Front direction indicator lights
Position lights
5. Install the new bulb in the reverse
order of the removal procedure.
Running lights (Type B)
*
1. Make sure the ignition is switched off, and the headlight switch is off.
2. If you are changing the right bulb, start
the engine, turn the steering wheel all
the way to the left, and turn off engine.
If you are changing the left bulb, turn
the steering wheel to the right.
3. Pull the centre of each plastic retainer
using a flathead screwdriver and
remove the retainers, and then partially
peel back the over fender.
Removal
Installation
Maintenance and Care
Owner Maintenance
*Some models.6-49
2017-6-7 7:51:19 Form No. CX-5 8FY4-EE-17E+L_Edition2
Page 597 of 772
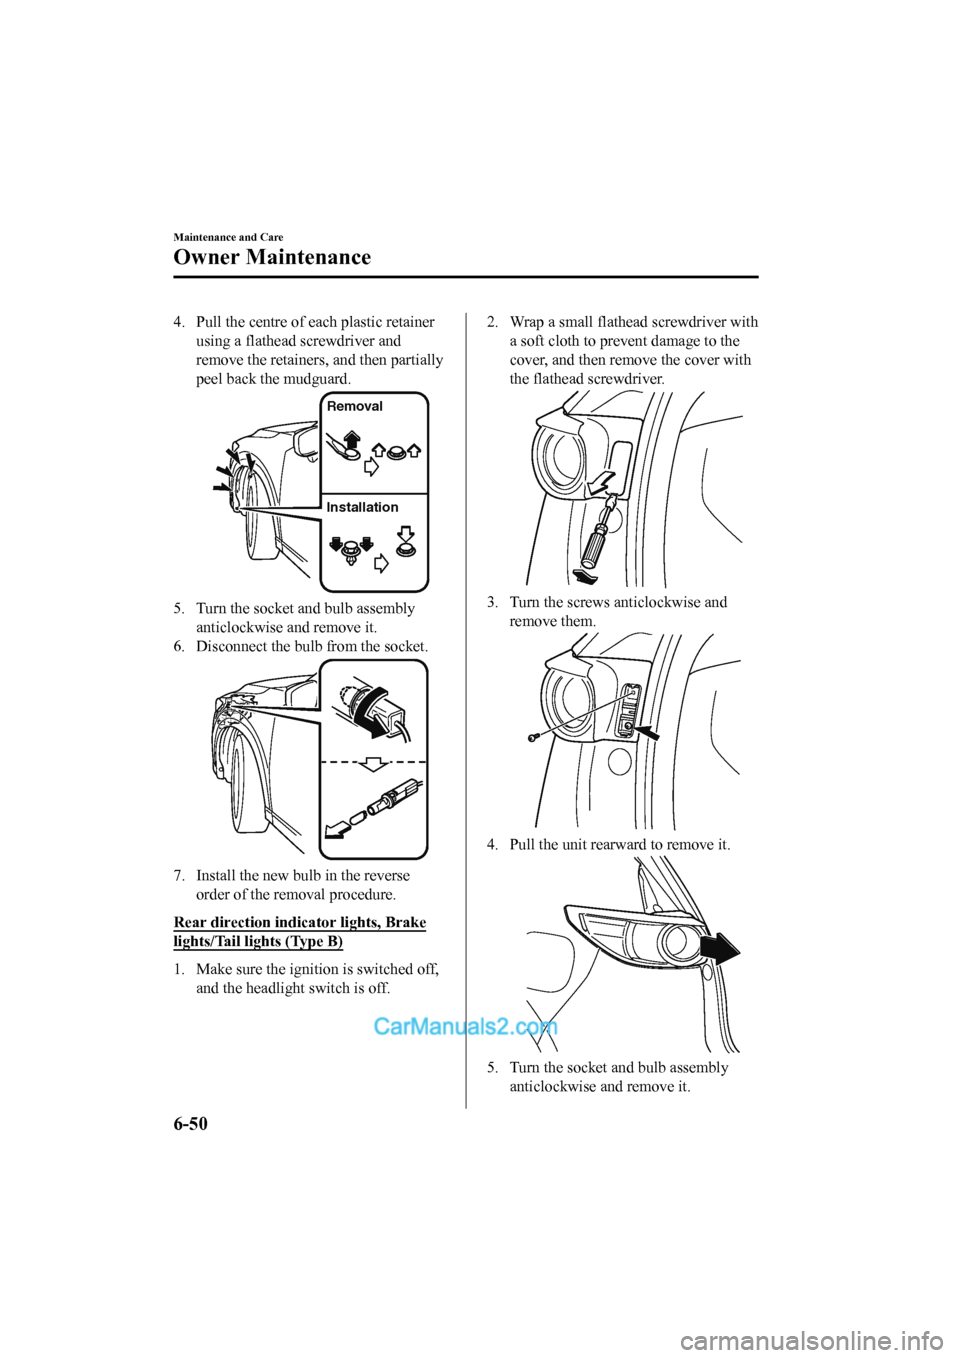
4. Pull the centre of each plastic retainerusing a flathead screwdriver and
remove the retainers, and then partially
peel back the mudguard.
Removal
Installation
5. Turn the socket and bulb assemblyanticlockwise and remove it.
6. Disconnect the bulb from the socket.
7. Install the new bulb in the reverse order of the removal procedure.
Rear direction indicator lights, Brake
lights/Tail lights (Type B)
1. Make sure the ignition is switched off, and the headlight switch is off.
2. Wrap a small flathead screwdriver witha soft cloth to prev ent damage to the
cover, and then remove the cover with
the flathead screwdriver.
3. Turn the screws anticlockwise and remove them.
4. Pull the unit rearward to remove it.
5. Turn the socket and bulb assembly
anticlockwise and remove it.
Maintenance and Care
Owner Maintenance
6-50
2017-6-7 7:51:19 Form No. CX-5 8FY4-EE-17E+L_Edition2
Page 598 of 772
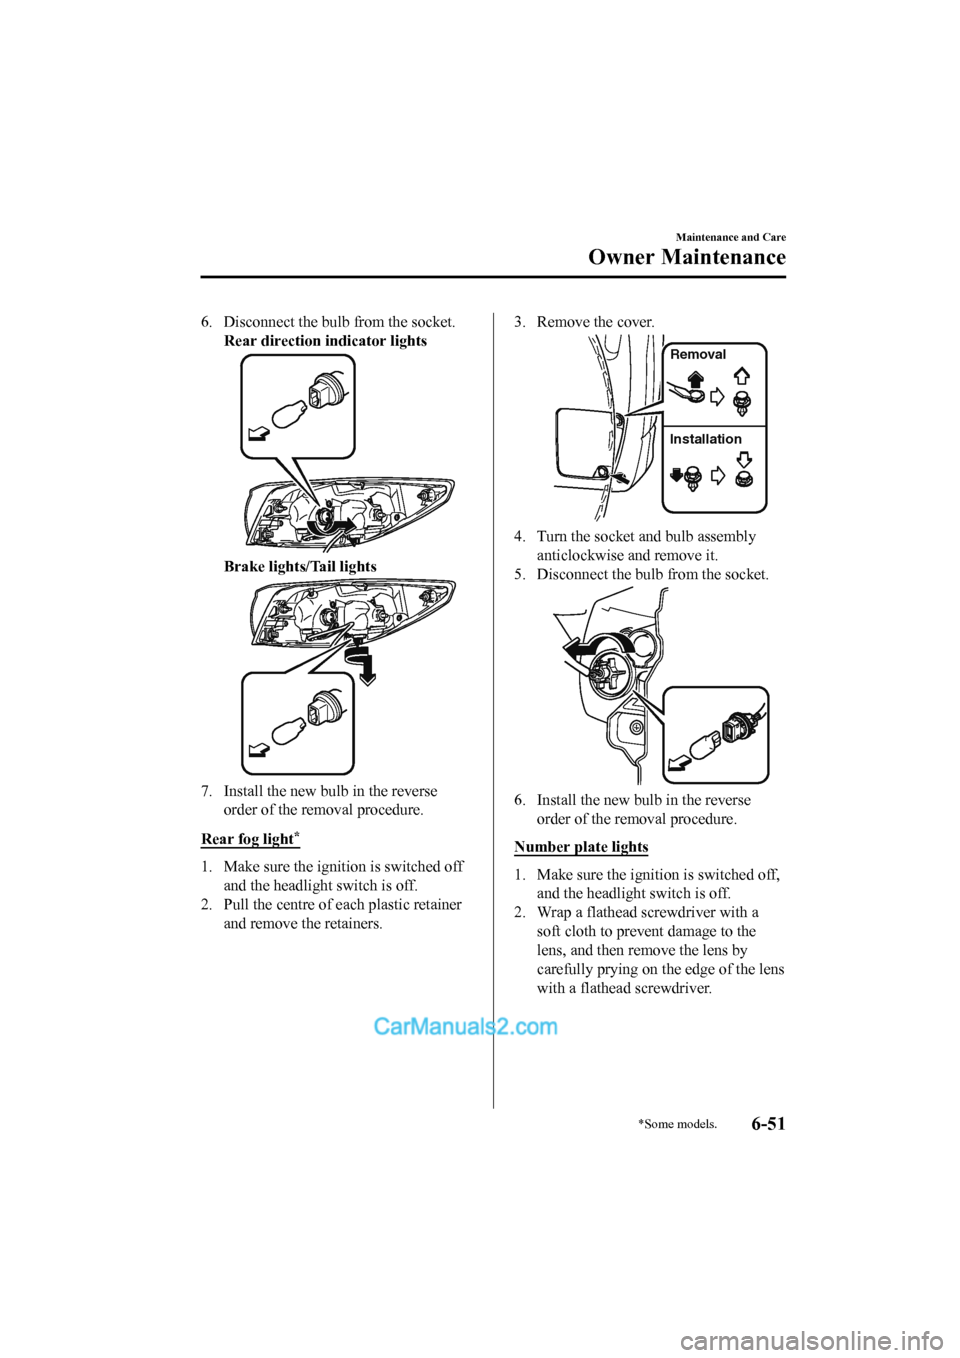
6. Disconnect the bulb from the socket.Rear direction indicator lights
Brake lights/Tail lights
7. Install the new bulb in the reverseorder of the removal procedure.
Rear fog light
*
1. Make sure the ignition is switched off and the headlight switch is off.
2. Pull the centre of each plastic retainer and remove the retainers.
3. Remove the cover.
Removal
Installation
4. Turn the socket and bulb assembly
anticlockwise and remove it.
5. Disconnect the bulb from the socket.
6. Install the new bulb in the reverse order of the removal procedure.
Number plate lights
1. Make sure the ignition is switched off, and the headlight switch is off.
2. Wrap a flathead screwdriver with a soft cloth to prevent damage to the
lens, and then remove the lens by
carefully prying on t he edge of the lens
with a flathead screwdriver.
Maintenance and Care
Owner Maintenance
*Some models.6-51
2017-6-7 7:51:19 Form No. CX-5 8FY4-EE-17E+L_Edition2
Page 636 of 772
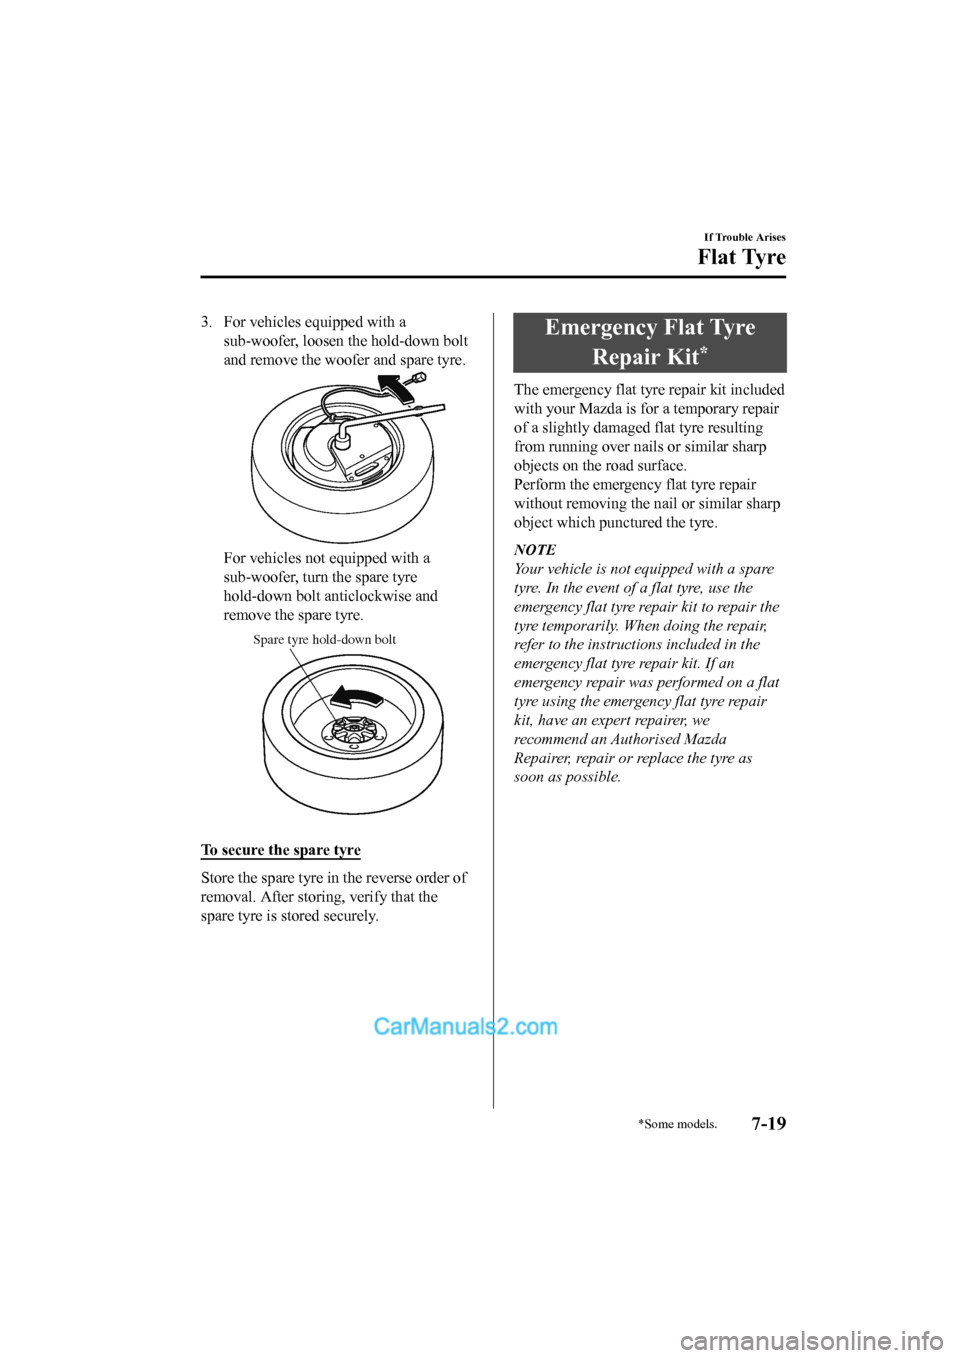
3. For vehicles equipped with asub-woofer, loosen the hold-down bolt
and remove the woofe r and spare tyre.
For vehicles not equipped with a
sub-woofer, turn the spare tyre
hold-down bolt anticlockwise and
remove the spare tyre.
Spare tyre hold-down bolt
To secure the spare tyre
Store the spare tyre in the reverse order of
removal. After storing, verify that the
spare tyre is stored securely.
Emergency Flat Tyre
Repair Kit
*
The emergency flat tyre repair kit included
with your Mazda is for a temporary repair
of a slightly damaged flat tyre resulting
from running over nails or similar sharp
objects on the road surface.
Perform the emergency flat tyre repair
without removing the nail or similar sharp
object which punc tured the tyre.
NOTE
Your vehicle is not eq uipped with a spare
tyre. In the event of a flat tyre, use the
emergency flat tyre repair kit to repair the
tyre temporarily. When doing the repair,
refer to the instruct ions included in the
emergency flat tyre repair kit. If an
emergency repair was performed on a flat
tyre using the emergency flat tyre repair
kit, have an expert repairer, we
recommend an Authorised Mazda
Repairer, repair or replace the tyre as
soon as possible.
If Trouble Arises
Flat Tyre
*Some models.7-19
2017-6-7 7:51:19 Form No. CX-5 8FY4-EE-17E+L_Edition2
Page 639 of 772
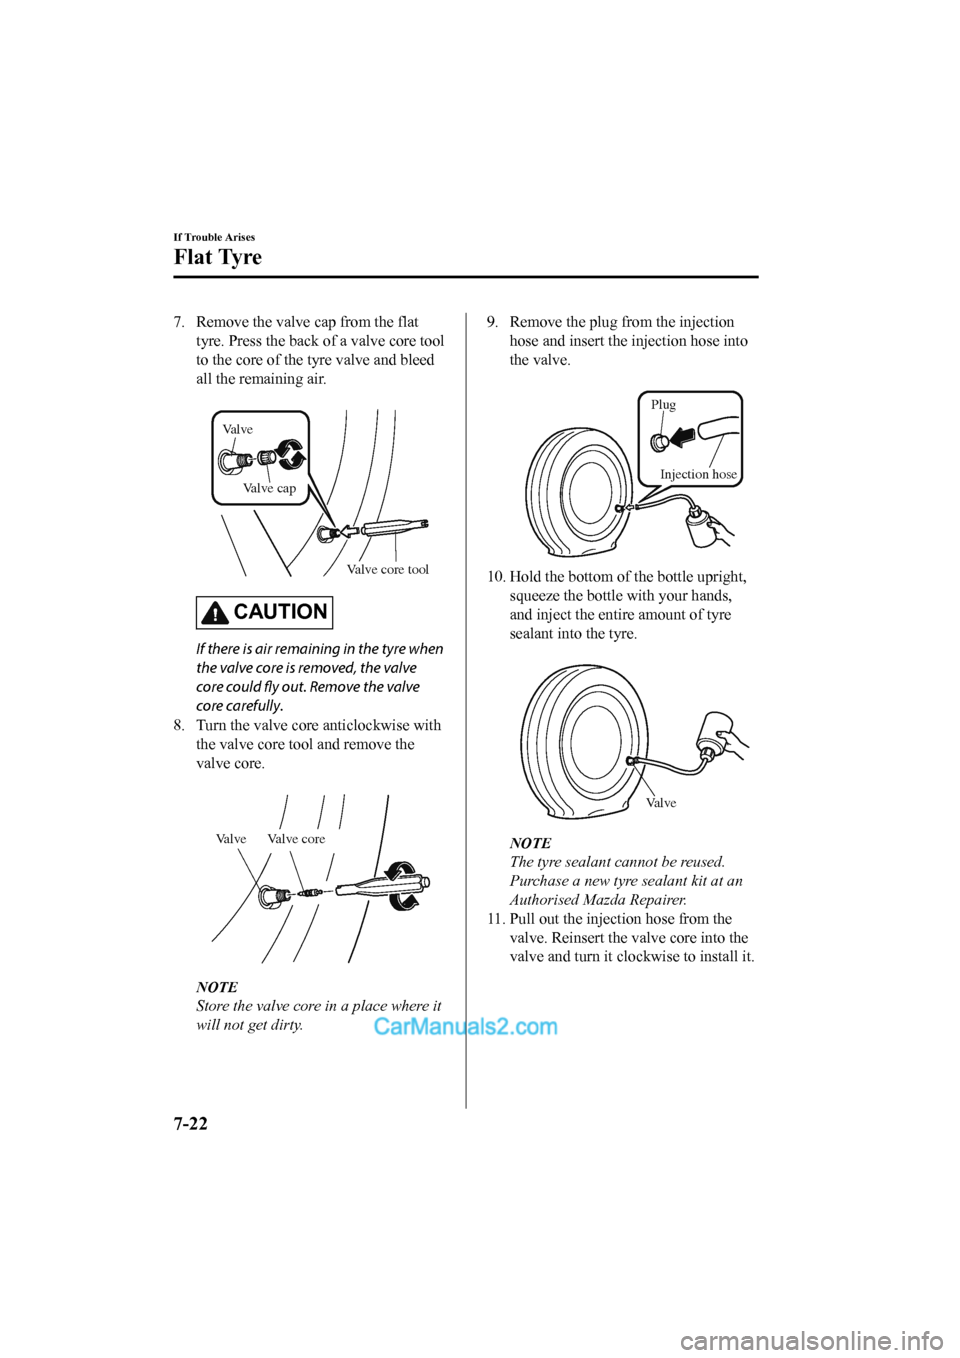
7. Remove the valve cap from the flattyre. Press the back of a valve core tool
to the core of the tyre valve and bleed
all the remaining air.
Valve core tool
Valve
Valve cap
CAUTION
If there is air remaining in the tyre when
the valve core is removed, the valve
core could fly out. Remove the valve
core carefully.
8. Turn the valve core anticlockwise with the valve core tool and remove the
valve core.
Valve Valve core
NOTE
Store the valve core in a place where it
will not get dirty.
9. Remove the plug from the injectionhose and insert the injection hose into
the valve.
Injection hose
Plug
10. Hold the bottom of
the bottle upright,
squeeze the bottle with your hands,
and inject the entire amount of tyre
sealant into the tyre.
Valve
NOTE
The tyre sealant cannot be reused.
Purchase a new tyre sealant kit at an
Authorised Mazda Repairer.
11. Pull out the injection hose from the
valve. Reinsert the valve core into the
valve and turn it cloc kwise to install it.
If Trouble Arises
Flat Tyre
7-22
2017-6-7 7:51:19 Form No. CX-5 8FY4-EE-17E+L_Edition2
Page 644 of 772
▼Removing a Flat Tyre
WA R N I N G
When jacking-up a vehicle, always shift the
shift lever to 1st or R (manual transaxle
vehicle) or shift the selector lever to P
(automatic transaxle vehicle), apply the
parking brake, and place wheel blocks in
the position diagonally opposed to the
jack:
Changing a
flat tyre without using wheel
blocks is dangerous because the vehicle
may move and fall off the jack even with
the shift lever in 1st or R, or the select lever
is in P, which could result in an accident.
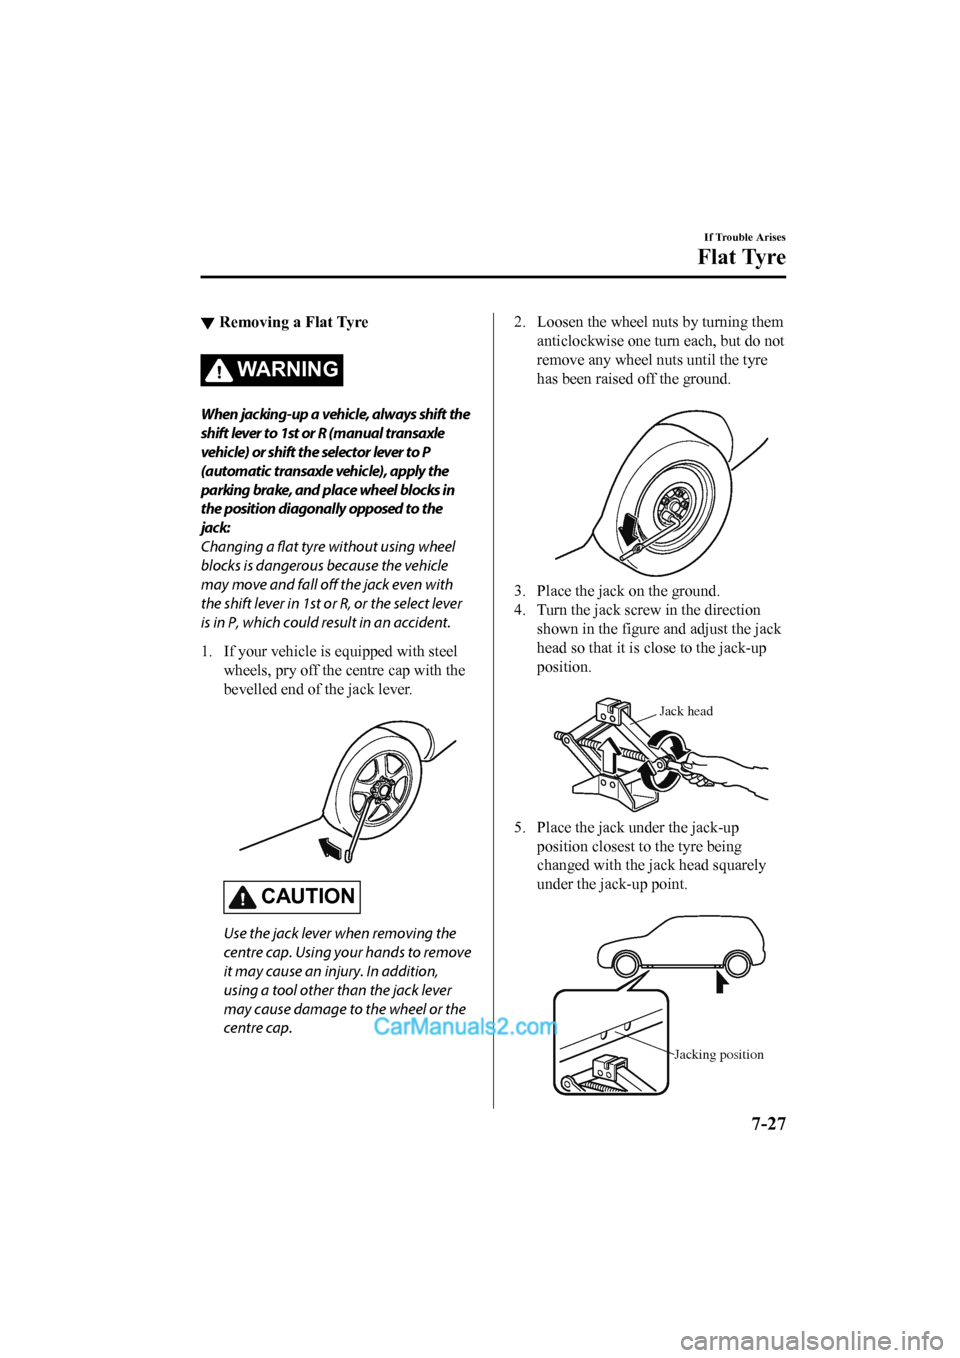
1. If your vehicle is equipped with steel wheels, pry off the c entre cap with the
bevelled end of the jack lever.
CAUTION
Use the jack lever when removing the
centre cap. Using your hands to remove
it may cause an injury. In addition,
using a tool other than the jack lever
may cause damage to the wheel or the
centre cap.
2. Loosen the wheel nuts by turning them anticlockwise one turn each, but do not
remove any wheel nuts until the tyre
has been raised off the ground.
3. Place the jack on the ground.
4. Turn the jack screw in the directionshown in the figure and adjust the jack
head so that it is close to the jack-up
position.
Jack head
5. Place the jack under the jack-upposition closest to the tyre being
changed with the jack head squarely
under the jack-up point.
Jacking position
If Trouble Arises
Flat Tyre
7-27
2017-6-7 7:51:19 Form No. CX-5 8FY4-EE-17E+L_Edition2
Page 646 of 772
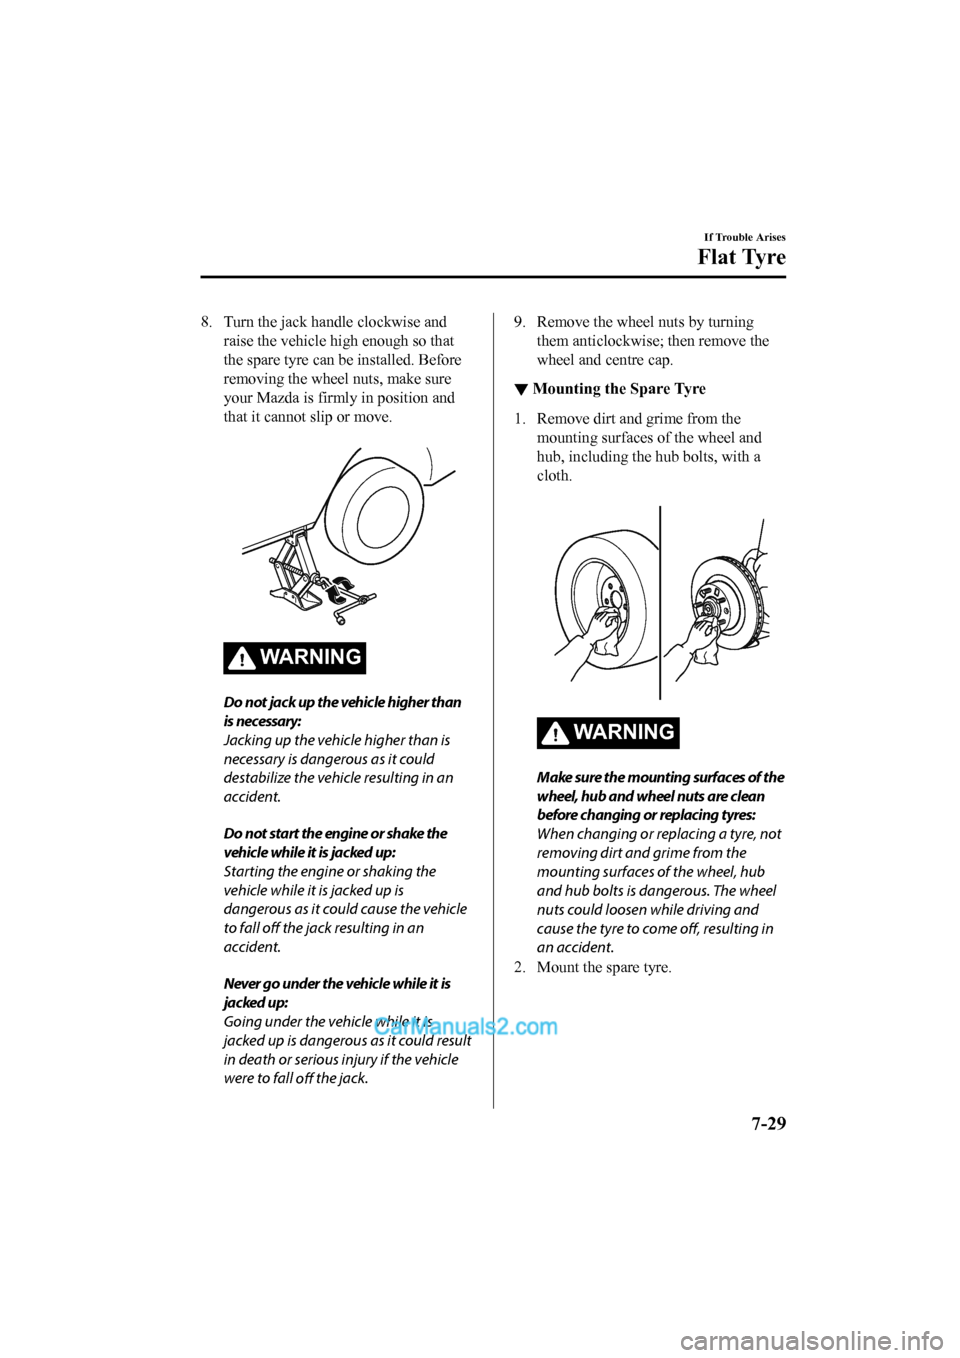
8. Turn the jack handle clockwise andraise the vehicle high enough so that
the spare tyre can be installed. Before
removing the wheel nuts, make sure
your Mazda is firmly in position and
that it cannot slip or move.
WA R N I N G
Do not jack up the vehicle higher than
is necessary:
Jacking up the vehicle higher than is
necessary is dangerous as it could
destabilize the vehicle resulting in an
accident.
Do not start the engine or shake the
vehicle while it is jacked up:
Starting the engine or shaking the
vehicle while it is jacked up is
dangerous as it could cause the vehicle
to fall off the jack resulting in an
accident.
Never go under the vehicle while it is
jacked up:
Going under the vehicle while it is
jacked up is dangerous as it could result
in death or serious injury if the vehicle
were to fall off the jack.
9. Remove the wheel nuts by turning
them anticlockwise; then remove the
wheel and centre cap.
▼Mounting the Spare Tyre
1. Remove dirt and grime from the
mounting surfaces of the wheel and
hub, including the hub bolts, with a
cloth.
WA R N I N G
Make sure the mounting surfaces of the
wheel, hub and wheel nuts are clean
before changing or replacing tyres:
When changing or replacing a tyre, not
removing dirt and grime from the
mounting surfaces of the wheel, hub
and hub bolts is dangerous. The wheel
nuts could loosen while driving and
cause the tyre to come off, resulting in
an accident.
2. Mount the spare tyre.
If Trouble Arises
Flat Tyre
7-29
2017-6-7 7:51:19 Form No. CX-5 8FY4-EE-17E+L_Edition2