tire pressure MAZDA MODEL CX-7 2011 (in English) Owner's Manual
[x] Cancel search | Manufacturer: MAZDA, Model Year: 2011, Model line: MODEL CX-7, Model: MAZDA MODEL CX-7 2011Pages: 520, PDF Size: 8.75 MB
Page 377 of 520
Black plate (377,1)
WARNING
Do not jack up the vehicle higher than
is necessary:
Jacking up the vehicle higher than is
necessary is dangerous as it could
destabilize the vehicle resulting in an
accident.
Do not start the engine or shake the
vehicle while it is jacked up:
Starting the engine or shaking the
vehicle while it is jacked up is
dangerous as it could cause the
vehicle to fall off the jack resulting in
an accident.
Never go under the vehicle while it is
jacked up:
Going under the vehicle while it is
jacked up is dangerous as it could
result in death or serious injury if the
vehicle were to fall off the jack.
8. Remove the lug nuts by turning them
counterclockwise; then remove the
wheel and center cap.
qLocking Lug Nutsí
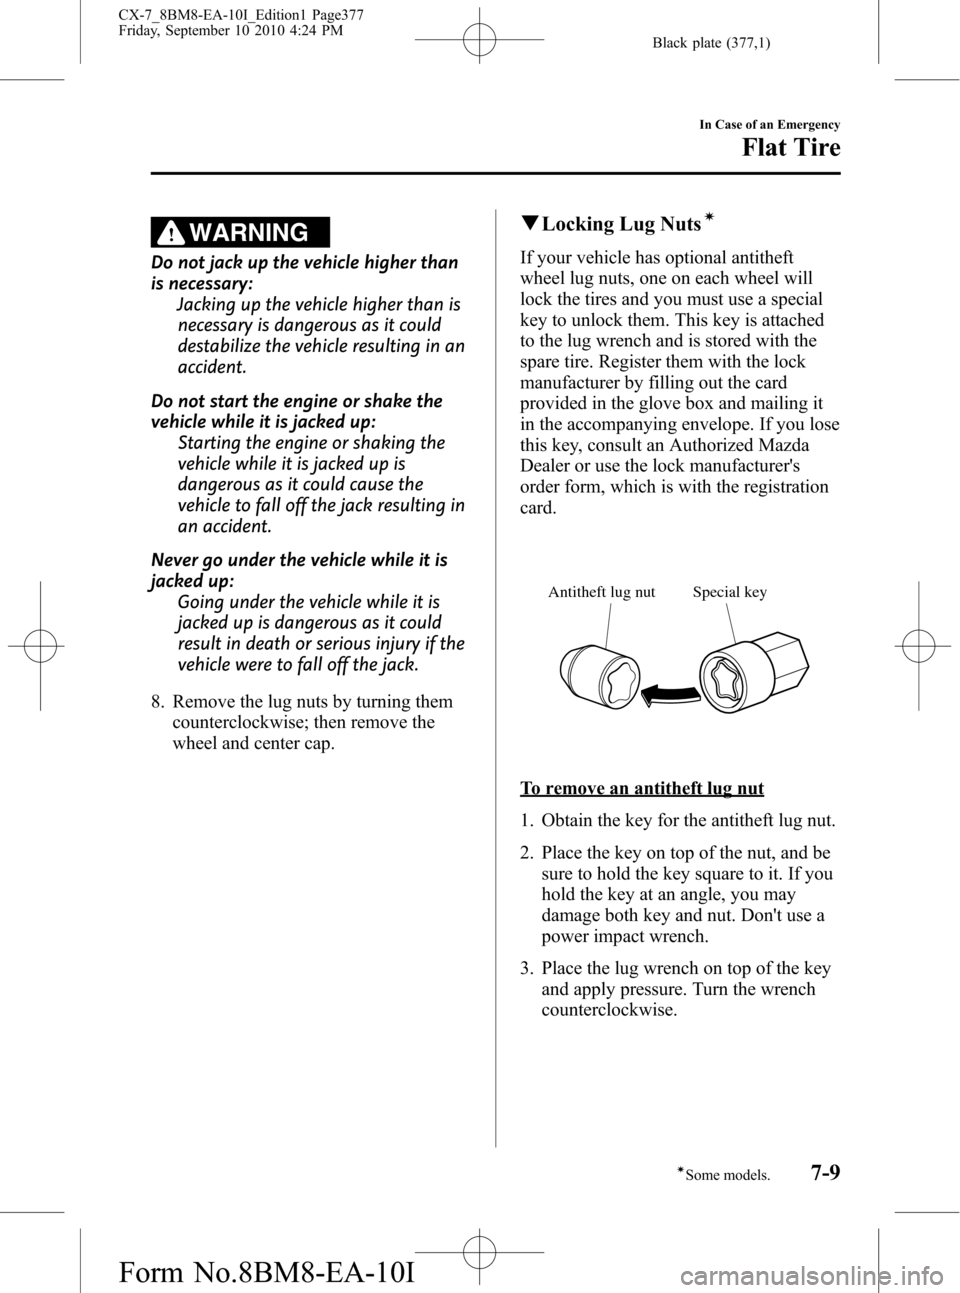
If your vehicle has optional antitheft
wheel lug nuts, one on each wheel will
lock the tires and you must use a special
key to unlock them. This key is attached
to the lug wrench and is stored with the
spare tire. Register them with the lock
manufacturer by filling out the card
provided in the glove box and mailing it
in the accompanying envelope. If you lose
this key, consult an Authorized Mazda
Dealer or use the lock manufacturer's
order form, which is with the registration
card.
Special key Antitheft lug nut
To remove an antitheft lug nut
1. Obtain the key for the antitheft lug nut.
2. Place the key on top of the nut, and be
sure to hold the key square to it. If you
hold the key at an angle, you may
damage both key and nut. Don't use a
power impact wrench.
3. Place the lug wrench on top of the key
and apply pressure. Turn the wrench
counterclockwise.
In Case of an Emergency
Flat Tire
7-9íSome models. CX-7_8BM8-EA-10I_Edition1 Page377
Friday, September 10 2010 4:24 PM
Form No.8BM8-EA-10I
Page 378 of 520
Black plate (378,1)
To install the nut
1. Place the key on top of the nut, and be
sure to hold the key square to it. If you
hold the key at an angle, you may
damage both key and nut. Don't use a
power impact wrench.
2. Place the lug wrench on top of the key,
apply pressure, and turn it clockwise.
qMounting the Spare Tire
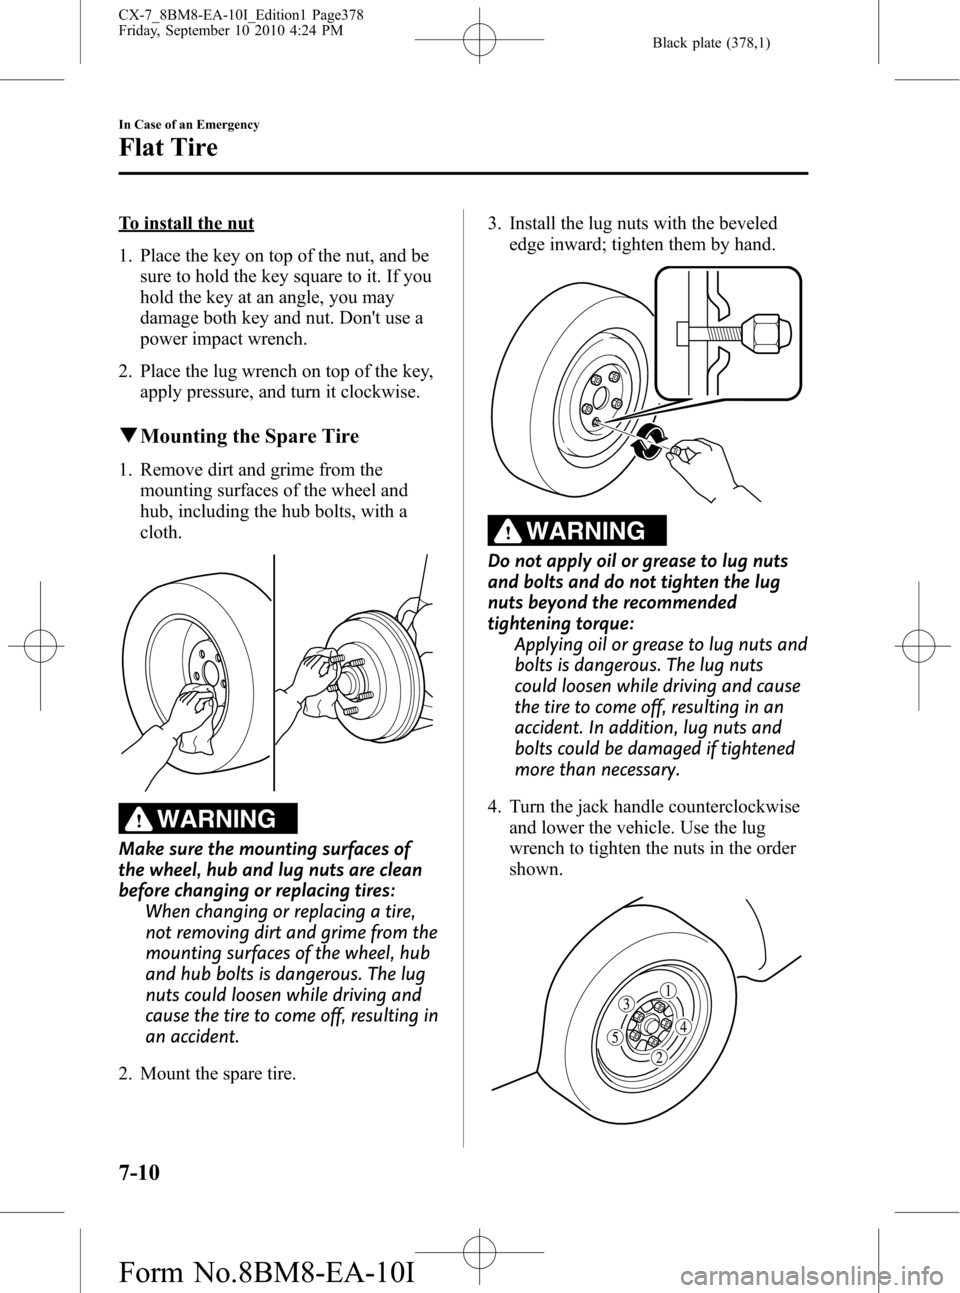
1. Remove dirt and grime from the
mounting surfaces of the wheel and
hub, including the hub bolts, with a
cloth.
WARNING
Make sure the mounting surfaces of
the wheel, hub and lug nuts are clean
before changing or replacing tires:
When changing or replacing a tire,
not removing dirt and grime from the
mounting surfaces of the wheel, hub
and hub bolts is dangerous. The lug
nuts could loosen while driving and
cause the tire to come off, resulting in
an accident.
2. Mount the spare tire.3. Install the lug nuts with the beveled
edge inward; tighten them by hand.
WARNING
Do not apply oil or grease to lug nuts
and bolts and do not tighten the lug
nuts beyond the recommended
tightening torque:
Applying oil or grease to lug nuts and
bolts is dangerous. The lug nuts
could loosen while driving and cause
the tire to come off, resulting in an
accident. In addition, lug nuts and
bolts could be damaged if tightened
more than necessary.
4. Turn the jack handle counterclockwise
and lower the vehicle. Use the lug
wrench to tighten the nuts in the order
shown.
7-10
In Case of an Emergency
Flat Tire
CX-7_8BM8-EA-10I_Edition1 Page378
Friday, September 10 2010 4:24 PM
Form No.8BM8-EA-10I
Page 379 of 520
Black plate (379,1)
If you are unsure of how tight the nuts
should be, have them inspected at an
Authorized Mazda Dealer.
Nut tightening torque
N·m (kgf·m, ft·lbf) 88―118 (9―12, 65―87)
WARNING
Always securely and correctly tighten
the lug nuts:
Improperly or loosely tightened lug
nuts are dangerous. The wheel could
wobble or come off. This could result
in loss of vehicle control and cause a
serious accident.
Be sure to reinstall the same nuts you
removed or replace them with metric
nuts of the same configuration:
Because the wheel studs and lug nuts
on your Mazda have metric threads,
using a non-metric nut is dangerous.
On a metric stud, it would not secure
the wheel and would damage the
stud, which could cause the wheel to
slip off and cause an accident.
5. Remove the center cap by tapping it
with the lug wrench.
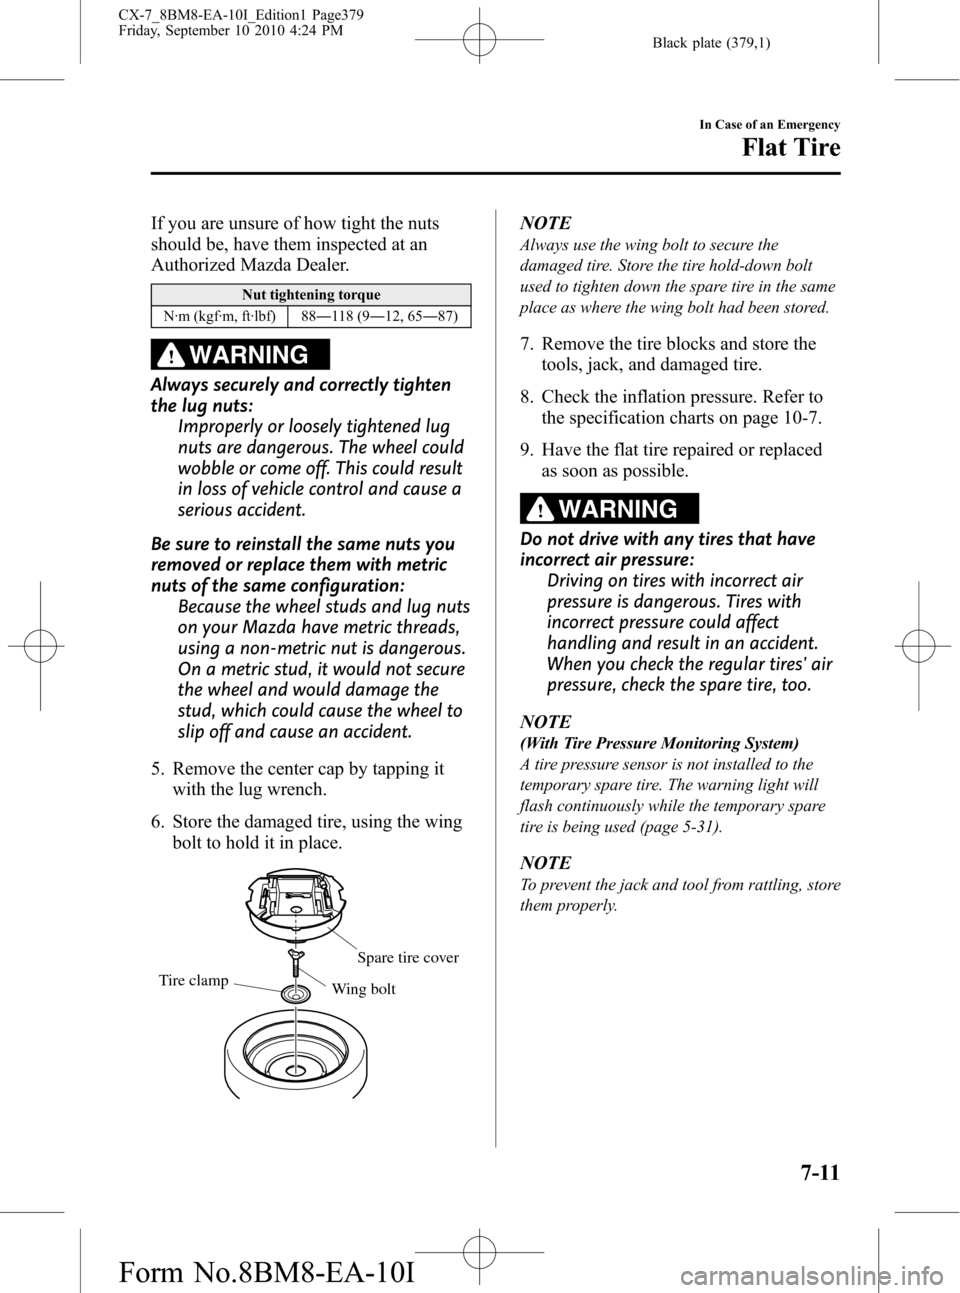
6. Store the damaged tire, using the wing
bolt to hold it in place.
Tire clamp
Spare tire cover
Wing bolt
NOTE
Always use the wing bolt to secure the
damaged tire. Store the tire hold-down bolt
used to tighten down the spare tire in the same
place as where the wing bolt had been stored.
7. Remove the tire blocks and store the
tools, jack, and damaged tire.
8. Check the inflation pressure. Refer to
the specification charts on page 10-7.
9. Have the flat tire repaired or replaced
as soon as possible.
WARNING
Do not drive with any tires that have
incorrect air pressure:
Driving on tires with incorrect air
pressure is dangerous. Tires with
incorrect pressure could affect
handling and result in an accident.
When you check the regular tires' air
pressure, check the spare tire, too.
NOTE
(With Tire Pressure Monitoring System)
A tire pressure sensor is not installed to the
temporary spare tire. The warning light will
flash continuously while the temporary spare
tire is being used (page 5-31).
NOTE
To prevent the jack and tool from rattling, store
them properly.
In Case of an Emergency
Flat Tire
7-11
CX-7_8BM8-EA-10I_Edition1 Page379
Friday, September 10 2010 4:24 PM
Form No.8BM8-EA-10I
Page 399 of 520
Black plate (399,1)
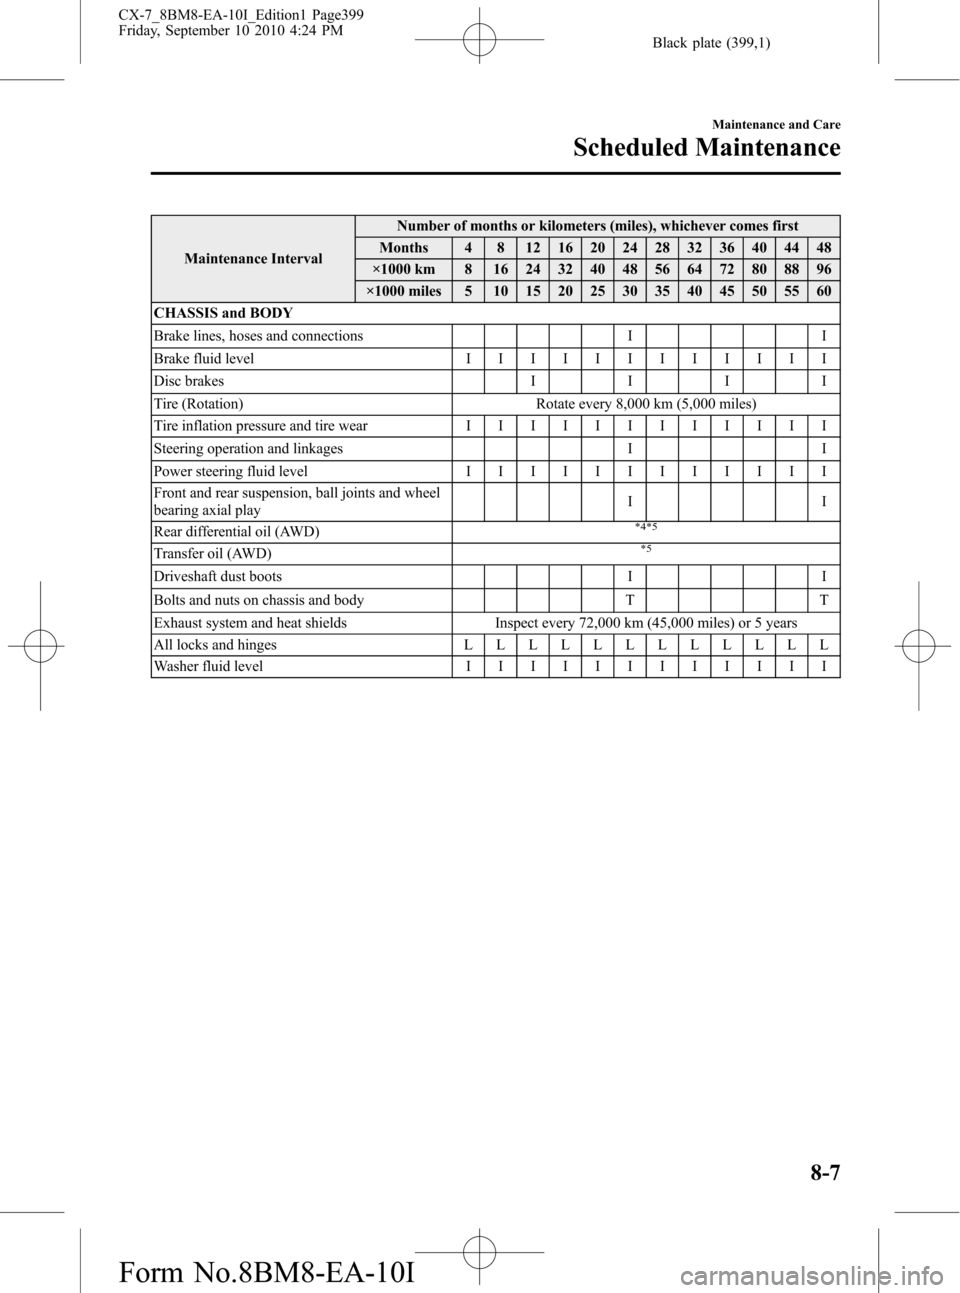
Maintenance IntervalNumber of months or kilometers (miles), whichever comes first
Months 4 8 12 16 20 24 28 32 36 40 44 48
×1000 km 8 16 24 32 40 48 56 64 72 80 88 96
×1000 miles 5 10 15 20 25 30 35 40 45 50 55 60
CHASSIS and BODY
Brake lines, hoses and connections I I
Brake fluid levelIIIIIIIIIIII
Disc brakesIIII
Tire (Rotation) Rotate every 8,000 km (5,000 miles)
Tire inflation pressure and tire wearIIIIIIIIIIII
Steering operation and linkages I I
Power steering fluid levelIIIIIIIIIIII
Front and rear suspension, ball joints and wheel
bearing axial playII
Rear differential oil (AWD)
*4*5
Transfer oil (AWD)*5
Driveshaft dust boots I I
Bolts and nuts on chassis and body T T
Exhaust system and heat shields Inspect every 72,000 km (45,000 miles) or 5 years
All locks and hingesLLLLLLLLLLLL
Washer fluid levelIIIIIIIIIIII
Maintenance and Care
Scheduled Maintenance
8-7
CX-7_8BM8-EA-10I_Edition1 Page399
Friday, September 10 2010 4:24 PM
Form No.8BM8-EA-10I
Page 402 of 520
Black plate (402,1)
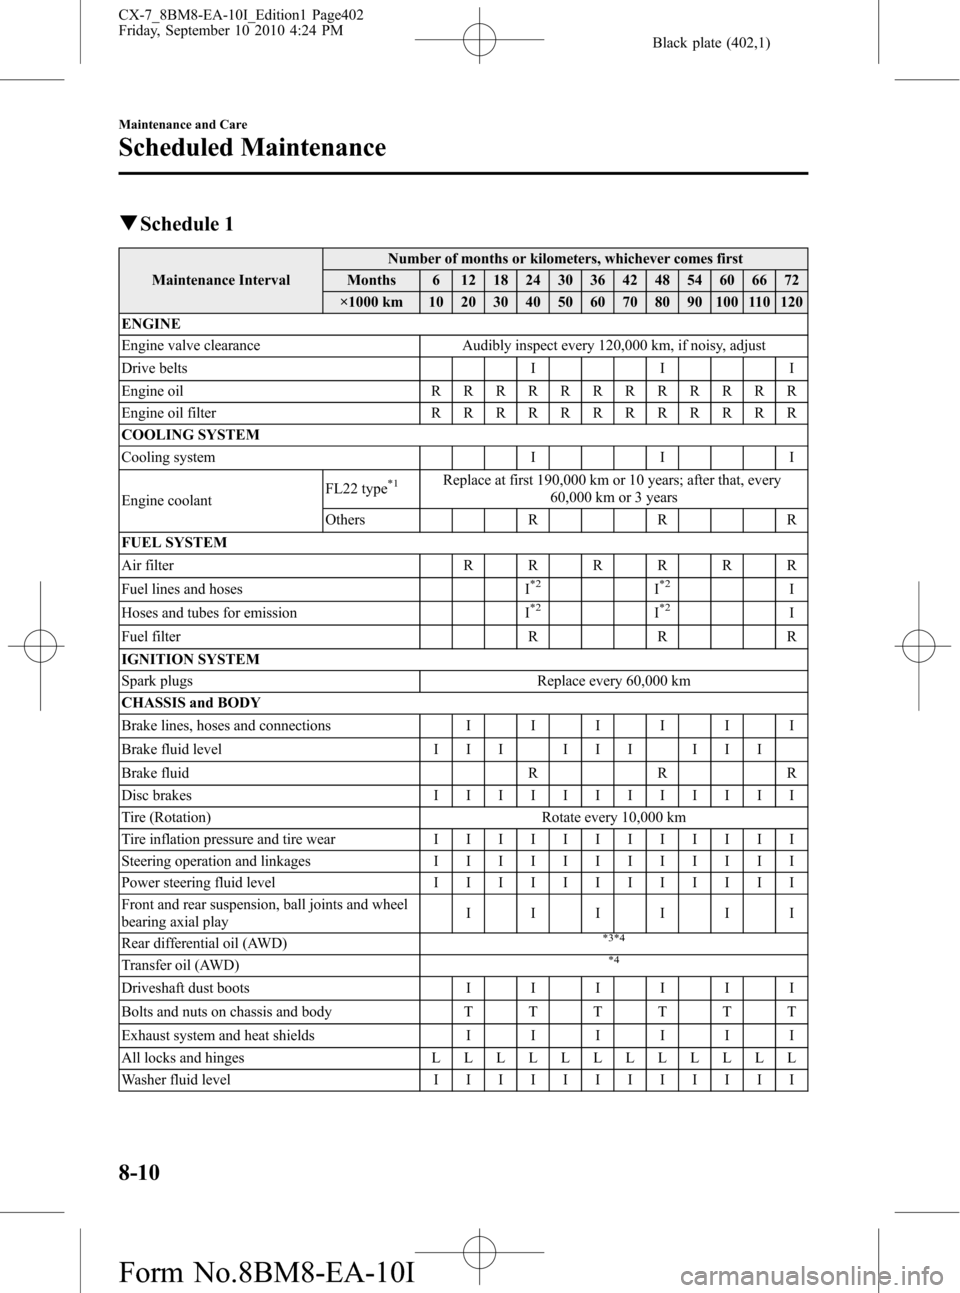
qSchedule 1
Maintenance IntervalNumber of months or kilometers, whichever comes first
Months 6 12 18 24 30 36 42 48 54 60 66 72
×1000 km 10 20 30 40 50 60 70 80 90 100 110 120
ENGINE
Engine valve clearance Audibly inspect every 120,000 km, if noisy, adjust
Drive belts I I I
Engine oilRRRRRRRRRRRR
Engine oil filterRRRRRRRRRRRR
COOLING SYSTEM
Cooling system I I I
Engine coolantFL22 type
*1Replace at first 190,000 km or 10 years; after that, every
60,000 km or 3 years
Others R R R
FUEL SYSTEM
Air filterRRRRRR
Fuel lines and hoses I
*2I*2I
Hoses and tubes for emission I*2I*2I
Fuel filter R R R
IGNITION SYSTEM
Spark plugs Replace every 60,000 km
CHASSIS and BODY
Brake lines, hoses and connectionsIIIIII
Brake fluid level I I I I I I I I I
Brake fluid R R R
Disc brakesIIIIIIIIIIII
Tire (Rotation) Rotate every 10,000 km
Tire inflation pressure and tire wearIIIIIIIIIIII
Steering operation and linkagesIIIIIIIIIIII
Power steering fluid levelIIIIIIIIIIII
Front and rear suspension, ball joints and wheel
bearing axial playIIIIII
Rear differential oil (AWD)
*3*4
Transfer oil (AWD)*4
Driveshaft dust bootsIIIIII
Bolts and nuts on chassis and bodyTTTTTT
Exhaust system and heat shieldsIIIIII
All locks and hingesLLLLLLLLLLLL
Washer fluid levelIIIIIIIIIIII
8-10
Maintenance and Care
Scheduled Maintenance
CX-7_8BM8-EA-10I_Edition1 Page402
Friday, September 10 2010 4:24 PM
Form No.8BM8-EA-10I
Page 405 of 520
Black plate (405,1)
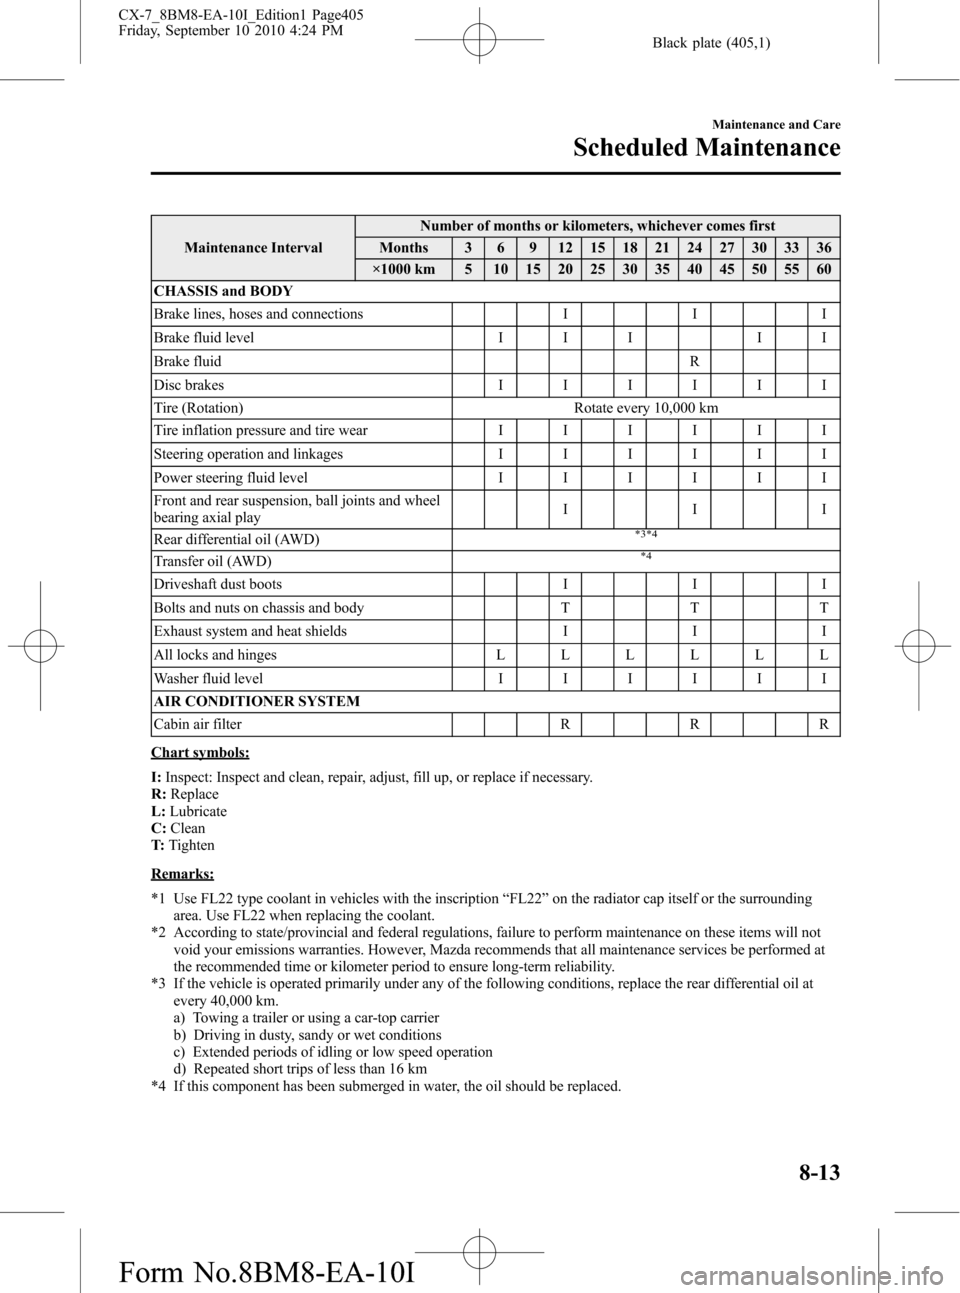
Maintenance IntervalNumber of months or kilometers, whichever comes first
Months 3 6 9 12 15 18 21 24 27 30 33 36
×1000 km 5 10 15 20 25 30 35 40 45 50 55 60
CHASSIS and BODY
Brake lines, hoses and connections I I I
Brake fluid level I I I I I
Brake fluid R
Disc brakesIIIIII
Tire (Rotation) Rotate every 10,000 km
Tire inflation pressure and tire wearIIIIII
Steering operation and linkagesIIIIII
Power steering fluid levelIIIIII
Front and rear suspension, ball joints and wheel
bearing axial playIII
Rear differential oil (AWD)
*3*4
Transfer oil (AWD)*4
Driveshaft dust boots I I I
Bolts and nuts on chassis and body T T T
Exhaust system and heat shields I I I
All locks and hingesLLLLLL
Washer fluid levelIIIIII
AIR CONDITIONER SYSTEM
Cabin air filter R R R
Chart symbols:
I:Inspect: Inspect and clean, repair, adjust, fill up, or replace if necessary.
R:Replace
L:Lubricate
C:Clean
T:Tighten
Remarks:
*1 Use FL22 type coolant in vehicles with the inscription“FL22”on the radiator cap itself or the surrounding
area. Use FL22 when replacing the coolant.
*2 According to state/provincial and federal regulations, failure to perform maintenance on these items will not
void your emissions warranties. However, Mazda recommends that all maintenance services be performed at
the recommended time or kilometer period to ensure long-term reliability.
*3 If the vehicle is operated primarily under any of the following conditions, replace the rear differential oil at
every 40,000 km.
a) Towing a trailer or using a car-top carrier
b) Driving in dusty, sandy or wet conditions
c) Extended periods of idling or low speed operation
d) Repeated short trips of less than 16 km
*4 If this component has been submerged in water, the oil should be replaced.
Maintenance and Care
Scheduled Maintenance
8-13
CX-7_8BM8-EA-10I_Edition1 Page405
Friday, September 10 2010 4:24 PM
Form No.8BM8-EA-10I
Page 407 of 520
Black plate (407,1)
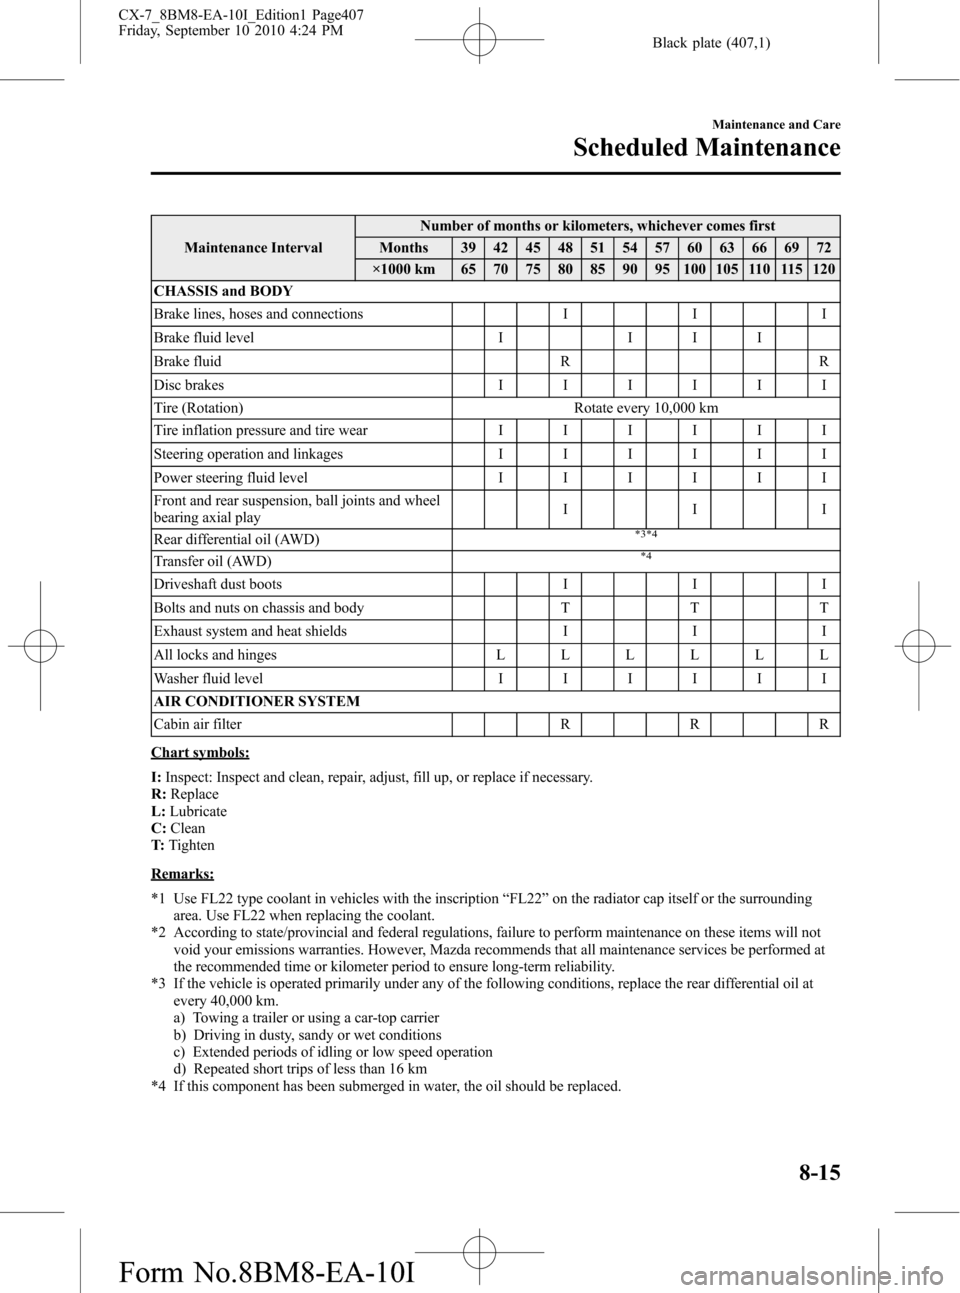
Maintenance IntervalNumber of months or kilometers, whichever comes first
Months 39 42 45 48 51 54 57 60 63 66 69 72
×1000 km 65 70 75 80 85 90 95 100 105 110 115 120
CHASSIS and BODY
Brake lines, hoses and connections I I I
Brake fluid level I I I I
Brake fluid R R
Disc brakesIIIIII
Tire (Rotation) Rotate every 10,000 km
Tire inflation pressure and tire wearIIIIII
Steering operation and linkagesIIIIII
Power steering fluid levelIIIIII
Front and rear suspension, ball joints and wheel
bearing axial playIII
Rear differential oil (AWD)
*3*4
Transfer oil (AWD)*4
Driveshaft dust boots I I I
Bolts and nuts on chassis and body T T T
Exhaust system and heat shields I I I
All locks and hingesLLLLLL
Washer fluid levelIIIIII
AIR CONDITIONER SYSTEM
Cabin air filter R R R
Chart symbols:
I:Inspect: Inspect and clean, repair, adjust, fill up, or replace if necessary.
R:Replace
L:Lubricate
C:Clean
T:Tighten
Remarks:
*1 Use FL22 type coolant in vehicles with the inscription“FL22”on the radiator cap itself or the surrounding
area. Use FL22 when replacing the coolant.
*2 According to state/provincial and federal regulations, failure to perform maintenance on these items will not
void your emissions warranties. However, Mazda recommends that all maintenance services be performed at
the recommended time or kilometer period to ensure long-term reliability.
*3 If the vehicle is operated primarily under any of the following conditions, replace the rear differential oil at
every 40,000 km.
a) Towing a trailer or using a car-top carrier
b) Driving in dusty, sandy or wet conditions
c) Extended periods of idling or low speed operation
d) Repeated short trips of less than 16 km
*4 If this component has been submerged in water, the oil should be replaced.
Maintenance and Care
Scheduled Maintenance
8-15
CX-7_8BM8-EA-10I_Edition1 Page407
Friday, September 10 2010 4:24 PM
Form No.8BM8-EA-10I
Page 408 of 520
Black plate (408,1)
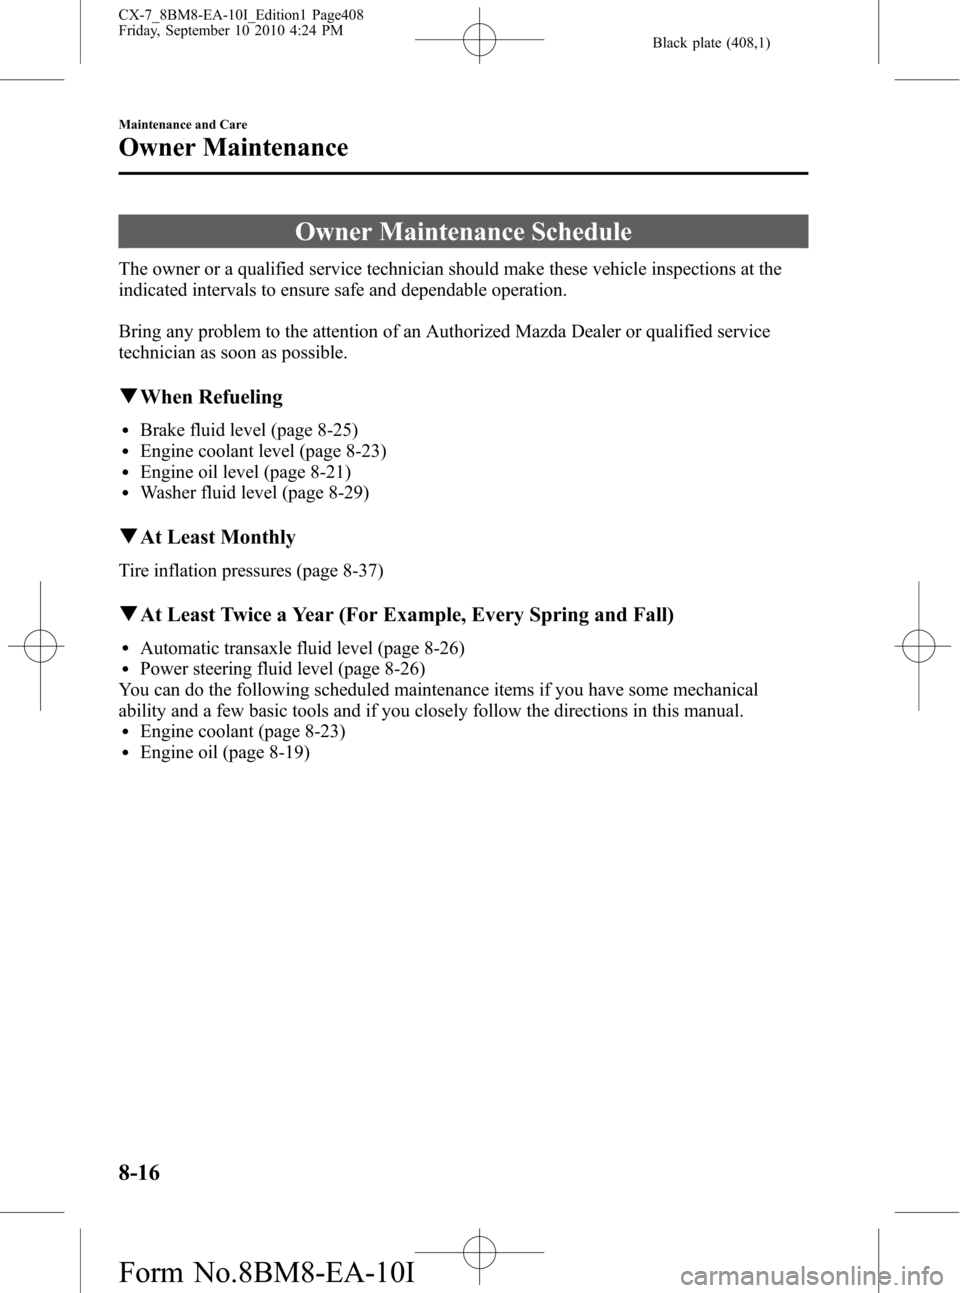
Owner Maintenance Schedule
The owner or a qualified service technician should make these vehicle inspections at the
indicated intervals to ensure safe and dependable operation.
Bring any problem to the attention of an Authorized Mazda Dealer or qualified service
technician as soon as possible.
qWhen Refueling
lBrake fluid level (page 8-25)lEngine coolant level (page 8-23)lEngine oil level (page 8-21)lWasher fluid level (page 8-29)
qAt Least Monthly
Tire inflation pressures (page 8-37)
qAt Least Twice a Year (For Example, Every Spring and Fall)
lAutomatic transaxle fluid level (page 8-26)lPower steering fluid level (page 8-26)
You can do the following scheduled maintenance items if you have some mechanical
ability and a few basic tools and if you closely follow the directions in this manual.
lEngine coolant (page 8-23)lEngine oil (page 8-19)
8-16
Maintenance and Care
Owner Maintenance
CX-7_8BM8-EA-10I_Edition1 Page408
Friday, September 10 2010 4:24 PM
Form No.8BM8-EA-10I
Page 428 of 520
Black plate (428,1)
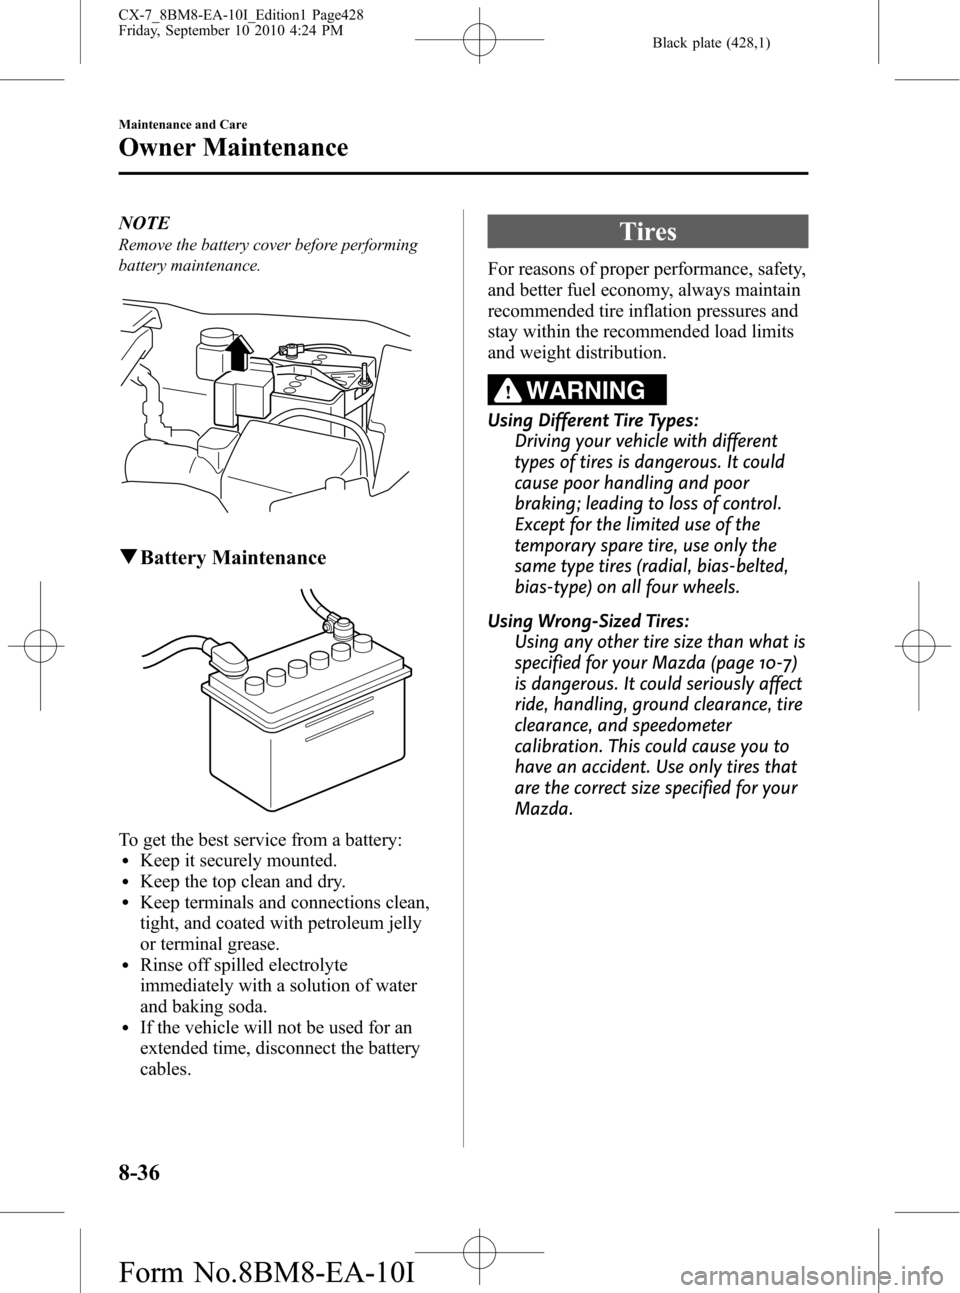
NOTE
Remove the battery cover before performing
battery maintenance.
qBattery Maintenance
To get the best service from a battery:lKeep it securely mounted.lKeep the top clean and dry.lKeep terminals and connections clean,
tight, and coated with petroleum jelly
or terminal grease.
lRinse off spilled electrolyte
immediately with a solution of water
and baking soda.
lIf the vehicle will not be used for an
extended time, disconnect the battery
cables.
Tires
For reasons of proper performance, safety,
and better fuel economy, always maintain
recommended tire inflation pressures and
stay within the recommended load limits
and weight distribution.
WARNING
Using Different Tire Types:
Driving your vehicle with different
types of tires is dangerous. It could
cause poor handling and poor
braking; leading to loss of control.
Except for the limited use of the
temporary spare tire, use only the
same type tires (radial, bias-belted,
bias-type) on all four wheels.
Using Wrong-Sized Tires:
Using any other tire size than what is
specified for your Mazda (page 10-7)
is dangerous. It could seriously affect
ride, handling, ground clearance, tire
clearance, and speedometer
calibration. This could cause you to
have an accident. Use only tires that
are the correct size specified for your
Mazda.
8-36
Maintenance and Care
Owner Maintenance
CX-7_8BM8-EA-10I_Edition1 Page428
Friday, September 10 2010 4:24 PM
Form No.8BM8-EA-10I
Page 429 of 520

Black plate (429,1)
qTire Inflation Pressure
WARNING
Always inflate the tires to the correct
pressure:
Overinflation or underinflation of
tires is dangerous. Adverse handling
or unexpected tire failure could result
in a serious accident.
Refer to specification charts on page
10-7.
Use only a Mazda-genuine tire valve
cap:
Use of a non-genuine part is
dangerous as the correct tire air
pressure cannot be maintained if the
tire valve becomes damaged. If the
vehicle is driven under this condition,
the tire air pressure will decrease
which could result in a serious
accident. Do not use any part for the
tire valve cap that is not a Mazda-
genuine part.The Tire Pressure Monitoring System
í
does not alleviate the need to check the
tire condition every day, including
whether the tires all look inflated properly.
Inspect all tire pressure monthly
(including the spare) when the tires are
cold. Maintain recommended pressures
for the best ride, handling, and minimum
tire wear.
When checking the tire pressures, use of a
digital tire pressure gauge is
recommended.
Except Canada (Tire pressure label)
Canada (Motor vehicle safety standard
label)
Refer to the specification charts (page
10-7).
Maintenance and Care
Owner Maintenance
8-37íSome models. CX-7_8BM8-EA-10I_Edition1 Page429
Friday, September 10 2010 4:24 PM
Form No.8BM8-EA-10I