change time MAZDA MODEL MX-5 MIATA RF 2019 User Guide
[x] Cancel search | Manufacturer: MAZDA, Model Year: 2019, Model line: MODEL MX-5 MIATA RF, Model: MAZDA MODEL MX-5 MIATA RF 2019Pages: 553, PDF Size: 59 MB
Page 137 of 553

NOTE
Even though the distance-to-empty
display may indicate a sufficient amount
of remaining driving distance before
refueling is required, refuel as soon as
possible if the fuel level is very low or
the low fuel warning light illuminates.
The display may not change unless you
add more than approximately 9 L (2.3
US gal, 1.9 Imp gal) of fuel.
The distance-to-empty is the
approximate remaining distance the
vehicle can be driven until all the
graduation marks in the fuel gauge
(indicating the remaining fuel supply)
disappear.
If there is no past fuel economy
information such as after first
purchasing your vehicle or the
information is dele ted when the battery
cables are disconnected, the actual
distance-to empty/range may differ from
the amount indicated.
Average fuel economy mode
This mode displays the average fuel
economy by calculating the total traveled
distance and the total fuel consumption
since the vehicle was purchased or the past
data was reset. The average fuel economy
is calculated and displayed every minute.
To reset the displayed past data, press the
INFO switch for 1.5 seconds or longer.
After resetting the data, - - - L/100 km
(- - - mpg) is displayed for one minute
before the fuel economy is recalculated
and displayed.
NOTE
If TRIP A is reset using the trip meter
when the function which synchronizes
(resets) the fuel economy monitor and the
trip meter (TRIP A) is on, the displayed
past data is reset.
Current fuel economy mode
This mode displays the current fuel
economy by calculating the amount of fuel
consumption and the distance traveled.
Current fuel economy will be calculated
and displayed every 2 seconds.
When you've slowed to about 5 km/h (3
mph), - - - L/100 km (- - - mpg) will be
displayed.
Average vehicle speed mode
This mode displays the average vehicle
speed by calculating the distance and the
time traveled since connecting the battery
or resetting the data.
Average vehicle speed will be calculated
and displayed every 10 seconds.
To clear the data being displayed, press the
INFO switch for more than 1.5 seconds.
After pressing the INFO switch, - - - km/h
(- - - mph) will be displayed for about 1
minute before the vehicle speed is
recalculated and displayed.
When Driving
Instrument Cluster and Display
4-17
MX-5_8GV5-EA-18E_Edition3 2018-7-17 15:48:16
Page 139 of 553

The screen content changes each time the INFO switch is pressed.
Press the INFO switch Press the INFO switch
Press the INFO switch
Press the INFO switch
Press the INFO switch
Engine Coolant
Temperature Gauge,
Maintenance Monitor,
Outside Temperature,
Odometer, Fuel Gauge Engine Coolant
Temperature Gauge,
Compass,
Distance-to-empty,
Outside Temperature,
Odometer, Fuel Gauge Warning message,
Outside
Temperature,
Odometer, Fuel
Gauge
Engine Coolant
Temperature Gauge,
Trip Meter A, Average
Fuel Economy, Current
Fuel Economy, Outside
Temperature,
Odometer, Fuel Gauge
Engine Coolant
Temperature Gauge,
Trip Meter B, Avera
ge
Fuel Economy, Current
Fuel Economy, Outside
Temperature,
Odometer, Fuel Gauge *1
*2
*1: Displayed only when a warning occurs.
*2: Displayed only while vehicle is bein g driven.
When Driving
Instrument Cluster and Display
4-19
MX-5_8GV5-EA-18E_Edition3 2018-7-17 15:48:16
Page 141 of 553

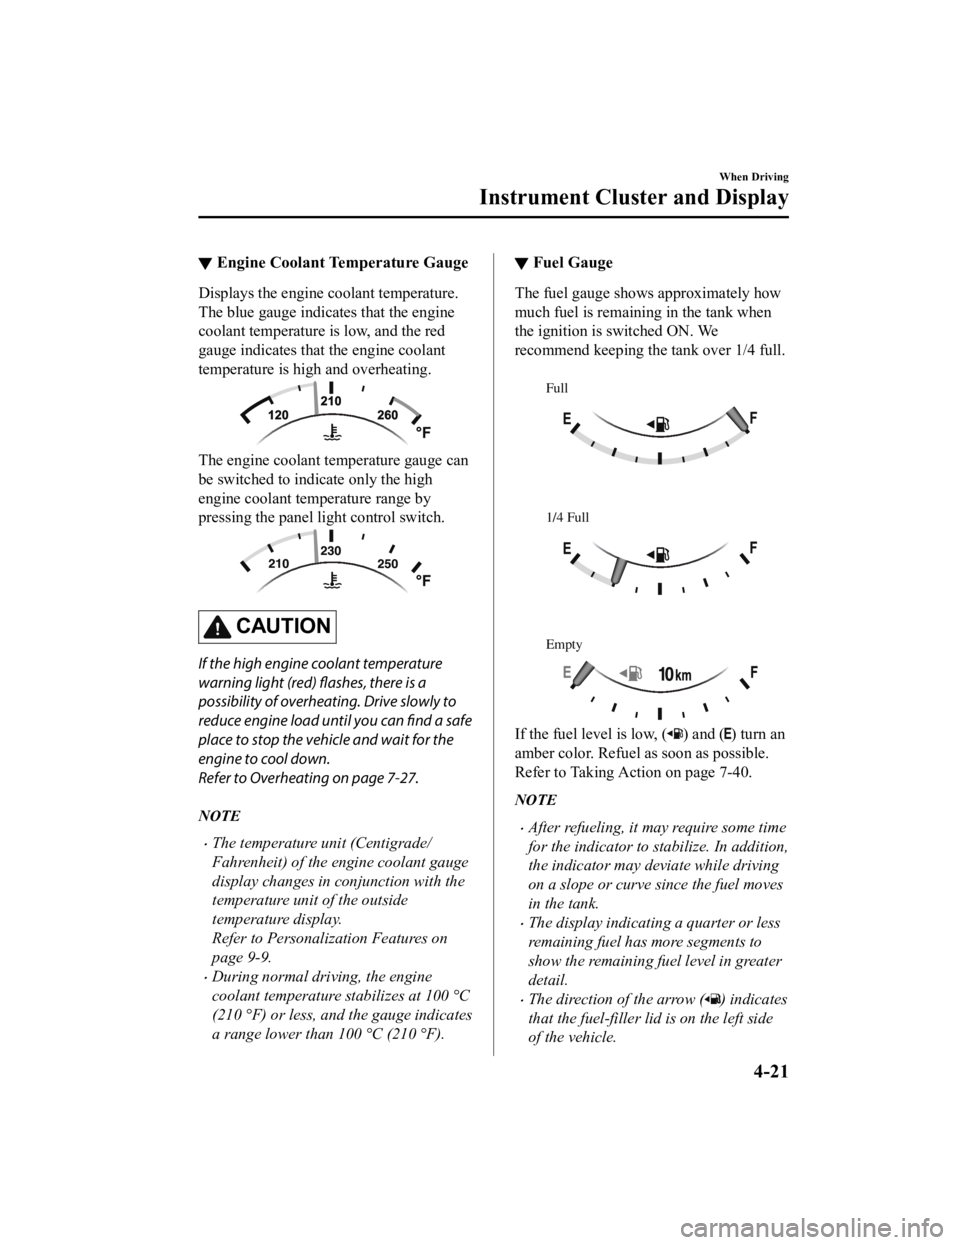
▼Engine Coolant Temperature Gauge
Displays the engine coolant temperature.
The blue gauge indicates that the engine
coolant temperature is low, and the red
gauge indicates that the engine coolant
temperature is high and overheating.
The engine coolant temperature gauge can
be switched to indicate only the high
engine coolant temperature range by
pressing the panel light control switch.
CAUTION
If the high engine coolant temperature
warning light (red) flashes, there is a
possibility of overheating. Drive slowly to
reduce engine load until you can
find a safe
place to stop the vehicle and wait for the
engine to cool down.
Refer to Overheating on page 7-27.
NOTE
The temperature unit (Centigrade/
Fahrenheit) of the engine coolant gauge
display changes in conjunction with the
temperature unit of the outside
temperature display.
Refer to Personalization Features on
page 9-9.
During normal driving, the engine
coolant temperature stabilizes at 100 °C
(210 °F) or less, and the gauge indicates
a range lower than 100 °C (210 °F).
▼ Fuel Gauge
The fuel gauge shows approximately how
much fuel is remaining in the tank when
the ignition is switched ON. We
recommend keeping the tank over 1/4 full.
Full
1/4 Full
Empty
If the fuel level is low, () and () turn an
amber color. Refuel as soon as possible.
Refer to Taking Action on page 7-40.
NOTE
After refueling, it may require some time
for the indicator to stabilize. In addition,
the indicator may deviate while driving
on a slope or curve since the fuel moves
in the tank.
The display indicating a quarter or less
remaining fuel has more segments to
show the remaining fuel level in greater
detail.
The direction of the arrow () indicates
that the fuel-filler lid is on the left side
of the vehicle.
When Driving
Instrument Cluster and Display
4-21
MX-5_8GV5-EA-18E_Edition3 2018-7-17 15:48:16
Page 143 of 553

▼Average Fuel Economy
The average fuel economy is calculated
every minute from the total traveled
distance on the trip me
ter and the total fuel
consumption, and the average fuel
economy for either TRIP A or TRIP B is
displayed.
The average fuel economy and trip meters
can be reset by pressing the INFO switch
for 1.5 seconds or more while in each
mode. After the data is cleared, the fuel
consumption is recalcu lated and the - - -
L/100 km (- - - mpg) for the 1 minute prior
to it being displayed is indicated.
▼ Current Fuel Economy
This displays the curr
ent fuel economy by
calculating the amount of fuel
consumption and the distance traveled.
Current fuel economy will be calculated
and displayed every two seconds.
When you've slowed to about 5 km/h (3
mph), - - - L/100 km (- - - mpg) will be
displayed.
▼ Maintenance Monitor
The following maintenance period
notifications can be displayed by turning
the Maintenance Monitor on.
Scheduled Maintenance
Tire Rotation
Oil Change
For the setting method and indications for
the maintenance monitor, refer to the
Maintenance Monitor.
Refer to Maintenance Monitor on page
6-15.
The maintenance monitor displays the
information when the ignition is switched
ON.
NOTE
This function is inoperable while the
vehicle is being driven.
Message display
When the remaining days to the
maintenance period is 15 days or less, or
the remaining distance is 1,000 km (600
miles) or shorter, a message is indicated
when the ignition is switched ON.
NOTE
If any of the INFO switch is pressed
while a message is displayed, it will no
longer be displayed the next time the
ignition is switched ON.
When Driving
Instrument Cluster and Display
4-23
MX-5_8GV5-EA-18E_Edition3 2018-7-17 15:48:16
Page 164 of 553

Lighting Control
▼Headlights
Turn the headlight switch to turn the headlights, other exterior lights and dashboard
illumination on or off.
When the lights are turned on, the lights-on indicator light in
the instrument cluster turns on.
NOTE
If the light switch is left on, the lights will automatically switch off approximately 30
seconds after switching the ignition off.
The time setting can be changed.
Refer to Personalization Features on page 9-9.
To prevent discharging the battery, do not leave the lights on while th e engine is off unless
safety requires them.
Without auto-light control
Switch Position
Ignition Position ONACC or
OFF ON
ACC or
OFF ON
ACC or
OFF
Headlights Off Off Off Off On
On
*2
Daytime running lightsOn*1OffOn*1Off Off Off
Taillights
Parking lights
License plate lights
Side-marker lights Off Off On
On
*2OnOn*2
*1 The lights are turned on wh ile the vehicle is driven.*2 The lights are turned on for th e specified period by the auto headlight off function.
When Driving
Switches and Controls
4-44
MX-5_8GV5-EA-18E_Edition3 2018-7-17 15:48:16
Page 166 of 553

CAUTION
Do not shade the light sensor by adhering a st icker or a label on the windshield. Otherwise
the light sensor will not operate correctly.
The light sensor also works as a rain sensor for the auto-wiper control. Keep hands and
scrapers clear of the windshield when the wiper lever is in the
position and the ignition
is switched ON as fingers could be pinched or the wipers and wiper blades could be
damaged when the wipers activate automaticall y. If you are going to clean the windshield,
be sure the wipers are turned off completely wh en it is particularly tempting to leave the
engine running. This is particularly important when clearing ice and snow.
NOTE
The headlights, other exterior lights and dashboard illumination may not turn off
immediately even if the surrounding area becomes well-lit because the light sensor
determines that it is night time if the surrounding area is continuously dark for several
minutes such as inside long tunnels, traffic jams inside tunnels, or in indoor parking lots.
In this case, the lights turn off if the light switch is turned to the
position.
If the headlight switch and the windshield wiper switch are in , and the wipers are
operated at low or high speed by the auto wiper control for several seconds, bad weather
conditions are determined and the headlights may be turned on.
The sensitivity of the auto-light control may be changed.
Refer to Personalization Features on page 9-9.
When Driving
Switches and Controls
4-46
MX-5_8GV5-EA-18E_Edition3 2018-7-17 15:48:16
Page 167 of 553

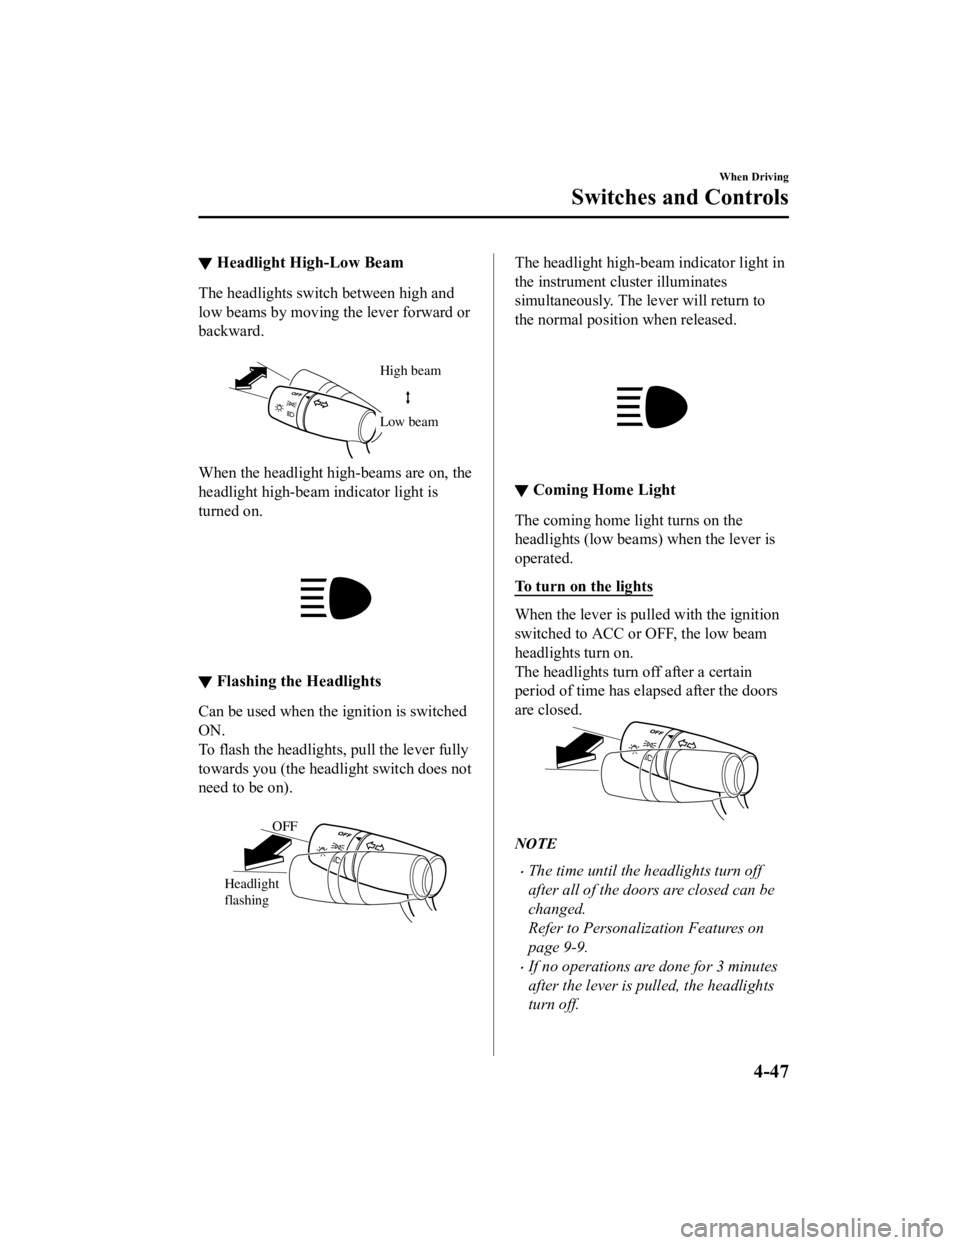
▼Headlight High-Low Beam
The headlights switch between high and
low beams by moving the lever forward or
backward.
High beam
Low beam
When the headlight high-beams are on, the
headlight high-beam indicator light is
turned on.
▼Flashing the Headlights
Can be used when the ignition is switched
ON.
To flash the headlight
s, pull the lever fully
towards you (th e headlight switch does not
need to be on).
OFF
Headlight
flashing
The headlight high-beam indicator light in
the instrument cluster illuminates
simultaneously. The lever will return to
the normal position when released.
▼ Coming Home Light
The coming home light turns on the
headlights (low beams) when the lever is
operated.
To turn on the lights
When the lever is pulled with the ignition
switched to ACC or OFF, the low beam
headlights turn on.
The headlights turn off after a certain
period of time has elapsed after the doors
are closed.
NOTE
The time until the headlights turn off
after all of the doors are closed can be
changed.
Refer to Personalization Features on
page 9-9.
If no operations are done for 3 minutes
after the lever is pulled, the headlights
turn off.
When Driving
Switches and Controls
4-47
MX-5_8GV5-EA-18E_Edition3
2018-7-17 15:48:16
Page 168 of 553

The headlights turn off if the lever is
pulled again while the headlights are
illuminated.
▼ Leaving Home Light
The leaving home light turns on the lights
when the transmitte
r unlock button is
pressed while away from the vehicle.
The following light s turn on when the
leaving home light is operated.
Low beams, Parking lights, Taillights,
License plate lights.
To turn on the lights
When the ignition switch and the headlight
switch are in the following conditions, the
headlights will il luminate when the
transmitter unlock button is pressed and
the vehicle receives the transmitter signal.
The headlights turn off after a certain
period of time has elapsed (30 seconds).
Ignition switch: off
Headlight switch: , , or
Lock button
Unlock
button
NOTE
Operation of the leaving home light can
be turned on or off.
Refer to Personalization Features on
page 9-9.
When the transmitter lock button is
pressed and the vehicle receives the
transmitter signal, the headlights turn
off.
When the headlight switch is turned to
the
position, the headlights turn off.
▼ Headlight Leveling
The number of passengers and weight of
cargo in the luggage compartment change
the angle of the headlights.
The angle of the headlights will be
automatically adjusted when turning on
the headlights.
▼Daytime Running Lights
Some countries requir
e moving vehicles to
have their lights on (daytime running
lights) during the daytime.
The daytime running lights turn on
automatically when the vehicle starts
moving.
They turn off when the parking brake is
operated or the shift lever is shifted to the
P position (automatic transmission
vehicle).
NOTE
(Except Canada)
The daytime running lights can be
deactivated.
Refer to Personalization Features on page
9-9.
When Driving
Switches and Controls
4-48
MX-5_8GV5-EA-18E_Edition3 2018-7-17 15:48:16
Page 169 of 553

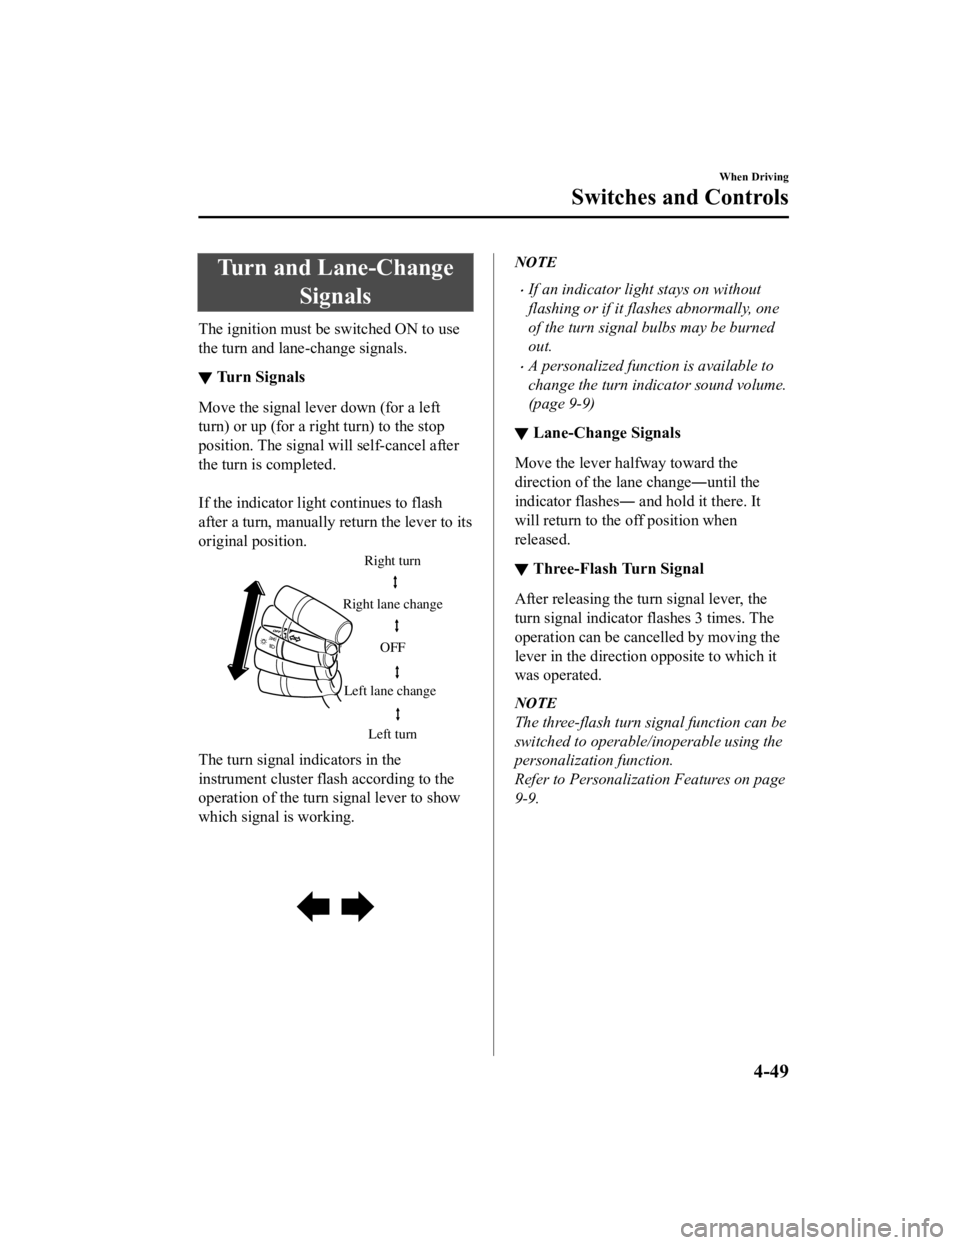
Turn and Lane-ChangeSignals
The ignition must be switched ON to use
the turn and lane-change signals.
▼Tu r n S i g n a l s
Move the signal lever down (for a left
turn) or up (for a right turn) to the stop
position. The signal will self-cancel after
the turn is completed.
If the indicator light continues to flash
after a turn, ma
nually return the lever to its
original position.
Right turn
Left turn
Right lane change
Left lane change OFF
The turn signal indicators in the
instrument cluster flash according to the
operation of the turn
signal lever to show
which signal is working.
NOTE
If an indicator light stays on without
flashing or if it flashes abnormally, one
of the turn signal bulbs may be burned
out.
A personalized function is available to
change the turn indicator sound volume.
(page 9-9)
▼ Lane-Change Signals
Move the lever halfway toward the
direction of the lane change―until the
indicator flashes― and hold it there. It
will return to the off position when
released.
▼Three-Flash Turn Signal
After releasing the turn signal lever, the
turn signal indicator flashes 3 times. The
operation can be cancelled by moving the
lever in the direction opposite to which it
was operated.
NOTE
The three-flash turn signal function can be
switched to operable/inoperable using the
personalization function.
Refer to Personalization Features on page
9-9.
When Driving
Switches and Controls
4-49
MX-5_8GV5-EA-18E_Edition3
2018-7-17 15:48:16
Page 177 of 553

▼Programming the HomeLink
System
CAUTION
When programming a garage door opener
or a gate, disconnect the power to these
devices before performing programming.
Continuous operation of the devices could
damage the motor.
The HomeLink system provides 3 buttons
which can be individually selected and
programmed using t
he transmitters for
current, on-market d evices as follows:
1. Disconnect the power to the garage door opener or gate programmed to the
hand-held transmitter.
2. Position the end of your hand-held transmitter 2.5―7.5 cm (1―3 inches)
away from the HomeLink button you
wish to program while keeping the
indicator light in view.
3. Simultaneously press and hold both the chosen HomeLink and hand-held
transmitter buttons. Do not release the
buttons until step 3 has been
completed.
NOTE
Some gate operators and garage door
openers may require you to replace
this Programming Step 2 with
procedures noted in the “Gate
Operator/Canadian Programming”
section.
4. After the HomeLink indicator light changes from a slow to a rapidly
blinking light, release both the
HomeLink and hand-held transmitter
buttons.
NOTE
If the HomeLink indicator light does
not change to a rapidly blinking light,
contact HomeLink at
www.homelink.com or call
1-800-355-3515 for assistance.
5. Connect the power to the garage door
opener or gate programmed to the
hand-held transmitter.
6. Firmly press and hold the programmed
HomeLink button for five seconds, and
then release it. Perf orm this operation
two times to activate the door or gate.
If the door or gate does not activate,
press and hold the just-trained
HomeLink button and observe the
indicator light.
If the indicator light stays on
constantly, programming is complete
and your device should activate when
the HomeLink button is pressed and
released.
NOTE
To program the remaining two
HomeLink buttons, begin with
“Programming” ― step 1
If the indicator light blinks rapidly for
two seconds and then turns to a
constant light, continue with
“Programming” steps 7―9 to
complete the progra mming of a rolling
code equipped device (most commonly
a garage door opener).
7. At the garage door opener receiver (motor-head unit) in the garage, locate
the “learn” or “smart” button. This can
usually be found where the hanging
antenna wire is attached to the
motor-head unit.
When Driving
Switches and Controls
4-57
MX-5_8GV5-EA-18E_Edition3 2018-7-17 15:48:16