clock MAZDA MODEL RX 8 2010 (in English) Owner's Manual
[x] Cancel search | Manufacturer: MAZDA, Model Year: 2010, Model line: MODEL RX 8, Model: MAZDA MODEL RX 8 2010Pages: 438, PDF Size: 7.02 MB
Page 317 of 438

Black plate (317,1)
3. Install the lug nuts with the beveled
edge inward; tighten them by hand.
WARNING
Do not apply oil or grease to lug nuts
and bolts and do not tighten the lug
nuts beyond the recommended
tightening torque:
Applying oil or grease to lug nuts and
bolts is dangerous. The lug nuts
could loosen while driving and cause
the tire to come off, resulting in an
accident. In addition, lug nuts and
bolts could be damaged if tightened
more than necessary.
4. Turn the jack handle counterclockwise
and lower the vehicle. Use the lug
wrench to tighten the nuts in the order
shown.
If you're unsure of how tight the nuts
should be, have them inspected at an
Authorized Mazda Dealer.
Nut tightening torque
N·m (kgf·m, ft·lbf)88―118
(9―12, 65―87)
WARNING
Always securely and correctly tighten
the lug nuts:
Improperly or loosely tightened lug
nuts are dangerous. The wheel could
wobble or come off. This could result
in loss of vehicle control and cause a
serious accident.
Be sure to reinstall the same nuts you
removed or replace them with metric
nuts of the same configuration:
Because the wheel studs and lug nuts
on your Mazda have metric threads,
using a non-metric nut is dangerous.
On a metric stud, it would not secure
the wheel and would damage the
stud, which could cause the wheel to
slip off and cause an accident.
5. Check the inflation pressure. Refer to
the specification charts on page 10-6.
WARNING
Do not drive with any tires that have
incorrect air pressure:
Driving on tires with incorrect air
pressure is dangerous. Tires with
incorrect pressure could affect
handling and result in an accident.
In Case of an Emergency
Flat Tire
7-15
RX-8_8AT5-EA-09E_Edition1 Page317
Wednesday, April 15 2009 10:34 AM
Form No.8AT5-EA-09E
Page 359 of 438

Black plate (359,1)
WARNING
Do not replace the xenon fusion bulbs
yourself:
Replacing the xenon fusion bulbs
yourself is dangerous. Because the
xenon fusion bulbs require high
voltage, you could receive an electric
shock if the bulbs are handled
incorrectly. Consult an Authorized
Mazda Dealer when the replacement
is necessary.
Never touch the glass portion of a
halogen bulb with your bare hands and
always wear eye protection when
handling or working around the bulbs:
When a halogen bulb breaks, it is
dangerous. These bulbs contain
pressurized gas. If one is broken, it
will explode and serious injuries
could be caused by the flying glass.
If the glass portion is touched with
bare hands, body oil could cause the
bulb to overheat and explode when
lit.
Always keep halogen bulbs out of the
reach of children:
Playing with a halogen bulb is
dangerous. Serious injuries could be
caused by dropping a halogen bulb
or breaking it some other way.
qReplacing Exterior Light Bulbs
Replacing a headlight bulb
Low-beam bulb
(Xenon fusion bulb)
You cannot replace the low beam bulbs by
yourself.
The bulbs must be replaced at an
Authorized Mazda Dealer.High-beam bulb
1. Make sure the ignition switch is turned
off and the headlight switch is off.
2. If you are changing the right headlight
bulb, start the engine, turn the steering
wheel all the way to the right, and turn
off engine. If you are changing the left
headlight bulb, turn the steering wheel
to the left.
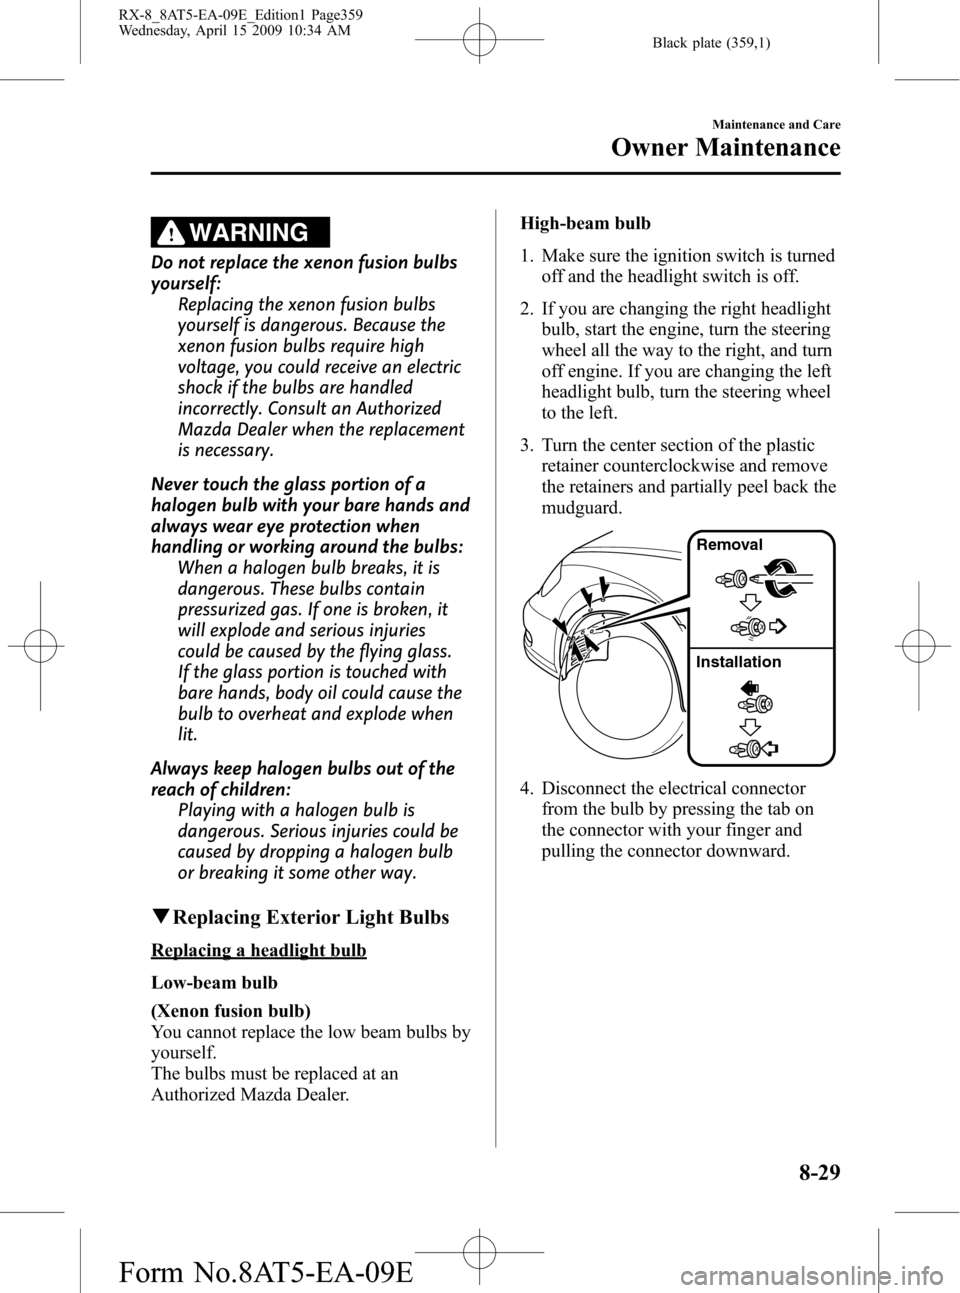
3. Turn the center section of the plastic
retainer counterclockwise and remove
the retainers and partially peel back the
mudguard.
Removal
Installation
4. Disconnect the electrical connector
from the bulb by pressing the tab on
the connector with your finger and
pulling the connector downward.
Maintenance and Care
Owner Maintenance
8-29
RX-8_8AT5-EA-09E_Edition1 Page359
Wednesday, April 15 2009 10:34 AM
Form No.8AT5-EA-09E
Page 361 of 438

Black plate (361,1)
3. Remove the fog light unit by pulling it
downward and then straight out using
both hands.
NOTE
When pulling out the fog light unit, be careful
not to allow the bulb socket to contact the oil
cooler.
4. Press the tab on the bulb socket and
disconnect the connector cord.
5. Rotate the bulb socket
counterclockwise as shown in the
figure and remove it.
6. Replace the bulb.
7. Reinstall the bulb socket in the reverse
order of the removal procedure.
Front turn signal lights/Parking lights
1. Make sure the ignition switch is turned
off and the headlight switch is off.
2. If you are changing the right bulb, start
the engine, turn the steering wheel all
the way to the right, and turn off
engine. If you are changing the left
bulb, turn the steering wheel to the left.
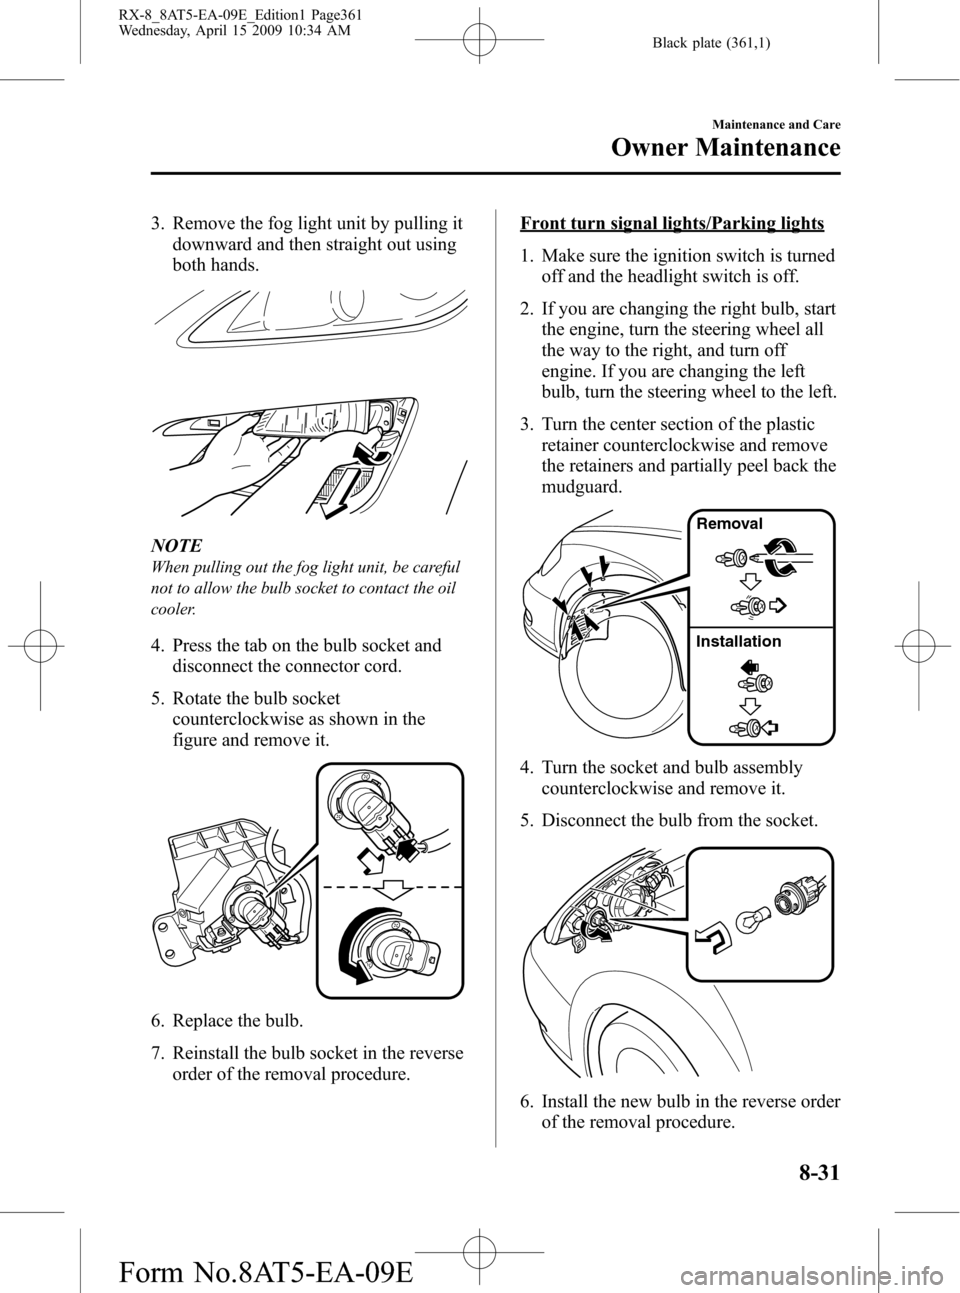
3. Turn the center section of the plastic
retainer counterclockwise and remove
the retainers and partially peel back the
mudguard.
Removal
Installation
4. Turn the socket and bulb assembly
counterclockwise and remove it.
5. Disconnect the bulb from the socket.
6. Install the new bulb in the reverse order
of the removal procedure.
Maintenance and Care
Owner Maintenance
8-31
RX-8_8AT5-EA-09E_Edition1 Page361
Wednesday, April 15 2009 10:34 AM
Form No.8AT5-EA-09E
Page 362 of 438

Black plate (362,1)
Side-turn signal lights
1. Slide the light unit rearward.
2. Rotate the light unit clockwise as
shown in the figure and pull it out.
3. Press the tab on the bulb socket and
disconnect the connector cord.
4. Replace with a new light unit and
install it in the reverse order of the
removal procedure.
NOTE
The side-turn signal light bulb cannot be
replaced. The entire light unit itself has to be
replaced, therefore consult an Authorized
Mazda Dealer for a replacement light unit.
Brake lights/Taillights
Due to the complexity and difficulty of
the procedure, the LED bulbs should be
replaced by an expert repairer, we
recommend an Authorized Mazda Dealer.
Rear turn signal lights, Reverse lights,
Rear side marker lights
1. Pull the center section of the plastic
retainer and remove the retainers and
partially open the trunk side trim.
Removal
Installation
2. Turn the socket and bulb assembly
counterclockwise and remove it.
3. Disconnect the bulb from the socket.
Rear turn signal lights
8-32
Maintenance and Care
Owner Maintenance
RX-8_8AT5-EA-09E_Edition1 Page362
Wednesday, April 15 2009 10:34 AM
Form No.8AT5-EA-09E
Page 364 of 438

Black plate (364,1)
3. Press the tab on the bulb socket and
remove the connector cord.
4. Rotate the bulb socket
counterclockwise as shown in the
figure and pull it out, then pull out the
bulb from the socket.
5. Replace the bulb.
6. Reinstall the bulb socket in the reverse
order of the removal procedure.
NOTE
When re-installing the trunk trim, set the trunk
trim in place and insert the clips without the
internal pin, then insert the pins and engage
them.
License plate light
1. Press the front of the lens to detach the
front tabs.2. Wrap the end of a flathead screwdriver
in a soft cloth to prevent damage to the
lens and remove the lens by carefully
prying on the edge of the lens with the
flathead screwdriver.
3. Disconnect the bulb by pulling it out.
4. Install the new bulb in the reverse order
of removal.
8-34
Maintenance and Care
Owner Maintenance
RX-8_8AT5-EA-09E_Edition1 Page364
Wednesday, April 15 2009 10:34 AM
Form No.8AT5-EA-09E
Page 365 of 438

Black plate (365,1)
qReplacing Interior Light Bulbs
Overhead light/Map lights (Front)
1. Remove the screws with a Phillips
screwdriver.
2. Wrap a flathead screwdriver with a soft
cloth to prevent damage to the trim and
gently insert it in the overhead light as
shown in the figure, and then remove
the overhead light unit.
3. Turn the socket and bulb assembly
counterclockwise and remove it.
4. Disconnect the bulb from the socket.
5. Install the new bulb in the reverse order
of removal.
Overhead light (Rear), Courtesy lights,
Vanity mirror lights
1. Wrap a small flathead screwdriver with
a soft cloth to prevent damage to the
lens and remove the lens by carefully
prying on the edge of the lens with the
screwdriver.
2. Disconnect the bulb by pulling it out.
Maintenance and Care
Owner Maintenance
8-35
RX-8_8AT5-EA-09E_Edition1 Page365
Wednesday, April 15 2009 10:34 AM
Form No.8AT5-EA-09E
Page 433 of 438

Black plate (433,1)
C
Capacities .......................................... 10-5
Carbon Monoxide ............................... 4-4
Catalytic Converter ............................. 4-3
Cell Phones ....................................... 9-16
Center Console .................................. 6-85
Child Restraint
Installing child-restraint
systems ....................................... 2-29
LATCH child-restraint
systems ....................................... 2-35
Cigarette Lighter ............................... 6-81
Climate Control System ...................... 6-2
Gas specifications ...................... 10-5
Clock ................................................. 6-80
Coin Box ........................................... 6-84
Courtesy Lights ................................. 6-78
Cruise Control ................................... 5-22
Cup Holder ........................................ 6-83
Customer Assistance ........................... 9-2
D
Dashboard Illumination .................... 5-38
Daytime Running Lights ................... 5-60
Defroster
Mirror ......................................... 5-66
Rear window .............................. 5-66
Dimensions ....................................... 10-5
Door Locks ....................................... 3-28
Driving In Flooded Area ................... 4-11
Driving on Uneven Road .................. 4-12
D
Driving Tips ........................................ 4-6
Automatic transmission .............. 5-20
Break-in period ............................ 4-6
Driving in flooded area .............. 4-11
Driving on uneven road ............. 4-12
Hazardous driving ........................ 4-7
Money-saving suggestions ........... 4-6
Rocking the vehicle ...................... 4-8
Winter driving .............................. 4-9
Dynamic Stability Control (DSC) ..... 5-26
DSC OFF indicator light ............ 5-27
DSC OFF switch ........................ 5-28
TCS/DSC Indicator light ............ 5-27
E
Emergency Starting ........................... 7-19
Jump-starting .............................. 7-20
Push-starting .............................. 7-23
Emergency Towing ........................... 7-24
Emission Control System .................... 4-3
Engine
Coolant ....................................... 8-14
Exhaust gas .................................. 4-4
Hood release .............................. 3-45
Oil .............................................. 8-12
Overheating ................................ 7-17
Starting ......................................... 5-4
Engine Compartment Overview ........ 8-11
Engine Coolant
Overheating ................................ 7-17
Engine Coolant Temperature
Gauge ................................................ 5-38
Exhaust Gas ........................................ 4-4
Exterior Care ..................................... 8-44
Index
11-3
RX-8_8AT5-EA-09E_Edition1 Page433
Wednesday, April 15 2009 10:34 AM
Form No.8AT5-EA-09E
Page 434 of 438

Black plate (434,1)
F
Flasher
Hazard warning .......................... 5-67
Flat Tire ............................................... 7-3
Changing .................................... 7-11
Instant Mobility System
(IMS) Emergency Flat Tire Repair
Kit ................................................ 7-5
Spare tire and tool storage ............ 7-3
Fluids
Classification .............................. 10-4
Owner maintenance ..................... 8-8
Fog Lights ......................................... 5-61
Foot Brake .......................................... 5-5
Front Seats
(Electrically Operated Seats) ............... 2-6
Front Seats
(Manually Operated Seats) ................. 2-2
Fuel
Filler lid and cap ........................ 3-43
Gauge ......................................... 5-38
Requirements ............................... 4-2
Tank capacity ............................. 10-5
Fuses ................................................. 8-36
Panel description ........................ 8-39
Replacement ............................... 8-36
G
Gauges .............................................. 5-35
Glove Box ......................................... 6-84
H
Hazard Warning Flasher .................... 5-67
Hazardous Driving .............................. 4-7
Headlight Washer .............................. 5-65
H
Headlights
Control ....................................... 5-57
Flashing ...................................... 5-59
High-low beam .......................... 5-59
Leveling ..................................... 5-59
On reminder ............................... 5-59
HomeLink Wireless Control
System .............................................. 5-68
Hood Release .................................... 3-45
Horn .................................................. 5-67
I
Ignition
Keys ........................................... 3-22
Switch .......................................... 5-2
Illuminated Entry System ................. 6-77
Immobilizer System
(with Advanced Key) ........................ 3-48
Immobilizer System
(without Advanced Key) ................... 3-51
Indicator Lights ................................. 5-40
Cruise ......................................... 5-54
DSC OFF .................................... 5-53
Headlight auto-leveling
malfunction ................................ 5-55
Headlight high-beam .................. 5-52
Power steering malfunction ........ 5-54
Security ...................................... 5-52
Shift position .............................. 5-53
TCS/DSC ................................... 5-53
Turn-signal/hazard warning ....... 5-55
Information Display .......................... 6-79
Ambient temperature display ..... 6-80
Audio display ............................. 6-81
Climate control display .............. 6-81
Clock .......................................... 6-80
Information display functions .... 6-79
11-4
Index
RX-8_8AT5-EA-09E_Edition1 Page434
Wednesday, April 15 2009 10:34 AM
Form No.8AT5-EA-09E