warning light MERCEDES-BENZ B-CLASS HATCHBACK 2008 Owner's Manual
[x] Cancel search | Manufacturer: MERCEDES-BENZ, Model Year: 2008, Model line: B-CLASS HATCHBACK, Model: MERCEDES-BENZ B-CLASS HATCHBACK 2008Pages: 305, PDF Size: 5.1 MB
Page 48 of 305
Occupant safety
45
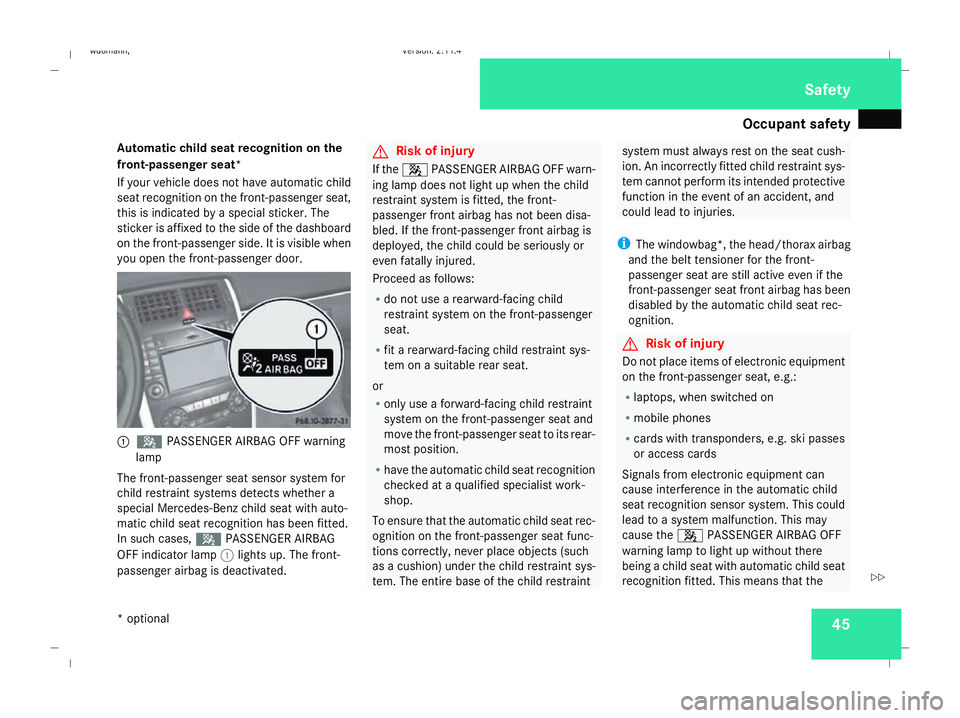
Automatic child seat recognition on the
front-passenger seat*
If your vehicle does not have automatic child
seat recognition on the front-passenger seat,
this is indicated by a special sticker. The
sticker is affixed to the side of the dashboard
on the front-passenger side. It is visible when
you open the front-passenger door. 1
5 PASSENGER AIRBAG OFF warning
lamp
The front-passenger seat sensor system for
child restraint systems detects whether a
special Mercedes-Benz child seat with auto-
matic child seat recognition has been fitted.
In such cases, 5PASSENGER AIRBAG
OFF indicator lamp 1lights up. The front-
passenger airbag is deactivated. G
Risk of injury
If the 4 PASSENGER AIRBAG OFF warn-
ing lamp does not light up when the child
restraint system is fitted, the front-
passenger front airbag has not been disa-
bled. If the front-passenger front airbag is
deployed, the child could be seriously or
even fatally injured.
Proceed as follows:
R do not use a rearward-facing child
restraint system on the front-passenger
seat.
R fit a rearward-facing child restraint sys-
tem on a suitable rear seat.
or
R only use a forward-facing child restraint
system on the front-passenger seat and
move the front-passenger seat to its rear-
most position.
R have the automatic child seat recognition
checked at a qualified specialist work-
shop.
To ensure that the automatic child seat rec-
ognition on the front-passenger seat func-
tions correctly, never place objects (such
as a cushion) under the child restraint sys-
tem. The entire base of the child restraint system must always rest on the seat cush-
ion. An incorrectly fitted child restraint sys-
tem cannot perform its intended protective
function in the event of an accident, and
could lead to injuries.
i The windowbag*, the head/thorax airbag
and the belt tensioner for the front-
passenger seat are still active even if the
front-passenger seat front airbag has been
disabled by the automatic child seat rec-
ognition. G
Risk of injury
Do not place items of electronic equipment
on the front-passenger seat, e.g.:
R laptops, when switched on
R mobile phones
R cards with transponders, e.g. ski passes
or access cards
Signals from electronic equipment can
cause interference in the automatic child
seat recognition sensor system. This could
lead to a system malfunction. This may
cause the 4PASSENGER AIRBAG OFF
warning lamp to light up without there
being a child seat with automatic child seat
recognition fitted. This means that the Safety
* optional
245_AKB; 2; 7, en-GB
wdomann,
Version: 2.11.4 2008-10-17T11:22:31+02:00 - Seite 45 ZDateiname: 6515_1640_02_buchblock.pdf; preflight
Page 49 of 305
Occupant safety
46 front-passenger airbag does not deploy
during an accident. It is also possible that the
4 PASSENGER AIRBAG OFF warning
lamp will not light up briefly if you turn the
key in the ignition lock to position 2.
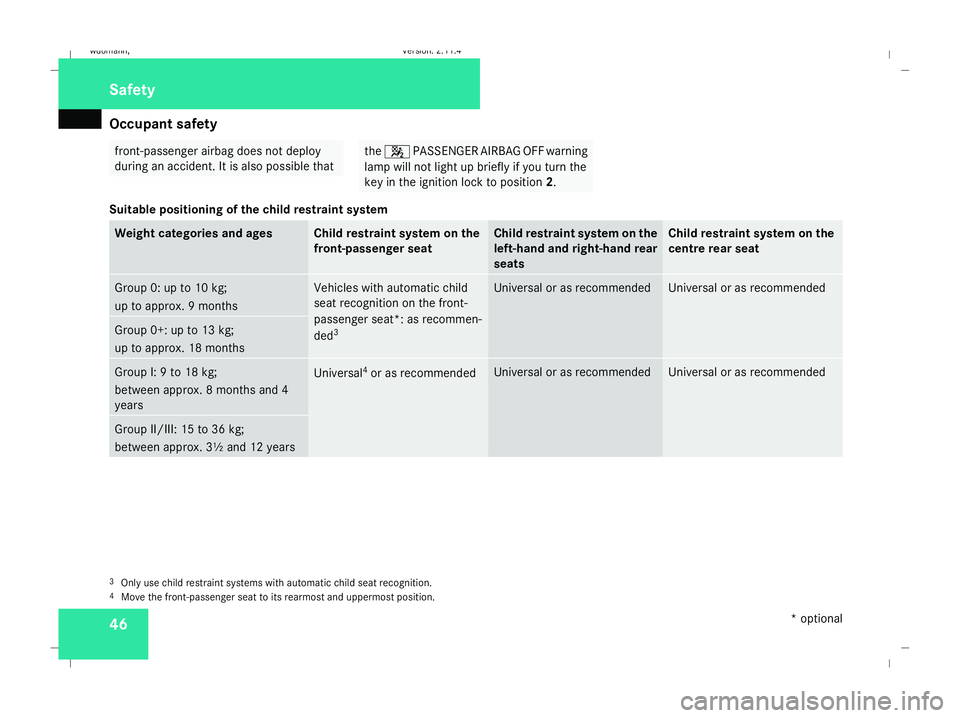
Suitable positioning of the child restraint system Weight categories and ages Child restraint system on the
front-passenger seat Child restraint system on the
left-hand and right-hand rear
seats Child restraint system on the
centre rear seat
Group 0: up to 10 kg;
up to approx. 9 months Vehicles with automatic child
seat recognition on the front-
passenger seat*: as recommen-
ded 3 Universal or as recommended Universal or as recommended
Group 0+: up to 13 kg;
up to approx. 18 months
Group I: 9 to 18 kg;
between approx. 8 months and 4
years Universal
4
or as recommended Universal or as recommended Universal or as recommended
Group II/III: 15 to 36 kg;
between approx. 3½ and 12 years 3
Only use child restraint systems with automatic child seat recognition.
4 Move the front-passenger seat to its rearmost and uppermost position. Safety
* optional
245_AKB; 2; 7, en-GB
wdomann
,V ersion: 2.11.4
2008-10-17T11:22:31+02:00 - Seite 46 Dateiname: 6515_1640_02_buchblock.pdf; preflight
Page 59 of 305

Driving safety sys
tems56 G
Risk of accident
If BAS has malfunctioned, the braking sys-
tem remains available with full brake boost-
ing effect. However, braking force is not
automatically increased in emergency
braking situations and the stopping dis-
tance may increase. Adaptive brake lamps
i Adaptive brake lamps are only available in
certain countries.
If you brake sharply from a speed of more
than 50 km/h or if braking is assisted by BAS,
the brake lamps flash rapidly. In this way,
traffic travelling behind you is warned in an
even more noticeable manner.
If you brake sharply from a speed of more
than 70 km/h to a standstill, the hazard warn-
ing lamps are activated automatically. If the
brakes are applied again, the brake lamps
light up continuously. The hazard warning
lamps switch off automatically if you travel
faster than 10 km/h. You can also switch off
the hazard warning lamps using the hazard
warning switch button ( Ypage 79). ESP
®
(Electronic Stability Program)
ESP ®
monitors driving stability and traction,
i.e. power transmission between tyres and
the road surface.
ESP ®
detects when a wheel spins or the vehi-
cle starts to skid. ESP ®
stabilises the vehicle
by targeted braking of individual wheels and
by limiting engine power. It assists you when
pulling away on wet or slippery roads. ESP ®
also stabilises the vehicle during braking.
When ESP ®
intervenes, the vwarning
lamp flashes in the instrument cluster. G
Risk of accident
If the v warning lamp in the instrument
cluster flashes, proceed as follows:
R only depress the accelerator pedal as far
as necessary when pulling away.
R adapt your driving style to suit the pre-
vailing road and weather conditions.
The vehicle could otherwise go into a skid.
ESP ®
cannot reduce the risk of an accident
if you drive too fast. ESP ®
cannot override
the laws of physics.
! The ignition must be switched off (key in
position 0or 1in the ignition lock), if: R
the parking brake is being tested using a
dynamometer
R the vehicle is being towed with the front
axle raised
Application of the brakes by ESP ®
could
otherwise destroy the brake system on the
front axle.
i Only use wheels with the recommended
tyre sizes. Only then will ESP ®
function
properly. Steering assistant STEER CONTROL
The steering assistant STEER CONTROL helps
you by transmitting a noticeable steering
force to the steering wheel in the direction
required for vehicle stabilisation. This steer-
ing assistance is provided in particular if:
R both right wheels or both left wheels are on
a wet or slippery road surface when you
brake
R the vehicle starts to skid
You have control over the steering at all
times. G
Risk of accident
If there is an ESP ®
malfunction, you will not
receive any steering assistance from the Safety
245_AKB; 2; 7, en-GB
wdomann,
Version: 2.11.4 2008-10-17T11:22:31+02:00 - Seite 56Dateiname: 6515_1640_02_buchblock.pdf; preflight
Page 77 of 305
Seat belts
74
X
Engage belt tongue 2into buckle 3.
X If necessary, adjust the belt to the appro-
priate height (Y page 74).
X If necessary, pull upwards on the shoulder
section of the belt to tighten the belt across
your body.
Routing the belt X
Press release button 4and guide belt
tongue 2back towards belt sash guide
1. Belt warning for driver and front
passenger
The < seat belt warning lamp in the instru-
ment cluster reminds you that all passengers
should fasten their seat belts. It may light up
continuously or flash. Additionally, there may
be a warning tone.
The < seat belt warning lamp goes out and
the acoustic signal ceases as soon as the
driver and passenger have fastened their seat
belts.
For certain countries only: regardless of
whether the driver or the front passenger
already have their seat belt fastened, the
< seat belt warning lamp lights up for six seconds after the engine has been started. It
then goes out when the driver and front
passenger have already fastened their seat
belts.
i
Further information about the
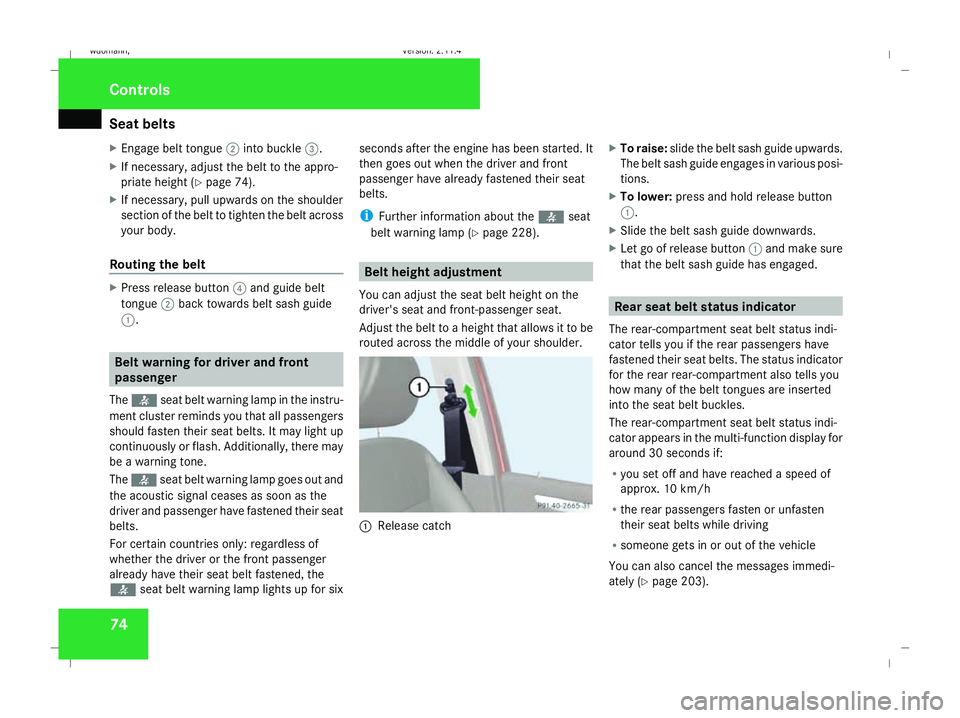
You can adjust the seat belt height on the
driver's seat and front-passenger seat.
Adjust the belt to a height that allows it to be
routed across the middle of your shoulder. 1
Release catch X
To raise: slide the belt sash guide upwards.
The belt sash guide engages in various posi-
tions.
X To lower: press and hold release button
1.
X Slide the belt sash guide downwards.
X Let go of release button 1and make sure
that the belt sash guide has engaged. Rear seat belt status indicator
The rear-compartment seat belt status indi-
cator tells you if the rear passengers have
fastened their seat belts. The status indicator
for the rear rear-compartment also tells you
how many of the belt tongues are inserted
into the seat belt buckles.
The rear-compartment seat belt status indi-
cator appears in the multi-function display for
around 30 seconds if:
R you set off and have reached a speed of
approx. 10 km/h
R the rear passengers fasten or unfasten
their seat belts while driving
R someone gets in or out of the vehicle
You can also cancel the messages immedi-
ately (Y page 203). Controls
245_AKB; 2; 7, en-GB
wdomann,
Version: 2.11.4 2008-10-17T11:22:31+02:00 - Seite 74Dateiname: 6515_1640_02_buchblock.pdf; preflight
Page 82 of 305
Lights
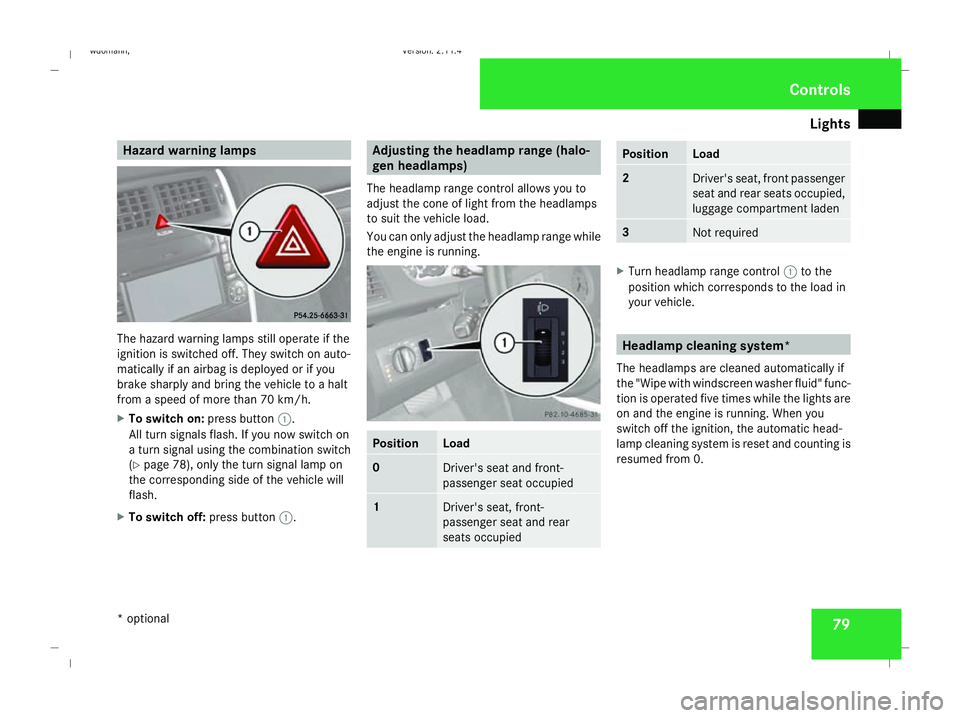
79Hazard warning lamps
The hazard warning lamps still operate if the
ignition is switched off. They switch on auto-
matically if an airbag is deployed or if you
brake sharply and bring the vehicle to a halt
from a speed of more than 70 km/h.
X To switch on: press button1.
All turn signals flash. If you now switch on
a turn signal using the combination switch
(Y page 78), only the turn signal lamp on
the corresponding side of the vehicle will
flash.
X To switch off: press button1. Adjusting the headlamp range (halo-
gen headlamps)
The headlamp range control allows you to
adjust the cone of light from the headlamps
to suit the vehicle load.
You can only adjust the headlamp range while
the engine is running. Position Load
0
Driver's seat and front-
passenger seat occupied
1
Driver's seat, front-
passenger seat and rear
seats occupied Position Load
2
Driver's seat, front passenger
seat and rear seats occupied,
luggage compartment laden
3
Not required
X
Turn headlamp range control 1to the
position which corresponds to the load in
your vehicle. Headlamp cleaning system*
The headlamps are cleaned automatically if
the "Wipe with windscreen washer fluid" func-
tion is operated five times while the lights are
on and the engine is running. When you
switch off the ignition, the automatic head-
lamp cleaning system is reset and counting is
resumed from 0. Controls
* optional
245_AKB; 2; 7, en-GB
wdomann,
Version: 2.11.4 2008-10-17T11:22:31+02:00 - Seite 79 ZDateiname: 6515_1640_02_buchblock.pdf; preflight
Page 84 of 305
Lights
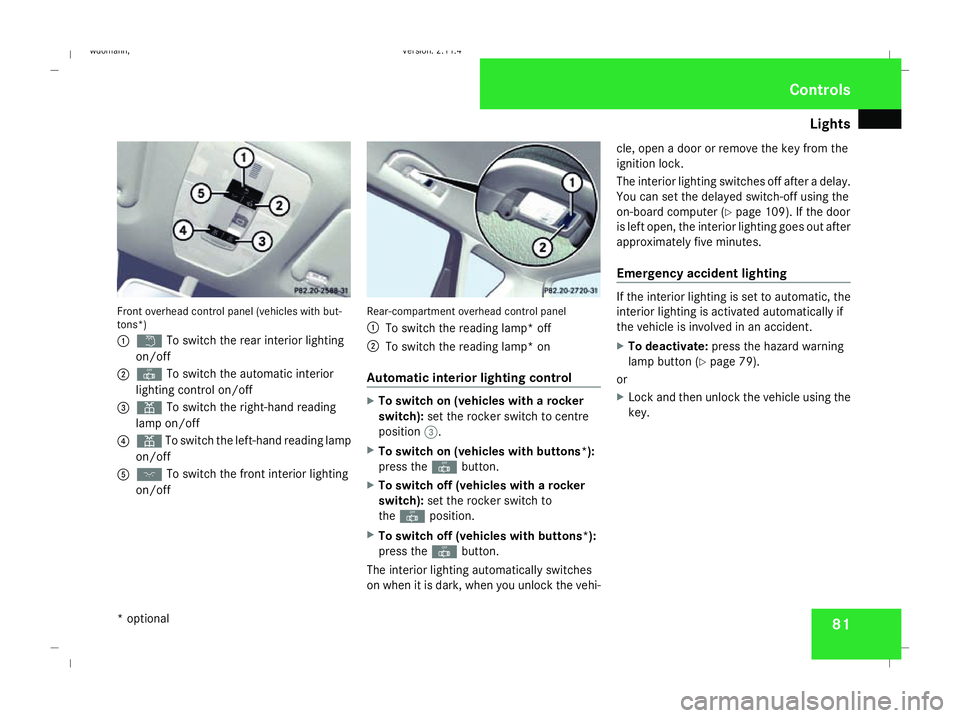
81Front overhead control panel (vehicles with but-
tons*)
1 £ To switch the rear interior lighting
on/off
2 ¥ To switch the automatic interior
lighting control on/off
3 X To switch the right-hand reading
lamp on/off
4 X To switch the left-hand reading lamp
on/off
5 ð To switch the front interior lighting
on/off Rear-compartment overhead control panel
1
To switch the reading lamp* off
2 To switch the reading lamp* on
Automatic interior lighting control X
To switch on (vehicles with a rocker
switch): set the rocker switch to centre
position 3.
X To switch on (vehicles with buttons*):
press the ¥button.
X To switch off (vehicles with a rocker
switch): set the rocker switch to
the ¥ position.
X To switch off (vehicles with buttons*):
press the ¥button.
The interior lighting automatically switches
on when it is dark, when you unlock the vehi- cle, open a door or remove the key from the
ignition lock.
The interior lighting switches off after a delay.
You can set the delayed switch-off using the
on-board computer (Y
page 109). If the door
is left open, the interior lighting goes out after
approximately five minutes.
Emergency accident lighting If the interior lighting is set to automatic, the
interior lighting is activated automatically if
the vehicle is involved in an accident.
X
To deactivate: press the hazard warning
lamp button (Y page 79).
or
X Lock and then unlock the vehicle using the
key. Controls
* optional
245_AKB; 2; 7, en-GB
wdomann,
Version: 2.11.4 2008-10-17T11:22:31+02:00 - Seite 81 ZDateiname: 6515_1640_02_buchblock.pdf; preflight
Page 92 of 305
Driving and pa
rking 89
R
the vehicle is secured with the parking
brake.
R ESP ®
is malfunctioning. Parking
G
Risk of accident
Only remove the key from the ignition lock
when the vehicle is stationary, as you can-
not steer the vehicle with the key removed.
Never leave children unsupervised in the
vehicle. They could release the parking
brake. This could lead to a serious or fatal
accident. G
Risk of fire
Make sure that the exhaust system does
not under any circumstances come into
contact with easily ignitable material such
as dry grass or petrol. The material could
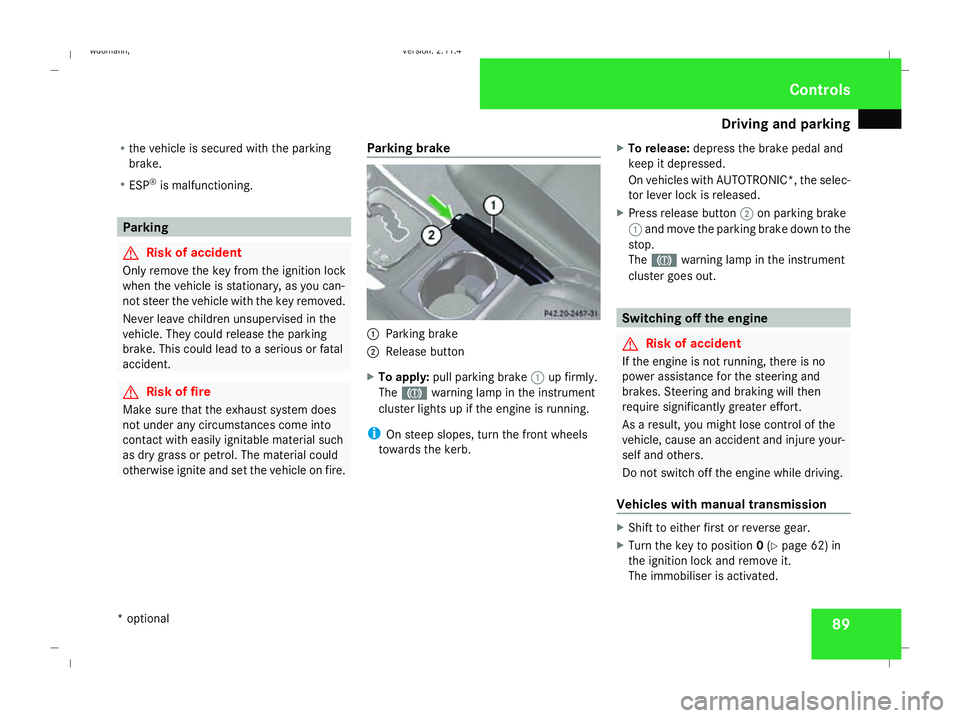
otherwise ignite and set the vehicle on fire. Parking brake 1
Parking brake
2 Release button
X To apply: pull parking brake 1up firmly.
The 3 warning lamp in the instrument
cluster lights up if the engine is running.
i On steep slopes, turn the front wheels
towards the kerb. X
To release: depress the brake pedal and
keep it depressed.
On vehicles with AUTOTRONIC*, the selec-
tor lever lock is released.
X Press release button 2on parking brake
1 and move the parking brake down to the
stop.
The 3 warning lamp in the instrument
cluster goes out. Switching off the engine
G
Risk of accident
If the engine is not running, there is no
power assistance for the steering and
brakes. Steering and braking will then
require significantly greater effort.
As a result, you might lose control of the
vehicle, cause an accident and injure your-
self and others.
Do not switch off the engine while driving.
Vehicles with manual transmission X
Shift to either first or reverse gear.
X Turn the key to position 0(Y page 62) in
the ignition lock and remove it.
The immobiliser is activated. Controls
* optional
245_AKB; 2; 7, en-GB
wdomann,
Version: 2.11.4 2008-10-17T11:22:31+02:00 - Seite 89 ZDateiname: 6515_1640_02_buchblock.pdf; preflight
Page 99 of 305
Instrument cluster
96 could cause the drive wheels to lose their
grip and the vehicle could skid.
X Press left-hand button 2on the steering
wheel.
The transmission shifts to the next gear
down, depending on the gear currently
selected.
i The transmission does not shift down if
you push the selector lever towards D–
while travelling at too high a speed. The
engine could otherwise overrev.
i AUTOTRONIC automatically shifts down if
the lowest permissible engine speed for the
gear currently selected is reached.
Upshifting X
Press right-hand button 1on the steering
wheel.
The transmission shifts to the next gear up,
depending on the gear currently selected.
i If the highest permissible engine speed
for the gear currently engaged is reached
and you continue to accelerate, AUTO-
TRONIC shifts up automatically. Selecting the ideal gear X
Press and hold left-hand button 2on the
steering wheel.
The transmission will shift to a gear which
allows ideal acceleration and deceleration.
To do this, the transmission will shift down
one or more gears.
Deactivating manual operation X
Press and hold right-hand button 1on the
steering wheel until Dappears again in the
multi-function display.
The transmission shifts from the current
gear to D.
Or:
X Briefly press the program selector button
next to the selector lever (Y page 94).
The letter for the last selected drive pro-
gram Cor Sis shown again in the multi-
function display. The transmission shifts
from the current gear to D.
i When you start the engine again, manual
operation is deactivated and AUTOTRONIC
switches to the previously selected drive
program Cor S. Instrument cluster
Points to remember
You will find an illustration of the instrument
cluster in the "At a glance" section
(Y page 26). G
Risk of accident
No further messages can be displayed if the
instrument cluster and/or the multi-func-
tion display fails.
This means that you will not see information
about the driving situation, such as the
speed, outside temperature, warning/indi-
cator lamps, display messages or system
failures. The vehicle's handling character-
istics may be affected. Adjust your driving
style and speed accordingly.
Immediately consult a qualified specialist
workshop which has the necessary special-
ist knowledge and tools to carry out the
work required. Mercedes-Benz recom-
mends that you use a Mercedes-Benz
Service Centre for this purpose. In particu-
lar, work relevant to safety or on safety-
related systems must be carried out at a
qualified specialist workshop. Cont
rols
245_AKB; 2; 7, en-GB
wdomann,
Version: 2.11.4
2008-10-17T11:22:31+02:00 - Seite 96 Dateiname: 6515_1640_02_buchblock.pdf; preflight
Page 104 of 305
On-board computer
101Function
1
Operation
menu (Ypage 101)
R trip meter and total distance
recorder (standard display)
(Y page 102)
R tyre pressure loss warning
(Y page 179)
R digital speedometer or outside tem-
perature (Y page 102)
R ASSYST PLUS service interval dis-
play (Y page 191)
R Engine oil level* (Y page 172) 2
Audio*/DVD*
menu (Ypage 102)
R radio station (Y page 102)
R CD player* (Y page 103)
R audio drive or
media* ( Ypage 103)
R DVD video* (Y page 104) 3
Navigation* menu (NAV)
(Y
page 104) Function
4
Message memory
10
menu (Display
messages) ( Ypage 105) 5
Settings
menu (Ypage 105)
R resetting to factory settings
(Y page 105)
R selecting submenus (Y page 106) 6
Trip computer
menu (Ypage 111)
R consumption statistics
(Y page 111)
R range (Y page 112) 7
Telephone
* menu (Ypage 112) The number of menus shown depends on the
optional equipment in the vehicle.
The generic terms in the table overview are
intended to help you navigate through the
menus. The terms themselves are not always
displayed in the multi-function display.
For the Audio 5*, the on-board computer dis-
plays the Audio* and Telephone* menus in
English. The language for these menus is not dependent on the language selected for the
multi-function display.
Audio 20*, Audio 50 APS* and COMAND
APS*:
Depending on the audio system* fitted, the
Audio*,
Navigation* and Telephone*
menus are slightly different. The examples
given in this Owner's Manual apply to vehicles
equipped with COMAND APS*. Operation menu
i Please refer to the menu overview
(Y page 100).
Use the buttons on the multi-function steer-
ing wheel.
X Press the èor· button to select the
standard display.
You can select the following functions in the
Operation menu by pressing the jor
k button:
R trip meter and total distance recorder
(standard display)
R tyre pressure loss warning (Y page 179)
10 The menu is only visible when there is a display message. Controls
* optional
245_AKB; 2; 7, en-GB
wdomann
,V ersion: 2.11.4
2008-10-17T11:22:31+02:00 - Seite 101 ZDateiname: 6515_1640_02_buchblock.pdf; preflight
Page 108 of 305
On-board computer
105
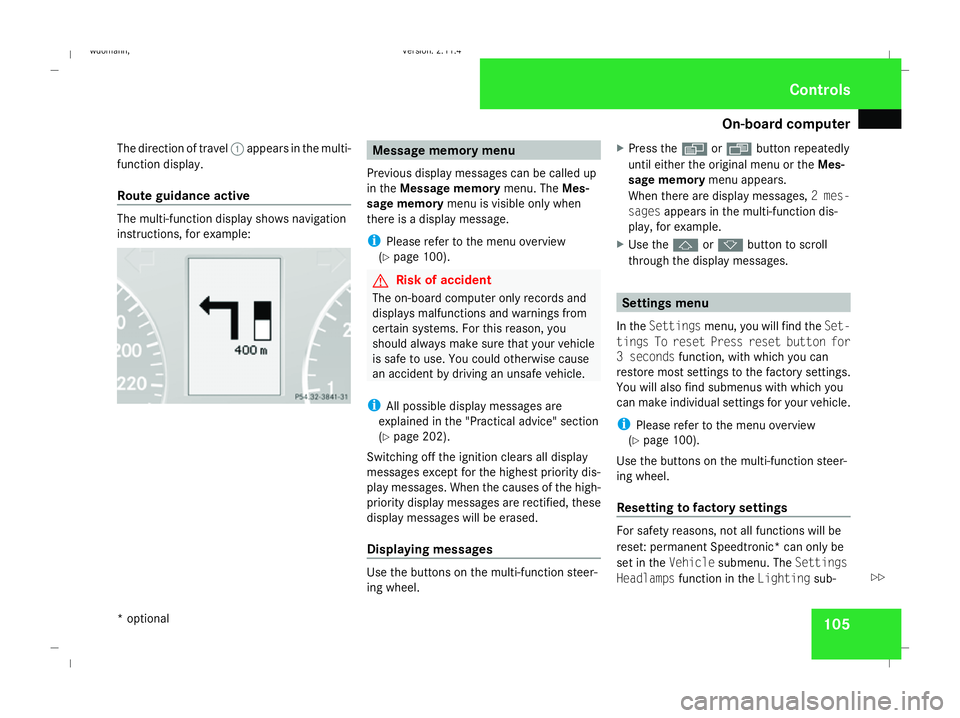
The direction of travel
1appears in the multi-
function display.
Route guidance active The multi-function display shows navigation
instructions, for example: Message memory menu
Previous display messages can be called up
in the Message memory menu. TheMes-
sage memory menu is visible only when
there is a display message.
i Please refer to the menu overview
(Y page 100). G
Risk of accident
The on-board computer only records and
displays malfunctions and warnings from
certain systems. For this reason, you
should always make sure that your vehicle
is safe to use. You could otherwise cause
an accident by driving an unsafe vehicle.
i All possible display messages are
explained in the "Practical advice" section
(Y page 202).
Switching off the ignition clears all display
messages except for the highest priority dis-
play messages. When the causes of the high-
priority display messages are rectified, these
display messages will be erased.
Displaying messages Use the buttons on the multi-function steer-
ing wheel. X
Press the èor· button repeatedly
until either the original menu or the Mes-
sage memory menu appears.
When there are display messages, 2 mes-
sages appears in the multi-function dis-
play, for example.
X Use the jork button to scroll
through the display messages. Settings menu
In the Settings menu, you will find the Set-
tings To reset Press reset button for
3 seconds function, with which you can
restore most settings to the factory settings.
You will also find submenus with which you
can make individual settings for your vehicle.
i Please refer to the menu overview
(Y page 100).
Use the buttons on the multi-function steer-
ing wheel.
Resetting to factory settings For safety reasons, not all functions will be
reset: permanent Speedtronic* can only be
set in the
Vehiclesubmenu. The Settings
Headlamps function in the Lightingsub- Controls
* optional
245_AKB; 2; 7, en-GB
wdomann
,V ersion: 2.11.4
2008-10-17T11:22:31+02:00 - Seite 105 ZDateiname: 6515_1640_02_buchblock.pdf; preflight