tire type MERCEDES-BENZ C-Class COUPE 2014 CL204 Owner's Manual
[x] Cancel search | Manufacturer: MERCEDES-BENZ, Model Year: 2014, Model line: C-Class COUPE, Model: MERCEDES-BENZ C-Class COUPE 2014 CL204Pages: 342, PDF Size: 4.55 MB
Page 20 of 342
MOExtended tires
..........................283
Optional equipment weight
(definition) ..................................... 319
PSI (pounds per square inch)
(definition) ..................................... 318
Replacing ....................................... 320
Service life ..................................... 298
Sidewall (definition) .......................319
Speed rating (definition) ................318
Storing ........................................... 320
Structure and characteristics
(definition) ..................................... 317
Summer tires ................................. 298
Temperature .................................. 313
TIN (Tire Identification Number)
(definition) ..................................... 319
Tire bea d(definition) ...................... 319
Tire pressure (definition) ................319
Tire pressures (recommended )...... 317
Tire size (data) ............................... 324
Tire size designation, load-bearing
capacity, speed rating .................... 314
Tire tread ....................................... 297
Tire tread (definition) .....................319
Total load limit (definition) .............319
Traction ......................................... 312
Traction (definition) .......................319
Trea dwear ..................................... 312
Uniform Tire Quality Grading
Standard s...................................... 312
Uniform Tire Quality Grading
Standard s(definition) .................... 317
Unladen weight (definition) ............318
Wea rindicato r(definition) .............319
Whee lrim (definition ).................... 317
see Flat tire
Top Tether ............................................ 60
Towing Important safety guidelines ...........290
Installing the towing eye ................291
Removing the towing eye. ..............291
With the rear axle raised ................291
Towing away
With both axles on the ground .......291
Tow-starting
Emergency engine starting ............292
Important safety notes ..................290Transmission
see Automatic transmission
Transporting the vehicle ..................292
Trim pieces (cleaning instructions) .278
Trip computer (on-board computer) 191
Trip odometer Calling up ....................................... 191
Resetting (on-board computer) ......192
Trunk
Emergency release ....................82, 83
Important safety notes ....................80
Locking separatel y........................... 82
Opening (automatically from
inside) .............................................. 82
Opening (automatically from
outside) ............................................ 81
Trunk lid
Display message ............................ 229
Opening/closing .............................. 80
Opening dimensions ......................340
Trunk load (maximum) ......................340
Turn signals Display message ............................ 214
Switching on/off ........................... 108
Type identification plate
see Vehicle identification plate U
Unlocking Emergency unlocking .......................79
From inside the vehicle (central
unlocking button) ............................. 78 V
Vanity mirror (in the sun visor) ........252
Vehicle Correct use ...................................... 25
Data acquisition ............................... 26
Display message ............................ 228
Emergency locking ........................... 79
Emergency unlocking .......................79
Equipment ....................................... 21
Individua lsettings .......................... 199
Limited Warranty ............................. 25
Loading .......................................... 308
Locking (in an emergency) ...............79 18
Index
Page 63 of 342

Top Tether provides an additional connection
between a child restraint system, secured
with a LATCH-type (ISOFIX) child seat mount,
and the rear seat. This helps reduce the risk
of injury even further.
The Top Tether anchorages are located in the
rear compartment behind the head restraints. X
Press down the rear of cover 0003in the
direction of the arrow.
Cover 0003is raised slightly at the front.
X Fold up cover 0003of Top Tether anchorage
0022. X
Hook Top Tether hook 0021into Top Tether
anchorage 0022.
X Depending on the model and version, and
according to the manufacturer's
installation instructions, route Top Tether
belt 001Fon the left and right past head
restraint 0002.
or
X Route Top Tether belt 001Fover the center of
the head restraint. X
Make sure that Top Tether belt 001Fis not
twisted.
X Install the LATCH-type (ISOFIX) child
restraint system with Top Tether. Comply
with the manufacturer's installation
instructions when doing so. Make sure that
Top Tether belt 001Fis tight. Driving safety systems
Overview of driving safety systems
In this section, you will find information about
the following driving safety systems:
R ABS (Anti-lock BrakingSystem)
R BAS (Brake AssistSystem)
R BAS PLUS ( BrakeAssist System Plus)
R ESP ®
(Electronic StabilityProgram)
R EBD ( Electronic Brake force Distribution)
R ADAPTIVE BRAKE
R PRE-SAFE ®
Brake Important safety notes
If you fail to adapt your driving style or
become distracted, the driving safety
systems can neither reduce the risk of
accident nor override the laws of physics.
Driving safety systems are merely aids
designed to assist driving. You are
responsible for the distance to the vehicle in
front, for vehicle speed and for braking in
good time. Always adapt your driving style to
suit the prevailing road, weather and traffic
conditions and maintain asafe distance from
the vehicle in front. Drive carefully.
i The driving safety systems described only
work as effectively as possible when there
is adequate contact between the tires and
the road surface. Please pay special
attention to the note son tires,
recommended minimu mtire tread depths,
etc. (Y page 296). Driving safety systems
61Safety Z
Page 148 of 342

You must make sure that fuel does not come
into contact with your skin, eyes or clothing
and that it is not swallowed. Do not inhale fuel
vapors .Keep fuel away from children.
If you or others come into contact with fuel,
observe the following:
R Wash away fuel from skin immediately
using soap and water.
R If fuel comes into contact with your eyes,
immediately rinse them thoroughly with
clean water. Seek medical assistance
without delay.
R If fuel is swallowed, seek medical
assistance without delay. Do not induce
vomiting.
R Immediately change out of clothing which
has come into contact with fuel. G
WARNING
Electrostatic buildup can create sparks and
ignite fuel vapors. There is a risk of fire and
explosion.
Always touch the vehicle body before opening
the fuel filler flap or touching the fuel pump
nozzle. Any existing electrostatic buildup is
thereby discharged.
! Overfilling the fuel tank could damage the
fuel system.
! Take care not to spill any fuel on painted
surfaces. You could otherwise damage the
paintwork.
! Use a filter when refueling from a fuel can.
Otherwise, the fuel lines and/or injection
system could be blocked by particles from
the fuel can.
Do not get into the vehicle again during the
refueling process .Otherwise, electrostatic
charge could build up again.
If you overfill the fuel tank, fuel could spray
ou tw hen the fuel pump nozzle is removed.
For further information on fuel and fuel quality
(Y page 333). Refueling
Opening/closing the fuel filler flap 0002
To open the fuel filler flap
0003 To insert the fuel filler cap
0022 Tire pressure table
0021 Fuel type to be used
The fuel filler flap is unlocked or locked
automatically when you open or close the
vehicle with the SmartKey or with KEYLESS-
GO.
The position of the fuel filler cap is displayed
000E in the instrument cluster. The arrow
next to the filling pump indicates the side of
the vehicle.
To open X
Switch the engine off.
X Remove the SmartKey from the ignition
lock.
X KEYLESS-GO: open the driver’s door.
This corresponds to key position 0: "key
removed".
The driver’s door can be closed again.
X Press the fuel filler flap in the direction of
arrow 0002.
The fuel filler flap opens slightly.
X Open the fuel filler flap fully.
X Turn the fuel filler flap counter-clockwise
and remove it.
X Insert the fuel filler cap into the holder
bracket on the inside of filler flap 0003.146
RefuelingDriving and parking
Page 281 of 342
are chrome-plated or not, consult an
authorized Mercedes-Ben zCenter.
X Wipe the wooden trim and trim pieces with
a damp, lint-free cloth, e.g. a microfiber
cloth.
X Heavy soiling: use car care and cleaning
products recommended and approved by
Mercedes-Benz.
Cleaning the seat covers General notes
!
Do not use microfiber cloths to clean
genuine leather, artificial leather or
Alcantara® covers. If used often, these can
damage the cover.
i Note that regular care is essential to
ensure that the appearance and comfort of
the covers is retained over time.
Genuine leather seat covers
Leather is a natural product.
It exhibits natural surface characteristics, for
example:
R Differences in the texture
R Signs of stretching and marking
R Slight nuances of color
These are characteristics of leather and not
material defects.
! To retain the natural appearance of the
leather, observe the following cleaning
instructions:
R Clean genuine leather covers carefully
with a damp cloth and then wipe the
covers down with a dry cloth.
R Make sure that the leather does not
become soaked. It may otherwise
become rough and cracked.
R Only use leather care agents that have
been tested and approved by Mercedes-
Benz. You can obtain these from a
qualified specialist workshop. Seat covers of other materials
!
Observe the following when cleaning:
R Clean artificial leather covers with a cloth
moistened with a solution containing
1% detergen t(e.g. dish washing liquid).
R Clean cloth covers with a microfiber
cloth moistened with a solution
containing 1% detergen t(e.g. dish
washing liquid). Rub carefully and always
wipe entire seat sections to avoid leaving
visible lines. Leave the seat to dry
afterwards. Cleaning results depend on
the type of dirt and how long it has been
there.
R Clean Alcantara® covers with a damp
cloth. Make sure that you wipe entire
seat sections to avoid leaving visible
lines.
Cleaning the seat belts G
WARNING
Seat belts can become severely weakened if
bleached or dyed. This could cause the seat
belts to tear or fail, for instance, in the event
of an accident. This poses an increased risk
of injury or fatal injury.
Never bleach or dye the seat belts.
! Do not clean the seat belts using chemical
cleaning agents .Do not dry the seat belts
by heating at temperatures above 176 ‡
(80 †) or in direct sunlight.
X Use clean, lukewarm water and soap
solution.
Cleaning the headliner and carpets X
Headliner: if it is very dirty, use a soft brush
or a cleaning agent recommended and
approved by Mercedes-Benz.
X Carpets: use the carpet and textile
cleaning agents recommended and
approved by Mercedes-Benz. Care
279Maintenance and care Z
Page 286 of 342
The maximum permissible distance which
can be driven in run-flat mode is counted from
the moment the tire pressure loss warning
appears in the multifunction display.
You must not exceed a maximum speed of
50 mph (80 km/h).
i
When replacing one or all tires, make sure
that you use only tires:
R of the size specified for the vehicle and
R marked "MOExtended"
If a tire has gone flat and cannot be
replaced with a MOExtended tire, a
standard tire may be used as a temporary
measure. Make sure that you use the
proper size and type (summer or winter
tire).
Important safety notes G
WARNING
When driving in emergency mode, the driving
characteristics deteriorate, e.g. when
cornering, accelerating quickly and when
braking. There is a risk of an accident.
Do not exceed the stated maximum speed.
Avoid abrupt steering and driving maneuvers,
and driving over obstacles (curbs, potholes,
off-road). This applies in particular to a laden
vehicle.
Stop driving in emergency mode if:
R you hear banging noises.
R the vehicle starts to shake.
R you see smoke and smell rubber.
R ESP ®
is intervening constantly.
R there are tears in the sidewalls of the tire.
After driving in emergency mode, have the
wheel rims checked at a qualified specialist
workshop with regard to their further use. The
defective tire must be replaced in every case. Battery (vehicle)
Important safety notes
Special tools and expert knowledge are
required when working on the battery, e.g.
removal and installing. You should therefore
have all work involving the battery carried out
at a qualified specialist workshop. G
WARNING
Work carried out incorrectly on the battery
can lead, for example, to a short circuit and
thus damage the vehicle electronics. This can
lead to function restrictions applying to
safety-relevan tsystems, e.g. the lighting
system, ABS (anti-lock braking system) or
ESP ®
(Electronic Stability Program). The
operating safety of your vehicle may be
restricted. You could lose control of the
vehicle, for example:
R braking
R in the event of abrupt steering maneuver
and/o rwhen the vehicle's speed is not
adapted to the road conditions
There is a risk of an accident.
In the event of a short circuit or a similar
incident, contact a qualified specialist
workshop immediately. Do not drive any
further. You should have all work involving the
battery carried out at aqualified specialist
workshop.
For further information about ABS and ESP ®
,
see (Y page 62) and ( Ypage 64). G
WARNING
Electrostatic build-up can lead to the creation
of sparks, which could ignite the highly
explosive gases of a battery. There is a ris kof
an explosion.
Before handling the battery, touch the vehicle
body to remove any existing electrostatic
build-up.
The highly flammable gas mixture forms when
charging the battery as well as when jump-
starting. 284
Battery (vehicle)Breakdown assistance
Page 292 of 342
X
Close cover 0002of positive terminal 0003after removing the jumper cables.
X Have the battery checked at a qualified specialist workshop.
i Jump-starting is no tconsidered to be a normal operating condition.
i Jumper cables and further information regarding jump-starting can be obtained at any
qualified specialist workshop. Towing and tow-starting
Important safety notes
G
WARNING
You can no longer steer the vehicle if the
steering wheel lock has been engaged. There
is a risk of an accident.
Always switch off the ignition when towing the
vehicle with a tow cable or a tow bar. G
WARNING
If the weight of the vehicle to be towed or tow-
started is greater than the permissible gross
weight of your vehicle:
R the towing eye could detach itself
R the vehicle/trailer combination could
rollover.
There is a risk of an accident.
When towing or tow-starting another vehicle,
its weight should not be greater than the
permissible gross weight of your vehicle.
Information on your vehicle's gross vehicle
weight rating can be found on the vehicle
identification plate (Y page 332).
! If DISTRONIC PLUS or the HOLD function
is activated, the vehicle brakes
automatically in certain situations. To
prevent damage to the vehicle, deactivate
DISTRONIC PLUS and the HOLD function in
the following or other similar situations:
R when towing the vehicle
R in the car wash
! The vehicle can be towed a maximum of
30 miles (50km). The towing speed of
30 mph (50 km/h) must not be exceeded. If the vehicle has to be towed more than
30 miles
(50km), the entire vehicle must be
raised and transported.
! Only secure the tow rope or tow bar at the
towing eyes. Otherwise, the vehicle could
be damaged.
! Do not use the towing eyes for recovery
purposes as this could damage the vehicle.
If in doubt, recover the vehicle with a crane.
! When towing, pull away slowly and
smoothly. If the tractive power is too high,
the vehicles could be damaged.
! Do not tow with sling-type equipment.
This could damage the vehicle.
! On vehicles with KEYLESS-GO, use the
SmartKey instead of the Start/Stop
button. Turn the SmartKey to position 2in
the ignition lock and shift the automatic
transmission to N. Then, turn the SmartKey
back to 0and leave it in the ignition lock.
It is better to have the vehicle transported
than to have it towed.
The automatic transmission must be in
position Nwhen the vehicle is being towed.
The battery must be connected and charged.
Otherwise, you:
R cannot turn the SmartKey to position 2in
the ignition lock
R cannot shift the automatic transmission to
position N
Release the selector lever lock manually to
move it out of position P(Ypage 145).
i Deactivate the automatic locking feature
(Y page 78). You could otherwise be locked
out when pushing or towing the vehicle. 290
Towing and tow-startingBreakdown assistance
Page 298 of 342
Useful information
i This Operator's Manual describes all
models and all standard and optional
equipment of your vehicle available at the
time of publication of the Operator's
Manual. Country-specific differences are
possible. Please note that your vehicle may
not be equipped with all features
described. This also applies to safety-
related systems and functions.
i Read the information on qualified
specialist workshops: (Y page 24).Important safety notes
G
WARNING
If wheels and tires of the wrong size are used,
the wheel brakes or suspension components
may be damaged. There is arisk of an
accident.
Always replace wheels and tires with those
that fulfill the specifications of the original
part.
When replacing wheels, make sure to use the
correct:
R designation
R model
When replacing tires, make sure to use the
correct:
R designation
R manufacturer
R model G
WARNING
Af lat tire severely impairs the driving,
steering and braking characteristics of the
vehicle. There is a risk of accident.
Tires without run-flat characteristics:
R do not drive with aflat tire.
R immediately replace the flat tire with your
emergency spare wheel or spare wheel, or
consult a qualified specialist workshop. Tires with run-flat characteristics:
R
pay attention to the information and
warning notices on MOExtended tires (tires
with run-flat characteristics).
Accessories that are not approved for your
vehicle by Mercedes-Ben zorthat are not
being used correctly can impair operating
safety.
Before purchasing and using non-approved
accessories, visit a qualified specialist
workshop and inquire about:
R suitability
R legal stipulations
R factory recommendations
Information on the dimensions and types of
wheels and tires for your vehicle can be found
in the "Wheel/tire combinations" section
(Y page 324).
Information on air pressure for the tires on
your vehicle can be found:
R on the vehicle's Tire and Loading
Information placard on the B-pillar
R on the tire pressure label on the fuel filler
flap
R in the "Tire pressure" section
Modification work on the brake system and
wheels is not permitted. The use of wheel
spacers or brake dust shields is not
permitted. This invalidates the general
operating permit for the vehicle.
i Further information on wheels and tires
can be obtained at any qualified specialist
workshop. Operation
Information on driving
R If the vehicle is heavily loaded, check the
tire pressures and correct them if
necessary.
R While driving, pay attention to vibrations,
noises and unusual handling 296
OperationWheels and tires
Page 300 of 342

For safety reasons, replace the tires before
the legally prescribed limit for the minimum
tire tread depth is reached.
Treadwea rindicators (TWI) are required by
law. Six indicators are positioned on the tire
tread. They are visible once the tread depth
is approximately 0008in (1.6 mm). If thi sisthe
case, the tire is so worn that it must be
replaced. Bar indicator
0002for tread wear is integrated
into the tire tread. Selecting, mounting and replacing
tires
R Only mount tires and wheels of the same
type and make.
Exception: it is permissible to install a
different type or make in the event of a flat
tire. Observe the "MOExtended tires (tires
with run-flat characteristics)" section
(Y page 283).
R Only mount tires of the correct size onto
the wheels.
R After mounting new tires, break them in at
moderate speeds for the first 60 miles
(100 km), as they only reach their full
performance after this distance.
R Do not drive with tires which have too little
tread depth, as this significantly reduces
the traction on wet roads (hydroplaning).
R Replace the tires after six years at the
latest, regardless of wear. Observe the notes on the emergency spare
wheel (Y
page 328). MOExtended tires (tires with run-flat
properties)
With MOExtended tires (tires with run flat
characteristics), you can continue to drive
your vehicle even if there is a total loss of
pressure in one or more tires.
MOExtended tires may only be used in
conjunction with an active tire pressure loss
warning system or with an active tire pressure
monitor and on wheels specifically tested by
Mercedes-Benz.
Notes on driving with MOExtended tires in the
event of a flat tire can be found in the
"Breakdown assistance" section
(Y page 283). Winter operation
Points to remember
Have your vehicle winterproofed at a qualified
specialist workshop at the onset of winter.
Observe the notes in the "Changing a wheel"
section (Y page 320). Driving with summer tires
At temperatures below 45 ‡(+7 †), summer
tires lose elasticity and therefore traction and
braking power. Change the tires on your
vehicle to M+S tires. Using summer tires at
very cold temperatures could cause cracks to
form, thereby damaging the tires
permanently. Mercedes-Benz cannot accept
responsibility for this type of damage. M+S tires
G
WARNING
M+S tires with a tire tread depth of less than
000A in (4 mm) are not suitable for use in winter 298
Winter operationWheels and tires
Page 301 of 342
and do not provide sufficient traction. There
is a risk of an accident.
M+S tires with a tread depth of less than 000A
in (4 mm) must be replaced immediately.
At temperatures below 45 ‡ (+7 †), use
winter tires or all-season tires. Both types of
tire are identified by th eM+S marking.
Only winter tires bearing the 0002snowflake
symbol in addition to the M+S marking
provide the best possible grip in wintry road
conditions. Only these tires will allow driving
safety systems such as ABS and ESP ®
to
function optimally in winter. These tires have
bee ndeveloped specifically for driving in
snow.
Use M+S tires of the same make and tread on
all wheels to maintain safe handling
characteristics.
Always observe the maximum permissible
speed specified for the M+S tires you have
mounted.
When you have mounted M+S tires:
X Check the tire pressures (Y page 303).
X Vehicles for Canada: restart the tire
pressure loss warning system
(Y page 303).
X Restart the tire pressure monitor
(Y page 304).
For more information on driving with the
emergency spare wheel, see (Y page 328).Snow chains
G
WARNING
If snow chains are installed to the front
wheels, they may drag against the vehicle
body or chassis components. This could
cause damage to the vehicle or the tires.
There is a risk of an accident. To avoid hazardous situations:
R
never install snow chains to the front
wheels
R always install snow chains in pairs to the
rear wheels.
! On some tire sizes there is not enough
space for snow chains. To avoid damage to
the vehicle or tires, observe the "Wheel and
tire combinations" section under "Tires and
wheels".
! Vehicles with steel wheels: if you wish
to mount snow chains on steel wheels,
make sure that you remove the respective
wheels' hubcaps first .The hubcaps may
otherwise be damaged.
For safety reasons, Mercedes-Benz
recommends that you only use snow chains
that have been specially approved for your
vehicle by Mercedes-Benz, or are of a
corresponding standard of quality.
If you intend to mount snow chains, please
bear the following points in mind:
R snow chains may not be mounted on all
wheel/tire combinations. Permissible
wheel-tire combinations (Y page 324).
R only use snow chains when driving on roads
completely covered by snow. Remove the
snow chains as soon as possible when you
come to a road that is not snow-covered.
R local regulations may restrict the use of
snow chains. Observe the appropriate
regulations if you wish to mount snow
chains.
R do not exceed the maximum permissible
speed of 30 mph (50 km/h).
i You may wish to deactivate
ESP ®
(Y page 64) when pulling away with
snow chains installed. You can thereby
allow the wheels to spin in a controlled
manner, achieving an increased driving
force (cutting action).
For more information on driving with the
emergency spare wheel, see (Y page 328). Winter operation
299Wheels and tires Z
Page 316 of 342
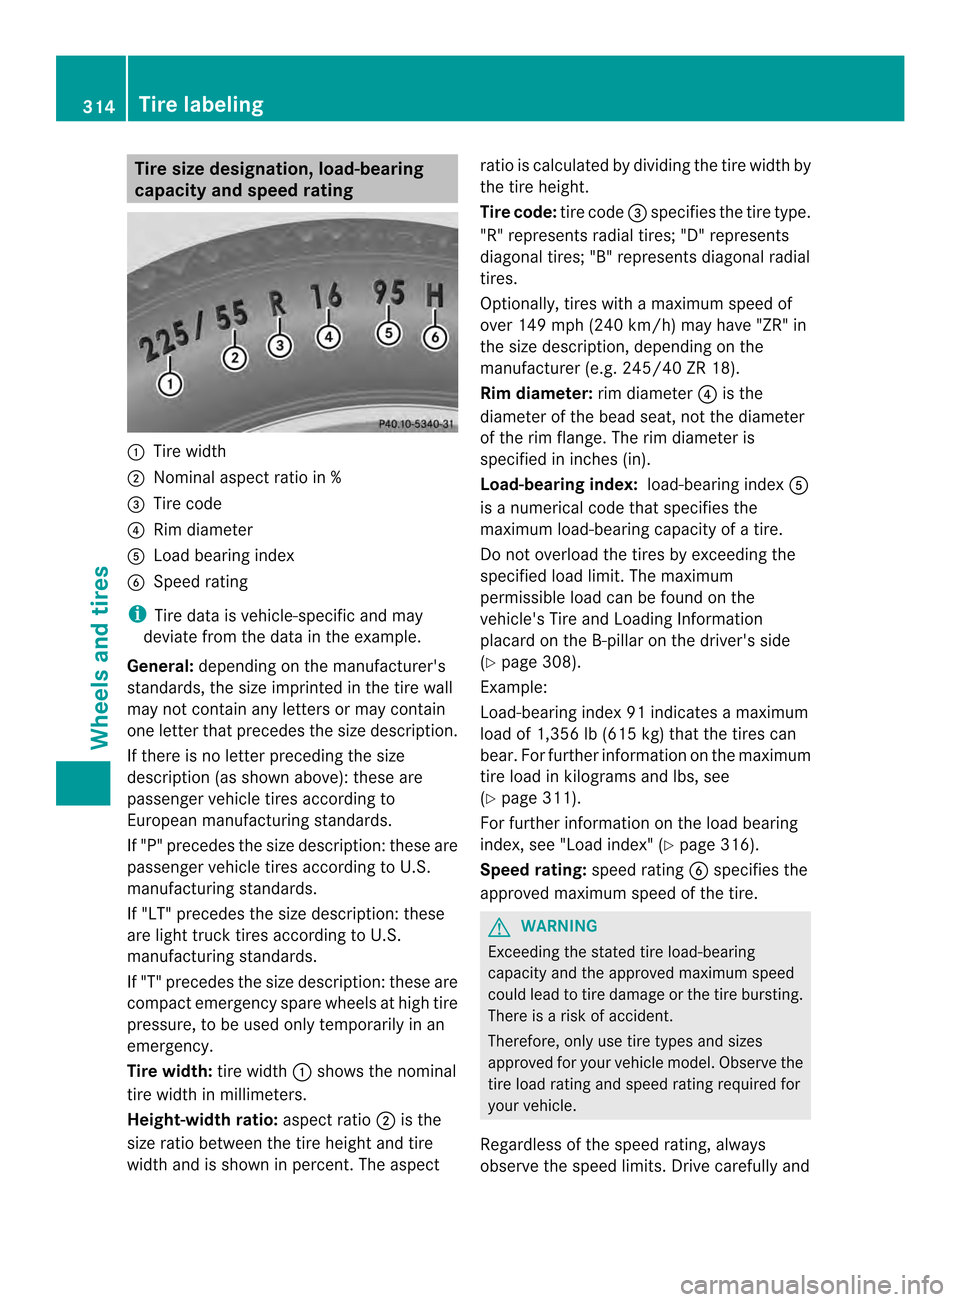
Tire size designation
,load-bearing
capacity and speed rating 0002
Tire width
0003 Nominal aspec tratio in %
0022 Tire code
0021 Rim diameter
001F Load bearing index
0020 Speed rating
i Tire data is vehicle-specific and may
deviate from the data in the example.
General: depending on the manufacturer's
standards, the size imprinted in the tire wall
may not contain any letters or may contain
one lette rthat precedes the size description.
If there is no letter preceding the size
description (as shown above): these are
passenger vehicle tires according to
European manufacturing standards.
If "P" precedes the size description: these are
passenger vehicle tires according to U.S.
manufacturing standards.
If "LT" precedes the size description: these
are light truck tires according to U.S.
manufacturing standards.
If "T" precedes the size description: these are
compact emergency spare wheels at high tire
pressure, to be used only temporarily in an
emergency.
Tire width: tire width0002shows the nominal
tire width in millimeters.
Height-width ratio: aspect ratio0003is the
size ratio between the tire height and tire
width and is shown in percent.T he aspectratio is calculated by dividing the tire width by
the tire height.
Tire code:
tire code0022specifies the tire type.
"R" represents radial tires; "D" represents
diagonal tires; "B" represents diagonal radial
tires.
Optionally, tires with a maximum speed of
over 149 mph (240 km/h) may have "ZR" in
the size description, depending on the
manufacturer (e.g. 245/40 ZR 18).
Rim diameter: rim diameter0021is the
diameter of the bead seat, not the diameter
of the rim flange. The rim diameter is
specified in inches (in).
Load-bearing index: load-bearing index001F
is a numerical code that specifies the
maximum load-bearing capacity of a tire.
Do not overload the tires by exceeding the
specified load limit. The maximum
permissible load can be found on the
vehicle's Tire and Loading Information
placard on the B-pillar on the driver's side
(Y page 308).
Example:
Load-bearing index 91 indicates a maximum
load of 1,356 lb (615 kg) that the tires can
bear. For further information on the maximum
tire load in kilograms and lbs, see
(Y page 311).
For further information on the load bearing
index, see "Load index" (Y page 316).
Speed rating: speed rating0020specifies the
approved maximum speed of the tire. G
WARNING
Exceeding the stated tire load-bearing
capacity and the approved maximum speed
could lead to tire damage or the tire bursting.
There is a risk of accident.
Therefore, only use tire types and sizes
approved for your vehicle model. Observe the
tire load rating and speed rating required for
your vehicle.
Regardless of the speed rating, always
observe the speed limits. Drive carefully and 314
Tire labelingWheels and tires