turn signal MERCEDES-BENZ C-Class COUPE 2017 CL205 User Guide
[x] Cancel search | Manufacturer: MERCEDES-BENZ, Model Year: 2017, Model line: C-Class COUPE, Model: MERCEDES-BENZ C-Class COUPE 2017 CL205Pages: 354, PDF Size: 8.66 MB
Page 167 of 354
If there is no vehicle in front, DISTRONIC PLUS
operates in the same way as cruise control.
If DISTRONIC PLUS detects that the vehicle in
front has slowed down, it brakes yourvehicle.I n
this way ,the distance you have selected is main-
tained.
If DISTRONIC PLUS detects afaster-moving
vehicle in front, it increases the driving speed.
However, the vehicle is only accelerated up to
the speed you have stored.
Selecting the drive program
DISTRONIC PLUS supports asporty driving style
when you have selected the Sor S+ driving pro-
gram (
Ypage 144). Acceleration behind the
vehicle in front or to the set speed is then notice-
abl ym ore dynamic. If you have selected the Cor
E driving program, the vehicle accelerates more
gently. This setting is recommended in stop-
and-start traffic.
Changing lanes
If you change to the passing lane, DISTRONIC
PLUS supports you when:
Ryou are driving faster than 45 mph (70 km/h)
Ryou switch on the appropriate turn signal
RDISTRONIC PLUS does not detect adanger of
collision
If these conditions are fulfilled,y ourv ehicle is
accelerated. Acceleration wil lbeinterrupted if
changing lanes takes too long or if the distance
betwee nyourv ehicle and the vehicle in front
becomes too small.
iWhen you change lanes, DISTRONIC PLUS
monitors the left lane on left-hand-drive vehi-
cles or the right lane on right-hand-drive vehi-
cles.
Stopping
GWARNING
When leaving the vehicle,e ven if it is braked
only by DISTRONIC PLUS, it could roll awa yif:
Rthere is amalfunction in the system or in
the voltage supply.
RDISTRONIC PLUS has been deactivated
with the cruise control lever, e.g. by avehi-
cle occupant or from outsid ethe vehicle.
Rthe electrical system in the engine com-
partment, the battery or the fuses have
been tampered with.
Rthe battery is disconnected.
Rthe accelerator pedalh as been depressed,
e.g. by avehicle occupant.
There is arisk of an accident.
If you wish to exit the vehicle,a lways turn off
DISTRONIC PLUS and secure the vehicle
against rolling away.
For further information on deactivating
DISTRONIC PLUS (
Ypage 167).
If DISTRONIC PLUS detects that the vehicle in
front is stopping, it brakes you rvehicle until it is
stationary.
Once you rvehicle is stationary,itr emains sta-
tionary and you do not need to depresst he
brake.
iAfter atime, the electric parking brake
secures the vehicle and relieves the service
brake.
iDepending on the specifiedm inimum dis-
tance, you rvehicle wil lcome to astandstill at
as ufficient distance behind the vehicle in
front. The specifiedm inimum distance is set
using the control on the cruise control lever.
When DISTRONIC PLUS is activated, the trans-
missioniss hifted automatically to position Pif:
Rthe driver's seat belt is not fastened and the
driver's door is open.
Rthe engine is switched off, unless it is auto-
matically switched off by the ECO start/stop
function.
The electric parking brake secures the vehicle
automatically if DISTRONIC PLUS is activated
when the vehicle is stationary and:
Ras ystem malfunction occurs.
Rthe powers upply is not sufficient.
If am alfunction occurs, the transmission may
also shift into position Pautomatically.
Setting aspeed
XPress the cruise control lever up :for a
highers peed or down ;for alowers peed.
XTo adjust the set speed in 1mph incre-
ments (1 km/h increments): brieflypress
Driving systems165
Driving and parking
Z
Page 171 of 354
The system is switched to passive and no longer
assists you by performingsteeringinterventions
if:
Ryou actively change lane
Ryou switch on the turn signal
Rtake your hands off the steerin gwheel or do
not steer for aprolonged period of time
iSteering Assist and Stop&Go Pilot are acti-
vated again automatically after alane change
is completed.
Steering Assist and Stop&Go Pilot do not pro-
vide any support:
Ron very sharp corners
Rwhen aloss of tire pressure or adefective tire
has been detected and displayed
Pay attention also to the important safety notes for DISTRONIC PLUS (
Ypage 163).
The steerin ginterventions are carried out with a
limited steerin gmoment.T he system requires
the driver to keep his hands on the steering
wheel and to steer himself.
If you do not steer yourself or if you take your
hands off the steerin gwheel for aprolonged
period of time, the system will first alert you with
av isual warning. Asteerin gwheel symbol
appears in the multifunction display.Ify ou have
still not started to steer and have not taken hold
of the steerin gwheel after five seconds at the
latest, awarning ton ealso sounds to remind you
to take control of the vehicle. Steering Assist
and Stop&Go Pilot are switched to passive.
DISTRONIC PLUS remains active.
Activating Steering Assist and Stop&Go
Pilot
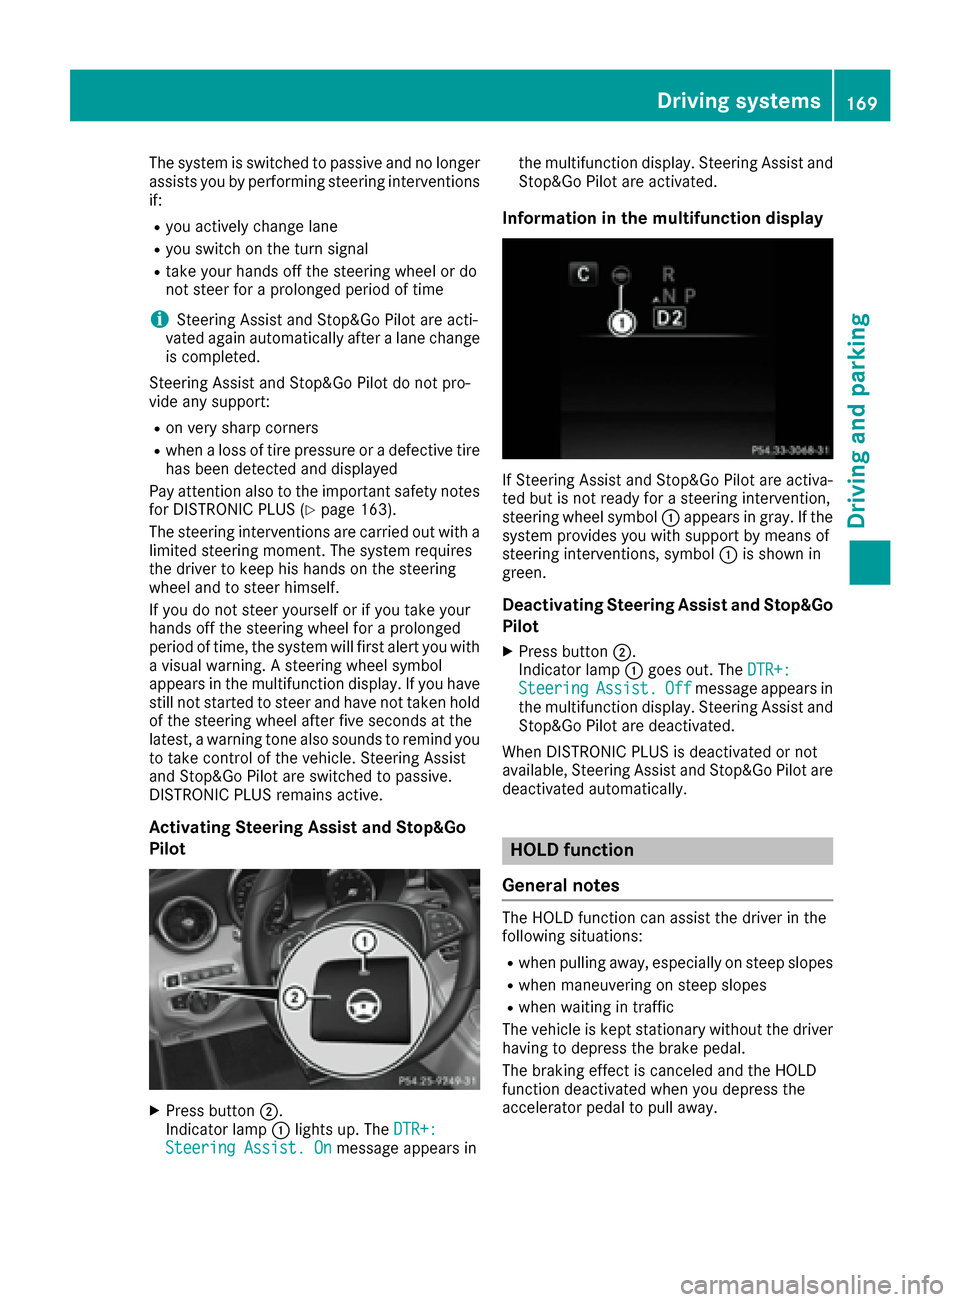
XPress button ;.
Indicator lamp :lights up. The DTR+:
Steering Assist. Onmessage appears in the multifunction display.S
teering Assist and
Stop&Go Pilot are activated.
Information in the multifunction display
If Steering Assist and Stop&Go Pilot are activa-
ted but is not ready for asteerin gintervention,
steerin gwheel symbol :appears in gray. If the
system provides you with support by means of
steerin ginterventions, symbol :is shown in
green.
Deactivating Steering Assist and Stop&Go
Pilot
XPress button ;.
Indicator lamp :goes out. The DTR+:
SteeringAssist.Offmessage appears in
the multifunction display.S teering Assist and
Stop&Go Pilot are deactivated.
When DISTRONIC PLUS is deactivated or not
available, Steering Assist and Stop&Go Pilot are deactivated automatically.
HOLD function
General notes
The HOLD function can assist the driver in the
following situations:
Rwhen pulling away,e specially on steep slopes
Rwhen maneuvering on steep slopes
Rwhen waiting in traffic
The vehicle is kept stationary without the driver having to depress the brake pedal.
The braking effect is canceled and the HOLD
function deactivated when you depress the
accelerator pedal to pull away.
Driving systems169
Driving and parking
Z
Page 181 of 354
Rthatareparallel to the direction of travel and
at leas t39.5 in (1.0 m)longer than your vehi-
cle
Rthat are at right angles to the direction of
travel and at least 39.5i n(1.0m )wider than
your vehicle
iNotet hat Activ eParking Assist cannot
measure the size of aparking space if it is at
right angles to the direction of travel. You will
need to judge whether your vehicle will fit into the parking space.
When drivingats peeds below 19 mph
(3 0k m/ h),y ou will see the parking symbol as a
status indicator in the instrumentc luster. When
ap arking space has been detected, an arrow
towards the right or the left also appears. By
default,A ctiveP arking Assist only displays park-
ing spaces on the front-passenge rside. Parking
spaces on the driver's side are displayed as
soon as the turn signal on the driver's side is
activated. When parking on the driver's side,
this must remain switched on until you acknowl-
edge the use of Activ eParking Assist by press-
ing the abutton on the multifunction steer-
ing wheel. The system automatically determines
whether the parking space is parallel or at right
angles to the direction of travel.
Ap arking space is displayed while you are driv-
ing past it, and until you are approximately 50 ft (1 5m)a way fromi t.
Parking
GWARNING
If you leave the vehicle when it is only being
braked by Activ eParking Assist it could roll
away if:
Rthere is amalfunction in the system or in
the voltage supply.
Rthe electrical system in the engin ecom-
partment, the battery or the fuses have
been tampered with.
Rthe battery is disconnected.
Rthe accelerator pedal has been depressed,
e.g. by avehicle occupant.
There is arisk of an accident.
Before leavingt he vehicle, always secur eit
against rollinga way.
iWhen PARKTRONIC detect sobstacles,
Activ eParking Assist brakes automatically
duringt he parking process. You are respon-
sible for braking in good time.
XStop the vehicle when the parking space sym- bol shows the desiredp arking space in the
instrumentc luster.
XShiftthe transmission to position R.
The Start
ParkAssist?Yes:OKNo:%
message appears in the multifunction display.
XTo cancel th eprocedure: press the %
button on the multifunction steeringw heel or
pull away.
or
XTo park using Active Parking Assist: press
the a button on the multifunction steering
wheel.
The Park Assist Active Accelerate
and BrakeObserve Surroundingsmes-
sage appears in the multifunction display.
XLet go of the multifunction steeringw heel.
XBackupt he vehicle, being ready to brakeata ll
times. When backing up, drive at aspeed
below approximately 6mph (10 km/h). Oth-
erwise Activ eParking Assist will be canceled.
Activ eParking Assist brakes the vehicle to a
standstill when the vehicle approaches the
rear border of the parking space.
Maneuveringm ay be requiredint ightparking
spaces.
The Park
AssistActiveSelect DObserveSurroundingsmessage appears in the multi-
function display.
XShif tthe transmission to position Dwhile the
vehicle is stationary.
Activ eParking Assist immediately steers in
the other direction.
The Park Assist Active Accelerate
and BrakeObserve Surroundingsmes-
sage appears in the multifunction display.
iYou will achiev ethe best resultsbyw aiting
for the steeringp rocedure to complete before
pulling away.
XDrive forwards and be ready to brakeata ll
times.
Activ eParking Assist brakes the vehicle to a
standstill when the vehicle approaches the
front border of the parking space.
Maneuveringm ay be requiredint ightparking
spaces.
Driving systems179
Driving and parking
Z
Page 182 of 354

TheParkAssistActiveSelect RObserveSurroundingsmessage appears in the multi-
function display.
As soon as the parking procedure is complete,
the Park Assist Switched Off
message
appears and awarning ton esounds. The vehicle
is now parked.
The vehicle is kept stationary without the driver having to depress the brake pedal. The braking
effect is canceled when you depress the accel-
erator pedal.
Active Parking Assist no longer supports you
with steerin ginterventions and brake applica-
tions. When Active Parking Assist is finished,
you must steer and brake again yourself.
PARKTRONIC is still available.
Parking tips:
RThe way your vehicle is positioned in the park-
ing space after parking is dependent on vari-
ous factors. These include the position and
shape of the vehicles parked in front and
behind it and the conditions of the location. It
may be the case that Active Parking Assist
guides you too far into aparking space, or not
far enough into it. In some cases, it may also
lead you across or ontot he curb. If necessary,
you should cancel the parking procedure with
Active Parking Assist.
RYou can also select preselect transmission
position D.The vehicle redirectsa nd does not
drive as far into the parking space. Should the
transmission change take place too early, the
parking procedure will be canceled. Asensi-
ble parking position can no longer be ach-
ieved from this position.
Exiting aparking space
In order that Active Parking Assist can support
you when you exit the parking space:
Rthe border of the parking space must be high
enough at the front and the rear. Acurb is too
small, for example.
Rthe border of the parking space must not be
too wide, as the position of the vehicle must
not exceed an angle of 45° to the starting
position as it is maneuvering into the parking
space.
Ram aneuvering distance of at least 3.3 ft
(1.0 m) must be available.
Active Parking Assist can only assist you with
exitin gaparking space if you have parked the vehicle parallel to the direction of travel using
Active Parking Assist.
iIf PARKTRONIC detect
sobstacles, Active
Parking Assist brakes automatically whilst the
vehicle exits the parking space. You are
responsible for braking in good time.
XStart the engine.
XRelease the electric parking brake.
XSwitch on the turn signal in the direction you
are pulling away.
XShift the transmission to position Dor R.
The Start
ParkAssist?Yes:OKNo:%
message appears in the multifunction display.
XTo cancel the procedure: press the%
button on the multifunction steerin gwheel or
pull away.
or
XTo exit aparking space using Active Park-
ing Assist: press theabutton on the mul-
tifunction steerin gwheel.
The Park Assist Active Accelerate
and BrakeObserve Surroundingsmes-
sage appears in the multifunction display.
XLet go of the multifunction steerin gwheel.
XPull away,b eing ready to brake at all times. Do
not exceed amaximum speed of approx-
imately 6mph (10 km/h) when exitin gapark-
ing space. Otherwise Active Parking Assist
will be canceled.
XDependin gonthe message or as required,
shift the transmission to position Dor R.
Active Parking Assist immediately steers in
the other direction .The Park Assist
Active Accelerate and BrakeObserveSurroundingsmessage appears in the mul-
tifunction display.
iYou will achieve the best results by waiting
for the steerin gprocedure to complete before
pulling away.
If you back up after activation ,the steering
wheel is moved to the straight-ahead posi-
tion.
XDrive forwards and back up as prompted by
the PARKTRONIC warning displays, several
times if necessary.
Once you have exited the parking space com-
pletely, the steerin gwheel is moved to the
straight-ahead position. You hear aton ea nd the
Park
AssistSwitchedOffmessage appears
in the multifunction display.Y ou will then have
to steer and merge into traffic on your own.
180Driving systems
Driving and parking
Page 194 of 354
cycleracks or overhanging loads. Following a
severe impact or in the event of damag etothe
bumpers, have the function of the radar sensors
checke dataq ualified specialist workshop.
Blind Spot Assist may no longer work properly.
Monitoring area
In particular, the detection of obstacles can be
impaired if:
Rthere is dirt on the sensors or anything else
covering the sensors
Rthere is poo rvisibility,e .g. duetof og, heavy
rain, snow or spray
Rthere are narro wvehicles, e.g. motorcycle sor
bicycles
Rthe roadh asvery wide lanes
Rthe roadh asnarro wlanes
Ryoua re not driving in the middleoft he lane
Rthere are barriers or similar lane borders
Vehicles in the monitoring rang eare then not
indicated.
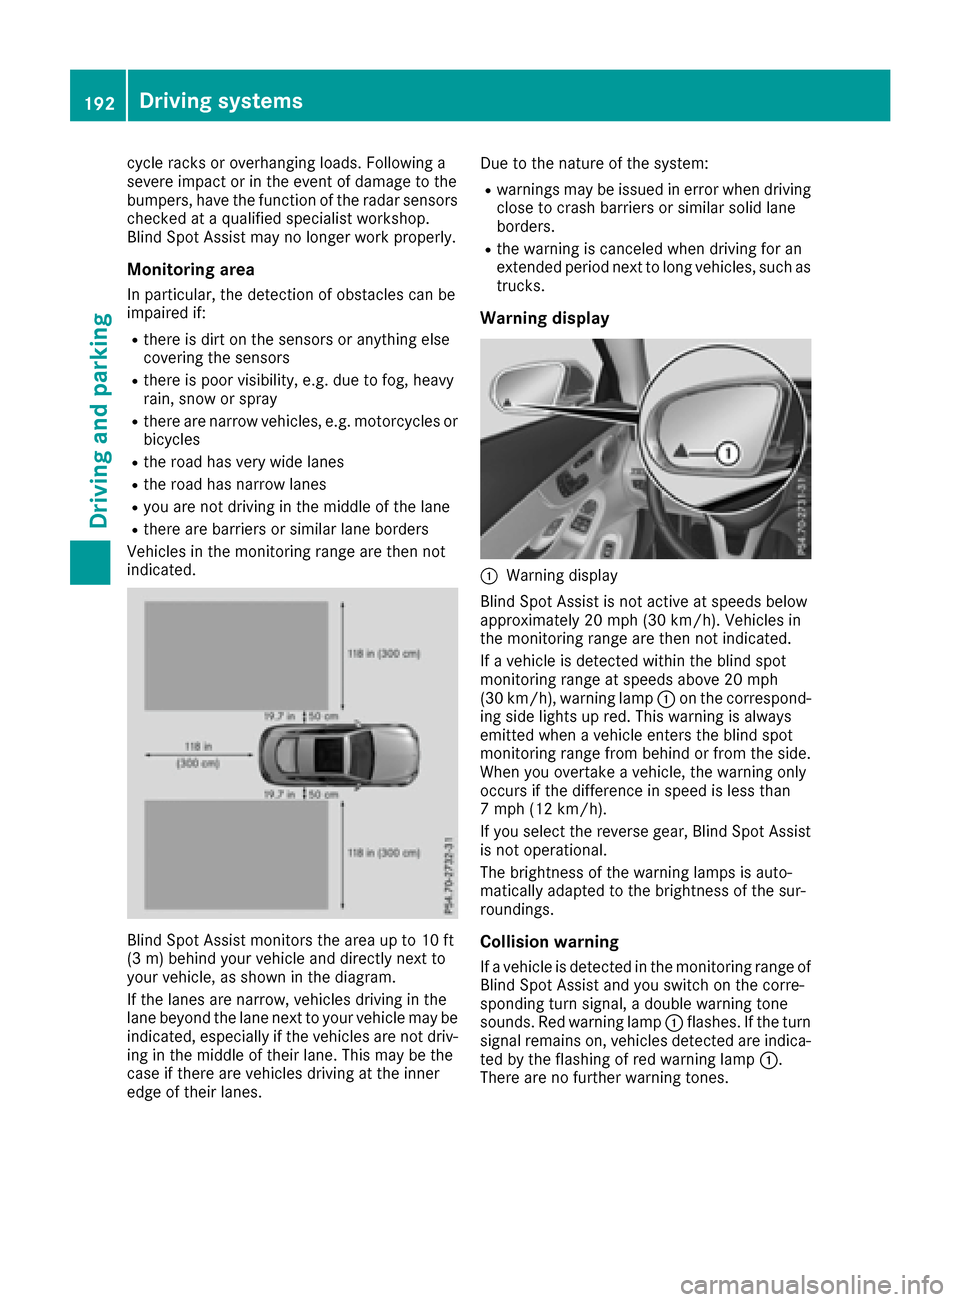
Blind Spot Assist monitors the are aupto10ft
(3 m) behind your vehicle and directl ynext to
your vehicle ,asshown in the diagram.
If the lanes are narrow, vehicle sdriving in the
lane beyond the lane next to your vehicle may be
indicated ,especially if the vehicle sare not driv-
ing in the middleoft heirlan e. Thism ay be the
case if there are vehicle sdriving at the inner
edg eoft heirlan es. Due to the nature of the system:
Rwarnings may be issue
dinerrorw hend riving
clos etoc rashb arriers or similar solid lane
borders.
Rthe warning is cancele dwhend riving for an
extended period next to long vehicles, such as
trucks.
Warning display
:Warning display
Blind Spot Assist is not active at speeds below
approximately 20 mph (30 km/h). Vehicles in
the monitoring rang eare then not indicated.
If av ehicle is detected within the blind spot
monitoring rang eatspeeds above 20 mph
(30 km/h), warning lamp :on the correspond-
ing sid elights up red .Thisw arning is always
emitted whe navehicle enters the blind spot
monitoring rang efrom behind or from the side.
Whe nyou overtake avehicle ,the warning only
occurs if the difference in speed is less than
7m ph (12 km/h).
If yo uselect the reverse gear, Blind Spot Assist
is not operational.
The brightnes softhe warning lamps is auto-
matically adapted to the brightnes softhe sur-
roundings.
Collision warning
If av ehicle is detected in the monitoring rang eof
Blind Spot Assist and yo uswitch on the corre-
sponding turn signal ,adoublew arning tone
sounds. Re dwarning lamp :flashes. If the turn
signal remains on, vehicle sdetected are indica-
ted by the flashing of red warning lamp :.
There are no further warning tones.
192Drivin gsystems
Drivin gand parking
Page 198 of 354

The detection of obstacles can be impaired in
the case of:
Rthere is dirt on the sensors or anything else
coveringthe sensors
Rpoor visibility, e.g. due to rain, snow or spray
Vehicles in the monitoring range are then not
indicated.
Active Blind Spot Assist may not detect narrow
vehicles, such as motorcycles or bicycles, or
may only detect them too late.
If the lanes are narrow, vehicles driving in the
lane beyond the lane next to your vehicle may be
indicated, especially if the vehicles are not driv- ing in the middle of their lane. This may be the
case if there are vehicles at the inner edge of
your lane.
Due to the nature of the system:
Rwarnings may be issued in error when driving
close to crash barriers or similar solid lane
borders.
Rwarnings may be interrupted when driving
alongside particularly long vehicles, e.g.
trucks, for aprolonged time.
Warning display
:Warning display
Active Blind Spot Assist is not operational at
speeds below approximately 20 mph (30 km/h).
Vehicles in the monitoring range are then not
indicated.
If av ehicle is detected within the blind spot
monitoring range at speeds above 20 mph
(3 0k m/ h),w arnin glamp :on the correspond-
ing side lights up red. This warnin gisalways
emitted when avehicle enters the blind spot
monitoring range from behind or from the side.
When you overtake avehicle, the warnin gonly
occurs if the differenc einspeed is less than
7m ph (12 km/h). If you select the reverse gear, Active Blind Spot
Assis
tisnot operational.
The brightness of the warnin glamps is auto-
matically adapted to the brightness of the sur-
roundings.
When Active Blind Spot Assis tisactivated, gray
radar waves propagatin gbackwards appear
nex ttot he vehicle in the assistance display in
the multifunction display. Abov easpeed of
20 mph (30 km/h), the color of the radar waves
in the assistance display changes to green ;.
Active Blind Spot Assis tisthen ready for use.
Visua land acoustic collision warning
If you switc honthe turn signals to change lanes
and avehicle is detected in the side monitoring
range, you receiv eavisual and acoustic collision
warning. You will then hear adouble warning
ton eand red warnin glamp :flashes. If the turn
signal remainso n, detected vehicles are indica-
ted by the flashingofr ed warninglamp :.
There are no further warnin gtones.
Course-correcting brake application
If Active Blind Spot Assis tdetects arisk of alat-
eral collision in the monitoring range, acourse-
correcting brake application is carried out. This
is meant to assist you in avoiding acollision.
GWARNING
Ac ourse-correctin gbrake application cannot
always preventac ollision.There is arisk of an
accident.
Always steer ,brake or accelerate yourself,
especially if Active Blind Spot Assis twarns
you or makes acourse-correctin gbrake appli-
cation. Always maintain asafe distance at the
sides.
196Driving systems
Driving and parking
Page 200 of 354

Alwayspayparticula rattentio ntothe traffic
situatio nand kee pwithint he lane, especially
if Active Lane Keeping Assist alerts you. Ter-
minate the interventio ninanon-critica ldriv-
ing situation.
The system maybei mpaired or maynot function
if:
Rther eisp oorvisibility ,e.g.d ue to insufficient
illuminatio nofthe road, or du etosnow,rain,
fog or spray
Rther eisg lare,e.g.f rom oncoming traffic, the
sunorr eflections (e.g. when the roa dsurface
is wet)
Rthe windshield is dirty,f ogged up,damag ed or
covered ,for instance by asticker, in the vicin-
ity of the camera
Rthe rada rsensors in the front or rea rbum pers
or the radiato rtrim ar edirty,e .g.o bscured by
snow
Rther eareno, severa lorunclea rlan em arkings
for alan e, e.g .inareas with roa dconstruction
work
Rthe lane marking sareworn away ,darkorc ov-
ere dup,e.g .byd irtors now
Rthe distance to the vehicl einfront is too small
and the lane marking sthusc annotbed etec-
ted
Rthe lane marking schange quickly, e.g .lan es
branch off, cros sone another or merge
Rthe roa disnarrow and winding
Rtherearestrong shadows cas tonthe road
If no vehicl eisdetectedint he adjacent lane and
broken lane marking saredete
cted, no lane-cor-
recting brake applicatio nism ade.
Warning vibration in the steering wheel
Aw arning maybeg iven if afront whee lpasses
ove ralanem arking .Itw illw arny ou by means of
intermittent vibratio ninthe steering whee lfor
up to 1.5 seconds.
Lane -correcting brake application
If you leave you rlane, unde rcertai ncircumstan-
ces the vehicle will brake briefly on one side.
Thisism eant to assist you in bringing the vehicle
back to the original lane.
GWARNING
Al ane-correcting brake application cannot
always bring the vehicle back into the original lane. Thereisar isk of an accident.
Always steer, brake or accelerate yourself,
especially if Active Lane Keeping Assis twarns
you or makes alane-correcting brake appli-
cation.
If al ane-correcting brake application occurs,
display :appear sinthe multifunction display.
The brake application also slightly reduces vehi-
cle speed.
Thisf unctio nisavailable in the range between
40 mph and 120 mph (60 km/h and 200 km/h).
Al ane-correcting brake application can be made
after driving over alanem arking detected as
being solid or broken. Before this, awarning
must be give nbym eans of intermittent vibration
in the steering wheel. In addition, alanew ith
lane markings on both sides must be recog-
nized.
In the case of abroken lane marking being
detected,al ane-correcting brake application
can only be mad eifavehicle has beend etected
in the adjacent lane. Oncoming vehicles ,over-
taking vehicles and vehicles in adjacent lanes
can be detected.
iAf urthe rlane-correcting brake application
can only occur after you rvehicle has returned
to the original lane.
No lane-correcting brake application occurs if:
Ryou clearly and actively steer, brake or accel- erate.
Ryou cut the corner on asharp bend.
Ryou have switched on the turn signal.
Rad riving safety system intervenes, e.g. ESP®,
PRE-SAFE®Brake or Active Blind Spot Assist.
198Driving systems
Drivin gand parking
Page 287 of 354
Notesonp rogrammin gthe remote con-
trol
Canadia nradio frequency laws require a"break"
(o ri nterruption) of the transmission signals
after broadcasting for afew seconds. Therefore,
these signals mayn ot last long enoughfor the
integrated garage door opener. Th esigna lisn ot
recognize dduringp rogramming. Comparable
with Canadia nlaw ,som eU .S. garage door open-
ers also featur ea"break".
Procee dasfollows:
Rif youliveinC anada
Rif yo uhaved ifficultie sprogramming the
garage door opene r(regardles sofwhere you
live) when using the programming steps
XPress and hol done of buttons ;to? on the
integrated garage door opener.
After ashort time, indicator lamp :lights up
yellow.
XReleas ethe button.
Indicato rlam p: flashe syellow.
XPress button Bof garage door remote con-
trol Afor two seconds, thenr elease it for two
seconds.
XPress button Bagai nfor two seconds.
XRepeat thiss equence on button Bof remote
control Aunti lindicator lamp :lights up
green.
When indicator lamp :lights up green: pro-
gramming is finished.
When indicator lamp :flashe sgreen: pro-
gramming wa ssuccessful. Th enext stepi
sto
s
ynchronize the rolling code.
XReleas ebutton Bof remote control Aof the
garage door drive.
If indicator lamp :lights up red :repea tthe
programming proces sfor the corresponding
button on the rear-view mirror. When doing
so, vary the distance between remote control
A and the rear-view mirror.
Th er equired distance between remote con-
trol Aand the integrated garage door opener
depends on the garage door drive system.
Severala ttempts might be necessary.Y ou
shoul dteste very positio nfor at least
25 second sbefor etrying another position.
Problems whe nprogramming
If you are experiencing problems programing
the integrated garage door opener on the rear-
view mirror, take note of the following instruc-
tions:
RCheck the transmitter frequency use dby
garage door drive remote control Aand
whethe ritissupported. The transmitter fre-
quency can usuall ybefound on the back of
the garage door drive remote control.
The integrated garage door opener is com-
patible with devices that have units which
operate in the frequency range of 280 to
433 MHz.
RReplace the batteries in garage door remote
control A.This increases the likelihoo dthat
garage door remote control Awilltransmit a
strong and precis esigna ltot he integrated
garage door opener.
RWhen programming, hold remote control A
at varying distances and angle sfrom the but-
ton which you are programming. Try various
angle satad istance between 2and 12 inches
(5to 30 cm) or at the same angle but at varying
distances.
RIf another remote control is available for the
same garage door drive ,repeatt he same pro-
gramming steps with this remote control.
Before performing these steps, make sure
that new batteries have been installed in
garage door drive remote control A.
RNote that some remote controls only transmit
foralimited amount of time (the indicator
lam pont he remote control goes out). Press
button Bon remote control Aagain before
transmission ends.
RAlign the antenna cabl eofthe garage door
opener unit. This can improve signa lrecep-
tion/transmission.
Opening/closingt he garage door
After it has been programmed, the integrated
garage door opener performs the function of the
garage door system remote control. Please also
read the operating instructions for the garage
door system.
XTurn the SmartKey to position 2in the ignition
lock (Ypag e131).
XPress button ;,=or? which you have
programmed to operate the garage door.
Garage door syste mwithafixed code: indi-
cator lamp :lights up green.
Features285
Stowage and features
Z
Page 288 of 354
Garage door system witharolling code: indi-
cator lamp :flashes green.
The transmitte rwill transmit asignal as long
as th ebutton is pressed. The transmission is
halted after amaximum of te nseconds and
indicator lamp :lightsupy ellow.
XPress button ;,=or? again if necessary.
Clearing th ememory
Makes ure that you clear th ememory of the
integrate dgarag edoor opener before sellingt he
vehicle.
XTurn th eSma rtKey to position 2in th eignition
lock(Ypage 131).
XPress and hold buttons ;and ?.
The indicator lamp initially lightsupy ellow
and then green.
XRelease buttons ;and ?.
The memory of th eintegrate dgarag edoor
opener in th erear-view mirror is cleared.
Floormats
GWARNING
Object sinthedriver'sf ootwell can restrict the
pedal travel or obstruc tadepressedp edal.
The operatin gand road safety of th evehicle is
jeopardized. Thereisar isk of an accident.
Makes ure that all object sinthevehicle are
stowed correctly, and that they canno tenter
th ed river'sf ootwell. Install th efloormats
securely and as specified in order to ensure
sufficient clearance for th epedals.Don otuse
loosef loormats and do no tplace floormats on
to pofo neanother.
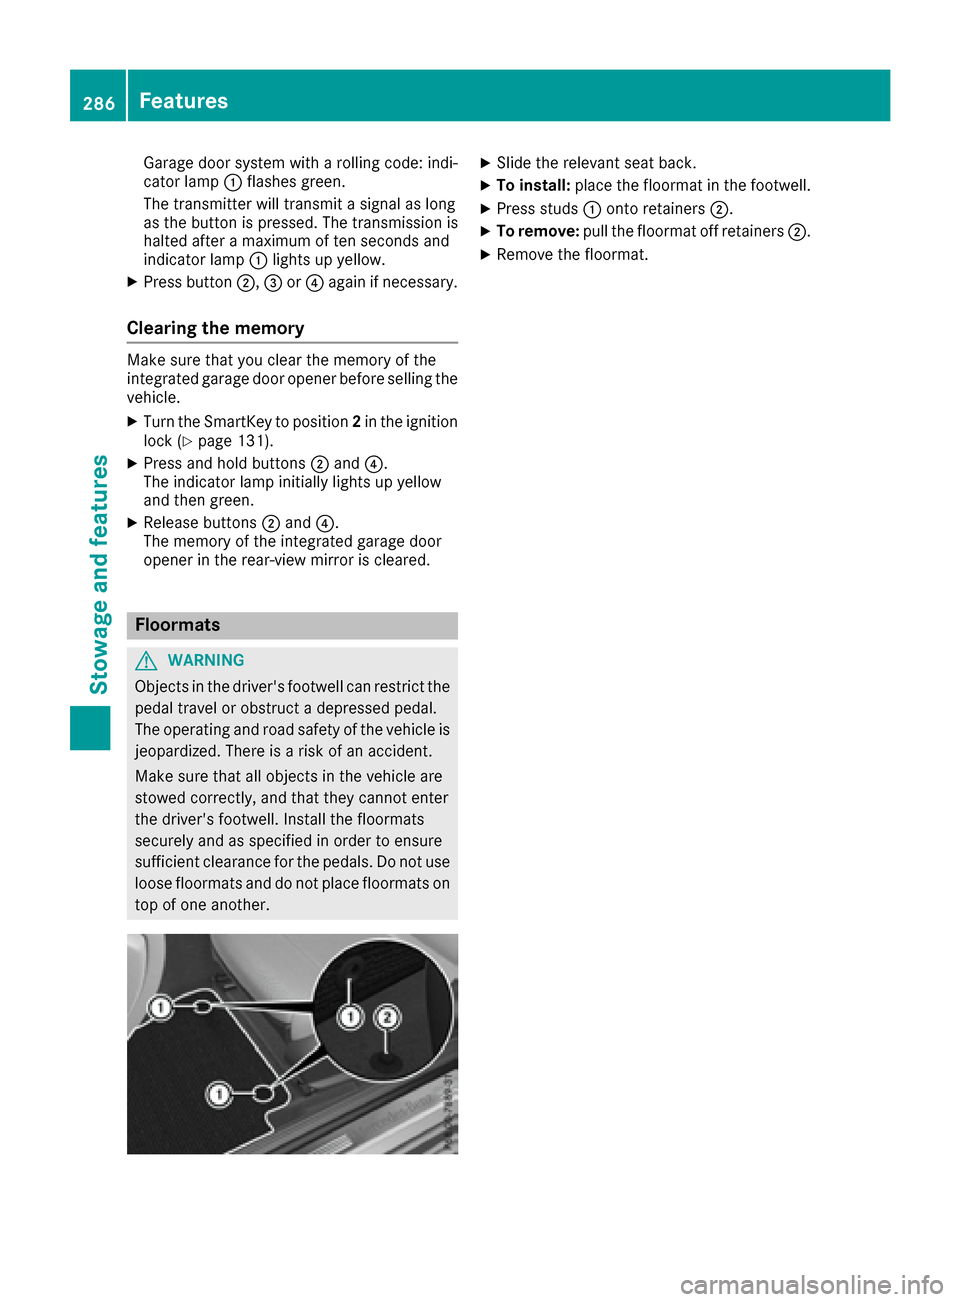
XSlid ethe relevan tseat back.
XTo install: place thefloormat in th efootwell.
XPress studs :onto retainers ;.
XTo remove:pull thefloormat off retainers ;.
XRemovethefloormat.
286Features
Stowage and features
Page 298 of 354

Cleaning themirror turn signals
!Only use cleanin gagents or cleanin gcloths
that are suitable for plastic lenses.U nsuitable
cleanin gagents or cleanin gcloth scould
scratch or damag ethe plastic lenses of the
mirror tur nsignals.
XClean th eplastic lenses of th emirror tur nsig-
nals in th eexteri or mirror housing usingaw et
sponge and mild cleanin gagent, e.g.
Mercedes-Ben zcar shampoo or cleaning
cloths.
Cleaning th esensors
!If you clean th esensorsw ithapower
washer, mak esure that you keep adistance
of at least 11.8 in (30 cm)between the vehicl e
and th epower washer nozzle. Information
about th ecorrec tdistanc eisavailabl efrom
th ee quipment manufacturer.
XClean sensors :of th edriving systems with
water, car shampoo and asoftc loth.
Cleaning th erearv iew camera and 360°
camera
!Do no tclean th ecamera lensa nd thearea
aroun dthe rear view camera or 360°camera
with ahigh-pressurew aterjet.
XMakes ure that th evehicle is stationar yand
that th eSmartKey is in position 2in th eigni-
tio nlock.
XOpen th ecamera cover for cleanin gvia the
multimedia system (see th eseparate operat-
ing instructions).
XTo clean th ecamera: use clean wate rand a
softc loth to clean camera lens :.
360°camera: if you driveatspeeds above
20 mph (30 km/h) or with th eSma rtKey in posi-
tion 0or 1in th eignition lock, th ecover of the
360° camera closes automatically.
Cleaning th eexhaust pipes
GWARNING
The exhaust tail pipe and tail pipe trim can
become ver yhot.Ify ou com eintoc ontact
with these part softhevehicle ,you coul dburn
yourself. Thereisar isk of injury.
Always be particularly careful aroun dthe
exhaust tail pipe and th etail pipe trim. Allow
these component stocooldown before touch-
ing them.
!Do no tclean th eexhaust pipe with acid-
based cleanin gagents ,suchasb athroom
cleaner or wheel cleaner.
!Mercedes-AM Gvehicle swith black exhaust
pipes:t heblack-chrome tailpipe finishers
shouldn otbe polished with achrom epolish.
They will otherwise lose their black sheen. For
optimal care, th efaceplates shouldber ubbed
with alightly oiled cloth after everyc ar wash.
Commercially availabl eengine and car eoils
are suitable for this.
For heavier soiling, you can apply afinep aint-
work polishw itham icrofiber cloth .Remove
th ee xcess polishr esidue after polishing.
296Care
Maintenance and care