key MERCEDES-BENZ C-CLASS SALOON 2014 Owners Manual
[x] Cancel search | Manufacturer: MERCEDES-BENZ, Model Year: 2014, Model line: C-CLASS SALOON, Model: MERCEDES-BENZ C-CLASS SALOON 2014Pages: 489, PDF Size: 14.88 MB
Page 354 of 489
Display messages
Possible causes/consequences and
M
MSolutions Because there is interference from a strong source of radio waves,
the key is not detected whilst the engine is running.
A warning tone also sounds.
X Pull over and stop the vehicle safely as soon as possible, paying
attention to road and traffic conditions.
X Secure the vehicle to prevent it from rolling away (Y page 207).
X Operate the vehicle with the key in the ignition lock if necessary. Â
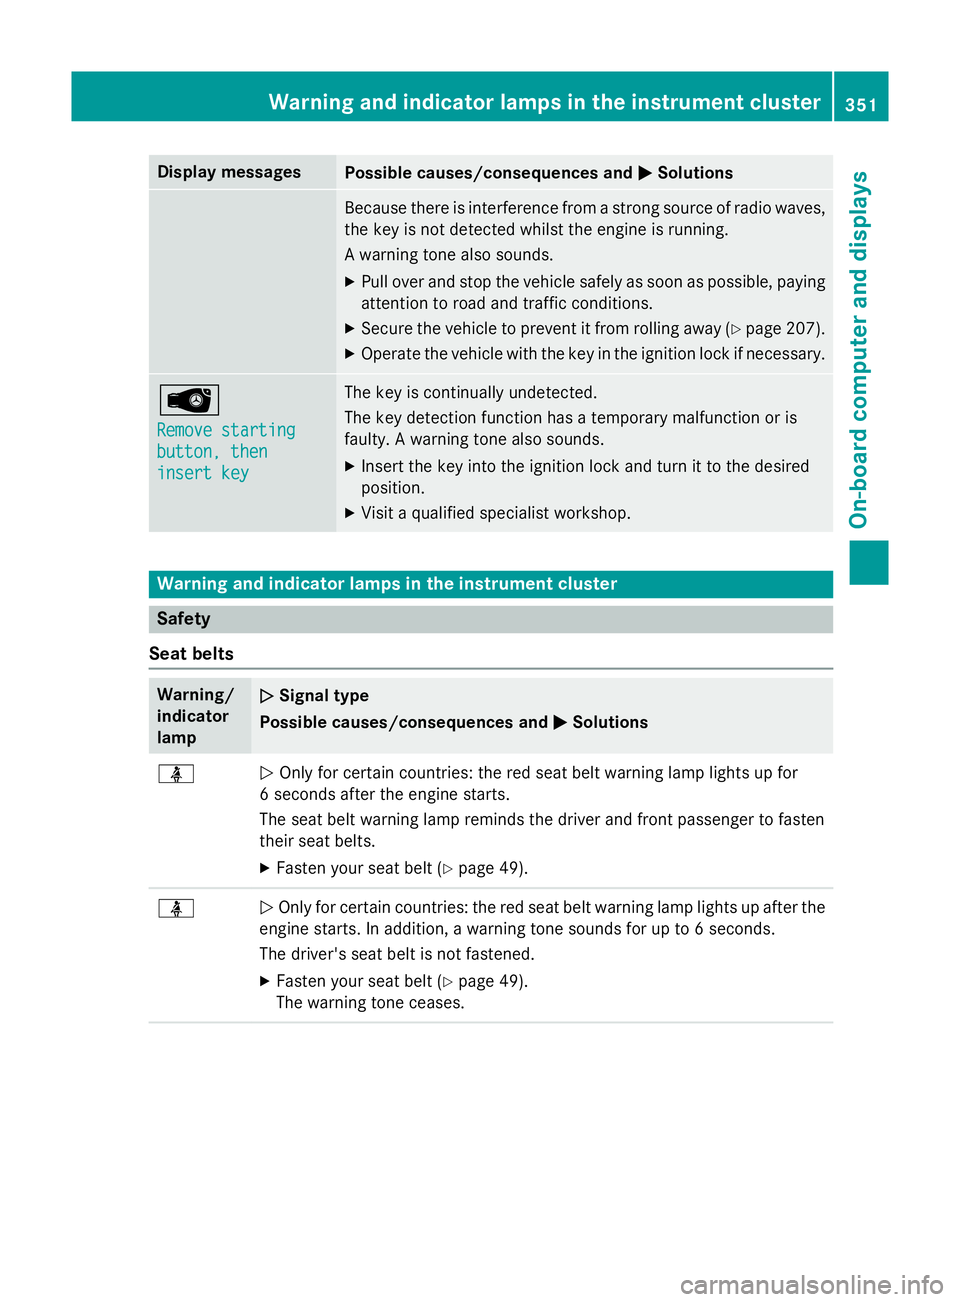
Remove starting Remove starting
button, then button, then
insert key insert key The key is continually undetected.
The key detection function has a temporary malfunction or is
faulty. A warning tone also sounds.
X Insert the key into the ignition lock and turn it to the desired
position.
X Visit a qualified specialist workshop. Warning and indicator lamps in the instrument cluster
Safety
Seat belts Warning/
indicator
lamp
N N
Signal type
Possible causes/consequences and M
MSolutions ü
N
Only for certain countries: the red seat belt warning lamp lights up for
6 seconds after the engine starts.
The seat belt warning lamp reminds the driver and front passenger to fasten
their seat belts.
X Fasten your seat belt (Y page 49).ü
N
Only for certain countries: the red seat belt warning lamp lights up after the
engine starts. In addition, a warning tone sounds for up to 6 seconds.
The driver's seat belt is not fastened.
X Fasten your seat belt (Y page 49).
The warning tone ceases. Wa
rning and indi cator lamps in the instrument cluster
351On-board computer and displays Z
Page 372 of 489
R
Close lockable stowage compartments
while driving.
R Stow and secure objects that are heavy,
hard, pointy, sharp-edged, fragile or too
large in the boot.
Observe the loading guidelines (Y page 368).
Front stowage compartments Glove compartment
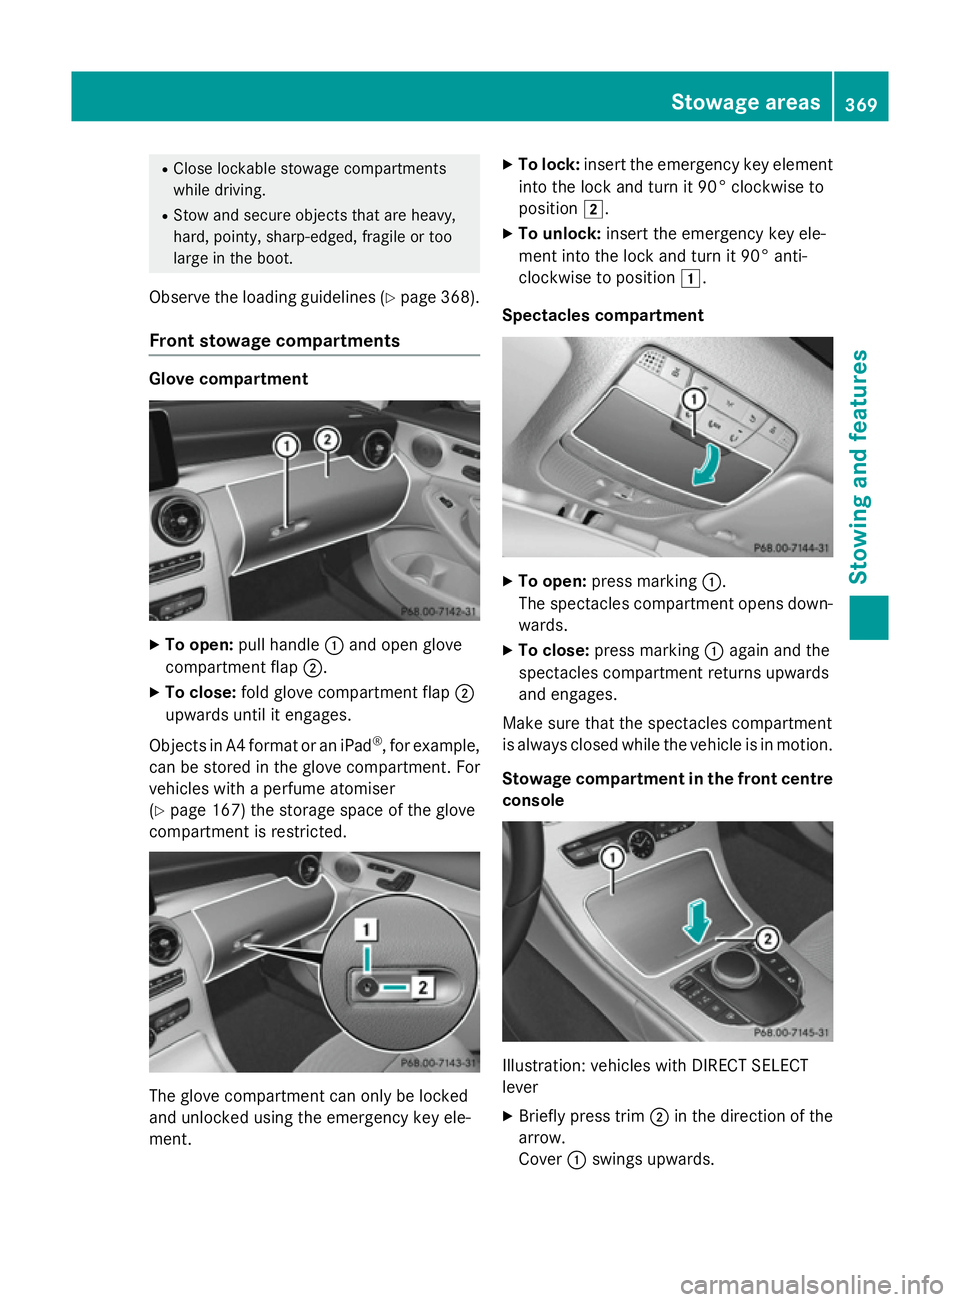
X
To open: pull handle :and open glove
compartment flap ;.
X To close: fold glove compartment flap ;
upwards until it engages.
Objects in A4 format or an iPad ®
, for example,
can be stored in the glove compartment. For
vehicles with a perfume atomiser
(Y page 167) the storage space of the glove
compartment is restricted. The glove compartment can only be locked
and unlocked using the emergency key ele-
ment. X
To lock: insert the emergency key element
into the lock and turn it 90° clockwise to
position 2.
X To unlock: insert the emergency key ele-
ment into the lock and turn it 90° anti-
clockwise to position 1.
Spectacles compartment X
To open: press marking :.
The spectacles compartment opens down- wards.
X To close: press marking :again and the
spectacles compartment returns upwards
and engages.
Make sure that the spectacles compartment
is always closed while the vehicle is in motion.
Stowage compartment in the front centre
console Illustration: vehicles with DIRECT SELECT
lever
X Briefly press trim ;in the direction of the
arrow.
Cover :swings upwards. Stowage areas
369Stowing and features Z
Page 382 of 489
either close the side window or retract the
roller sunblind before driving at high
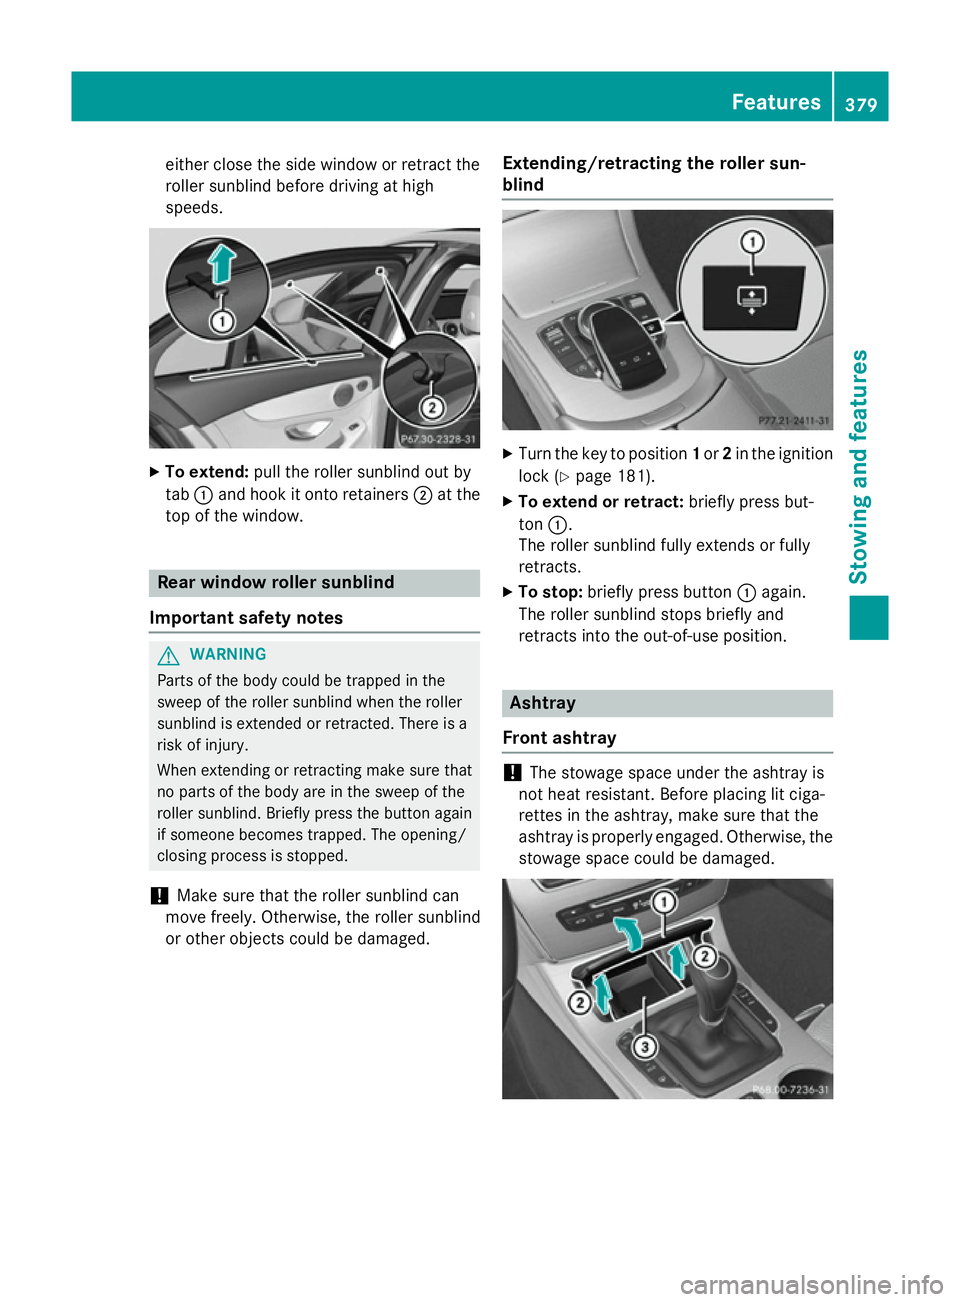
speeds. X
To extend: pull the roller sunblind out by
tab :and hook it onto retainers ;at the
top of the window. Rear window roller sunblind
Important safety notes G
WARNING
Parts of the body could be trapped in the
sweep of the roller sunblind when the roller
sunblind is extended or retracted. There is a
risk of injury.
When extending or retracting make sure that
no parts of the body are in the sweep of the
roller sunblind. Briefly press the button again if someone becomes trapped. The opening/
closing process is stopped.
! Make sure that the roller sunblind can
move freely. Otherwise, the roller sunblind
or other objects could be damaged. Extending/retracting the roller sun-
blind X
Turn the key to position 1or 2in the ignition
lock (Y page 181).
X To extend or retract: briefly press but-
ton :.
The roller sunblind fully extends or fully
retracts.
X To stop: briefly press button :again.
The roller sunblind stops briefly and
retracts into the out-of-use position. Ashtray
Front ashtray !
The stowage space under the ashtray is
not heat resistant. Before placing lit ciga-
rettes in the ashtray, make sure that the
ashtray is properly engaged. Otherwise, the
stowage space could be damaged. Features
379Stowing and features Z
Page 384 of 489
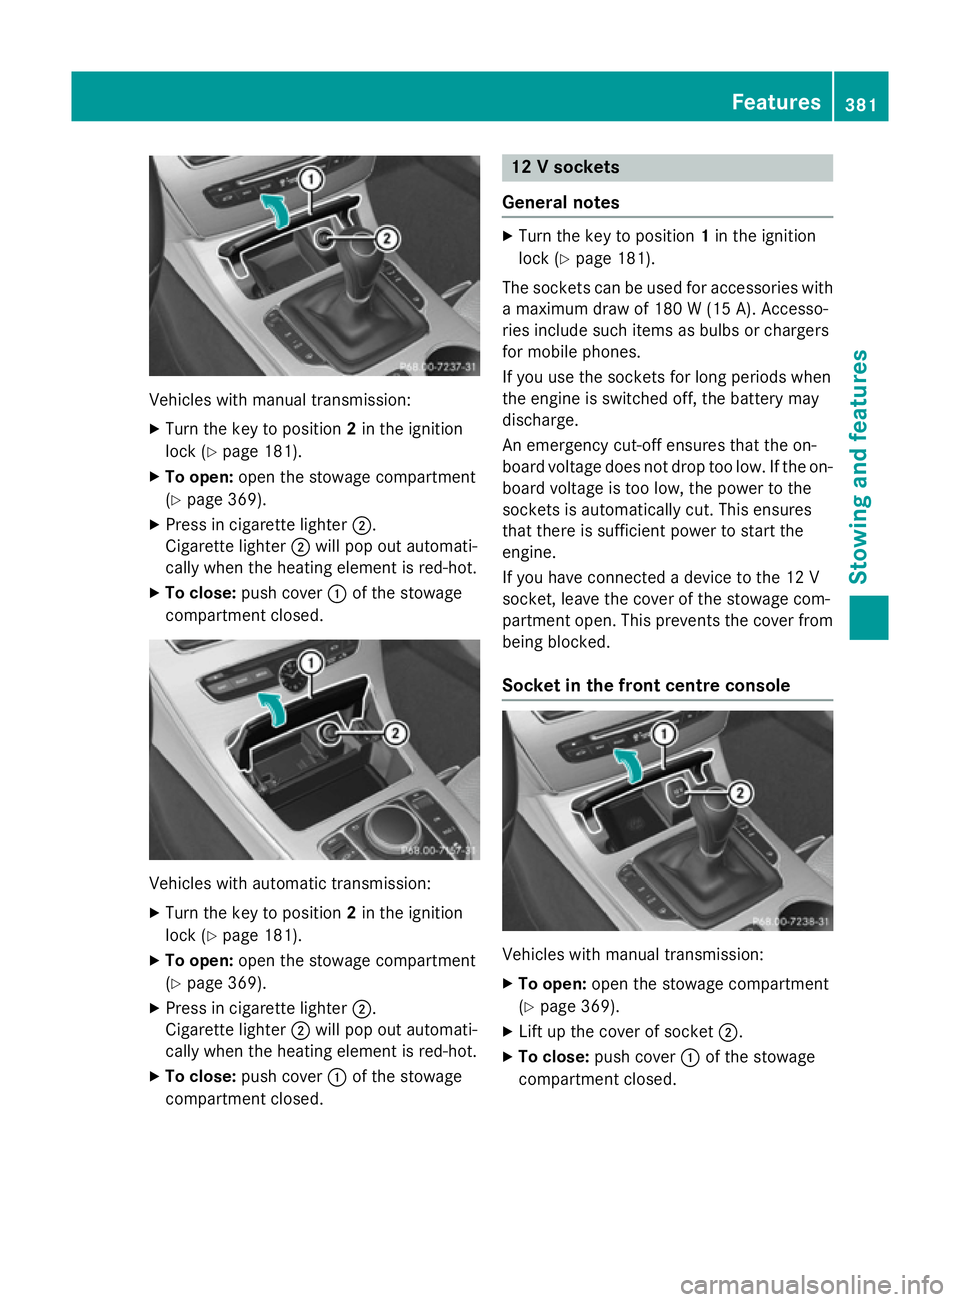
Vehicles with manual transmission:
X
Turn the key to position 2in the ignition
lock (Y page 181).
X To open: open the stowage compartment
(Y page 369).
X Press in cigarette lighter ;.
Cigarette lighter ;will pop out automati-
cally when the heating element is red-hot.
X To close: push cover :of the stowage
compartment closed. Vehicles with automatic transmission:
X
Turn the key to position 2in the ignition
lock (Y page 181).
X To open: open the stowage compartment
(Y page 369).
X Press in cigarette lighter ;.
Cigarette lighter ;will pop out automati-
cally when the heating element is red-hot.
X To close: push cover :of the stowage
compartment closed. 12 V sockets
General notes X
Turn the key to position 1in the ignition
lock (Y page 181).
The sockets can be used for accessories with a maximum draw of 180 W(15 A). Accesso-
ries include such items as bulbs or chargers
for mobile phones.
If you use the sockets for long periods when
the engine is switched off, the battery may
discharge.
An emergency cut-off ensures that the on-
board voltage does not drop too low. If the on-
board voltage is too low, the power to the
sockets is automatically cut. This ensures
that there is sufficient power to start the
engine.
If you have connected a device to the 12 V
socket, leave the cover of the stowage com-
partment open. This prevents the cover from
being blocked.
Socket in the front cent re console Vehicles with manual transmission:
X To open: open the stowage compartment
(Y page 369).
X Lift up the cover of socket ;.
X To close: push cover :of the stowage
compartment closed. Features
381Stowing an d features Z
Page 390 of 489
Operating the mobile phone
You can operate the telephone using the
6
and~ buttons on the multifunction
steering wheel. You can operate other mobile
phone functions via the on-board computer
(Y page 304).
When you remove the key from the ignition
lock, the mobile phone is disconnected from
the vehicle. You can then no longer make calls using the hands-free system.
If a call is active and you remove the key from
the ignition lock, the conversation is trans-
ferred over to the mobile telephone. It is then possible to continue the conversation on the
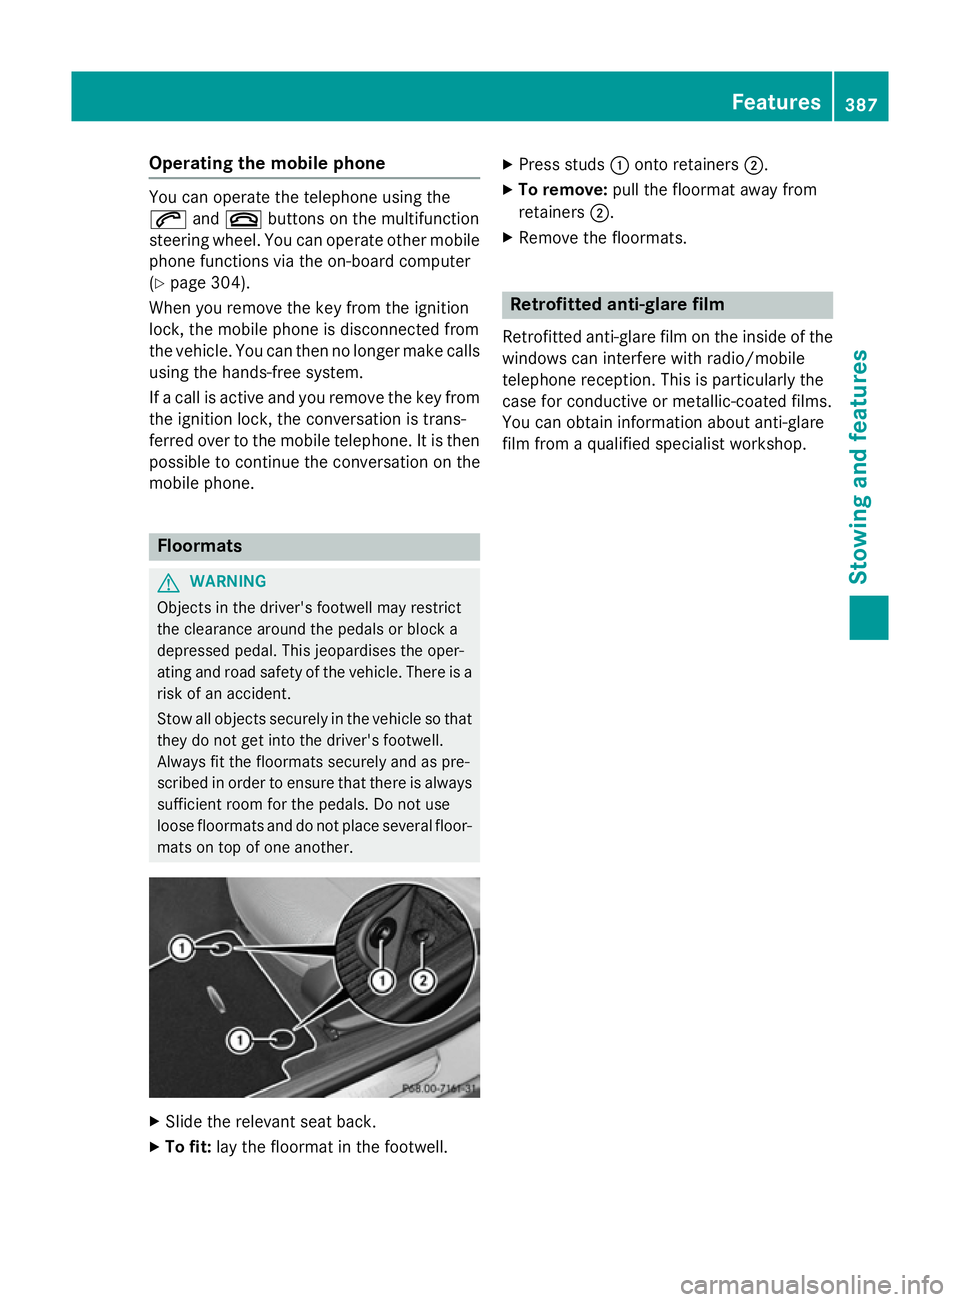
mobile phone. Floormats
G
WARNING
Objects in the driver's footwell may restrict
the clearance around the pedals or block a
depressed pedal. This jeopardises the oper-
ating and road safety of the vehicle. There is a risk of an accident.
Stow all objects securely in the vehicle so that
they do not get into the driver's footwell.
Always fit the floormats securely and as pre-
scribed in order to ensure that there is always sufficient room for the pedals. Do not use
loose floormats and do not place several floor- mats on top of one another. X
Slide the relevant seat back.
X To fit: lay the floormat in the footwell. X
Press studs :onto retainers ;.
X To remove: pull the floormat away from
retainers ;.
X Remove the floormats. Retrofitted anti-glare film
Retrofitted anti-glare film on the inside of the
windows can interfere with radio/mobile
telephone reception. This is particularly the
case for conductive or metallic-coated films.
You can obtain information about anti-glare
film from a qualified specialist workshop. Features
387Stowing and features Z
Page 397 of 489
Allow the engine to cool before opening the
cap. Wear gloves and protective eyewear
when opening. Slowly turn the cap half a turn to allow pressure to escape. X
Park the vehicle on a level surface.
Only check the coolant level if the vehicle is
on a level surface and the engine has
cooled down.
X Turn the key to position 2in the ignition
lock (Y page 181).
or
X On vehicles with KEYLESS-GO, press the
Start/Stop button twice (Y page 181).
X Check the coolant temperature display in
the instrument cluster.
The coolant temperature must be below
70 †.
X Turn the key to position 0(Y page 181) in
the ignition lock.
or
X On vehicles with KEYLESS-GO, pull the
Start/Stop button from the ignition lock
(Y page 181).
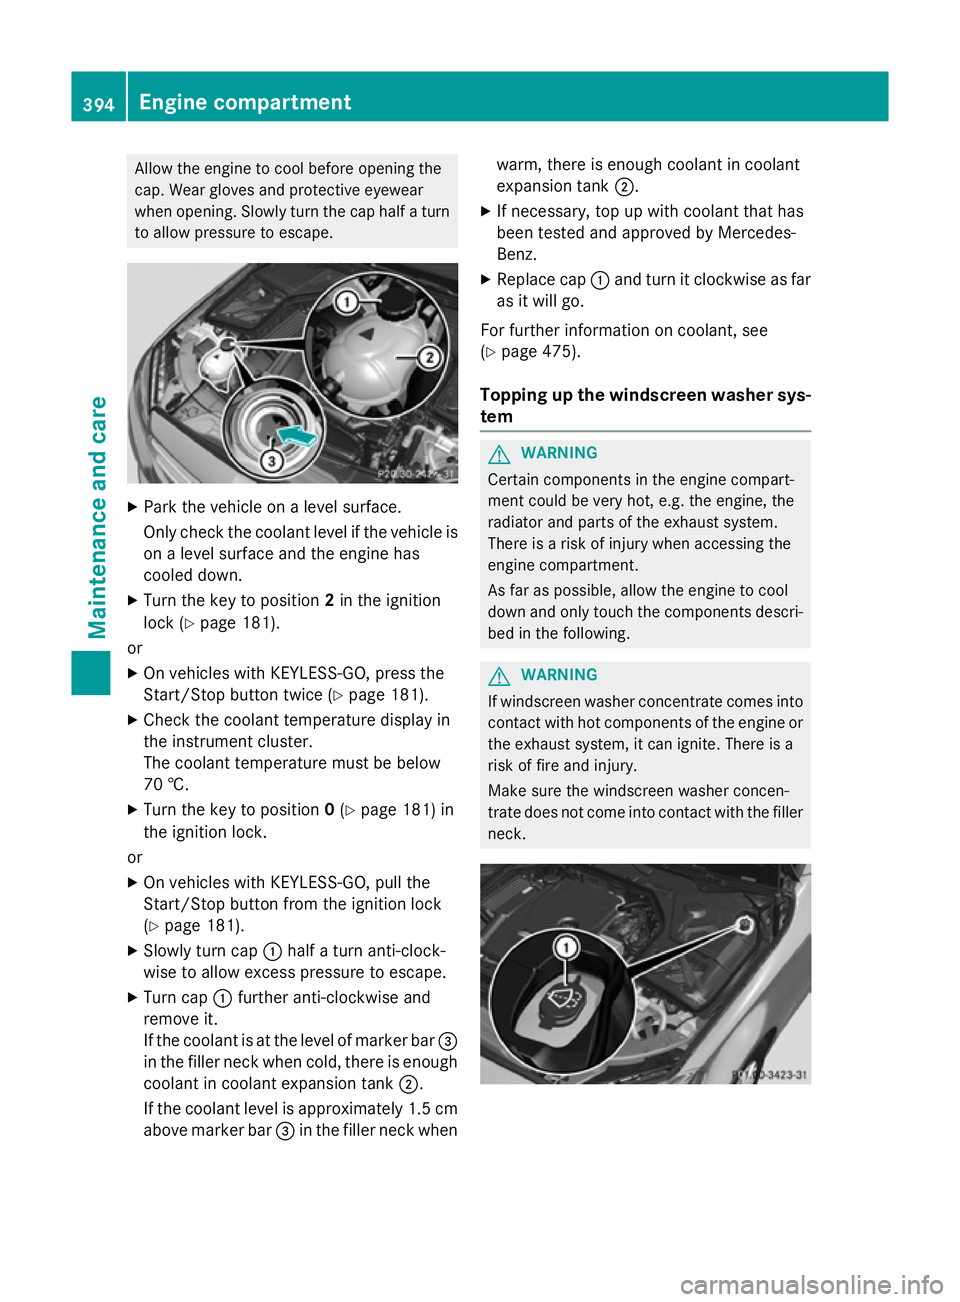
X Slowly turn cap :half a turn anti-clock-
wise to allow excess pressure to escape.
X Turn cap :further anti-clockwise and
remove it.
If the coolant is at the level of marker bar =
in the filler neck when cold, there is enough coolant in coolant expansion tank ;.
If the coolant level is approximately 1.5 cm above marker bar =in the filler neck when warm, there is enough coolant in coolant
expansion tank
;.
X If necessary, top up with coolant that has
been tested and approved by Mercedes-
Benz.
X Replace cap :and turn it clockwise as far
as it will go.
For further information on coolant, see
(Y page 475).
Topping up the windscreen washer sys-
tem G
WARNING
Certain components in the engine compart-
ment could be very hot, e.g. the engine, the
radiator and parts of the exhaust system.
There is a risk of injury when accessing the
engine compartment.
As far as possible, allow the engine to cool
down and only touch the components descri- bed in the following. G
WARNING
If windscreen washer concentrate comes into contact with hot components of the engine or
the exhaust system, it can ignite. There is a
risk of fire and injury.
Make sure the windscreen washer concen-
trate does not come into contact with the filler neck. 394
Engine compartmentMaintenance and care
Page 400 of 489
After washing the vehicle, brake carefully
while paying attention to the traffic conditions in order to restore full braking efficiency.
! If DISTRONIC PLUS or the HOLD function
is activated, the vehicle brakes automati-
cally in certain situations. To prevent dam-
age to the vehicle, deactivate DISTRONIC
PLUS and the HOLD function in the follow-
ing or other similar situations:
R when towing the vehicle
R in the car wash
! Make sure:
R the side windows and sliding sunroof are
closed completely.
R the blower for the ventilation/heating is
switched off (OFF button is depressed).
R the windscreen wiper switch is at posi-
tion 0
R the 360° camera or reversing camera is
switched off.
The vehicle could otherwise be damaged.
! If the key is within the rear detection
range of KEYLESS-GO, the following situa-
tions, for example, could lead to the boot lid
opening unintentionally:
R using a car wash
R using a high-pressure cleaner
Make sure that the key is at least 3 m away
from the vehicle.
! Make sure that the automatic transmis-
sion is in neutral position Nwhen washing
your vehicle in a tow-through car wash. The
vehicle may otherwise be damaged.
R Operating with the key:
Do not remove the key from the ignition
lock. Do not open the driver's door when
the engine is switched off or at very low
speeds. Otherwise, when in transmission position Dor Rthe automatic transmis-
sion will automatically switch to park
position Pand block the wheels.
R Operating with the Start/Stop button: Do not open the driver's door when the
engine is switched off or at very low
speeds. Otherwise, when in transmission
position Dor Rthe automatic transmis-
sion will automatically switch to park
position Pand block the wheels.
Observe the following to make sure that the
automatic transmission stays in position N
neutral:
Operating with the key:
X Make sure the ignition is switched on.
X Make sure that the vehicle is stationary.
X Depress and hold the brake pedal.
X Select neutral N.
X Release the brake pedal.
X Release the electric parking brake, if nec-
essary.
X Switch off the ignition and leave the key in
the ignition lock.
Operating with the Start/Stop button:
X Make sure the ignition is switched on.
X Make sure that the vehicle is stationary.
X Depress and hold the brake pedal.
X Select park position P.
X Release the brake pedal.
X Remove Start/Stop button from ignition
lock (Y page 181).
X Insert the key into the ignition lock.
X Switch on the ignition.
X Depress and hold the brake pedal.
X Select neutral N.
X Release the brake pedal.
X Release the electric parking brake, if nec-
essary.
X Switch off the ignition and leave the key in
the ignition lock.
You can wash the vehicle in an automatic car
wash from the very start.
Wash off excess dirt before cleaning the vehi-
cle in an automatic car wash.
After using an automatic car wash, wipe off
wax from the windscreen and the wiper Care
397Maintenance and care Z
Page 401 of 489
blades. This will prevent smears and reduce
wiping noises caused by residue on the wind-
screen.
Washing by hand In some countries, washing by hand is only
allowed at specially equipped washing bays.
Observe the legal requirements for each indi-
vidual country.
X Do not use hot water and do not wash the
vehicle in direct sunlight.
X Use a soft sponge to clean.
X Use a mild cleaning agent, such as a car
shampoo approved by Mercedes-Benz.
X Thoroughly hose down the vehicle with a
gentle jet of water.
X Do not point the water jet directly towards
the air inlet.
X Use plenty of water and rinse out the
sponge frequently.
X Rinse the vehicle with clean water and dry
thoroughly with a chamois.
X Do not let the cleaning agent dry on the
paintwork.
When using the vehicle in winter, remove all
traces of road salt deposits carefully and as
soon as possible.
High-pressure cleaning equipment G
WARNING
The water jet of circular-jet nozzles (dirt grind- ers) can cause damage not visible from the
outside to tyres or chassis components. Com-
ponents damaged in this way can unexpect-
edly fail. There is a risk of an accident.
Do not use high-pressure cleaners with circu-
lar-jet nozzles to clean the vehicle. Have dam- aged tyres or chassis components replaced
immediately.
! Always maintain a distance of at least
30 cm between the vehicle and the high-
pressure cleaner nozzle. Information about the correct distance is available from the
equipment manufacturer.
Move the high-pressure cleaner nozzle
around when cleaning your vehicle.
Do not aim directly at any of the following:
R tyres
R door gaps, roof gaps, joints etc.
R electrical components
R battery
R connectors
R lights
R seals
R trim elements
R ventilation slots
Damaged seals or electrical components
can lead to leaks or failures.
! If the key is within the rear detection
range of KEYLESS-GO, the following situa-
tions, for example, could lead to the boot lid opening unintentionally:
R using a car wash
R using a high-pressure cleaner
Make sure that the key is at least 3 m away
from the vehicle.
Cleaning the paintwork !
Do not affix:
R stickers
R films
R magnetic plates or similar items
to painted surfaces. You could otherwise
damage the paintwork.
Scratches, corrosive deposits, areas affected by corrosion and damage caused by inade-
quate care cannot always be completely
repaired. In such cases, visit a qualified spe-
cialist workshop.
X Remove impurities immediately, where
possible, whilst avoiding rubbing too hard.
X Soak insect remains with insect remover
and rinse off the treated areas afterwards. 398
CareMaintenance and care
Page 404 of 489
X
Turn the key to position 2in the ignition
lock.
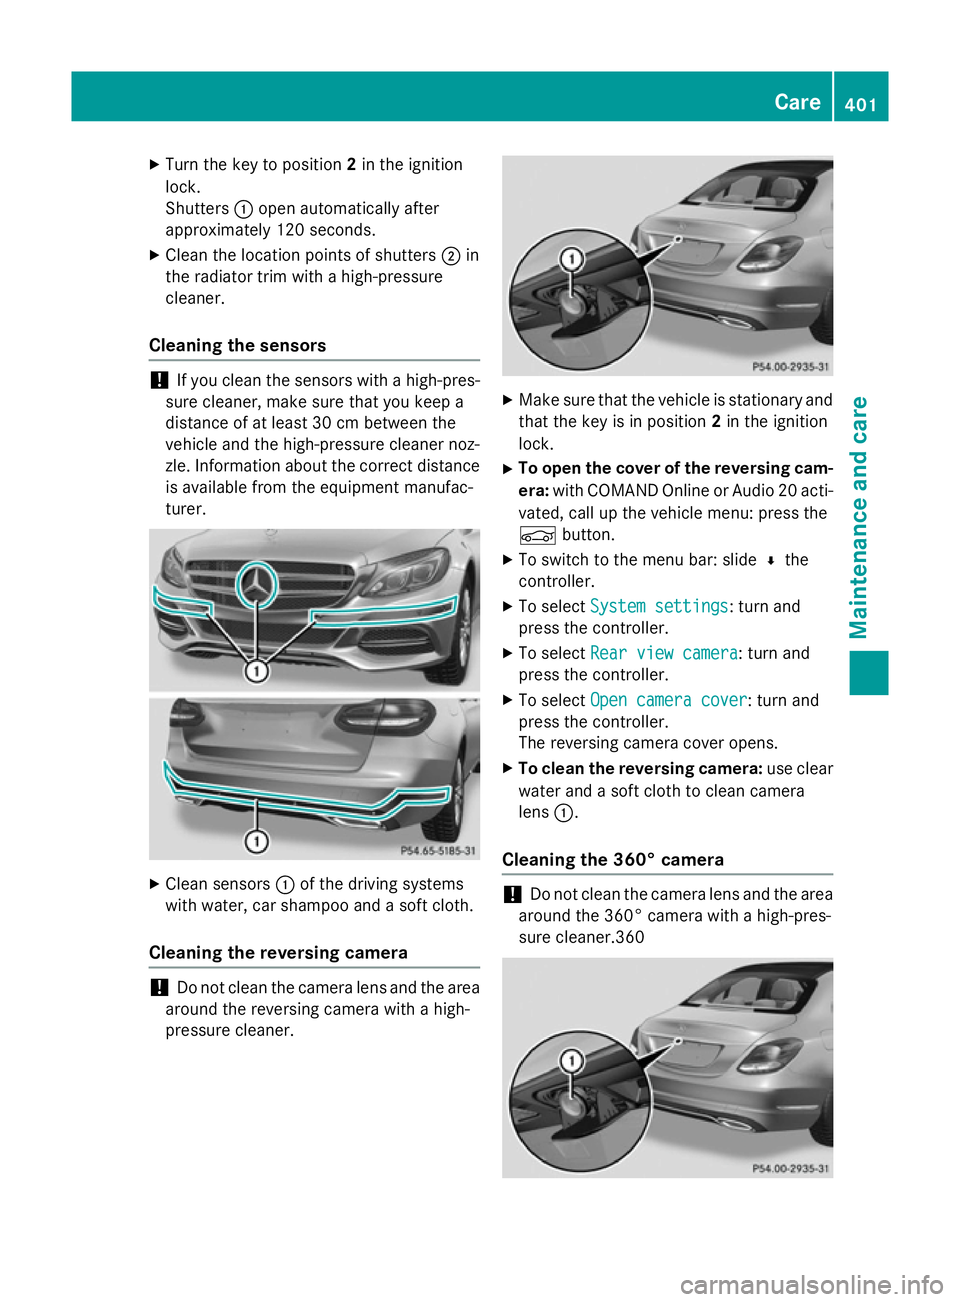
Shutters :open automatically after
approximately 120 seconds.
X Clean the location points of shutters ;in
the radiator trim with a high-pressure
cleaner.
Cleaning the sensors !
If you clean the sensors with a high-pres-
sure cleaner, make sure that you keep a
distance of at least 30 cm between the
vehicle and the high-pressure cleaner noz-
zle. Information about the correct distance is available from the equipment manufac-
turer. X
Clean sensors :of the driving systems
with water, car shampoo and a soft cloth.
Cleaning the reversing camera !
Do not clean the camera lens and the area
around the reversing camera with a high-
pressure cleaner. X
Make sure that the vehicle is stationary and
that the key is in position 2in the ignition
lock.
X To open the cover of the reversing cam-
era: with COMAND Online or Audio 20 acti-
vated, call up the vehicle menu: press the
Ñ button.
X To switch to the menu bar: slide ¬the
controller.
X To select System settings System settings: turn and
press the controller.
X To select Rear view camera
Rear view camera: turn and
press the controller.
X To select Open camera cover
Open camera cover: turn and
press the controller.
The reversing camera cover opens.
X To clean the reversing camera: use clear
water and a soft cloth to clean camera
lens :.
Cleaning the 360° camera !
Do not clean the camera lens and the area
around the 360° camera with a high-pres-
sure cleaner.360 Care
401Maintenance and care Z
Page 405 of 489
X
Make sure that the vehicle is stationary and
that the key is in position 2in the ignition
lock.
X To open the cover of the 360° camera:
with COMAND Online or Audio 20 activa-
ted, call up the vehicle menu: press the
Ñ button.
X To switch to the menu bar: slide ¬the
controller.
X To select System settings System settings: turn and
press the controller.
X To select the 360°
360°camera
camera: turn and press
the controller.
X To select Open camera cover
Open camera cover: turn and
press the controller.
The cover of the 360° camera opens.
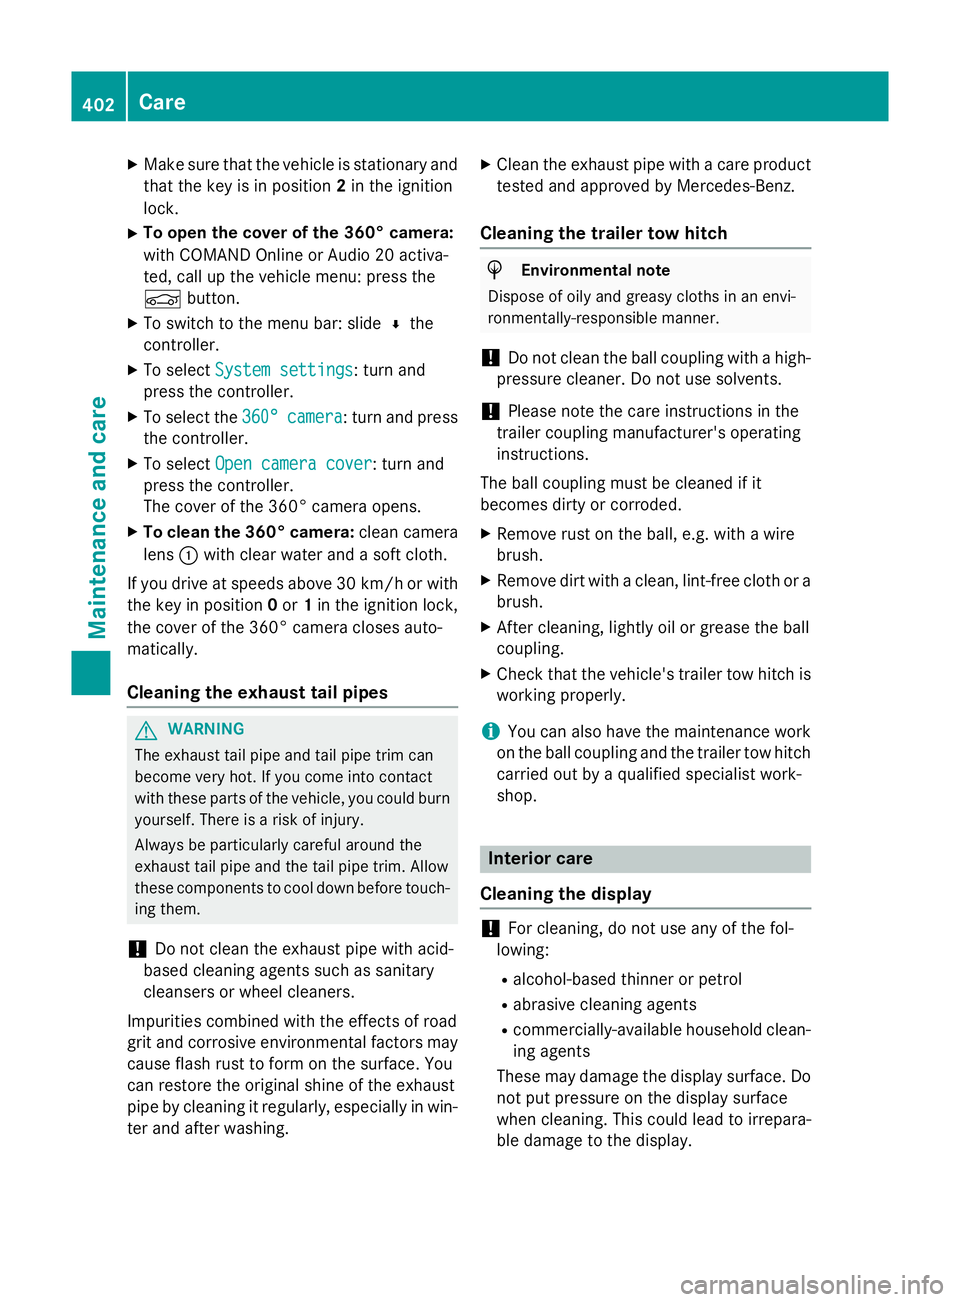
X To clean the 360° camera: clean camera
lens :with clear water and a soft cloth.
If you drive at speeds above 30 km/h or with the key in position 0or 1in the ignition lock,
the cover of the 360° camera closes auto-
matically.
Cleaning the exhaust tail pipes G
WARNING
The exhaust tail pipe and tail pipe trim can
become very hot. If you come into contact
with these parts of the vehicle, you could burn
yourself. There is a risk of injury.
Always be particularly careful around the
exhaust tail pipe and the tail pipe trim. Allow
these components to cool down before touch-
ing them.
! Do not clean the exhaust pipe with acid-
based cleaning agents such as sanitary
cleansers or wheel cleaners.
Impurities combined with the effects of road
grit and corrosive environmental factors may cause flash rust to form on the surface. You
can restore the original shine of the exhaust
pipe by cleaning it regularly, especially in win- ter and after washing. X
Clean the exhaust pipe with a care product
tested and approved by Mercedes-Benz.
Cleaning the trailer tow hitch H
Environmental note
Dispose of oily and greasy cloths in an envi-
ronmentally-responsible manner.
! Do not clean the ball coupling with a high-
pressure cleaner. Do not use solvents.
! Please note the care instructions in the
trailer coupling manufacturer's operating
instructions.
The ball coupling must be cleaned if it
becomes dirty or corroded. X Remove rust on the ball, e.g. with a wire
brush.
X Remove dirt with a clean, lint-free cloth or a
brush.
X After cleaning, lightly oil or grease the ball
coupling.
X Check that the vehicle's trailer tow hitch is
working properly.
i You can also have the maintenance work
on the ball coupling and the trailer tow hitch
carried out by a qualified specialist work-
shop. Interior care
Cleaning the display !
For cleaning, do not use any of the fol-
lowing:
R alcohol-based thinner or petrol
R abrasive cleaning agents
R commercially-available household clean-
ing agents
These may damage the display surface. Do not put pressure on the display surface
when cleaning. This could lead to irrepara-
ble damage to the display. 402
CareMaintenance and care