stop start MERCEDES-BENZ CL CLASS 2010 Owner's Manual
[x] Cancel search | Manufacturer: MERCEDES-BENZ, Model Year: 2010, Model line: CL CLASS, Model: MERCEDES-BENZ CL CLASS 2010Pages: 500, PDF Size: 9.32 MB
Page 193 of 500
To stop seat/steering wheel movement, do
one of the following:
R
Press seat adjustment switch.
R Move steering wheel adjustment stalk.
R Press one of the memory position buttons
or the memory button M.
Do not leave children unattended in the
vehicle, or with access to an unlocked vehicle.
Children could open the driver’s door and
unintentionally activate the easy-entry/exit
feature, which could result in an accident
and/or serious personal injury.
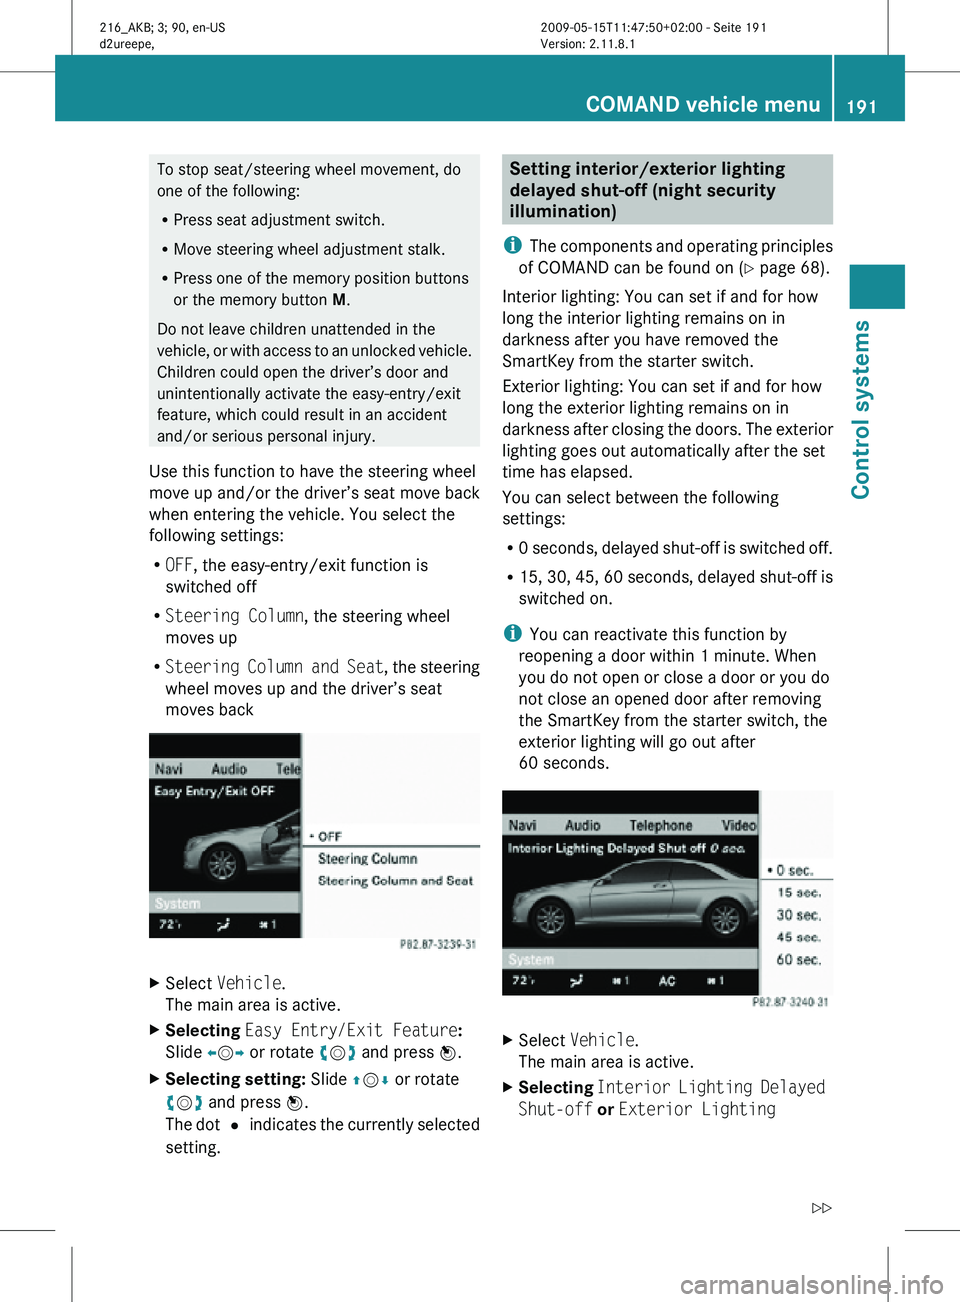
Use this function to have the steering wheel
move up and/or the driver’s seat move back
when entering the vehicle. You select the
following settings:
R OFF, the easy-entry/exit function is
switched off
R Steering Column, the steering wheel
moves up
R Steering Column and Seat , the steering
wheel moves up and the driver’s seat
moves back X
Select Vehicle.
The main area is active.
X Selecting Easy Entry/Exit Feature:
Slide XVY or rotate cVd and press W.
X Selecting setting: Slide ZVÆ or rotate
cVd and press W.
The dot # indicates the currently selected
setting. Setting interior/exterior lighting
delayed shut-off (night security
illumination)
i The components and operating principles
of COMAND can be found on ( Y page 68).
Interior lighting: You can set if and for how
long the interior lighting remains on in
darkness after you have removed the
SmartKey from the starter switch.
Exterior lighting: You can set if and for how
long the exterior lighting remains on in
darkness after closing the doors. The exterior
lighting goes out automatically after the set
time has elapsed.
You can select between the following
settings:
R 0 seconds, delayed shut-off is switched off.
R 15, 30, 45, 60 seconds, delayed shut-off is
switched on.
i You can reactivate this function by
reopening a door within 1 minute. When
you do not open or close a door or you do
not close an opened door after removing
the SmartKey from the starter switch, the
exterior lighting will go out after
60 seconds. X
Select Vehicle.
The main area is active.
X Selecting Interior Lighting Delayed
Shut-off or Exterior Lighting COMAND vehicle menu
191Control systems
216_AKB; 3; 90, en-US
d2ureepe, Version: 2.11.8.1 2009-05-15T11:47:50+02:00 - Seite 191 Z
Page 211 of 500
The engine oil temperature will be shown in
blue if the engine oil temperature has not yet
reached 176‡ (80†). During this time, avoid
driving at full engine speed.
If the engine reaches the overspeed range in
the manual shift program, you will see
up next
to gear indicator : as a reminder to upshift.
Use buttons : or 9 to select the
following functions in the AMG menu:
R RACETIMER (Y page 209)
R Overall analysis ( Y page 210)
R Lap analysis (Y page 210)
RACETIMER G
Warning!
The RACETIMER feature is only for use on
roads and in conditions where high speed
driving is permitted. Racing on public roads is
prohibited under all circumstances. The driver
is and must always remain responsible for
following posted speed limits.
The RACETIMER allows you to time and save
driving stretches.
X Press button = or ; to select the
AMG menu.
X Press button 9 to select the
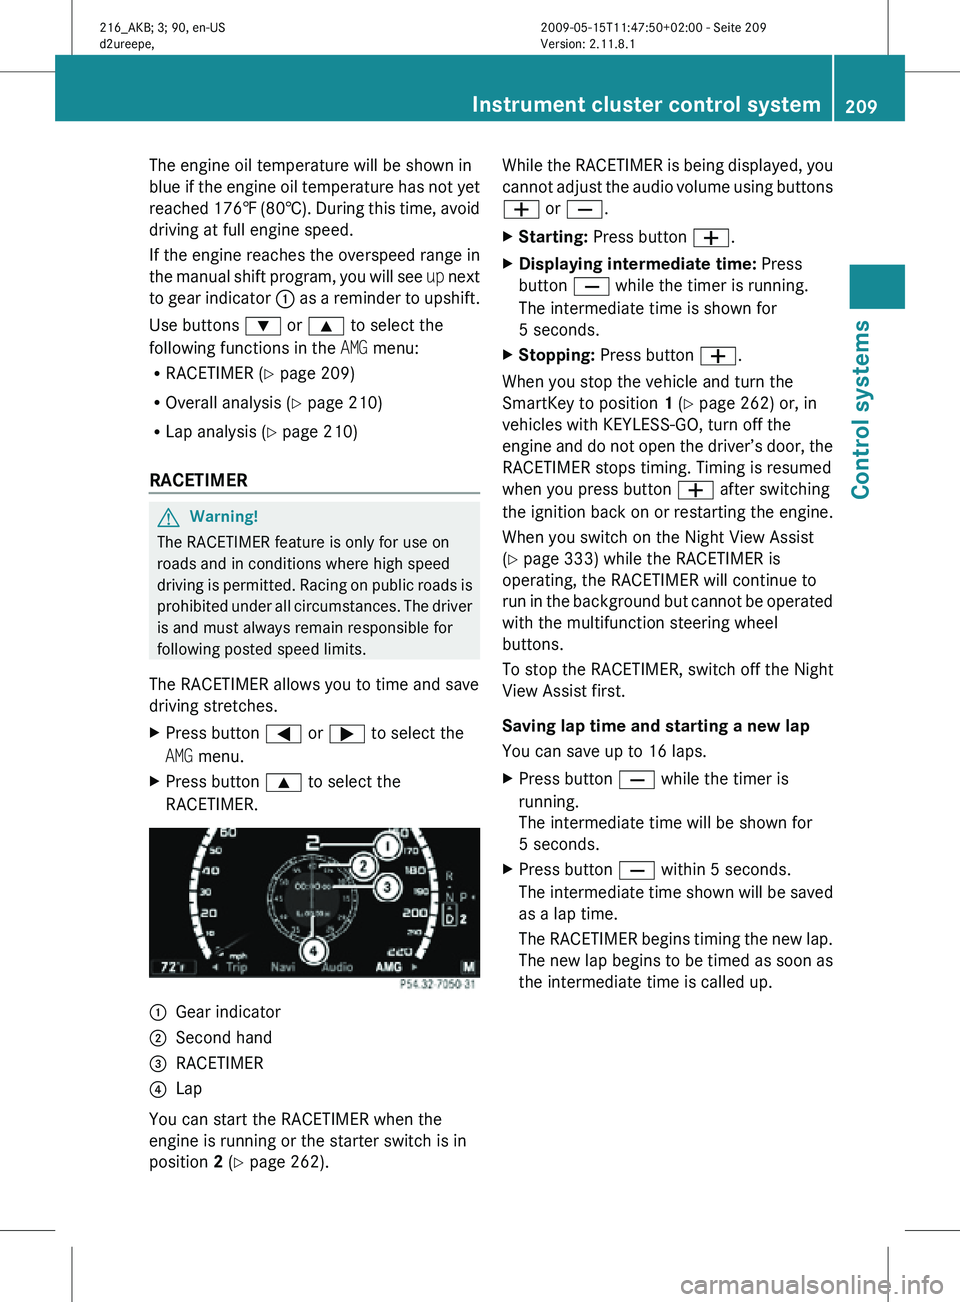
RACETIMER. :
Gear indicator
; Second hand
= RACETIMER
? Lap
You can start the RACETIMER when the
engine is running or the starter switch is in
position 2 (Y page 262). While the RACETIMER is being displayed, you
cannot adjust the audio volume using buttons
W or X.
X
Starting: Press button W.
X Displaying intermediate time: Press
button X while the timer is running.
The intermediate time is shown for
5 seconds.
X Stopping: Press button W.
When you stop the vehicle and turn the
SmartKey to position 1 (Y page 262) or, in
vehicles with KEYLESS-GO, turn off the
engine and do not open the driver’s door, the
RACETIMER stops timing. Timing is resumed
when you press button W after switching
the ignition back on or restarting the engine.
When you switch on the Night View Assist
(Y page 333) while the RACETIMER is
operating, the RACETIMER will continue to
run in the background but cannot be operated
with the multifunction steering wheel
buttons.
To stop the RACETIMER, switch off the Night
View Assist first.
Saving lap time and starting a new lap
You can save up to 16 laps.
X Press button X while the timer is
running.
The intermediate time will be shown for
5 seconds.
X Press button X within 5 seconds.
The intermediate time shown will be saved
as a lap time.
The RACETIMER begins timing the new lap.
The new lap begins to be timed as soon as
the intermediate time is called up. Instrument cluster control system
209Control systems
216_AKB; 3; 90, en-US
d2ureepe, Version: 2.11.8.1 2009-05-15T11:47:50+02:00 - Seite 209 Z
Page 212 of 500
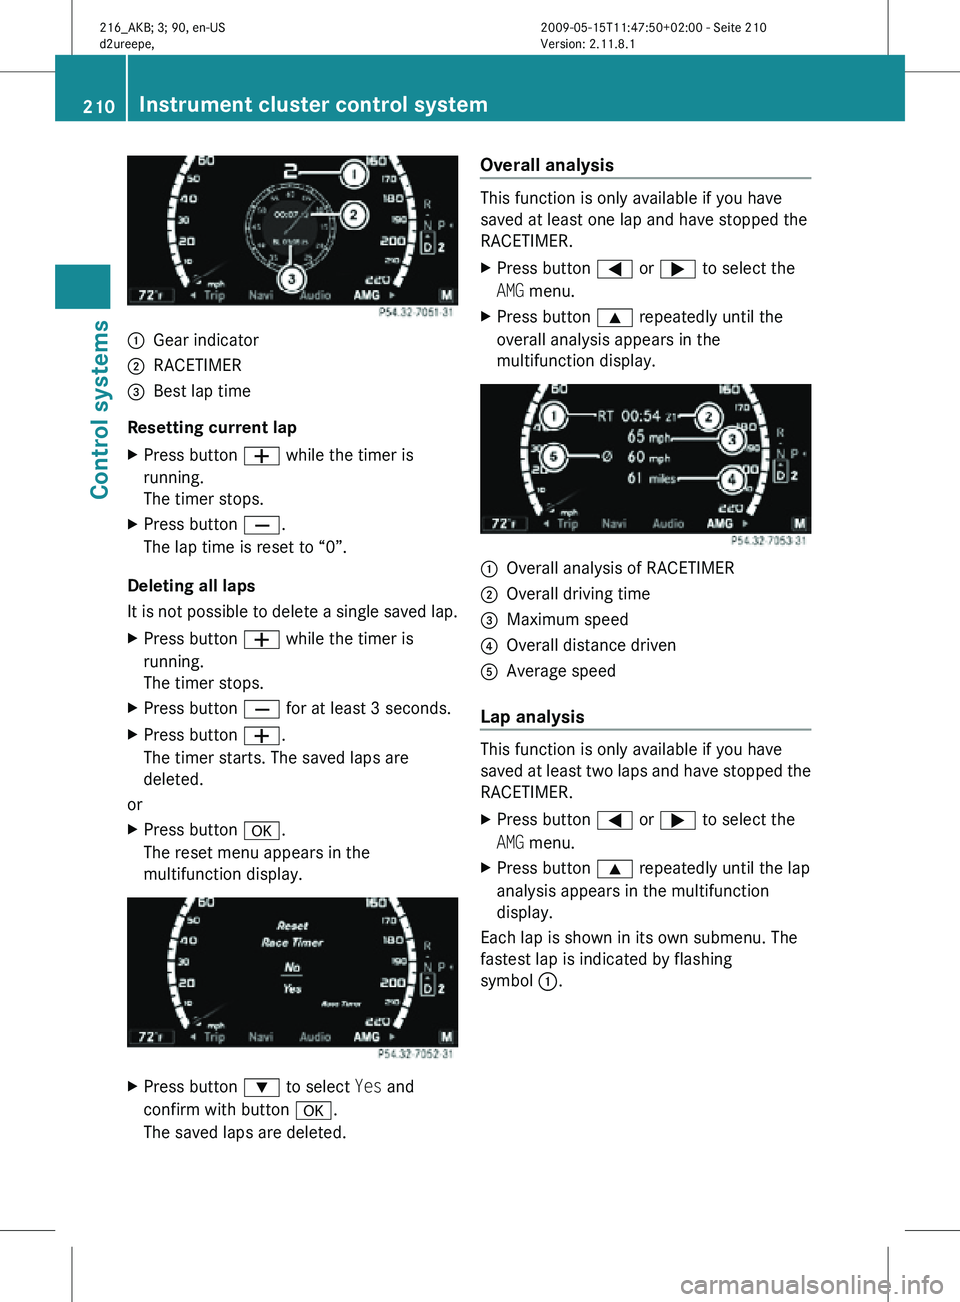
:
Gear indicator
; RACETIMER
= Best lap time
Resetting current lap
X Press button W while the timer is
running.
The timer stops.
X Press button X.
The lap time is reset to “0”.
Deleting all laps
It is not possible to delete a single saved lap.
X Press button W while the timer is
running.
The timer stops.
X Press button X for at least 3 seconds.
X Press button W.
The timer starts. The saved laps are
deleted.
or
X Press button a.
The reset menu appears in the
multifunction display. X
Press button : to select Yes and
confirm with button a.
The saved laps are deleted. Overall analysis This function is only available if you have
saved at least one lap and have stopped the
RACETIMER.
X
Press button = or ; to select the
AMG menu.
X Press button 9 repeatedly until the
overall analysis appears in the
multifunction display. :
Overall analysis of RACETIMER
; Overall driving time
= Maximum speed
? Overall distance driven
A Average speed
Lap analysis This function is only available if you have
saved at least two laps and have stopped the
RACETIMER.
X
Press button = or ; to select the
AMG menu.
X Press button 9 repeatedly until the lap
analysis appears in the multifunction
display.
Each lap is shown in its own submenu. The
fastest lap is indicated by flashing
symbol :. 210
Instrument cluster control systemControl systems
216_AKB; 3; 90, en-US
d2ureepe,
Version: 2.11.8.1 2009-05-15T11:47:50+02:00 - Seite 210
Page 220 of 500
You can use the Voice Control System to call
up all of COMAND’s main menu items.
The commands can be spoken without
pausing between the individual words. If an
unavailable or incorrect command is used,
the Voice Control System will prompt you for
a new command by asking “Please repeat” or
“Please repeat your entry”.
The Voice Control System will confirm
important commands and inform you in case
of incorrect entries.
i
To support the user, the Voice Control
System contains an extensive help function
(Y page 247).
You can use the commands “Continue” or
“Back” to scroll up or down in lists.
The command “Correction” lets you repeat
the entry. Controls
Operation via the multifunction
steering wheel The Voice Control System is operational
approximately 30 seconds after switching on
the COMAND.
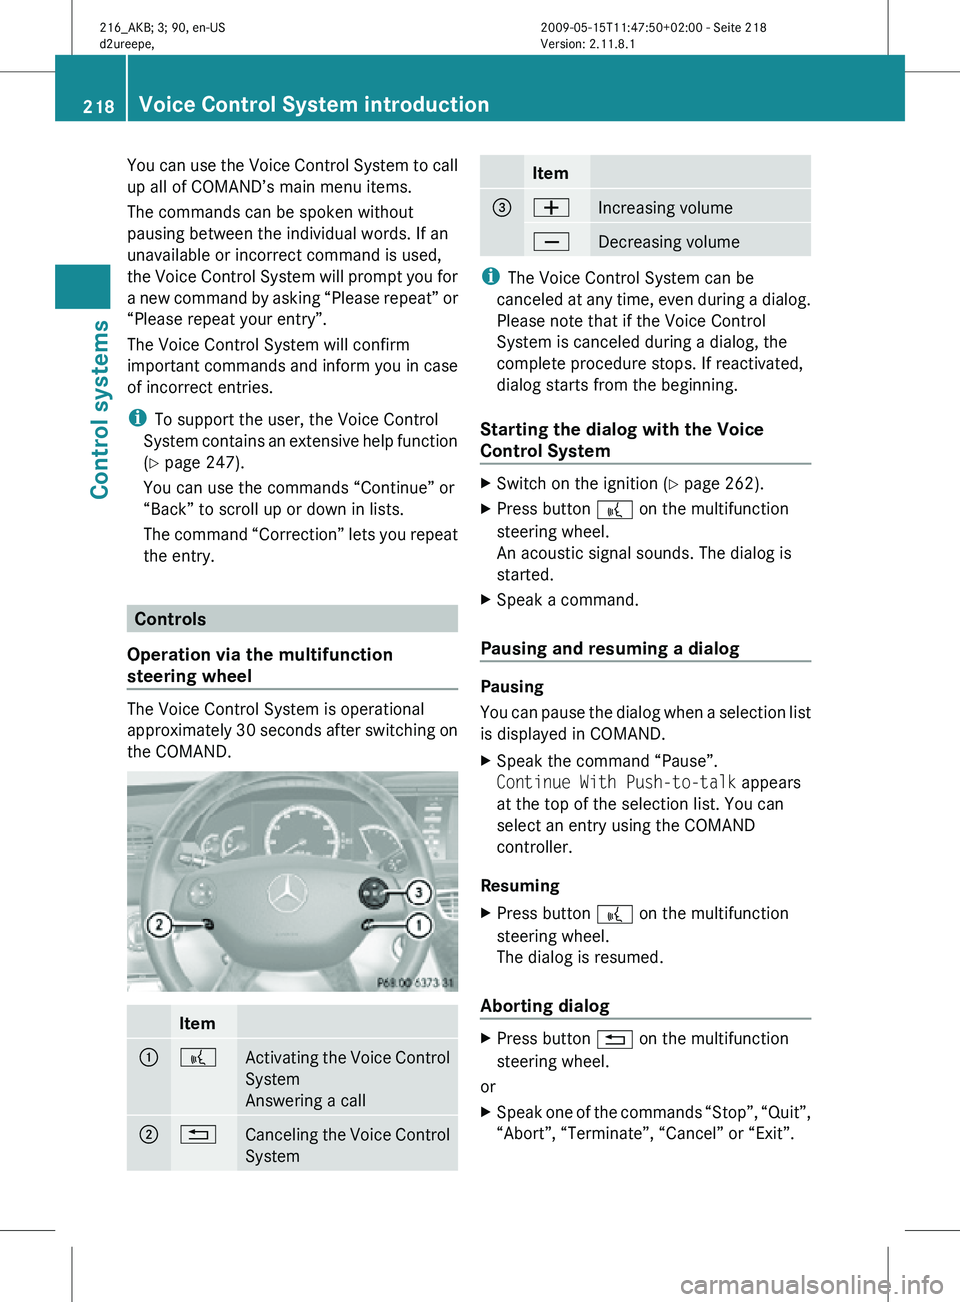
Item
:
?
Activating the Voice Control
System
Answering a call
;
%
Canceling the Voice Control
System Item
=
W
Increasing volume
X
Decreasing volume
i
The Voice Control System can be
canceled at any time, even during a dialog.
Please note that if the Voice Control
System is canceled during a dialog, the
complete procedure stops. If reactivated,
dialog starts from the beginning.
Starting the dialog with the Voice
Control System X
Switch on the ignition (Y page 262).
X Press button ? on the multifunction
steering wheel.
An acoustic signal sounds. The dialog is
started.
X Speak a command.
Pausing and resuming a dialog Pausing
You can pause the dialog when a selection list
is displayed in COMAND.
X
Speak the command “Pause”.
Continue With Push-to-talk appears
at the top of the selection list. You can
select an entry using the COMAND
controller.
Resuming
X Press button ? on the multifunction
steering wheel.
The dialog is resumed.
Aborting dialog X
Press button % on the multifunction
steering wheel.
or
X Speak one of the commands “Stop”, “Quit”,
“Abort”, “Terminate”, “Cancel” or “Exit”. 218
Voice Control System introductionControl systems
216_AKB; 3; 90, en-US
d2ureepe,
Version: 2.11.8.1 2009-05-15T11:47:50+02:00 - Seite 218
Page 242 of 500
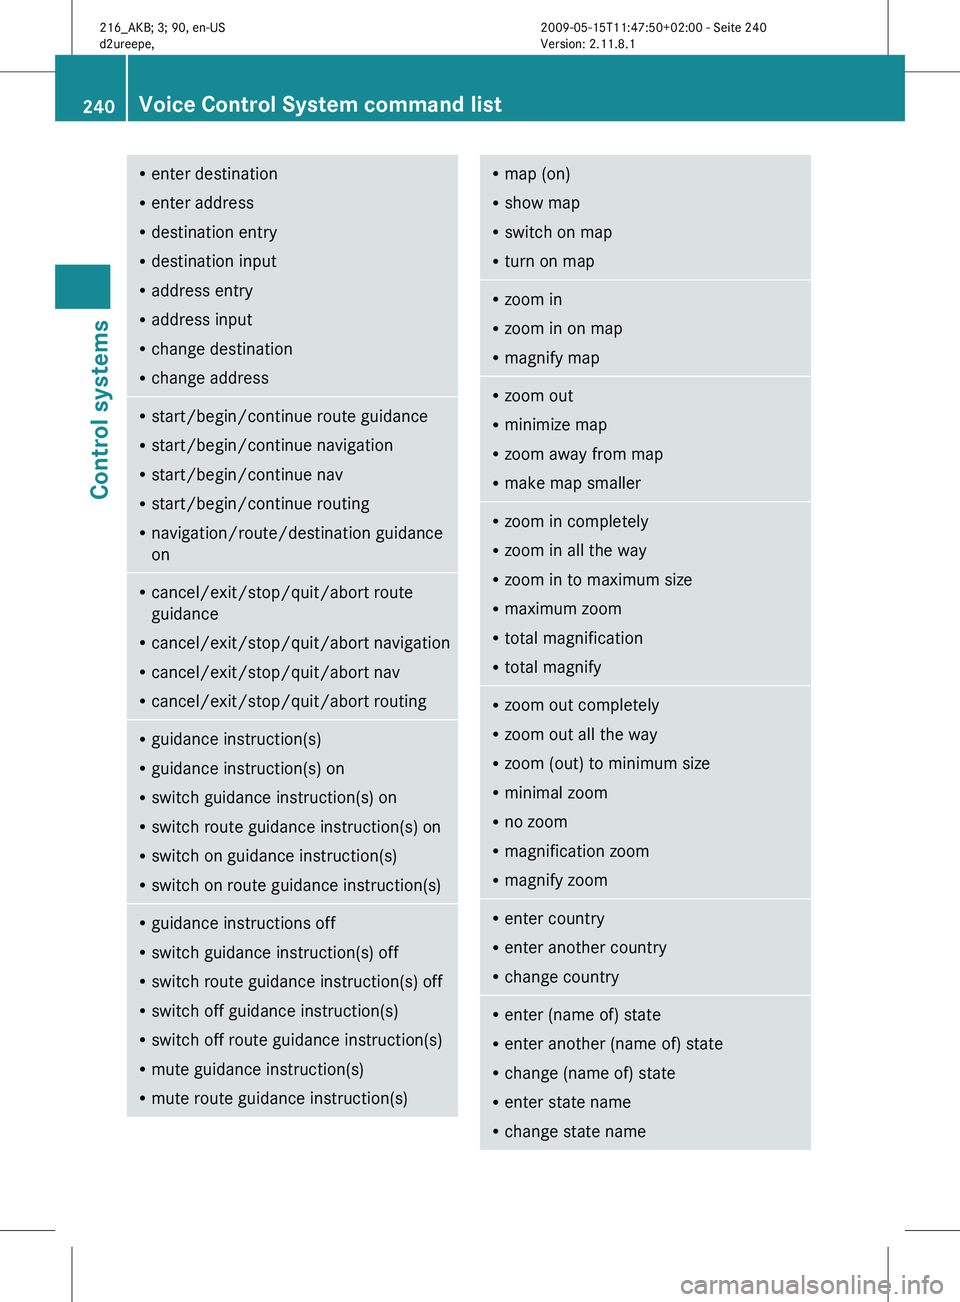
R
enter destination
R enter address
R destination entry
R destination input
R address entry
R address input
R change destination
R change address R
start/begin/continue route guidance
R start/begin/continue navigation
R start/begin/continue nav
R start/begin/continue routing
R navigation/route/destination guidance
on R
cancel/exit/stop/quit/abort route
guidance
R cancel/exit/stop/quit/abort navigation
R cancel/exit/stop/quit/abort nav
R cancel/exit/stop/quit/abort routing R
guidance instruction(s)
R guidance instruction(s) on
R switch guidance instruction(s) on
R switch route guidance instruction(s) on
R switch on guidance instruction(s)
R switch on route guidance instruction(s) R
guidance instructions off
R switch guidance instruction(s) off
R switch route guidance instruction(s) off
R switch off guidance instruction(s)
R switch off route guidance instruction(s)
R mute guidance instruction(s)
R mute route guidance instruction(s) R
map (on)
R show map
R switch on map
R turn on map R
zoom in
R zoom in on map
R magnify map R
zoom out
R minimize map
R zoom away from map
R make map smaller R
zoom in completely
R zoom in all the way
R zoom in to maximum size
R maximum zoom
R total magnification
R total magnify R
zoom out completely
R zoom out all the way
R zoom (out) to minimum size
R minimal zoom
R no zoom
R magnification zoom
R magnify zoom R
enter country
R enter another country
R change country R
enter (name of) state
R enter another (name of) state
R change (name of) state
R enter state name
R change state name 240
Voice Control System command listControl systems
216_AKB; 3; 90, en-US
d2ureepe,
Version: 2.11.8.1 2009-05-15T11:47:50+02:00 - Seite 240
Page 256 of 500
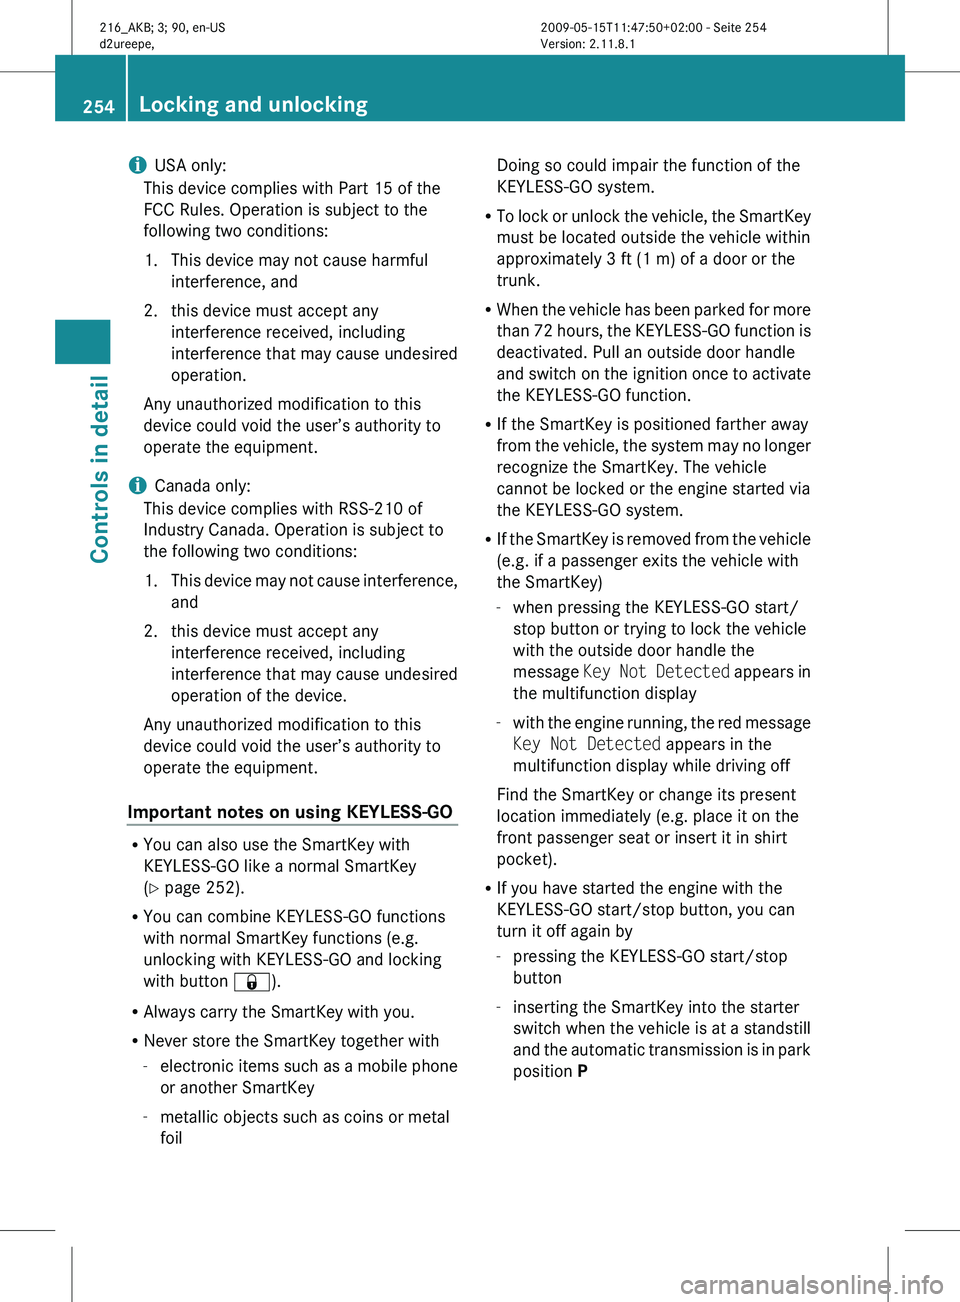
i
USA only:
This device complies with Part 15 of the
FCC Rules. Operation is subject to the
following two conditions:
1. This device may not cause harmful
interference, and
2.
this device must accept anyinterference received, including
interference that may cause undesired
operation.
Any unauthorized modification to this
device could void the user’s authority to
operate the equipment.
i Canada only:
This device complies with RSS-210 of
Industry Canada. Operation is subject to
the following two conditions:
1. This device may not cause interference, and
2. this device must accept any interference received, including
interference that may cause undesired
operation of the device.
Any unauthorized modification to this
device could void the user’s authority to
operate the equipment.
Important notes on using KEYLESS-GO R
You can also use the SmartKey with
KEYLESS-GO like a normal SmartKey
(Y page 252).
R You can combine KEYLESS-GO functions
with normal SmartKey functions (e.g.
unlocking with KEYLESS-GO and locking
with button &).
R Always carry the SmartKey with you.
R Never store the SmartKey together with
-electronic items
such as a mobile phone
or another SmartKey
- metallic objects such as coins or metal
foil Doing so could impair the function of the
KEYLESS-GO system.
R To lock
or unlock the vehicle, the SmartKey
must be located outside the vehicle within
approximately 3 ft (1 m) of a door or the
trunk.
R When the vehicle has been parked for more
than 72 hours, the KEYLESS-GO function is
deactivated. Pull an outside door handle
and switch on the ignition once to activate
the KEYLESS-GO function.
R If the SmartKey is positioned farther away
from the vehicle, the system may no longer
recognize the SmartKey. The vehicle
cannot be locked or the engine started via
the KEYLESS-GO system.
R If the SmartKey is removed from the vehicle
(e.g. if a passenger exits the vehicle with
the SmartKey)
-when pressing the KEYLESS-GO start/
stop button or trying to lock the vehicle
with the outside door handle the
message Key Not Detected appears in
the multifunction display
- with the engine running, the red message
Key Not Detected appears in the
multifunction display while driving off
Find the SmartKey or change its present
location immediately (e.g. place it on the
front passenger seat or insert it in shirt
pocket).
R If you have started the engine with the
KEYLESS-GO start/stop button, you can
turn it off again by
-pressing the KEYLESS-GO start/stop
button
- inserting the SmartKey into the starter
switch when the vehicle is at a standstill
and the automatic transmission is in park
position P 254
Locking and unlocking
Controls in detail
216_AKB; 3; 90, en-US
d2ureepe,
Version: 2.11.8.1 2009-05-15T11:47:50+02:00 - Seite 254
Page 261 of 500
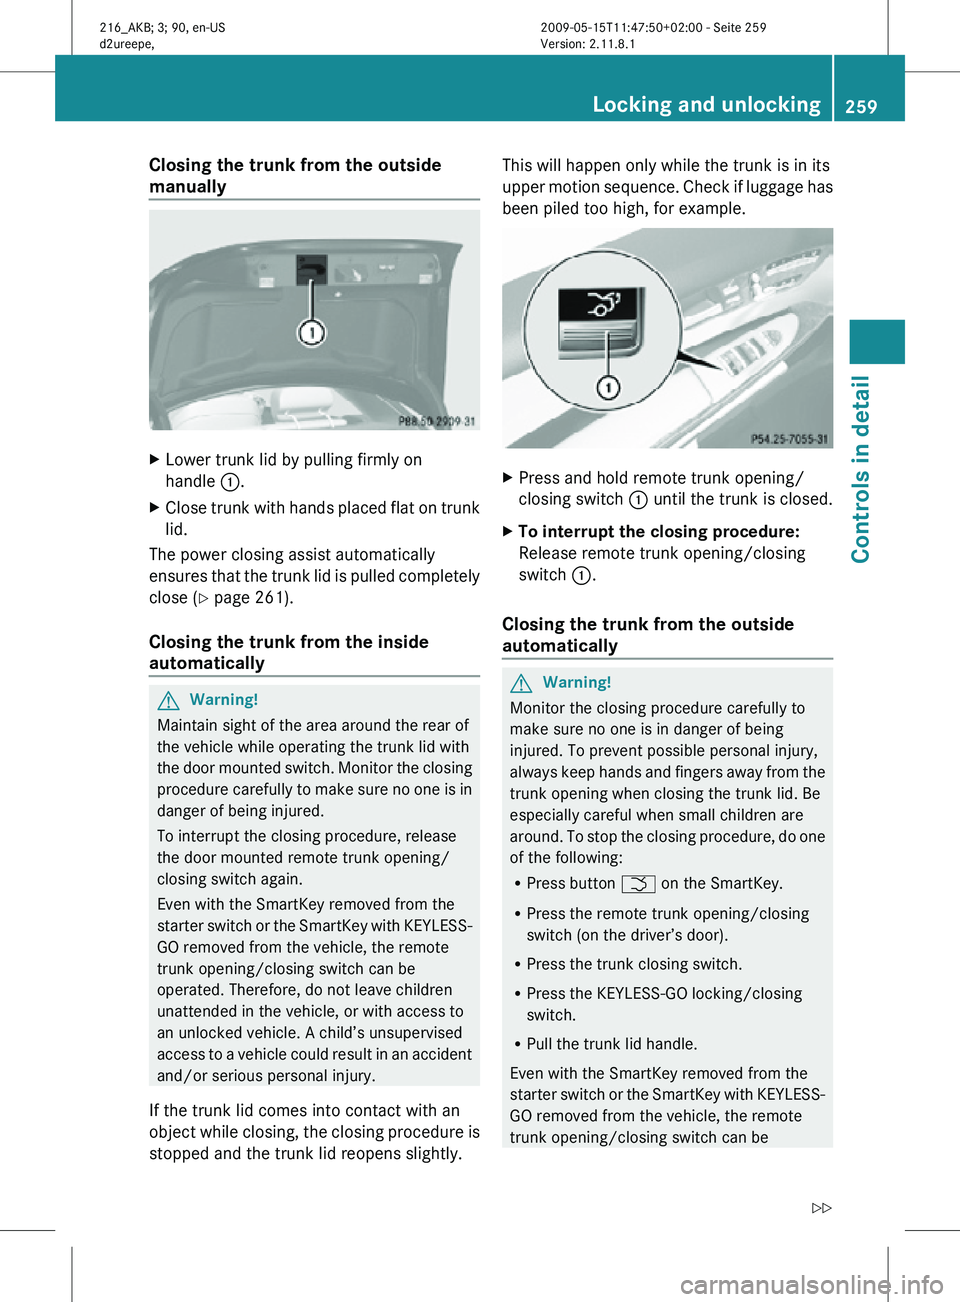
Closing the trunk from the outside
manually
X
Lower trunk lid by pulling firmly on
handle :.
X Close trunk with hands placed flat on trunk
lid.
The power closing assist automatically
ensures that the trunk lid is pulled completely
close ( Y page 261).
Closing the trunk from the inside
automatically G
Warning!
Maintain sight of the area around the rear of
the vehicle while operating the trunk lid with
the door mounted switch. Monitor the closing
procedure carefully to make sure no one is in
danger of being injured.
To interrupt the closing procedure, release
the door mounted remote trunk opening/
closing switch again.
Even with the SmartKey removed from the
starter switch or the SmartKey with KEYLESS-
GO removed from the vehicle, the remote
trunk opening/closing switch can be
operated. Therefore, do not leave children
unattended in the vehicle, or with access to
an unlocked vehicle. A child’s unsupervised
access to a vehicle could result in an accident
and/or serious personal injury.
If the trunk lid comes into contact with an
object while closing, the closing procedure is
stopped and the trunk lid reopens slightly. This will happen only while the trunk is in its
upper motion sequence. Check if luggage has
been piled too high, for example.
X
Press and hold remote trunk opening/
closing switch : until the trunk is closed.
X To interrupt the closing procedure:
Release remote trunk opening/closing
switch :.
Closing the trunk from the outside
automatically G
Warning!
Monitor the closing procedure carefully to
make sure no one is in danger of being
injured. To prevent possible personal injury,
always keep hands and fingers away from the
trunk opening when closing the trunk lid. Be
especially careful when small children are
around. To stop the closing procedure, do one
of the following:
R Press button F on the SmartKey.
R Press the remote trunk opening/closing
switch (on the driver’s door).
R Press the trunk closing switch.
R Press the KEYLESS-GO locking/closing
switch.
R Pull the trunk lid handle.
Even with the SmartKey removed from the
starter switch or the SmartKey with KEYLESS-
GO removed from the vehicle, the remote
trunk opening/closing switch can be Locking and unlocking
259Controls in detail
216_AKB; 3; 90, en-US
d2ureepe, Version: 2.11.8.1 2009-05-15T11:47:50+02:00 - Seite 259 Z
Page 262 of 500
operated. Therefore, do not leave children
unattended in the vehicle, or with access to
an unlocked vehicle. A child’s unsupervised
access to a vehicle could result in an accident
and/or serious personal injury.
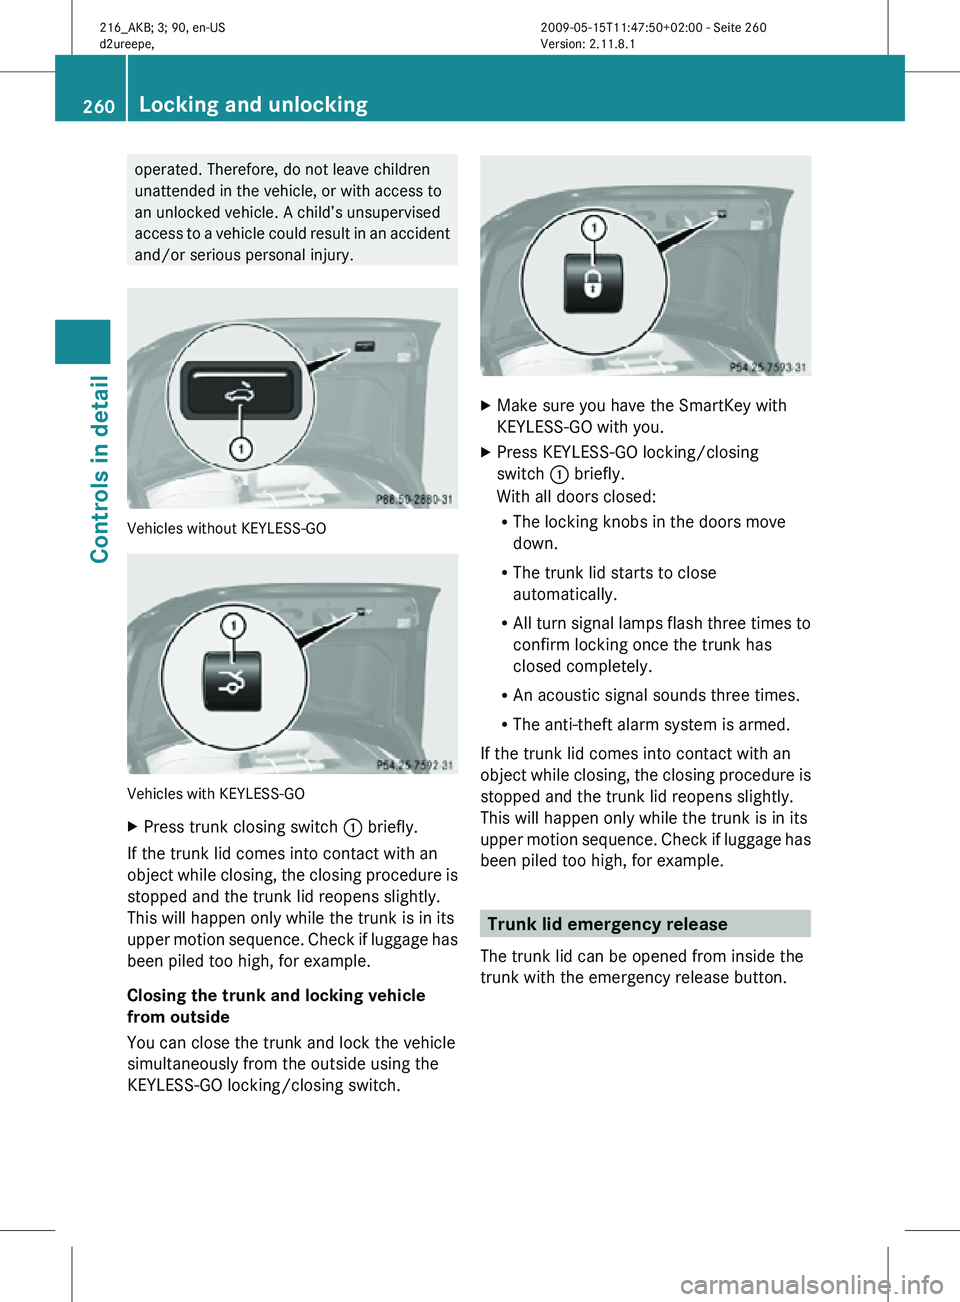
Vehicles without KEYLESS-GO
Vehicles with KEYLESS-GO
X
Press trunk closing switch : briefly.
If the trunk lid comes into contact with an
object while closing, the closing procedure is
stopped and the trunk lid reopens slightly.
This will happen only while the trunk is in its
upper motion sequence. Check if luggage has
been piled too high, for example.
Closing the trunk and locking vehicle
from outside
You can close the trunk and lock the vehicle
simultaneously from the outside using the
KEYLESS-GO locking/closing switch. X
Make sure you have the SmartKey with
KEYLESS-GO with you.
X Press KEYLESS-GO locking/closing
switch : briefly.
With all doors closed:
R
The locking knobs in the doors move
down.
R The trunk lid starts to close
automatically.
R All turn signal lamps flash three times to
confirm locking once the trunk has
closed completely.
R An acoustic signal sounds three times.
R The anti-theft alarm system is armed.
If the trunk lid comes into contact with an
object while closing, the closing procedure is
stopped and the trunk lid reopens slightly.
This will happen only while the trunk is in its
upper motion sequence. Check if luggage has
been piled too high, for example. Trunk lid emergency release
The trunk lid can be opened from inside the
trunk with the emergency release button. 260
Locking and unlockingControls in detail
216_AKB; 3; 90, en-US
d2ureepe,
Version: 2.11.8.1 2009-05-15T11:47:50+02:00 - Seite 260
Page 264 of 500

G
Warning!
Only drive with the doors closed. Otherwise,
one or more of the doors could open while the
vehicle is in motion, putting you and/or
others at risk. G
Warning!
Make sure the trunk is closed when the engine
is running and while driving. Among other
dangers, deadly carbon monoxide (CO) gases
may enter vehicle interior resulting in
unconsciousness and death.
X Power closing assist for doors: Press the
doors gently past the initial engage position
into the lock.
X Power closing assist for trunk lid: Press
the trunk lid gently into its lock. Starter switch positions
SmartKey
G
Observe Safety notes, see page 51. Starter switch
g
For removing SmartKey
1 Power supply for some electrical
consumers, e.g. wipers
2 Ignition (power supply for all electrical
consumers) and driving position
3 Starting position
When you switch on the ignition, all lamps in
the instrument cluster come on. The high-
beam headlamp indicator lamp and turn
signal indicator lamps will only come on if activated. If a lamp in the instrument cluster
fails to come on when the ignition is switched
on, have it checked and replaced if necessary.
If a lamp in the instrument cluster remains on
after starting the engine or comes on while
driving, refer to “Lamps in instrument cluster”
(Y page 450).
X
Always remove the SmartKey from the
starter switch when the engine is not in
operation.
This will help to prevent accelerated vehicle
battery discharge or a completely
discharged vehicle battery.
If the SmartKey cannot be turned in the
starter switch, the vehicle battery may not be
sufficiently charged.
X Check the vehicle battery and charge it if
necessary ( Y page 471).
or
X Get a jump start (Y page 471).
i If the SmartKey does not belong to the
vehicle, the SmartKey can be turned in the
starter switch. However, the ignition does
not switch on and the engine does not start. KEYLESS-GO
G
Observe Safety notes, see page 51.
Vehicles equipped with the KEYLESS-GO
feature are supplied with a SmartKey with
integrated KEYLESS-GO function and a
removable KEYLESS-GO start/stop button.
The KEYLESS-GO start/stop button must be
inserted in the starter switch and the
SmartKey present in the vehicle.
Pressing the KEYLESS-GO start/stop button
without depressing the brake pedal
corresponds to the various starter switch
positions (Y page 262).
Pressing the KEYLESS-GO start/stop button
with the brake pedal firmly depressed will
start the engine (Y page 285).
The KEYLESS-GO start/stop button can be
pulled out of the starter switch easily. You can 262
Starter switch positionsControls in detail
216_AKB; 3; 90, en-US
d2ureepe,
Version: 2.11.8.1 2009-05-15T11:47:50+02:00 - Seite 262
Page 265 of 500

then insert the SmartKey into the starter
switch.
i
The KEYLESS-GO start/stop button does
not need to be removed from the starter
switch when you leave the vehicle.
However, always take the SmartKey with
you when you leave the vehicle. As long as
the SmartKey is in the vehicle, the vehicle’s
electrical systems can be switched on or
the engine can be started using the
KEYLESS-GO start/stop button. :
KEYLESS-GO start/stop button
; Starter switch
X Insert the KEYLESS-GO start/stop button
into the starter switch (if not inserted
already).
i Allow for 2 seconds until the system has
detected the KEYLESS-GO start/stop
button.
X Make sure the automatic transmission is in
park position P.
X Do not depress the brake pedal. KEYLESS-GO start/stop button
=
USA only
? Canada only
Position 0 Before you press the KEYLESS-GO start/stop
button, the vehicle’s on-board electronics
have status 0 (as with SmartKey removed).
Position 1
X
Press the KEYLESS-GO start/stop button
once.
This supplies power for some electrical
consumers, e.g. wipers.
i When you now open the driver’s door, the
power supply is switched off.
Ignition (or position 2) X
Press the KEYLESS-GO start/stop button
twice.
This supplies power for all electrical
consumers.
When you switch on the ignition, all lamps
in the instrument cluster come on. The
high-beam headlamp indicator lamp and
turn signal indicator lamps will only come
on if activated. If a lamp in the instrument
cluster fails to come on when the ignition
is switched on, have it checked and
replaced if necessary. If a lamp in the
instrument cluster remains on after
starting the engine or comes on while
driving, refer to “Lamps in instrument
cluster” ( Y page 450). Starter switch positions
263Controls in detail
216_AKB; 3; 90, en-US
d2ureepe, Version: 2.11.8.1 2009-05-15T11:47:50+02:00 - Seite 263 Z