windshield wipers MERCEDES-BENZ CL-Class 2014 C217 User Guide
[x] Cancel search | Manufacturer: MERCEDES-BENZ, Model Year: 2014, Model line: CL-Class, Model: MERCEDES-BENZ CL-Class 2014 C217Pages: 494, PDF Size: 13.55 MB
Page 259 of 494
Keep bulbs out of the reach of children.
Otherwise, they could, for example, damage
the bulbs and injure themselves.
Never use a bulb which has been dropped.
Such a bulb may explode and injure you.
Halogen bulbs are pressurized and could
explode when you change them, especially if
they are very hot. You should therefore wear
eye protection and gloves when you are
changing them. Overview: changing bulbs/bulb types
You can change the following bulbs. The bulb
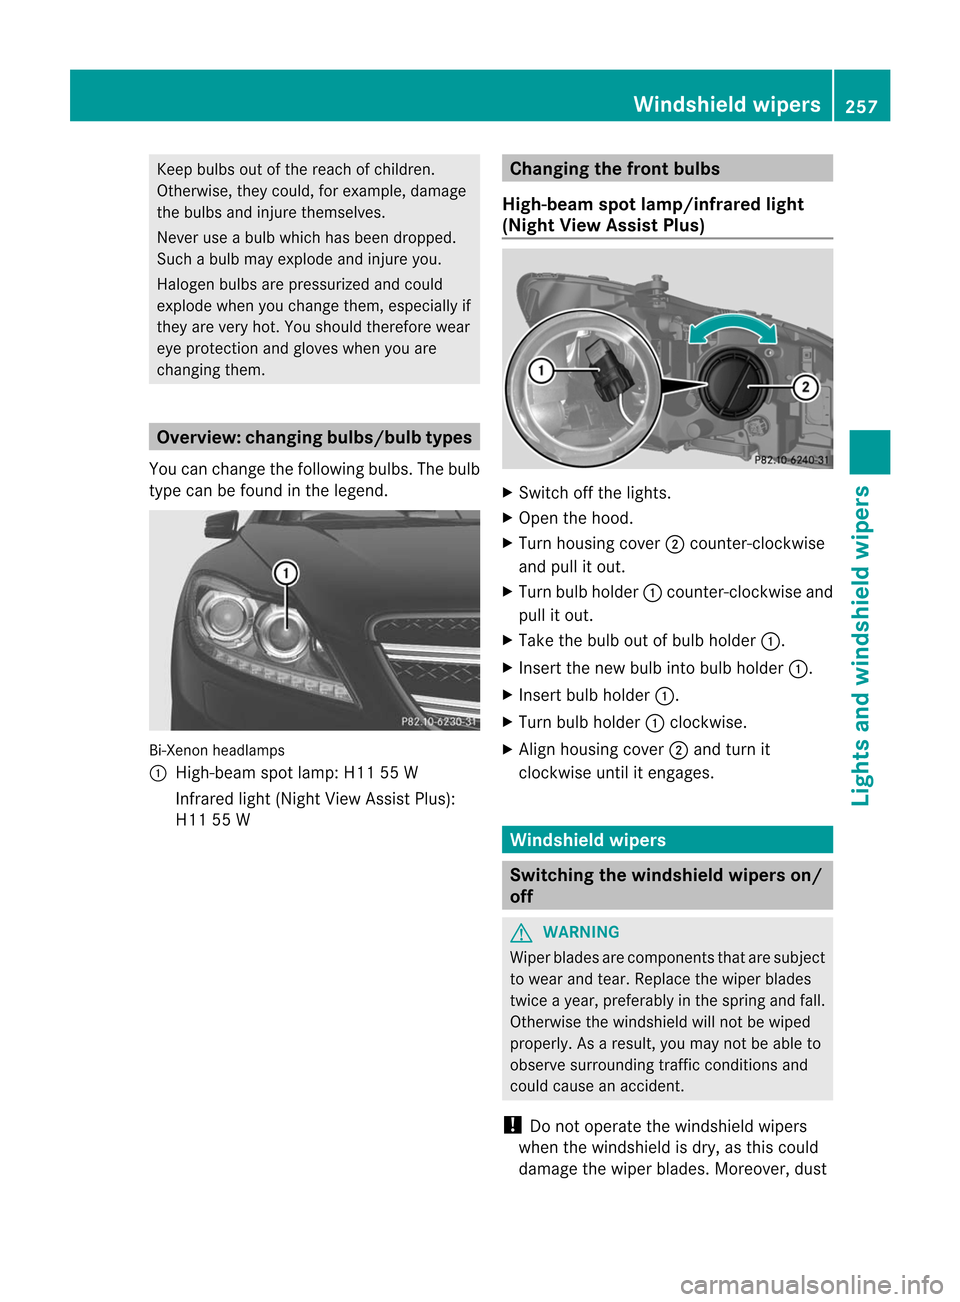
type can be found in the legend. Bi-Xenon headlamps
:
High-beam spot lamp: H11 55 W
Infrared light( Night View Assist Plus):
H11 55 W Changing the front bulbs
High-beam spot lamp/infrared light
(Night View Assist Plus) X
Switch off the lights.
X Open the hood.
X Turn housing cover ;counter-clockwise
and pull it out.
X Turn bulb holder :counter-clockwise and
pull it out.
X Take the bulb out of bulb holder :.
X Insert the new bulb into bulb holder :.
X Insert bulb holder :.
X Turn bulb holder :clockwise.
X Align housing cover ;and turn it
clockwise until it engages. Windshiel
dwipers Switching the windshield wipers on/
off
G
WARNING
Wiper blades are components that are subject
to wear and tear .Replace the wiper blades
twice a year, preferably in the spring and fall.
Otherwise the windshield will not be wiped
properly. As a result, you may not be able to
observe surrounding traffic conditions and
could cause an accident.
! Do not operate the windshield wipers
when the windshield is dry, as this could
damage the wiper blades. Moreover, dust Windshield wipers
257Lights and windshield wipers Z
Page 260 of 494
tha
thas collected on the windshield can
scratch the glass if wiping takes place when
the windshield is dry.
! If the windshield wipers leave smears on
the windshield after the vehicle has been
washed in an automatic car wash, wax or
other residues may be the reason for this.
Clean the windshield using washe rfluid
after washing the vehicle in an automatic
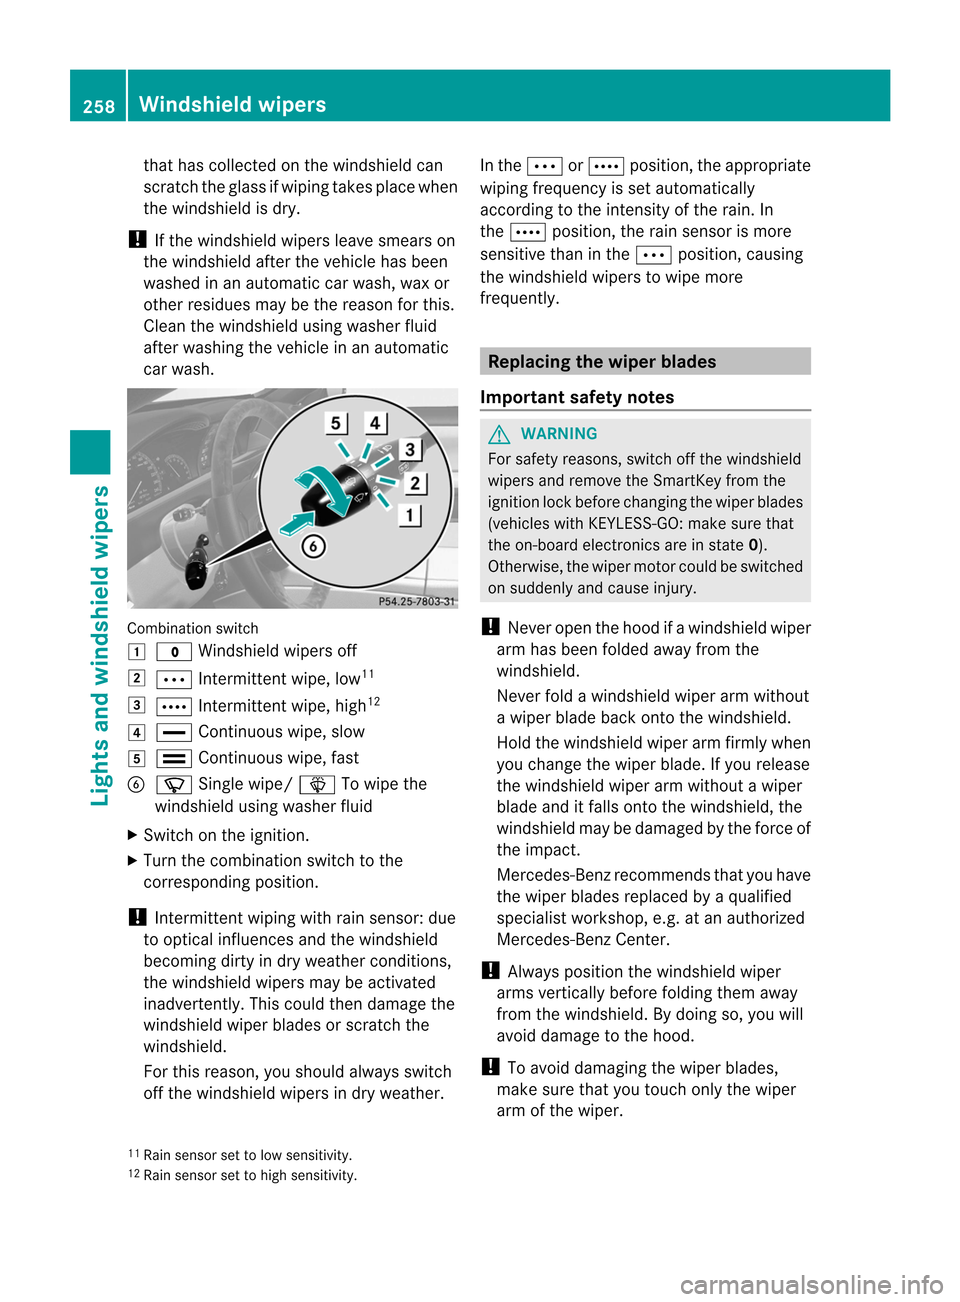
car wash. Combination switch
1
$ Windshield wipers off
2 Ä Intermittent wipe, low 11
3 Å Intermittent wipe, high 12
4 ° Continuous wipe, slow
5 ¯ Continuous wipe, fast
B í Single wipe/ îTo wipe the
windshield using washer fluid
X Switch on the ignition.
X Turn the combination switch to the
corresponding position.
! Intermittent wiping with rain sensor: due
to optical influences and the windshield
becoming dirty in dry weathe rconditions,
the windshield wipers may be activated
inadvertently. This could then damage the
windshield wiper blades or scratch the
windshield.
For this reason, you should always switch
off the windshield wipers in dry weather. In the
ÄorÅ position, the appropriate
wiping frequency is set automatically
according to the intensity of the rain. In
the Å position, the rain sensor is more
sensitive than in the Äposition, causing
the windshield wipers to wipe more
frequently. Replacing the wiper blades
Important safety notes G
WARNING
For safety reasons, switch off the windshield
wipers and remove the SmartKey from the
ignition lock before changing the wiper blades
(vehicles with KEYLESS-GO: make sure that
the on-board electronics are in state 0).
Otherwise, the wiper motor could be switched
on suddenly and cause injury.
! Never open the hood if a windshield wiper
arm has been folded away from the
windshield.
Never fold a windshield wiper arm without
a wiper blade back onto the windshield.
Hold the windshield wiper arm firmly when
you change the wiper blade. If you release
the windshield wiper arm without a wiper
blade and it falls onto the windshield, the
windshield may be damaged by the force of
the impact.
Mercedes-Benz recommends that you have
the wiper blades replaced by aqualified
specialist workshop, e.g. at an authorized
Mercedes-Ben zCenter.
! Always position the windshield wiper
arms vertically before folding them away
from the windshield. By doing so, you will
avoid damage to the hood.
! To avoid damaging the wiper blades,
make sure that you touch only the wiper
arm of the wiper.
11 Rain sensor set to low sensitivity.
12 Rain sensor set to high sensitivity. 258
Windshield wipersLights and windshield wipers
Page 261 of 494
Changing the windshiel
dwiper blades Moving the wiper blades to
avertical
position
Vehicles without KEYLESS-GO
X Turn the SmartKey to position 1or 2in the
ignitio nlock.
X Set the windshield wipers to
position °.
X When the wiper arms have reached a
vertical position, turn the SmartKey to
position 0and remove it from the ignition
lock.
Vehicles with KEYLESS-GO
X Switch off the engine.
X Remove your foot from the brake pedal.
X Set the windshield wipers to
position °.
X Press the Start/Stop button repeatedly
until the windshield wipers start.
X When the wiper arms have reached a
vertical position, press the Start/Stop
button.
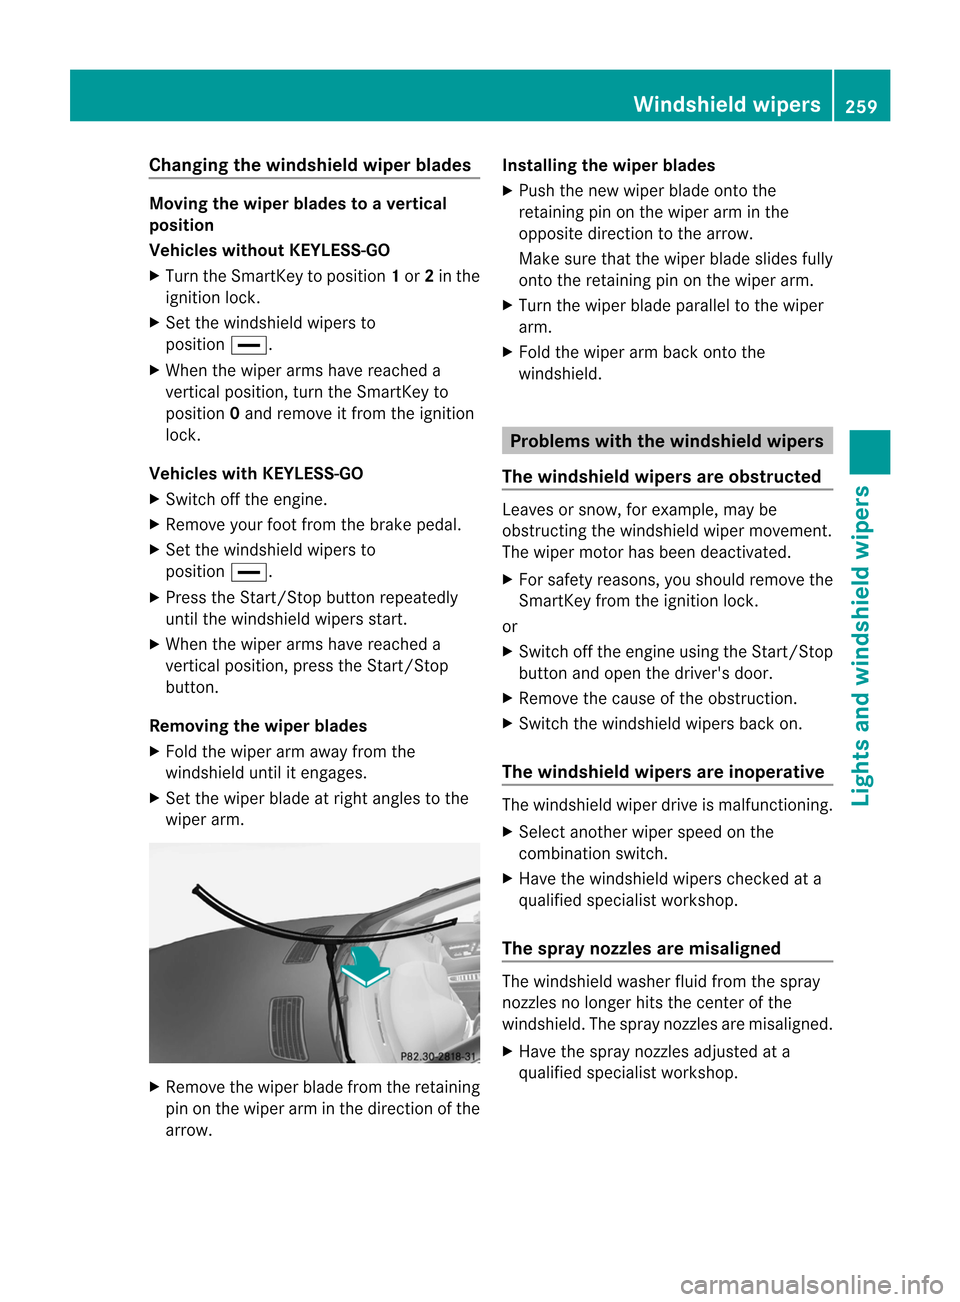
Removing the wiper blades
X Fold the wiper arm away from the
windshield until it engages.
X Set the wiper blade at right angles to the
wiper arm. X
Remove the wiper blade from the retaining
pin on the wiper arm in the direction of the
arrow. Installing the wiper blades
X
Push the new wiper blade ontot he
retaining pin on the wiper arm in the
opposite direction to the arrow.
Make sure that the wiper blade slides fully
onto the retaining pin on the wiper arm.
X Turn the wiper blade parallel to the wiper
arm.
X Fold the wiper arm back onto the
windshield. Problems with the windshield wipers
The windshield wipers are obstructed Leaves or snow, for example, may be
obstructing the windshield wiper movement.
The wiper motor has been deactivated.
X
For safety reasons, you should remove the
SmartKey from the ignition lock.
or
X Switch off the engine using the Start/Stop
button and open the driver's door.
X Remove the cause of the obstruction.
X Switch the windshield wipers back on.
The windshield wipers are inoperative The windshield wiper drive is malfunctioning.
X
Select another wiper speed on the
combination switch.
X Have the windshield wipers checked at a
qualified specialist workshop.
The spray nozzles are misaligned The windshield washer fluid from the spray
nozzles no longer hits the center of the
windshield. The spray nozzles are misaligned.
X
Have the spray nozzles adjusted at a
qualified specialist workshop. Windshield wipers
259Lights and windshield wipers Z
Page 268 of 494
X
To deactivate: press the¬rocker
switch up or down.
The indicator lamp in the ¬rocker
switch goes out. The previously selected
settings come into effect again. The cooling
with ai rdehumidification function remains
on. Air-recirculation mode remains
deactivated.
or
X Press the wrocker switch up or down.
or
X Press the Krocker switch up or down. MAX COOL maximum cooling
The MAX COOL function is only available in
vehicles for the USA.
MAX COOL is only operational when the
engine is running.
The MAX COOL function is activated
automatically:
R if climate control is set to automatic
(Ã) on both sides
R if additional cooling is used
The display shows MAX COOL .
This is the quickest way to cool the vehicle
interior when the sliding sunroof and the side
windows are closed. Defrosting the windows
Windows fogged up on the inside X
Activate the cooling with air
dehumidification function via COMAND
(Y page 241).
X Activate automatic mode Ã.
X If the windows continue to fog up, activate
the defrosting function (Y page 265).
i You should only select this setting until
the windshield is clear again. Windows fogged up on the outside X
Switch on the windshield wipers.
X Activate automatic climate control.
i You should only select this setting until
the windshield is clear again. Rear window defroster
Activating/deactivating G
WARNING
Any accumulation of snow and ice should be
removed from the rear window before driving.
Visibility could otherwise be impaired,
endangering you and others.
The rear window defroster has a high current
draw. You should therefore switch it off as
soon as the window is clear. Otherwise, the
rear window defroster switches off
automatically after several minutes.
If the battery voltage is too low, the rear
window defroster may switch off.
X Turn the SmartKey to position 2in the
ignition lock.
X Press the ¤rocker switch up or down.
The indicator lamp in the ¤rocker
switch lights up or goes out.
Problems with the rear window
defroster The rear window defroster has deactivated
prematurely or cannot be activated.
X
Switch off any consumers that are not
required, e.g. reading lamps or interior
lighting.
When the battery is sufficiently charged,
the rear window defroster is activated
again automatically. 266
Operating the climate control systemsClimate control
Page 275 of 494
could lose control of the vehicle and hit
someone or something .Only shift into gear
when the engine is idling normally and when
your right foo tis firmly on the brake pedal.
! Warm up the engine quickly. Do not use
the engine's full performance until it has
reached operating temperature.
Only shift the automatic transmission to
the desired drive position when the vehicle
is stationary.
Where possible, avoid spinning the drive
wheels when pulling away on slippery
roads. You could otherwise damage the
drive train.
! CL 63 AMG: at low engine oil
temperatures below 68 ‡(+20 †), the
maximu mengine speed is restricted in
order to protect the engine .To protec tthe
engine and maintain smooth engine
operation, avoid driving at full throttle when
the engine is cold. Key positions
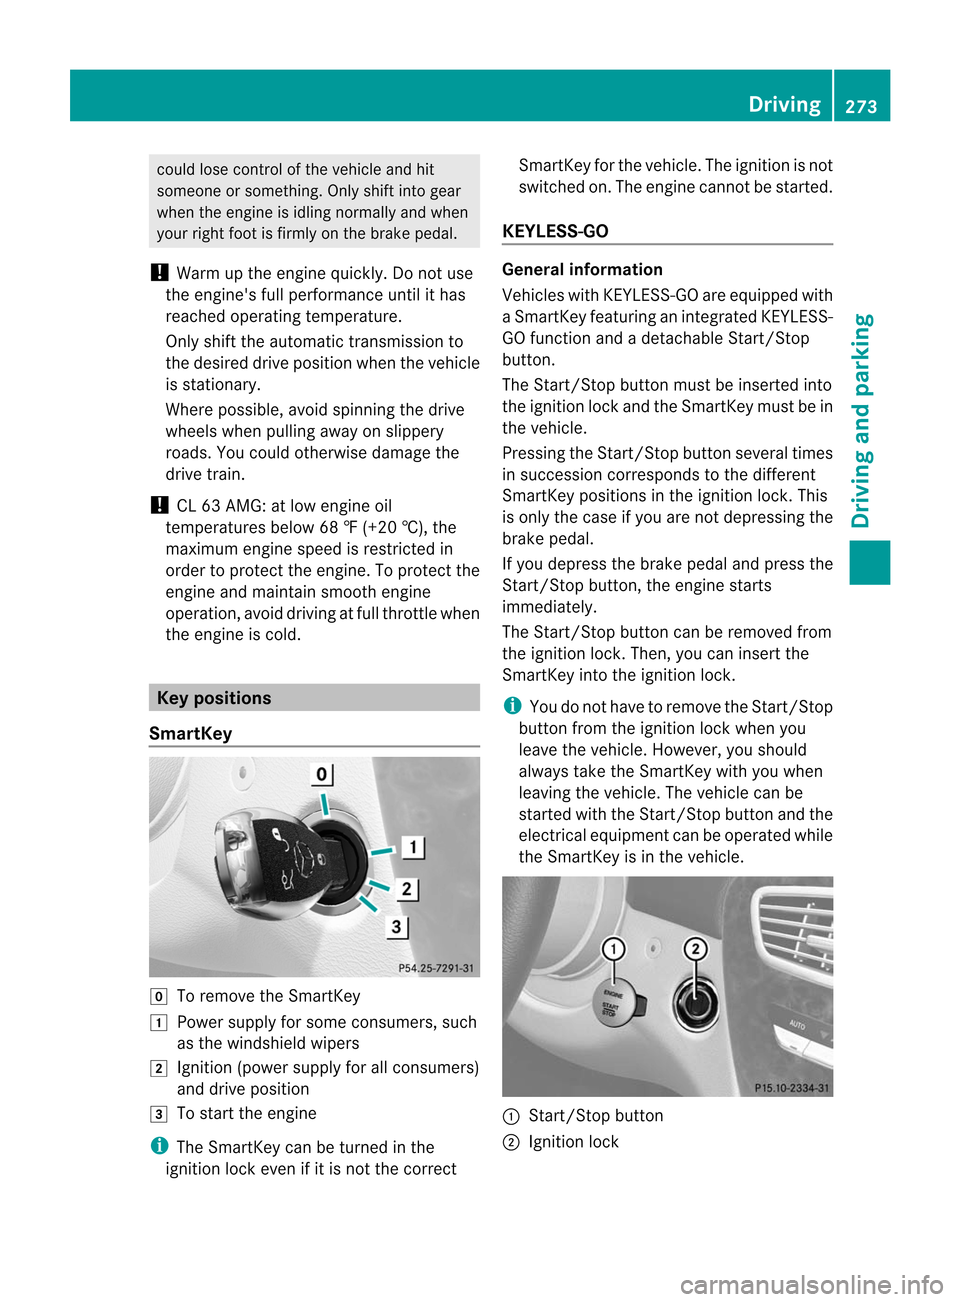
SmartKey g
To remove the SmartKey
1 Power supply for some consumers, such
as the windshield wipers
2 Ignition (power supply for all consumers)
and drive position
3 To start the engine
i The SmartKey can be turned in the
ignition lock even if it is not the correct SmartKey for the vehicle. The ignition is not
switched on. The engine cannot be started.
KEYLESS-GO General information
Vehicles with KEYLESS-GO are equipped with
aS
martKey featuring an integrated KEYLESS-
GO function and a detachable Start/Stop
button.
The Start/Stop button must be inserted into
the ignitio nlock and the SmartKey must be in
the vehicle.
Pressing the Start/Stop button several times
in succession corresponds to the different
SmartKey positions in the ignition lock. This
is only the case if you are not depressing the
brake pedal.
If you depress the brake pedal and press the
Start/Stop button, the engine starts
immediately.
The Start/Stop button can be removed from
the ignition lock. Then, you can insert the
SmartKey into the ignition lock.
i You do not have to remove the Start/Stop
button from the ignition lock when you
leave the vehicle. However, you should
always take the SmartKey with you when
leaving the vehicle. The vehicle can be
started with the Start/Stop button and the
electrical equipment can be operated while
the SmartKey is in the vehicle. :
Start/Stop button
; Ignition lock Driving
273Driving and parking Z
Page 276 of 494
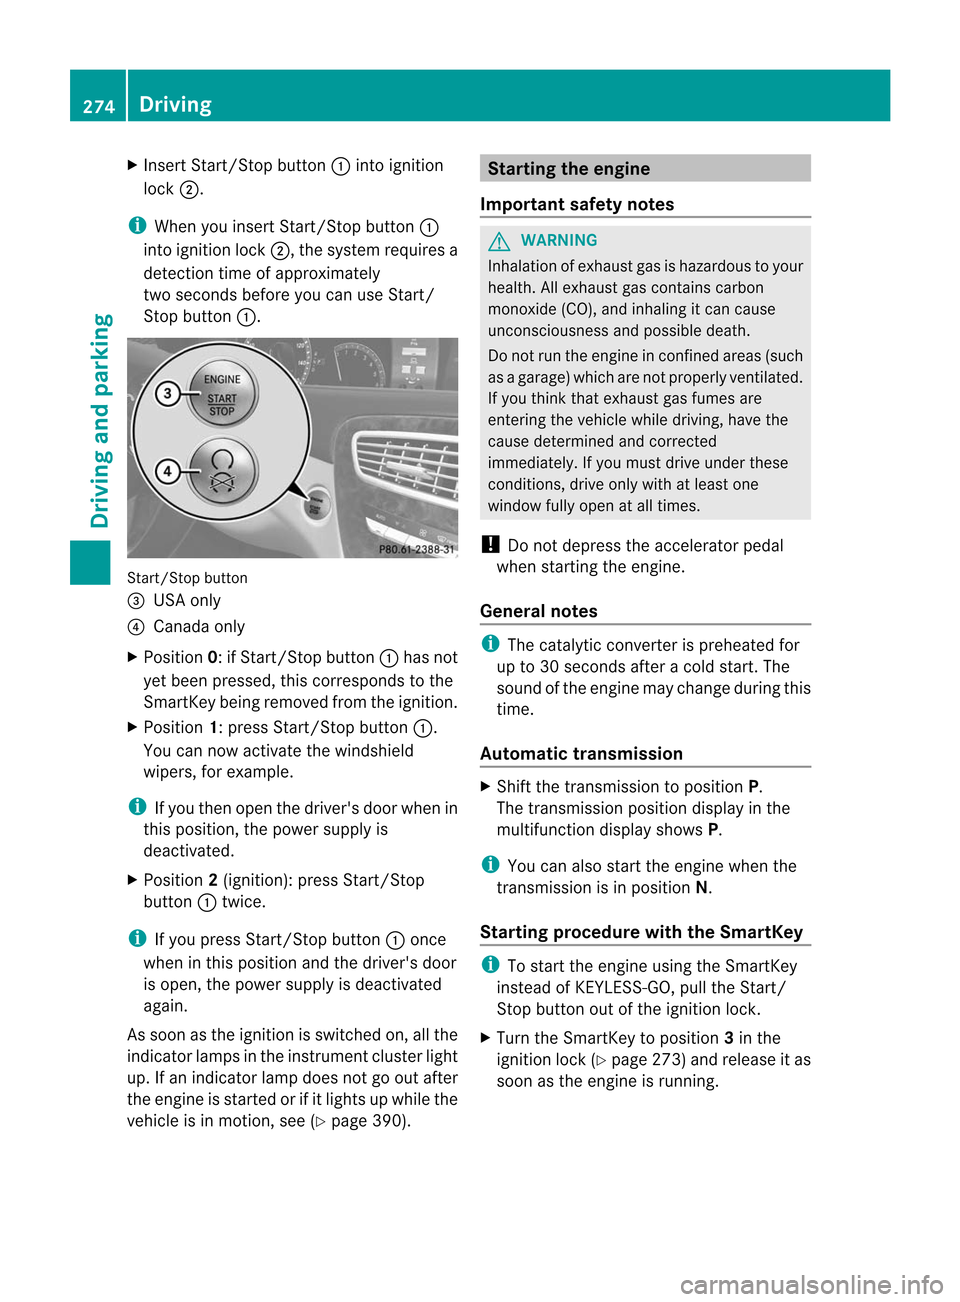
X
Insert Start/Stop button :into ignition
lock ;.
i When you insert Start/Stop button :
into ignition lock ;, the system requires a
detection time of approximately
two seconds before you can use Start/
Stop button :. Start/Stop button
=
USA only
? Canada only
X Position 0: if Start/Stop button :has not
yet been pressed, this corresponds to the
SmartKey being removed from the ignition.
X Position 1: press Start/Stop button :.
You can now activate the windshield
wipers, for example.
i If you then open the driver's door when in
this position, the powers upply is
deactivated.
X Position 2(ignition): press Start/Stop
button :twice.
i If you press Start/Stop button :once
when in this position and the driver's door
is open, the power supply is deactivated
again.
As soo nas the ignition is switched on, all the
indicator lamps in the instrument cluster light
up. If an indicator lamp does not go out after
the engine is started or if it lights up while the
vehicle is in motion, see (Y page 390). Starting the engine
Important safety notes G
WARNING
Inhalation of exhaust gas is hazardous to your
health. All exhaust gas contains carbon
monoxide (CO), and inhaling it can cause
unconsciousness and possible death.
Do not run the engine in confined areas (such
as a garage) which are not properly ventilated.
If you think that exhaust gas fumes are
entering the vehicle while driving, have the
cause determined and corrected
immediately.Ify ou must drive under these
conditions, drive only with at least one
window fully open at all times.
! Do not depress the accelerator pedal
when starting the engine.
General notes i
The catalytic converter is preheated for
up to 30 seconds after a cold start. The
sound of the engine may change during this
time.
Automatic transmission X
Shift the transmission to position P.
The transmission position display in the
multifunction display shows P.
i You can also start the engine when the
transmission is in position N.
Starting procedure with the SmartKey i
To start the engine using the SmartKey
instead of KEYLESS-GO, pull the Start/
Stop button out of the ignition lock.
X Turn the SmartKey to position 3in the
ignition lock (Y page 273) and release it as
soon as the engine is running. 274
DrivingDriving and parking
Page 329 of 494
Problems with Night View Assist Plus
Problem Possible causes/consequences and
M Solutions
The picture quality of
Night View Assist Plus
has deteriorated. The windshield wipers are smearing the windshield.
X
Replace the wiper blades (Y page 258). The windshield is smeared after the vehicle has been cleaned in a
car wash.
X
Cleant he windshield (Y page 430). There is windshield chip damage in the camera's field of vision.
X
Replace the windshield. The windshield is fogged up on the inside.
X
Defrost the windshield (Y page 266). The windshield is iced up.
X
De-ice the windshield (Y page 265). There is dirt on the inside of the windshield.
X
Cleant he inside of the windshield (Y page 430).Active Driving Assistance package
General notes The Active Driving Assistance package
consists of DISTRONIC PLUS (Y
page 298),
Active Blind Spot Assist (Y page 327) and
Active Lane Keeping Assist (Y page 330).
Active Blind Spot Assist Important safety notes
Active Blind Spot Assist uses a radar sensor
system to monitor the side areas of your
vehicle which are behind the driver. Awarning
display in the exterior mirrors draws your
attentio nto vehicles detected in the
monitored area. If you then switch on the
corresponding turn signal to change lanes,
you will also receive a visual and audible
collision warning. If a risk of lateral collision
is detected, corrective braking may help you
avoid a collision. To support the course-
correcting brake application, Active Blind Spot Assist also uses the forward-facing radar
sensor system. Active Blind Spot Assist
supports you from a speed of approximately
20 mph (30 km/h). G
WARNING
Active Blind Spot Assist is only an aid, and
may detect vehicles/obstacles incorrectly or
not at all.
The system may be impaired or may not
function if:
R there is poor visibility, e.g. due to snow,
rain, fog or spray.
R the rear and/or front sensors are dirty.
Active Blind Spot Assist may not detect
narrow vehicles, such as motorcycles or
bicycles, or may only detect them too late. It
cannot detect vehicles that are overtaken at
a small distance and then enter the blind spot
area.
Active Blind Spot Assist cannot detect road
and traffic conditions. It is not a substitute for Driving systems
327Driving and parking
Z
Page 422 of 494
Useful information
i This Operator's Manual describes all
models and all standard and optional
equipment of your vehicle available at the
time of publication of the Operator's
Manual. Country-specific differences are
possible. Please note that your vehicle may
not be equipped with all features
described. This also applies to safety-
related systems and functions.
i Please read the information on qualified
specialist workshops (Y page 29).Engine compartment
Hood
Opening the hood G
WARNING
Do not pull the release lever while the vehicle
is in motion. Otherwise, the hood could be
forced open by passing air flow.
This could cause the hood to come loose and
injure you and/o rothers. G
WARNING
Do not open the hood when the engine is
overheated. You could be seriously injured.
Observe the coolant temperature gauge to
determine whether the engine may be
overheated. If you see flames or smoke
coming from the engine compartment, move
away fro mthe vehicle. Wait until the engine
has cooled. If necessary, call the fire
department. G
WARNING
There is a risk of injury if the hood is open,
even if the engine is not running.
Some engine components can become very
hot.
To avoid the risk of burns, only touch those
components described in the Operator's
Manual and observe the relevant safety notes. G
WARNING
To avoid injury, stay clear of moving parts
when the hood is open and the engine is
running.
The radiator fan may continue to run for
approximately 30seconds or may even restart
after the engine has been switched off. For
this reason, you must not reach into the fan
rotation area. G
WARNING
The engine is equipped with a transistorized
ignition system. Because of the high voltage,
it is dangerous to touch any components
(ignition coils, spark plug sockets, diagnostic
socket) of the ignition system:
R with the engine running
R while starting the engine
R when the ignition is switched on and the
engine is turned manually
X Make sure that the windshield wipers are
switched off. G
WARNING
The windshield wipers and wiper linkage
could be set in motion.
When the hood is open, you or others could
be injured by the wiper linkage.
Make sure that the windshield wipers are
switched off. Remove the SmartKey or make
sure that no ignition position has been
selected with KEYLESS-GO. All indicator
lamps must be off in the instrument panel. 420
Engine compartmentMaintenance and care
Page 423 of 494
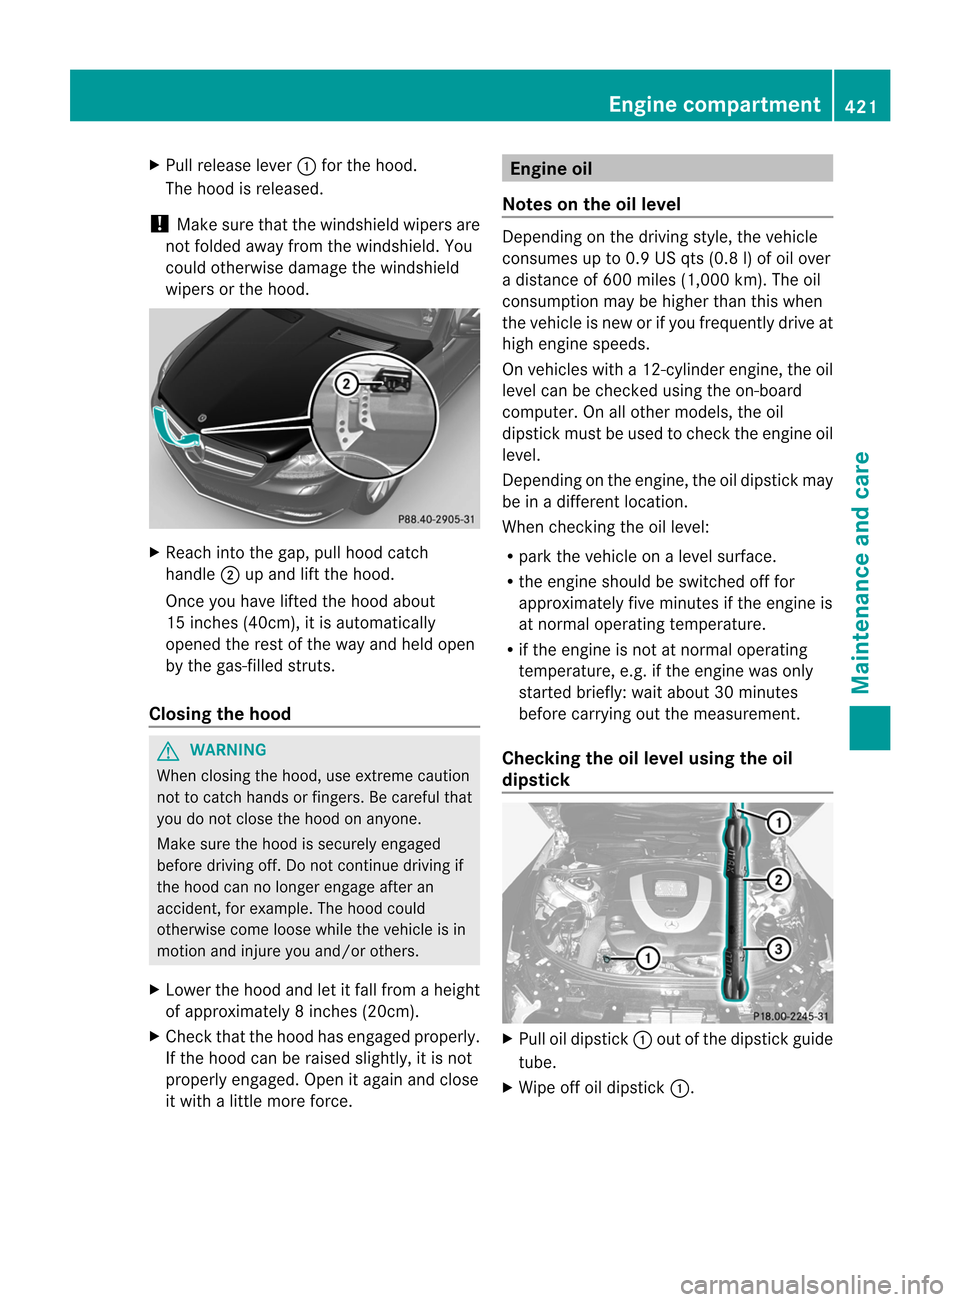
X
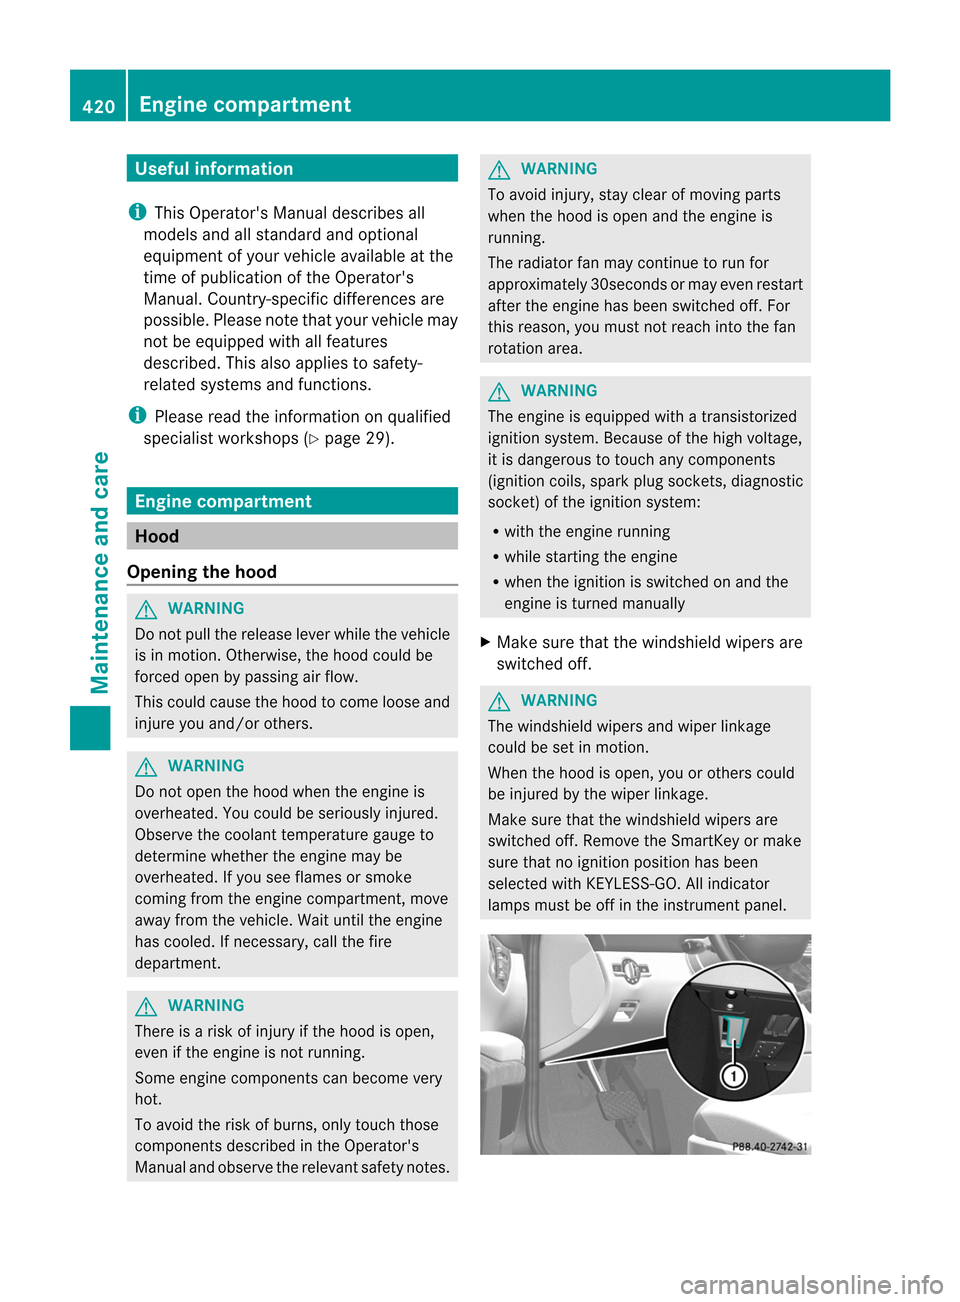
Pull release lever :for the hood.
The hood is released.
! Make sure that the windshield wipers are
not folded away from the windshield. You
could otherwise damage the windshield
wipers or the hood. X
Reach into the gap, pull hood catch
handle ;up and lift the hood.
Once you have lifted the hood about
15 inches (40cm), it is automatically
opened the rest of the way and held open
by the gas-filled struts.
Closing the hood G
WARNING
When closing the hood, use extreme caution
not to catch hands or fingers. Be careful that
you do not close the hood on anyone.
Make sure the hood is securely engaged
before driving off. Do not continue driving if
the hood can no longer engage after an
accident, for example. The hood could
otherwise come loose while the vehicle is in
motion and injure you and/or others.
X Lower the hood and let it fall from a height
of approximately 8inche s(20cm).
X Check that the hood has engaged properly.
If the hood can be raised slightly, it is not
properly engaged. Open it again and close
it with a little more force. Engine oil
Notes on the oil level Depending on the driving style, the vehicle
consumes up to 0.9 US qts
(0.8 l) of oil over
a distance of 600 miles (1,000 km). The oil
consumption may be highe rthan this when
the vehicle is new or if you frequently drive at
high engine speeds.
On vehicles with a 12-cylinder engine, the oil
level can be checked using the on-board
computer. On all other models, the oil
dipstick must be used to check the engine oil
level.
Depending on the engine, the oil dipstick may
be in a different location.
When checking the oil level:
R park the vehicle on a level surface.
R the engine should be switched off for
approximately five minutes if the engine is
at normal operating temperature.
R if the engine is not at normal operating
temperature, e.g. if the engine was only
started briefly: wait about 30 minutes
before carrying out the measurement.
Checking the oil level using the oil
dipstick X
Pull oil dipstick :out of the dipstick guide
tube.
X Wipe off oil dipstick :. Engine compartment
421Maintenance and care Z
Page 432 of 494
Always have paintwork repairs carried out
at a qualified specialis
tworkshop.
! Do not use wash programs with a hot wax
treatment under any circumstances.
i The vehicle should preferably be washed
by hand using a soft sponge, car shampoo
and plenty of water.
i Use only insect remover and car shampoo
from the range of recommended and
approved Mercedes-Benz care products.
Cleaning the windows G
WARNING
Before cleaning the windshield or wiper
blades, switch off the windshield wipers and
remove the SmartKey from the ignition lock.
On vehicles with KEYLESS-GO, press the
Start/Stop button repeatedly until all
indicator lamps in the instrument cluster have
gone out. The windshield wipers could
otherwise move and injure you.
! Only fold the windshield wipers away from
the windshield when vertical. Otherwise,
you will damage the hood.
X Clean the inside and outside of the
windows with a damp cloth and a cleaning
agent that is recommended and approved
by Mercedes-Benz.
! Do not use dry cloths, abrasive products,
solvents or cleaning agents containing
solvents to clean the inside of the windows.
Do not touch the insides of the windows
with hard objects, e.g. an ice scraper or
ring. There is otherwise a risk of damaging
the windows.
! Clean the water drainage channels of the
windshield and the rear window at regular
intervals. Deposits such as leaves, petals
and pollen may under certain
circumstances prevent water from draining
away.T his can lead to corrosion damage
and damage to electronic components. Cleaning wiper blades G
WARNING
Before cleaning the windshield or wiper
blades, switch off the windshield wipers and
remove the SmartKey from the ignition lock.
On vehicles with KEYLESS-GO, press the
Start/Stop button repeatedly until all
indicator lamps in the instrumentc luster have
gone out. The windshield wipers could
otherwise move and injure you.
! Only fold the windshield wipers away from
the windshield when vertical. Otherwise,
you will damage the hood.
! Do not pull the wiper blade. Otherwise,
the wiper blade could be damaged.
! Do not clean wiper blades too often and
do not rub the mtoo hard. Otherwise, the
graphite coating could be damaged. This
could cause wiper noise.
X Fold the wiper arms away from the
windshield.
X Carefully clean the wiper blades with a
damp cloth.
X Fold the windshield wipers back again
before switching on the ignition.
! Hold the wiper arm securely when folding
back. The windshield could be damaged if
the wiper arm smacks against it suddenly.
Cleaning the exterior lighting !
Only use cleaning agents or cleaning
cloths which are suitable for plastic light
lenses. Unsuitable cleaning agents or
cleaning cloths could scratch or damage
the plastic light lenses.
X Clean the plastic lenses of the exterior
lighting using a wet sponge and a mild
cleaning agent, e.g. Mercedes-Benz car
shampoo. Or clean the exterior lighting
with cleaning cloths. 430
CareMaintenance and care