stop start MERCEDES-BENZ CL-Class 2014 C217 Owner's Guide
[x] Cancel search | Manufacturer: MERCEDES-BENZ, Model Year: 2014, Model line: CL-Class, Model: MERCEDES-BENZ CL-Class 2014 C217Pages: 494, PDF Size: 13.55 MB
Page 151 of 494
X
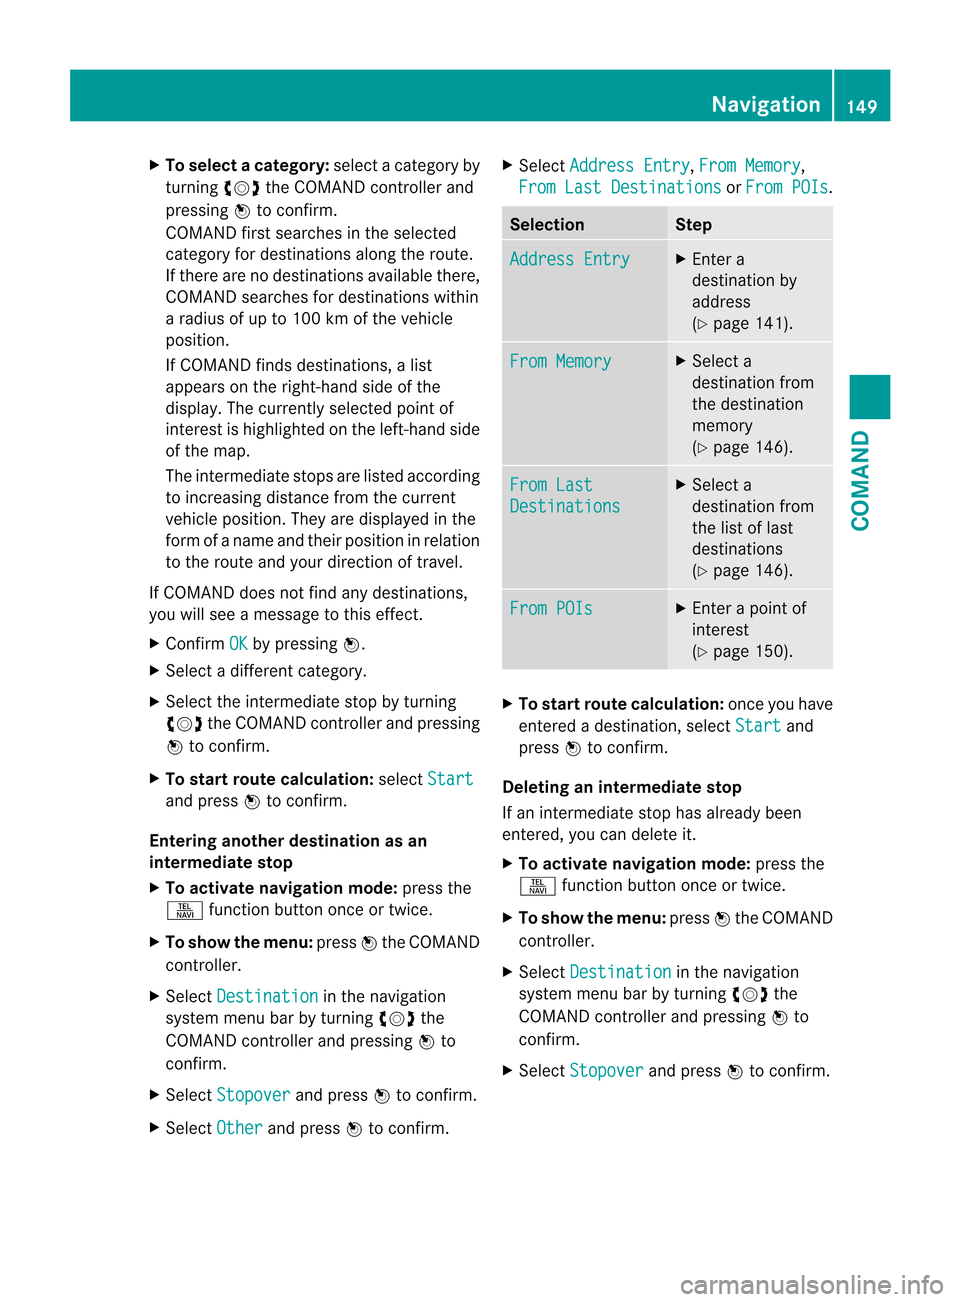
To select acategory: select a category by
turning cVdthe COMAND controller and
pressing Wto confirm.
COMAND first searches in the selected
category for destinations along the route.
If there are no destinations available there,
COMAND searches for destinations within
a radius of up to 100 km of the vehicle
position.
If COMAND finds destinations, a list
appears on the right-hand side of the
display. The currently selected point of
interest is highlighted on the left-hand side
of the map.
The intermediate stops are listed according
to increasing distance from the current
vehicle position. They are displayed in the
form of a name and their position in relation
to the route and your direction of travel.
If COMAND does not find any destinations,
you will see a message to this effect.
X Confirm OK by pressing
W.
X Select a different category.
X Select the intermediate stop by turning
cVd the COMAND controller and pressing
W to confirm.
X To start route calculation: selectStart and press
Wto confirm.
Entering anothe rdestination as an
intermediate stop
X To activate navigation mode: press the
S function button once or twice.
X To show the menu: pressWthe COMAND
controller.
X Select Destination in the navigation
system menu bar by turning cVdthe
COMAND controller and pressing Wto
confirm.
X Select Stopover and press
Wto confirm.
X Select Other and press
Wto confirm. X
Select Address Entry ,
From Memory ,
From Last Destinations or
From POIs .
Selection Step
Address Entry X
Enter a
destination by
address
(Y page 141). From Memory X
Select a
destination from
the destination
memory
(Y page 146). From Last
Destinations X
Select a
destination from
the list of last
destinations
(Y page 146). From POIs X
Enter a point of
interest
(Y page 150). X
To start route calculation: once you have
entered a destination, select Start and
press Wto confirm.
Deleting an intermediate stop
If an intermediate stop has already been
entered, you can delete it.
X To activate navigation mode: press the
S function button once or twice.
X To show the menu: pressWthe COMAND
controller.
X Select Destination in the navigation
system menu bar by turning cVdthe
COMAND controller and pressing Wto
confirm.
X Select Stopover and press
Wto confirm. Navigation
149COMAND Z
Page 166 of 494
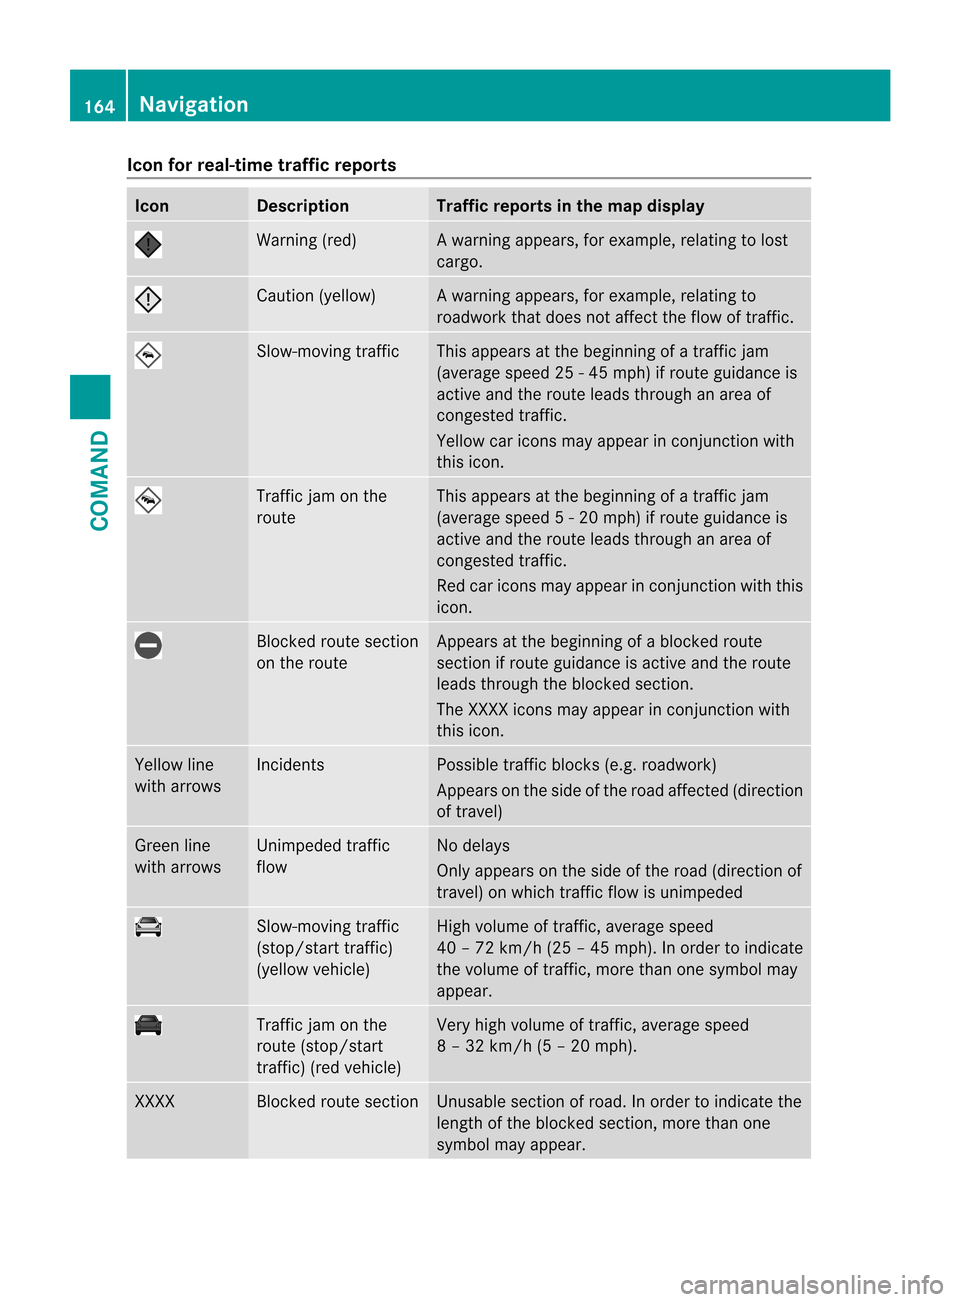
Icon for real-time traffic reports
Icon Description Traffic reports in the map display
Warning (red) Aw
arning appears, for example, relating to lost
cargo. Cautio
n(yellow) Aw
arning appears, for example, relating to
roadwork that does not affect the flow of traffic. Slow-moving traffic This appears at the beginning of a traffic jam
(average speed 25
-45mph) if route guidance is
active and the route leads through an area of
congested traffic.
Yellow car icons may appear in conjunction with
this icon. Traffic jam on the
route This appears at the beginning of a traffic jam
(average speed
5-20mph) if route guidance is
active and the route leads through an area of
congested traffic.
Red car icons may appear in conjunction with this
icon. Blocked route section
on the route Appears at the beginning of a blocked route
section if route guidance is active and the route
leads through the blocked section.
The XXXX icons may appear in conjunction with
this icon. Yellow line
with arrows Incidents Possible traffic blocks (e.g. roadwork)
Appears on the side of the road affected (direction
of travel) Green line
with arrows Unimpeded traffic
flow No delays
Only appears on the side of the road (direction of
travel) on which traffic flow is unimpeded Slow-moving traffic
(stop/start traffic)
(yellow vehicle) High volume of traffic, average speed
40 – 72 km/
h(25 – 45 mph). In order to indicate
the volume of traffic, more than one symbol may
appear. Traffic jam on the
route (stop/start
traffic) (red vehicle) Very high volume of traffic, average speed
8 – 32 km/h (5 – 20 mph). XXXX Blocked route section Unusable section of road. In order to indicate the
length of the blocked section, more than one
symbol may appear.164
NavigationCOMAND
Page 182 of 494
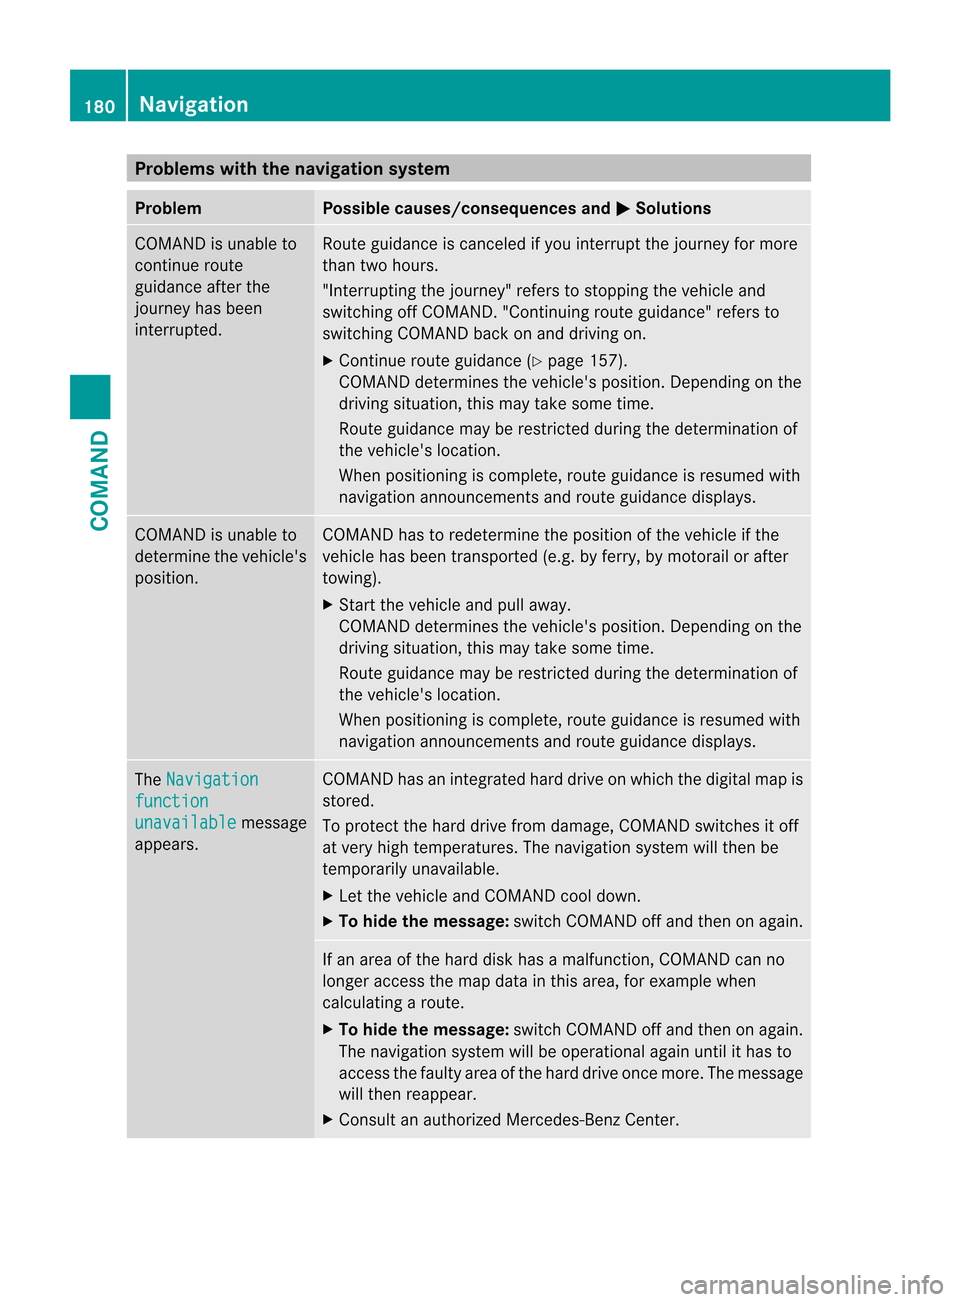
Problems with the navigation system
Problem Possible causes/consequences and
M Solutions
COMAND is unable to
continue route
guidance after the
journey has been
interrupted. Route guidance is canceled if you interrupt the journey for more
than two hours.
"Interrupting the journey" refers to stopping the vehicle and
switching off COMAND. "Continuing route guidance" refers to
switching COMAND back on and driving on.
X
Continue route guidance (Y page 157).
COMAND determines the vehicle's position. Depending on the
driving situation, this may take some time.
Route guidance may be restricted during the determination of
the vehicle's location.
When positioning is complete, route guidance is resumed with
navigation announcements and route guidance displays. COMAND is unable to
determine the vehicle's
position. COMAND has to redetermine the position of the vehicle if the
vehicle has been transported (e.g. by ferry, by motorail or after
towing).
X
Start the vehicle and pull away.
COMAND determines the vehicle's position. Depending on the
driving situation, this may take some time.
Route guidance may be restricted during the determination of
the vehicle's location.
When positioning is complete, route guidance is resumed with
navigation announcements and route guidance displays. The
Navigation function
unavailable message
appears. COMAND has an integrated hard drive on which the digital map is
stored.
To protect the hard drive from damage, COMAND switches it off
at very high temperatures. The navigation system will then be
temporarily unavailable.
X
Let the vehicle and COMAND cool down.
X To hide the message: switch COMAND off and then on again. If an area of the hard disk has a malfunction, COMAND can no
longer access the map data in this area, for example when
calculating a route.
X
To hide the message: switch COMAND off and then on again.
The navigation system will be operational again until it has to
access the faulty area of the hard drive once more. The message
will then reappear.
X Consult an authorized Mercedes-Benz Center. 180
NavigationCOMAND
Page 183 of 494
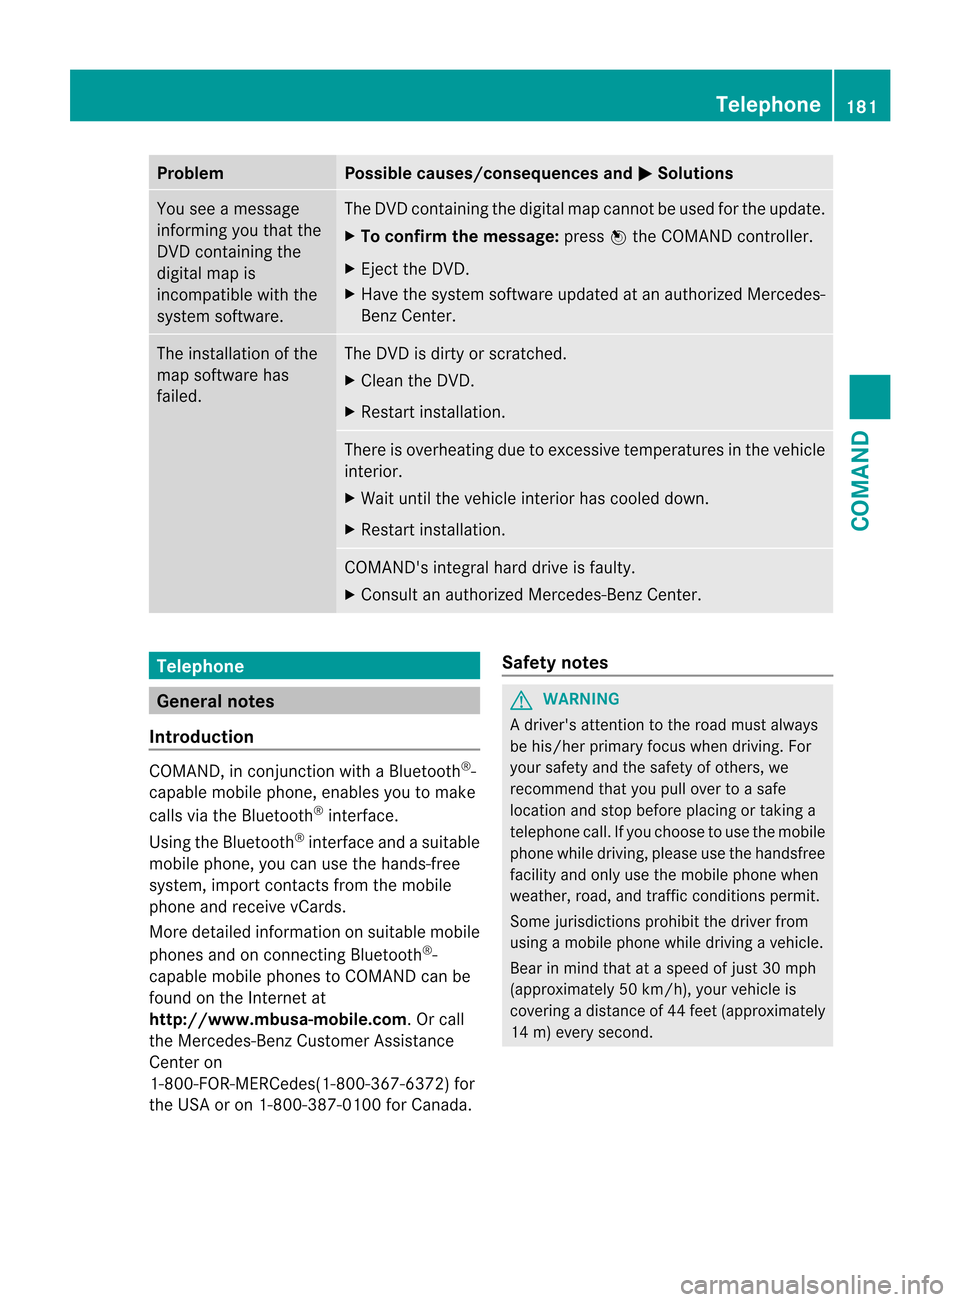
Problem Possible causes/consequences and
M Solutions
You see a message
informing you that the
DVD containing the
digital map is
incompatible with the
system software. The DVD containing the digital map cannot be used for the update.
X
To confirm the message: pressWthe COMAND controller.
X Eject the DVD.
X Have the system software updated at an authorized Mercedes-
Benz Center. The installation of the
map software has
failed. The DVD is dirty or scratched.
X
Clean the DVD.
X Restart installation. There is overheating due to excessive temperatures in the vehicle
interior.
X
Wait until the vehicle interior has cooled down.
X Restart installation. COMAND's integral hard drive is faulty.
X
Consult an authorized Mercedes-Benz Center. Telephone
General notes
Introduction COMAND, in conjunction with a Bluetooth
®
-
capable mobile phone, enables you to make
calls via the Bluetooth ®
interface.
Using the Bluetooth ®
interface and a suitable
mobile phone, you can use the hands-free
system, import contacts from the mobile
phone and receive vCards.
More detailed information on suitable mobile
phones and on connecting Bluetooth ®
-
capable mobile phones to COMAND can be
found on the Internet at
http://www.mbusa-mobile.com. Or call
the Mercedes-Benz Customer Assistance
Center on
1-800-FOR-MERCedes(1-800-367-6372) for
the USA or on 1-800-387-0100 for Canada. Safety notes G
WARNING
A driver's attention to the road must always
be his/her primary focus when driving. For
your safety and the safety of others, we
recommend that you pull over to a safe
location and stop before placing or taking a
telephone call. If you choose to use the mobile
phone while driving, please use the handsfree
facility and only use the mobile phone when
weather, road, and traffic conditions permit.
Some jurisdictions prohibit the driver from
using a mobile phone while driving a vehicle.
Bear in mind that at a speed of just 30 mph
(approximately 50 km/h), your vehicle is
covering a distance of 44 feet (approximately
14 m) every second. Telephone
181COMAND Z
Page 214 of 494
Only in audio DVD mode
X To pause playback: switch on audio DVD
mode (Y page 210).
X Select Ëby sliding VÆand turning
cVd the COMAND controller and press
W to confirm.
The Ë display changes to Ì.
X To continue playback: selectÌand
press Wto confirm.
Playback continues from the point where it
was interrupted. The Ìdisplay changes
to Ë.
Stop function This function is only available in audio DVD
mode.
X
Switch on audio DVD mode (Y page 210).
X To interrupt playback: selectÉby
sliding VÆand turning cVdthe COMAND
controller and press Wto confirm.
The Ë display changes to Ì.É
remains highlighted.
X To continue playback: selectÌand
press Wto confirm.
Playback continues from the point where it
was interrupted.
X To stop playback: while playback is
interrupted, select Éagain and press
W to confirm.
or
X Select Éand confirm by pressing W
twice in rapid succession.
Ì is highlighted.
X To restart playback: selectÌand
press Wto confirm.
Playback starts at the beginning of the
DVD. Selecting CD/audio DVD/MP3 discs Selecting via the media list
X
In CD/audio DVD and MP3 mode: select
Media by sliding
VÆor turning cVdthe
COMAND controller and press Wto
confirm.
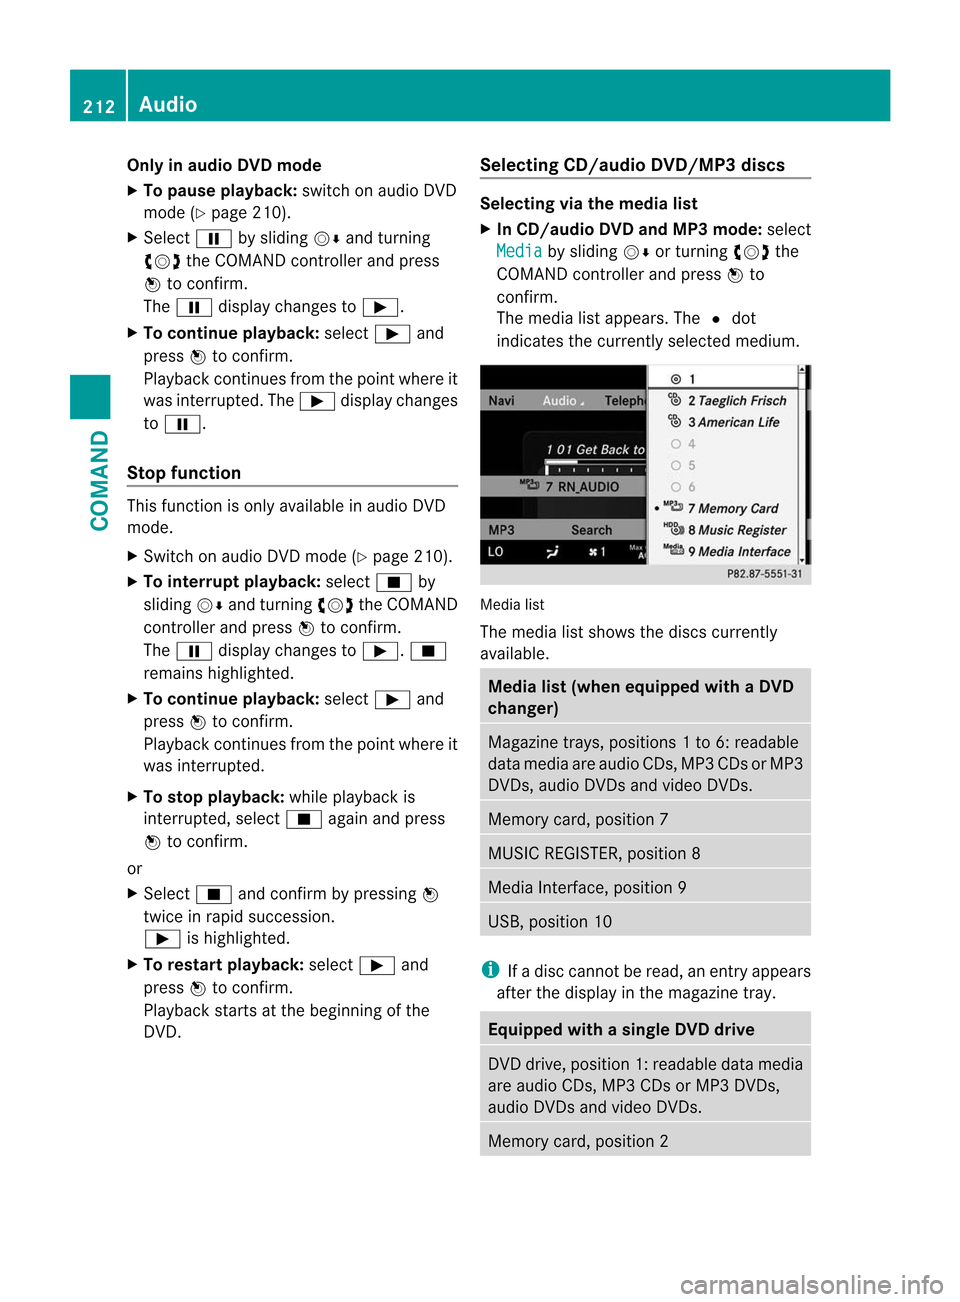
The media list appears. The #dot
indicates the currently selected medium. Media list
The media list shows the discs currently
available.
Media list (when equipped with a DVD
changer)
Magazine trays, positions
1to 6: readable
data media are audio CDs, MP3 CDs or MP3
DVDs, audio DVDs and video DVDs. Memory card, position 7
MUSIC REGISTER, position 8
Media Interface, position 9
USB, position 10
i
If a disc cannot be read, an entry appears
after the display in the magazine tray. Equipped with a single DVD drive
DVD drive, position 1: readable data media
are audio CDs, MP3 CDs or MP3 DVDs,
audio DVDs and video DVDs.
Memory card, position 2212
AudioCOMAND
Page 232 of 494
authorized Mercedes-Ben
zCenter. This will
allow you to play video DVDs with a
differen tregion code, provided that they
are produced in accordance with the PAL
or NTSC standard. The region code can be
changed up to five times.
Function restrictions Depending on the DVD, it is possible that
certain functions or actions will be
temporarily blocked or may not function at all.
As soon as you try to activate these functions
or actions, you will see the Ksymbol in the
display.
Inserting and removing DVDs X
Proceed as described in the "Inserting and
ejecting CDs and DVDs" section
(Y page 209).
Activating video DVD mode Option 1
X
Insert a video DVD.
COMAND loads the medium inserted and
starts to play it.
Option 2
X Select Video in the main function bar by
sliding ZVand turning cVdthe COMAND
controller and press Wto confirm.
Video DVD mode is switched on.
Hiding/showing the navigation menu X
To show: turncVd or slide ZVÆthe
COMAND controller.
i This function is not available while the
DVD's own menu (Y page 232) is being
displayed.
X To hide: slideZVÆ the COMAND
controller.
or
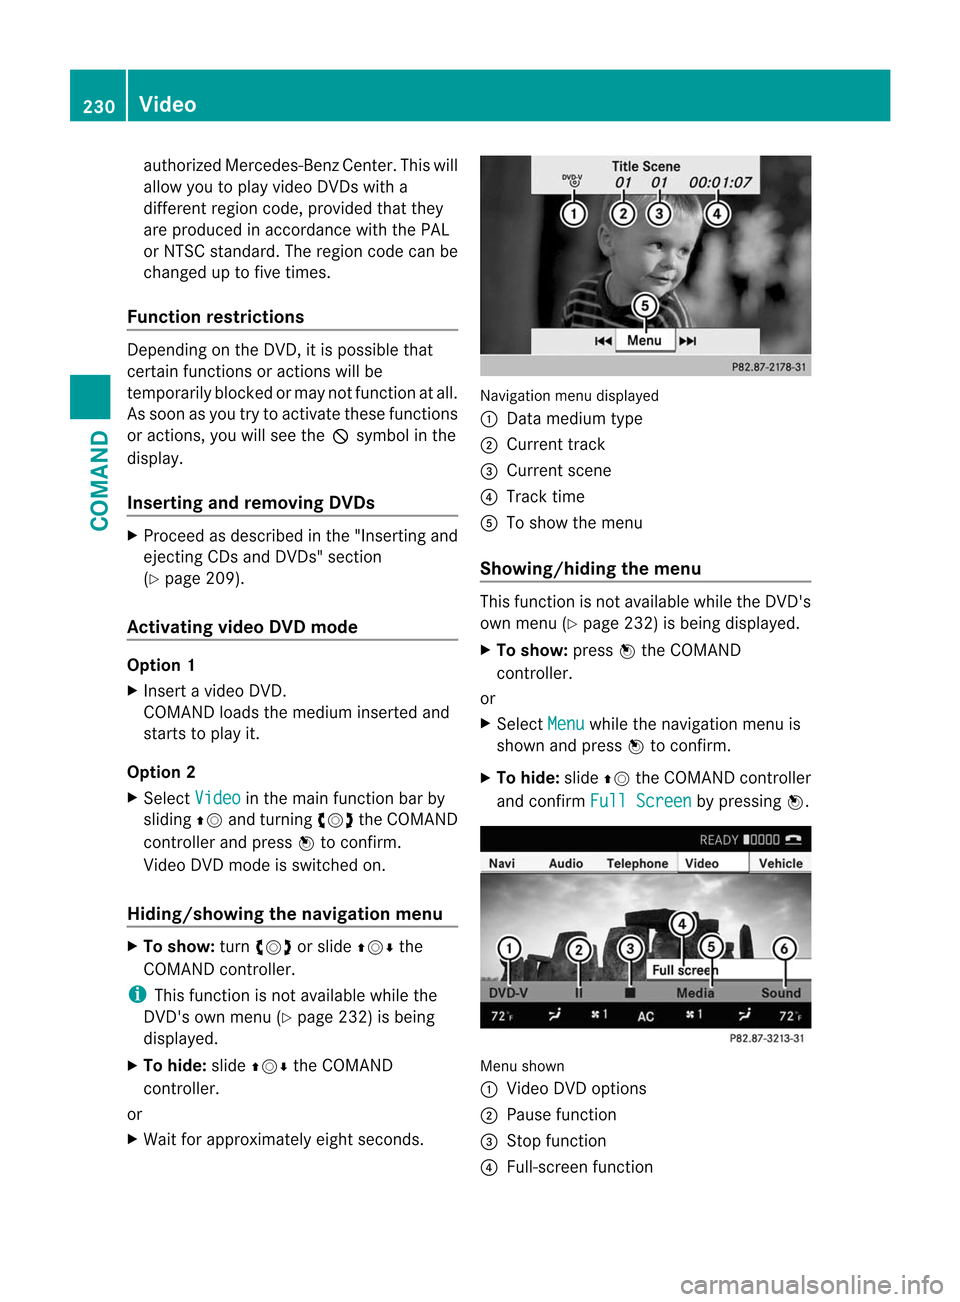
X Wait for approximately eight seconds. Navigation menu displayed
:
Data medium type
; Current track
= Current scene
? Track time
A To show the menu
Showing/hiding the menu This function is not available while the DVD's
own menu (Y
page 232) is being displayed.
X To show: pressWthe COMAND
controller.
or
X Select Menu while the navigation menu is
shown and press Wto confirm.
X To hide: slideZVthe COMAND controller
and confirm Full Screen by pressing
W. Menu shown
:
Video DVD options
; Pause function
= Stop function
? Full-screen function 230
VideoCOMAND
Page 233 of 494
A
Media selection
B Sound settings
Fast forward/rewind X
Slide XVY and hold the COMAND
controller until the desired position has
been reached.
You see the navigation menu.
Selecting avideo DVD X
Press Wthe COMAND controller to show
the menu.
X Select Media by sliding
VÆand turning
cVd the COMAND controller and press
W to confirm.
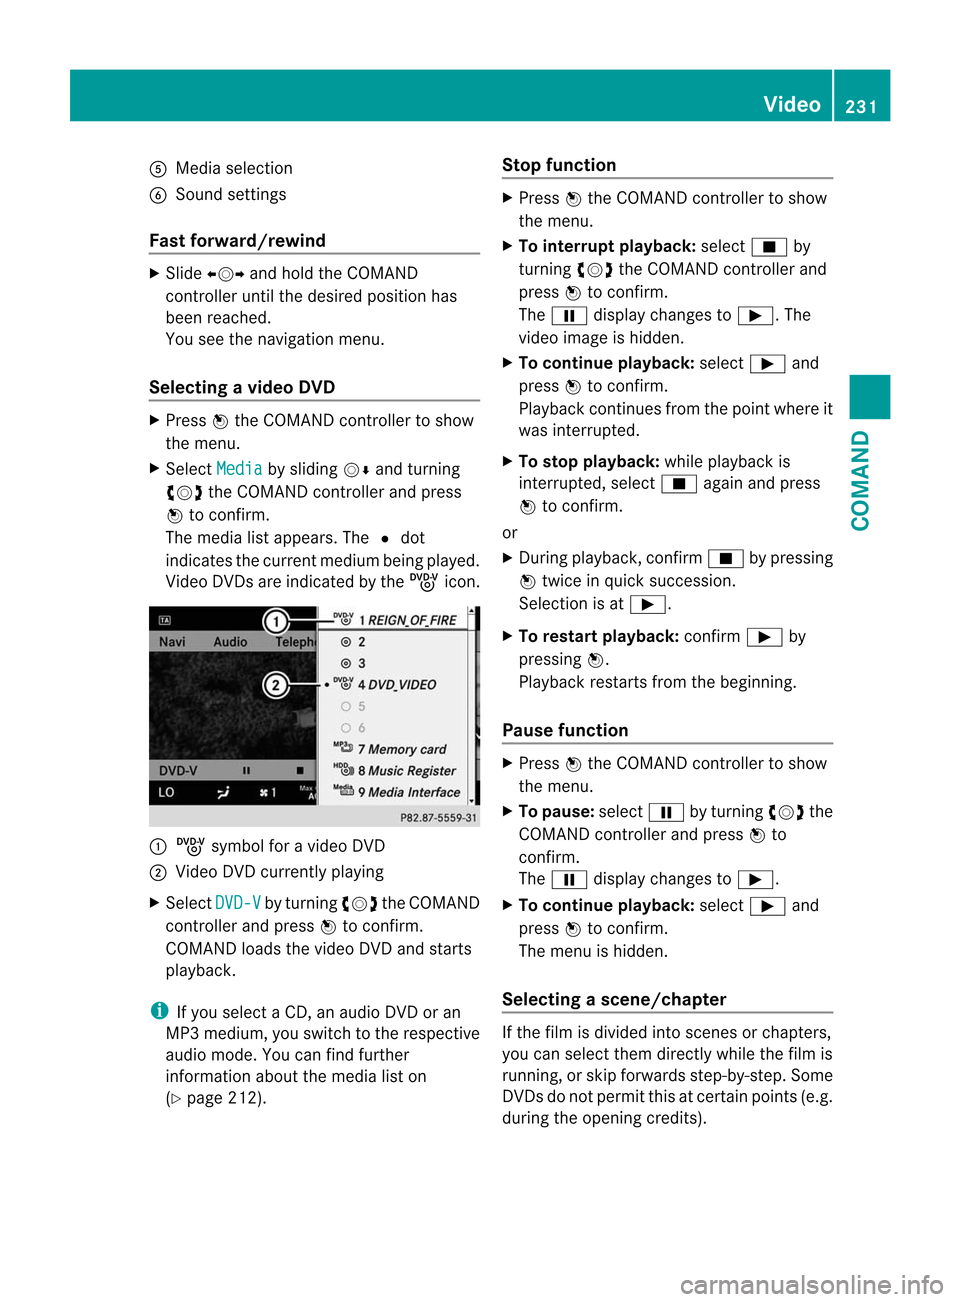
The media list appears. The #dot
indicates the current medium being played.
Video DVDs are indicated by the ýicon. :
ý symbol for a video DVD
; Video DVD currently playing
X Select DVD-V by turning
cVdthe COMAND
controller and press Wto confirm.
COMAN Dloads the video DVD and starts
playback.
i If you select a CD, an audio DVD or an
MP3 medium, you switch to the respective
audio mode. You can find further
information about the media list on
(Y page 212). Stop function X
Press Wthe COMAND controller to show
the menu.
X To interrupt playback: selectÉby
turning cVdthe COMAND controller and
press Wto confirm.
The Ë display changes to Ì.The
video image is hidden.
X To continue playback: selectÌand
press Wto confirm.
Playback continues from the point where it
was interrupted.
X To stop playback: while playback is
interrupted, select Éagain and press
W to confirm.
or
X During playback, confirm Éby pressing
W twice in quick succession.
Selection is at Ì.
X To restart playback: confirmÌby
pressing W.
Playback restarts from the beginning.
Pause function X
Press Wthe COMAND controller to show
the menu.
X To pause: selectËby turning cVdthe
COMAND controller and press Wto
confirm.
The Ë display changes to Ì.
X To continue playback: selectÌand
press Wto confirm.
The menu is hidden.
Selecting ascene/chapter If the film is divided into scenes or chapters,
you can select them directly while the film is
running, or skip forwards step-by-step. Some
DVDs do no
tpermit this at certain points (e.g.
during the opening credits). Video
231COMAND Z
Page 237 of 494
gradually. This enables you to determine
whether the system is able to play the
music at high volume without distorting it. Vehicle
Vehicle functions
General information In this menu, you can set the following vehicle
functions:
R
ECO
R multicontour seat settings
R rear window blind
R EASY-ENTRY/EXIT feature
R exterior lighting delayed switch-off
R interior lighting delayed switch-off
R ambient lighting
R automatic folding mirror function
R locator lighting
R automatic locking feature
R trunk lid opening height restriction
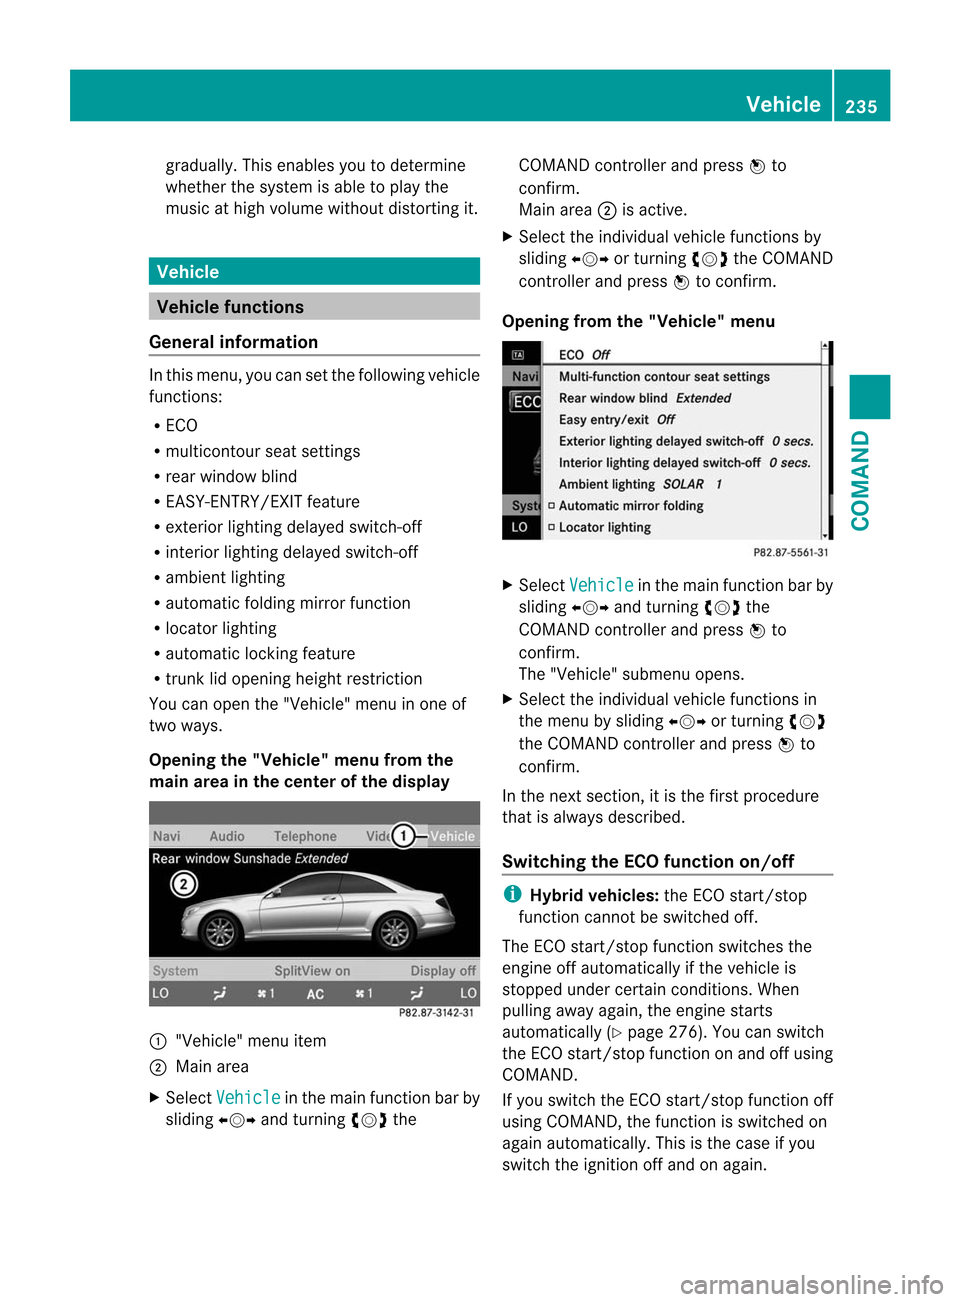
You can open the "Vehicle" menu in one of
two ways.
Opening the "Vehicle" menu from the
main area in the center of the display :
"Vehicle" menu item
; Main area
X Select Vehicle in the main function bar by
sliding XVYand turning cVdthe COMAND controller and press
Wto
confirm.
Main area ;is active.
X Select the individual vehicle functions by
sliding XVYor turning cVdthe COMAND
controller and press Wto confirm.
Opening from the "Vehicle" menu X
Select Vehicle in the main function bar by
sliding XVYand turning cVdthe
COMAND controller and press Wto
confirm.
The "Vehicle" submenu opens.
X Select the individual vehicle functions in
the menu by sliding XVYor turning cVd
the COMAND controller and press Wto
confirm.
In the next section, it is the first procedure
that is always described.
Switching the ECO function on/off i
Hybrid vehicles: the ECO start/stop
function cannot be switched off.
The ECO start/stop function switches the
engine off automatically if the vehicle is
stopped under certain conditions. When
pulling away again, the engine starts
automatically (Y page 276). You can switch
the ECO start/stop function on and off using
COMAND.
If you switch the ECO start/stop function off
using COMAND, the function is switched on
again automatically. This is the case if you
switch the ignition off and on again. Vehicle
235COMAND Z
Page 238 of 494
X
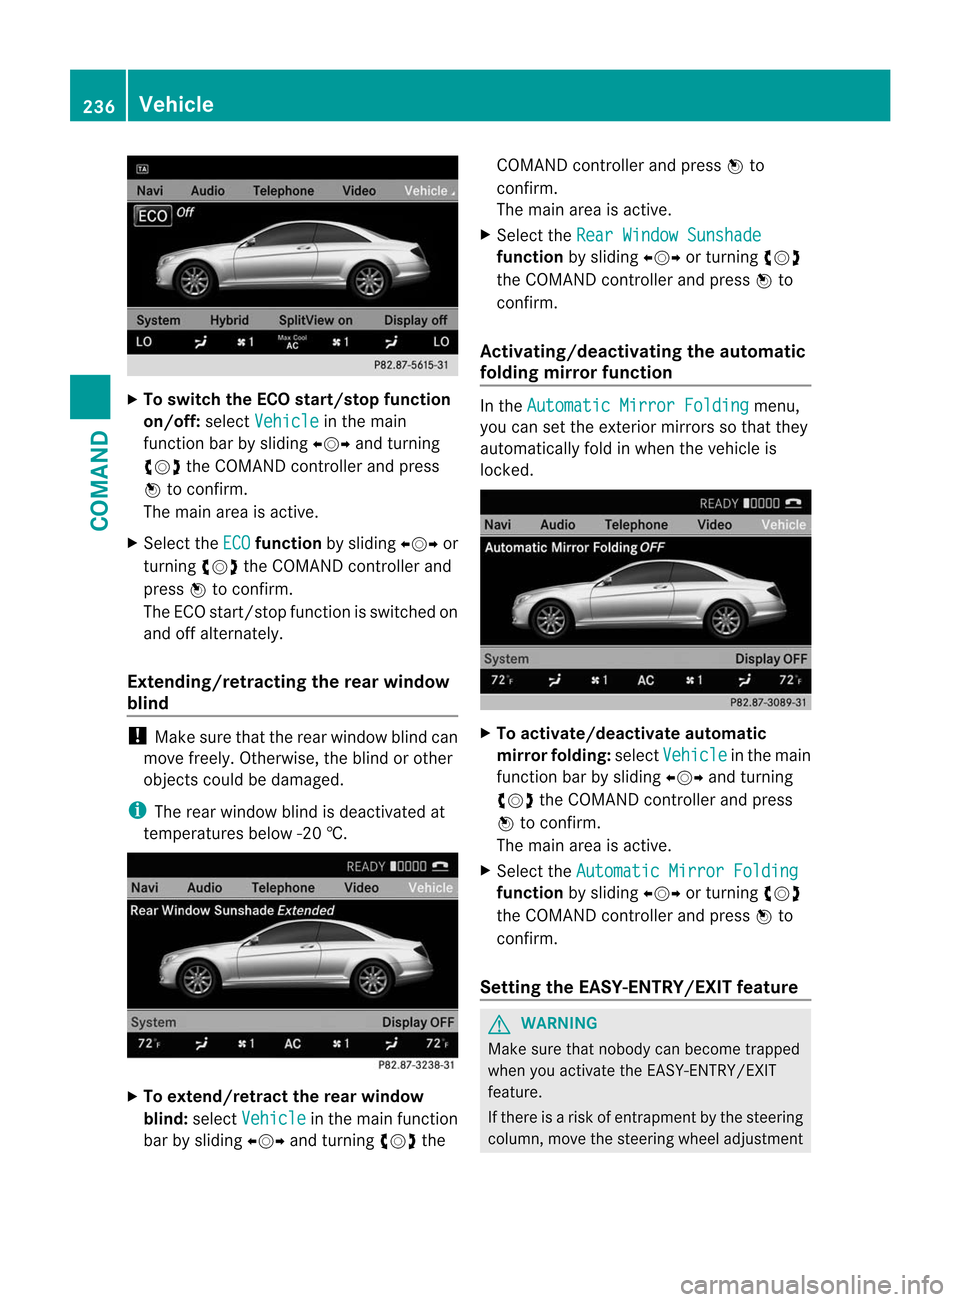
To switch the ECO start/stop function
on/off: selectVehicle in the main
functio nbar by sliding XVYand turning
cVd the COMAND controller and press
W to confirm.
The main area is active.
X Select the ECO function
by sliding XVYor
turning cVdthe COMAND controller and
press Wto confirm.
The ECO start/stop function is switched on
and off alternately.
Extending/retracting the rea rwindow
blind !
Make sure that the rear window blind can
move freely. Otherwise, the blind or other
objects could be damaged.
i The rear window blind is deactivated at
temperatures below -2 0†.X
To extend/retract the rear window
blind: selectVehicle in the main function
ba rb y sliding XVYand turning cVdthe COMAND controller and press
Wto
confirm.
The main area is active.
X Selec tthe Rear Window Sunshade function
by sliding XVYor turning cVd
the COMAND controller and press Wto
confirm.
Activating/deactivating the automatic
folding mirror function In the
Automatic Mirror Folding menu,
you can set the exterior mirrors so that they
automatically fold in when the vehicle is
locked. X
To activate/deactivate automatic
mirror folding: selectVehicle in the main
function bar by sliding XVYand turning
cVd the COMAND controller and press
W to confirm.
The main area is active.
X Select the Automatic Mirror Folding function
by sliding XVYor turning cVd
the COMAND controller and press Wto
confirm.
Setting the EASY-ENTRY/EXIT feature G
WARNING
Make sure that nobody can become trapped
when you activate the EASY-ENTRY/EXIT
feature.
If there is a risk of entrapmentb y the steering
column, move the steering wheel adjustment 236
VehicleCOMAND
Page 253 of 494
X
Turn the light switch to $orc.
or
X If the rear fog lamp is switched on: press
the light switch in to the stop.
Low-beam headlamps X
To switch on the low-beam headlamps:
turn the SmartKey in the ignition lock to
position 2or start the engine.
X Turn the light switch to L.
The T indicator lamp on the light switch
lights up.
X To switch off the low-beam
headlamps: turn the light switch to $.
Daytime running lamps Daytime running lamps in Canada
The daytime running lamps function is
required by law in Canada. It cannot therefore
be deactivated.
X Turn the light switch to $orc.
With the engine running: depending on the
ambient light, the daytime running lamps or
the low-beam headlamps are switched on.
When the low-beam headlamps are
switched on, the Tindicator lamp on
the light switch lights up.
When the engine is running and the vehicle is
stationary or if the electronic parking brake is
applied: if you move the selector lever from a
drive position to P, the daytime running
lamps/low-beam headlamps go out after
three minutes.
When the engine is running, the vehicle is
stationary and in high ambient light
brightness: if you turn the light switch
to T, you turn on the daytime running
lamps and parking lamps.
If the engine is running and you turn the light
switch to L, the manual settings take
precedence over the daytime running lamps. Daytime running lamps in the USA
In the USA, the daytime running lamps are
deactivated upon delivery from the factory.
X
To activate the daytime running
lamps: activate the daytime running lamps
function in the on-board computer
(Y page 349).
X Turn the light switch to $orc.
With the engine running: depending on the
ambient light, the daytime running lamps or
the low-beam headlamps are switched on.
When the low-beam headlamps are
switched on, the Tindicator lamp on
the light switch lights up.
If the engine is running and you turn the light
switch to TorL, the manual settings
take precedence over the daytime running
lamps.
Automatic headlamp mode X
To switch on automatic headlamp
mode: turn the light switch to c.
SmartKey in position 1in the ignition lock:
the parking lamps are switched on or off
automatically depending on the brightness
of the ambient light.
With the engine running: depending on the
brightness of the ambient light, the daytime
running lamps 10
or the parking lamps and
low-beam headlamps are switched on or off
automatically.
When the low-beam headlamps are
switched on, the Tindicator lamp on
the light switch lights up. G
WARNING
If the light switch is set to c, the low-beam
headlamps will not come on automatically if
it is foggy. This could endanger you and
others. Therefore, turn the light switch to
L in fog.
10 Only if daytime running lamps have been activated via the on-board computer. Exterior lighting
251Lights and windshield wipers
Z