change time MERCEDES-BENZ CLA 2013 Owners Manual
[x] Cancel search | Manufacturer: MERCEDES-BENZ, Model Year: 2013, Model line: CLA, Model: MERCEDES-BENZ CLA 2013Pages: 352, PDF Size: 5.37 MB
Page 3 of 352
Welcome to the world of Mercedes-Benz
Before you first drive off, read this Owner's
Manual carefully and familiarise yourself with
your vehicle. For your own safety and a longer
vehicle life, follow the instructions and warn-
ing notices in this manual. Disregarding them
may lead to damage to the vehicle or personal
injury.
The equipment or model designation of your
vehicle may vary according to:
R Model
R Order
R Country variant
R Availability
The illustrations in this manual show a left-
hand-drive vehicle. On right-hand-drive vehi-
cles, the layout of components and controls
differs accordingly.
Mercedes-Benz is constantly updating its
vehicles to the state of the art.
Mercedes-Benz therefore reserves the right
to introduce changes in the following areas:
R Design
R Equipment
R Technical features
The equipment in your vehicle may therefore
differ from that shown in the descriptions and
illustrations.
The following are integral components of the
vehicle:
R Owner's Manual
R Service Booklet
R Equipment-dependent supplements
Keep printed copies of the documents in the
vehicle at all times. If you sell the vehicle,
always pass the documents on to the new
owner.
i You can get to know the important fea-
tures of your vehicle in the interactive Own-
er's Manual on the Internet at:
http://www.mercedes-benz.de/
betriebsanleitungYou can also use the CLA Guide smartphone
app:
Apple ®
iOS
Android™
The technical documentation team at
Daimler AG wishes you safe and pleasant
motoring.
1175840100Z102 É1175840100Z102AËÍ
Page 23 of 352
Protection of the environment
General notes
HEnvironmental note
Daimler's declared policy is one of compre-
hensive environmental protection.
Our objectives are to use the natural resour-
ces which form the basis of our existence on
this planet sparingly and in a manner which
takes the requirements of both nature and
humanity into consideration.
You too can help to protect the environment
by operating your vehicle in an environmen-
tally-responsible manner.
Fuel consumption and the rate of engine,
transmission, brake and tyre wear depend on
the following factors:
R operating conditions of your vehicle
R your personal driving style
You can influence both factors. Therefore,
please bear the following in mind:
Operating conditions:
R avoid short trips, as these increase fuel
consumption.
R observe the correct tyre pressure.
R do not carry any unnecessary weight in the
vehicle.
R remove the roof rack once you no longer
need it.
R a regularly serviced vehicle will contribute
to environmental protection. You should
therefore adhere to the service intervals.
R all maintenance work should be carried out
at a qualified specialist workshop.
Personal driving style:
R do not depress the accelerator pedal when
starting the engine.
R do not warm up the engine when the vehicle
is stationary.
R drive carefully and maintain a safe distance
from the vehicle in front.
R avoid frequent, sudden acceleration and
braking.
R change gear in good time and use each gear
only up to Ô of its maximum engine speed.
R switch off the engine in stationary traffic.
R monitor the vehicle's fuel consumption.
Returning an end-of-life vehicle
EU countries only:
Mercedes-Benz will take back your old vehicle
to dispose of it in an environmentally-respon-
sible manner in accordance with the Euro-
pean Union (EU) End of Life Vehicles Direc-
tive.
There is a network of return points and dis-
assembly plants available. You can return
your vehicle to these plants free of charge.
This makes a valuable contribution to the
recycling process and the conservation of
resources.
For further information on recycling old vehi-
cles, recovery and the terms of the policy,
visit the Mercedes-Benz homepage.
Genuine Mercedes-Benz parts
HEnvironmental note
Daimler AG also supplies reconditioned
assemblies and parts which are of the same
quality as new parts. For these, the same war-
ranty applies as for new parts.
! Airbags and seat belt tensioners, as well
as control units and sensors for these
restraint systems, may be installed in the
following areas of your vehicle:
R doors
R door pillars
R door sills
R seats
R dashboard
R instrument cluster
R centre console
Introduction21Z
Page 24 of 352
Do not install accessories such as audio
systems in these areas. Do not carry out
repairs or welding. You could impair the
operating efficiency of the restraint sys-
tems.
Have accessories retrofitted at a qualified
specialist workshop.
If you use parts, tyres and wheels as well as
accessories relevant to safety which have not
been approved by Mercedes, the operating
safety of the vehicle could be jeopardised.
This could lead to malfunctions in safety-rel-
evant systems, e.g. the brake system. Only
use genuine Mercedes-Benz parts or parts of
equal quality. Only use tyres, wheels and
accessories that have been specifically
approved for your vehicle.
Mercedes-Benz tests genuine parts and con-
version parts and accessories that have been
specifically approved for your vehicle for their
reliability, safety and suitability. Despite
ongoing market research, Mercedes-Benz is
unable to assess other parts. Mercedes-Benz
accepts no responsibility for the use of such
parts in Mercedes-Benz vehicles, even if they
have been independently or officially
approved.
In Germany, certain parts are only officially
approved for installation or modification if
they comply with legal requirements. This
also applies to some other countries. All gen-
uine Mercedes-Benz parts meet the approval
requirements. The use of non-approved parts
may invalidate the vehicle's general operating
permit.
This is the case:
R if they cause a change of the vehicle type
from that for which the vehicle's general
operating permit was granted
R if other road users could be endangered
R if the emission or noise levels are adversely
affected
Always specify the vehicle identification num-
ber (VIN) ( Y page 336) and the engine num-
ber ( Y page 336) when ordering genuine
Mercedes-Benz parts.Owner's Manual
General notes
Before you first drive off, read this Owner's
Manual carefully and familiarise yourself with
your vehicle.
For your own safety and a longer vehicle life,
follow the instructions and warning notices in
this manual. Disregarding them may lead to
damage to the vehicle or personal injury.
Vehicle equipment
This Owner's Manual describes all models
and all standard and optional equipment
available for your vehicle at the time of pub-
lication of the Owner's Manual. Country-spe-
cific differences are possible. Note that your
vehicle may not be fitted with all features
described. This is also the case for systems
and functions relevant to safety. Therefore,
the equipment on your vehicle may differ from
that in the descriptions and illustrations.
The original purchase contract documenta-
tion for your vehicle contains a list of all of the
systems in your vehicle.
Should you have any questions concerning
equipment and operation, please consult a
Mercedes-Benz Service Centre.
The Owner's Manual and Service Booklet are
important documents and should kept in the
vehicle.
Operating safety
Important safety notes
GWARNING
If you do not have the prescribed service/
maintenance work or necessary repairs car-
ried out, this could result in malfunctions or
system failures. There is a risk of an accident.
Always have the prescribed service/mainte-
nance work as well as necessary repairs car-
ried out at a qualified specialist workshop.
22Introduction
Page 49 of 352
— on no account across your neck or under
your arm — and pulled tight against your
upper body. The lap belt must always pass
across your lap as low down as possible, i.e.
over your hip joints — not across your abdo-
men. If necessary, push the seat belt
slightly downwards and adjust it by pulling
it in the direction the seat belt retracts.
R Do not route the seat belt strap over sharp
or fragile objects. Please make sure that
such objects are not on or in your clothing,
e.g. spectacles, pens or keys etc. The seat
belt strap could become damaged and tear
during an accident and you or other vehicle
occupants could be injured.
R Only one person should use each seat belt
at any one time. Children must never travel
sitting on the lap of another occupant. The
child will not be secured in the event of an
accident, heavy braking or sudden change
of direction. This may result in the child or
other occupants being seriously or fatally
injured.
R Persons under 1.50 m tall cannot wear the
seat belts correctly. For this reason secure
persons less than 1.50 m tall in specially
designed, suitable restraint systems.
R Children under 1.50 m tall and younger
than twelve years of age cannot wear the
seat belts correctly. For this reason secure
them in special suitable child restraint sys-
tems installed on a suitable seat. Additional
information can be found in the Operating
Instructions in the chapter "Safety", "Chil-
dren in the Vehicle". Observe the installa-
tion instructions of the child restraint sys-
tem manufacturer.
R Do not secure an object with a seat belt if
the seat belt is also being used by one of
the vehicle's occupants.GWARNING
The seat belt does not offer the intended level
of protection if the backrest is not in the
upright position. When braking or in the event
of an accident, you could slide underneath the
seat belt and sustain abdomen or neck inju-
ries, for example. This poses an increased risk
of injury or even fatal injury.
Adjust the seat properly before beginning
your journey. Always make sure that the seat
is in the upright position.GWARNING
Seat belts cannot perform their intended pro-
tective function if:
R they are damaged, modified, bleached or
coloured, or are very dirty
R the seat belt buckle is damaged or very
dirty
R modifications have been made to the seat
belt tensioners or belt anchorages
In the event of an accident, seat belts can
sustain damage that is not visible to the naked
eye, e. g. due to glass splinters. Modified or
damaged seat belts could tear or fail in the
event of an accident, for example. Modified
belt tensioners could deploy unexpectedly or
fail. There is an increased risk of serious or
even fatal injuries.
Never make modifications to seat belts, belt
tensioners, belt anchorages or seat belt
retractors. Make sure that the seat belts are
undamaged, are not worn and are clean.
Mercedes-Benz recommends that you only
use seat belts which have been approved
specifically for your vehicle by Mercedes-
Benz.
Seat belts are the most effective means of
restraining the movement of vehicle occu-
pants in the event of an accident. This
reduces the risk of vehicle occupants coming
into contact with parts of the vehicle interior.
Occupant safety47SafetyZ
Page 79 of 352
opened from the inside. Switch off the alarm
( Y page 71).
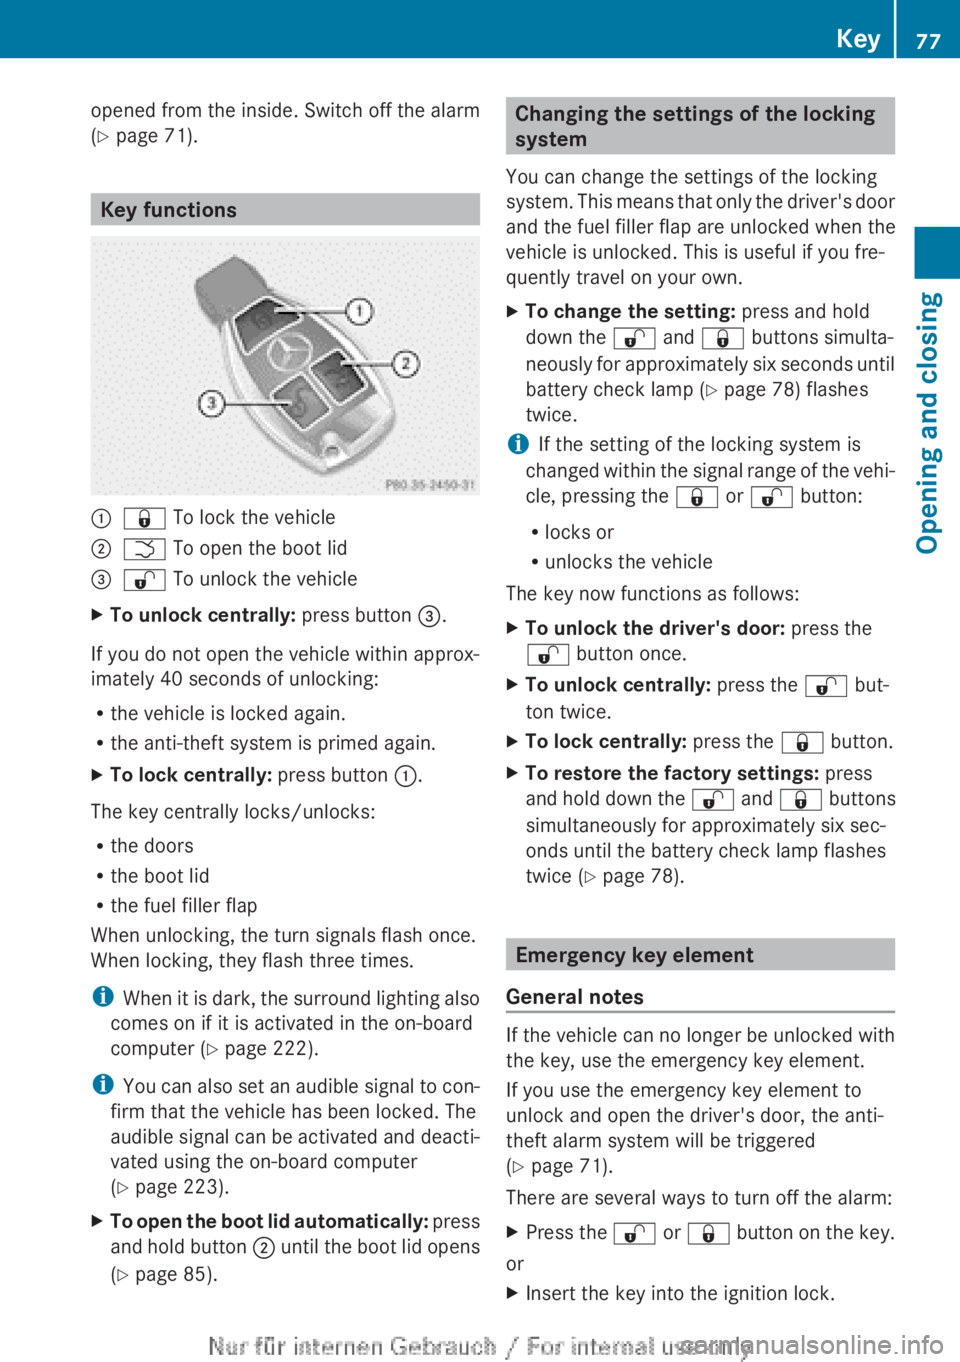
Key functions
:& To lock the vehicle;F To open the boot lid=% To unlock the vehicleXTo unlock centrally: press button =.
If you do not open the vehicle within approx-
imately 40 seconds of unlocking:
R the vehicle is locked again.
R the anti-theft system is primed again.
XTo lock centrally: press button :.
The key centrally locks/unlocks:
R the doors
R the boot lid
R the fuel filler flap
When unlocking, the turn signals flash once.
When locking, they flash three times.
i When it is dark, the surround lighting also
comes on if it is activated in the on-board
computer ( Y page 222).
i You can also set an audible signal to con-
firm that the vehicle has been locked. The
audible signal can be activated and deacti-
vated using the on-board computer
( Y page 223).
XTo open the boot lid automatically: press
and hold button ; until the boot lid opens
( Y page 85).Changing the settings of the locking
system
You can change the settings of the locking
system. This means that only the driver's door
and the fuel filler flap are unlocked when the
vehicle is unlocked. This is useful if you fre-
quently travel on your own.XTo change the setting: press and hold
down the % and & buttons simulta-
neously for approximately six seconds until
battery check lamp ( Y page 78) flashes
twice.
i If the setting of the locking system is
changed within the signal range of the vehi-
cle, pressing the & or % button:
R locks or
R unlocks the vehicle
The key now functions as follows:
XTo unlock the driver's door: press the
% button once.XTo unlock centrally: press the % but-
ton twice.XTo lock centrally: press the & button.XTo restore the factory settings: press
and hold down the % and & buttons
simultaneously for approximately six sec-
onds until the battery check lamp flashes
twice ( Y page 78).
Emergency key element
General notes
If the vehicle can no longer be unlocked with
the key, use the emergency key element.
If you use the emergency key element to
unlock and open the driver's door, the anti-
theft alarm system will be triggered
( Y page 71).
There are several ways to turn off the alarm:
XPress the % or & button on the key.
or
XInsert the key into the ignition lock.Key77Opening and closingZ
Page 114 of 352
In very rare cases, Adaptive Highbeam Assist
recognises road users too late or not at all. In
this, or in similar situations, the automatic
main-beam headlamps will not be deactivated
or activated regardless. There is a risk of an
accident.
Always carefully observe the traffic conditions
and switch off the main-beam headlamps in
good time.
Adaptive Highbeam Assist cannot take into
account road, weather or traffic conditions.
Adaptive Highbeam Assist is only an aid. You
are responsible for adjusting the vehicle's
lighting to the prevailing light, visibility and
traffic conditions.
In particular, the detection of obstacles can
be restricted if there is:
R poor visibility, e.g. due to fog, heavy rain or
snow
R dirt on the sensors or the sensors are
obscured
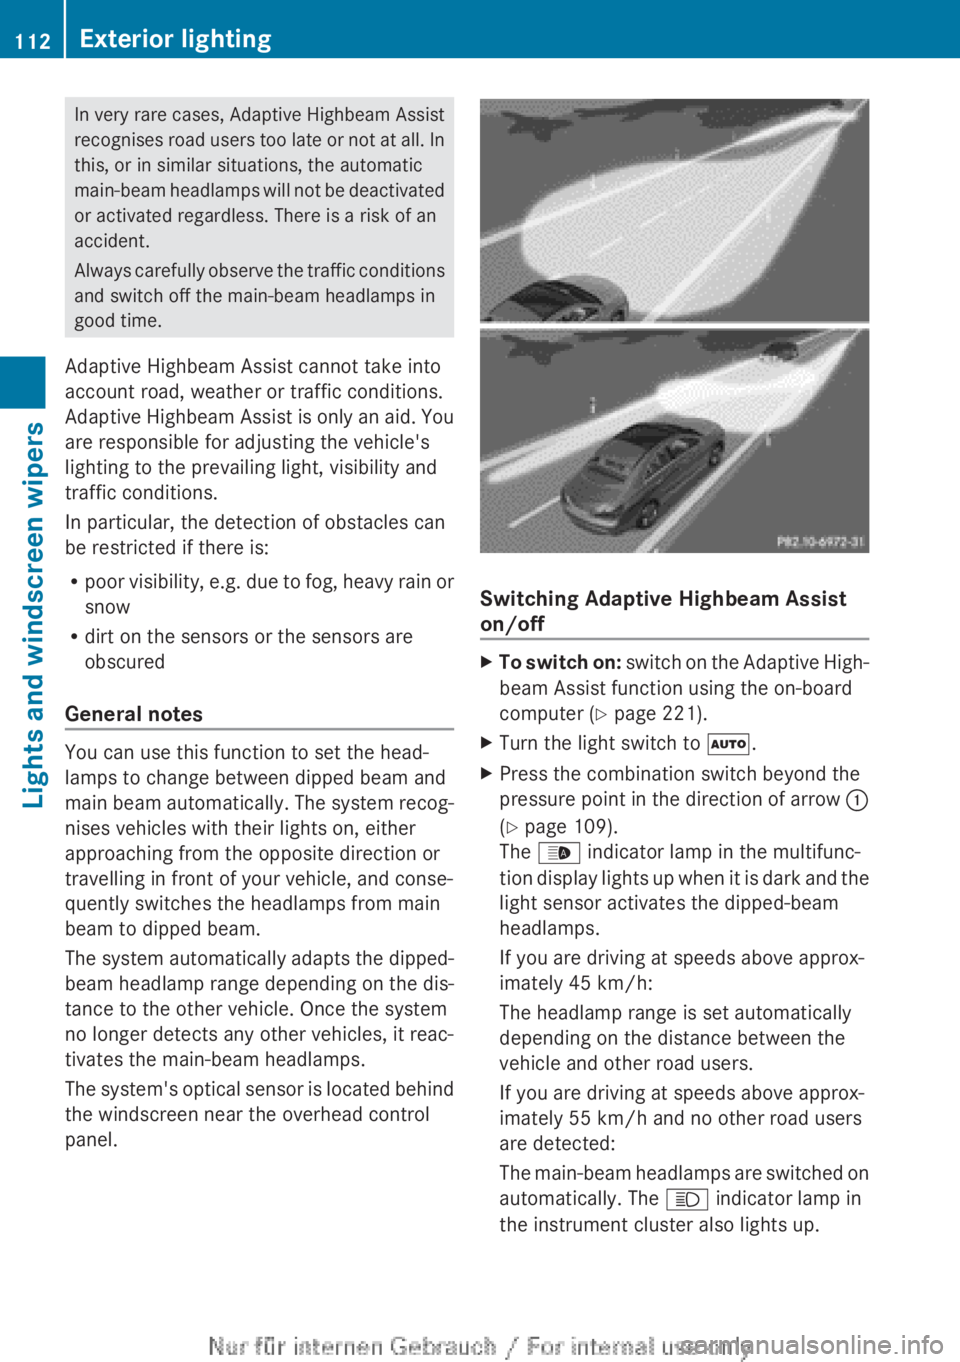
General notes
You can use this function to set the head-
lamps to change between dipped beam and
main beam automatically. The system recog-
nises vehicles with their lights on, either
approaching from the opposite direction or
travelling in front of your vehicle, and conse-
quently switches the headlamps from main
beam to dipped beam.
The system automatically adapts the dipped-
beam headlamp range depending on the dis-
tance to the other vehicle. Once the system
no longer detects any other vehicles, it reac-
tivates the main-beam headlamps.
The system's optical sensor is located behind
the windscreen near the overhead control
panel.
Switching Adaptive Highbeam Assist
on/off
XTo switch on: switch on the Adaptive High-
beam Assist function using the on-board
computer ( Y page 221).XTurn the light switch to Ã.XPress the combination switch beyond the
pressure point in the direction of arrow :
( Y page 109).
The _ indicator lamp in the multifunc-
tion display lights up when it is dark and the
light sensor activates the dipped-beam
headlamps.
If you are driving at speeds above approx-
imately 45 km/h:
The headlamp range is set automatically
depending on the distance between the
vehicle and other road users.
If you are driving at speeds above approx-
imately 55 km/h and no other road users
are detected:
The main-beam headlamps are switched on
automatically. The K indicator lamp in
the instrument cluster also lights up.112Exterior lightingLights and windscreen wipers
Page 118 of 352
?Turn signal lamp: PY 21 WAReversing lamp: W 16 W
Replacing the front bulbs
Fitting/removing the cover on the front
wheel arch
You must remove the cover from the front
wheel housing before you can change the
front bulbs.
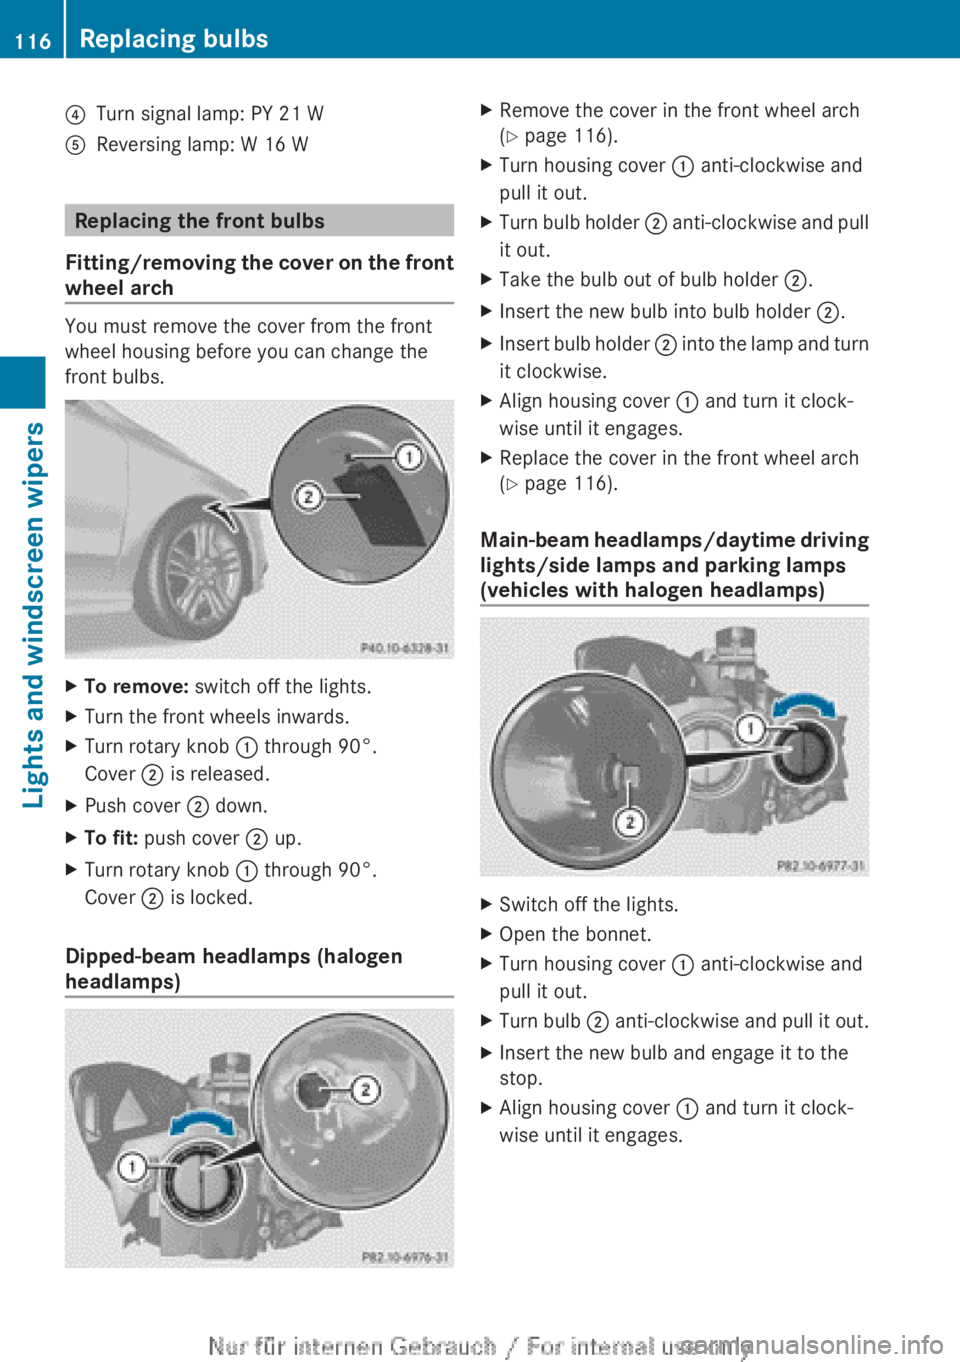
XTo remove: switch off the lights.XTurn the front wheels inwards.XTurn rotary knob : through 90°.
Cover ; is released.XPush cover ; down.XTo fit: push cover ; up.XTurn rotary knob : through 90°.
Cover ; is locked.
Dipped-beam headlamps (halogen
headlamps)
XRemove the cover in the front wheel arch
( Y page 116).XTurn housing cover : anti-clockwise and
pull it out.XTurn bulb holder ; anti-clockwise and pull
it out.XTake the bulb out of bulb holder ;.XInsert the new bulb into bulb holder ;.XInsert bulb holder ; into the lamp and turn
it clockwise.XAlign housing cover : and turn it clock-
wise until it engages.XReplace the cover in the front wheel arch
( Y page 116).
Main-beam headlamps/daytime driving
lights/side lamps and parking lamps
(vehicles with halogen headlamps)
XSwitch off the lights.XOpen the bonnet.XTurn housing cover : anti-clockwise and
pull it out.XTurn bulb ; anti-clockwise and pull it out.XInsert the new bulb and engage it to the
stop.XAlign housing cover : and turn it clock-
wise until it engages.116Replacing bulbsLights and windscreen wipers
Page 132 of 352
Problems with the "Cooling with air dehumidification" functionProblemPossible causes/consequences and M SolutionsThe indicator lamp in
the ¿ button
flashes three times or
remains off. The "Cool-
ing with air dehumidifi-
cation function" cannot
be switched on.Cooling with air dehumidification has been deactivated due to a
malfunction.XVisit a qualified specialist workshop.Setting climate control to automatic
mode
Points to observe before use
Only THERMOTRONIC automatic climate con-
trol features the "Control climate control
automatically" function.
In automatic mode, the set temperature is
maintained automatically at a constant level.
The system automatically regulates the tem-
perature of the dispensed air, the airflow and
the air distribution.
The automatic mode functions optimally
when the "Cooling with air dehumidification"
function is activated. If desired, cooling with
air dehumidification can be deactivated.
If you deactivate the "Cooling with air-dehu-
midification" function, the air inside the vehi-
cle will not be cooled. The air inside the vehi-
cle will also not be dehumidified. The win-
dows can mist up more quickly. Therefore,
only deactivate the "Cooling with air-dehu-
midification" function briefly.
Setting climate control to automatic
mode
XTurn the key to position 2 in the ignition
lock ( Y page 145).XSet the desired temperature.XTo activate: press the à button.
The indicator lamp in the à button lights
up. Automatic air distribution and airflow
are activated.XTo switch to manual mode: press the
É or Ë button.
or
XPress the K or I button.
The indicator lamp in the à button goes
out. Automatic air distribution and airflow
are deactivated.
Setting the temperature
THERMATIC automatic climate control
You can set the temperature for the entire
vehicle.
XTurn the key to position 2 in the ignition
lock ( Y page 145).XTo increase/reduce: turn control :
clockwise or anti-clockwise ( Y page 125).
Only change the temperature setting in
small increments. Start at 22 †.
THERMOTRONIC automatic climate
control
Different temperatures can be set for the
driver's and front-passenger sides.
XTurn the key to position 2 in the ignition
lock ( Y page 145).XTo increase/reduce: turn controls : or
E clockwise or anti-clockwise
( Y page 127). Only change the temperature
setting in small increments. Start at 22 †.130Operating the climate control systemClimate control
Page 138 of 352
Auxiliary heating
Important safety notesGDANGER
If the exhaust pipe is blocked or sufficient
ventilation is not possible, toxic exhaust
fumes can enter the vehicle, especially car-
bon monoxide. This is the case, e.g. in
enclosed spaces, or if the vehicle is stuck in
snow. There is a risk of fatal injuries.
You should switch off the auxiliary heating in
enclosed spaces which do not have an extrac-
tion system, e.g. a garage. If the vehicle is
stuck in snow and you must leave the auxiliary
heating running, keep the exhaust pipe and
the area around the vehicle clear of snow. To
guarantee a sufficient supply of fresh air, open
a window on the side of the vehicle away from
the wind.
GWARNING
When the auxiliary heating is switched on,
parts of the vehicle can become very hot.
Flammable material such as leaves, grass or
twigs may ignite if they come into contact with
hot parts of the exhaust system for extended
periods. There is a risk of fire.
When the auxiliary heating is switched on,
make sure that no flammable material can
come into contact with hot vehicle compo-
nents.
! Operating the auxiliary heating/ventila-
tion draws on the vehicle battery. After you
have heated or ventilated the vehicle a
maximum of two times, drive for a longer
distance.
i Switch the auxiliary heating on regularly
once a month for about ten minutes.
The auxiliary heating heats the air in the vehi-
cle interior to the set temperature. This
occurs without using the heat of the running
engine. The auxiliary heating is operated
directly using the vehicle's fuel. For this rea-
son, the fuel tank must be at least ¼ full to
ensure that the auxiliary heating functions.
The auxiliary heating/ventilation automati-
cally adjusts to changes in temperature and
weather conditions. For this reason, the aux-
iliary heating could switch from ventilation
mode to heating mode or from heating mode
to ventilation mode.
The auxiliary heating switches off when the
engine is switched off. The auxiliary ventila-
tion switches off when you turn the key to key
position 2(Y page 145).
The auxiliary heating switches off automati-
cally after 30 minutes.
You cannot use the auxiliary ventilation to
cool the vehicle interior to a temperature
lower than the outside temperature.
Before switching onXTurn the key to position 2 in the ignition
lock ( Y page 145).XSet the desired temperature.
Auxiliary heating or ventilation can also be
switched on if the manually set climate con-
trol is activated. Optimum comfort can be
attained when the system is set to automatic
mode. Set the temperature to 22 †.
The auxiliary heating/ventilation can be acti-
vated or deactivated using the remote control
or the button on the centre console.
The on-board computer can be used to spec-
ify up to three departure times, one of which
may be preselected ( Y page 224).
136Operating the climate control systemClimate control
Page 140 of 352
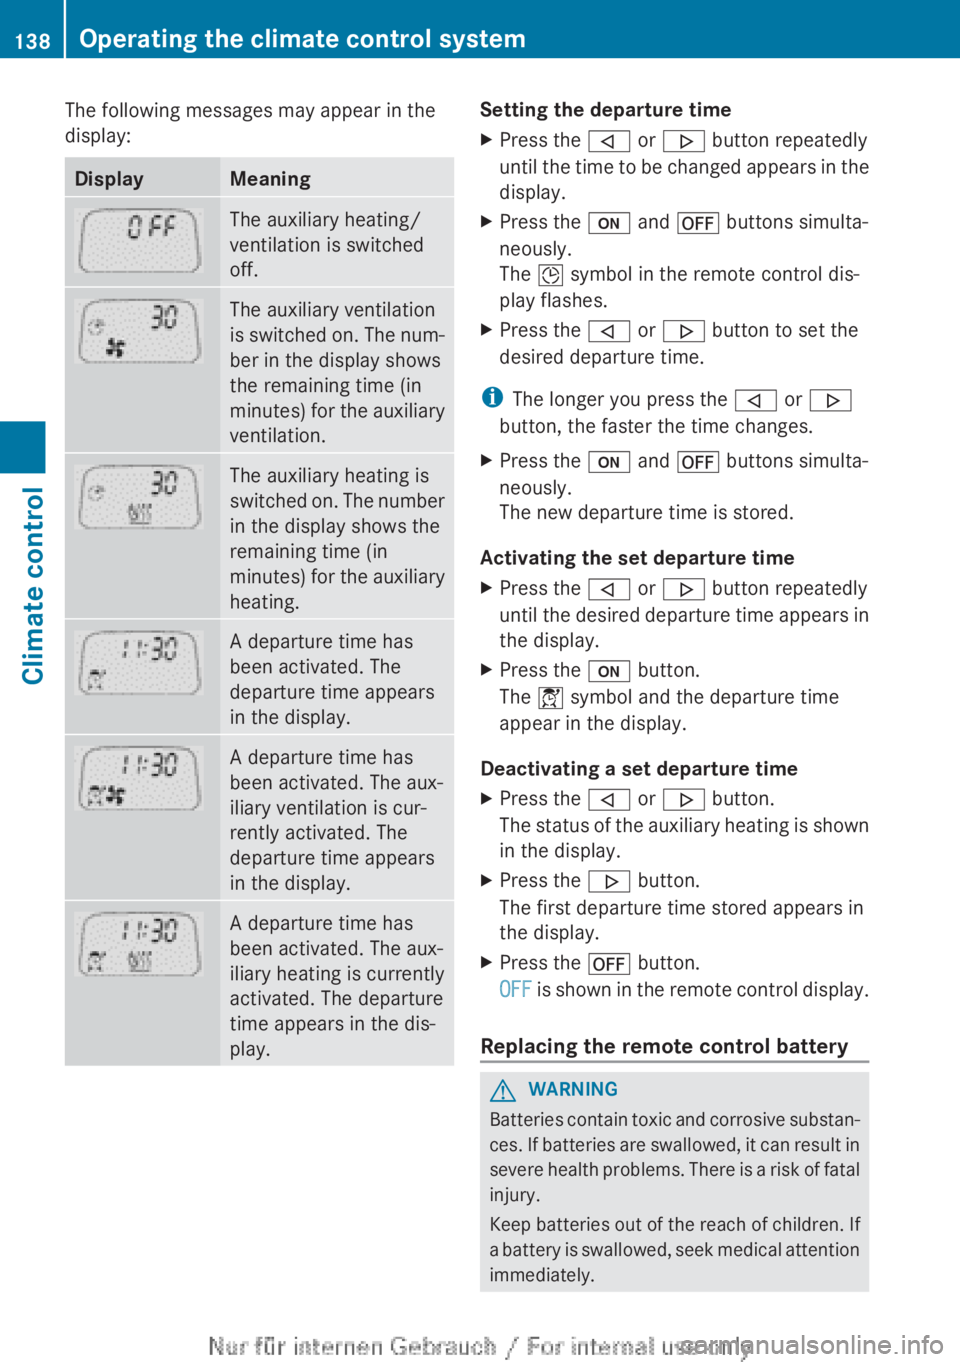
The following messages may appear in the
display:DisplayMeaningThe auxiliary heating/
ventilation is switched
off.The auxiliary ventilation
is switched on. The num-
ber in the display shows
the remaining time (in
minutes) for the auxiliary
ventilation.The auxiliary heating is
switched on. The number
in the display shows the
remaining time (in
minutes) for the auxiliary
heating.A departure time has
been activated. The
departure time appears
in the display.A departure time has
been activated. The aux-
iliary ventilation is cur-
rently activated. The
departure time appears
in the display.A departure time has
been activated. The aux-
iliary heating is currently
activated. The departure
time appears in the dis-
play.Setting the departure timeXPress the , or . button repeatedly
until the time to be changed appears in the
display.XPress the u and ^ buttons simulta-
neously.
The Î symbol in the remote control dis-
play flashes.XPress the , or . button to set the
desired departure time.
i The longer you press the , or .
button, the faster the time changes.
XPress the u and ^ buttons simulta-
neously.
The new departure time is stored.
Activating the set departure time
XPress the , or . button repeatedly
until the desired departure time appears in
the display.XPress the u button.
The Í symbol and the departure time
appear in the display.
Deactivating a set departure time
XPress the , or . button.
The status of the auxiliary heating is shown
in the display.XPress the . button.
The first departure time stored appears in
the display.XPress the ^ button.
OFF is shown in the remote control display.
Replacing the remote control battery
GWARNING
Batteries contain toxic and corrosive substan-
ces. If batteries are swallowed, it can result in
severe health problems. There is a risk of fatal
injury.
Keep batteries out of the reach of children. If
a battery is swallowed, seek medical attention
immediately.
138Operating the climate control systemClimate control