sensor MERCEDES-BENZ CLA-Class 2016 C117 User Guide
[x] Cancel search | Manufacturer: MERCEDES-BENZ, Model Year: 2016, Model line: CLA-Class, Model: MERCEDES-BENZ CLA-Class 2016 C117Pages: 374, PDF Size: 8.19 MB
Page 80 of 374
Deactivating andactivating
If you do no tintend to use th evehicle fo r a
longer period of time, you can deactivat eKEY-
LESS-GO .The SmartKey will then use ver ylit -
tl e power, thereby conservin gbattery power.
Fo rth epurposes of activation/deactivation ,
th evehicle mus tno tbe nearby.
XTo deactivate :press th e& buttonon
th eSmartKey twic ein rapid succession .
The battery chec klamp of th eSmartKey
flashes twic ebriefly and lights up once ,
then KEYLESS-GO is deactivated
(
Ypage 79) .
XTo activate :press any butto non th e
SmartKey.
or
XInser tth eSmartKey into th eignition lock.
KEYLESS-GO and all of it sassociated fea-
tures are available again .
KEYLESS-GOstar tfunction
General notes
Bear in min dthat th eengin ecan be started by
any of th evehicle occupant sif there is a
SmartKey in th evehicle.
Changin gth esettings of th elocking
syste m
You can chang eth esetting sof th elocking
system. Thi smeans that only th edriver's doo r
and th efue lfiller flap are unlocke dwhen th e
vehicle is unlocked. Thi sis useful if you fre-
quentl ytrave lon your own .
XTo change th esetting: press and hol dth e
% and& buttons simultaneousl yfo r approximately six seconds until th
ebattery
indicator lamp flashes twic e (
Ypage 79).
If th esetting of th elocking system is changed
within th esignal range of th evehicle, press-
in g th e& or% button:
Rlocks or
Runlocks th evehicle
The SmartKey no wfunction sas follows :
XTo unlock :press th e% buttononce .
XTo unlock centrally :press th e% but-
to ntwice.
XTo lock centrally :press th e& button.
The KEYLESS-GO function is changed as fol-
lows :
XTo unlock th edriver's door: touch the
inne rsurfac eof th edoo rhandle on th e
driver's door.
XTo unlock centrally :touch th einne rsur -
fac eof th edoo rhandle on th efront-
passenger doo ror th erea rdoor.
XTo lock centrally :touch th eouter sensor
surfac eon on eof th edoo rhandles .
XTo restor eth efactory settings: press
and hol dth e% and& buttons simul-
taneousl yfo rapproximately six seconds
until th ebattery chec klamp flashes twic e
(
Ypage 79).
Mechanica lkey
General notes
If th evehicle can no longer be locke dor
unlocke dwit hth eSmartKey or KEYLESS-GO ,
use th emechanical key.
If you use th emechanical ke yto unloc kand
ope nth edriver's doo ror th etrunk lid, th e
anti-thef talar msystem will be triggere d
(
Ypage 73).
There are severa lways to turn of fth ealarm:
XTo deactivate th ealarm wit hth ekey :
press th e% or& buttonon th ekey.
or
78SmartKey
Opening and closing
Page 93 of 374
XTouch recessed sensor surface:on the
door handle until the side windows and the
panorama roof with power tilt/sliding
panel are fully closed.
iMake sure you only touch recessed sen-
sor surface :.
XMake sure that all the side windows are
closed.
XMake sure that all the side windows and the
panorama roof with power tilt/sliding
panel are closed.
On vehicles with a panorama roof with power
tilt/sliding panel:
XTouch recessed sensor surface :on the
door handle again until the roller sunblind
of the panorama sliding sunroof closes.
XTo interrupt convenience closing:
release recessed sensor surface :on the
door handle.
Resetting the side windows
If a side window can no longer be closed fully,
you must reset it.
XClose all the doors.
XTurn the SmartKey to position 1or 2in the
ignition lock (
Ypage 147).
XPull the corresponding switch on the door
control panel until the side window is com-
pletely closed (
Ypage 89).
XHold the switch for an additional second.
If the side window opens again slightly:
XImmediately pull the corresponding switch on the door control panel until the side win-
dow is completely closed (
Ypage 89).
XHold the switch for an additional second.
XIf the respective side window remains
closed after the button is released, then it
has been set correctly. If this is not the
case, repeat the steps above again.
Side windows91
Opening and closing
Z
Page 96 of 374
XTurn the SmartKey to position1or 2in the
ignition lock (
Ypage 147).
XPress or pull the 3switch in the corre-
sponding direction.
If you press/pull the 3switch beyond the
point of resistance, automatic operation is
started in the corresponding direction. You
can stop automatic operation by pressing/
pulling the switch again.
After opening the sliding sunroof, the roller
sunblind closes slightly automatically. This
reduces drafts in the vehicle interior.
If the sliding sunroof is raised at the rear, it
lowers slightly automatically at higher
speeds. The noise level in the vehicle interior
is reduced as a result.
At low speeds it raises again automatically.
You can also temporarily deactivate auto-
matic lowering. To do so, press the 3
switch. The sliding sunroof raises again auto-
matically.
You can continue to operate the sliding sun-
roof after switching off the engine or remov-
ing the SmartKey from the ignition lock. This
function remains active for five minutes or
until you open a front door.
The sliding sunroof cannot be opened if a roof
carrier is installed. In order to allow ventila-
tion of the vehicle interior, you can raise the
sliding sunroof.
If contact is made with a roof carrier approved
by Mercedes-Benz, the sliding sunroof lowers
slightly but remains raised at the rear.
Rain-closing feature
The rain-closing feature is only available for
vehicles with a rain sensor.
When the SmartKey is in position 0in the
ignition lock or is removed, the sliding sunroof
closes automatically:
Rif it starts to rain.
Rat extreme outside temperatures.
Rafter six hours.
Rif there is a malfunction in the power sup-
ply.
The panorama roof with power tilt/sliding
panel remains raised at the rear in order to
allow ventilation of the vehicle interior.
If the panorama roof with power tilt/sliding
panel is obstructed while being closed by the
rain-closing feature, it opens again slightly.
The rain-closing feature is then deactivated.
The panorama roof with power tilt/sliding
panel does not close if:
Rit is raised at the rear.
Rit is blocked.
Rno rain is falling on the area of the wind-
shield being monitored by the rain sensor.
If the vehicle is under a bridge or in a car-
port, for example, the field of the sensor
may be covered.
Operating the roller sunblind for the
panorama roof with power tilt/sliding
panel
Important safety notes
GWARNING
Parts of the body could become trapped
between the roller sunblind and frame or slid-
ing sunroof during automatic opening or clos-
ing. There is a risk of injury.
When opening or closing, make sure that no
body parts are in the sweep of the roller sun-
blind.
If somebody becomes trapped:
Rrelease the switch immediately, or
Rduring automatic operation, push the
switch briefly in any direction
The opening or closing procedure will be stop- ped.
The roller sunblind shields the vehicle interior
from sunlight. The roller sunblind can only be
opened and closed when the panorama roof
with power tilt/sliding panel is closed.
94Panorama roof with power tilt/sliding panel
Opening and closing
Page 111 of 374
RIf electrolyte comes into contact with your
skin or hair or is swallowed, seek medical
attention immediately.
RImmediately change out of clothing which
has come into contact with electrolyte.
RIf an allergic reaction occurs, seek medical
attention immediately.
The "Automatic anti-glare mirrors" function is
only available if the vehicle is equipped with
the "Mirrors package".
The rear-view mirror and the exterior mirror
on the driver's side automatically go into anti-
glare mode if:
Rthe ignition is switched on and
Rincident light from headlamps strikes the
sensor in the rear-view mirror
The mirrors do not go into anti-glare mode if
reverse gear is engaged or the interior lighting
is switched on.
Parking position for the exterior mir-
ror on the front-passenger side
General notes
The "Parking position of the exterior mirror on
the front-passenger side" function is only
available if the vehicle is equipped with the
"Mirrors package".
Setting and storing the parking position
You can position the front-passenger side
exterior mirror in such a way that you can see the rear wheel on that side as soon as you
engage reverse gear. You can store this posi-
tion.
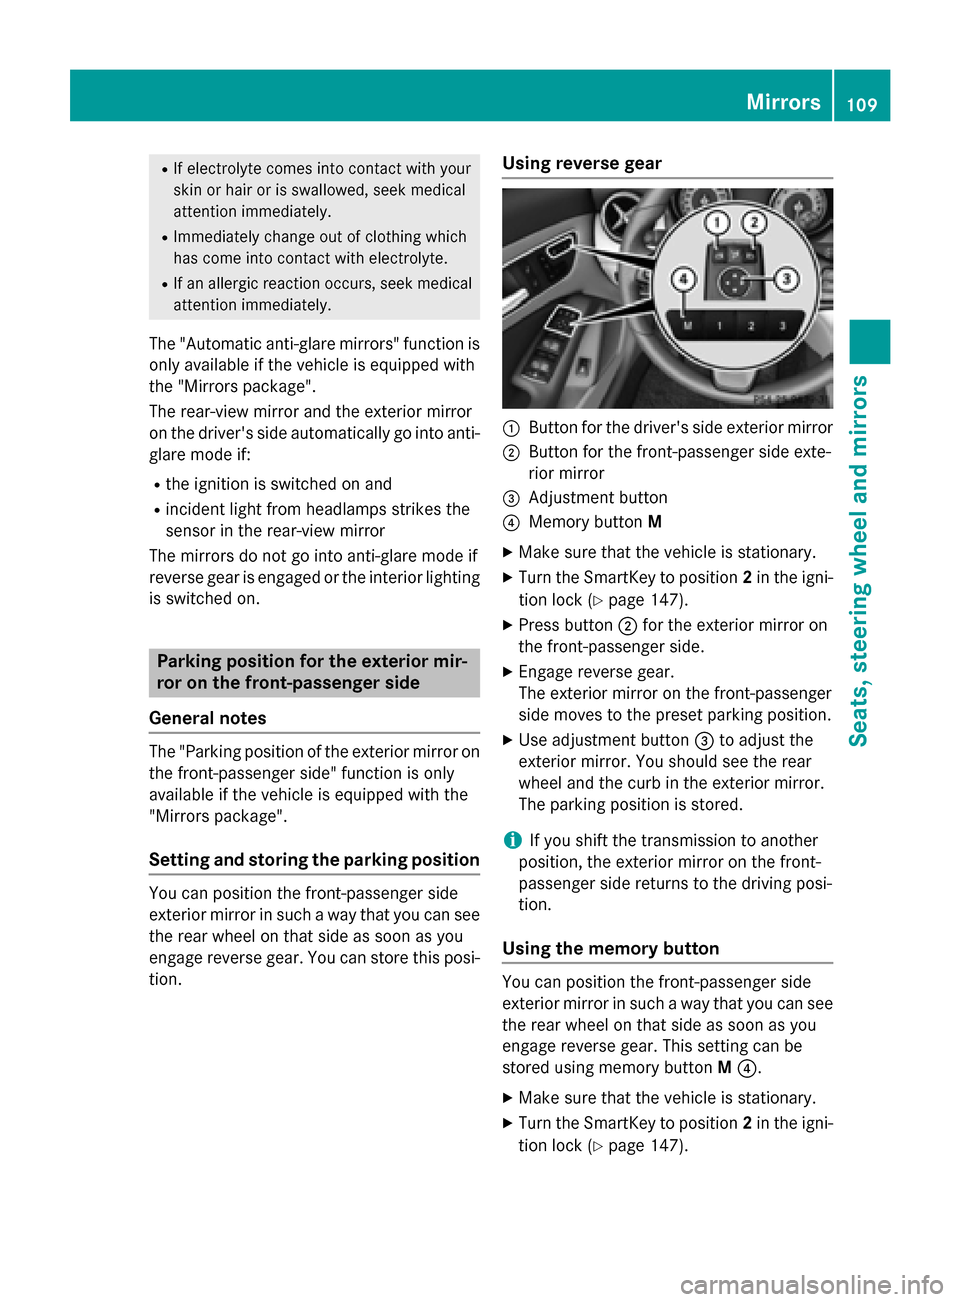
Using reverse gear
:Button for the driver's side exterior mirror
;Button for the front-passenger side exte-
rior mirror
=Adjustment button
?Memory button M
XMake sure that the vehicle is stationary.
XTurn the SmartKey to position 2in the igni-
tion lock (
Ypage 147).
XPress button ;for the exterior mirror on
the front-passenger side.
XEngage reverse gear.
The exterior mirror on the front-passenger
side moves to the preset parking position.
XUse adjustment button =to adjust the
exterior mirror. You should see the rear
wheel and the curb in the exterior mirror.
The parking position is stored.
iIf you shift the transmission to another
position, the exterior mirror on the front-
passenger side returns to the driving posi-
tion.
Using the memory button
You can position the front-passenger side
exterior mirror in such a way that you can see
the rear wheel on that side as soon as you
engage reverse gear. This setting can be
stored using memory button M?.
XMake sure that the vehicle is stationary.
XTurn the SmartKey to position 2in the igni-
tion lock (
Ypage 147).
Mirrors109
Seats, steering wheel and mirrors
Z
Page 116 of 374
Useful information
i
This Operator's Manual describes all
models and all standard and optional equip-
ment of your vehicle available at the time of
publication of the Operator's Manual.
Country-specific differences are possible.
Please note that your vehicle may not be
equipped with all features described. This
also applies to safety-related systems and
functions.
iRead the information on qualified special-
ist workshops (
Ypage 25).
Exterior lighting
General notes
For reasons of safety, Mercedes-Benz recom-
mends that you drive with the lights switched
on even during the daytime. In some coun-
tries, operation of the headlamps varies due
to legal requirements and self-imposed obli-
gations.
Setting the exterior lighting
Setting options
Exterior lighting can be set using the:
Rlight switch
Rcombination switch (Ypage 116)
Ron-board computer (Ypage 222)
Light switch
Operation
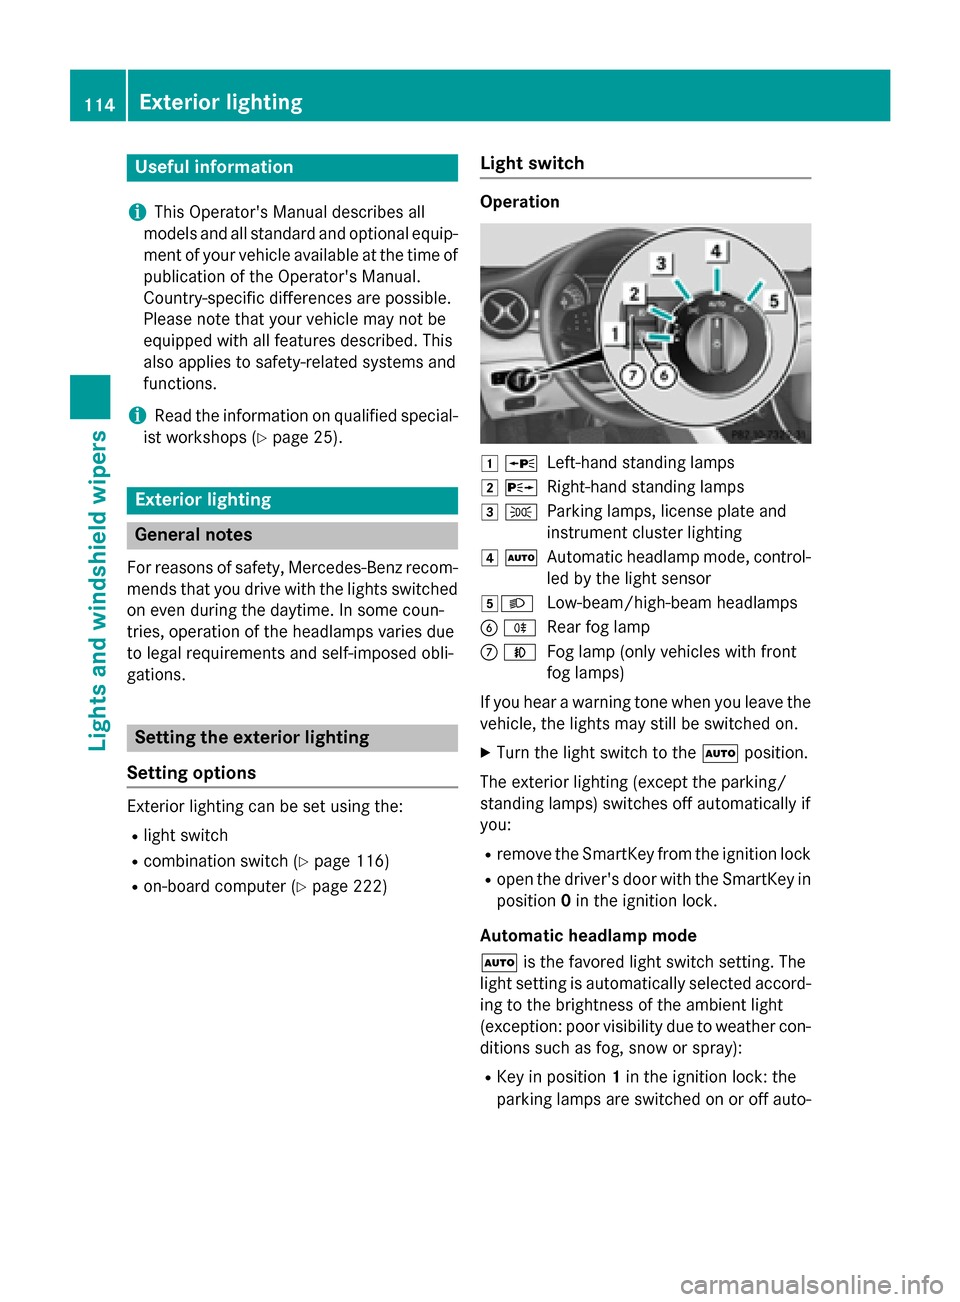
1 WLeft-hand standing lamps
2XRight-hand standing lamps
3TParking lamps, license plate and
instrument cluster lighting
4ÃAutomatic headlamp mode, control-
led by the light sensor
5LLow-beam/high-beam headlamps
BRRear fog lamp
CNFog lamp (only vehicles with front
fog lamps)
If you hear a warning tone when you leave the
vehicle, the lights may still be switched on.
XTurn the light switch to the Ãposition.
The exterior lighting (except the parking/
standing lamps) switches off automatically if
you:
Rremove the SmartKey from the ignition lock
Ropen the driver's door with the SmartKey in position 0in the ignition lock.
Automatic headlamp mode
à is the favored light switch setting. The
light setting is automatically selected accord-
ing to the brightness of the ambient light
(exception: poor visibility due to weather con-
ditions such as fog, snow or spray):
RKey in position 1in the ignition lock: the
parking lamps are switched on or off auto-
114Exterior lighting
Lights and windshield wipers
Page 117 of 374
matically depending on the brightness of
the ambient light.
RWith the engine running: if you have acti-
vated the daytime running lamps function
via the on-board computer, the daytime
running lamps or the parking lamps and the
low-beam headlamps are switched on or off
automatically depending on the brightness
of the ambient light.
XTo switch on the automatic headlamp
mode: turn the light switch to the Ã
position.
GWARNING
When the light switch is set to Ã, the low-
beam headlamps may not be switched on
automatically if there is fog, snow or other
causes of poor visibility due to the weather
conditions such as spray. There is a risk of an
accident.
In such situations, turn the light switch to
L.
The automatic headlamp feature is only an
aid. The driver is responsible for the vehicle's
lighting at all times.
Canada only:
The daytime running lamps improve the visi-
bility of your vehicle during the day. The day-
time running lamps function is required by law
in Canada. It cannot therefore be deactivated.
When the engine is running and the vehicle is
stationary: if you move the selector lever from
a drive position to P, the daytime running
lamps/low-beam headlamps go out after
three minutes.
When the engine is running, the vehicle is
stationary and in bright ambient light: if you
turn the light switch to the Tposition, the
daytime running lamps and parking lamps
turn on.
If the engine is running and you turn the light
switch to the Lposition, the manual set-
tings take precedence over the daytime run-
ning lamps.
USA only: The daytime running lamps improve the visi-
bility of your vehicle during the day. To do this,
the daytime running lamps function must be
switched on using the on-board computer
(
Ypage 222).
If the engine is running and you turn the light
switch to the TorL position, the man-
ual settings take precedence over the day-
time running lamps.
Low-beam headlamps
Even if the light sensor does not detect that it
is dark, the parking lamps and low-beam
headlamps switch on when the ignition is
switched on and the light switch is set to the
L position. This is a pa
rticularly useful
function in the event of rain and fog.
XTo switch on the low-beam headlamps:
turn the SmartKey in the ignition lock to
position 2or start the engine.
XTurn the light switch to L.
The green Lindicator lamp in the instru-
ment cluster lights up.
Front fog lamps
In conditions where visibility is poor due to
fog, snow or rain, the fog lamps improve vis-
ibility as well as making it easier for other road
users to see you. They can be operated
together with the parking lamps or together
with the parking lamps and low-beam head-
lamps.
XTo switch on the fog lamps: turn the key
in the ignition lock to position 2or start the
engine.
XTurn the light switch to LorÃ.
XPress the Nbutton.
The green Nindicator lamp in the instru-
ment cluster lights up.
XTo switch off the fog lamps: press the
N button.
The green Nindicator lamp in the instru-
ment cluster goes out.
Exterior lighting115
Lights and windshield wipers
Z
Page 120 of 374
Adaptive Highbeam Assist
Gene ral notes
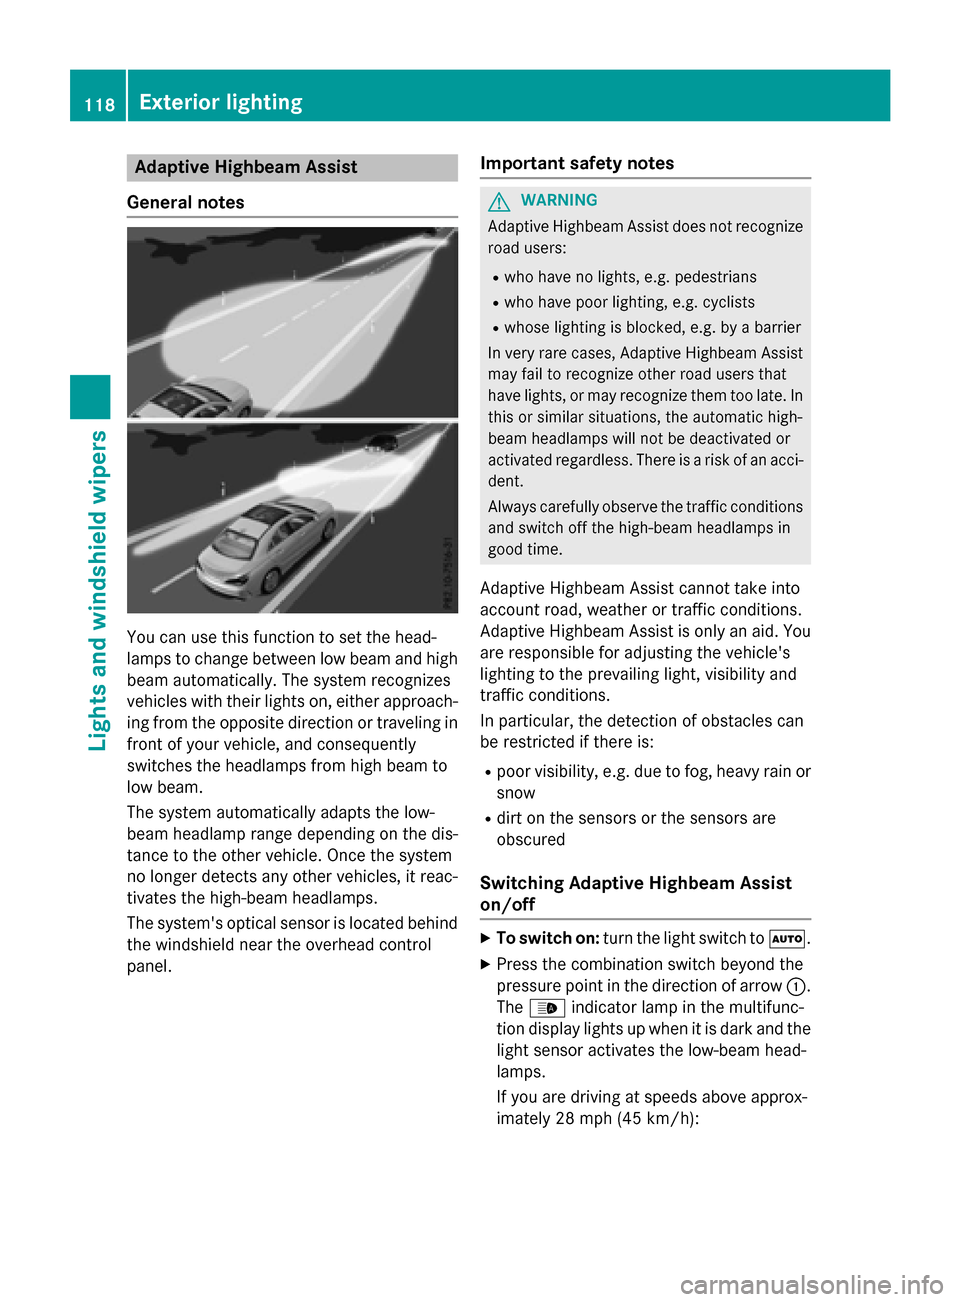
You can use this function to set th ehead-
lamp sto chang ebetween low beam and high
beam automatically. The system recognizes
vehicles wit htheir lights on ,either approach-
ing from th eopposit edirection or traveling in
fron tof your vehicle, and consequentl y
switches th eheadlamps from high beam to
low beam .
The system automatically adapt sth elow-
beam headlamp range depending on th edis-
tance to th eother vehicle. Once thesystem
no longer detects any other vehicles, it reac -
tivates th ehigh-beam headlamps .
The system' soptical sensor is locate dbehind
th ewindshield near th eoverhead control
panel.
Import ant safety notes
GWARNIN G
Adaptive Highbea mAssis tdoes no trecogniz e
road users:
Rwho hav eno lights ,e.g. pedestrian s
Rwho havepoor lighting ,e.g. cyclist s
Rwhoselighting is blocked, e.g. by abarrier
In ver yrar ecases, Adaptive Highbea mAssis t
may fail to recogniz eother road user sthat
hav elights ,or may recogniz ethem to olate. In
this or similar situations, th eautomatic high -
beam headlamp swill no tbe deactivated or
activated regardless .There is aris kof an acci-
dent.
Always carefully observ eth etraffic condition s
and switch off th ehigh-beam headlamp sin
goo dtime.
Adaptive Highbeam As sistcanno ttak eint o
accoun troad ,weather or traffic conditions.
Adaptive Highbeam As sistis only an aid. You
are responsible for adj usting thevehicle's
lighting to th eprevailing light, visibilit yand
traffic condition s.
In particular, th edetection of obstacles can
be restricted if there is:
Rpoor visibility, e.g. due to fog ,heav yrain or
snow
Rdirt on th e sensors or the sensors are
obscured
Switching Adaptive Highbeam Assist
on/off
XTo switch on: turnth eligh tswitch to Ã.
XPressthecombination switch beyon dth e
pressur epoin tin th edirection of arrow :.
The _ indicator lamp in th emultifunc-
tion display lights up when it is dark and th e
ligh tsensor activates th elow-beam head-
lamp s.
If you are driving at speeds abov eapprox -
imately 28 mph (45 km/h):
118Exterior lighting
Lights and windshield wipers
Page 126 of 374
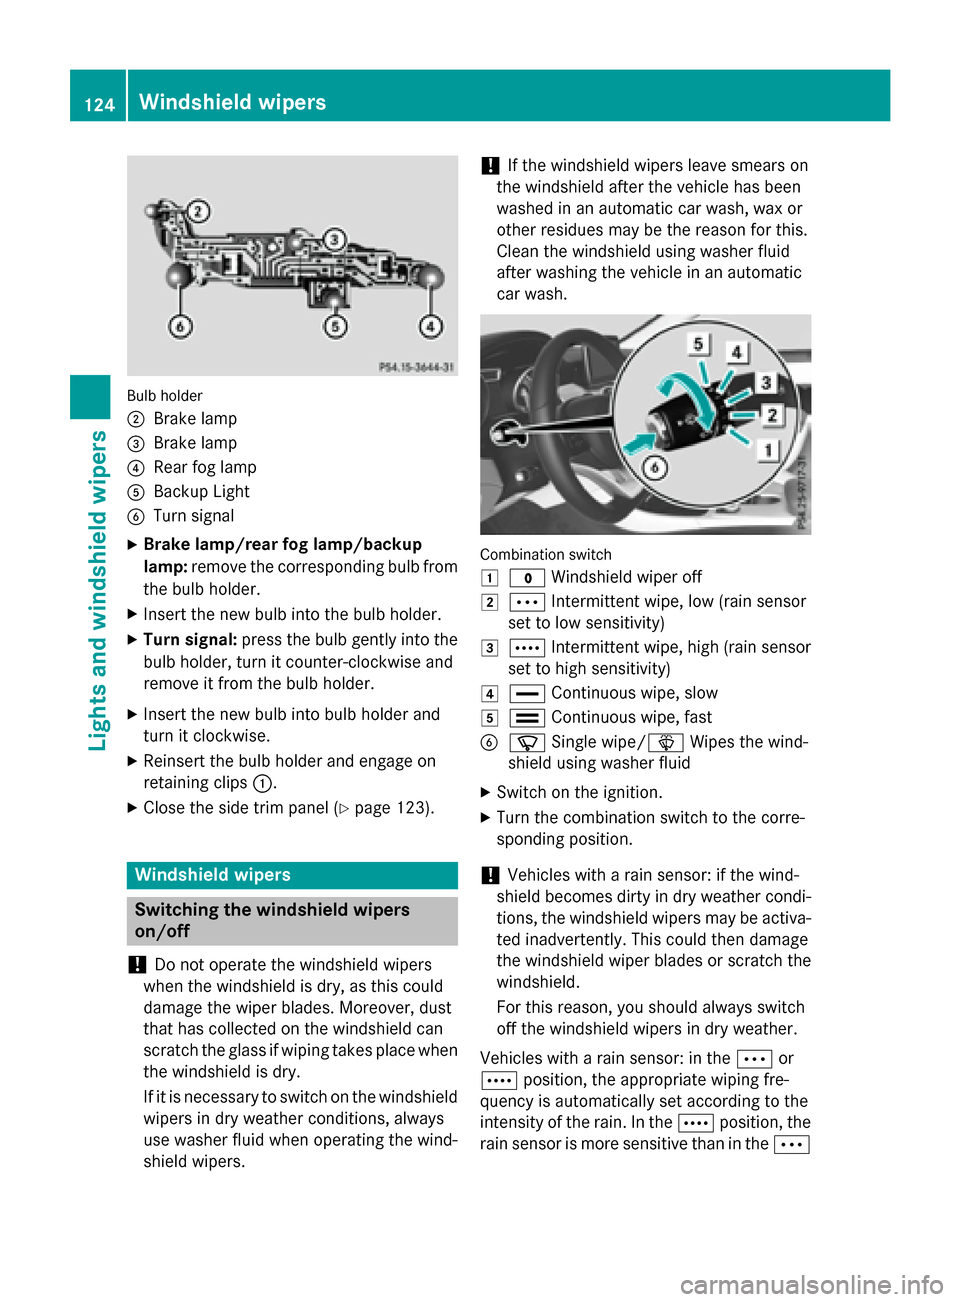
Bulb holder
;
Brake lamp
=Brake lamp
?Rear fog lamp
ABackup Light
BTurn signal
XBrake lamp/rear fog lamp/backup
lamp:remove the corresponding bulb from
the bulb holder.
XInsert the new bulb into the bulb holder.
XTurn signal: press the bulb gently into the
bulb holder, turn it counter-clockwise and
remove it from the bulb holder.
XInsert the new bulb into bulb holder and
turn it clockwise.
XReinsert the bulb holder and engage on
retaining clips :.
XClose the side trim panel (Ypage 123).
Windshield wipers
Switching the windshield wipers
on/off
!
Do not operate the windshield wipers
when the windshield is dry, as this could
damage the wiper blades. Moreover, dust
that has collected on the windshield can
scratch the glass if wiping takes place when
the windshield is dry.
If it is necessary to switch on the windshield
wipers in dry weather conditions, always
use washer fluid when operating the wind-
shield wipers.
!If the windshield wipers leave smears on
the windshield after the vehicle has been
washed in an automatic car wash, wax or
other residues may be the reason for this.
Clean the windshield using washer fluid
after washing the vehicle in an automatic
car wash.
Combination switch
1
$ Windshield wiper off
2ÄIntermittent wipe, low (rain sensor
set to low sensitivity)
3Å Intermittent wipe, high (rain sensor
set to high sensitivity)
4° Continuous wipe, slow
5¯Continuous wipe, fast
BíSingle wipe/î Wipes the wind-
shield using washer fluid
XSwitch on the ignition.
XTurn the combination switch to the corre-
sponding position.
!Vehicles with a rain sensor: if the wind-
shield becomes dirty in dry weather condi-
tions, the windshield wipers may be activa-
ted inadvertently. This could then damage
the windshield wiper blades or scratch the
windshield.
For this reason, you should always switch
off the windshield wipers in dry weather.
Vehicles with a rain sensor: in the Äor
Å position, the appropriate wiping fre-
quency is automatically set according to the
intensity of the rain. In the Åposition, the
rain sensor is more sensitive than in the Ä
124Windshield wipers
Lights and windshield wipers
Page 148 of 374
Useful information
i
This Operator's Manual describes all
models and all standard and optional equip-
ment of your vehicle available at the time of
publication of the Operator's Manual.
Country-specific differences are possible.
Please note that your vehicle may not be
equipped with all features described. This
also applies to safety-related systems and
functions.
iRead the information on qualified special-
ist workshops (
Ypage 25).
Notes on breaking-in a new vehicle
Important safety notes
The sensor system of some driving and driv-
ing safety systems adjusts automatically
while a certain distance is being driven after
the vehicle has been delivered or after
repairs. Full system effectiveness is not
reached until the end of this teach-in proce-
dure.
New and replaced brake pads and discs only
reach their optimum braking effect after sev-
eral hundred kilometers of driving. Compen-
sate for this by applying greater force to the
brake pedal.
The first 1000 miles (1500 km)
The more you look after the engine when it is
new, the more satisfied you will be with its
performance in the future.
RYou should therefore drive at varying vehi-
cle and engine speeds for the first
1000 miles (1500 km).
RAvoid heavy loads, e.g. driving at full throt-
tle, during this period.
RChange gear in good time, before the tach-
ometer needle is Ôof the way to the red
area of the tachometer.
RDo not manually shift to a lower gear to
brake the vehicle.
RTry to avoid depressing the accelerator
pedal beyond the point of resistance (kick- down).
RIdeally, for the first 1000 miles (1500 km),
drive in program E.
After 1,000 miles (1,500 km), you can
increase the engine speed gradually and bring
the vehicle to full speed.
Additional breaking-in notes for Mercedes-
AMG vehicles:
RDo not drive faster than 85 mph
(140 km/h) for the first 1,000 miles
(1,500 km).
ROnly allow the engine to reach a maximum engine speed of 4,500 rpm briefly.
RChange gear in good time.
You should also observe these notes on
breaking-in if the engine or parts of the drive
train on your vehicle have been replaced.
Always observe the maximum permissible
speed.
Driving
Important safety notes
GWARNING
Objects in the driver's footwell can restrict the pedal travel or obstruct a depressed pedal.
The operating and road safety of the vehicle is
jeopardized. There is a risk of an accident.
Make sure that all objects in the vehicle are
stowed correctly, and that they cannot enter
the driver's footwell. Install the floormats
securely and as specified in order to ensure
sufficient clearance for the pedals. Do not use
loose floormats and do not place floormats on
top of one another.
146Driving
Driving and parking
Page 182 of 374
press the cruise control lever up:or
down ?to the pressure point.
The last stored speed increases or decrea-
ses in 5 mph (10 km/h) increments.
iCruise control is not deactivated if you
depress the accelerator pedal. For exam-
ple, if you accelerate briefly to overtake,
cruise control adjusts the vehicle's speed
to the last speed stored after you have fin- ished overtaking.
Deactivating cruise control
There are several ways to deactivate cruise
control:
XBriefly press the cruise control lever for-
wards =.
or
XBrake.
Cruise control is automatically deactivated if:
Rthe vehicle is secured with the electric
parking brake
Ryou are driving at less than 20 mph
(30 km/h)
RESP®intervenes or you deactivate ESP®
Ryou shift the transmission to position N
while driving
If cruise control is deactivated, you will hear a
warning tone. You will see the Cruise con‐
trol Offmessage in the multifunction dis-
play for approximately five seconds.
iWhen you switch off the engine, the last
speed stored is cleared.
DISTRONIC PLUS
General notes
DISTRONIC PLUS regulates the speed and
automatically helps you maintain the dis-
tance to the vehicle detected in front. Vehi-
cles are detected with the aid of the radar
sensor system. DISTRONIC PLUS brakes
automatically to avoid exceeding the set speed or to maintain the designated distance
from the vehicle in front.
Change into a lower gear in good time on long
and steep downhill gradients. This is espe-
cially important if the vehicle is laden. By
doing so, you will make use of the braking
effect of the engine. This relieves the load on
the brake system and prevents the brakes
from overheating and wearing too quickly.
If DISTRONIC PLUS detects that there is a risk
of a collision, you will be warned visually and
acoustically. DISTRONIC PLUS cannot pre-
vent a collision without your intervention. An
intermittent warning tone will then sound and
the distance warning lamp will light up in the
instrument cluster. Brake immediately in
order to increase the distance to the vehicle
in front or take evasive action provided it is
safe to do so.
DISTRONIC PLUS operates in range between
0 mph (0 km/h) and 120 mph (200 km/h).
Do not use DISTRONIC PLUS while driving on
roads with steep gradients.
Important safety notes
GWARNING
DISTRONIC PLUS does not react to:
Rpeople or animals
Rstationary obstacles on the road, e.g. stop- ped or parked vehicles
Roncoming and crossing traffic
As a result, DISTRONIC PLUS may neither give
warnings nor intervene in such situations.
There is a risk of an accident.
Always pay careful attention to the traffic sit- uation and be ready to brake.
GWARNING
DISTRONIC PLUS cannot always clearly iden-
tify other road users and complex traffic sit-
uations.
180Driving systems
Driving and parking