Warning light MERCEDES-BENZ CLA-Class 2017 C117 Workshop Manual
[x] Cancel search | Manufacturer: MERCEDES-BENZ, Model Year: 2017, Model line: CLA-Class, Model: MERCEDES-BENZ CLA-Class 2017 C117Pages: 318, PDF Size: 8.02 MB
Page 150 of 318
If you leave the engine or the auxiliary heatingrunning, make sure the exhaust pipe and area
around the vehicle are clear of snow. To
ensure an adequate supply of fresh air, open a
window on the side of the vehicle that is not
facing into the wind.
Have your vehicle winter-proofed at a qualified
specialist workshop at the onset of winter.
Drive particularly carefully on slippery road sur-
faces. Avoid sudden acceleration, steering and
braking maneuvers. Do not use cruise control or Distance Pilot DISTRONIC.
If the vehicle threatens to skid or cannot be
stopped when moving at low speed:
XShift the transmission to position N.
XTry to bring the vehicle under control using
corrective steering.
The outside temperature indicator is not
designed to serve as an ice-warning device and is therefore unsuitable for that purpose.
Changes in the outside temperature are dis-
played after a short delay.
Indicated temperatures just above the freezing
point do not guarantee that the road surface is
free of ice. The road may still be icy, especially in
wooded areas or on bridges.
You should pay special attention to road condi-
tions when temperatures are around freezing
point.
For more information on driving with snow
chains, see (
Ypage 285).
For more information on driving with summer
tires, see (
Ypage 284).
Observe the notes in the "Winter operation" sec-
tion (
Ypage 284).
Driving systems
Cruise control
General notes
Cruise control maintains a constant road speed
for you. It brakes automatically in order to avoid
exceeding the set speed. On long and steep
downhill gradients, especially if the vehicle is
laden, you must select a low gear in good time.
You need to have selected manual drive pro-
gram M(
Ypage 135). By doing so, you will make
use of the braking effect of the engine. This relieves the load on the brake system and pre-
vents the brakes from overheating and wearing
too quickly.
When the engine is running, you can use the
cruise control lever to limit the speed to any
speed between 20 mph (30 km/h) and the tech-
nically permitted maximum speed of the vehicle.
Use cruise control only if road and traffic con-
ditions make it appropriate to maintain a steady
speed for a prolonged period.
The speed indicated in the speedometer may
differ slightly from the speed stored.
Important safety notes
If you fail to adapt your driving style, cruise con-
trol can neither reduce the risk of an accident
nor override the laws of physics. Cruise control
cannot take into account the road, traffic and
weather conditions. Cruise control is only an
aid. You are responsible for the distance to the
vehicle in front, for vehicle speed, for braking in
good time and for staying in your lane.
Do not use cruise control:
Rin road and traffic conditions which do not
allow you to maintain a constant speed e.g. in
heavy traffic or on winding roads
Ron slippery road surfaces. Braking or accel-
erating could cause the drive wheels to lose
traction and the vehicle could then skid
Rin poor visibility, e.g. due to fog, heavy rain or
snow
If there is a change of drivers, advise the new
driver of the speed stored.
Cruise control lever
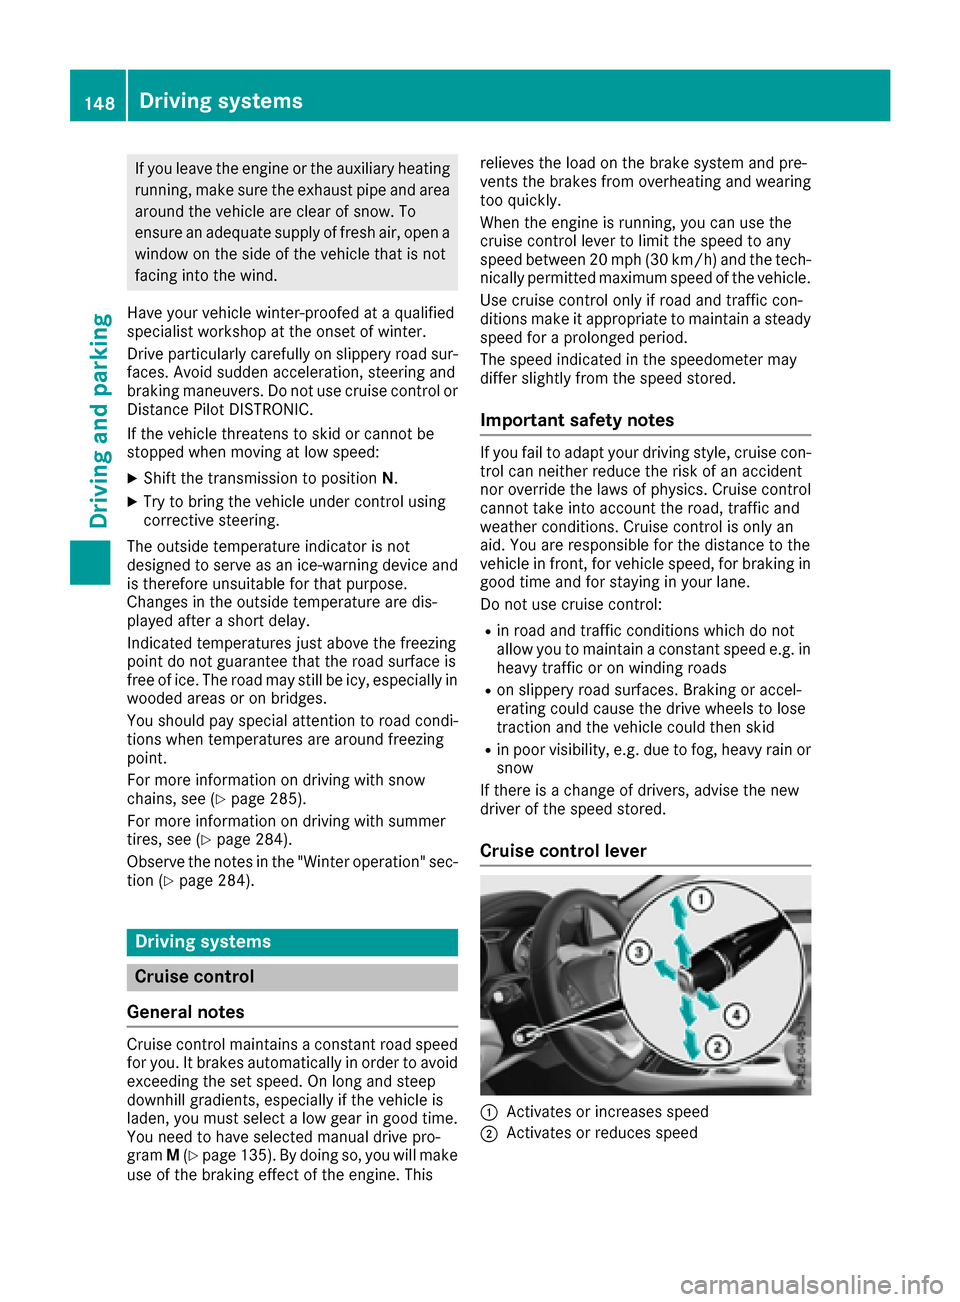
:Activates or increases speed
;Activates or reduces speed
148Driving systems
Driving and parking
Page 152 of 318
RESP®intervenes or you deactivate ESP®
Ryou shift the transmission to positionNwhile
driving
If cruise control is deactivated, you will hear a
warning tone. You will see the Cruise Con‐
trol Offmessage in the multifunction display
for approximately five seconds.
iWhen you switch off the engine, the last
speed stored is cleared.
Distance Pilot DISTRONIC
General notes
Distance Pilot DISTRONIC regulates the speed
and automatically helps you maintain the dis-
tance to the vehicle detected in front. Vehicles
are detected with the aid of the radar sensor
system. Distance Pilot DISTRONIC brakes auto-
matically to avoid exceeding the set speed or to
maintain the designated distance from the vehi-
cle in front.
If Distance Pilot DISTRONIC detects that there is a risk of a collision, you will be warned visually
and acoustically. Without your intervention, Dis-
tance Pilot DISTRONIC cannot prevent a colli-
sion. An intermittent warning tone will then
sound and the distance warning lamp will light
up in the instrument cluster. Brake immediately in order to increase the distance to the vehicle in
front or take evasive action provided it is safe to
do so.
Distance Pilot DISTRONIC operates in the range
between 0 mph (0 km/h) and 120 mph
(200 km/h).
Change into a lower gear in good time on long
and steep downhill gradients. This is especially
important if the vehicle is laden. By doing so, you will make use of the braking effect of the engine.
This relieves the load on the brake system and
prevents the brakes from overheating and wear-
ing too qui
ckly.
Do not use Distance Pilot DISTRONIC on roads
with steep gradients.
For Distance Pilot DISTRONIC to assist you
when driving, the radar sensor system must be
operational.
Since Distance Pilot DISTRONIC transmits radar
waves, it can resemble the radar detectors of
the responsible authorities. You can refer to the
relevant chapter in the Operator's Manual if
questions are asked about this.
iUSA only: This device has been approved by
the FCC as a "Vehicular Radar System". The
radar sensor is intended for use in an auto-
motive radar system only. Removal, tamper-
ing, or altering of the device will void any war-
ranties, and is not permitted by the FCC. Do
not tamper with, alter, or use in any non-
approved way.
Any unauthorized modification to this device
could void the user's authority to operate the equipment.
iCanada only: This device complies with
RSS-210 of Industry Canada. Operation is
subject to the following two conditions:
1. This device may not cause harmful inter-
ference, and
2. This device must accept any interference
received, including interference that may
cause undesired operation of the device.
Removal, tam peri
ng, or altering of the device
will void any warranties, and is not permitted.
Do not tamper with, alter, or use in any non-
approved way.
Any unauthorized modification to this device
could void the user's authority to operate the
equipment.
Important safety notes
GWARNING
Distance Pilot DISTRONIC does not react to:
Rpeople or animals
Rstationary objects on the road, e.g. stopped
or parked vehicles
Roncoming vehicles and crossing traffic
As a result, Distance Pilot DISTRONIC may
neither give warnings nor intervene in such
situations. There is a risk of an accident.
Always pay careful attention to the traffic sit- uation and be ready to brake.
GWARNING
Distance Pilot DISTRONIC cannot always
clearly identify other road users and complex
traffic situations.
150Driving system s
Driving an d parking
Page 156 of 318
The specified minimum distance can be
changed while Distance Pilot DISTRONIC is
switched on or off.
iMake sure that you maintain the minimum
distance to the vehicle in front as required by
law. Adjust the distance to the vehicle in front
if necessary.
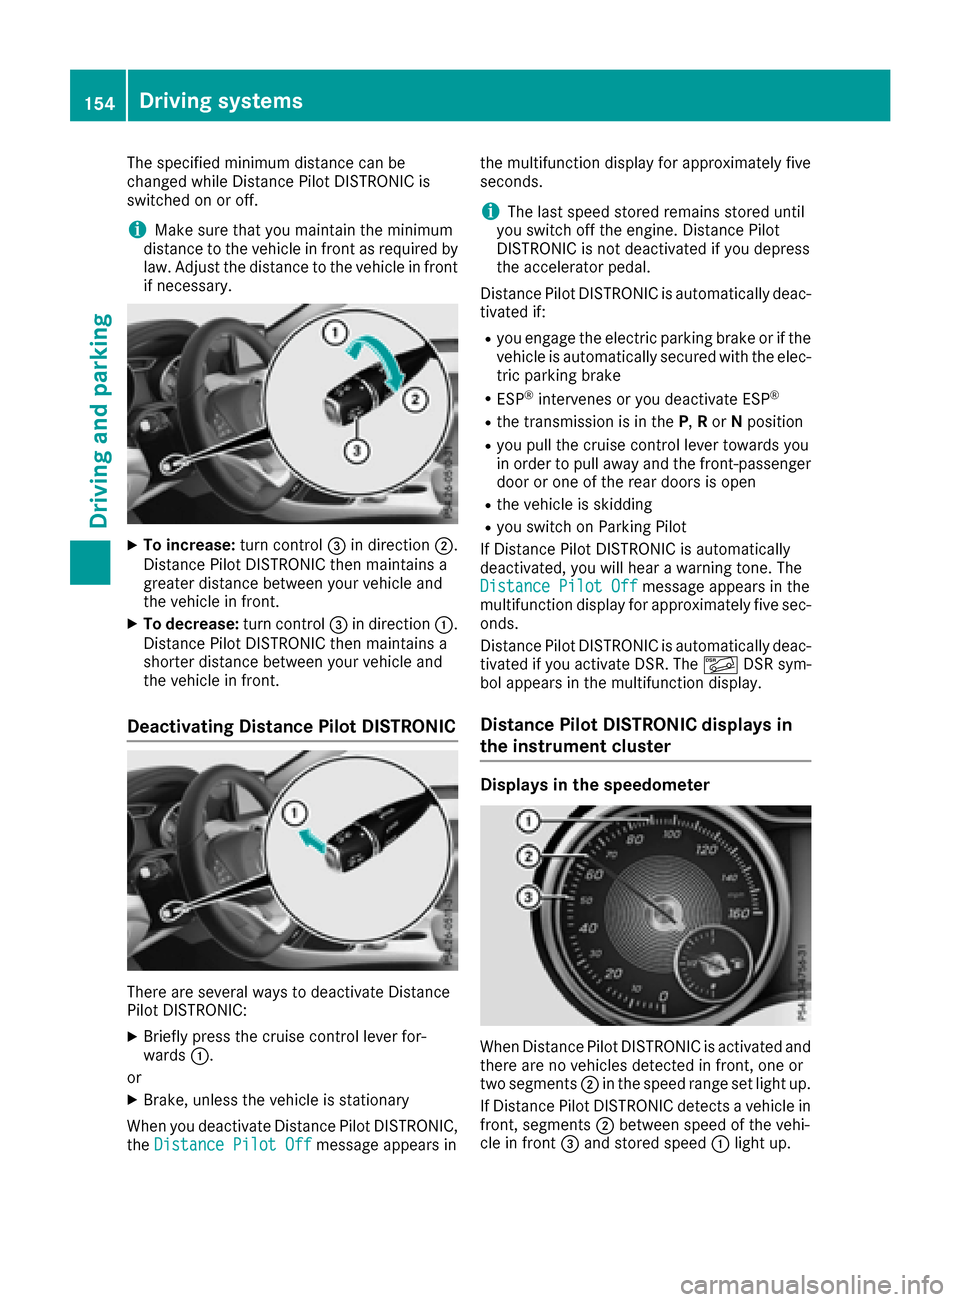
XTo increase: turn control=in direction ;.
Distance Pilot DISTRONIC then maintains a
greater distance between your vehicle and
the vehicle in front.
XTo decrease: turn control=in direction :.
Distance Pilot DISTRONIC then maintains a
shorter distance between your vehicle and
the vehicle in front.
Deactivating Distance Pilot DISTRONIC
There are several ways to deactivate Distance
Pilot DISTRONIC:
XBriefly press the cruise control lever for-
wards :.
or
XBrake, unless the vehicle is stationary
When you deactivate Distance Pilot DISTRONIC,
the Distance Pilot Off
message appears in the multifunction display for approximately five
seconds.
iThe last speed stored remains stored until
you switch off the engine. Distance Pilot
DISTRONIC is not deactivated if you depress
the accelerator pedal.
Distance Pilot DISTRONIC is automatically deac-
tivated if:
Ryou engage the electric parking brake or if the
vehicle is automatically secured with the elec-
tric parking brake
RESP®intervenes or you deactivate ESP®
Rthe transmission is in the P,Ror Nposition
Ryou pull the cruise control lever towards you
in order to pull away and the front-passenger
door or one of the rear doors is open
Rthe vehicle is skidding
Ryou switch on Parking Pilot
If Distance Pilot DISTRONIC is automatically
deactivated, you will hear a warning tone. The
Distance Pilot Off
message appears in the
multifunction display for approximately five sec- onds.
Distance Pilot DISTRONIC is automatically deac-
tivated if you activate DSR. The ÃDSR sym-
bol appears in the multifunction display.
Distance Pilot DISTRONIC displays in
the instrument cluster
Displays in the speedometer
When Distance Pilot DISTRONIC is activated and
there are no vehicles detected in front, one or
two segments ;in the speed range set light up.
If Distance Pilot DISTRONIC detects a vehicle in
front, segments ;between speed of the vehi-
cle in front =and stored speed :light up.
154Driving systems
Driving and parking
Page 163 of 318
Front sensors
CenterApprox. 40 in (approx.
100 cm)
CornersApprox. 24 in (approx.
60 cm)
Rear sensors
CenterApprox. 48 in (approx.
120 cm)
CornersApprox. 32 in (approx.
80 cm)
Minimum distance
CenterApprox. 8 in (approx. 20 cm)
CornersApprox. 6 in (approx. 15 cm)
If there is an obstacle within this range, the rel-
evant warning displays light up and a warning
tone sounds. If the distance falls below the min-
imum, the distance may no longer be shown.
Warning displays
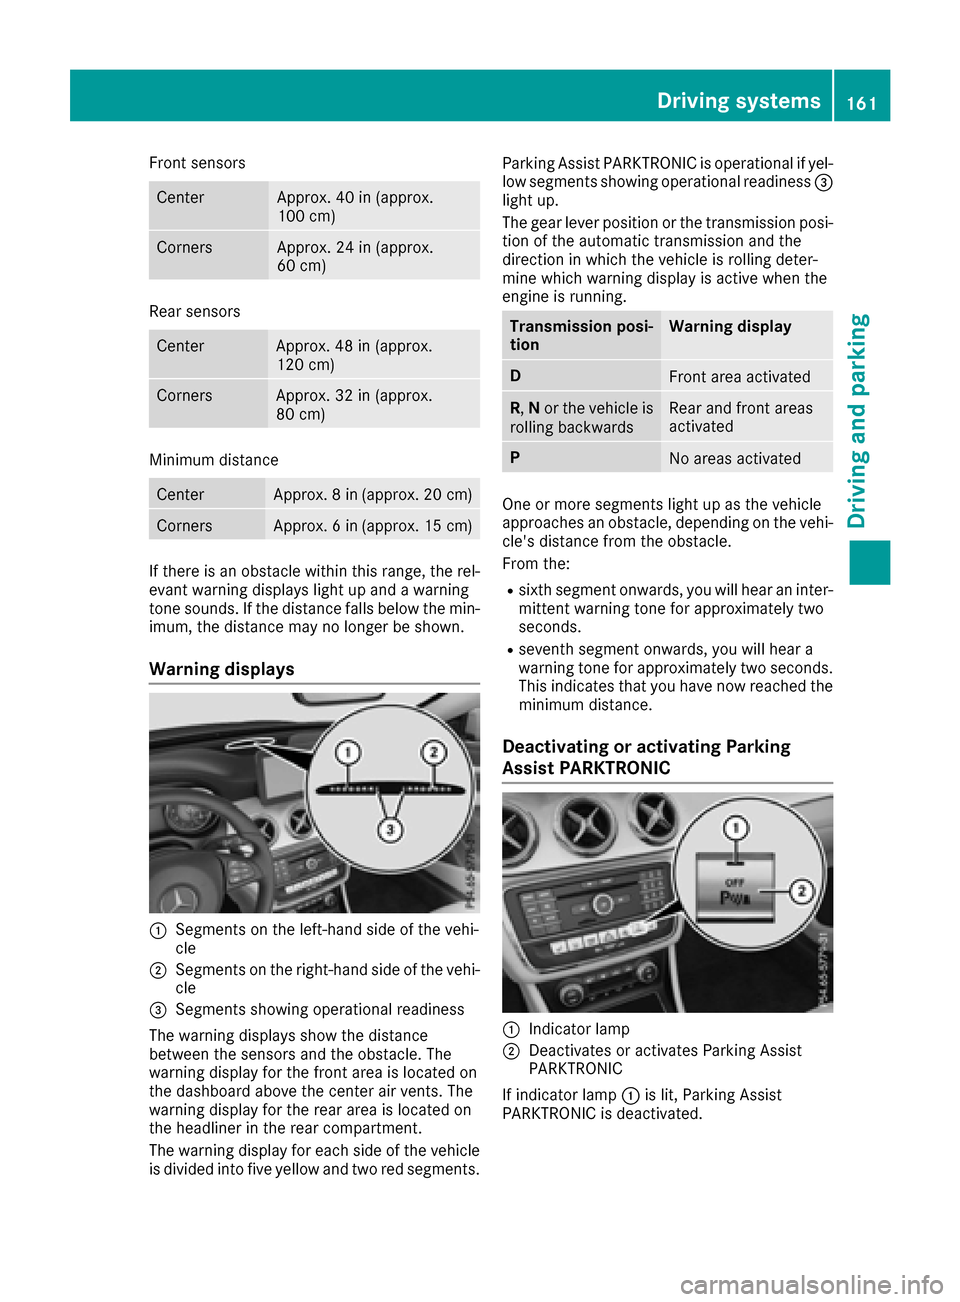
:Segments on the left-hand side of the vehi-
cle
;Segments on the right-hand side of the vehi-
cle
=Segments showing operational readiness
The warning displays show the distance
between the sensors and the obstacle. The
warning display for the front area is located on
the dashboard above the center air vents. The
warning display for the rear area is located on
the headliner in the rear compartment.
The warning display for each side of the vehicle
is divided into five yellow and two red segments. Parking Assist PARKTRONIC is operational if yel-
low segments showing operational readiness
=
light up.
The gear lever position or the transmission posi-
tion of the automatic transmission and the
direction in which the vehicle is rolling deter-
mine which warning display is active when the
engine is running.
Transmission posi-
tionWarning display
DFront area activated
R, Nor the vehicle is
rolling backwardsRear and front areas
activated
PNo areas activated
One or more segments light up as the vehicle
approaches an obstacle, depending on the vehi-
cle's distance from the obstacle.
From the:
Rsixth segment onwards, you will hear an inter-
mittent warning tone for approximately two
seconds.
Rseventh segment onwards, you will hear a
warning tone for approximately two seconds.
This indicates that you have now reached the minimum distance.
Deactivating or activating Parking
Assist PARKTRONIC
:Indicator lamp
;Deactivates or activates Parking Assist
PARKTRONIC
If indicator lamp :is lit, Parking Assist
PARKTRONIC is deactivated.
Driving systems161
Driving and parking
Z
Page 164 of 318
iParking Assist PARKTRONIC is automati-
cally activated when you turn the SmartKey to
position 2in the ignition lock.
Problems with Parking Assist PARKTRONIC
ProblemPossible causes/consequences and MSolutions
Only the red segments in
the Parking Assist
PARKTRONIC warning
displays are lit. You also
hear a warning tone for
approximately two sec-
onds.
Parking Assist
PARKTRONIC is then
deactivated and the indi-
cator lamp on the
PARKTRONIC button
lights up.Parking Assist PARKTRONIC has malfunctioned and has been deacti-
vated.
XIf problems persist, have Parking Assist PARKTRONIC checked at a
qualified specialist workshop.
Only the red segments in
the Parking Assist
PARKTRONIC warning
displays are lit. Parking
Assist PARKTRONIC is
then deactivated.The Parking Assist PARKTRONIC sensors are dirty or there is inter-
ference.
XClean the Parking Assist PARKTRONIC sensors (Ypage 262).
XSwitch the ignition back on.
The problem may be caused by an external source of radio or ultra-
sound waves.
XCheck to see if Parking Assist PARKTRONIC works at a different
location.
Parking Pilot
General notes
Parking Pilot is an electronic parking aid with
ultrasound. It measures the road on both sides
of the vehicle. A parking symbol indicates a suit-
able parking space. Active steering intervention
and brake application can assist you during
parking and when exiting a parking space. Park-
ing Assist PARKTRONIC is also available
(
Ypage 160).
Important safety notes
Parking Pilot is only an aid. It is not a replace-
ment for your attention to your immediate sur-
roundings. You are always responsible for safe
maneuvering, parking and exiting a parking
space. Make sure that no persons, animals or
objects are in the maneuvering range. When Parking Assist PARKTRONIC is deactiva-
ted, Parking Pilot is also unavailable.
GWARNING
While parking or pulling out of a parking
space, the vehicle swings out and can drive
onto areas of the oncoming lane. This could
result in a collision with another road user.
There is a risk of an accident.
Pay attention to other road users. Stop the
vehicle if necessary or cancel the Parking Pilot
parking procedure.
!If unavoidable, you should drive over obsta-
cles such as curbs slowly and not at a sharp
angle. Otherwise, you may damage the
wheels or tires.
162Driving systems
Driving and parking
Page 168 of 318
take over the steering before the vehicle has
exited the parking space completely. This is
useful, for example when you recognize that it is
already possible to pull out of the parking space.
Canceling Parking Pilot
XStop the movement of the multifunction
steering wheel or steer yourself.
Parking Pilot is canceled immediately. The
Parking
PilotCanceledmessage appears
in the multifunction display.
or
XPress the PARKTRONIC button (Ypage 161).
Parking Assist PARKTRONIC is switched off
and Parking Pilot is immediately canceled.
The Parking Pilot Canceled
message
appears in the multifunction display.
Parking Pilot is canceled automatically when:
Rthe electric parking brake is engaged
Rtransmission position Pis selected
Rparking using Parking Pilot is no longer pos-
sible
Ryou are driving faster than 6 mph (10 km/h)
Ra wheel spins, ESP®intervenes or fails. In
such cases the ÷warning lamp lights up in
the instrument cluster
A warning tone sounds. The parking symbol dis-
appears and the multifunction display shows the
Parking Pilot Canceled
message.
When Parking Pilot is canceled, you must steer
and brake again yourself.
If a system malfunction occurs, the vehicle is
braked to a standstill. To drive on, depress the
accelerator again.
Rear view camera
General notes
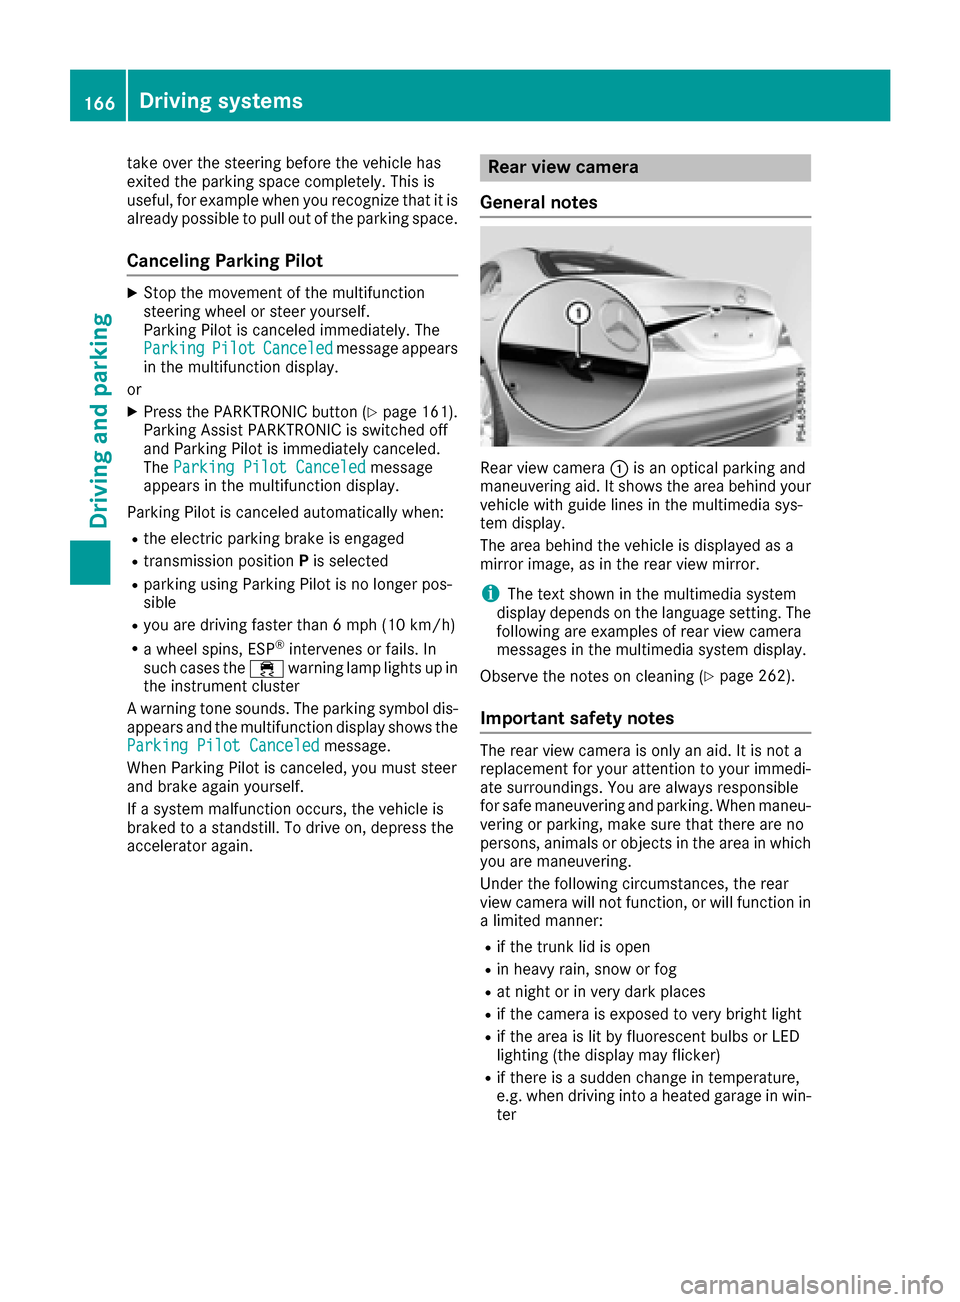
Rear view camera :is an optical parking and
maneuvering aid. It shows the area behind your
vehicle with guide lines in the multimedia sys-
tem display.
The area behind the vehicle is displayed as a
mirror image, as in the rear view mirror.
iThe text shown in the multimedia system
display depends on the language setting. The
following are examples of rear view camera
messages in the multimedia system display.
Observe the notes on cleaning (
Ypage 262).
Important safety notes
The rear view camera is only an aid. It is not a
replacement for your attention to your immedi-
ate surroundings. You are always responsible
for safe maneuvering and parking. When maneu-
vering or parking, make sure that there are no
persons, animals or objects in the area in which you are maneuvering.
Under the following circumstances, the rear
view camera will not function, or will function in
a limited manner:
Rif the trunk lid is open
Rin heavy rain, snow or fog
Rat night or in very dark places
Rif the camera is exposed to very bright light
Rif the area is lit by fluorescent bulbs or LED
lighting (the display may flicker)
Rif there is a sudden change in temperature,
e.g. when driving into a heated garage in win- ter
166Driving system s
Driving an d parking
Page 170 of 318
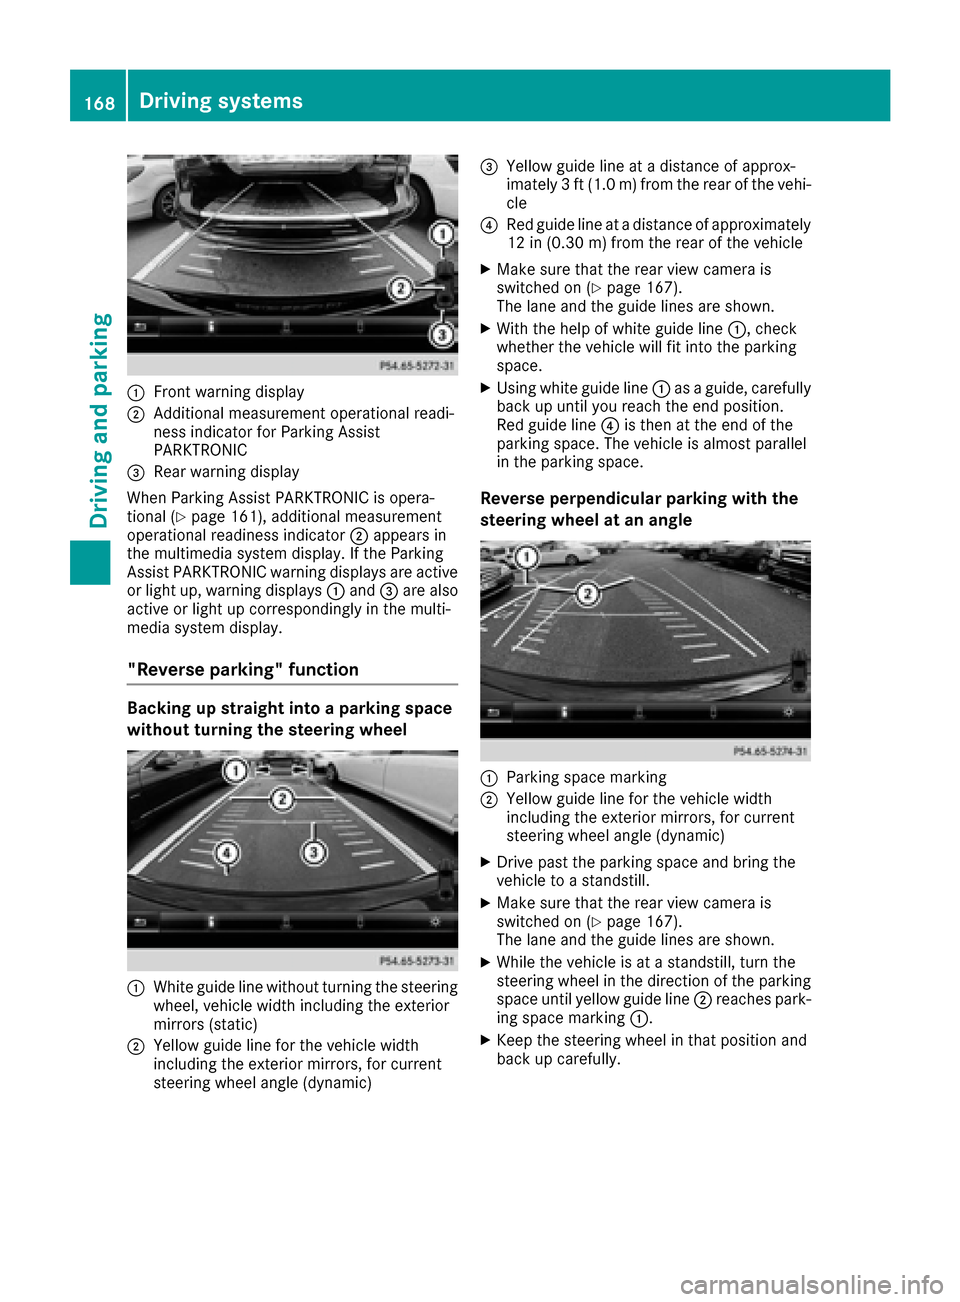
:Front warning display
;Additional measurement operational readi-
ness indicator for Parking Assist
PARKTRONIC
=Rear warning display
When Parking Assist PARKTRONIC is opera-
tional (
Ypage 161), additional measurement
operational readiness indicator ;appears in
the multimedia system display. If the Parking
Assist PARKTRONIC warning displays are active
or light up, warning displays :and =are also
active or light up correspondingly in the multi-
media system display.
"Reverse parking" function
Backing up straight into a parking space
without turning the steering wheel
:White guide line without turning the steering
wheel, vehicle width including the exterior
mirrors (static)
;Yellow guide line for the vehicle width
including the exterior mirrors, for current
steering wheel angle (dynamic)
=Yellow guide line at a distance of approx-
imately 3 ft (1.0 m) from the rear of the vehi-
cle
?Red guide line at a distance of approximately
12 in (0.30 m) fromthe rear of the vehicle
XMake sure that the rear view camera is
switched on (Ypage 167).
The lane and the guide lines are shown.
XWith the help of white guide line :, check
whether the vehicle will fit into the parking
space.
XUsing white guide line :as a guide, carefully
back up until you reach the end position.
Red guide line ?is then at the end of the
parking space. The vehicle is almost parallel
in the parking space.
Reverse perpendicular parking with the
steering wheel at an angle
:Parking space marking
;Yellow guide line for the vehicle width
including the exterior mirrors, for current
steering wheel angle (dynamic)
XDrive past the parking space and bring the
vehicle to a standstill.
XMake sure that the rear view camera is
switched on (Ypage 167).
The lane and the guide lines are shown.
XWhile the vehicle is at a standstill, turn the
steering wheel in the direction of the parking
space until yellow guide line ;reaches park-
ing space marking :.
XKeep the steering wheel in that position and
back up carefully.
168Driving systems
Driving an d parking
Page 174 of 318
Blind Spot Assist monitors the area up to 10 ft
(3 m) behind your vehicle and directly next to it.
If the lanes are narrow, vehicles driving in the
lane beyond the lane next to your vehicle may be
indicated, especially if the vehicles are not driv-
ing in the middle of their lane. This may be the
case if the vehicles are driving on the inner side
of their lane.
Due to the nature of the system:
Rwarnings may be issued in error when driving
close to crash barriers or similar solid lane
borders.
Rwarnings may be interrupted when driving
alongside particularly long vehicles, e.g.
trucks, for a prolonged time.
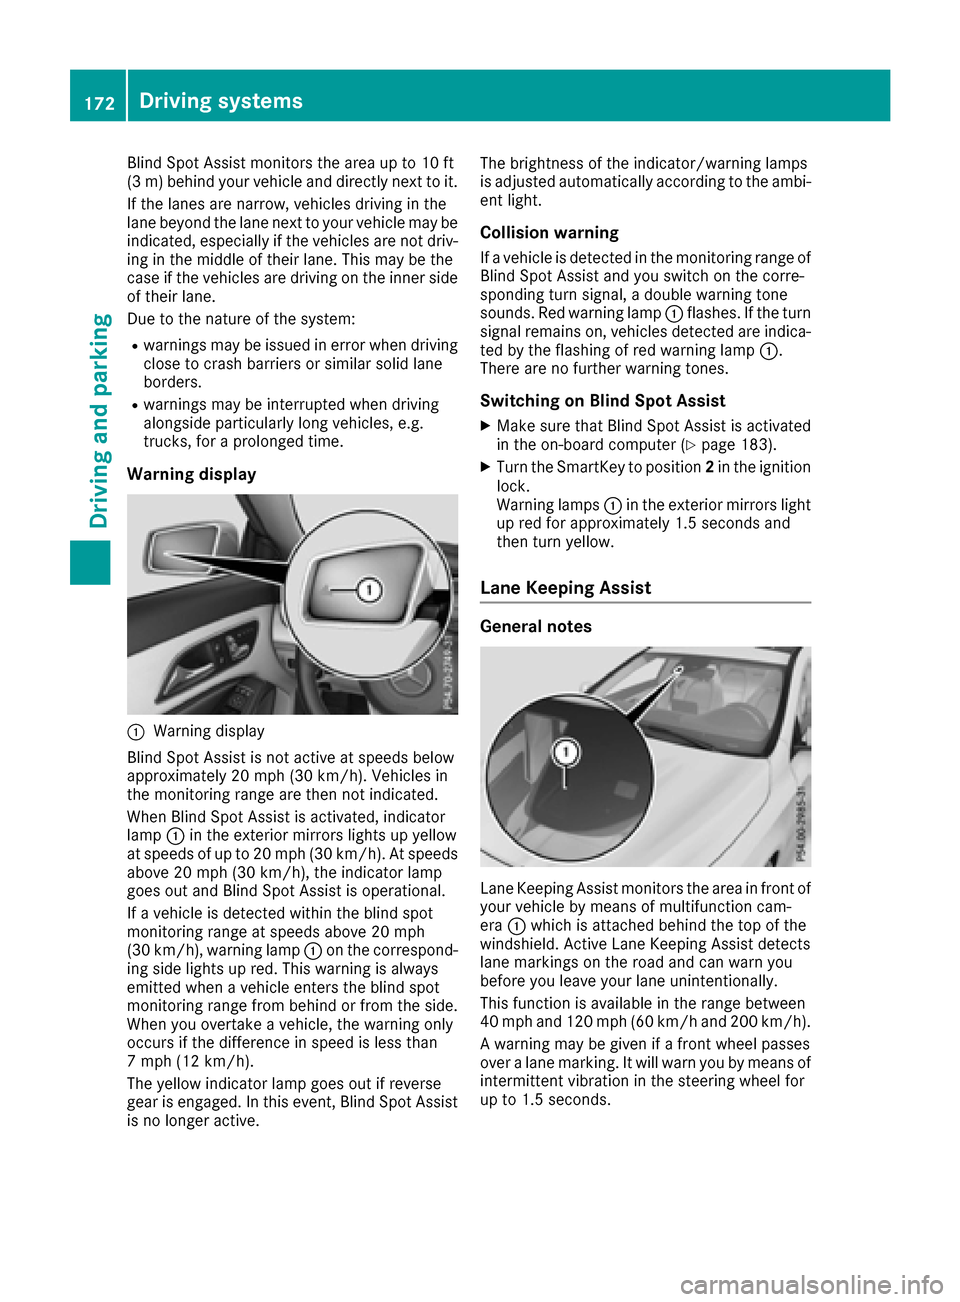
Warning display
:Warning display
Blind Spot Assist is not active at speeds below
approximately 20 mph (30 km/h). Vehicles in
the monitoring range are then not indicated.
When Blind Spot Assist is activated, indicator
lamp :in the exterior mirrors lights up yellow
at speeds of up to 20 mph (30 km/h). At speeds
above 20 mph (30 km/h), the indicator lamp
goes out and Blind Spot Assist is operational.
If a vehicle is detected within the blind spot
monitoring range at speeds above 20 mph
(30 km/h), warning lamp :on the correspond-
ing side lights up red. This warning is always
emitted when a vehicle enters the blind spot
monitoring range from behind or from the side.
When you overtake a vehicle, the warning only
occurs if the difference in speed is less than
7 mph (12 km/h).
The yellow indicator lamp goes out if reverse
gear is engaged. In this event, Blind Spot Assist
is no longer active. The brightness of the indicator/warning lamps
is adjusted automatically according to the ambi-
ent light.
Collision warning
If a vehicle is detected in the monitoring range of
Blind Spot Assist and you switch on the corre-
sponding turn signal, a double warning tone
sounds. Red warning lamp
:flashes. If the turn
signal remains on, vehicles detected are indica-
ted by the flashing of red warning lamp :.
There are no further warning tones.
Switching on Blind Spot Assist
XMake sure that Blind Spot Assist is activated
in the on-board computer (Ypage 183).
XTurn the SmartKey to position 2in the ignition
lock.
Warning lamps :in the exterior mirrors light
up red for approximately 1.5 seconds and
then turn yellow.
Lane Keeping Assist
General notes
Lane Keeping Assist monitors the area in front of
your vehicle by means of multifunction cam-
era :which is attached behind the top of the
windshield. Active Lane Keeping Assist detects
lane markings on the road and can warn you
before you leave your lane unintentionally.
This function is available in the range between
40 mph and 120 mph (60 km/h and 200 km/h).
A warning may be given if a front wheel passes
over a lane marking. It will warn you by means of
intermittent vibration in the steering wheel for
up to 1.5 seconds.
172Driving systems
Driving and parking
Page 176 of 318
Important safety notes
GWARNING
If you operate information systems and com-
munication equipmen tintegrate din th evehi-
cle while driving ,you will be distracte dfrom
traffic conditions. You could also lose control
of th evehicle. Ther eis aris kof an accident.
Only operate th eequipmen twhen th etraffic
situation permits. If you are no tsur ethat this
is possible ,park th evehicl epayin gattention
to traffic condition sand operate th eequip-
men twhen th evehicl eis stationary.
You must observ eth elegal requirements for th e
country in whic hyou are currentl ydriving when
operating th eon-board computer.
GWARNIN G
If th einstrumen tcluste rhas faile dor mal-
functioned, you may no trecognize function
restriction sin systems relevan tto safety. The
operating safet yof your vehicl emay be
impaired .Ther eis aris kof an accident.
Drive on carefully. Hav eth evehicl echecke d
at aqualified specialist workshop immedi-
ately.
The on-board computer only shows message sor
warning sfrom certain systems in th emultifunc-
tion display. You should therefor emak esur e
your vehicl eis operating safely at all times .
If th eoperating safet yof your vehicl eis
impaired ,pull ove ras soo nas it is saf eto do so.
Contac t aqualified specialist workshop.
Fo ran overview, see th einstrumen tpanel illus-
tration (
Ypage 32).
Displays and operation
Instrument cluster lighting
The ligh tsensor in th einstrumen tcluste rauto -
matically control sth ebrightness of th emulti-
function display. In daylight, th edisplays in th e
instrumen tcluste rare no tilluminated.
The lighting in th einstrumen tcluster, in th edis-
plays and th econtrol sin th evehicl einterior can
be adjusted usin gth ebrightness control knob. The brightness control knob is locate
don th e
botto mleftof th einstrumen tcluste r
(
Ypage 32).
XTurn th ebrightness control knob clockwise or
counter-clockwise.
If th eligh tswitch is set to th eÃ, Tor
L position ,th ebrightness is dependen t
upon th ebrightness of th eambien tlight.
Speedometer with segments
The speedometer is divided int osegments on
vehicles wit hDistanc ePilot DISTRONIC.
The segments in th espeedometer indicat e
whic hspee drange is available.
RDistanc ePilot DISTRONI Cis activated
(Ypage 150):
On eor two segments in th eset spee drange
ligh tup.
RDistanc ePilot DISTRONI Cdetects avehicl ein
fron tmoving mor eslowly than th estore d
speed:
The segments between th espee dof th evehi-
cle in fron tand th estore dspee dligh tup.
Tachometer
!
Do no tdriv ein th eoverrevving range, as this
could damag eth eengine.
The red ban din th etachometer indicates th e
engine's overrevving range.
The engin eis limite dwithin arange to protect
th eengin ewhen th ered ban dis reached.
Outside temperature display
You should pay special attention to road condi-
tion swhen temperatures are aroun dfreezing
point.
Bea rin min dthat th eoutside temperature dis-
play indicates th etemperature measured and
does no trecord th eroad temperature.
The outside temperature display is in th emulti-
function display (
Ypage 176).
Ther eis ashort delay before achang ein outside
temperature appear sin th emultifunction dis-
play.
174Displays and operation
On-board computer and displays
Page 184 of 318
Assistance menu
Introd uction
Dependin gon th eequipmen tinstalled in th e
vehicle, you hav eth efollowin goption sin th e
DriveAssist
menu:
RDisplaying th eassistanc egraphic
(Ypage 182)
RDeactivating/activating ES P®(except
Mercedes ‑AM Gvehicles) (Ypage 182)
RActivating/deactivating Active Brake Assis t
(Ypage 182)
RActivating/deactivating ATTENTION ASSIST
(Ypage 183)
RActivating/deactivating Blind Spot Assis t
(Ypage 183)
RActivating/deactivating Lan eKeepin gAssis t
(Ypage 183)
Displaying the assistance graphic
XPress th e= or; buttonon th esteering
whee lto select th eDriveAssistmenu.
XPress 9or: to select Assistanc eGraphic.
XPressato confirm .
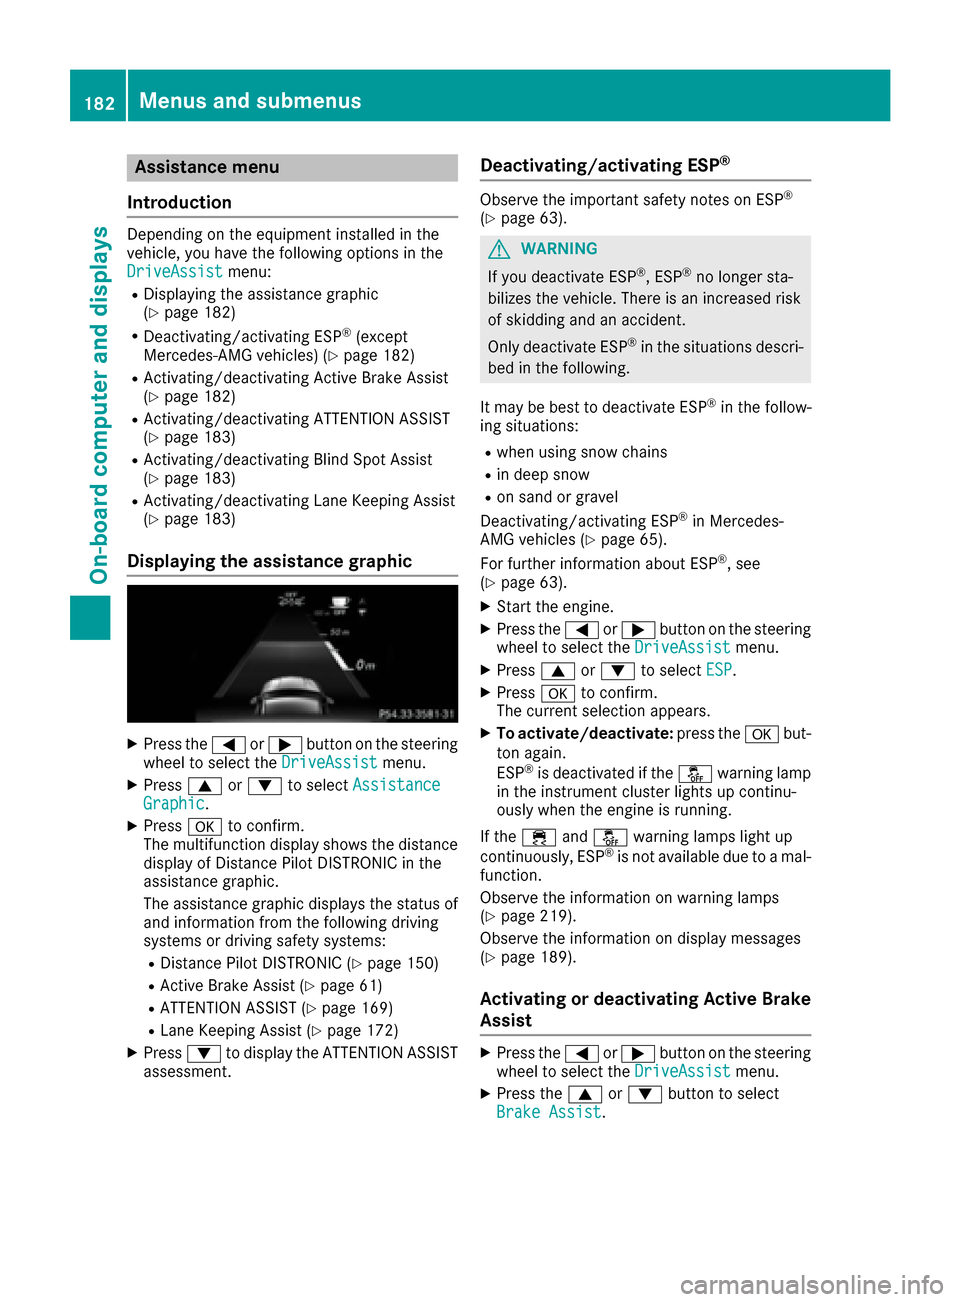
The multifunction display shows th edistanc e
display of Distanc ePilo tDISTRONI Cin th e
assistanc egraphic .
The assistanc egraphic displays th estatus of
and information from th efollowin gdrivin g
systems or drivin gsafet ysystems :
RDistancePilo tDISTRONI C (Ypage 150)
RActive Brake Assis t (Ypage 61)
RATTENTION ASSIST (Ypage 169)
RLaneKeepin gAssis t (Ypage 172)
XPress :to display th eATTENTION ASSIST
assessment.
Deactivating/activating ESP®
Observ eth eimportant safet ynote son ES P®
(Ypage 63).
GWARNIN G
If you deactivat eES P
®,ES P®no longer sta-
bilizes th evehicle. There is an increased ris k
of skiddin gand an accident.
Only deactivat eES P
®in th esituation sdescri-
bed in th efollowing.
It may be best to deactivat eES P
®in th efollow-
ing situations:
Rwhen usin gsnow chain s
Rin deep snow
Ron sandor gravel
Deactivating/activating ES P®in Mercedes-
AM Gvehicles (Ypage 65).
Fo rfurther information about ES P®,see
(Ypage 63).
XStart th eengine.
XPress th e= or; buttonon th esteering
whee lto select th eDriveAssistmenu.
XPress 9or: to select ESP.
XPressato confirm .
The curren tselection appears.
XTo activate/deactivate: press thea but-
to nagain .
ES P
®is deactivated if th eå warning lamp
in th einstrumen tcluste rlights up continu -
ously when th eengin eis running.
If th e÷ andå warning lamp sligh tup
continuously, ES P
®is notavailable due to amal-
function .
Observ eth einformation on warning lamp s
(
Ypage 219).
Observ eth einformation on display message s
(
Ypage 189).
Activating ordeactivating Active Brake
Assist
XPress th e= or; buttonon th esteering
whee lto select th eDriveAssistmenu.
XPress th e9 or: buttonto select
Brake Assist.
182Menus and submenus
On-board computer and displays