clock MERCEDES-BENZ CLS-Class 2017 W218 Comand Manual
[x] Cancel search | Manufacturer: MERCEDES-BENZ, Model Year: 2017, Model line: CLS-Class, Model: MERCEDES-BENZ CLS-Class 2017 W218Pages: 206, PDF Size: 6.66 MB
Page 24 of 206

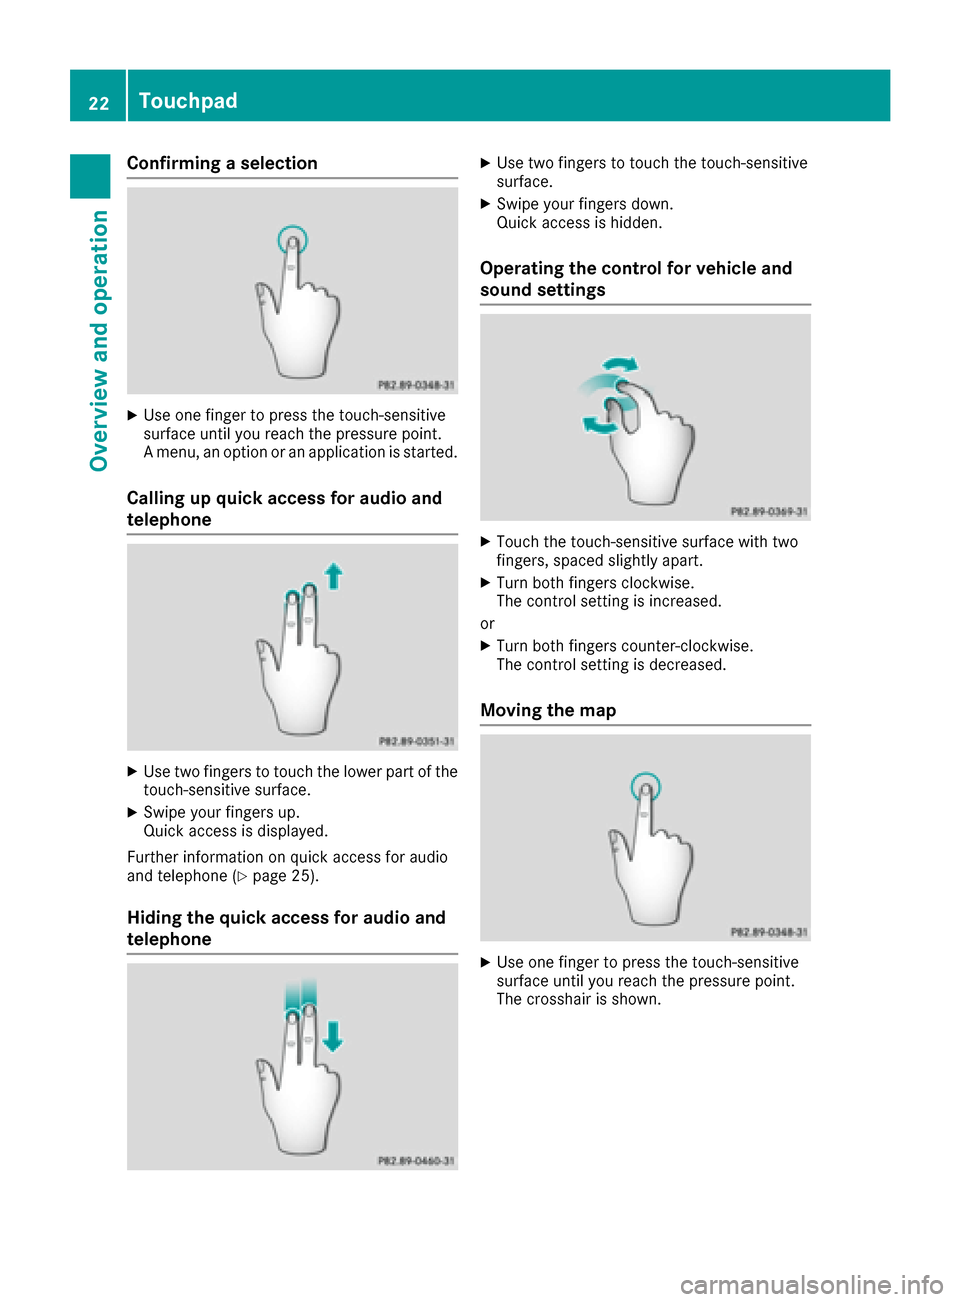
Confirming a selection
XUse one finger to press the touch-sensitive
surface until you reach the pressure point.
A menu, an option or an application is started.
Calling up quick access for audio and
telephone
XUse two fingers to touch the lower part of the
touch-sensitive surface.
XSwipe your fingers up.
Quick access is displayed.
Further information on quick access for audio
and telephone (
Ypage 25).
Hiding the quick access for audio and
telephone
XUse two fingers to touch the touch-sensitive
surface.
XSwipe your fingers down.
Quick access is hidden.
Operating the control for vehicle and
sound settings
XTouch the touch-sensitive surface with two
fingers, spaced slightly apart.
XTurn both fingers clockwise.
The control setting is increased.
or
XTurn both fingers counter-clockwise.
The control setting is decreased.
Moving the map
XUse one finger to press the touch-sensitive
surface until you reach the pressure point.
The crosshair is shown.
22Touchpad
Overview and operation
Page 37 of 206

XPress theØbutton.
or
XPress Vehiclein the main function bar.
The vehicle menu is displayed.
XTo select Time: slide6, turn and press the
controller.
A menu appears.
XTo select Daylight Saving Time: turn and
press the controller.
A list with options appears.
XTo select Automatic,Onor Off: turn and
press the controller.
SettingFunction
AutomaticThe summer and
standard time are
automatically
changed over.
OnThe clock is advanced
one hour ahead of
standard time.
OffThe standard time for
the chosen time zone
is selected.
Manual time setting
iUsing the manual time settings, you can set
the time forwards or backwards by up to sev-
eral hours.
XPress the Øbutton.
or
XPress Vehiclein the main function bar.
The vehicle menu is displayed.
XTo select Time: slide6, turn and press the
controller.
A menu appears.
XTo select Set Time Manually: turn and
press the controller.
A menu with an analog clock appears.
XTo set the hour: turn the controller.
XTo highlight the minutes: slide9 the
controller.
XTo set the minutes: turn and press the con-
troller.
The time is accepted.
The Automatic Time Settings
function is
deactivated ª.
If Automatic
is set for the summer time
changeover, a prompt will appear asking
whether the automatic changeover should be
maintained between summer and winter
time.
iIf Automatic Time Settingsis reactiva-
ted, the previous settings for time zone and
summer time changeover are restored.
Setting the time and date format
Use this function to set the time and date format for all displays in the vehicle.
XPress the Øbutton.
or
XPress Vehiclein the main function bar.
The vehicle menu is displayed.
XTo select Time: slide6, turn and press the
controller.
A menu appears.
XTo select Format: turn and press the control-
ler.
XTo select the desired date format: turn and
press the controller.
The #dot indicates the current setting.
XTo select the desired time format: turn and
press the controller.
The #dot indicates the current setting.
Time settings35
System settings
Z
Page 66 of 206

Using the map
:Crosshair
;Distance of crosshair position from current
vehicle position
XTo switch to navigation mode:press the
ß button.
XTo show the menu: slide6the controller.
XTo select Destination: turn and press the
controller.
XSelect Using Map.
The map with crosshair is shown.
XTo move the map: slide1, 4or2
the controller.
XTo change the map scale: turn the controller
until the desired map scale is selected.
The scale is displayed at the bottom of the
display.
To enlarge the map: turn the controller coun-
ter-clockwise.
To zoom the map out: turn the controller
clockwise.
XTo select a destination: press the controller.
The list contains the Menu
menu item. If sev-
eral destinations are available in the area
around the crosshair, these are also dis-
played.
XPress the controller to show the menu.
XTo select a destination from the selection list: turn and press the controller.
If the digital map provides navigable address
data, you will see the destination address in
the address entry menu.
XTo start route calculation: selectStart.
Entering intermediate destinations
Introduction
You can also map the route to the destination
yourself by entering up to four intermediate des-
tinations. The sequence of the intermediate des-
tinations can be changed at any time.
The multimedia system provides a selection of
eight predefined POI categories, e.g. Restau‐
rantsfor a quick selection. You can also use the
destination entry options to enter intermediate
destinations.
Creating intermediate destinations
XTo switch to navigation mode: press the
Ø button.
XTo show the menu: slide6the controller.
XTo select Destination: turn and press the
controller.
XSelect Intermediate Destinations.
The destination is entered in the intermediate
destinations menu.
XTo select Add New:: press the controller.
64Destination entry
Navigation
Page 146 of 206

Sirius XM®Satellite Radio uses a fleet of high-
performance satellites to broadcast around the
clock throughout the USA and Canada.
The satellite radio program is available for a
monthly fee. Details are available from the Sirius
XM
®Service Center and at
http://www.siriusxm.com (USA) or
http://www.siriusxm.ca (Canada).
Your new Mercedes-Benz vehicle comes with
Sirius XM
®Satellite Radio pre-installed at the
factory. This service is free for a six-month trial
period. About a month before the trial period
ends, information will be provided on how to
extend this subscription. An acoustic signal
sounds and a message is shown, describing how
the subscription can be extended.
iSirius, XM and all related marks and logos
are trademarks of Sirius XM Radio Inc. and its
subsidiaries. All other marks, channel names
and logos are the property of their respective
owners. All rights reserved.
Registering satellite radio
:Phone number of provider
;Sirius XM®ID of your satellite receiver
XSwitch on SatRadio mode (Ypage 144).
The satellite radio main menu appears show-
ing the preview channel. You cannot select
any other stations.
XTo select Optionsin the radio menu bar: turn
and press the controller.
XTo select Service: turn and press the con-
troller.
The service information screen appears. Once the telephone connection has been estab-
lished:
XFollow the instructions of the service staff.
The activation process may take up to
ten minutes. If the activation is completed
successfully, the
Updating Channels...
message appears in the display, followed by
the satellite radio main menu.
iYou can also have the satellite service acti-
vated online. To do this, visit
http://www.siriusxm.com (USA) or
http://www.siriusxm.ca (Canada).
iIf registration is not included when purchas-
ing the system, your credit card details will be
required to activate your account.
If the satellite receiver is not installed correctly,
the Device
Unavailablemessage will appear.
Switching to satellite radio
XTo show the main function bar: slide 5the
controller.
XTo select Radio: turn and press the controller.
The radio display appears. You will hear the
last station played on the last waveband
selected.
XTo select Radioin radio mode: slide 5and
press the controller.
The menu with the available radio modes
appears.
XTo select SatRadio: turn and press the con-
troller.
The No
Servicemessage appears if there is no
signal.
144Satellite radio
Radio
Page 171 of 206

DVD'scontro lmenu
Mos tDVDs hav etheir own contro lmenu which
can be operated usin gth econtroller .
Showin gth eDVD' scontro lmen u
XTo selec tMen ufrom th eDV Doverlay menu:
turn and press th econtroller .
The men uof th eDV Doverlay men uis hidden
and th eDVD' smen uentries (e.g. scenes, lan -
guage, trailers) are displayed.
XTo selec t amen uentry: slid eand press th e
controller .
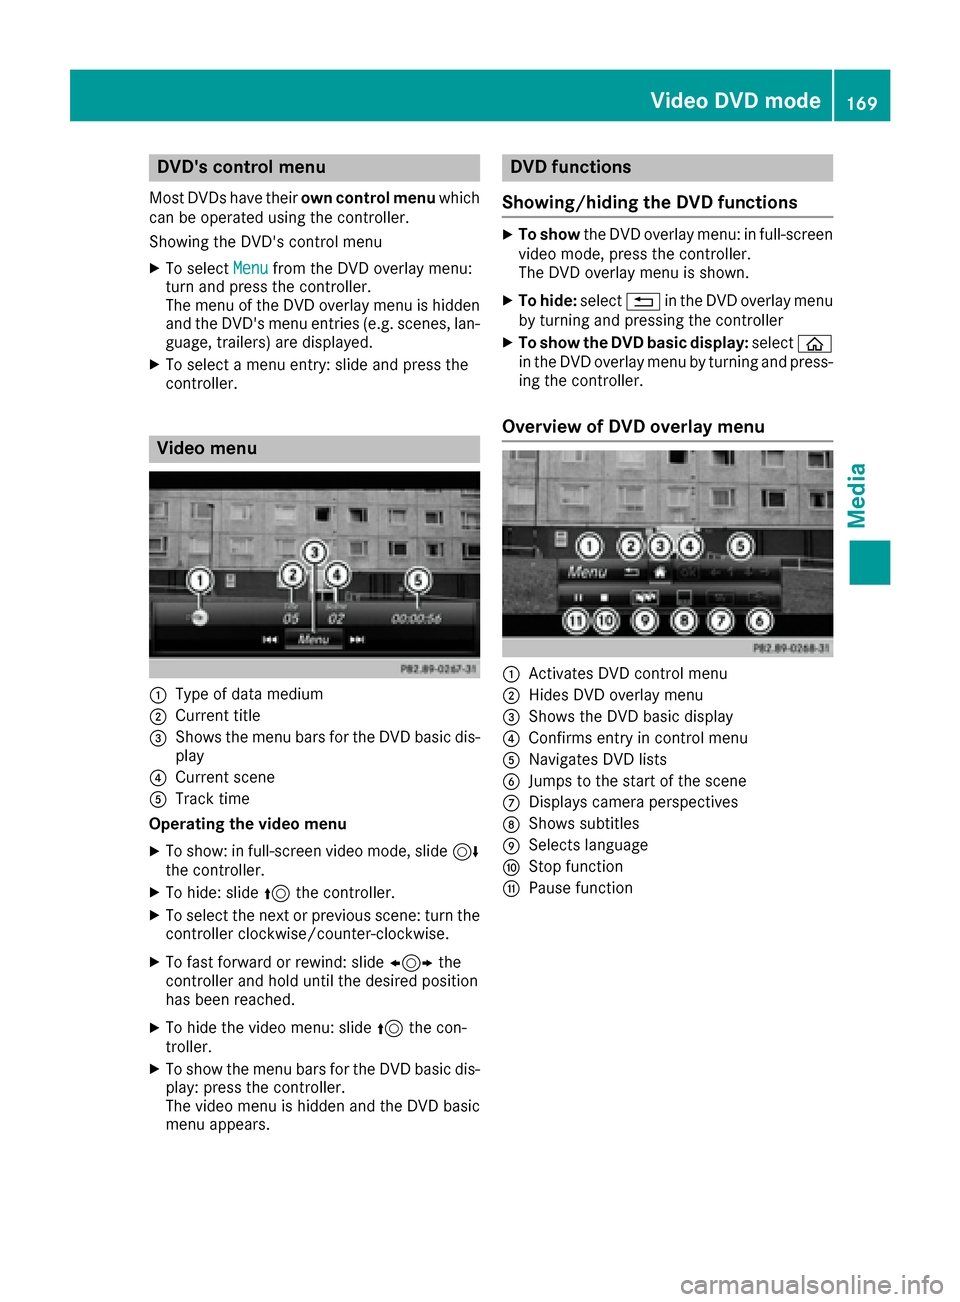
Video menu
:Type of dat amedium
;Curren ttitl e
=Shows th emen ubar sfo rth eDV Dbasi cdis -
play
?Curren tscen e
ATrack time
Operating th evideo menu
XTo show: in full-screen video mode, slid e6
th econtroller .
XTo hide:slid e5 thecontroller .
XTo selectth enext or previous scene: turn th e
controller clockwise/counter-clockwise .
XTo fastforwar dor rewind: slid e1 the
controller and hol duntil th edesire dposition
has bee nreached.
XTo hide th evideo menu: slid e5 thecon-
troller.
XTo sho wthemen ubar sfo rth eDV Dbasi cdis -
play: press th econtroller .
The video men uis hidden and th eDV Dbasi c
men uappears .
DVD functions
Showing/hiding th eDVD functions
XTo show theDV Doverlay menu: in full-screen
video mode, press th econtroller .
The DV Doverlay men uis shown .
XTo hide:select% in theDV Doverlay men u
by turnin gand pressing th econtroller
XTo show th eDVD basic display :selec tò
in th eDV Doverlay men uby turnin gand press-
in g th econtroller .
Overview of DVD overlay menu
:Activates DV Dcontro lmen u
;Hides DV Doverlay men u
=Shows theDV Dbasi cdisplay
?Confirms entr yin contro lmen u
ANavigates DV Dlist s
BJump sto th estart of th escen e
CDisplays camera perspective s
DShows subtitles
ESelects language
FStop function
GPausefunction
Video DVD mode16 9
Media
Z
Page 173 of 206

Displaying pictures
XIn themedia basi cdisplay, press th econtrol-
ler .
The Search
with a category list appears .
XTo selectPhotosin th ecategory list :turn and
press th econtroller .
A directory list appears .Folder sand picture
files can be shown .
XSelect afolder or picture.
If there is no picture on th edat amedium, an
empty list is shown .
You can search fo rpictures on other dat a
media.
Searchin gfor picture son other data medi a
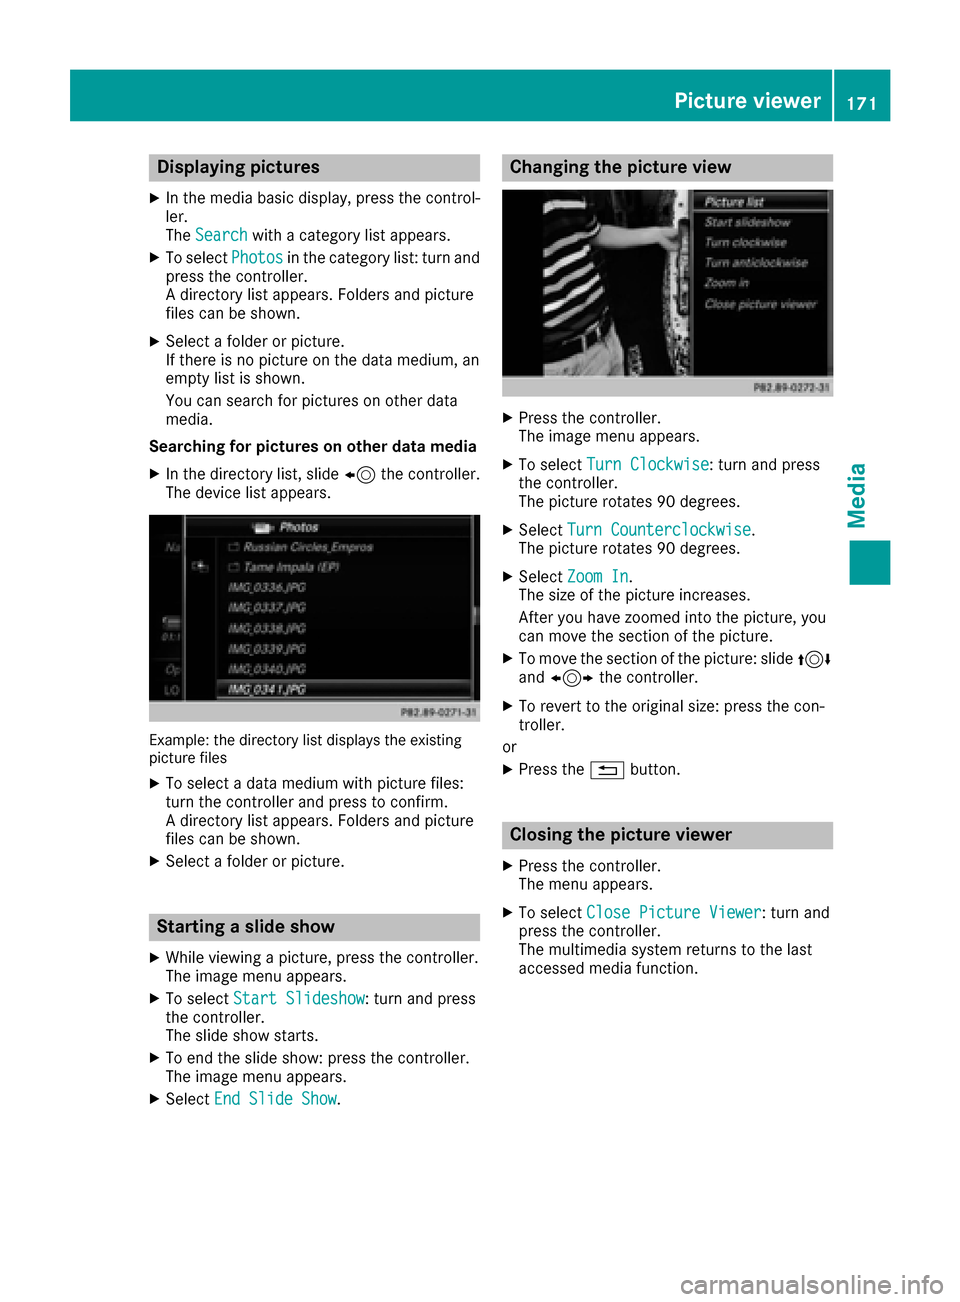
XIn thedirectory list ,slid e8 thecontroller .
The devic elist appears .
Example: th edirectory list displays th eexistin g
picture files
XTo selec t adat amedium wit hpicture files:
turn th econtroller and press to confirm .
A directory list appears .Folder sand picture
files can be shown .
XSelect afolder or picture.
Starting aslid eshow
XWhile viewin g apicture, press th econtroller .
The imag emen uappears .
XTo selec tStart Slideshow:turn and press
th econtroller .
The slid esho wstarts.
XTo en dth eslid eshow: press th econtroller .
The imag emen uappears .
XSelectEnd Slide Sho w.
Changingth epicture view
XPress th econtroller .
The imag emen uappears .
XTo selec tTur nClockwise:turn and press
th econtroller .
The picture rotate s90 degrees.
XSelec tTur nCounterclockwis e.
The picture rotate s90 degrees.
XSelec tZoo mIn.
The siz eof th epicture increases.
Afte ryou hav ezoomed into th epicture, you
can move th esection of th epicture.
XTo move th esection of th epicture: slid e4
and 1 thecontroller .
XTo revert to th eoriginal size: press th econ-
troller.
or
XPress th e% button.
Closing th epicture viewer
XPress th econtroller .
The men uappears .
XTo selec tClose Pictur eViewer:turn and
press th econtroller .
The multimedia system return sto th elast
accessed media function .
Picture viewer171
Media
Z
Page 193 of 206

XTo open the battery compartment:remove
battery compartment cover =on the back of
the remote control.
XTo do so, press down retaining lug ;and
take off battery compartment cover =.
XRemove discharged batteriesAfrom the
tray.
XInsert the new batteries. Observe the polarity
markings on the batteries and battery com-
partment when doing so.
Left-hand battery: the positive pole (+) must
face upwards.
Right-hand battery: the positive pole (+) must
face downwards.
XTo close the battery compartment: insert
battery compartment cover =starting with
retaining lugs ?into the battery compart-
ment and allow catch tab ;to engage in
place.
On the cordless headphones
The battery compartment is located on the left
headphone. The cordless headphones require
two type AAA, 1.5 V batteries.
XTo open the battery compartment: turn
battery compartment cover :counter-
clockwise and remove.
XRemove the discharged batteries from the
tray.
XInsert the new batteries. Observe the polarity markings on the batteries and battery tray
when doing so.
XTo close the battery compartment: replace
battery housing cover :and turn it clock-
wise until it engages.
If the batteries have been inserted correctly,
the indicator lamp will light up green when the
headphones are switched on.
iThe operating duration of the headphones
with a set of batteries is up to 40 hours.
Basic functions
Using headphones
You can use the cordless headphones supplied
and/or up to two sets of corded headphones
connected to the corresponding jack of the rear-
compartment screens (
Ypage 187).
Information on the cordless headphones
(
Ypage 189).
Using the main loudspeakers
This function is available in conjunction with
COMAND.
You can use the vehicle loudspeakers to listen to
a disc inserted in the rear-compartment drive.
To do so, disc mode (audio CD/audio DVD/
MP3) must be activated on at least one rear
screen.
The headphones' volume setting does not affect
the main loudspeakers.
XTo set on COMAND: press the$button,
for example, to switch on an audio mode.
XTo select Info6slide and press the con-
troller.
A menu appears.
XTurn the controller until Rear Seat Enter‐tainment System: Audiois brought to the
front.
XPress the controller.
Basic functions191
Rear Seat Entertainment System
Z