ESP MERCEDES-BENZ CLS-Class 2017 W218 Owner's Manual
[x] Cancel search | Manufacturer: MERCEDES-BENZ, Model Year: 2017, Model line: CLS-Class, Model: MERCEDES-BENZ CLS-Class 2017 W218Pages: 334, PDF Size: 8.22 MB
Page 299 of 334
Important notes on tire pressure
GWARNING
If th etire pressur edrops repeatedly, th e
wheel, valv eor tire may be damaged. Tir e
pressur ethat is to olow may result in atire
blow-out .Ther eis aris kof an accident.
RChec kth etire for foreign objects .
RCheckwhether th ewhee lis losing air or th e
valv eis leaking .
If you are unable to rectify th edamage, con-
tac t a qualified specialist workshop.
GWARNIN G
If you fit unsuitable accessories onto tire
valves, th etire valves may be overloaded and
malfunction ,whic hcan caus etire pressur e
loss .Due to their design ,retrofitte dtire pres-
sur emonitors keep th etire valv eopen .This
can also result in tire pressur eloss .Ther eis a
ris kof an accident.
Only screw th estandard valv ecap or other
valv ecap sapprove dby Mercedes-Ben zfor
your vehicl eonto th etire valve.
Use asuitable pressur egauge to chec kth etire
pressure. The outer appearanc eof atire does
no tpermit any reliable conclusio nabout th etire
pressure. On vehicles equipped wit hth eelec -
tronic tire pressur emonitor, th etire pressur e
can be checke din th eon-board computer.
The tire temperature and pressur eincreas e
when th evehicl eis in motion .This is dependen t
on th edriving spee dand th eload.
Therefore, you should only correc ttire pres-
sures when th etires are cold.
The tires are cold:
Rif th evehicl ehas been parked wit hth etires
out of direct sunligh tfor at least three hour s
and
Rif th evehicl ehas no tbeen driven further than
1 mile (1. 6km)
The tire temperature changes depending on th e
outside temperature, th evehicl espee dand th e
tire l
oad. If th etire temperature changes by
18 ‡(10 †), th etire pressur echanges by
approximately 10 kP a(0. 1bar/1.5 psi) .Tak e
this int oaccoun twhen checkin gth epressur eof
warm tires .Only correc tth etire pressur eif it is to
olow for th ecurren toperating conditions. If
you chec kth etire pressur ewhen th etires are
warm ,th eresulting value will be higher than if
th etires were cold. This is normal. Do no t
reduce th etire pressur eto th evalue specifie d
for cold tires .The tire pressur ewould otherwise
be to olow.
Observ eth erecommended tire pressures for
cold tires :
Ron theTir eand Loading Information placard
on th eB-pillar on th edriver' sside
Rin th etire pressur etable on th efuel filler flap
(Ypage 139)
Underinflated or overinflated tires
Underinflated tires
GWARNIN G
Tires wit hpressur ethat is to olow can over-
heat and burs tas aconsequence .In addition ,
they also suffer from excessiv eand/o rirreg-
ular wear ,whic hcan severely impair th ebrak -
ing properties and th edriving characteristics .
Ther eis aris kof an accident.
Avoid tire pressures that are to olow in all th e
tires ,includin gth espar ewheel.
Underinflated tires may:
Roverheat, leadin gto tire defects
Radversely affec thandlin g
Rwear excessively and/o runevenly
Rhav ean adverse effec ton fuel consumption
Overinflated tires
GWARNIN G
Tires wit hexcessively high pressur ecan burs t
because they are damaged mor eeasil yby
road debris, pothole setc. In addition ,they
also suffer from irregular wear ,whic hcan
severely impair th ebraking properties and th e
driving characteristics .Ther eis aris kof an
accident.
Avoid tire pressures that are to ohigh in all th e
tires ,includin gth espar ewheel.
Tire pressure297
Wheels and tires
Z
Page 300 of 334
Overinflated tires may:
Rincrease the braking distance
Radversely affect handling
Rwear excessively and/or unevenly
Rhave an adverse effect on ride comfort
Rbe more susceptible to damage
Maximum tire pressures
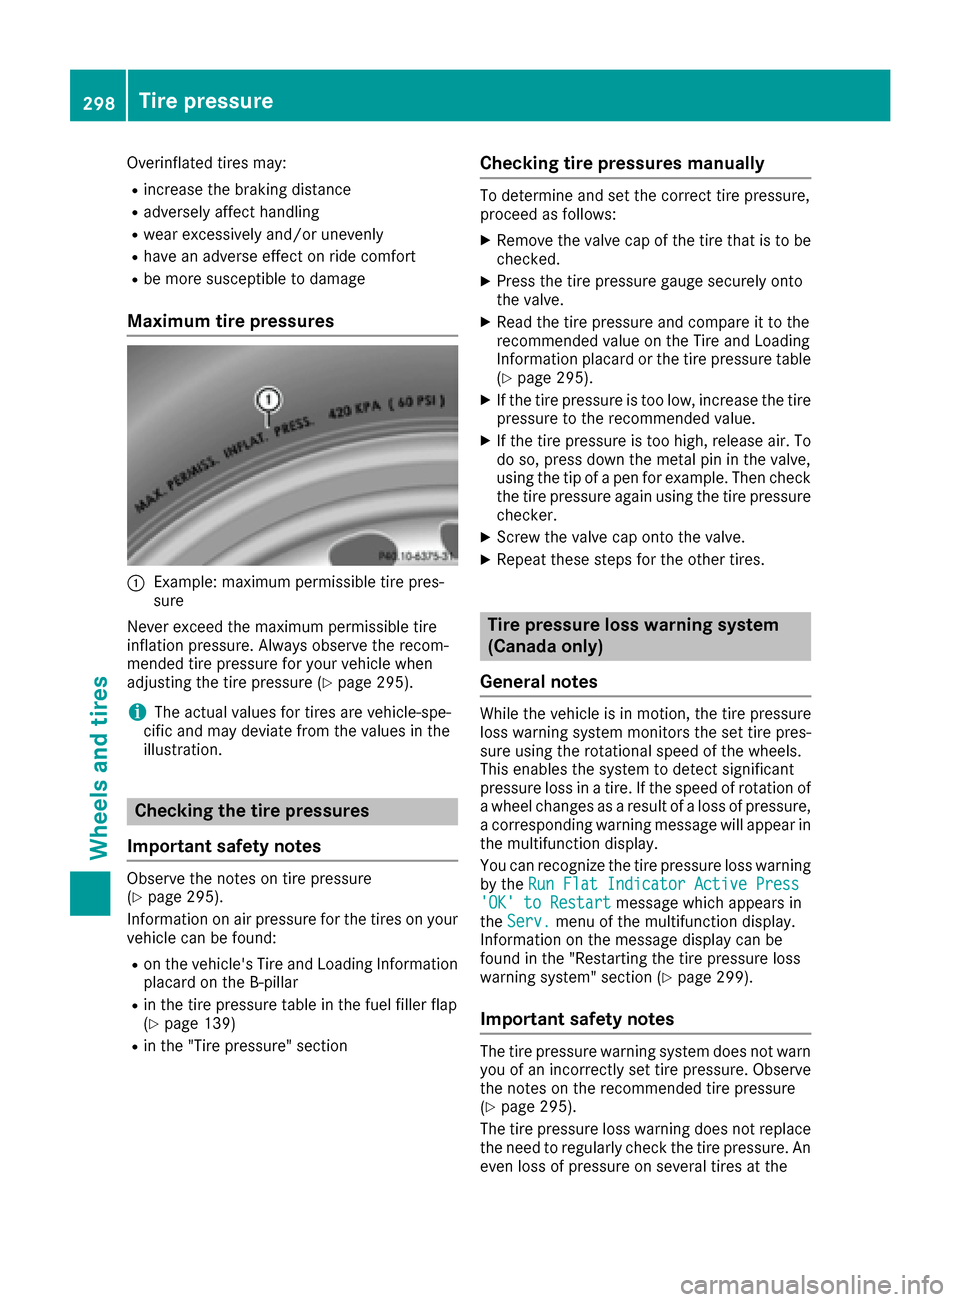
:Example: maximum permissible tire pres-
sure
Never exceed the maximum permissible tire
inflation pressure. Always observe the recom-
mended tire pressure for your vehicle when
adjusting the tire pressure (
Ypage 295).
iThe actual values for tires are vehicle-spe-
cific and may deviate from the values in the
illustration.
Checking the tire pressures
Important safety notes
Observe the notes on tire pressure
(Ypage 295).
Information on air pressure for the tires on your
vehicle can be found:
Ron the vehicle's Tire and Loading Information
placard on the B-pillar
Rin the tire pressure table in the fuel filler flap
(Ypage 139)
Rin the "Tire pressure" section
Checking tire pressures manually
To determine and set the correct tire pressure,
proceed as follows:
XRemove the valve cap of the tire that is to be
checked.
XPress the tire pressure gauge securely onto
the valve.
XRead the tire pressure and compare it to the
recommended value on the Tire and Loading
Information placard or the tire pressure table (
Ypage 295).
XIf the tire pressure is too low, increase the tire
pressure to the recommended value.
XIf the tire pressure is too high, release air. To
do so, press down the metal pin in the valve,
using the tip of a pen for example. Then check
the tire pressure again using the tire pressure
checker.
XScrew the valve cap onto the valve.
XRepeat these steps for the other tires.
Tire pressure loss warning system
(Canada only)
General notes
While the vehicle is in motion, the tire pressure
loss warning system monitors the set tire pres-
sure using the rotational speed of the wheels.
This enables the system to detect significant
pressure loss in a tire. If the speed of rotation of
a wheel changes as a result of a loss of pressure,
a corresponding warning message will appear in
the multifunction display.
You can recognize the tire pressure loss warning
by the Run Flat Indicator Active Press
'OK' to Restartmessage which appears in
the Serv.menu of the multifunction display.
Information on the message display can be
found in the "Restarting the tire pressure loss
warning system" section (
Ypage 299).
Important safety notes
The tire pressure warning system does not warn
you of an incorrectly set tire pressure. Observe
the notes on the recommended tire pressure
(
Ypage 295).
The tire pressure loss warning does not replace
the need to regularly check the tire pressure. An
even loss of pressure on several tires at the
298Tire pressure
Wheels and tires
Page 301 of 334

same time cannot be detected by the tire pres-
sure loss warning system.
The tire pressure monitor is not able to warn you
of a sudden loss of pressure, e.g. if the tire is
penetrated by a foreign object. In the event of a
sudden loss of pressure, bring the vehicle to a
halt by braking carefully. Avoid abrupt steering
movements.
The function of the tire pressure loss warning
system is limited or delayed if:
Rsnow chains are mounted on your vehicle's
tires.
Rroad conditions are wintry.
Ryou are driving on sand or gravel.
Ryou adopt a very sporty driving style (corner-
ing at high speeds or driving with high rates ofacceleration).
Ryou are driving with a heavy load (in the vehi-cle or on the roof).
Restarting the tire pressure loss warn-
ing system
Restart the tire pressure loss warning system if
you have:
Rchanged the tire pressure
Rchanged the wheels or tires
Rmounted new wheels or tires
XBefore restarting, make sure that the tire
pressures are set properly on all four tires for
the respective operating conditions.
The recommended tire pressure can be found
on the Tire and Loading Information placard
on the B-pillar on the driver's side. Addition-
ally, a tire pressure table is attached to the
fuel filler flap. The tire pressure loss warning
system can only give reliable warnings if you
have set the correct tire pressure. If an incor-
rect tire pressure is set, these incorrect val-
ues will be monitored.
XAlso observe the notes in the section on tire
pressures (Ypage 295).
XMake sure that the SmartKey is in position 2
in the ignition lock (Ypage 123).
XPress the =or; button on the steering
wheel to select the Serv.menu.
XPress the9or: button on the steering
wheel to select the Tire Pressuremenu.
XPress theabutton.
The Run Flat Indicator Active Press
'OK' to Restartmessage appears in the
multifunction display.
If you wish to confirm the restart:
XPress the abutton.
The Tire Pressure Now OK?message
appears in the multifunction display.
XPress the 9or: button to select Yes.
XPress theabutton.
The Run Flat Indicator Restartedmes-
sage appears in the multifunction display.
After a teach-in period, the tire pressure loss
warning system will monitor the set tire pres-
sures of all four tires.
If you wish to cancel the restart:
XPress the %button.
or
XWhen the TirePressureNowOK?message
appears, press the 9or: button to
select Cancel
.
XPress the abutton.
The tire pressure values stored at the last
restart will continue to be monitored.
Tire pressure monitor
General notes
If a tire pressure monitor is installed, the vehi-
cle's wheels have sensors that monitor the tire
pressures in all four tires. The tire pressure mon-
itor warns you if the pressure drops in one or
more of the tires. The tire pressure monitor only
functions if the corresponding sensors are
installed in all wheels.
Information on tire pressures is displayed in the
multifunction display. After a few minutes of
driving, the current tire pressure of each tire is
shown in the Service
menu of the multifunction
display, see illustration (example).
Tire pressure299
Wheels and tires
Z
Page 302 of 334
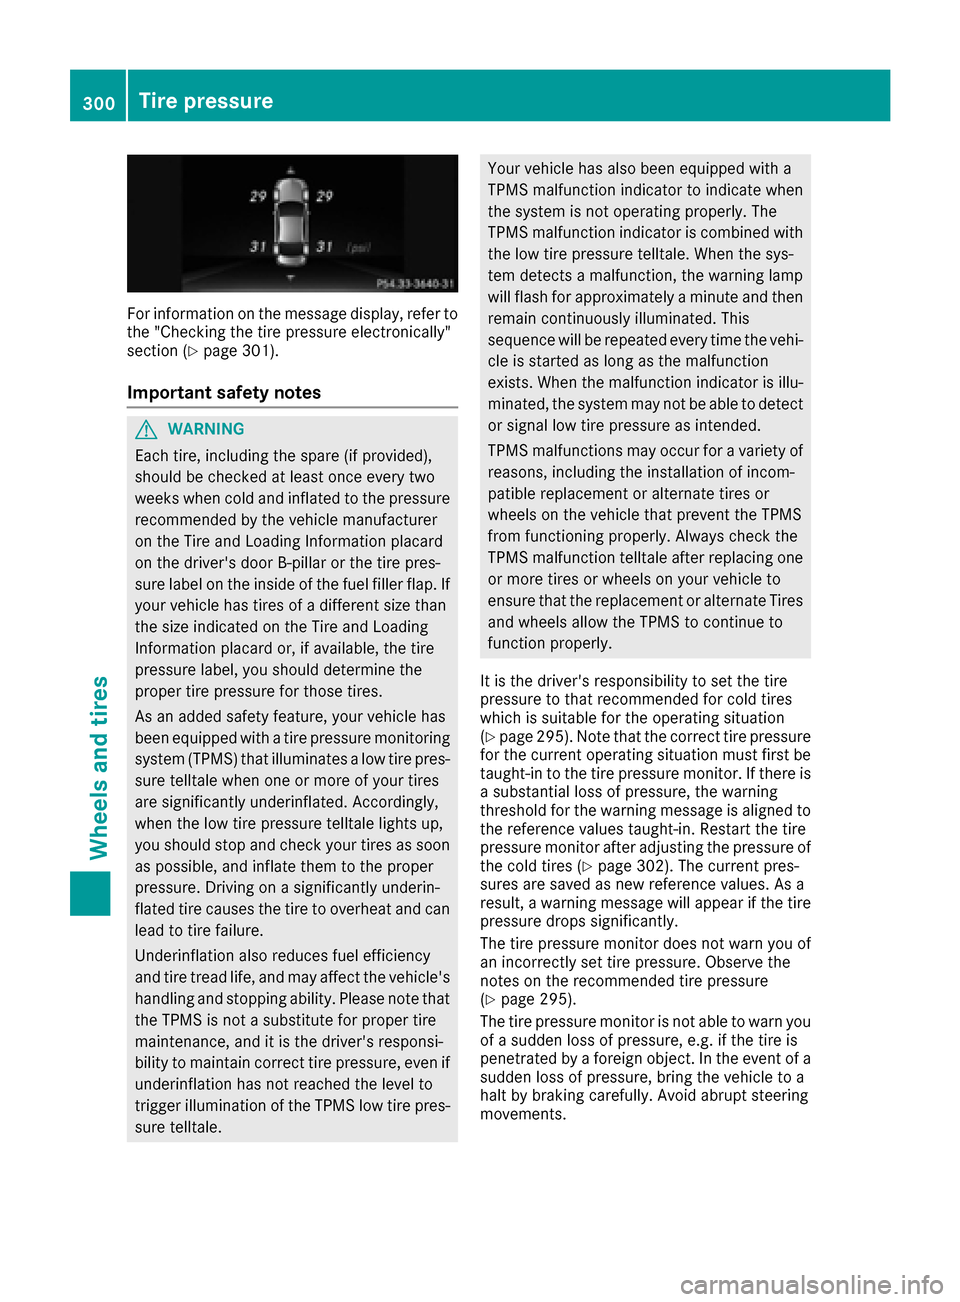
For information on the message display, refer to
the "Checking the tire pressure electronically"
section (
Ypage 301).
Important safety notes
GWARNING
Each tire, including the spare (if provided),
should be checked at least once every two
weeks when cold and inflated to the pressure recommended by the vehicle manufacturer
on the Tire and Loading Information placard
on the driver's door B-pillar or the tire pres-
sure label on the inside of the fuel filler flap. If
your vehicle has tires of a different size than
the size indicated on the Tire and Loading
Information placard or, if available, the tire
pressure label, you should determine the
proper tire pressure for those tires.
As an added safety feature, your vehicle has
been equipped with a tire pressure monitoring
system (TPMS) that illuminates a low tire pres-
sure telltale when one or more of your tires
are significantly underinflated. Accordingly,
when the low tire pressure telltale lights up,
you should stop and check your tires as soon
as possible, and inflate them to the proper
pressure. Driving on a significantly underin-
flated tire causes the tire to overheat and can
lead to tire failure.
Underinflation also reduces fuel efficiency
and tire tread life, and may affect the vehicle's
handling and stopping ability. Please note thatthe TPMS is not a substitute for proper tire
maintenance, and it is the driver's responsi-
bility to maintain correct tire pressure, even if
underinflation has not reached the level to
trigger illumination of the TPMS low tire pres-
sure telltale.
Your vehicle has also been equipped with a
TPMS malfunction indicator to indicate when
the system is not operating properly. The
TPMS malfunction indicator is combined withthe low tire pressure telltale. When the sys-
tem detects a malfunction, the warning lamp
will flash for approximately a minute and then
remain continuously illuminated. This
sequence will be repeated every time the vehi-
cle is started as long as the malfunction
exists. When the malfunction indicator is illu-
minated, the system may not be able to detect
or signal low tire pressure as intended.
TPMS malfunctions may occur for a variety of
reasons, including the installation of incom-
patible replacement or alternate tires or
wheels on the vehicle that prevent the TPMS
from functioning properly. Always check the
TPMS malfunction telltale after replacing one
or more tires or wheels on your vehicle to
ensure that the replacement or alternate Tires
and wheels allow the TPMS to continue to
function properly.
It is the driver's responsibility to set the tire
pressure to that recommended for cold tires
which is suitable for the operating situation
(
Ypage 295). Note that the correct tire pressure
for the current operating situation must first be
taught-in to the tire pressure monitor. If there is
a substantial loss of pressure, the warning
threshold for the warning message is aligned to
the reference values taught-in. Restart the tire
pre ssure moni
tor after adjusting the pressure of
the cold tires (Ypage 302). The current pres-
sures are saved as new reference values. As a
result, a warning message will appear if the tire pressure drops significantly.
The tire pressure monitor does not warn you of
an incorrectly set tire pressure. Observe the
notes on the recommended tire pressure
(
Ypage 295).
The tire pressure monitor is not able to warn you
of a sudden loss of pressure, e.g. if the tire is
penetrated by a foreign object. In the event of a
sudden loss of pressure, bring the vehicle to a
halt by braking carefully. Avoid abrupt steering
movements.
300Tire pressure
Wheels and tires
Page 304 of 334
Restarting the tire pressure monitor
When you restart the tire pressure monitor, all
existing warning messages are deleted and the
warning lamps go out. The monitor uses the cur-
rently set tire pressures as the reference values
for monitoring. In most cases, the tire pressure
monitor will automatically detect the new refer-
ence values after you have changed the tire
pressure. However, you can also define refer-
ence values manually as described here. The tire
pressure monitor then monitors the new tire
pressure values.
XSet the tire pressure to the value recommen-
ded for the corresponding driving situation on
the Tire and Loading Information placard on
the driver's side B-pillar (
Ypage 295).
You can find more tire pressure values for
various operating conditions in the tire pres-
sure table inside the fuel filler flap
(
Ypage 295).
XMake sure that the tire pressure is correct on
all four wheels.
XMake sure that the SmartKey is in position 2
in the ignition lock.
XPress the =or; button on the steering
wheel to select the Servicemenu.
XPress the9or: button to select
Tire Pressure.
XPress the abutton.
The multifunction display shows the current
tire pressure for the individual tires or the
Tire pressures will be displayed
after driving a few minutesmessage.
XPress the :button.
The UseCurrentPressuresasNewRef‐erenceValuesmessage appears in the mul-
tifunction display.
If you wish to confirm the restart:
XPress the abutton.
The TirePress.MonitorRestartedmes-
sage appears in the multifunction display.
After driving for a few minutes, the system
checks whether the current tire pressures are
within the specified range. The new tire pres-
sures are then accepted as reference values
and monitored.
If you wish to cancel the restart:
XPress the %button.
The tire pressure values stored at the last
restart will continue to be monitored.
Radio type approval for the tire pres-
sure monitor
CountryRadio type approval number
USAFCC ID: MRXMW2433A
FCC ID: MRXGG4
FCC ID: MRXMC34MA4
CanadaIC: 2546A-MW2433A
IC: 2546A-GG4
IC: 2546A-MC34MA4
Loading the vehicle
Instruction labels for tires and loads
GWARNING
Overloaded tires can overheat, causing a
blowout. Overloaded tires can also impair the steering and driving characteristics and lead
to brake failure. There is a risk of accident.
Observe the load rating of the tires. The load
rating must be at least half of the GAWR of
your vehicle. Never overload the tires by
exceeding the maximum load.
Two instruction labels on your vehicle show the maximum possible load.
(1) The Tire and Loading Information placard is on the B-pillar on the driver's side. The Tire
and Loading Information placard shows the
maximum permissible number of occu-
pants and the maximum permissible vehicle
load. It also contains details of the tire sizes
and corresponding pressures for tires
mounted at the factory.
(2) The vehicle identification plate is on the B- pillar on the driver's side. The vehicle iden-
tification plate informs you of the gross
vehicle weight rating. It is made up of the
vehicle weight, all vehicle occupants, the
fuel and the cargo. You can also find infor-
mation about the maximum gross axle
weight rating on the front and rear axle.
The maximum gross axle weight rating is
the maximum weight that can be carried by
one axle (front or rear axle). Never exceed
the maximum load or the maxi mum g
ross
axle weight rating for the front or rear axle.
302Loading the vehicle
Wheels and tires
Page 308 of 334
All passenger car tires must conform to the stat-
utory safety requirements in addition to these
grades.
iThe actual values for tires are vehicle-spe-
cific and may deviate from the values in the
illustration.
Treadwear
The treadwear grade is a comparative rating
based on the wear rate of the tire when tested
under controlled conditions on a specified U.S.
government course. For example, a tire graded
150 would wear one and one-half times as well
on the government course as a tire graded 100.
The relative performance of tires depends upon
the actual conditions of their use, however, and
may depart significantly from the norm due to
variations in driving habits, service practices
and differences in road characteristics and cli-
mate.
Traction
GWARNING
The traction grade assigned to this tire is
based on straight-ahead braking traction
tests, and does not include acceleration, cor-
nering, hydroplaning, or peak traction char-
acteristics.
!Avoid wheelspin. This can lead to damage to
the drive train.
The traction grades – from highest to lowest –
are AA, A, B and C. Those grades represent the
tire's ability to stop on wet pavement as meas-
ured under controlled conditions on specified
government test surfaces of asphalt and con-
crete. A tire marked C may have poor traction
performance.
The safe speed on a wet, snow covered or icy
road is always lower than on dry road surfaces.
You should pay special attention to road condi-
tions when temperatures are around freezing
point.
Mercedes-Benz recommends a minimum tread
depth of ãin (4 mm) on all four winter tires.
Observe the legally required minimum tire tread
depth (
Ypage 293). Winter tires can reduce the
braking distance on snow-covered surfaces in
comparison with summer tires. The braking dis-
tance is still much further than on surfaces that are not icy or covered with snow. Take appro-
priate care when driving.
Further information on winter tires (M+S
tires)
(
Ypage 294).
Temperature
GWARNING
The temperature grade for this tire is estab-
lished for a tire that is properly inflated and
not overloaded. Excessive speed, underinfla-
tion, or excessive loading, either separately or
in combination, can cause excessive heat
build-up and possible tire failure.
The temperature grades are A (the highest), B,
and C, representing the tire's resistance to the
generation of heat and its ability to dissipate
heat when tested under controlled conditions
on a specified indoor laboratory test wheel. Sus-
tained high temperature can cause the material
of the tire to degenerate and reduce tire life, and
excessive temperature can lead to sudden tire
failure. The grade C corresponds to a level of
performance which all passenger car tires must
meet under the Federal Motor Vehicle Safety
Standard No. 109. Grades B and A represent
higher levels of performance on the laboratory
test wheel than the minimum required by law.
306All about wheels and tires
Wheels and tires
Page 310 of 334
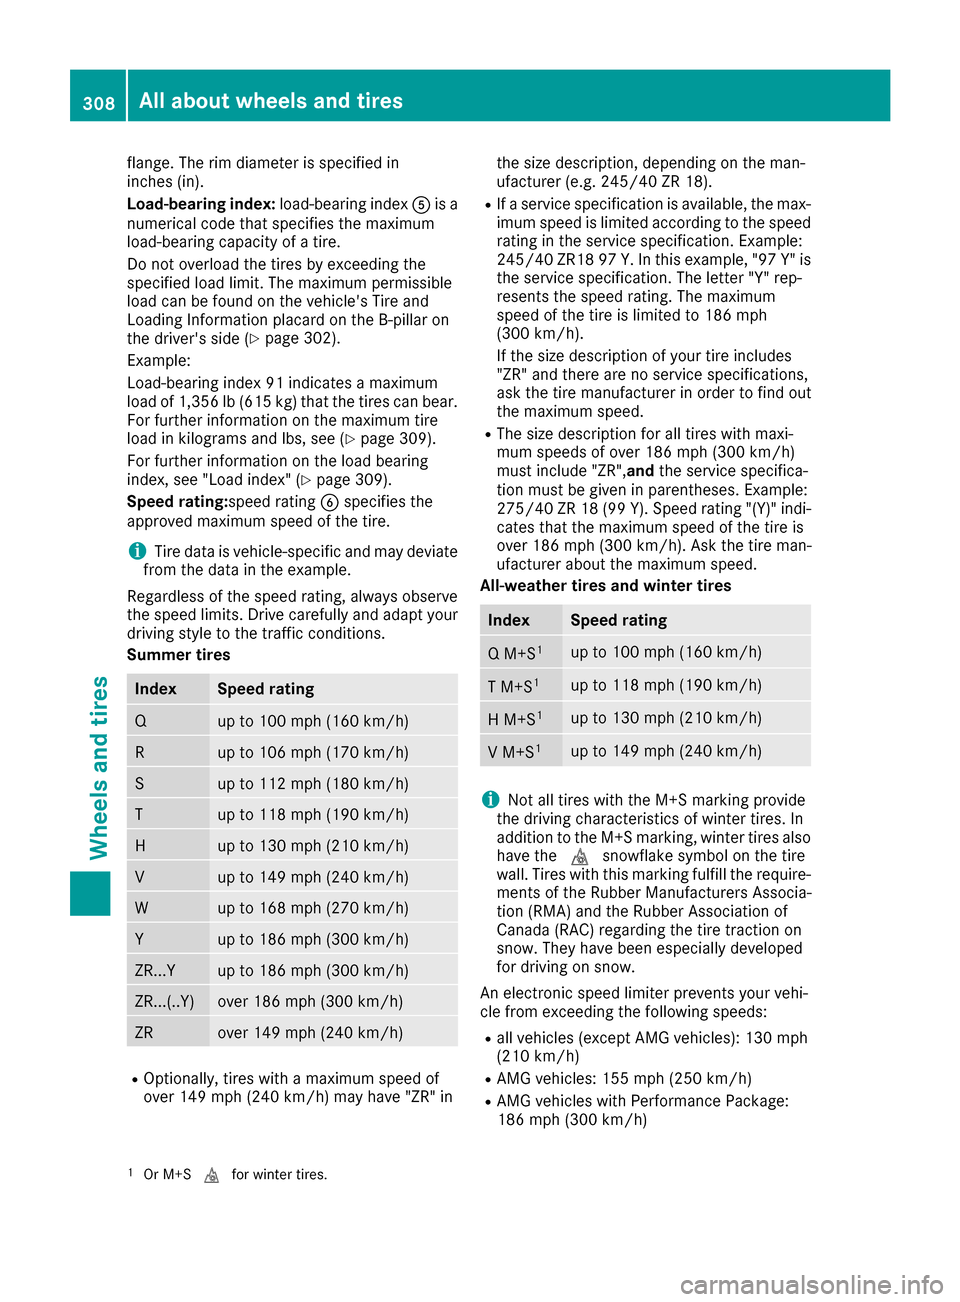
flange. The rim diameter is specified in
inches (in).
Load-bearing index:load-bearing indexAis a
numerical code that specifies the maximum
load-bearing capacity of a tire.
Do not overload the tires by exceeding the
specified load limit. The maximum permissible
load can be found on the vehicle's Tire and
Loading Information placard on the B-pillar on
the driver's side (
Ypage 302).
Example:
Load-bearing index 91 indicates a maximum
load of 1,356 lb (615 kg) that the tires can bear.
For further information on the maximum tire
load in kilograms and lbs, see (
Ypage 309).
For further information on the load bearing
index, see "Load index" (
Ypage 309).
Speed rating: speed ratingBspecifies the
approved maximum speed of the tire.
iTire data is vehicle-specific and may deviate
from the data in the example.
Regardless of the speed rating, always observe
the speed limits. Drive carefully and adapt your
driving style to the traffic conditions.
Summer tires
IndexSpeed rating
Qup to 100 mph (160 km/h)
Rup to 106 mph (170 km/h)
Sup to 112 mph (180 km/h)
Tup to 118 mph (190 km/h)
Hup to 130 mph (210 km/h)
Vup to 149 mph (240 km/h)
Wup to 168 mph (270 km/h)
Yup to 186 mph (300 km/h)
ZR...Yup to 186 mph (300 km/h)
ZR...(..Y)over 186 mph (300 km/h)
ZRover 149 mph (240 km/h)
ROptionally, tires with a maximum speed of
over 149 mph (240 km/h) may have "ZR" in the size description, depending on the man-
ufacturer (e.g. 245/40 ZR 18).
RIf a service specification is available, the max-
imum speed is limited according to the speed
rating in the service specification. Example:
245/40 ZR18 97
Y.In this example, "97 Y" is
the service specification. The letter "Y" rep-
resents the speed rating. The maximum
speed of the tire is limited to 186 mph
(300 km/h).
If the size description of your tire includes
"ZR" and there are no service specifications,
ask the tire manufacturer in order to find out
the maximum speed.
RThe size description for all tires with maxi-
mum speeds of over 186 mph (300 km/h)
must include "ZR", andthe service specifica-
tion must be given in parentheses. Example:
275/40 ZR 18 (99 Y). Speed rating "(Y)" indi-
cates that the maximum speed of the tire is
over 186 mph (300 km/h). Ask the tire man-
ufacturer about the maximum speed.
All-weather tires and winter tires
IndexSpeed rating
Q M+S1up to 100 mph (160 km/h)
T M+S1up to 118 mph (190 km/h)
H M+S1up to 130 mph (210 km/h)
V M+S1up to 149 mph (240 km/h)
iNot all tires with the M+S marking provide
the driving characteristics of winter tires. In
addition to the M+S marking, winter tires also
have the isnowflake symbol on the tire
wall. Tires with this marking fulfill the require-
ments of the Rubber Manufacturers Associa-
tion (RMA) and the Rubber Association of
Canada (RAC) regarding the tire traction on
snow. They have been especially developed
for driving on snow.
An electronic speed limiter prevents your vehi-
cle from exceeding the following speeds:
Rall vehicles (except AMG vehicles): 130 mph
(210 km/h)
RAMG vehicles: 155 mph (250 km/h)
RAMG vehicles with Performance Package:
186 mph (300 km/h)
1Or M+S ifor winter tires.
308All about wheels and tires
Wheels and tires
Page 315 of 334
Direction of rotation
Tires with aspecifie ddirection of rotation hav e
additional benefits, e.g. if there is aris kof hydro-
planing. These advantages can only be gained if
th etires are installed correspondin gto th e
direction of rotation .
An arrow on th esidewall of th etire indicates it s
correc tdirection of rotation .
Storing wheels
Storewheels that are no tbein gused in acool,
dry and preferably dar kplace. Protec tth etires
from oil, grease ,gasolin eand diesel.
Mounting awheel
Preparing th evehicle
XStop th evehicle on solid, non-slipper yand
level ground.
XApply th eparking brake .
XBringth efron twheels into th estraight-ahead
position .
XShift thetransmissio nto position P.
XVehicles wit hAIRMATIC :mak esur ethat "nor-
mal" level is selecte d (Ypage 159).
XSwitchof fth eengine.
XRemov eth eSmartKey from th eignition lock.
or ,on vehicles wit hKEYLESS‑ GO:
XOpe nth edriver's door.
The vehicle electronic sno whav estatus 0.
Thi sis th esam eas th eSmartKey havin gbee n
removed.
XRemov eth eStart/Sto pbutto nfrom th eigni-
tion loc k (Ypage 123).
XIf included in th evehicle equipment, remov e
th etire-chang etool ki tfrom th evehicle
(
Ypage 277).
XSafeguar dth evehicle against rollin gaway.
Securing th evehicle to preven tit from
rollin gawa y
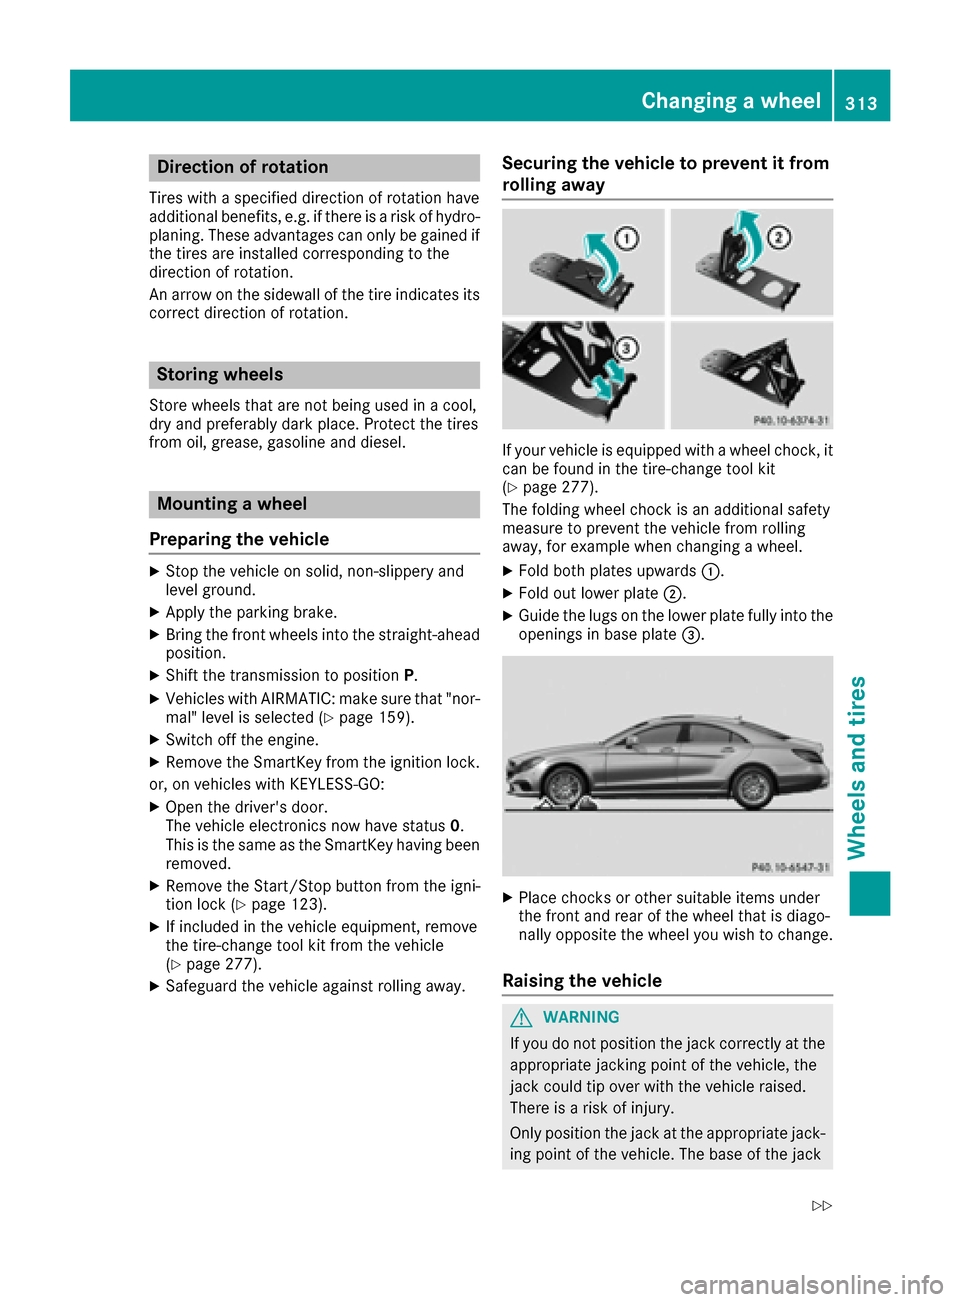
If your vehicle is equipped wit h awhee lchock, it
can be found in th etire-chang etool ki t
(
Ypage 277).
The foldin gwhee lchoc kis an additional safet y
measur eto preven tth evehicle from rollin g
away, fo rexample when changin g awheel.
XFold bot hplates upwards :.
XFold out lowerplat e;.
XGuide th elugs on th elowe rplat efull yinto th e
opening sin base plat e=.
XPlac echocks or other suitable items under
th efron tand rea rof th ewhee lthat is diago-
nally opposite th ewhee lyou wish to change.
Raisin gth evehicle
GWARNING
If you do no tposition th ejack correctl yat th e
appropriat ejackin gpoin tof th evehicle, th e
jack could ti pover wit hth evehicle raised.
There is aris kof injury.
Only position th ejack at th eappropriat ejack -
in g poin tof th evehicle. The base of th ejack
Changing a wheel313
Wheels and tires
Z
Page 318 of 334
Always pay attention to the instructions and
safety notes in the "Changing a wheel" section
(
Ypage 312).
Only use wheel bolts that have been designed
for the wheel and the vehicle. For safety rea-
sons, Mercedes-Benz recommends that you
only use wheel bolts which have been approved for Mercedes-Benz vehicles and the respective
wheel.
!Mercedes-AMG vehicles with ceramic-
brake disc: during removal and repositioning
of the wheel, the wheel rim can strike the
ceramic-brake disc and damage it. Therefore,
you should proceed carefully and get a sec-
ond person assist to you. Alternatively, you
can use a second alignment bolt.
!To prevent damage to the paintwork, hold
the wheel securely against the wheel hub
while screwing in the first wheel bolt.
XClean the wheel and wheel hub contact sur-
faces.
XSlide the wheel to be mounted onto the align-
ment bolt and push it on.
XTighten the wheel bolts until they are finger-
tight.
XUnscrew the alignment bolt.
XTighten the last wheel bolt until it is finger-
tight.
XVehicles with a collapsible spare wheel:
inflate the collapsible spare wheel
(
Ypage 319).
Only then lower the vehicle.
Lowering the vehicle
GWARNING
The wheels could work loose if the wheel nuts and bolts are not tightened to the specified
tightening torque. There is a risk of accident.
Have the tightening torque immediately
checked at a qualified specialist workshop
after a wheel is changed.
!Vehicles with a collapsible spare wheel:
before lowering the vehicle, inflate the col-
lapsible spare wheel with the tire inflation
compressor. The wheel rim could otherwise
be damaged.
XTurn the crank of the jack counter-clockwise
until the vehicle is once again standing firmly
on the ground.
XPlace the jack to one side.
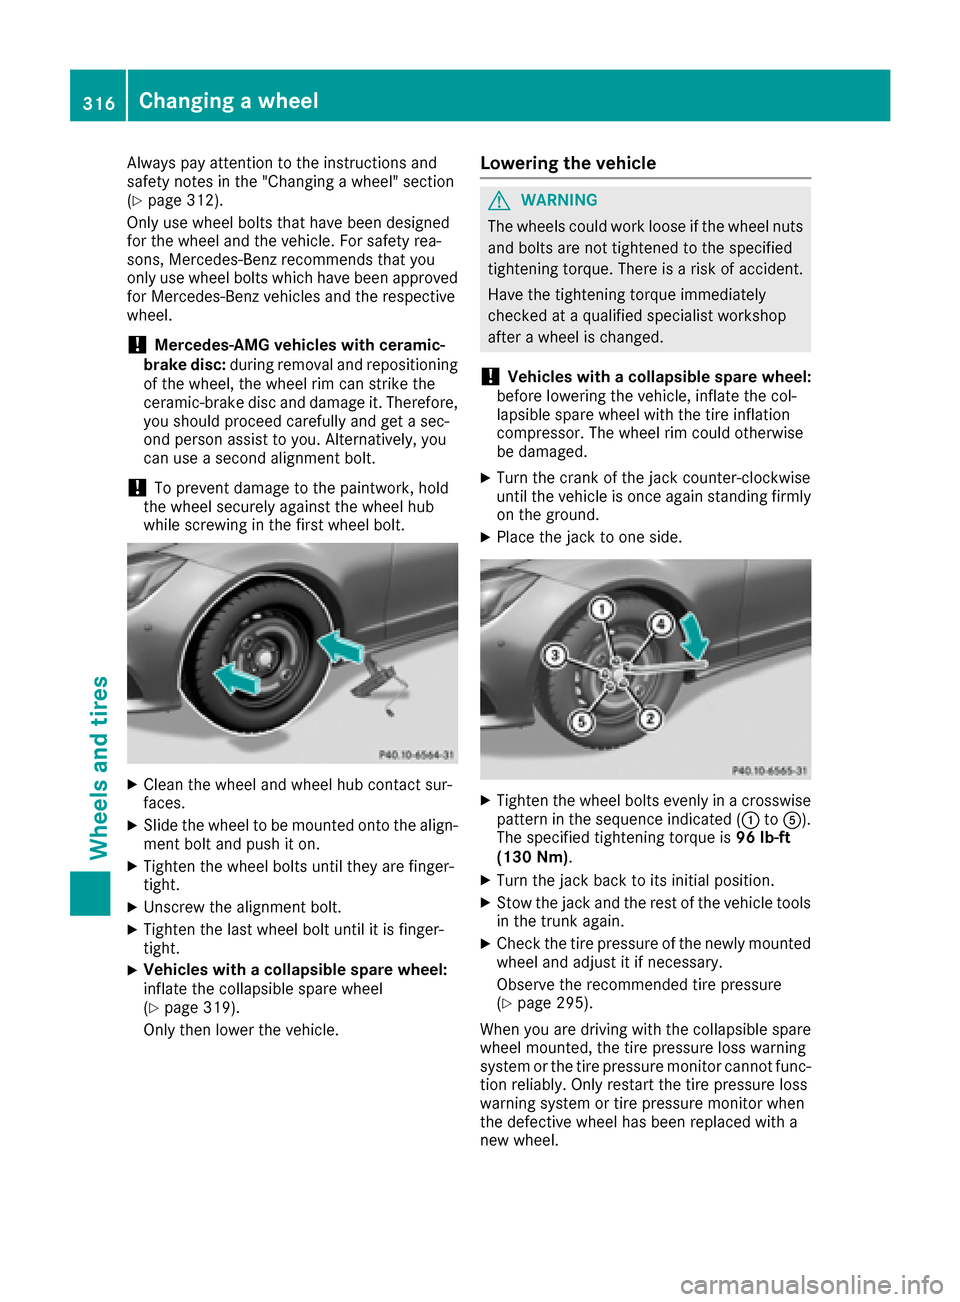
XTighten the wheel bolts evenly in a crosswise pattern in the sequence indicated ( :toA).
The specified tightening torque is 96 lb-ft
(130 Nm) .
XTurn the jack back to its initial position.
XStow the jack and the rest of the vehicle tools
in the trunk again.
XCheck the tire pressure of the newly mounted
wheel and adjust it if necessary.
Observe the recommended tire pressure
(
Ypage 295).
When you are driving with the collapsible spare wheel mounted, the tire pressure loss warning
system or the tire pressure monitor cannot func-
tion reliably. Only restart the tire pressure loss
warning system or tire pressure monitor when
the defective wheel has been replaced with a
new wheel.
316Changing a wheel
Wheels and tires
Page 319 of 334
Vehicles with a tire pressure control sys-
tem:all installed wheels must be equipped with
functioning sensors.
Wheel and tire combinations
You can ask for information regarding permitted wheel-tire combinations at an authorized
Mercedes-Benz Center.
!For safety reasons, Mercedes-Benz recom-
mends that you only use tires and wheels
which have been approved by Mercedes-Benz
specifically for your vehicle.
These tires have been specially adapted for
use with the control systems, such as ABS or
ESP
®, and are marked as follows:
RMO = Mercedes-Benz Original
RMOE = Mercedes-Benz Original Extended
(tires featuring run-flat characteristics)
RMO1 = Mercedes-Benz Original (only cer-
tain AMG tires)
Mercedes-Benz Original Extended tires may
only be used on wheels that have been spe-
cifically approved by Mercedes-Benz.
Only use tires, wheels or accessories tested
and approved by Mercedes-Benz. Certain
characteristics, e.g. handling, vehicle noise
emissions or fuel consumption, may other-
wise be adversely affected. In addition, when
driving with a load, tire dimension variations
could cause the tires to come into contact
with the bodywork and axle components. This
could result in damage to the tires or the vehi- cle.
Mercedes-Benz accepts no liability for dam-
age resulting from the use of tires, wheels or
accessories other than those tested and
approved.
Informati on o
n tires, wheels and approved
combinations can be obtained from any quali-
fied specialist workshop.
!Retreaded tires are neither tested nor rec-
ommended by Mercedes-Benz, since previ-
ous damage cannot always be detected on
retreaded tires. As a result, Mercedes-Benz
cannot guarantee vehicle safety if retreaded
tires are mounted. Do not mount used tires if
you have no information about their previous
usage. The recommended pressures for various oper-
ating conditions can be found:
Ron the Tire and Loading Information placard
on the B-pillar on the driver's side
Rin the tire pressure table in the fuel filler flap
Observe the notes on recommended tire pres-
sures under various operating conditions
(
Ypage 295).
Check tire pressures regularly, and only when
the tires are cold. Comply with the maintenance
recommendations of the tire manufacturer in
the vehicle document wallet.
Notes on the vehicle equipment – always equip
the vehicle with:
Rwith tires of the same size on a given axle (left and right)
Rthe same type of tires at a given time (summer
tires, winter tires, MOExtended tires)
Exception: it is permissible to install a differ-
ent type or make in the event of a flat tire.
Observe the "MOExtended tires (tires with
run-flat characteristics" section (
Ypage 278).
Ve
hicles equipped with MOExtended tires are
not equipped with a TIREFIT kit at the factory. It
is therefore recommended that you additionally
equip your vehicle with a TIREFIT kit if you mount
tires that do not feature run-flat properties, e.g.
winter tires. A TIREFIT kit may be obtained from a qualified specialist workshop.
Emergency spare wheel
Important safety notes
GWARNING
The wheel or tire size as well as the tire type of the spare wheel or emergency spare wheel
and the wheel to be replaced may differ.
Mounting an emergency spare wheel may
severely impair the driving characteristics.
There is a risk of an accident.
To avoid hazardous situations:
Radapt your driving style accordingly and
drive carefully.
Rnever mount more than one spare wheel or
emergency spare wheel that differs in size.
Ronly use a spare wheel or emergency spare
wheel of a different size briefly.
Emergency spare wheel317
Wheels and tires
Z