MERCEDES-BENZ CLS SHOOTING BRAKE 2012 Owners Manual
Manufacturer: MERCEDES-BENZ, Model Year: 2012, Model line: CLS SHOOTING BRAKE, Model: MERCEDES-BENZ CLS SHOOTING BRAKE 2012Pages: 405, PDF Size: 10.21 MB
Page 121 of 405
X
To switch on the main-beam head-
lamps: turn the key in the ignition lock to
position 2or start the engine.
X Turn the light switch to LorÃ.
X Press the combinatio nswitc hbeyond the
pressure point in the direction of
arrow :.
In the Ãposition, the main-beam head-
lamps are only switched on when it is dark
and the engine is running.
The blue Kindicator lamp in the instru-
ment cluster lights up when the main-beam
headlamps are switched on.
X To switch off the main-beam head-
lamps: move the combination switch back
to its normal position.
The blue Kindicator lamp in the instru-
ment cluster goes out.
i Vehicles with Adaptive Highbeam Assist:
when Adaptive Highbeam Assist is active,
it controls activation of the main-beam
headlamps (Y page 120).
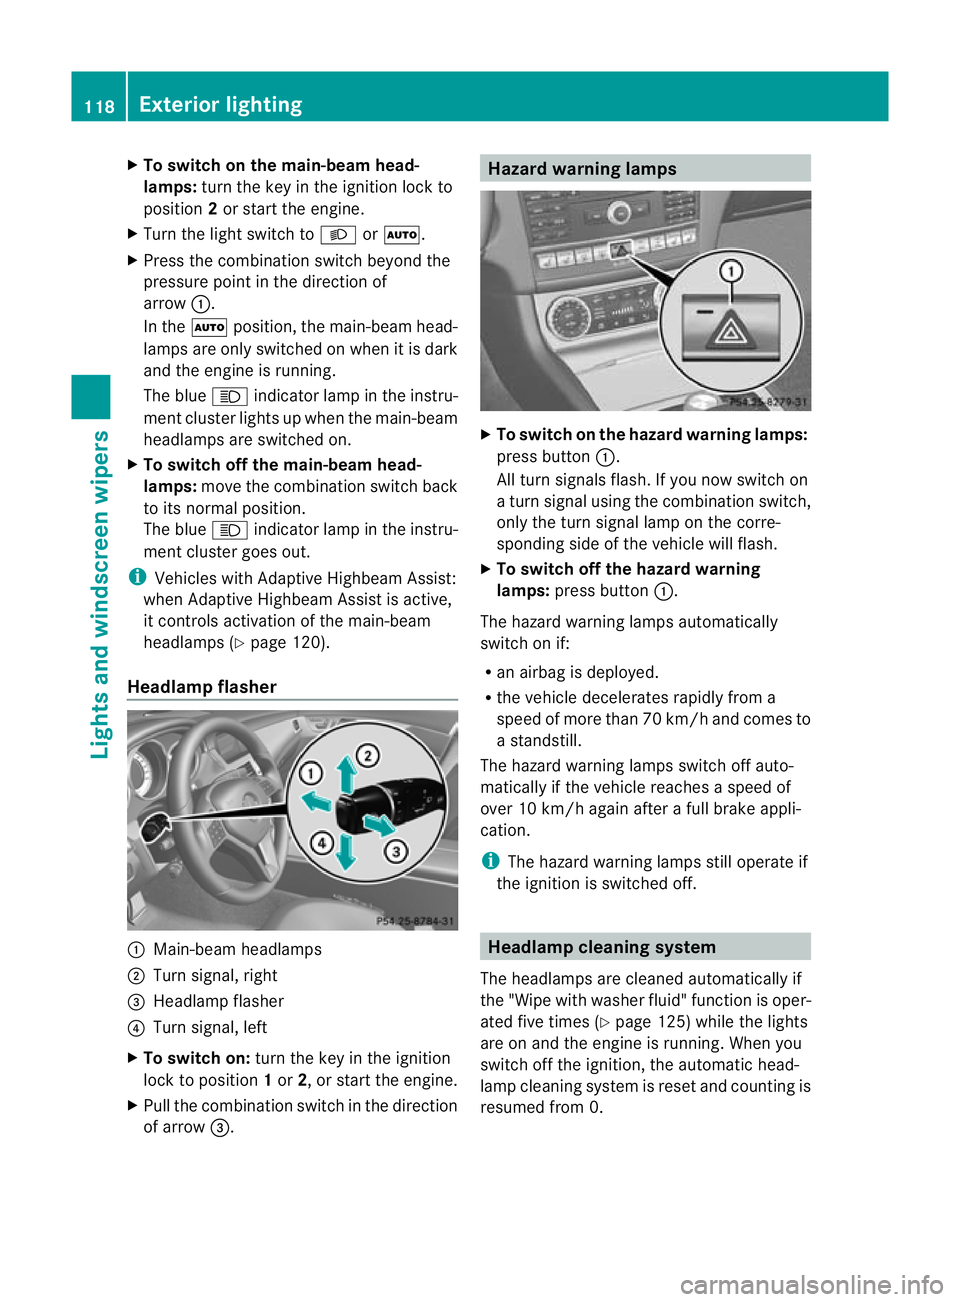
Headlamp flasher :
Main-beam headlamps
; Turn signal, right
= Headlamp flasher
? Turn signal, left
X To switch on: turn the key in the ignition
lock to position 1or 2, or start the engine.
X Pull the combination switch in the direction
of arrow =. Hazard warning lamps
X
To switch on the hazard warning lamps:
press button :.
All turn signals flash. If you now switch on
a turn signal using the combination switch,
only the turn signal lamp on the corre-
sponding side of the vehicle will flash.
X To switch off the hazard warning
lamps: press button :.
The hazard warning lamps automatically
switch on if:
R an airbag is deployed.
R the vehicle decelerates rapidly from a
speed of more than 70 km/ha nd comes to
a standstill.
The hazard warning lamps switch off auto-
matically if the vehicle reaches a speed of
over 10 km/h again after a full brake appli-
cation.
i The hazard warning lamps still operate if
the ignition is switched off. Headlamp cleaning system
The headlamps are cleaned automatically if
the "Wipe with washe rfluid" function is oper-
ated five times (Y page 125) while the lights
are on and the engine is running. When you
switch off the ignition, the automatic head-
lamp cleaning system is reset and counting is
resumed from 0. 118
Exterior lightingLights and windscreen wipers
Page 122 of 405
Intelligen
tLight System
General notes The Intelligent Light System is a syste
mthat
adjusts the headlamps automatically to suit
the prevailing driving and weather conditions.
It offers advanced functions for improved illu-
mination of the road surface, e.g. depending
on the vehicle speed or weather conditions.
The system includes the active light function,
cornering light function, motorway mode and
extended range foglamps. The system is only
active when it is dark.
You can activate or deactivate the "Intelligent
Light System" using the on-board computer
(Y page 240).
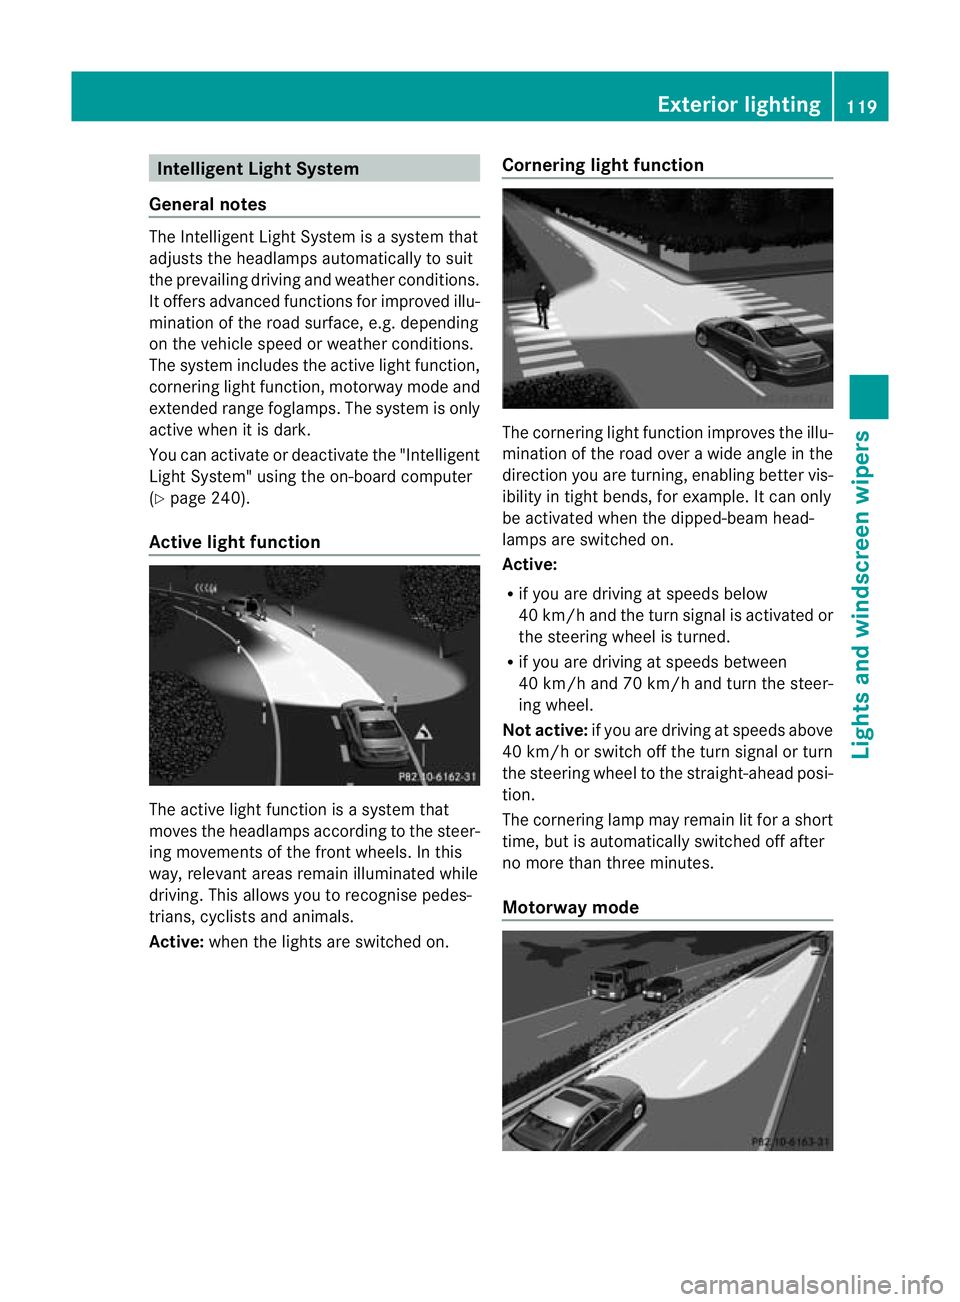
Active light function The active light function is a system that
moves the headlamps according to the steer-
ing movements of the front wheels. In this
way, relevant areas remain illuminated while
driving. This allows you to recognise pedes-
trians, cyclists and animals.
Active: when the lights are switched on. Cornering light function The cornering light function improves the illu-
mination of the road over a wide angle in the
direction you are turning, enabling better vis-
ibility in tight bends, for example. It can only
be activated when the dipped-beamh
ead-
lamps are switched on.
Active:
R if you are driving at speeds below
40 km/ha nd the turnsignal is activated or
the steering wheel is turned.
R if you are driving at speeds between
40 km/h and 70 km/h and turn the steer-
ing wheel.
Not active: if you are driving at speeds above
40 km/h or switch off the turn signal or turn
the steering wheel to the straight-ahead posi-
tion.
The cornering lamp may remain lit for a short
time, but is automatically switched off after
no more than three minutes.
Motorway mode Exterior lighting
119Lights and windscreen wipers Z
Page 123 of 405
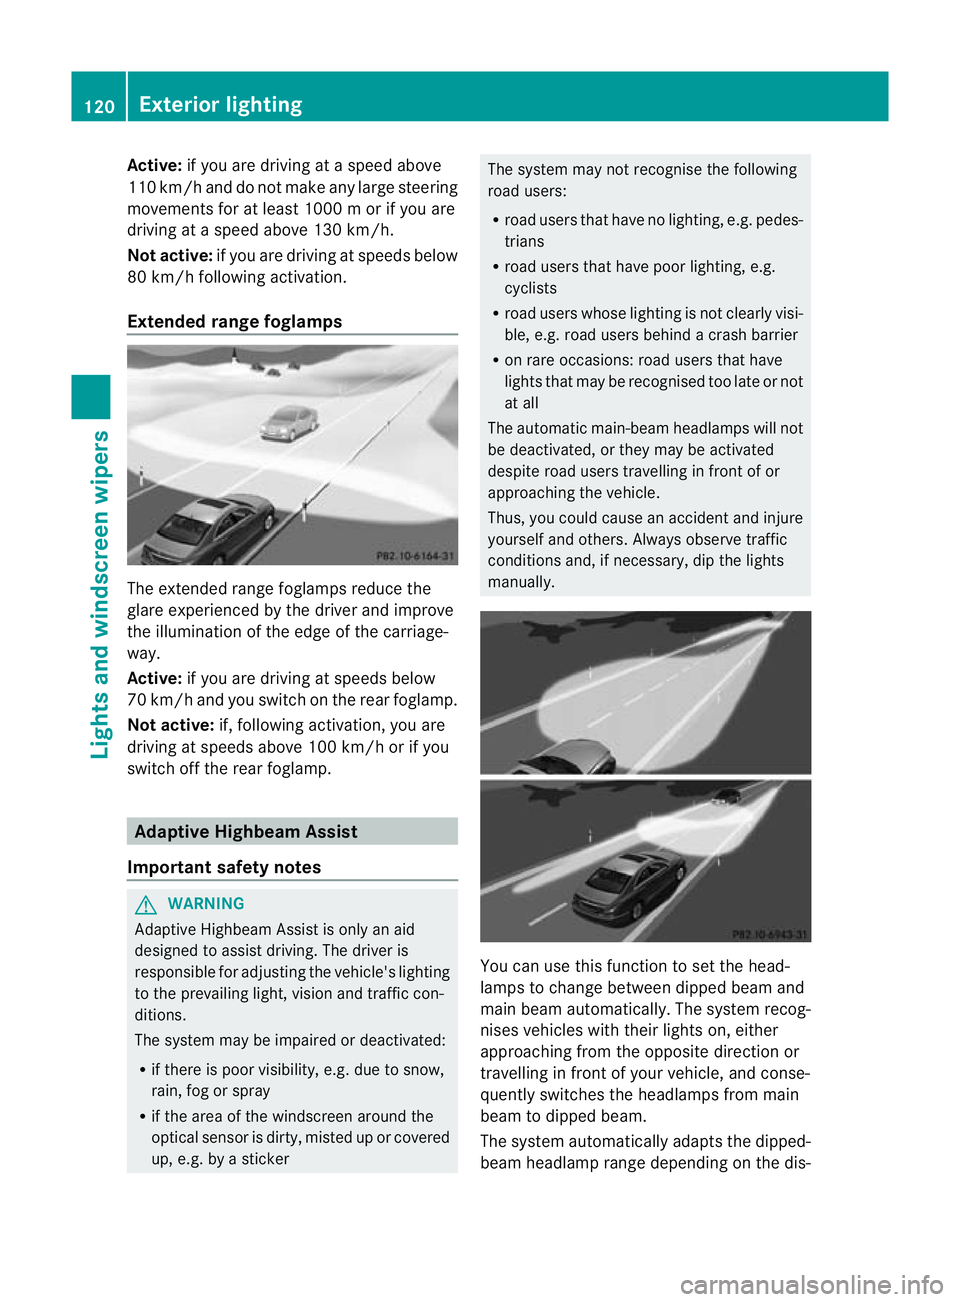
Active:
if you are driving at aspeed above
110 km/ hand do not make any large steering
movements for at least 1000 m or if you are
driving at a spee dabove 130 km/h.
Not active: if you are driving at speeds below
80 km/h following activation.
Extended range foglamps The extended range foglamps reduce the
glare experienced by the driver and improve
the illumination of the edge of the carriage-
way.
Active:
if you are driving at speeds below
70 km/ hand you switch on the rea rfoglamp.
Not active: if, following activation, you are
driving at speeds above 100 km/h or if you
switch off the rear foglamp. Adaptive Highbeam Assist
Important safety notes G
WARNING
Adaptive Highbeam Assist is only an aid
designed to assist driving. The driver is
responsible for adjusting the vehicle's lighting
to the prevailing light, vision and traffic con-
ditions.
The system may be impaired or deactivated:
R if there is poor visibility, e.g. due to snow,
rain, fog or spray
R if the area of the windscreen around the
optical sensor is dirty, misted up or covered
up, e.g. by a sticker The system may not recognise the following
road users:
R road users that have no lighting, e.g. pedes-
trians
R road users that have poor lighting, e.g.
cyclists
R road users whose lighting is not clearly visi-
ble, e.g. road users behind a crash barrier
R on rare occasions: road users that have
lights that may be recognised too late or not
at all
The automatic main-beam headlamps will not
be deactivated, or they may be activated
despite road users travelling in front of or
approaching the vehicle.
Thus, you could cause an accident and injure
yourself and others. Always observe traffic
conditions and, if necessary, dip the lights
manually. You can use this function to set the head-
lamps to change between dipped beam and
main beam automatically. The system recog-
nises vehicles with their lights on, either
approaching from the opposite direction or
travelling in front of your vehicle, and conse-
quently switches the headlamps from main
beam to dipped beam.
The system automatically adapts the dipped-
beam headlamp range depending on the dis-120
Exterior lightingLights and windscreen wipers
Page 124 of 405
tance to the other vehicle. Once the system
no longe rdetects any other vehicles, it reac-
tivates the main-beam headlamps.
The system's optical sensor is located behind
the windscreen near the overhead control
panel.
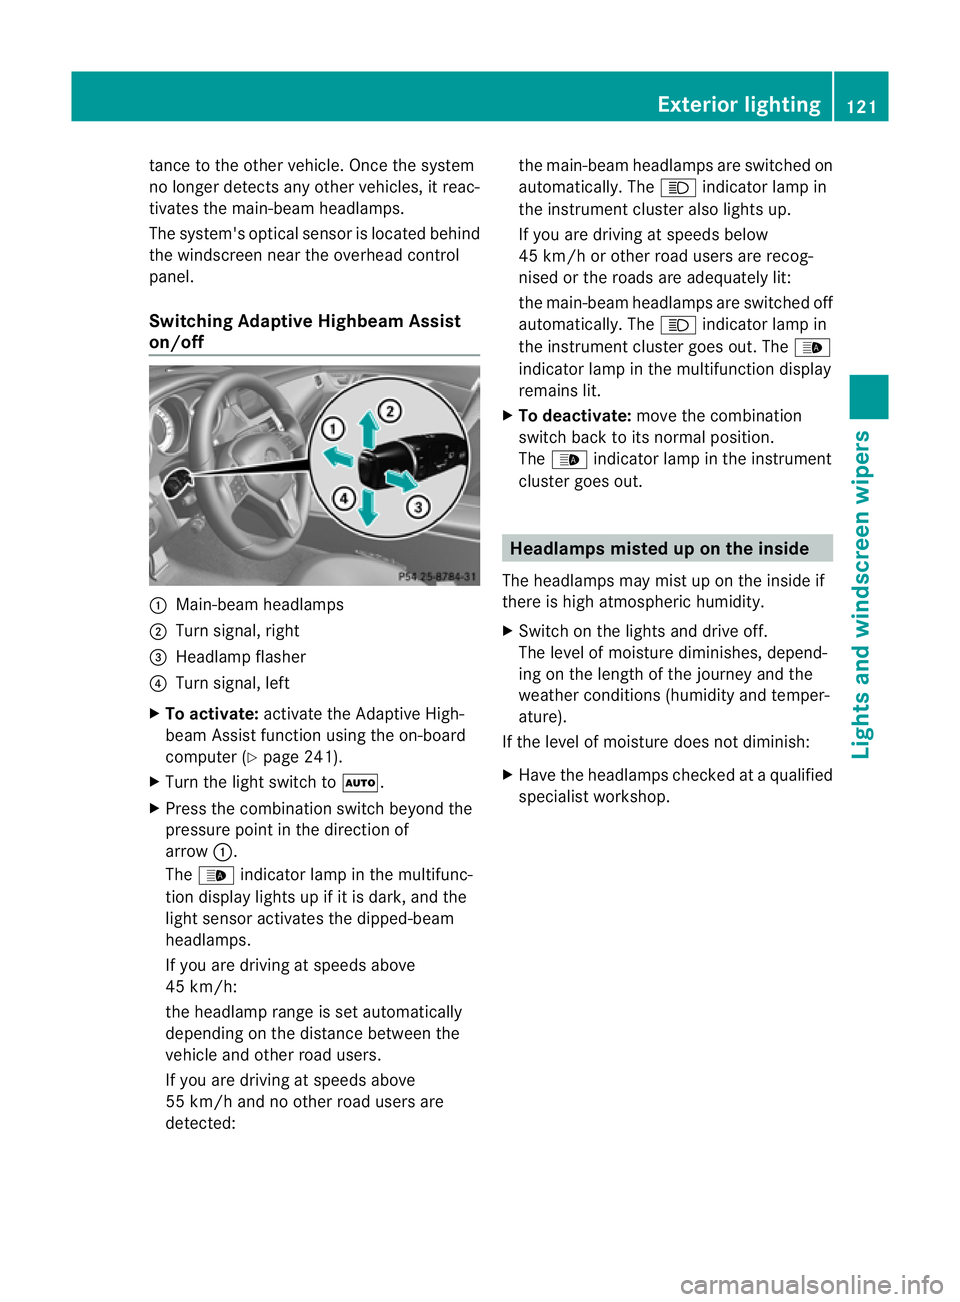
Switching Adaptive Highbeam Assist
on/off :
Main-beam headlamps
; Turn signal, right
= Headlamp flasher
? Turn signal, left
X To activate: activate the Adaptive High-
beam Assist function using the on-board
computer (Y page 241).
X Turn the light switch to Ã.
X Press the combination switch beyond the
pressure point in the direction of
arrow :.
The _ indicator lamp in the multifunc-
tion display lights up if it is dark, and the
light sensor activates the dipped-beam
headlamps.
If you are driving at speeds above
45 km/h:
the headlamp range is set automatically
depending on the distance between the
vehicle and other road users.
If you are driving at speeds above
55 km/h and no other road users are
detected: the main-beam headlamps are switched on
automatically. The
Kindicator lamp in
the instrument cluster also lights up.
If you are driving at speeds below
45 km/h or other road users are recog-
nised or the roads are adequately lit:
the main-beam headlamps are switched off
automatically. The Kindicator lamp in
the instrument cluster goes out. The _
indicator lamp in the multifunction display
remains lit.
X To deactivate: move the combination
switch back to its normal position.
The _ indicator lamp in the instrument
cluster goes out. Headlamps misted up on the inside
The headlamps may mist up on the inside if
there is high atmospheric humidity.
X Switch on the lights and drive off.
The level of moisture diminishes, depend-
ing on the length of the journey and the
weather conditions (humidity and temper-
ature).
If the level of moisture does not diminish:
X Have the headlamps checked at a qualified
specialist workshop. Exterior lighting
121Lights and windscreen wipers Z
Page 125 of 405
Interior lighting
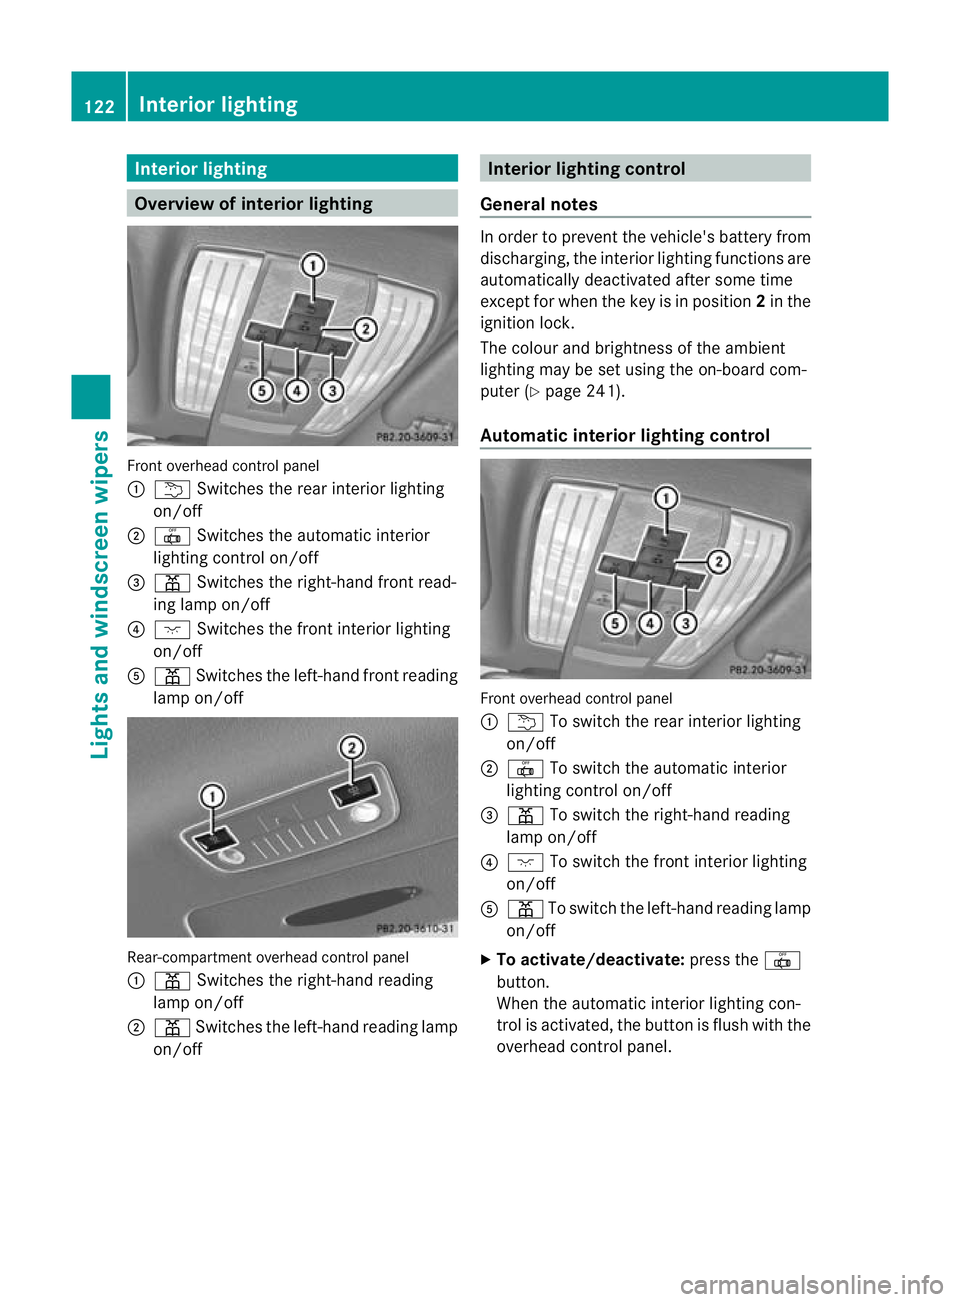
Overview of interior lighting
Front overhead control panel
:
u Switches the rear interio rlighting
on/off
; | Switches the automatic interior
lighting control on/off
= p Switches the right-hand front read-
ing lamp on/off
? c Switches the front interior lighting
on/off
A p Switches the left-hand front reading
lamp on/off Rear-compartment overhead control panel
: p Switches the right-hand reading
lamp on/off
; p Switches the left-hand reading lamp
on/off Interior lighting control
General notes In order to prevent the vehicle's battery from
discharging, the interior lighting functions are
automatically deactivated after some time
except for when the key is in position 2in the
ignition lock.
The colour and brightness of the ambient
lighting may be set using the on-board com-
puter (Y page 241).
Automatic interior lighting control Front overhead control panel
:
u To switch the rear interior lighting
on/off
; | To switch the automatic interior
lighting control on/off
= p To switch the right-han dreading
lamp on/off
? c To switch the front interior lighting
on/off
A p To switch the left-hand reading lamp
on/off
X To activate/deactivate: press the|
button.
When the automatic interior lighting con-
trol is activated, the button is flush with the
overhead control panel. 122
Interior lightingLights and windscreen wipers
Page 126 of 405
The interior lighting automatically switches
on if you:
R unlock the vehicle
R open a door
R remove the key from the ignition lock
The interior lighting is activated for a short
time when the key is removed from the igni-
tion lock. You can activate this delayed
switch-off using the on-board computer
(Y page 242).
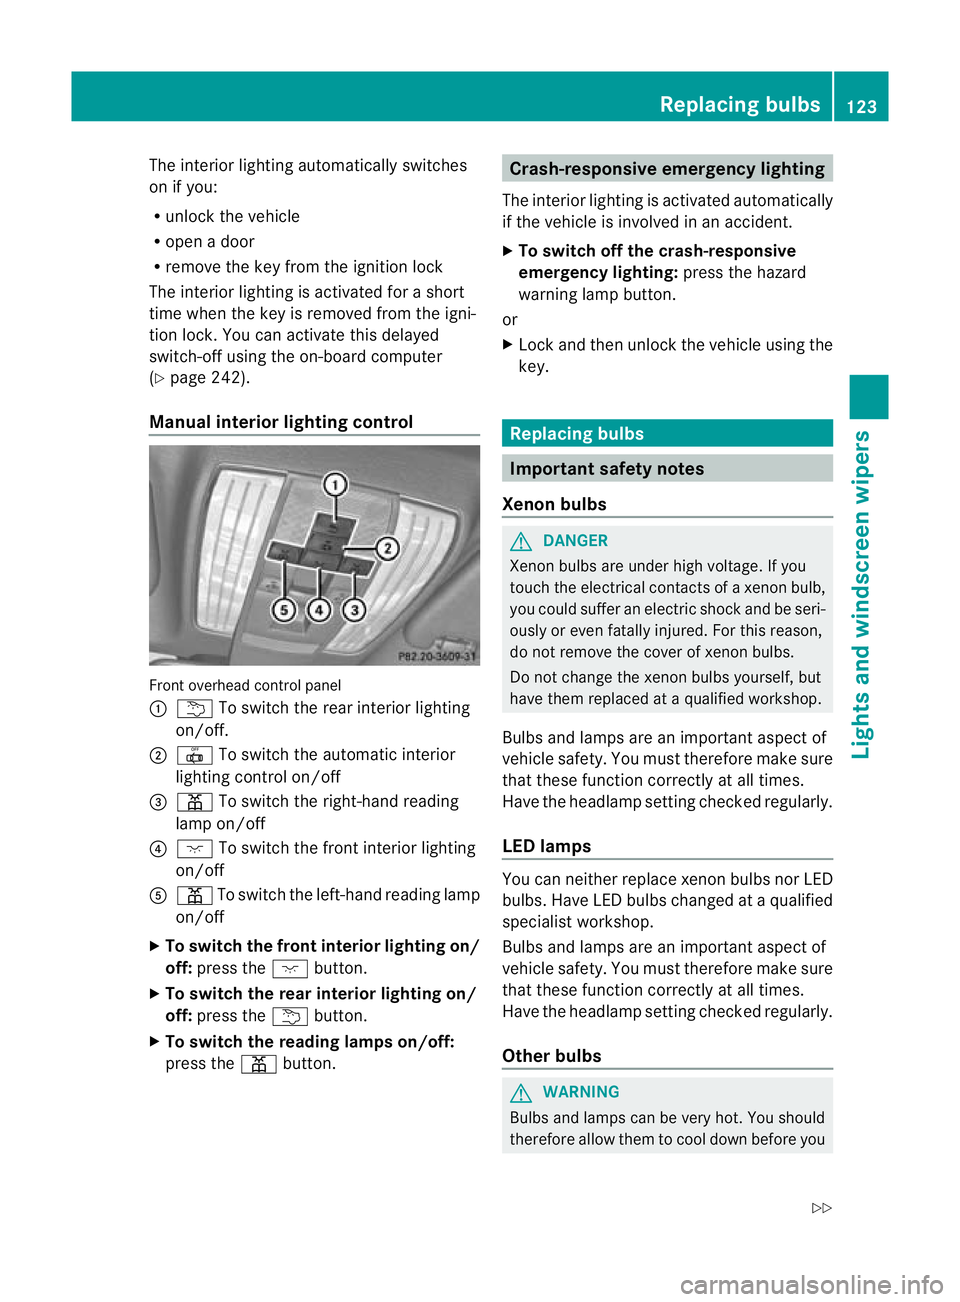
Manual interior lighting control Front overhead control panel
:
u To switch the rear interior lighting
on/off.
; | To switch the automatic interior
lighting control on/off
= p To switch the right-hand reading
lamp on/off
? c To switch the front interior lighting
on/off
A p To switch the left-hand reading lamp
on/off
X To switch the front interior lighting on/
off: press the cbutton.
X To switch the rear interior lighting on/
off: press the ubutton.
X To switch the reading lamps on/off:
press the pbutton. Crash-responsive emergency lighting
The interior lighting is activated automatically
if the vehicle is involved in an accident.
X To switch off the crash-responsive
emergency lighting: press the hazard
warning lamp button.
or
X Lock and then unlock the vehicle using the
key. Replacing bulbs
Important safety notes
Xenon bulbs G
DANGER
Xenon bulbs are under high voltage. If you
touch the electrical contacts of a xenon bulb,
you could suffer an electric shock and be seri-
ously or even fatally injured. For this reason,
do not remove the cover of xenon bulbs.
Do not change the xenon bulbs yourself, but
have them replaced at a qualified workshop.
Bulbs and lamps are an importan taspect of
vehicle safety. You must therefore make sure
that these function correctly at all times.
Have the headlamp setting checked regularly.
LED lamps You can neither replace xenon bulbs nor LED
bulbs. Have LED bulbs changed at a qualified
specialist workshop.
Bulbs and lamps are an important aspect of
vehicle safety. You must therefore make sure
that these function correctly at all times.
Have the headlamp setting checked regularly.
Other bulbs
G
WARNING
Bulbs and lamps can be very hot. You should
therefore allow them to cool down before you Replacing bulbs
123Lights and windscreen wipers
Z
Page 127 of 405
change them. Otherwise, you could be burned
if you touch them.
Keep bulbs ou
tofthe reach of children. Oth-
erwise, they could damage the bulbs, for
example, and injure themselves.
Never use a bulb which has been dropped.
Such a bulb may break or even explode and
injure you.
Halogen bulbs are pressurised and can
explode when you change them, particularly
if they are very hot. You should therefore wear
eye protection and gloves when you are
changing them.
There are bulbs other than xenon and LED
bulbs that you cannot replace. Replace only
the bulbs listed (Y page 124). Have the bulbs
that you cannot replace yourself changed at
a qualified specialist workshop.
If you require assistance changing bulbs, con-
sult a qualified specialist workshop.
Do not touch the glass tube of new bulbs with
your bare hands. Even minor contamination
can burn into the glass surface and reduce
the service life of the bulbs. Always use a lint-
free cloth or only touch the base of the bulb
when fitting.
Only use bulbs of the correct type.
If the new bulb still does not light up, consult
a qualified specialist workshop.
Bulbs and lamps are an important aspect of
vehicle safety. You must therefore make sure
that these function correctly at all times.
Have the headlamp setting checked regularly. Overview of bulb replacement
–bulbs
You can replace the following bulbs. The
details for the bulb type can be found in the
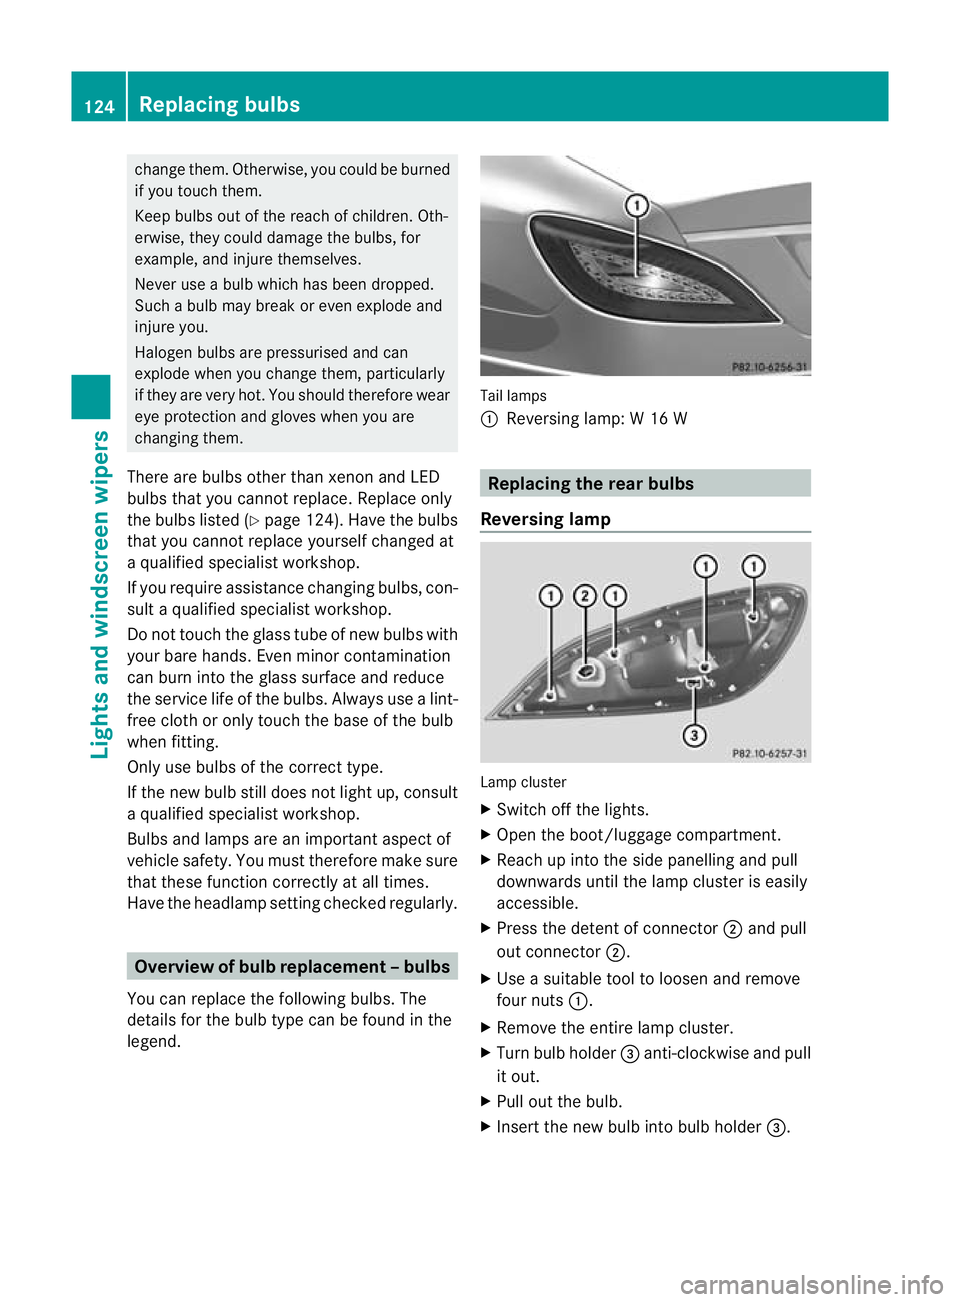
legend. Tail lamps
:
Reversing lamp: W 16 W Replacing the rear bulbs
Reversing lamp Lamp cluster
X
Switch off the lights.
X Open the boot/luggage compartment.
X Reach up into the side panelling and pull
downwards until the lamp cluster is easily
accessible.
X Press the detent of connector ;and pull
out connector ;.
X Use a suitable tool to loosen and remove
four nuts :.
X Remove the entire lamp cluster.
X Turn bulb holder =anti-clockwise and pull
it out.
X Pull out the bulb.
X Insert the new bulb into bulb holder =.124
Replacing bulbsLights and windscreen wipers
Page 128 of 405
X
Insert bulb holder =into the lamp and turn
it clockwise.
X Reinsert the lamp cluster.
X Tighten four nuts :.
X Push in connector ;until it engages.
X Insert the side panelling. Windscreen wipers
Switching the windscreen wipers on/
off G
WARNING
The windscree nwill not longer be wiped prop-
erly if the wiper blades are worn .This could
prevent you from observing the traffic condi-
tions, thereby causing an accident. Replace
the wiper blades twice a year, ideally in spring
and autumn.
! Do not operate the windscreen wipers
when the windscreen is dry, as this could
damage the wiper blades. Moreover, dust
that has collected on the windscreen can
scratch the glass if wiping takes place when
the windscreen is dry.
If it is necessary to switch on the wind-
screen wipers in dry weather conditions,
always operate them using washer fluid.
! If the windscreen wipers leave smears on
the windscreen after the vehicle has been
washed in an automatic car wash, this may
be due to wax or other residue. Cleant he
windscreen with washer fluid after an auto-
matic car wash.
! Intermittent wiping with rain sensor: due
to optical influences and the windscreen
becoming dirty in dry weather conditions,
the windscreen wipers may be activated
inadvertently. This could damage the wind-
screen wiper blades or scratch the wind-
screen.
For this reason, you should always switch
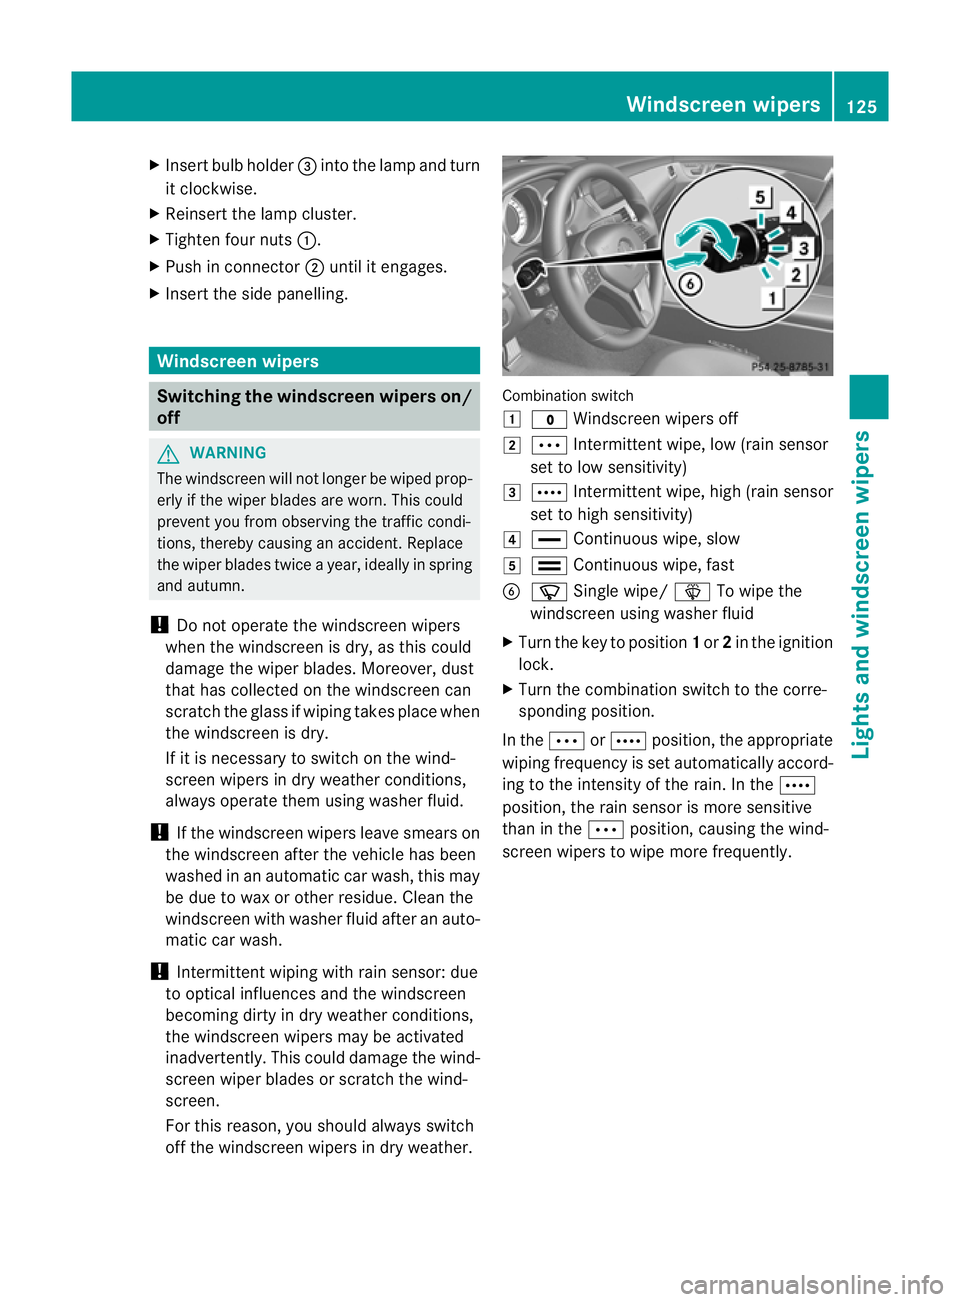
off the windscreen wipers in dry weather. Combination switch
1
$ Windscreen wipers off
2 Ä Intermittent wipe, low (rain sensor
set to low sensitivity)
3 Å Intermittent wipe, high (rain sensor
set to high sensitivity)
4 ° Continuous wipe, slow
5 ¯ Continuous wipe, fast
B í Single wipe/ îTo wipe the
windscreen using washer fluid
X Turn the key to position 1or 2in the ignition
lock.
X Turn the combination switch to the corre-
sponding position.
In the ÄorÅ position, the appropriate
wiping frequency is set automatically accord-
ing to the intensity of the rain. In the Å
position, the rain sensor is more sensitive
than in the Äposition, causing the wind-
screen wipers to wipe more frequently. Windscreen wipers
125Lights and windscreen wipers Z
Page 129 of 405
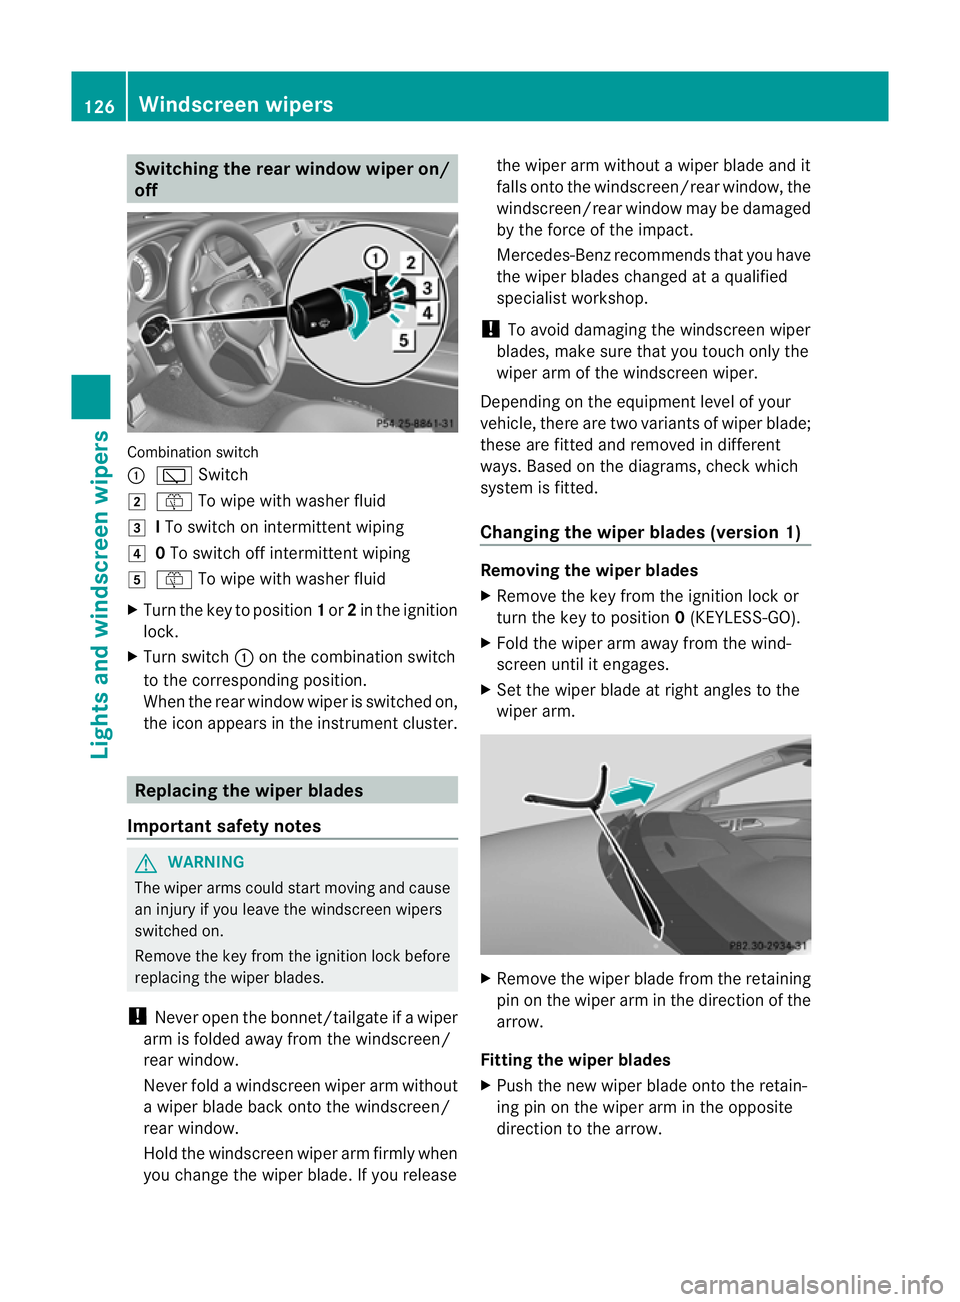
Switching the rear window wiper on/
off
Combination switch
:
è Switch
2 ô To wipe with washer fluid
3 ITo switch on intermittent wiping
4 0To switch off intermittent wiping
5 ô To wipe with washer fluid
X Turn the key to position 1or 2in the ignition
lock.
X Turn switch :on the combination switch
to the corresponding position.
When the rear window wiper is switched on,
the icon appears in the instrumen tcluster. Replacing the wiper blades
Important safety notes G
WARNING
The wiper arms could star tmoving and cause
an injury if you leave the windscreen wipers
switched on.
Remove the key from the ignition lock before
replacing the wiper blades.
! Never open the bonnet/tailgate if a wiper
arm is folded away from the windscreen/
rear window.
Never fold a windscreen wiper arm without
a wiper blade back onto the windscreen/
rear window.
Hold the windscreen wiper arm firmly when
you change the wiper blade. If you release the wiper arm without a wiper blade and it
falls onto the windscreen/rear window, the
windscreen/rear window may be damaged
by the force of the impact.
Mercedes-Benz recommends that you have
the wiper blades changed at
aqualified
specialist workshop.
! To avoid damaging the windscree nwiper
blades, make sure that you touch only the
wiper arm of the windscreen wiper.
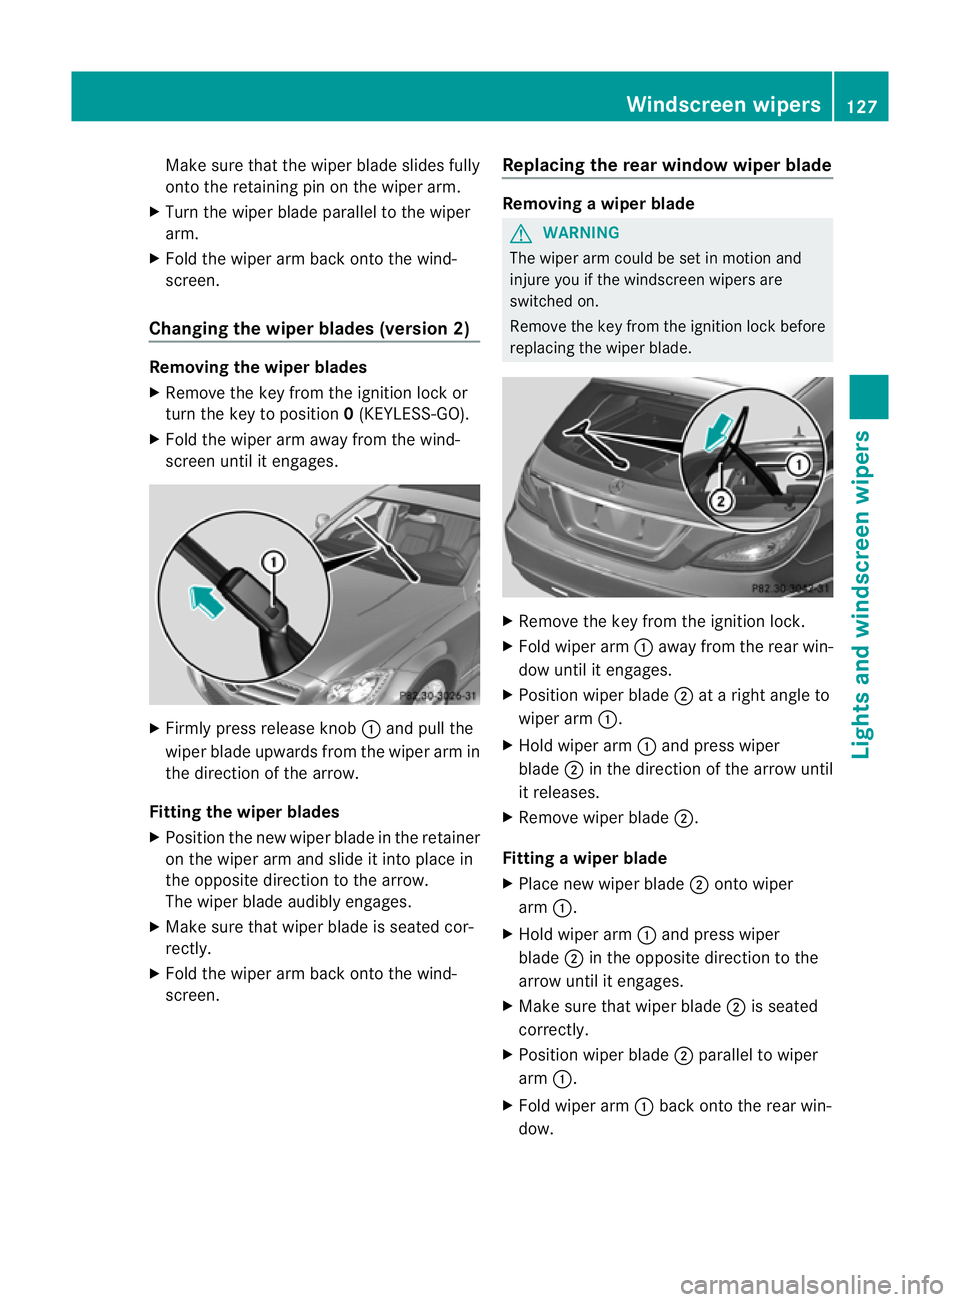
Depending on the equipmen tlevel of your
vehicle, there are two variants of wiper blade;
these are fitted and removed in different
ways. Based on the diagrams, chec kwhich
system is fitted.
Changing the wiper blades (version 1) Removing the wiper blades
X
Remove the key from the ignition lock or
turn the key to position 0(KEYLESS-GO).
X Fold the wiper arm away from the wind-
screen until it engages.
X Set the wiper blade at right angles to the
wiper arm. X
Remove the wiper blade from the retaining
pin on the wiper arm in the direction of the
arrow.
Fitting the wiper blades
X Push the new wiper blade onto the retain-
ing pin on the wiper arm in the opposite
direction to the arrow. 126
Windscreen wipersLights and windscreen wipers
Page 130 of 405
Make sure that the wiper blade slides fully
onto the retaining pin on the wiper arm.
X Turn the wiper blade parallel to the wiper
arm.
X Fold the wiper arm back onto the wind-
screen.
Changing the wiper blades (version 2) Removing the wiper blades
X
Remove the key from the ignition lock or
turn the key to position 0(KEYLESS-GO).
X Fold the wiper arm away from the wind-
screen until it engages. X
Firmly press release knob :and pull the
wiper blade upwards from the wiper arm in
the direction of the arrow.
Fitting the wiper blades
X Position the new wiper blade in the retainer
on the wiper arm and slide it into place in
the opposite direction to the arrow.
The wiper blade audibly engages.
X Make sure that wiper blade is seated cor-
rectly.
X Fold the wiper arm back onto the wind-
screen. Replacing the rear window wiper blade Removing
awiper blade G
WARNING
The wiper arm could be set in motion and
injure you if the windscreen wipers are
switched on.
Remove the key from the ignition lock before
replacing the wiper blade. X
Remove the key from the ignition lock.
X Fold wiper arm :away from the rear win-
dow until it engages.
X Position wiper blade ;at a right angle to
wiper arm :.
X Hold wiper arm :and press wiper
blade ;in the direction of the arrow until
it releases.
X Remove wiper blade ;.
Fitting awiper blade
X Place new wiper blade ;onto wiper
arm :.
X Hold wiper arm :and press wiper
blade ;in the opposite direction to the
arrow until it engages.
X Make sure that wiper blade ;is seated
correctly.
X Position wiper blade ;parallel to wiper
arm :.
X Fold wiper arm :back onto the rear win-
dow. Windscreen wipers
127Lights and windscreen wipers Z