Trunk lid MERCEDES-BENZ E-Class CABRIOLET 2017 A207 User Guide
[x] Cancel search | Manufacturer: MERCEDES-BENZ, Model Year: 2017, Model line: E-Class CABRIOLET, Model: MERCEDES-BENZ E-Class CABRIOLET 2017 A207Pages: 322, PDF Size: 7.97 MB
Page 88 of 322
Make sure that the soft top is dry and clean
before closing it. Otherwise, water or dirt could
enter the vehicle interior or trunk.
You can open or close the soft top:
Rwhen the vehicle is stationary or
Rwhen you do not exceed a speed of 25 mph
(40 km/h)
If there is a strong head wind, it may not be pos-
sible to close the soft top fully. In this case,
reduce speed or stop in order to close the soft
top fully.
For safety reasons, Mercedes-Benz recom-
mends that you only open or close the soft top
when the vehicle is stationary.
If the soft top does not open or close fully, the
soft-top hydraulics are depressurized and the
soft top is lowered:
Rafter approximately 7 minutes when the igni-
tion is switched on
Rimmediately if the ignition is switched off
Opening/closing with the soft top
switch
Important safety notes
GWARNING
When opening or closing the soft top, there is a risk that parts of the body could become
trapped by moving parts such as the roof
mechanism, the trunk lid, or the side win-
dows. There is a risk of injury.
When opening or closing the roof, make sure
that no parts of the body are in the vicinity of
moving parts. Release the switch if somebody
becomes trapped.
GWARNING
If the vehicle speed exceeds 25 mph
(40 km/h) the soft top stops during the open- ing or closing procedure. This impairs your
view to the rear. There is a risk of an accident.
Reduce your speed to below 25 mph
(40 km/h) or stop the vehicle in accordance
with the traffic conditions. Press or pull the
soft-top switch again in order to open or close
the soft top fully.
Opening and closing
XMake sure that the trunk partition is closed
(Ypage 91).
XClose the trunk lid.
XTurn the SmartKey to position 2in the ignition
lock.
XOpen the cover in the lower center console.
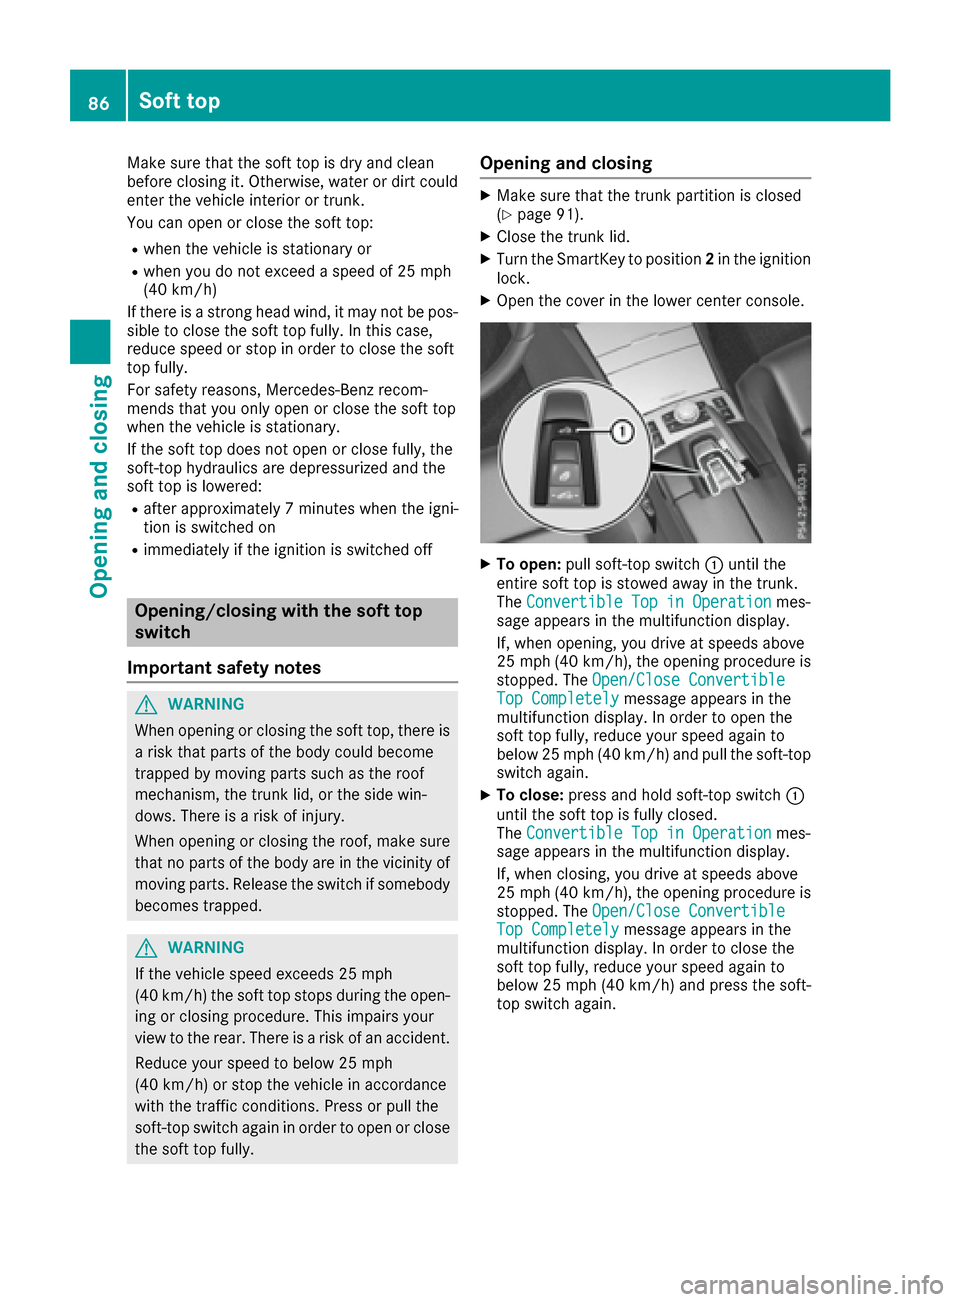
XTo open: pull soft-top switch :until the
entire soft top is stowed away in the trunk.
The Convertible Top in Operation
mes-
sage appears in the multifunction display.
If, when opening, you drive at speeds above
25 mph (40 km/h), the opening procedure is
stopped. The Open/Close Convertible
Top Completelymessage appears in the
multifunction display. In order to open the
soft top fully, reduce your speed again to
below 25 mph (40 km/h) and pull the soft-top
switch again.
XTo close: press and hold soft-top switch :
until the soft top is fully closed.
The Convertible Top in Operation
mes-
sage appears in the multifunction display.
If, when closing, you drive at speeds above
25 mph (40 km/h), the opening procedure is
stopped. The Open/Close Convertible
Top Completelymessage appears in the
multifunction display. In order to close the
soft top fully, reduce your speed again to
below 25 mph (40 km/h) and press the soft-
top switch again.
86Soft top
Opening and closing
Page 89 of 322
Opening/closing using the SmartKey
Important safety notes
GWARNING
When opening or closing the soft top, there is a risk that parts of the body could become
trapped by moving parts such as the roof
mechanism, the trunk lid, or the side win-
dows. There is a risk of injury.
When opening or closing the roof, make sure
that no parts of the body are in the vicinity of
moving parts. Release the switch if somebody
becomes trapped.
Opening and closing
The SmartKey must be near the door handle.
XTo open: press the %button in the Smart-
Key until the soft top is completely opened.
The Convertible Top in Operation
mes-
sage appears in the multifunction display. The
seat ventilation is switched on. The rear side
windows open.
XTo close: press the&button in the Smart-
Key until the soft top is completely closed.
The Convertible Top in Operation
mes-
sage appears in the multifunction display. The soft top and the side windows close.
Closing the soft top manually
Important safety notes
GWARNING
Closing the soft top manually is a complex,
technically challenging procedure which can
also be physically demanding. You or others
can become trapped. There is a risk of injury.
Where possible, have the soft top closed man-
ually at a qualified specialist workshop.
If the soft top cannot be closed automatically,
check the following points:
Ris the trunk partition engaged (Ypage 91)?
Rare the head restraints on the rear bench
seats extended?
Ris the trunk lid closed?
Ris the on-board voltage sufficient?
Start the engine if necessary.
If automatic operation still does not work, the
soft top can be closed manually.
To carry out this work, you will need the assis-
tance of another person.
Closing the soft top
XApply the parking brake.
XOpen the side windows.
XLower the head restraints automatically
(Ypage 98) or manually (Ypage 98).
XRemove the SmartKey from the ignition lock.
XOpen the trunk.
XTake the two straps out of the vehicle tool kit
(Ypage 270).
XTake the hex-socket wrench out of the Oper-
ator's Manual wallet and keep it with you.
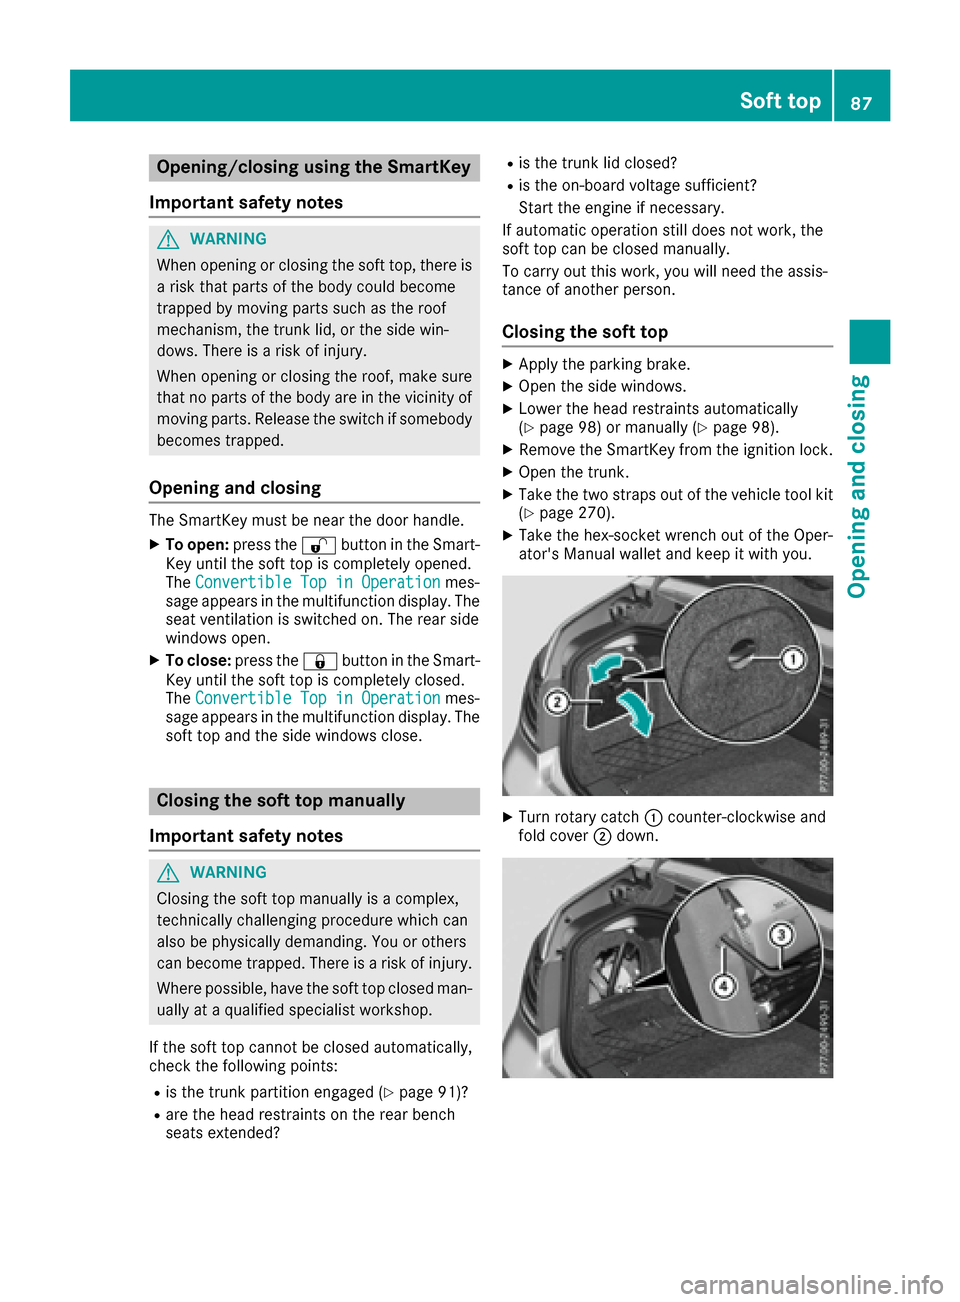
XTurn rotary catch :counter-clockwise and
fold cover ;down.
Soft top87
Opening and closing
Z
Page 90 of 322

XInsert Allen key=into valve screw ?on the
hydraulic pump.
XTurn valve screw ?of the hydraulic pump
with Allen key =counter-clockwise a full
turn.
XOn both sides of the trunk, tear paneling A
along the perforation in the direction of the
arrow.
XPull out catch Bas far as possible on both
sides and turn it counter-clockwise about a
quarter turn.
XMake sure catch Bis not drawn in again.
Otherwise, pull out catch Bagain as far as
possible and turn it counter-clockwise about
a quarter turn.
The soft-top compartment hinges are on the
right-hand and left-hand side in the gap between
the lid of the soft-top compartment and the
trunk seal.
XMove both levers Cof soft-top compartment
hinges forwards beyond the detent position
on both sides.
XOn both sides, pull the straps through behind the soft-top compartment hinges in the direc-
tion of the arrow D.
XRoute the straps through the created loops.
XPull the straps between the soft-top compart-
ment hinges and the soft-top compartment.
iDo not pull the straps as long as the trunk is
open.
88Soft top
Opening and closing
Page 91 of 322

XPlace strapsEon the soft-top compartment
lid.
iTake the hex-socket wrench and the Smart-
Key out of the trunk if necessary. You can only
access the trunk again once you have fully
closed the soft top manually.
XMake sure that catch Bis not pulled again.
Otherwise, pull out catch Bagain as far as
possible and turn it counter-clockwise about
a quarter turn.
XClose the trunk lid.
!The trunk lid must be closed for the next
steps. The soft top compartment cover could otherwise collide with the trunk lid.
XEach person takes a strap.
XPulling with force, simultaneously lift out the
cover of the soft-top compartment up and out
by the straps in the direction of the arrow.
GWARNING
If anywhere other than the indicated gripping
points is gripped, you or others can become
trapped or stuck. There is a risk of injury.
Take off jewelry and watches. Only hold the
indicated gripping points. Do not reach
between the cover halves and into the hinges.
XOne person stands on the right-hand side and
the other person on the left-hand side of the
vehicle.
XGrip the soft-top compartment with one hand
as illustrated.
XUse the other hand to support yourself on the
edge of the trunk lid as illustrated.
XLift soft-top compartment lid Fup as far as it
will go. In doing so, pull soft-top compartment cover Fevenly to the rear, applying constant
force.
GWARNING
If anywhere other than the indicated gripping
points is gripped, you or others can become
trapped or stuck. There is a risk of injury.
Take off jewelry and watches. Only hold the
indicated gripping points. Do not reach
between the cover halves and into the hinges.
XReach under the tip of soft top Gin the soft-
top compartment from the right-hand and
left-hand sides.
XLift the soft top out of the soft-top compart-
ment and guide it forwards in the direction of
the arrow onto windshield frame H.
Soft top89
Opening and closing
Z
Page 93 of 322
iPress the soft-top compartment lid again if
the trunk lid cannot be opened.
!Do not under any circumstances open the
trunk lid with the emergency key. You could
otherwise damage the trunk lid and the soft-
top compartment cover.
Relocking the soft top
Important safety notes
GWARNING
If you do not fully open/close the soft top, the
soft-top hydraulics depressurize after a short
time. This causes the soft top to lower unex-
pectedly and may cause you or others to be
trapped. There is a risk of injury.
Always open or close the soft top completely.
The soft top is not locked if:
Rthe Convertible Top in Operationmes-
sage appears in the multifunction display.
Ryou hear a warning tone for up to ten seconds
when pulling away or while driving.
Locking
You can lock the soft top again if it is not locked
fully.
XPull over and stop the vehicle safely as soon
as possible, paying attention to road and traf-
fic conditions.
XTurn the SmartKey to position 2in the ignition
lock.
XPress the soft-top switch (Ypage 86).
Trunk partition
General notes
!In order to avoid damaging the soft top or
stowed loads, please adhere to the following
while the soft top is open:
Rwhen the trunk partition is open, do not
place any objects in or behind the net on
the side that are too long. These objects could obstruct the trunk partition or cause
damage to the open soft top.
Rmake sure that the cargo does not push the
trunk partition upwards.
The soft top can only be opened when the trunk
partition is closed.
The trunk partition can be used to cover luggage
and loads in the trunk.
Opening and closing
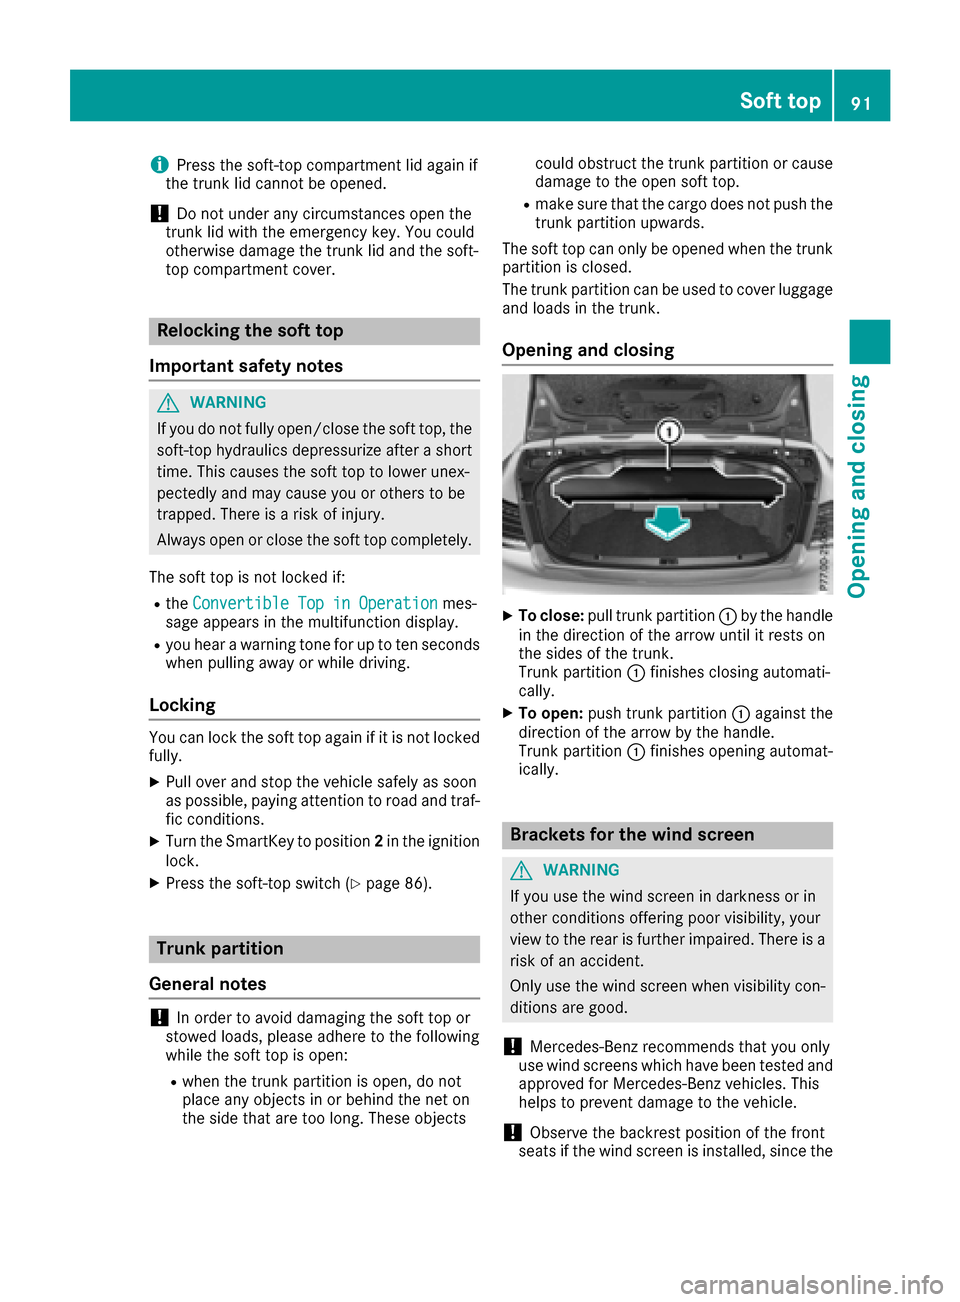
XTo close: pull trunk partition :by the handle
in the direction of the arrow until it rests on
the sides of the trunk.
Trunk partition :finishes closing automati-
cally.
XTo open: push trunk partition :against the
direction of the arrow by the handle.
Trunk partition :finishes opening automat-
ically.
Brackets for the wind screen
GWARNING
If you use the wind screen in darkness or in
other conditions offering poor visibility, your
view to the rear is further impaired. There is a
risk of an accident.
Only use the wind screen when visibility con-
ditions are good.
!Mercedes-Benz recommends that you only
use wind screens which have been tested and
approved for Mercedes-Benz vehicles. This
helps to prevent damage to the vehicle.
!Observe the backrest position of the front
seats if the wind screen is installed, since the
Soft top91
Opening and closing
Z
Page 97 of 322
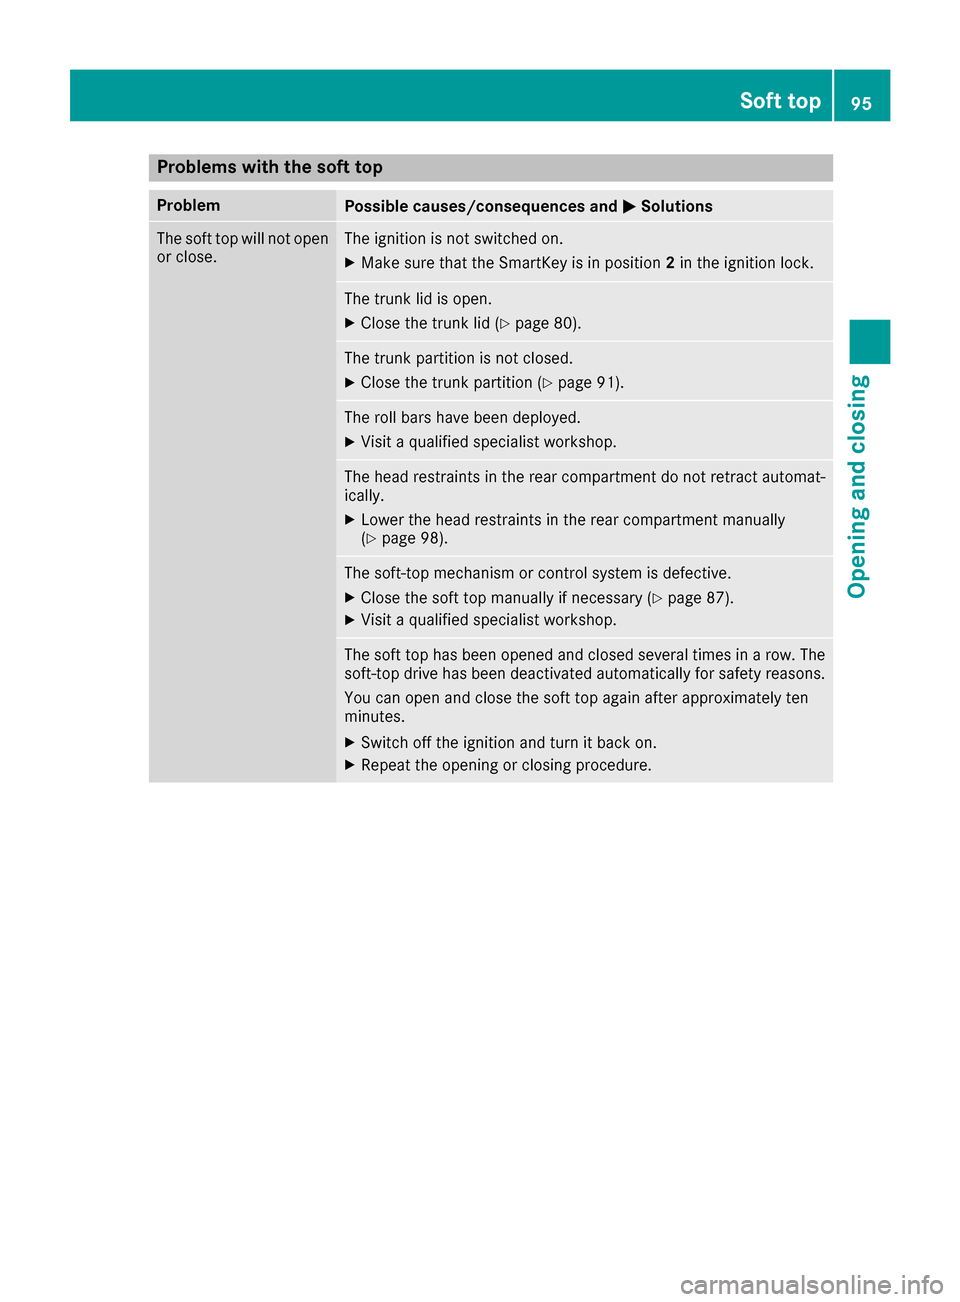
Problems with the soft top
ProblemPossible causes/consequences andMSolutions
The soft top will not open
or close.The ignition is not switched on.
XMake sure that the SmartKey is in position 2in the ignition lock.
The trunk lid is open.
XClose the trunk lid (Ypage 80).
The trunk partition is not closed.
XClose the trunk partition (Ypage 91).
The roll bars have been deployed.
XVisit a qualified specialist workshop.
The head restraints in the rear compartment do not retract automat-
ically.
XLower the head restraints in the rear compartment manually
(Ypage 98).
The soft-top mechanism or control system is defective.
XClose the soft top manually if necessary (Ypage 87).
XVisit a qualified specialist workshop.
The soft top has been opened and closed several times in a row. The
soft-top drive has been deactivated automatically for safety reasons.
You can open and close the soft top again after approximately ten
minutes.
XSwitch off the ignition and turn it back on.
XRepeat the opening or closing procedure.
Soft top95
Opening and closing
Z
Page 172 of 322
the steering, before the vehicle has exited the
parking space completely. This is useful, for
example when you recognize that it is already
possible to pull out of the parking space.
Canceling Active Parking Assist
You can cancel Active Parking Assist at any
time.
XStop the movement of the multifunction
steering wheel or steer yourself.
Active Parking Assist will be canceled at once.
ThePark Assist Canceled
message
appears in the multifunction display and you
hear a tone.
or
XPress the PARKTRONIC button on the center
console (Ypage 165).
PARKTRONIC is switched off and Active Park-
ing Assist is immediately canceled. The Park
Assist Canceledmessage appears in the
multifunction display and you hear a tone.
Active Parking Assist is canceled automatically
if:
Rthe transmission is shifted too early
Rtransmission position Pis selected
Rparking using Active Parking Assist is no lon-
ger possible
Ryou are driving faster than 6 mph (10 km/h)
Ra wheel spins, ESP®intervenes or fails. In
such cases the ÷warning lamp lights up in
the instrument cluster.
A warning tone sounds. The parking symbol dis-
appears and the multifunction display shows the
Park Assist Canceled
message.
When Active Parking Assist is canceled, you
must steer and brake again yourself.
If a system malfunction occurs, the vehicle is
braked to a standstill. To drive on, depress the
accelerator again.
Rear view camera
General notes
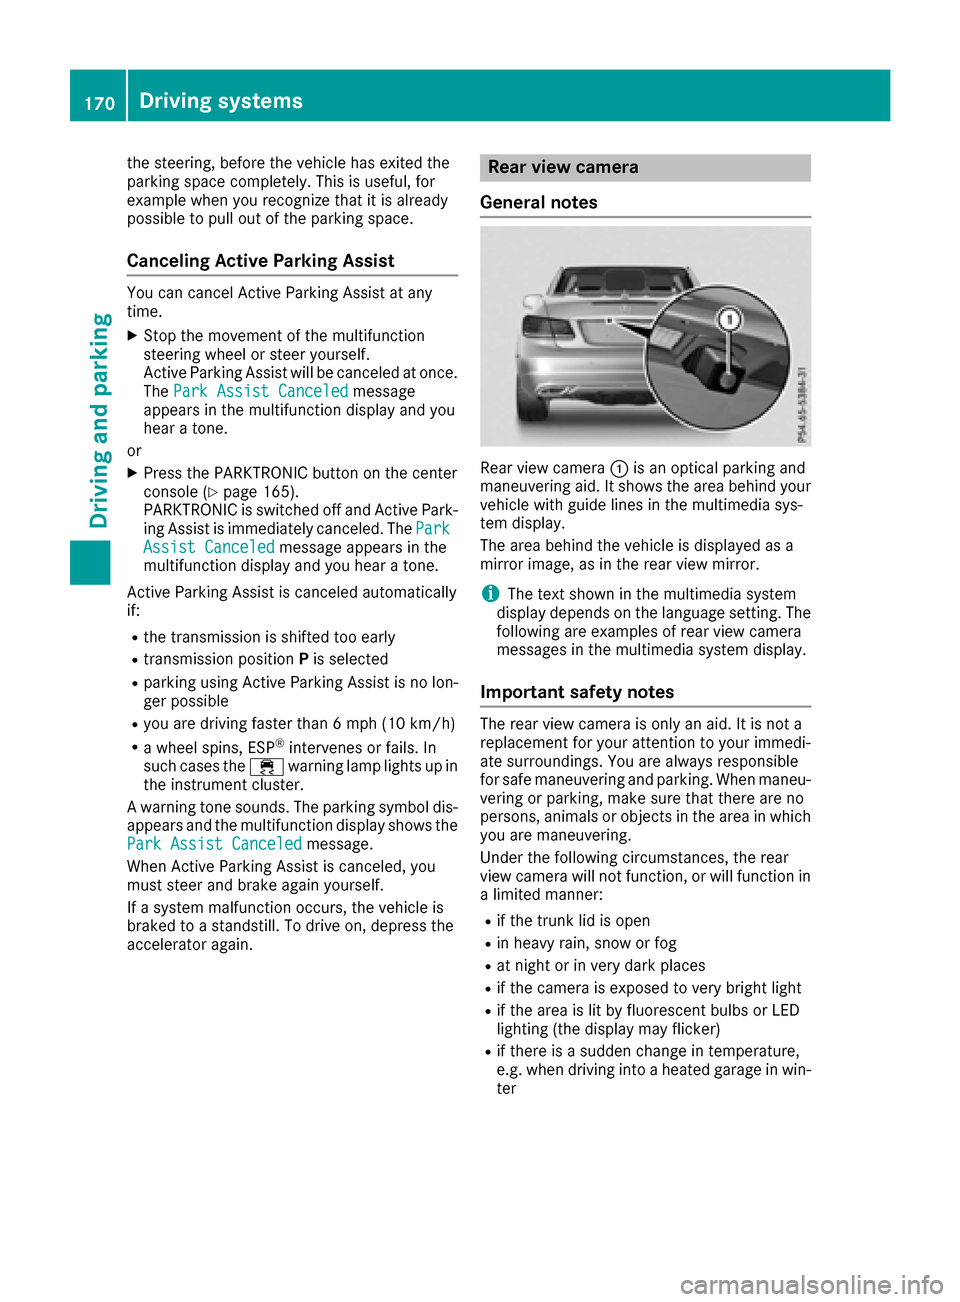
Rear view camera :is an optical parking and
maneuvering aid. It shows the area behind your
vehicle with guide lines in the multimedia sys-
tem display.
The area behind the vehicle is displayed as a
mirror image, as in the rear view mirror.
iThe text shown in the multimedia system
display depends on the language setting. The
following are examples of rear view camera
messages in the multimedia system display.
Important safety notes
The rear view camera is only an aid. It is not a
replacement for your attention to your immedi-
ate surroundings. You are always responsible
for safe maneuvering and parking. When maneu-
vering or parking, make sure that there are no
persons, animals or objects in the area in which you are maneuvering.
Under the following circumstances, the rear
view camera will not function, or will function in
a limited manner:
Rif the trunk lid is open
Rin heavy rain, snow or fog
Rat night or in very dark places
Rif the camera is exposed to very bright light
Rif the area is lit by fluorescent bulbs or LED
lighting (the display may flicker)
Rif there is a sudden change in temperature,
e.g. when driving into a heated garage in win- ter
170Driving system s
Driving an d parking
Page 177 of 322
The 360° camera will not function or will func-
tion in a limited manner:
Rif the doors are open
Rif the exterior mirrors are folded in
Rif the trunk lid is open
Rin heavy rain, snow or fog
Rat night or in very dark places
Rif the cameras are exposed to very bright light
Rif the area is lit by fluorescent bulbs or LED
lighting (the display may flicker)
Rif there is a sudden change in temperature,
e.g. when driving into a heated garage in win-ter
Rif the camera lenses are dirty or covered
Rif the vehicle components in which the cam-
eras are installed are damaged. In this event,have the camera position and setting checked
at a qualified specialist workshop
Do not use the 360° camera in this case. You
can otherwise injure others or cause damage to objects or the vehicle.
Guide lines are always shown at road level.
The field of vision and other functions of the
camera system may be restricted due to addi-
tional accessories on the rear of the vehicle (e.g.
license plate holder, bicycle rack).
On vehicles with height-adjustable chassis,
depending on technical conditions, leaving the
standard height can result in:
Rinaccuracies in the guide lines
Rinaccuracies in the display of generated
images (top view)
Activation conditions
The 360° camera image can be displayed if:
Ryour vehicle is equipped with a 360° camera
Rthe SmartKey is in position 2in the ignition
lock
Rthe multimedia system is switched on
Rthe 360° Camerafunction is switched on
Switching on the 360° camera
XPress the Øbutton in the center console
for longer than two seconds.
Depending on whether position Dor Ris
engaged, the following is shown:
Ra split screen with top view and the image
from the front camera or
Ra split screen with top view and the image
from the rear view camera
or
XPress the Øbutton in the center console.
The vehicle menu is displayed.
XSelect 360°Cameraand press 7to confirm.
Depending on whether position Dor Ris
engaged, the following is shown:
Ra split screen with top view and the image
from the front camera or
Ra split screen with top view and the image
from the rear view camera
Activating the 360° camera using
reverse gear
The 360° camera images can be automatically
displayed by engaging reverse gear.
XMake sure that the SmartKey is in position 2
in the ignition lock.
XMake sure that the Activation by R gearfunction is selected in the multimedia system
(see the separate operating instructions).
XTo show the 360° camera image: engage
reverse gear.
The area behind the vehicle is shown in the
multimedia system display in split-screen
mode. You see the top view of the vehicle and
the image from the rear view camera.
Selecting the split-screen and full
screen displays
Switching between split screen views
XTo switch to the line with the vehicle icons:
slide 5the controller.
XTo select one of the vehicle icons: turn 3
the controller.
XTo switch to 180° View:turn 3 the con-
troller to select 180° View
and press7to
confirm.
iThe 180°Viewoption is only available in the
following views:
RTop view with picture from the rear view
camera
RTop view with picture from the front camera
Driving systems175
Driving and parking
Z
Page 178 of 322
Messages in the multimedia system dis-
play
Important safety notes
The system may show a distorted view of obsta-
cles or show them incorrectly or not at all.
Obstacles are not shown by the system in the
following locations:
Runder the front and rear bumpers
Rvery close to the front and rear bumpers
Rin close range above the handle on the trunk
lid
Rvery close to the exterior mirrors
Rin the transitional areas between the various
cameras in the virtual top view
!Objects not at ground level may appear to
be further away than they actually are, e.g.:
Rthe bumper of a parked vehicle
Rthe drawbar of a trailer
Rthe ball coupling of a trailer tow hitch
Rthe rear section of an HGV
Ra slanted post
Use the guidelines only for orientation.
Approach objects no further than the bottom-
most guideline.
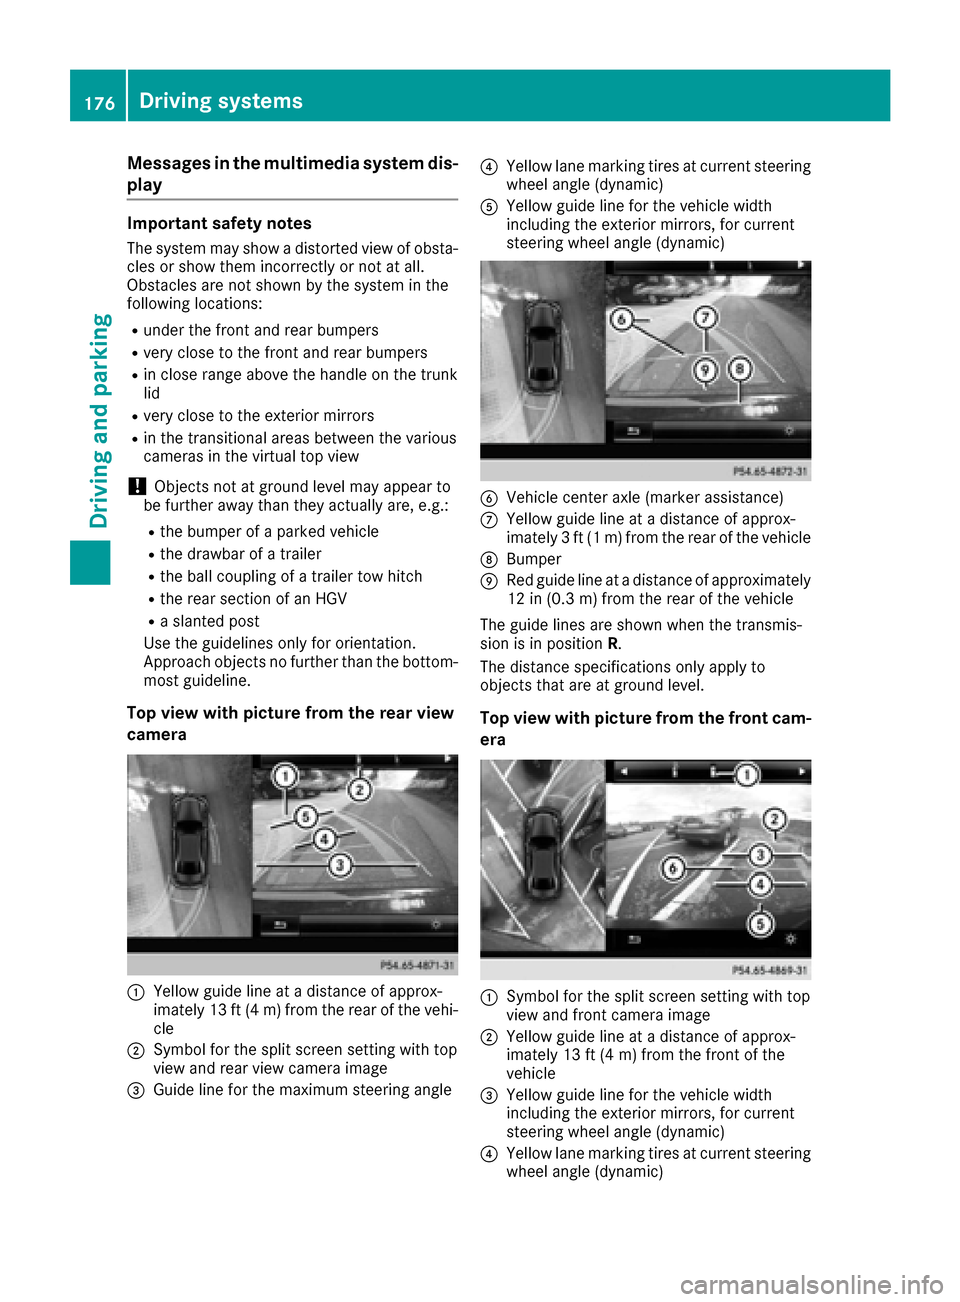
Top view with picture from the rear view
camera
:Yellow guide line at a distance of approx-
imately 13 ft (4 m) from the rear of the vehi-
cle
;Symbol for the split screen setting with top
view and rear view camera image
=Guide line for the maximum steering angle
?Yellow lane marking tires at current steering
wheel angle (dynamic)
AYellow guide line for the vehicle width
including the exterior mirrors, for current
steering wheel angle (dynamic)
BVehicle center axle (marker assistance)
CYellow guide line at a distance of approx-
imately 3 ft (1 m) from the rear of the vehicle
DBumper
ERed guide line at a distance of approximately
12 in (0.3 m) from the rear of the vehicle
The guide lines are shown when the transmis-
sion is in position R.
The distance specifications only apply to
objects that are at ground level.
Top view with picture from the front cam-
era
:Symbol for the split screen setting with top
view and front camera image
;Yellow guide line at a distance of approx-
imately 13 ft (4 m) from the front of the
vehicle
=Yellow guide line for the vehicle width
including the exterior mirrors, for current
steering wheel angle (dynamic)
?Yellow lane marking tires at current steering
wheel angle (dynamic)
176Driving systems
Driving and parking
Page 201 of 322
XPress the=or; button on the steering
wheel to select the Sett.menu.
XPress the:or9 button to select the
Instrument Clustersubmenu.
XPress ato confirm.
XPress the :or9 button to select the
Permanent Display:function.
The current setting, Outside Temperature
orSpeedometer [km/h]/Speedometer[mph], appears.
XPress the abutton to save the setting.
Lights
Setting the brightness of the instrument
cluster lighting and switches
The lighting in the instrument cluster, in the dis-
plays and the controls in the vehicle interior can
be adjusted with the Brightness Display/
Switches:function.
XPress the=or; button on the steering
wheel to select the Sett.menu.
XPress the:or9 button to select the
Lightssubmenu.
XPress ato confirm.
XPress the :or9 button to select the
Brightness Display/Switches:function.
The current setting appears.
XPress ato confirm.
XPress the :or9 button to adjust the
brightness to any level from Level 1to
Level 5(bright).
XPress the aor% button to save the
setting.
If the light switch is set to the Ã,Tor
L position, the brightness is dependent
upon the brightness of the ambient light.
iThe light sensor in the instrument cluster
automatically controls the brightness of the
multifunction display.
In daylight, the displays in the instrument
cluster are not illuminated.
Switching the daytime running lamps on/
off
XPress the =or; button on the steering
wheel to select the Sett.menu.
XPress the:or9 button to select the
Lightssubmenu.
XPress ato confirm.
XPress the :or9 button to select the
Day. Run. Lightsfunction.
If the Day. Run. Lightsfunction has been
switched on, the multifunction display shows
the cone of light and the Wsymbol in
orange.
XPress the abutton to save the setting.
Further information on daytime running lamps
(
Ypage 109).
Activating/deactivating surround light-
ing and exterior lighting delayed switch-
off
XPress the =or; button on the steering
wheel to select the Sett.menu.
XPress the:or9 button to select the
Lightssubmenu.
XPress ato confirm.
XUsing :or9, select the SurroundLightingfunction.
If the SurroundLightingfunction is activa-
ted, the light cone and the area around the
vehicle are displayed in orange in the multi-
function display.
XPress the abutton to save the setting.
Deactivating delayed switch-off of the exterior
lighting temporarily:
XBefore leaving the vehicle, turn the SmartKey to position 0in the ignition lock.
XTurn the SmartKey to position 2in the ignition
lock.
The exterior lighting delayed switch-off is
deactivated.
Delayed switch-off of the exterior lighting is
reactivated the next time you start the engine.
If you have activated the Surround Lighting
function and the light switch is set to the Ã
position, the following functions are activated
when it is dark:
Rsurround lighting: the exterior lighting
remains lit for 40 seconds after unlocking
with the SmartKey. If you start the engine, the
surround lighting is switched off and auto-
matic headlamp mode is activated
(
Ypage 109).
Rexterior lighting delayed switch-off: the
exterior lighting remains lit for 60 seconds
after the engine is switched off. If you close all
the doors and the trunk lid, the exterior light-
ing goes off after 15 seconds.
Menus and submenus199
On-board computer and displays
Z