window MERCEDES-BENZ E-Class CABRIOLET 2017 A207 User Guide
[x] Cancel search | Manufacturer: MERCEDES-BENZ, Model Year: 2017, Model line: E-Class CABRIOLET, Model: MERCEDES-BENZ E-Class CABRIOLET 2017 A207Pages: 322, PDF Size: 7.97 MB
Page 55 of 322
top can no longer be closed. In this case, visit
the nearest qualified specialist workshop.
Deployment of Emergency Tensioning
Devices and air bags
Important safety notes
GWARNING
The air bag parts are hot after an air bag has
been deployed. There is a risk of injury.
Do not touch the air bag parts. Have a
deployed air bag replaced at a qualified spe-
cialist workshop as soon as possible.
GWARNING
A deployed air bag no longer offers any pro-
tection and cannot provide the intended pro-
tection in an accident. There is an increased
risk of injury.
Have the vehicle towed to a qualified special-
ist workshop in order to have a deployed air
bag replaced.
It is important for your safety and that of your
passenger to have deployed air bags replaced
and to have any malfunctioning air bags
repaired. This will help to make sure the air bags
continue to perform their protective function for
the vehicle occupants in the event of a crash.
GWARNING
Pyrotechnic Emergency Tensioning Devices
that have been deployed are no longer opera-
tional and are unable to perform their inten-
ded protective function. This poses an
increased risk of injury or even fatal injury.
Therefore, have pyrotechnic Emergency Ten-
sioning Devices which have been triggered
immediately replaced at a qualified specialist workshop.
An electric motor is used by PRE-SAFE
®to trig-
ger the tightening of the seat belt in hazardous
situations. This procedure is reversible.
If Emergency Tensioning Devices are triggered
or air bags are deployed, you will hear a bang,
and a small amount of powder may also be released. The
6restraint system warning
lamp lights up.
Only in rare cases will the bang affect your hear-
ing. The powder that is released generally does
not constitute a health hazard, but it may cause
short-term breathing difficulties in people with
asthma or other respiratory problems. Provided
it is safe to do so, you should leave the vehicle
immediately or open the window in order to pre-
vent breathing difficulties.
Air bags and pyrotechni c Eme
rgency Tensioning
Devices (ETDs) contain perchlorate material,
which may require special handling and regard
for the environment. National guidelines must
be observed during disposal. In California, see
www.dtsc.ca.gov/HazardousWaste/
Perchlorate/index.cfm.
Method of operation
During the first stage of a collision, the restraint
system control unit evaluates important physi-
cal data relating to vehicle deceleration or accel-
eration, such as:
Rduration
Rdirection
Rintensity
Based on the evaluation of this data, the
restraint system control unit triggers the Emer-
gency Tensioning Devices during a frontal or
rear collision.
An Emergency Tensioning Device can only be
triggered, if:
Rthe ignition is switched on
Rthe components of the restraint system are
operational. You can find further information
under: "Restraint system warning lamp"
(
Ypage 40)
Rthe belt tongue is engaged in the buckle on
the respective front-passenger seat
The Emergency Tensioning Devices in the rear
compartment are triggered independently of the
lock status of the seat belts.
If the restraint system control unit detects a
more severe accident, further components of
the restraint system are activated independ-
ently of each other in certain frontal collision
situations:
RFront air bags and driver's knee bag
RHead bag, if the system determines that
deployment can offer additional protection to that provided by the seat belt
Occupant safety53
Safety
Z
Page 58 of 322
Rif the vehicle skids, the front side windows are
closed.
Rthe air pressure in the side bolsters of the seat
backrests of the front multicontour seats is
raised.
If the hazardous situation passes without result-
ing in an accident, PRE-SAFE
®slackens the belt
pre-tensioning. On vehicles with multicontour
seats, the air pressure in the side bolsters is
reduced again. All settings made by PRE-SAFE
®
can then be reversed.
If the seat belt pre-tensioning is not reduced:
XMove the seat backrest or seat back slightly
when the vehicle is stationary.
The seat belt pre-tensioning is reduced and
the locking mechanism is released.
The seat-belt adjustment is an integral part of
the PRE-SAFE
®convenience function. Informa-
tion about the convenience function can be
found under "Belt adjustment" (
Ypage 45).
PRE-SAFE®PLUS (anticipatory occu-
pant protection system PLUS)
Introduction
PRE-SAFE®PLUS is only available in vehicles
with the Driving Assistance package.
Using the radar sensor system, PRE-SAFE
®
PLUS is able to detect that a head-on or rear-end
collision is imminent. In certain hazardous sit-
uations, PRE-SAFE
®PLUS takes pre-emptive
measures to protect the vehicle occupants.
Important safety notes
The intervention of PRE-SAFE®PLUS cannot
prevent an imminent collision.
The driver is not warned about the intervention
of PRE-SAFE
®PLUS.
PRE-SAFE®PLUS does not intervene if the vehi-
cle is backing up.
When driving, or when parking or exiting a park-
ing space with assistance from Active Parking
Assist, PRE-SAFE
®PLUS will not apply the
brakes.
Function
PRE-SAFE®PLUS intervenes in certain situa-
tions if the radar sensor system detects an
imminent head-on or rear-end collision.
PRE-SAFE
®PLUS takes the following measures
depending on the hazardous situation detected:
Rif the radar sensor system detects that a
head-on collision is imminent, the seat belts
are pre-tensioned.
Rif the radar sensor system detects that a rear-
end collision is imminent:
-the brake pressure is increased if the driver
applies the brakes when the vehicle is sta- tionary.
-the seat belts are pre-tensioned.
The PRE-SAFE®PLUS braking application is can-
celed:
Rif the accelerator pedal is depressed when a
gear is engaged
Rif the risk of a collision passes or is no longer
detected
Rif DISTRONIC PLUS indicates an intention to
pull away
If the hazardous situation passes without result-
ing in an accident, the original settings are
restored.
Automatic measures after an acci-
dent
Immediately after an accident, the following
measures are implemented, depending on the
type and severity of the impact:
Rthe hazard warning lamps are activated
Rthe emergency lighting is activated
Rthe vehicle doors are unlocked
Rthe front side windows are lowered
Rvehicles with a memory function: the electri-
cally adjustable steering wheel is raised
Rthe engine is switched off and the fuel supply
is cut off
Rvehicles with mbrace: automatic emergency
call
56Occupant safety
Safety
Page 62 of 322
You can thus avoid the risks that could arise as
a result of:
Ran incorrectly categorized person in the front-
passenger seat
Rthe unintentional deactivation of the front-
passenger front air bag
Rthe unsuitable positioning of the child
restraint system, e.g. too close to the dash-
board
Rearward-facing child restraint system
If it is absolutely necessary to install a rearward-
facing child restraint system on the front-
passenger seat, always make sure that the
front-passenger front air bag is deactivated.
Only if the PASSENGER AIR BAG OFF indicator
lamp is permanently lit (
Ypage 41) is the front-
passenger front air bag deactivated.
Always observe the child restraint system man-
ufacturer's installation and operating instruc-
tions.
Forward-facing child restraint system
If you secure a child in a forward-facing child
restraint system on the front-passenger seat,
always move the front-passenger seat as far
back as possible. The entire base of the child
restraint system must always rest on the seat
cushion of the front-passenger seat. The back-
rest of the child restraint system must lie as flat
as possible against the backrest of the front-
passenger seat. The child restraint system must
not touch the roof or be subjected to a load by
the head restraint. Adjust the angle of the seat
backrest and the head restraint position accord- ingly. Always make sure that the shoulder belt
strap is correctly routed from the seat-belt
extender of the front-passenger seat to the
shoulder belt guide on the child restraint sys-
tem. The shoulder belt strap must be routed for-
wards from the retracted seat-belt extender for
the front-passenger seat.
Always observe the child restraint system man-
ufacturer's installation and operating instruc-
tions.
Child-proof locks
Important safety notes
GWARNING
If children are traveling in the vehicle, they
could:
Ropen doors, thus endangering other people
or road users
Rexit the vehicle and be caught by oncoming
traffic
Roperate vehicle equipment and become
trapped
There is a risk of an accident and injury.
Always activate the child-proof locks and
override feature if children are traveling in the vehicle. When leaving the vehicle, always take
the key with you and lock the vehicle. Never
leave children unattended in the vehicle.
Override feature for the rear side windows
(
Ypage 61).
GWARNING
If you leave children unsupervised in the vehi-
cle, they could set it in motion by, for example:
Rrelease the parking brake.
Rshift the automatic transmission out of the
parking position P.
Rstart the engine.
In addition, they may operate vehicle equip-
ment and become trapped. There is a risk of
an accident and injury.
When leaving the vehicle, always take the
SmartKey with you and lock the vehicle. Never
leave children unsupervised in the vehicle.
GWARNING
If persons, particularly children are subjected to prolonged exposure to extreme heat or
cold, there is a risk of injury, possibly even
fatal. Never leave children unattended in the
vehicle.
60Children in the vehicle
Safety
Page 63 of 322
GWARNING
If the child restraint system is subjected to
direct sunlight, parts may get very hot. Chil-
dren may burn themselves on these parts,
particularly on the metal parts of the child
restraint system. There is a risk of injury.
If you leave the vehicle, taking the child with
you, always ensure that the child restraint
system is not exposed to direct sunlight. Pro- tect it with a blanket, for example. If the child
restraint system has been exposed to direct
sunlight, let it cool down before securing the
child in it. Never leave children unattended in
the vehicle.
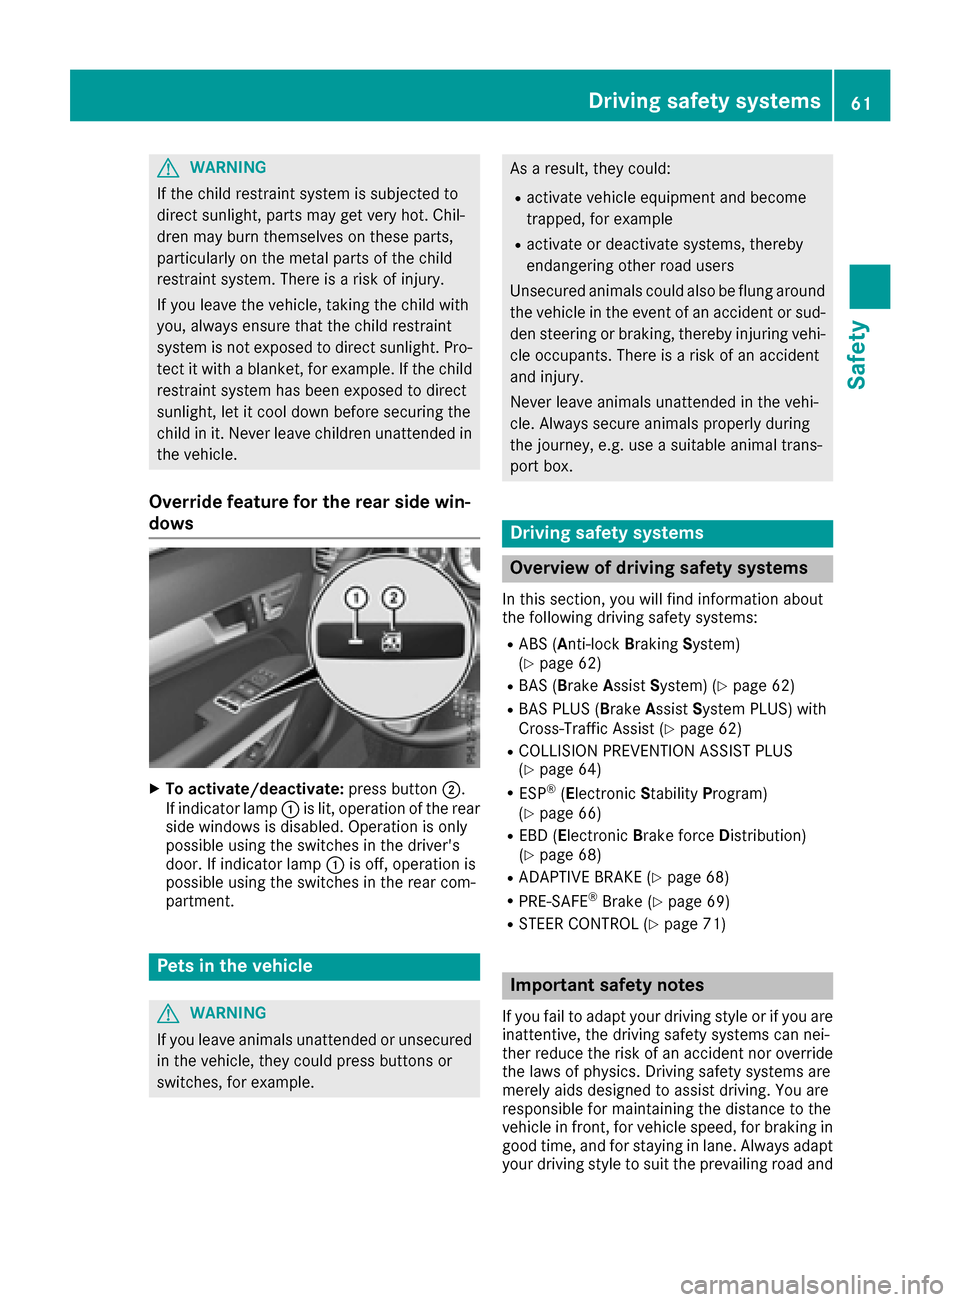
Override feature for the rear side win-
dows
XTo activate/deactivate: press button;.
If indicator lamp :is lit, operation of the rear
side windows is disabled. Operation is only
possible using the switches in the driver's
door. If indicator lamp :is off, operation is
possible using the switches in the rear com-
partment.
Pets in the vehicle
GWARNING
If you leave animals unattended or unsecured
in the vehicle, they could press buttons or
switches, for example.
As a result, they could:
Ractivate vehicle equipment and become
trapped, for example
Ractivate or deactivate systems, thereby
endangering other road users
Unsecured animals could also be flung around
the vehicle in the event of an accident or sud-
den steering or braking, thereby injuring vehi- cle occupants. There is a risk of an accident
and injury.
Never leave animals unattended in the vehi-
cle. Always secure animals properly during
the journey, e.g. use a suitable animal trans-
port box.
Driving safety systems
Overview of driving safety systems
In this section, you will find information about
the following driving safety systems:
RABS ( Anti-lock Braking System)
(Ypage 62)
RBAS ( Brake Assist System) (Ypage 62)
RBAS PLUS ( BrakeAssist System PLUS) with
Cross-Traffic Assist (Ypage 62)
RCOLLISION PREVENTION ASSIST PLUS
(Ypage 64)
RESP®(E lectronic StabilityProgram)
(Ypage 66)
REBD ( Electronic Brake force Distribution)
(Ypage 68)
RADAPTIVE BRAKE (Ypage 68)
RPRE-SAFE®Brake (Ypage 69)
RSTEER CONTROL (Ypage 71)
Important safety notes
If you fail to adapt your driving style or if you are
inattentive, the driving safety systems can nei-
ther reduce the risk of an accident nor override the laws of physics. Driving safety systems are
merely aids designed to assist driving. You are
responsible for maintaining the distance to the
vehicle in front, for vehicle speed, for braking in
good time, and for staying in lane. Always adapt
your driving style to suit the prevailing road and
Driving safety systems61
Safety
Z
Page 80 of 322
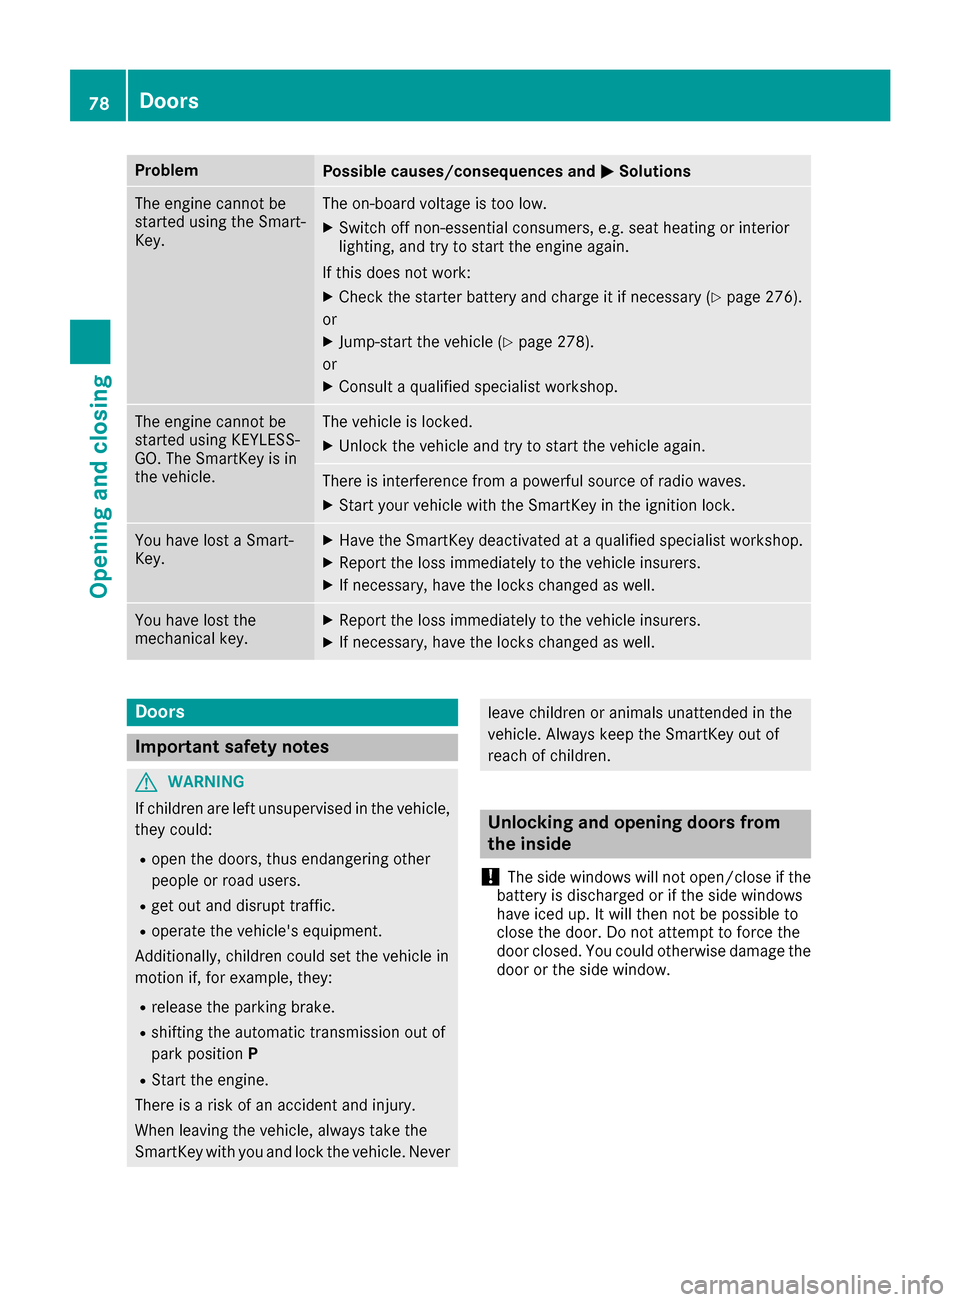
ProblemPossible causes/consequences andMSolutions
The engine cannot be
started using the Smart-
Key.The on-board voltage is too low.
XSwitch off non-essential consumers, e.g. seat heating or interior
lighting, and try to start the engine again.
If this does not work:
XCheck the starter battery and charge it if necessary (Ypage 276).
or
XJump-start the vehicle (Ypage 278).
or
XConsult a qualified specialist workshop.
The engine cannot be
started using KEYLESS-
GO. The SmartKey is in
the vehicle.The vehicle is locked.
XUnlock the vehicle and try to start the vehicle again.
There is interference from a powerful source of radio waves.
XStart your vehicle with the SmartKey in the ignition lock.
You have lost a Smart-
Key.XHave the SmartKey deactivated at a qualified specialist workshop.
XReport the loss immediately to the vehicle insurers.
XIf necessary, have the locks changed as well.
You have lost the
mechanical key.XReport the loss immediately to the vehicle insurers.
XIf necessary, have the locks changed as well.
Doors
Important safety notes
GWARNING
If children are left unsupervised in the vehicle,
they could:
Ropen the doors, thus endangering other
people or road users.
Rget out and disrupt traffic.
Roperate the vehicle's equipment.
Additionally, children could set the vehicle in
motion if, for example, they:
Rrelease the parking brake.
Rshifting the automatic transmission out of
park position P
RStart the engine.
There is a risk of an accident and injury.
When leaving the vehicle, always take the
SmartKey with you and lock the vehicle. Never
leave children or animals unattended in the
vehicle. Always keep the SmartKey out of
reach of children.
Unlocking and opening doors from
the inside
!
The side windows will not open/close if the
battery is discharged or if the side windows
have iced up. It will then not be possible to
close the door. Do not attempt to force the
door closed. You could otherwise damage the
door or the side window.
78Doors
Opening and closing
Page 81 of 322
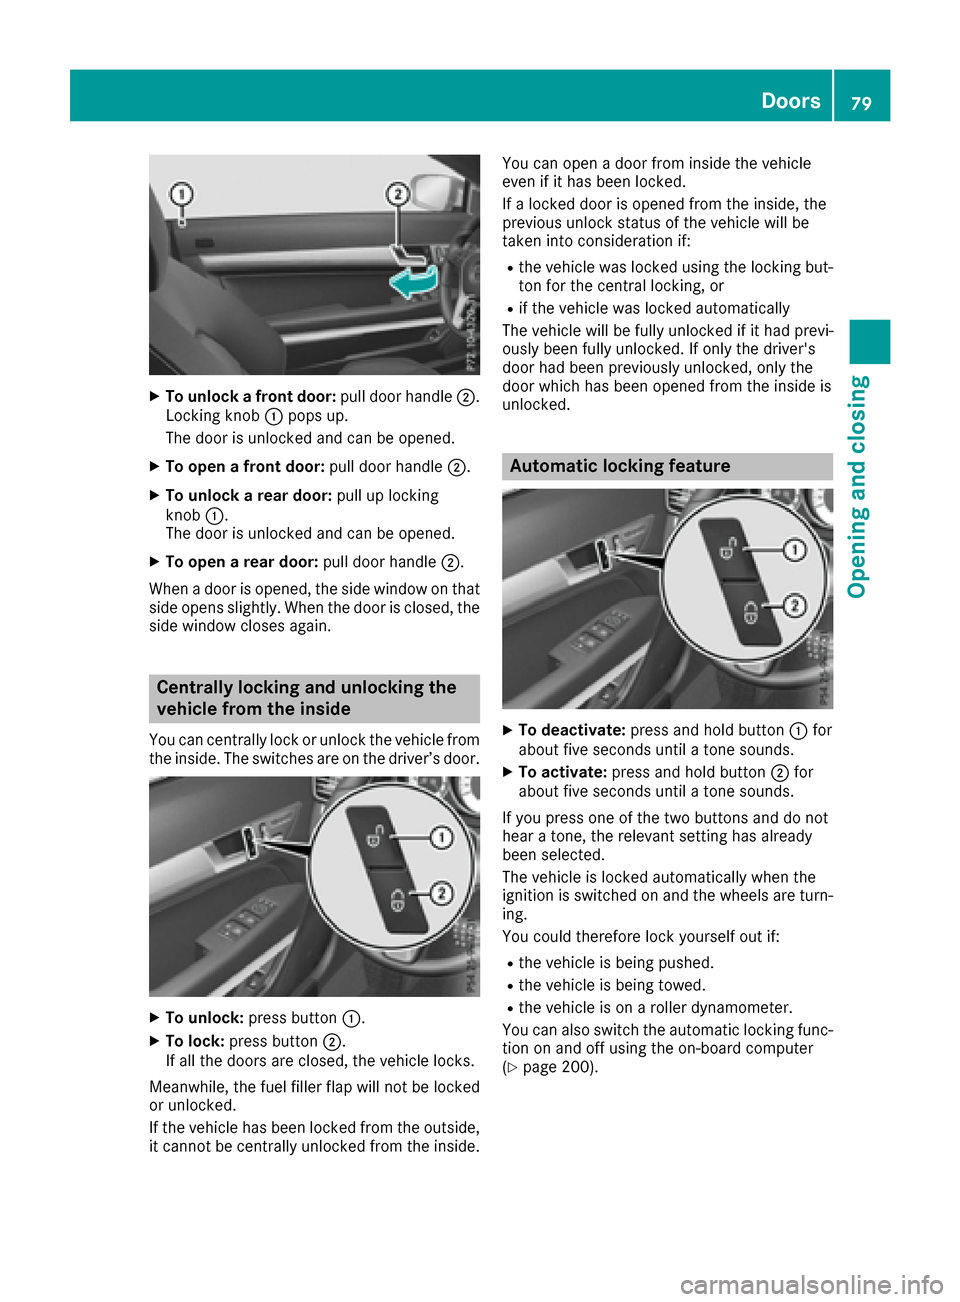
XTo unlock a front door:pull door handle;.
Locking knob :pops up.
The door is unlocked and can be opened.
XTo open a front door: pull door handle;.
XTo unlock a rear door: pull up locking
knob :.
The door is unlocked and can be opened.
XTo open a rear door: pull door handle;.
When a door is opened, the side window on that
side opens slightly. When the door is closed, the
side window closes again.
Centrally locking and unlocking the
vehicle from the inside
You can centrally lock or unlock the vehicle from
the inside. The switches are on the driver’s door.
XTo unlock: press button :.
XTo lock:press button ;.
If all the doors are closed, the vehicle locks.
Meanwhile, the fuel filler flap will not be locked
or unlocked.
If the vehicle has been locked from the outside,
it cannot be centrally unlocked from the inside. You can open a door from inside the vehicle
even if it has been locked.
If a locked door is opened from the inside, the
previous unlock status of the vehicle will be
taken into consideration if:
Rthe vehicle was locked using the locking but-
ton for the central locking, or
Rif the vehicle was locked automatically
The vehicle will be fully unlocked if it had previ-
ously been fully unlocked. If only the driver's
door had been previously unlocked, only the
door which has been opened from the inside is
unlocked.
Automatic locking feature
XTo deactivate: press and hold button :for
about five seconds until a tone sounds.
XTo activate: press and hold button ;for
about five seconds until a tone sounds.
If you press one of the two buttons and do not
hear a tone, the relevant setting has already
been selected.
The vehicle is locked automatically when the
ignition is switched on and the wheels are turn-
ing.
You could therefore lock yourself out if:
Rthe vehicle is being pushed.
Rthe vehicle is being towed.
Rthe vehicle is on a roller dynamometer.
You can also switch the automatic locking func-
tion on and off using the on-board computer
(
Ypage 200).
Doors79
Opening and closing
Z
Page 84 of 322
XTurn the mechanical key from position1
counter-clockwise as far as it will go to posi-
tion 2. Simultaneously pull the trunk lid han-
dle.
The trunk is unlocked.
XTurn the mechanical key back to position 1
and remove it.
XInsert the mechanical key into the SmartKey
(Ypage 75).
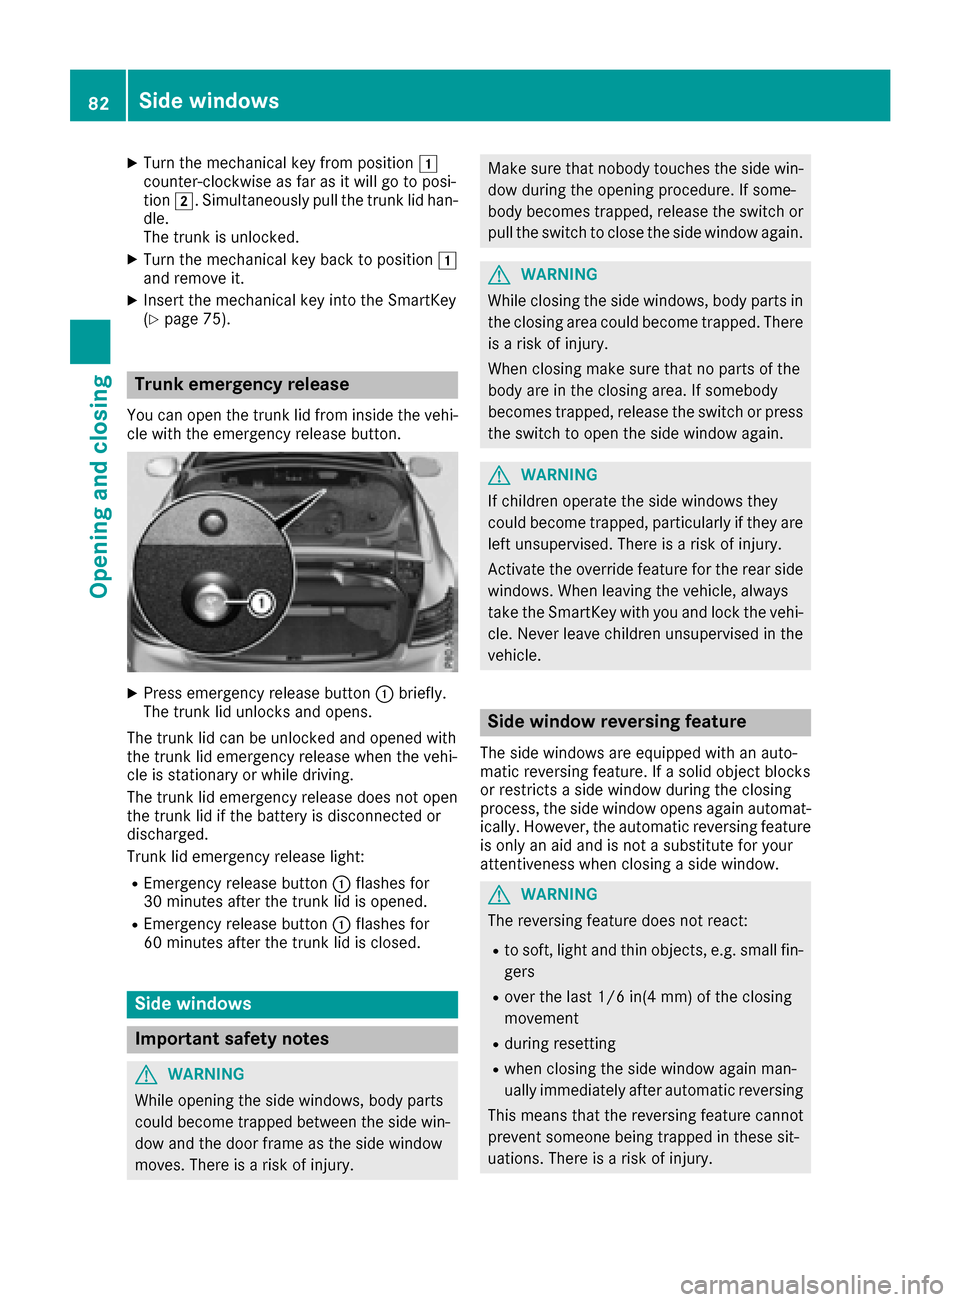
Trunk emergency release
You can open the trunk lid from inside the vehi-
cle with the emergency release button.
XPress emergency release button :briefly.
The trunk lid unlocks and opens.
The trunk lid can be unlocked and opened with
the trunk lid emergency release when the vehi-
cle is stationary or while driving.
The trunk lid emergency release does not open
the trunk lid if the battery is disconnected or
discharged.
Trunk lid emergency release light:
REmergency release button :flashes for
30 minutes after the trunk lid is opened.
REmergency release button :flashes for
60 minutes after the trunk lid is closed.
Side windows
Important safety notes
GWARNING
While opening the side windows, body parts
could become trapped between the side win-
dow and the door frame as the side window
moves. There is a risk of injury.
Make sure that nobody touches the side win- dow during the opening procedure. If some-
body becomes trapped, release the switch or
pull the switch to close the side window again.
GWARNING
While closing the side windows, body parts in
the closing area could become trapped. There is a risk of injury.
When closing make sure that no parts of the
body are in the closing area. If somebody
becomes trapped, release the switch or press
the switch to open the side window again.
GWARNING
If children operate the side windows they
could become trapped, particularly if they are left unsupervised. There is a risk of injury.
Activate the override feature for the rear side
windows. When leaving the vehicle, always
take the SmartKey with you and lock the vehi-
cle. Never leave children unsupervised in the
vehicle.
Side window reversing feature
The side windows are equipped with an auto-
matic reversing feature. If a solid object blocks
or restricts a side window during the closing
process, the side window opens again automat-
ically. However, the automatic reversing feature
is only an aid and is not a substitute for your
attentiveness when closing a side window.
GWARNING
The reversing feature does not react:
Rto soft, light and thin objects, e.g. small fin-
gers
Rover the last 1/6 in(4 mm) of the closing
movement
Rduring resetting
Rwhen closing the side window again man-
ually immediately after automatic reversing
This means that the reversing feature cannot
prevent someone being trapped in these sit-
uations. There is a risk of injury.
82Side windows
Opening and closing
Page 85 of 322

Make sure that no body parts are in close
proximity during the closing procedure. If
someone becomes trapped, press the switch
to open the side window again.
Opening and closing the side win-
dows
The switches for all side windows are located onthe driver's door. There is also a switch on the
front-passenger door as well as on the doors in
the rear compartment on the left and right-hand
sides for the respective side window.
The switches on the driver's door take prece-
dence.
:Front left
;Front right
=Rear right
?Rear left
XTurn the SmartKey to position 1or 2in the
ignition lock.
XTo open manually: press and hold the cor-
responding switch.
XTo open fully: press the switch beyond the
point of resistance and release it.
Automatic operation is started.
XTo close manually: pull and hold the corre-
sponding switch.
XTo close fully: pull the corresponding switch
beyond the pressure point.
Automatic operation is started.
XTo interrupt automatic operation: press/
pull the corresponding switch again.
You can start automatic operation when open-
ing and closing the front door windows and
when opening the rear door windows. To do so,
briefly press or pull the switch to beyond the point of resistance in the relevant direction. You
can stop automatic operation by pressing or
pulling again.
You can continue to operate the side windows
after you switch off the engine or remove the
SmartKey. This function is available for up to five
minutes or until the driver's or front-passenger
door is opened.
When the override feature for the side windows
is activated, the side windows cannot be oper-
ated from the rear (
Ypage 61).
Opening and closing all side windows
Using the switch on the center console
GWARNING
While opening the side windows, body parts in
the closing area could become trapped. There is a risk of injury.
Make sure that no body parts are in close
proximity during the closing procedure. If
somebody becomes trapped, release the
switch or press the switch down to open the
side window again.
You can use the switch on the center console to
close all side windows simultaneously.
XOpen the cover in the lower center console.
The switch for all side windows is under the
cover.
XTo open all side windows: press switch:
to the point of resistance.
XTo open all side windows fully: press
switch :beyond the point of resistance.
XTo close all side windows: pull switch:.
Side windows83
Opening and closing
Z
Page 86 of 322
Using the SmartKey
GWARNING
While closing the side windows, body parts in
the closing area could become trapped. There is a risk of injury.
When closing make sure that no parts of the
body are in the closing area. If somebody
becomes trapped, release the switch or press
the switch to open the side window again.
You can use the SmartKey to open or close all
side windows simultaneously. The SmartKey
must be near the door handle.
XClose the soft top (Ypage 86).
XOpen the trunk partition (Ypage 91).
XTo open all side windows: press the%
button on the SmartKey until the side win-
dows are fully opened.
XTo interrupt the opening procedure:
release the %button.
XTo close all side windows: press the&
button on the SmartKey until the side win-
dows are fully closed.
XTo interrupt the closing procedure: release
the & button.
Convenience closing with KEYLESS-GO
GWARNING
When using the convenience closing feature,
parts of the body could be trapped in the clos-
ing area when a side window is being closed.
There is a risk of injury.
Observe the complete closing procedure
when the convenience closing feature is oper-
ating. Make sure that no body parts are in
close proximity during the closing procedure.
Proceed as follows if someone is trapped:
XRelease recessed sensor surface on the door
handle.
XImmediately pull and hold the door handle
and keep the door handle pulled.
The side windows open.
With KEYLESS-GO you can close all side win-
dows simultaneously. The KEYLESS-GO key
must be outside the vehicle. All the doors must
be closed.
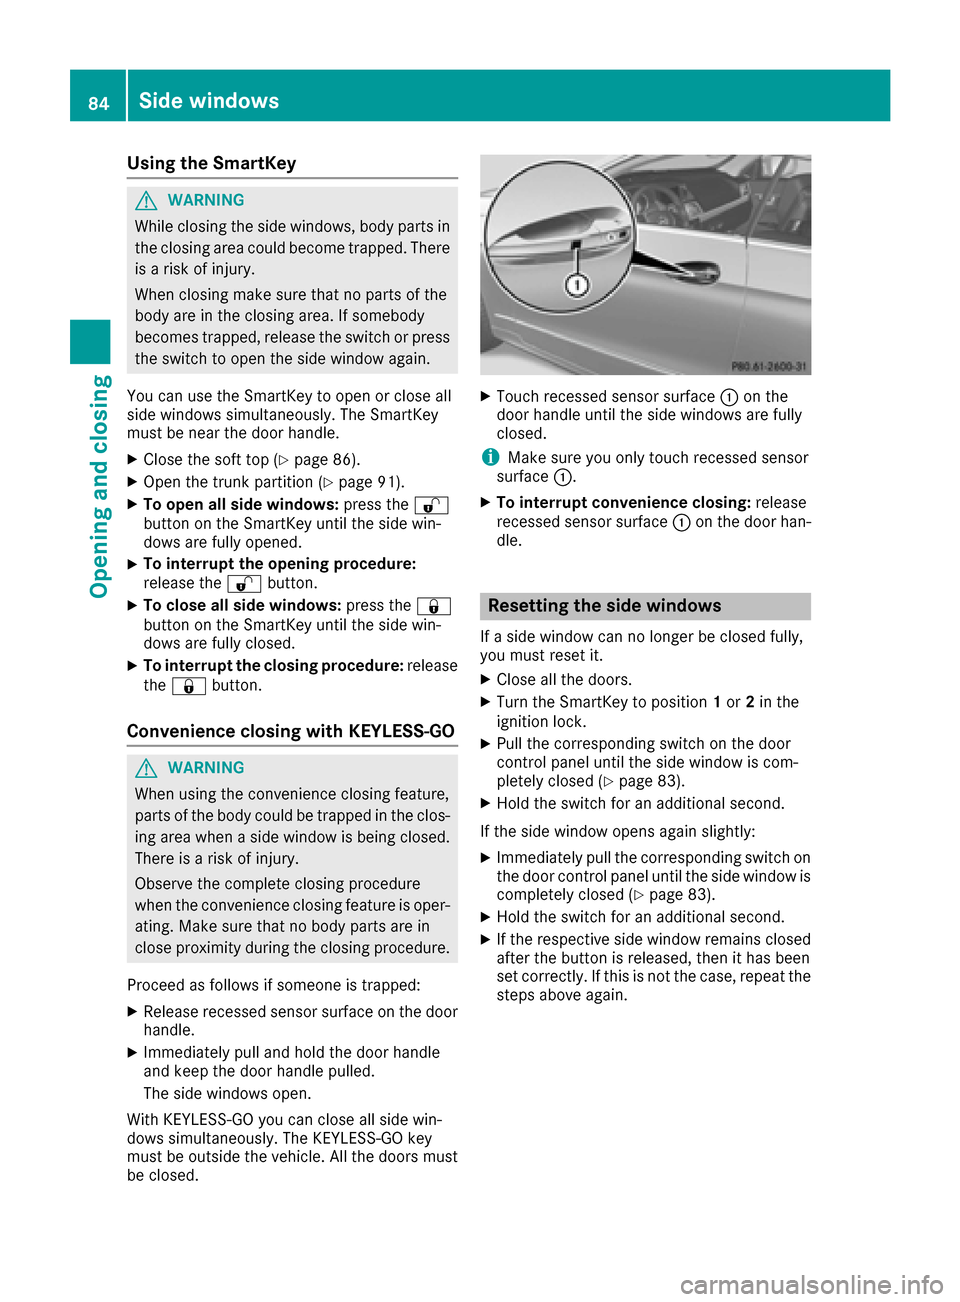
XTouch recessed sensor surface :on the
door handle until the side windows are fully
closed.
iMake sure you only touch recessed sensor
surface :.
XTo interrupt convenience closing: release
recessed sensor surface :on the door han-
dle.
Resetting the side windows
If a side window can no longer be closed fully,
you must reset it.
XClose all the doors.
XTurn the SmartKey to position 1or 2in the
ignition lock.
XPull the corresponding switch on the door
control panel until the side window is com-
pletely closed (
Ypage 83).
XHold the switch for an additional second.
If the side window opens again slightly:
XImmediately pull the corresponding switch on
the door control panel until the side window is
completely closed (
Ypage 83).
XHold the switch for an additional second.
XIf the respective side window remains closed
after the button is released, then it has been
set correctly. If this is not the case, repeat the
steps above again.
84Side windows
Opening and closing
Page 87 of 322
Problems with the side windows
GWARNING
If you close a side window again immediately after it has been blocked or reset, the side window
closes with increased or maximum force. The reversing feature is then not active. Parts of the
body could be trapped in the closing area in the process. This poses an increased risk of injury or
even fatal injury.
Make sure that no parts of the body are in the closing area. To stop the closing process, release
the switch or push the switch again to reopen the side window.
ProblemPossible causes/consequences and MSolutions
A side window cannot be
closed because it is
blocked by objects, e.g.
leaves in the window
guide.XRemove the objects.
XClose the side window.
A side window cannot be
closed and you cannot
see the cause.If a side window is obstructed during closing and reopens again
slightly:
XImmediately after the window blocks, pull the corresponding switch
again until the side window has closed.
The side window is closed with increased force.
If a side window is obstructed again during closing and reopens again slightly:
XImmediately after the window blocks, pull the corresponding switchagain until the side window has closed.
The side window is closed without the automatic reversing feature.
Soft top
Important safety notes
GWARNING
If you do not fully open/close the soft top, the
soft-top hydraulics depressurize after a short
time. This causes the soft top to lower unex-
pectedly and may cause you or others to be
trapped. There is a risk of injury.
Always open or close the soft top completely.
!Never sit on the soft-top compartment
cover or stow heavy objects there. You will
otherwise damage the soft top and soft-top
compartment cover of the vehicle.
!When opening and closing the soft top,
make sure that:
Rthere is sufficient clearance above it, as the soft top swings upwards.
Rthe trunk partition is closed.
Rthe trunk is only loaded to below the trunk
partition.
Rthe trunk partition is not pushed up by the
load.
Rthe trunk lid is closed.
Rthere are no objects on the soft-top com-
partment cover
Rthe fabric is not dirty, wet or frozen.
You could otherwise damage the soft top,
trunk and other parts of the vehicle.
Vehicle height when opening/closing the soft
top (
Ypage 317).
Soft top85
Opening and closing
Z