window MERCEDES-BENZ E-Class CABRIOLET 2017 A207 Owner's Guide
[x] Cancel search | Manufacturer: MERCEDES-BENZ, Model Year: 2017, Model line: E-Class CABRIOLET, Model: MERCEDES-BENZ E-Class CABRIOLET 2017 A207Pages: 322, PDF Size: 7.97 MB
Page 89 of 322
Opening/closing using the SmartKey
Important safety notes
GWARNING
When opening or closing the soft top, there is a risk that parts of the body could become
trapped by moving parts such as the roof
mechanism, the trunk lid, or the side win-
dows. There is a risk of injury.
When opening or closing the roof, make sure
that no parts of the body are in the vicinity of
moving parts. Release the switch if somebody
becomes trapped.
Opening and closing
The SmartKey must be near the door handle.
XTo open: press the %button in the Smart-
Key until the soft top is completely opened.
The Convertible Top in Operation
mes-
sage appears in the multifunction display. The
seat ventilation is switched on. The rear side
windows open.
XTo close: press the&button in the Smart-
Key until the soft top is completely closed.
The Convertible Top in Operation
mes-
sage appears in the multifunction display. The soft top and the side windows close.
Closing the soft top manually
Important safety notes
GWARNING
Closing the soft top manually is a complex,
technically challenging procedure which can
also be physically demanding. You or others
can become trapped. There is a risk of injury.
Where possible, have the soft top closed man-
ually at a qualified specialist workshop.
If the soft top cannot be closed automatically,
check the following points:
Ris the trunk partition engaged (Ypage 91)?
Rare the head restraints on the rear bench
seats extended?
Ris the trunk lid closed?
Ris the on-board voltage sufficient?
Start the engine if necessary.
If automatic operation still does not work, the
soft top can be closed manually.
To carry out this work, you will need the assis-
tance of another person.
Closing the soft top
XApply the parking brake.
XOpen the side windows.
XLower the head restraints automatically
(Ypage 98) or manually (Ypage 98).
XRemove the SmartKey from the ignition lock.
XOpen the trunk.
XTake the two straps out of the vehicle tool kit
(Ypage 270).
XTake the hex-socket wrench out of the Oper-
ator's Manual wallet and keep it with you.
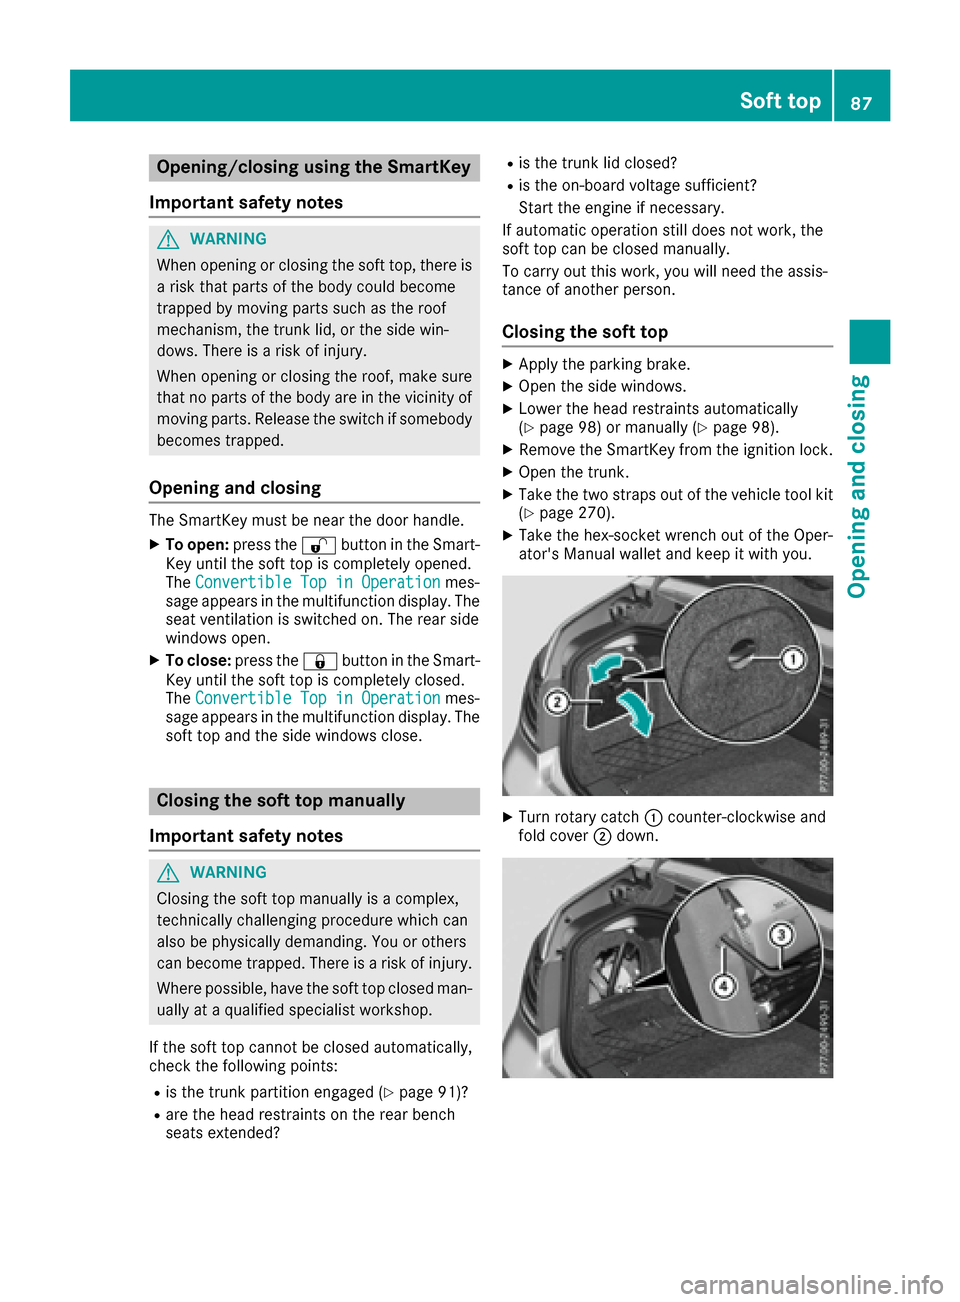
XTurn rotary catch :counter-clockwise and
fold cover ;down.
Soft top87
Opening and closing
Z
Page 103 of 322
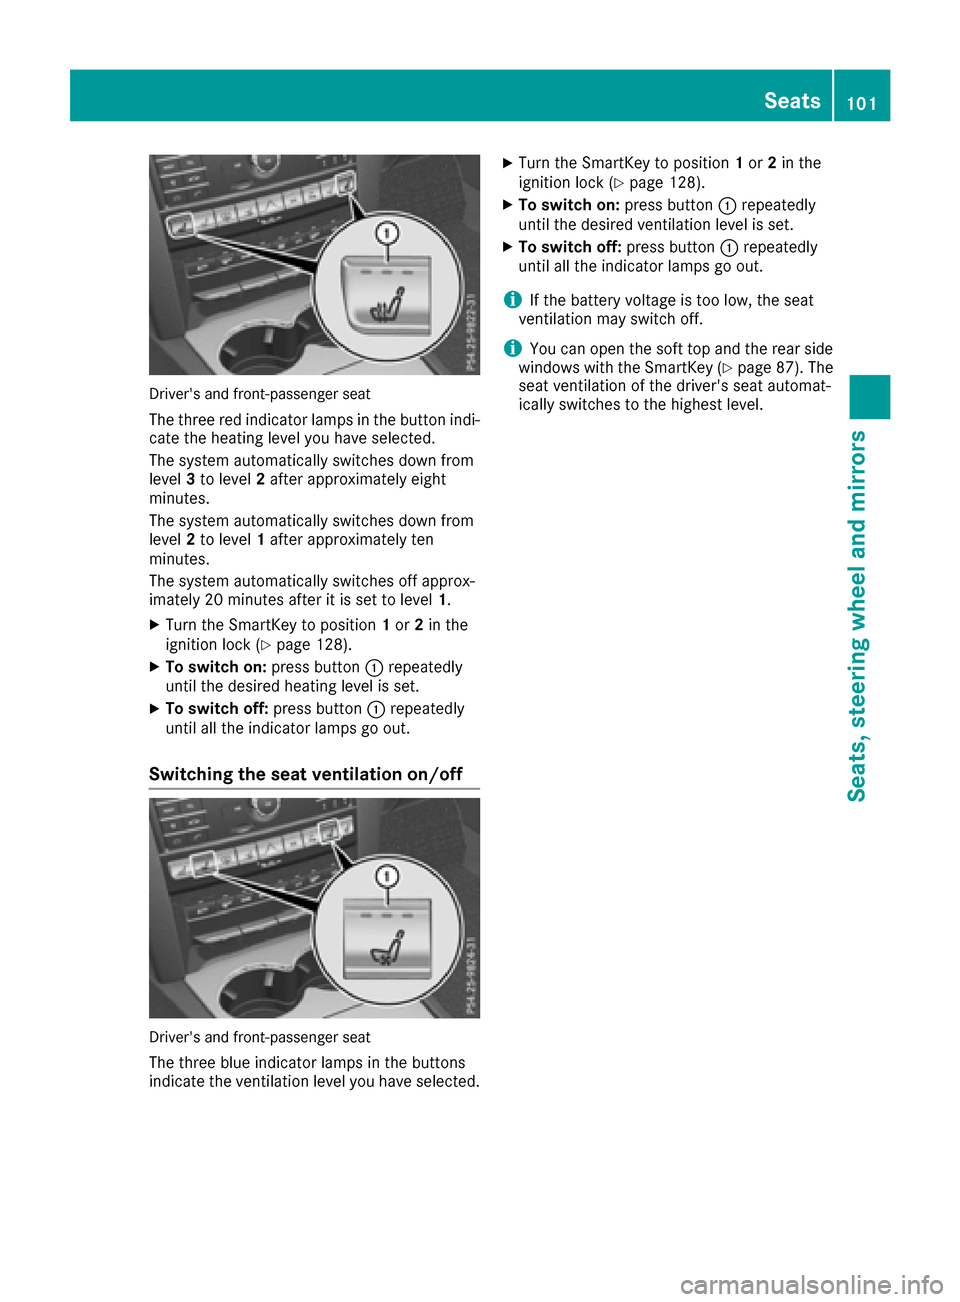
Driver's and front-passenger seat
The three red indicator lamps in the button indi-
cate the heating level you have selected.
The system automatically switches down from
level3to level 2after approximately eight
minutes.
The system automatically switches down from
level 2to level 1after approximately ten
minutes.
The system automatically switches off approx-
imately 20 minutes after it is set to level 1.
XTurn the SmartKey to position 1or 2in the
ignition lock (Ypage 128).
XTo switch on: press button:repeatedly
until the desired heating level is set.
XTo switch off: press button:repeatedly
until all the indicator lamps go out.
Switching the seat ventilation on/off
Driver's and front-passenger seat
The three blue indicator lamps in the buttons
indicate the ventilation level you have selected.
XTurn the SmartKey to position 1or 2in the
ignition lock (Ypage 128).
XTo switch on: press button:repeatedly
until the desired ventilation level is set.
XTo switch off: press button:repeatedly
until all the indicator lamps go out.
iIf the battery voltage is too low, the seat
ventilation may switch off.
iYou can open the soft top and the rear side
windows with the SmartKey (Ypage 87). The
seat ventilation of the driver's seat automat-
ically switches to the highest level.
Seats101
Seats, steering wheel and mirrors
Z
Page 104 of 322
Problems with the seat heating or seat ventilation
ProblemPossible causes/consequences andMSolutions
The seat heating or seat
ventilation has switched
off prematurely or can-
not be switched on.The on-board voltage is too low because too many electrical consum-
ers are switched on.
XSwitch off electrical consumers that you do not need, such as the
rear window defroster or interior lighting.
Once the battery is sufficiently charged, the seat heating or seat
ventilation can be switched back on manually.
AIRSCARF
GWARNING
When AIRSCARF is switched on, very hot air
can flow from the vents in the head restraints. This could result in burns in the immediate
vicinity of the air vents. There is a risk of injury.
Reduce the heater output before it becomes
too hot.
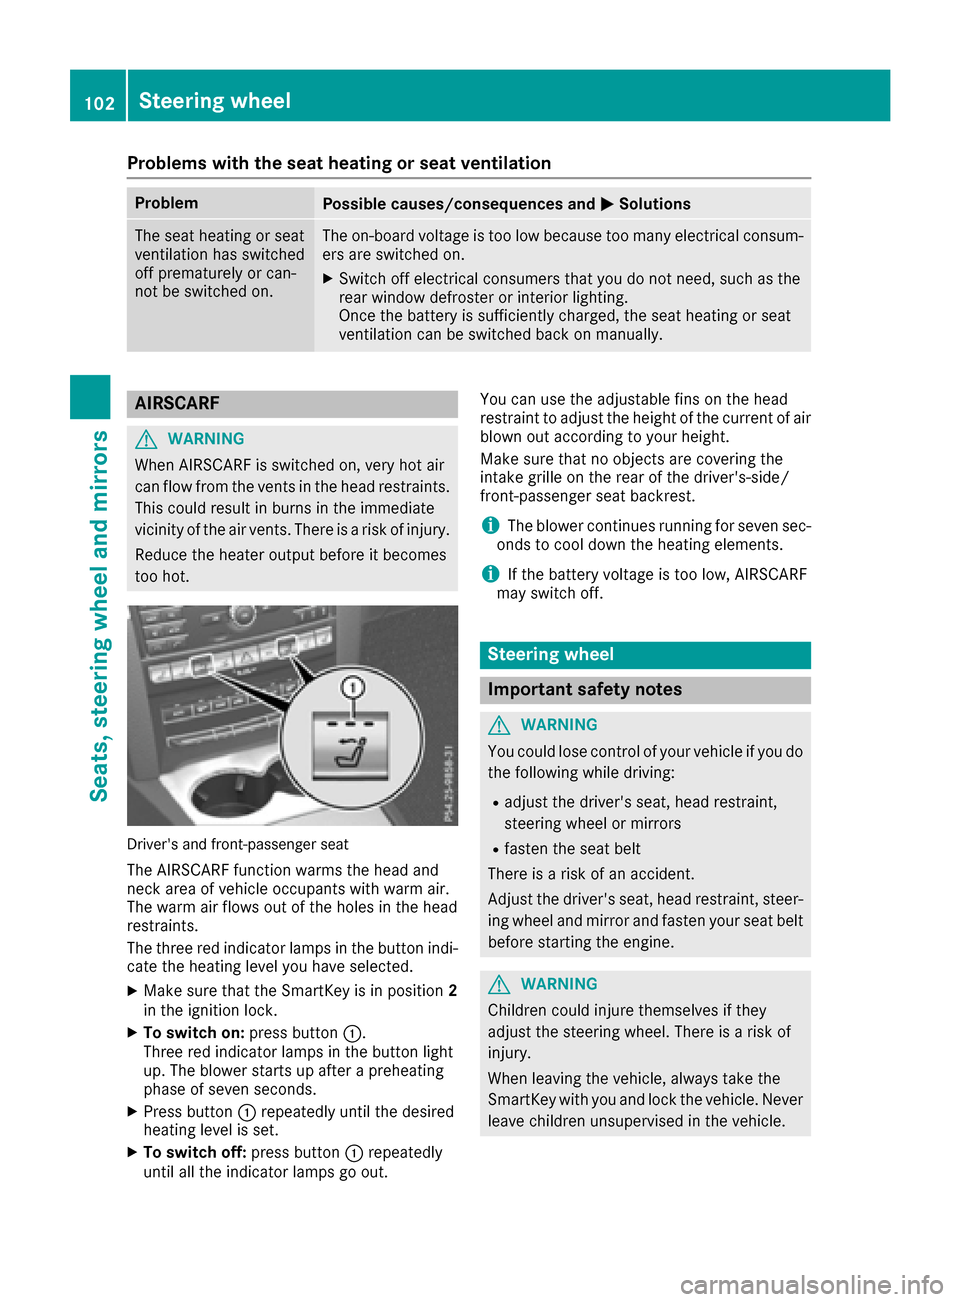
Driver's and front-passenger seat
The AIRSCARF function warms the head and
neck area of vehicle occupants with warm air.
The warm air flows out of the holes in the head
restraints.
The three red indicator lamps in the button indi-
cate the heating level you have selected.
XMake sure that the SmartKey is in position 2
in the ignition lock.
XTo switch on: press button:.
Three red indicator lamps in the button light
up. The blower starts up after a preheating
phase of seven seconds.
XPress button :repeatedly until the desired
heating level is set.
XTo switch off: press button:repeatedly
until all the indicator lamps go out. You can use the adjustable fins on the head
restraint to adjust the height of the current of air
blown out according to your height.
Make sure that no objects are covering the
intake grille on the rear of the driver's-side/
front-passenger seat backrest.
iThe blower continues running for seven sec-
onds to cool down the heating elements.
iIf the battery voltage is too low, AIRSCARF
may switch off.
Steering wheel
Important safety notes
GWARNING
You could lose control of your vehicle if you do the following while driving:
Radjust the driver's seat, head restraint,
steering wheel or mirrors
Rfasten the seat belt
There is a risk of an accident.
Adjust the driver's seat, head restraint, steer-
ing wheel and mirror and fasten your seat belt before starting the engine.
GWARNING
Children could injure themselves if they
adjust the steering wheel. There is a risk of
injury.
When leaving the vehicle, always take the
SmartKey with you and lock the vehicle. Never
leave children unsupervised in the vehicle.
102Steering wheel
Seats, steering wheel and mirrors
Page 106 of 322
Problems with the steering wheel heating
ProblemPossible causes/consequences andMSolutions
The steering wheel heat-
ing has switched off pre-
maturely or cannot be
switched on.The on-board voltage is too low because too many electrical consum-
ers are switched on.
XSwitch off electrical consumers that you do not need, such as the
rear window defroster or interior lighting.
Once the battery is sufficiently charged, the steering wheel heating
will switch back on automatically.
EASY-ENTRY/EXIT feature
Important safety notes
GWARNING
When the EASY-ENTRY/EXIT feature adjusts
the steering wheel, you and other vehicle
occupants – particularly children – could
become trapped. There is a risk of injury.
While the EASY-ENTRY/EXIT feature is mak-
ing adjustments, make sure that no one has
any body parts in the sweep of the steering
wheel.
Move the steering wheel adjustment lever if
there is a risk of entrapment by the steering
wheel. The adjustment process is stopped.
Vehicles with a memory function: if there is a
risk of becoming trapped by the steering wheel,
you can also one of the memory function posi-
tion buttons. The adjustment process is stop-
ped.
GWARNING
If children activate the EASY-ENTRY/EXIT fea-
ture, they can become trapped, particularly
when unattended. There is a risk of injury.
When leaving the vehicle, always take the
SmartKey with you and lock the vehicle. Never
leave children unsupervised in the vehicle.
GWARNING
If you drive off while the EASY-ENTRY/EXIT
feature is making adjustments, you could lose
control of the vehicle. There is a risk of an
accident.
Always wait until the adjustment process is
complete before driving off.
The EASY-ENTRY/EXIT feature makes getting in
and out of your vehicle easier.
You can activate and deactivate the EASY-
ENTRY/EXIT feature in the on-board computer
(
Ypage 200).
Position of the steering wheel when the
EASY-ENTRY/EXIT feature is active
The steering wheel swings upwards when you:
Rremove the SmartKey from the ignition lock
Rwith KEYLESS-GO: open the driver's door;
KEYLESS-GO must be in position 1
Rwith the SmartKey:open the driver's door;
the SmartKey is in position 0or 1must be in
the ignition lock (
Ypage 128).
iThe steering wheel only moves upwards if it
has not already reached the upper stop.
Position of the steering wheel for driv-
ing
The steering wheel is moved to the last selected position when:
Rthe driver's door is closed
Rwith KEYLESS-GO: you press the Start/Stop
button once
or
Rwith the SmartKey: you insert the SmartKey
into the ignition lock
When you close the driver's door with the igni-
tion switched on, the steering wheel is also
automatically moved to the previously set posi-
tion.
104Steering wheel
Seats, steering wheel and mirrors
Page 108 of 322
temperature is low. Heating takes a maximum of
ten minutes.
iYou can also heat up the exterior mirrors
manually by switching on the rear window
defroster.
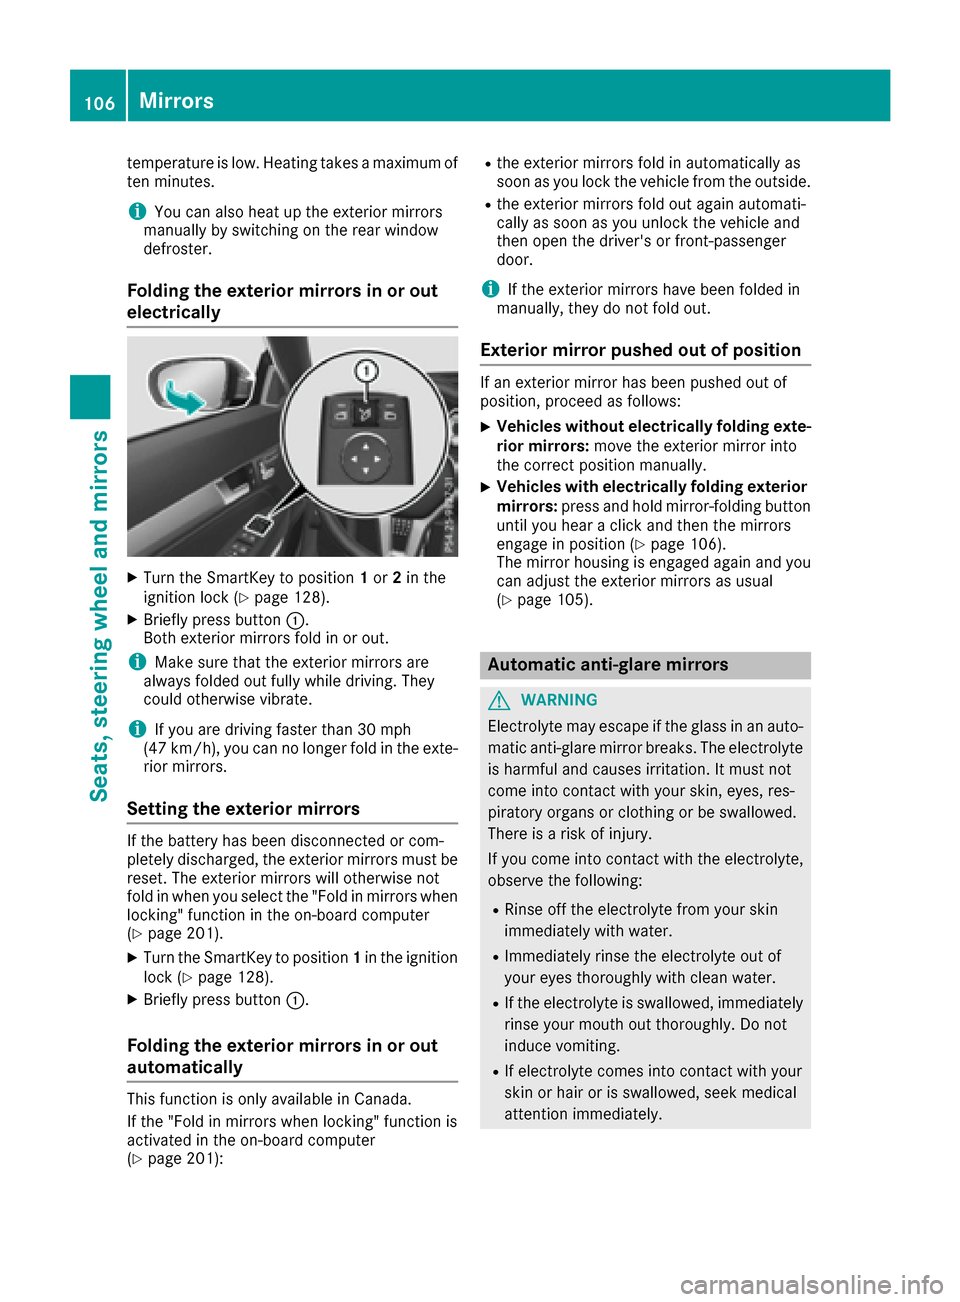
Folding the exterior mirrors in or out
electrically
XTurn the SmartKey to position 1or 2in the
ignition lock (Ypage 128).
XBriefly press button :.
Both exterior mirrors fold in or out.
iMake sure that the exterior mirrors are
always folded out fully while driving. They
could otherwise vibrate.
iIf you are driving faster than 30 mph
(47 km/h), you can no longer fold in the exte-
rior mirrors.
Setting the exterior mirrors
If the battery has been disconnected or com-
pletely discharged, the exterior mirrors must be
reset. The exterior mirrors will otherwise not
fold in when you select the "Fold in mirrors when
locking" function in the on-board computer
(
Ypage 201).
XTurn the SmartKey to position 1in the ignition
lock (Ypage 128).
XBriefly press button :.
Folding the exterior mirrors in or out
automatically
This function is only available in Canada.
If the "Fold in mirrors when locking" function is
activated in the on-board computer
(
Ypage 201):
Rthe exterior mirrors fold in automatically as
soon as you lock the vehicle from the outside.
Rthe exterior mirrors fold out again automati-
cally as soon as you unlock the vehicle and
then open the driver's or front-passenger
door.
iIf the exterior mirrors have been folded in
manually, they do not fold out.
Exterior mirror pushed out of position
If an exterior mirror has been pushed out of
position, proceed as follows:
XVehicles without electrically folding exte-
rior mirrors: move the exterior mirror into
the correct position manually.
XVehicles with electrically folding exterior
mirrors: press and hold mirror-folding button
until you hear a click and then the mirrors
engage in position (
Ypage 106).
The mirror housing is engaged again and you
can adjust the exterior mirrors as usual
(
Ypage 105).
Automatic anti-glare mirrors
GWARNING
Electrolyte may escape if the glass in an auto-
matic anti-glare mirror breaks. The electrolyte
is harmful and causes irritation. It must not
come into contact with your skin, eyes, res-
piratory organs or clothing or be swallowed.
There is a risk of injury.
If you come into contact with the electrolyte,
observe the following:
RRinse off the electrolyte from your skin
immediately with water.
RImmediately rinse the electrolyte out of
your eyes thoroughly with clean water.
RIf the electrolyte is swallowed, immediately
rinse your mouth out thoroughly. Do not
induce vomiting.
RIf electrolyte comes into contact with your
skin or hair or is swallowed, seek medical
attention immediately.
106Mirrors
Seats, steering wheel and mirrors
Page 119 of 322
Overview of climate control systems
General notes
Observe the settings recommended on the fol-
lowing pages. The windows could otherwise fog
up.
To prevent the windows from fogging up:
Rswitch off climate control only briefly
Rswitch on air-recirculation mode only briefly
Rswitch on the cooling with air dehumidifica-
tion function
Rswitch on the defrost windshield function
briefly, if required
Climate control regulates the temperature and
the humidity in the vehicle interior and filters
undesirable substances out of the air.
Climate control can only be operated when the
engine is running. Optimum operation is only
achieved with the side windows and roof closed.
The residual heat function can only be activated
or deactivated with the ignition switched off
(
Ypage 125).
iWhen the weather is warm, ventilate the
vehicle for a brief period. This will speed up
the cooling process and the desired interior
temperature will be reached more quickly.
iThe integrated filter filters out most parti-
cles of dust and soot and completely filters
out pollen. It also reduces gaseous pollutants
and odors. A clogged filter reduces the
amount of air supplied to the vehicle interior.
For this reason, you should always observe
the interval for replacing the filter, which is
specified in the Maintenance Booklet. As it
depends on environmental conditions, e.g.
heavy air pollution, the interval may be
shorter than stated in the Maintenance Book- let.
iIt is possible that the residual heat function
may be activated automatically an hour after
the SmartKey is removed. The vehicle is then ventilated for 30 minutes to dry the automatic
climate control.
Overview of climate control systems117
Climate control
Page 120 of 322
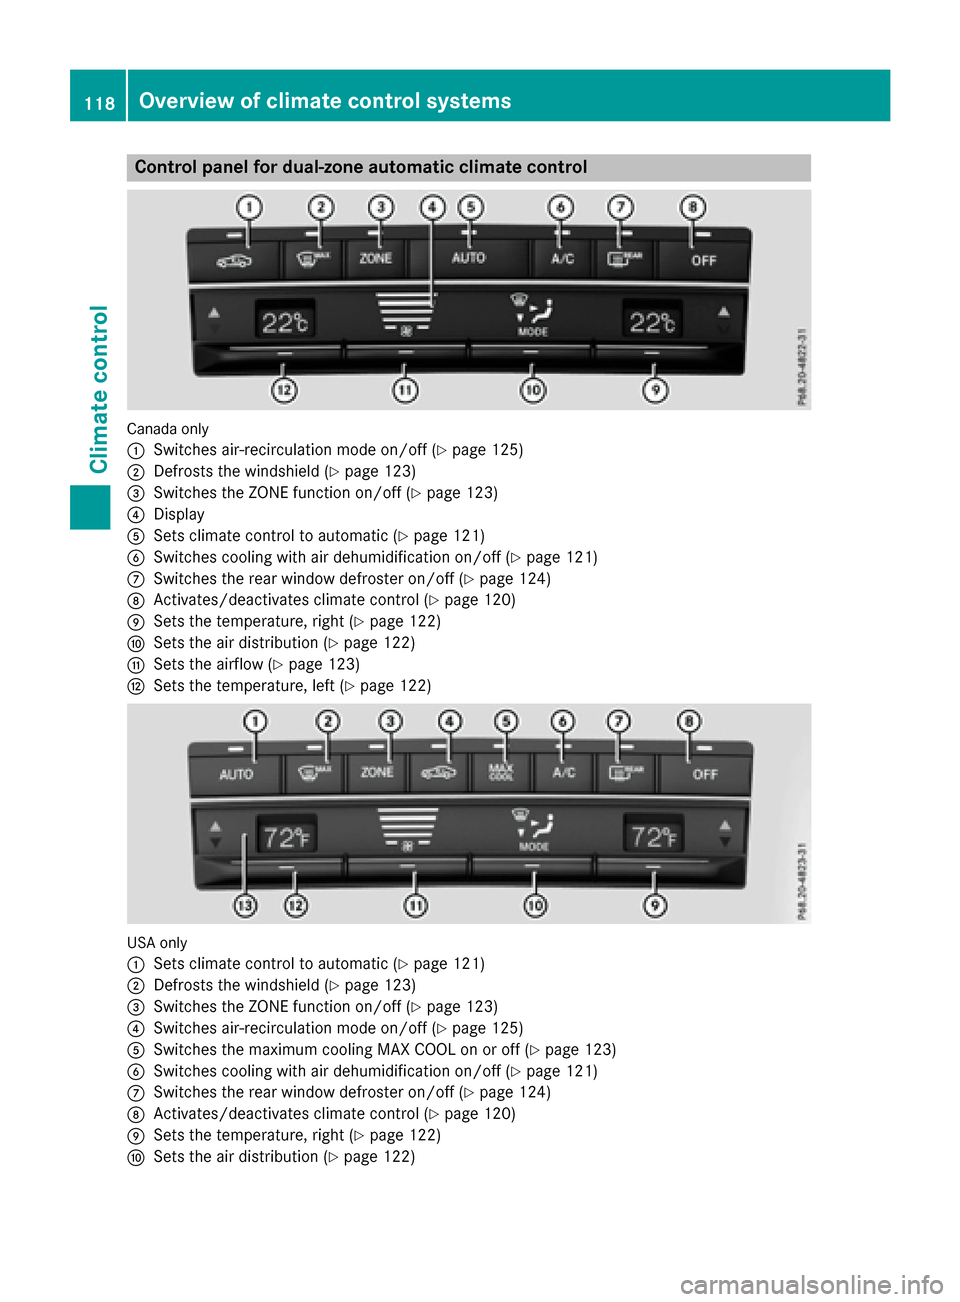
Control panel for dual-zone automatic climate control
Canadaonly
:
Switches air-recirculation mode on/off (Ypage 125)
;Defrosts the windshield (Ypage 123)
=Switches the ZONE function on/off (Ypage 123)
?Display
ASets climate control to automatic (Ypage 121)
BSwitches cooling with air dehumidification on/off (Ypage 121)
CSwitches the rear window defroster on/off (Ypage 124)
DActivates/deactivates climate control (Ypage 120)
ESets the temperature, right (Ypage 122)
FSets the air distribution (Ypage 122)
GSets the airflow (Ypage 123)
HSets the temperature, left (Ypage 122)
US Aonly
:
Sets climate control to automatic (Ypage 121)
;Defrosts the windshield (Ypage 123)
=Switches the ZONE function on/off (Ypage 123)
?Switches air-recirculation mode on/off (Ypage 125)
ASwitches the maximum cooling MAX COOL on or off (Ypage 123)
BSwitches cooling with air dehumidification on/off (Ypage 121)
CSwitches the rear window defroster on/off (Ypage 124)
DActivates/deactivates climate control (Ypage 120)
ESets the temperature, right (Ypage 122)
FSets the air distribution (Ypage 122)
118Overview of climate control systems
Climate control
Page 121 of 322
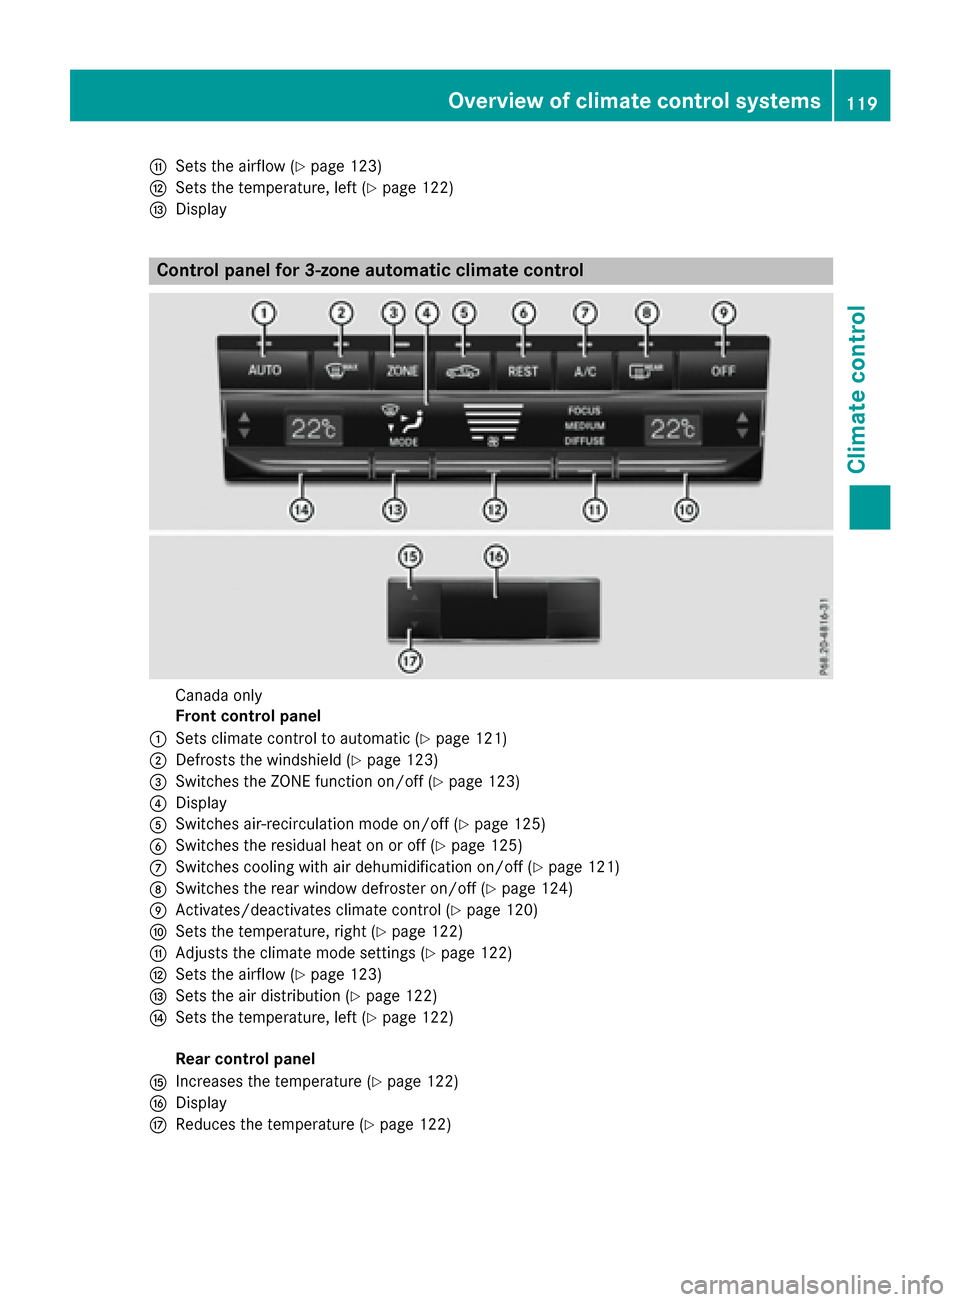
GSets the airflow (Ypage 123)
HSets the temperature, left (Ypage 122)
IDisplay
Control panel for 3-zone automatic climate control
Canada only
Front control panel
:Sets climate control to automatic (Ypage 121)
;Defrosts the windshield (Ypage 123)
=Switches the ZONE function on/off (Ypage 123)
?Display
ASwitches air-recirculation mode on/off (Ypage 125)
BSwitches the residual heat on or off (Ypage 125)
CSwitches cooling with air dehumidification on/off (Ypage 121)
DSwitches the rear window defroster on/off (Ypage 124)
EActivates/deactivates climate control (Ypage 120)
FSets the temperature, right (Ypage 122)
GAdjusts the climate mode settings (Ypage 122)
HSets the airflow (Ypage 123)
ISets the air distribution (Ypage 122)
JSets the temperature, left (Ypage 122)
Rear control panel
KIncreases the temperature (Ypage 122)
LDisplay
MReduces the temperature (Ypage 122)
Overview of climate control systems119
Climate control
Page 122 of 322
Optimum use of automatic climate
control
Climate control system
Below, you can find a number of notes and rec-
ommendations to help you use climate control
optimally.
The 3-zone automatic climate control is only
available on vehicles for Canada.
RActivate climate control using the Ãand
¿ buttons. The indicator lamps above the
à and¿ buttons light up.
RVehicles with 3-zone automatic climate con-
trol: in automatic mode, you can also set the
climate mode (FOCUS, MEDIUM or DIFFUSE).
The MEDIUM level is recommended.
RSet the temperature to 72 ‡ (22 †).
ROnly use the "Windshield defrosting" function
briefly until the windshield is clear again.
ROnly use air-recirculation mode briefly, e.g. if
there are unpleasant outside odors or when in
a tunnel. The windows could otherwise fog up, since no fresh air is drawn into the vehicle in
air-recirculation mode.
RUse the ZONE function to adopt the temper-
ature settings on the driver's side for the
front-passenger side and the rear compart-
ment as well. The indicator lamp above the
á button goes out.
RVehicles with 3-zone automatic climate con-
trol: use the residual heat function if you want
to heat or ventilate the vehicle interior when
the ignition is switched off. The residual heat
function can only be activated or deactivated with the ignition switched off.
RIf you change the settings of the climate con-
trol system, the climate status display
appears for approximately three seconds at
the bottom of the screen in the multimedia
system display. You will see the current set-
tings of the various climate control functions.
ECO start/stop function
During automatic engine switch-off, the climate
control system only operates at a reduced capa-
city. If you require the full climate control output,
you can switch off the ECO start/stop function
by pressing the ECO button (
Ypage 132).
Operating the climate control sys-
tems
Activating/deactivating climate con-
trol
General notes
When the climate control is switched off, the air
supply and air circulation are also switched off.
The windows could fog up. Therefore, switch off
climate control only briefly
iActivate climate control primarily using the
à button (Ypage 121).
Activating/deactivating
XTurn the SmartKey to position 2in the ignition
lock (Ypage 128).
XTo activate: press theÃbutton.
The indicator lamp above the Ãbutton
lights up. Airflow and air distribution are set to
automatic mode.
XTo deactivate: press the^button.
The indicator lamp above the ^button
lights up.
120Operating the climate control systems
Climate control
Page 123 of 322
Switching cooling with air dehumidification on/off
General notes
If you deactivate the "Cooling with air-dehumidification" function, the air inside the vehicle will not
be cooled. The air inside the vehicle will also not be dehumidified. The windows can fog up more
quickly. Therefore, deactivate the cooling with air-dehumidification function only briefly.
The "Cooling with air dehumidification" function is only available when the engine is running. The air
inside the vehicle is cooled and dehumidified according to the temperature selected.
Condensation may drip from the underside of the vehicle when it is in cooling mode. This is normal
and not a sign that there is a malfunction.
Switching on/off
XTo activate: press the¿button.
The indicator lamp above the ¿button lights up.
XTo deactivate: press the¿button.
The indicator lamp above the ¿button goes out. The "Cooling with air dehumidification"
function has a delayed switch-off feature.
Problems with the "Cooling with air dehumidification" function
ProblemPossible causes/consequences and MSolutions
The indicator lamp over
the¿ button flashes
three times or remains
off. The "Cooling with air
dehumidification" func-
tion cannot be switched
on.Cooling with air dehumidification has been deactivated due to a mal-
function.
XVisit a qualified specialist workshop.
Setting climate control to automatic
General notes
In automatic mode, the set temperature is main-
tained automatically at a constant level. The
system automatically regulates the temperature
of the dispensed air, the airflow and the air dis-
tribution.
The "Cooling with air dehumidification" function
is activated automatically in automatic mode.
Automatic control
XTurn the SmartKey to position 2in the ignition
lock (Ypage 128).
XSet the desired temperature.
XTo activate: press theÃbutton.
The indicator lamp above the Ãbutton
lights up. Automatic air distribution and air-
flow are activated.
i3-zone automatic climate control: when
automatic mode is activated, you can set the
climate mode (
Ypage 122).
XTo switch to manual mode:
Dual-zone automatic climate control: press
air distribution adjustment switch F
(
Ypage 118).
Operating the climate control systems121
Climate control