buttons MERCEDES-BENZ E-Class CABRIOLET 2017 A207 Owner's Manual
[x] Cancel search | Manufacturer: MERCEDES-BENZ, Model Year: 2017, Model line: E-Class CABRIOLET, Model: MERCEDES-BENZ E-Class CABRIOLET 2017 A207Pages: 322, PDF Size: 7.97 MB
Page 19 of 322
SMSsee also Digital Operator's Man-
ual .................................................. 234
Snow chains ...................................... 287
Sockets
General notes ................................ 245
Rear compartment .........................2 46
Soft top
AIRCAP ............................................ 92
Cleaning ......................................... 264
Closing manually in an emer-
gency ............................................... 87
Display message ............................ 223
Important safety notes .................... 85
Installing/removing the AIRCAP
wind screen ..................................... 93
Opening/closing (SmartKey) ........... 87
Opening/closing (with soft-top
switch) ............................................. 86
Problem (malfunction) ..................... 95
Relocking ......................................... 91
wind screen ..................................... 91
Soft-top switch ....................................8 6
Sound
Switching on/off ........................... 235
Special seat belt retractor .................. 57
Specialist workshop ............................28
Speed, controlling
see Cruise control
Speedometer
Digital ............................................ 192
In the Instrument cluster ................. 33
Segments ...................................... 189
Selecting the display unit ............... 198
Standing lamps
Display message ............................2 11
Switching on/off ........................... 110
Start/stop function
see ECO start/stop function
Starting (engine) ................................ 129
STEER CONTROL .................................. 71
Steering
Display message ............................ 222
Steering Assist and Stop&Go Pilot
(DISTRONIC PLUS)
Activating/deactivating ................. 197
Display message ............................ 218 Steering assistant
STEER CON-
TROL
see STEER CONTROL
Steering wheel
Adjusting (electrically) ................... 103
Button overview ............................... 34
Buttons (on-board computer) ......... 190
Cleaning ......................................... 268
Important safety notes .................. 102
Paddle shifters ............................... 138
Steering wheel heating .................. 103
Storing settings (memory func-
tion) ............................................... 108
Steering wheel heating
Problem (malfunction) ................... 104
Switching on/off ........................... 103
Steering wheel paddle shifters ........138
Stowage areas ................................... 240
Stowage compartments
Armrest (under) .............................2 41
Center console .............................. 241
Cup holders ................................... 243
Glove box ....................................... 241
Important safety information ......... 240
Stowage net ................................... 242
Under driver's seat/front-
passenger seat .............................. 241
Stowage net ....................................... 242
Stowage well beneath the trunk
floor .................................................... 243
Summer tires ..................................... 287
Sun visor ............................................ 244
Surround lighting (on-board com-
puter) .................................................. 199
Switching air-recirculation mode
on/off ................................................. 125
Switching on media mode
Via the device list .......................... 239
T
Tachometer ........................................ 189
Tail lamps
Display message ............................ 211
Tank
see Fuel tank
Tank content
Fuel gauge ....................................... 33
Index17
Page 25 of 322

XTo call up the basic menu of the Digital
Operator's Manual:selectÞsymbol A.
XTo switch functions to the multimedia
system using the buttons on the center
console: press the $,%,ÕorØ
button.
The selected menu appears. The Digital Oper-
ator's Manual remains open in the back-
ground.
Digital Operator's Manual23
Page 40 of 322
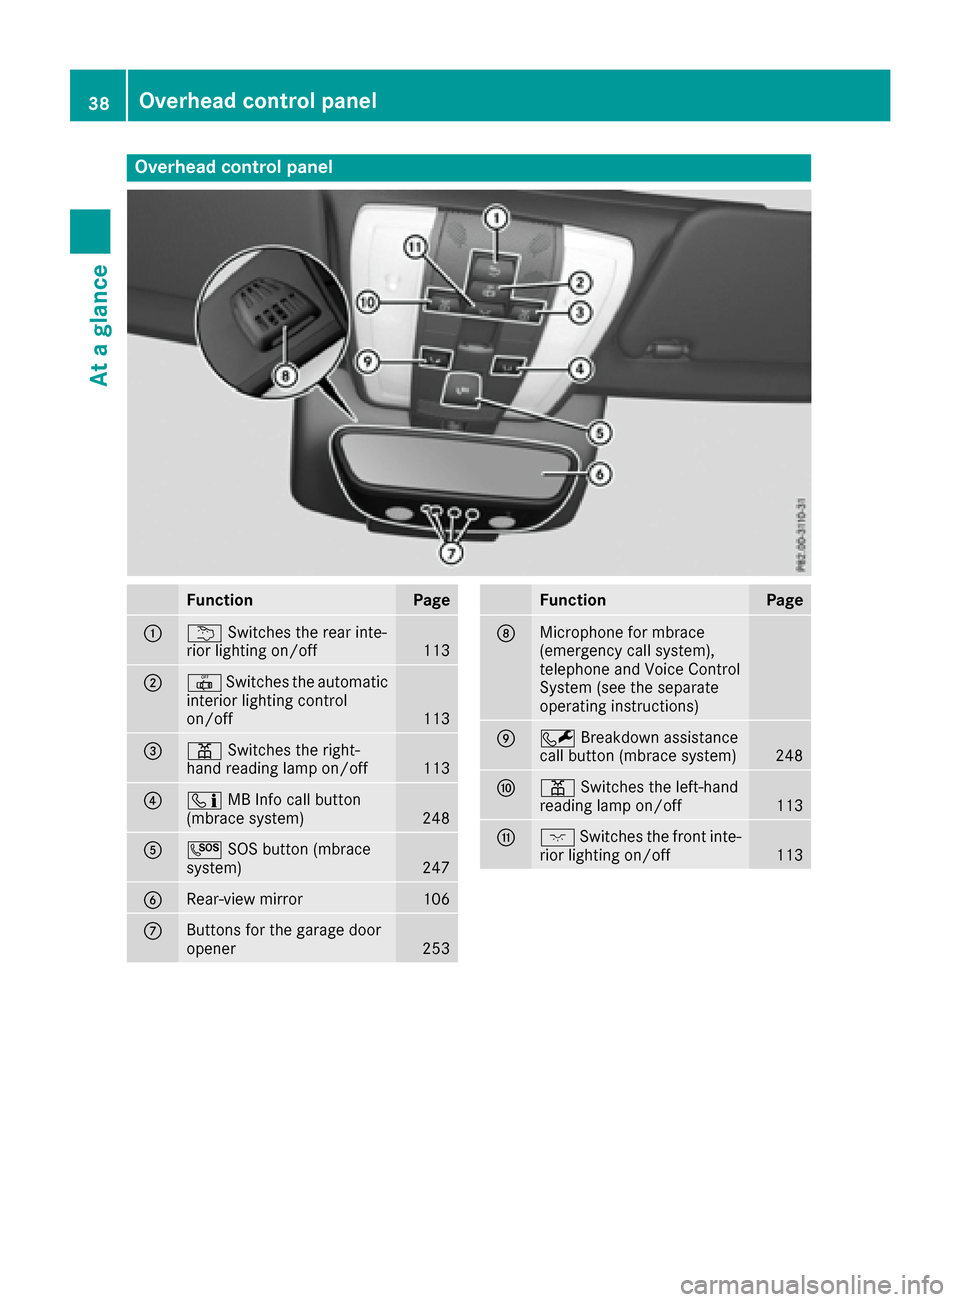
Overhead control panel
FunctionPage
:uSwitches the rear inte-
rior lighting on/off113
;| Switches the automatic
interior lighting control
on/off
113
=p Switches the right-
hand reading lamp on/off113
?ï MB Info call button
(mbrace system)248
AG SOS button (mbrace
system)247
BRear-view mirror106
CButtons for the garage door
opener253
FunctionPage
DMicrophone for mbrace
(emergency call system),
telephone and Voice Control
System (see the separate
operating instructions)
EF Breakdown assistance
call button (mbrace system)248
Fp Switches the left-hand
reading lamp on/off113
Gc Switches the front inte-
rior lighting on/off113
38Overhead control panel
At a glance
Page 63 of 322
GWARNING
If the child restraint system is subjected to
direct sunlight, parts may get very hot. Chil-
dren may burn themselves on these parts,
particularly on the metal parts of the child
restraint system. There is a risk of injury.
If you leave the vehicle, taking the child with
you, always ensure that the child restraint
system is not exposed to direct sunlight. Pro- tect it with a blanket, for example. If the child
restraint system has been exposed to direct
sunlight, let it cool down before securing the
child in it. Never leave children unattended in
the vehicle.
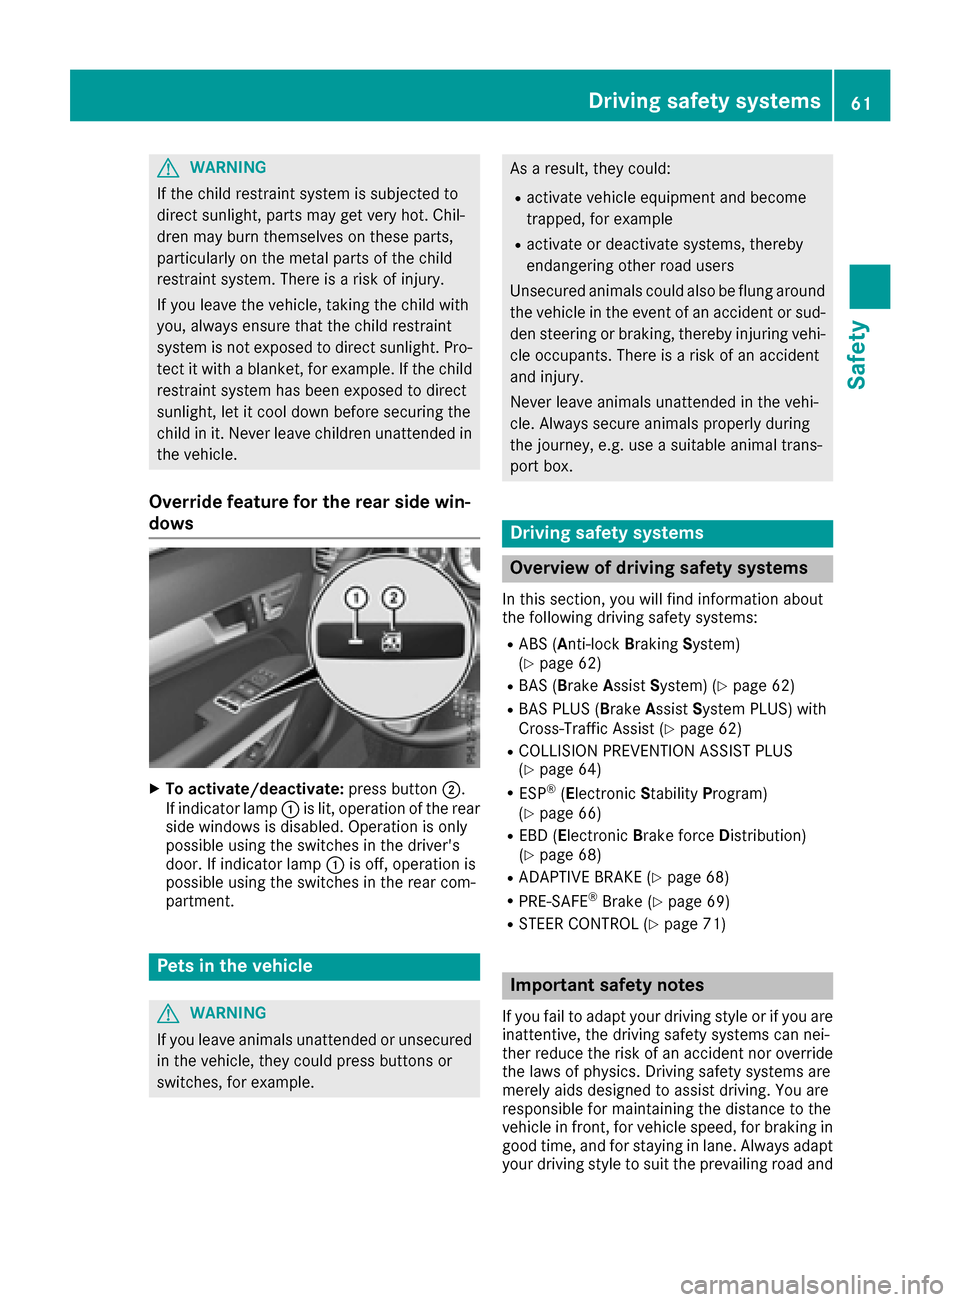
Override feature for the rear side win-
dows
XTo activate/deactivate: press button;.
If indicator lamp :is lit, operation of the rear
side windows is disabled. Operation is only
possible using the switches in the driver's
door. If indicator lamp :is off, operation is
possible using the switches in the rear com-
partment.
Pets in the vehicle
GWARNING
If you leave animals unattended or unsecured
in the vehicle, they could press buttons or
switches, for example.
As a result, they could:
Ractivate vehicle equipment and become
trapped, for example
Ractivate or deactivate systems, thereby
endangering other road users
Unsecured animals could also be flung around
the vehicle in the event of an accident or sud-
den steering or braking, thereby injuring vehi- cle occupants. There is a risk of an accident
and injury.
Never leave animals unattended in the vehi-
cle. Always secure animals properly during
the journey, e.g. use a suitable animal trans-
port box.
Driving safety systems
Overview of driving safety systems
In this section, you will find information about
the following driving safety systems:
RABS ( Anti-lock Braking System)
(Ypage 62)
RBAS ( Brake Assist System) (Ypage 62)
RBAS PLUS ( BrakeAssist System PLUS) with
Cross-Traffic Assist (Ypage 62)
RCOLLISION PREVENTION ASSIST PLUS
(Ypage 64)
RESP®(E lectronic StabilityProgram)
(Ypage 66)
REBD ( Electronic Brake force Distribution)
(Ypage 68)
RADAPTIVE BRAKE (Ypage 68)
RPRE-SAFE®Brake (Ypage 69)
RSTEER CONTROL (Ypage 71)
Important safety notes
If you fail to adapt your driving style or if you are
inattentive, the driving safety systems can nei-
ther reduce the risk of an accident nor override the laws of physics. Driving safety systems are
merely aids designed to assist driving. You are
responsible for maintaining the distance to the
vehicle in front, for vehicle speed, for braking in
good time, and for staying in lane. Always adapt
your driving style to suit the prevailing road and
Driving safety systems61
Safety
Z
Page 76 of 322
tions of KEYLESS-GO with those of a conven-
tional SmartKey. Unlock the vehicle by using
KEYLESS-GO, for instance, and lock it using the
&button on the SmartKey.
When locking or unlocking with KEYLESS-GO,
the distance between the SmartKey and the cor-
responding door handle must not be greater
than 3 ft (1 m).
A check which periodically establishes a radio
connection between the vehicle and the Smart-
Key determines whether a valid SmartKey is in
the vehicle. This occurs, for example:
Rwhen the external door handles are touched
Rwhen starting the engine
Rwhile the vehicle is in motion
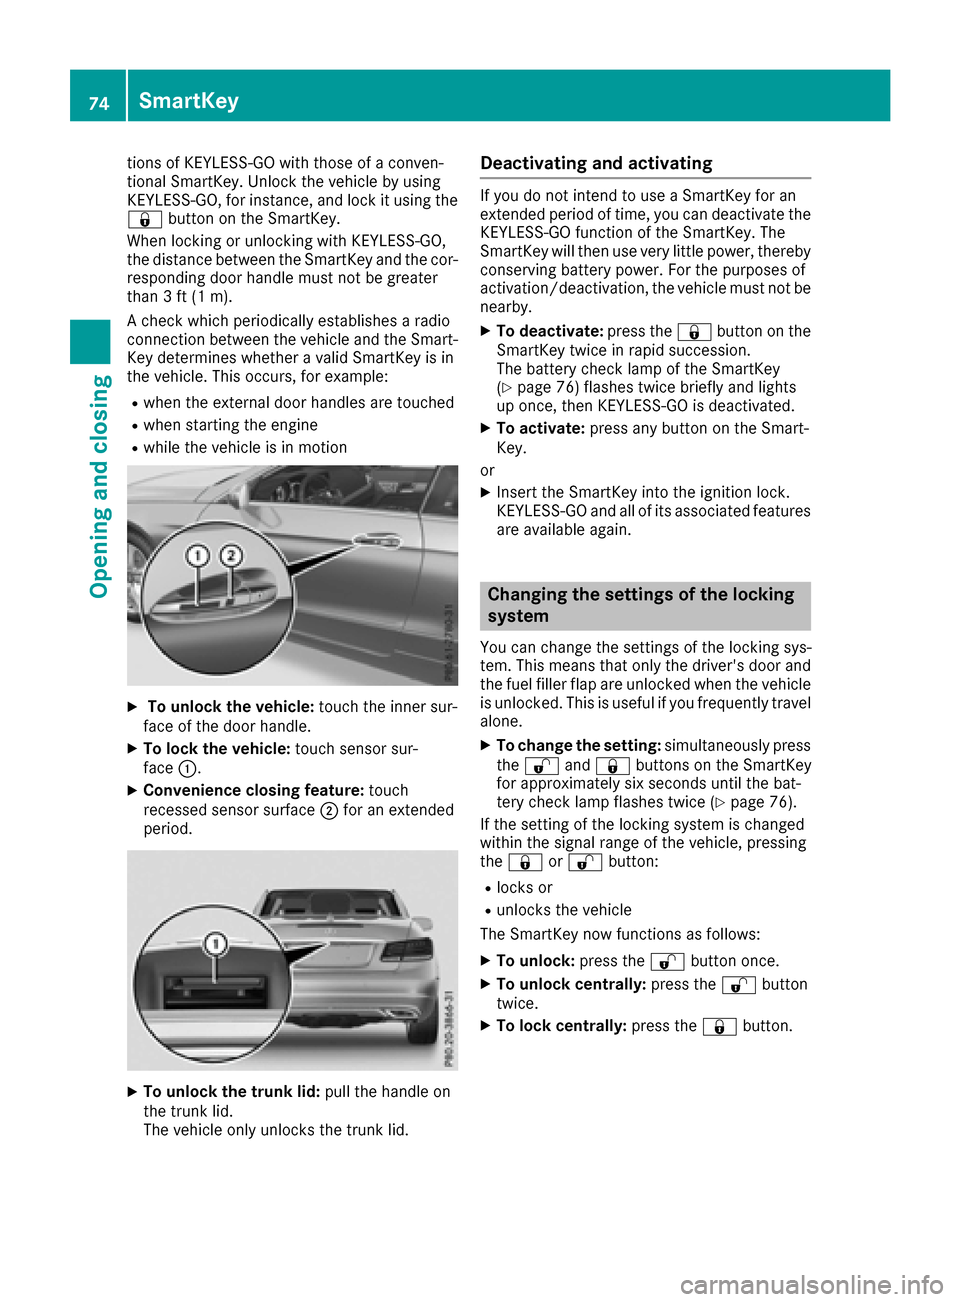
XTo unlock the vehicle: touch the inner sur-
face of the door handle.
XTo lock the vehicle: touch sensor sur-
face :.
XConvenience closing feature: touch
recessed sensor surface ;for an extended
period.
XTo unlock the trunk lid: pull the handle on
the trunk lid.
The vehicle only unlocks the trunk lid.
Deactivating and activating
If you do not intend to use a SmartKey for an
extended period of time, you can deactivate the
KEYLESS-GO function of the SmartKey. The
SmartKey will then use very little power, thereby
conserving battery power. For the purposes of
activation/deactivation, the vehicle must not be
nearby.
XTo deactivate: press the&button on the
SmartKey twice in rapid succession.
The battery check lamp of the SmartKey
(
Ypage 76) flashes twice briefly and lights
up once, then KEYLESS-GO is deactivated.
XTo activate: press any button on the Smart-
Key.
or
XInsert the SmartKey into the ignition lock.
KEYLESS-GO and all of its associated features
are available again.
Changing the settings of the locking
system
You can change the settings of the locking sys-
tem. This means that only the driver's door and
the fuel filler flap are unlocked when the vehicle
is unlocked. This is useful if you frequently travel
alone.
XTo change the setting: simultaneously press
the % and& buttons on the SmartKey
for approximately six seconds until the bat-
tery check lamp flashes twice (
Ypage 76).
If the setting of the locking system is changed
within the signal range of the vehicle, pressing
the & or% button:
Rlocks or
Runlocks the vehicle
The SmartKey now functions as follows:
XTo unlock: press the%button once.
XTo unlock centrally: press the%button
twice.
XTo lock centrally: press the&button.
74SmartKey
Opening and closing
Page 77 of 322
The KEYLESS-GO function is changed as fol-
lows:
XTo unlock the driver's door:touch the inner
surface of the door handle on the driver's
door.
XTo unlock centrally: touch the inner surface
of the front-passenger door handle.
XTo lock centrally: touch the outer sensor
surface on one of the door handles.
XTo restore the factory settings: press and
hold down the %and& buttons simul-
taneously for approximately six seconds until
the battery check lamp flashes twice
(
Ypage 76).
Mechanical key
General notes
If the vehicle can no longer be locked or
unlocked with the SmartKey, use the mechani-
cal key.
If you use the mechanical key to unlock and
open the driver's door or the trunk lid, the anti-
theft alarm system will be triggered. Switch off
the alarm (
Ypage 71).
If you unlock the vehicle using the mechanical
key, the fuel filler flap will not be unlocked auto-
matically.
XTo unlock the fuel filler flap: insert the
SmartKey into the ignition lock.
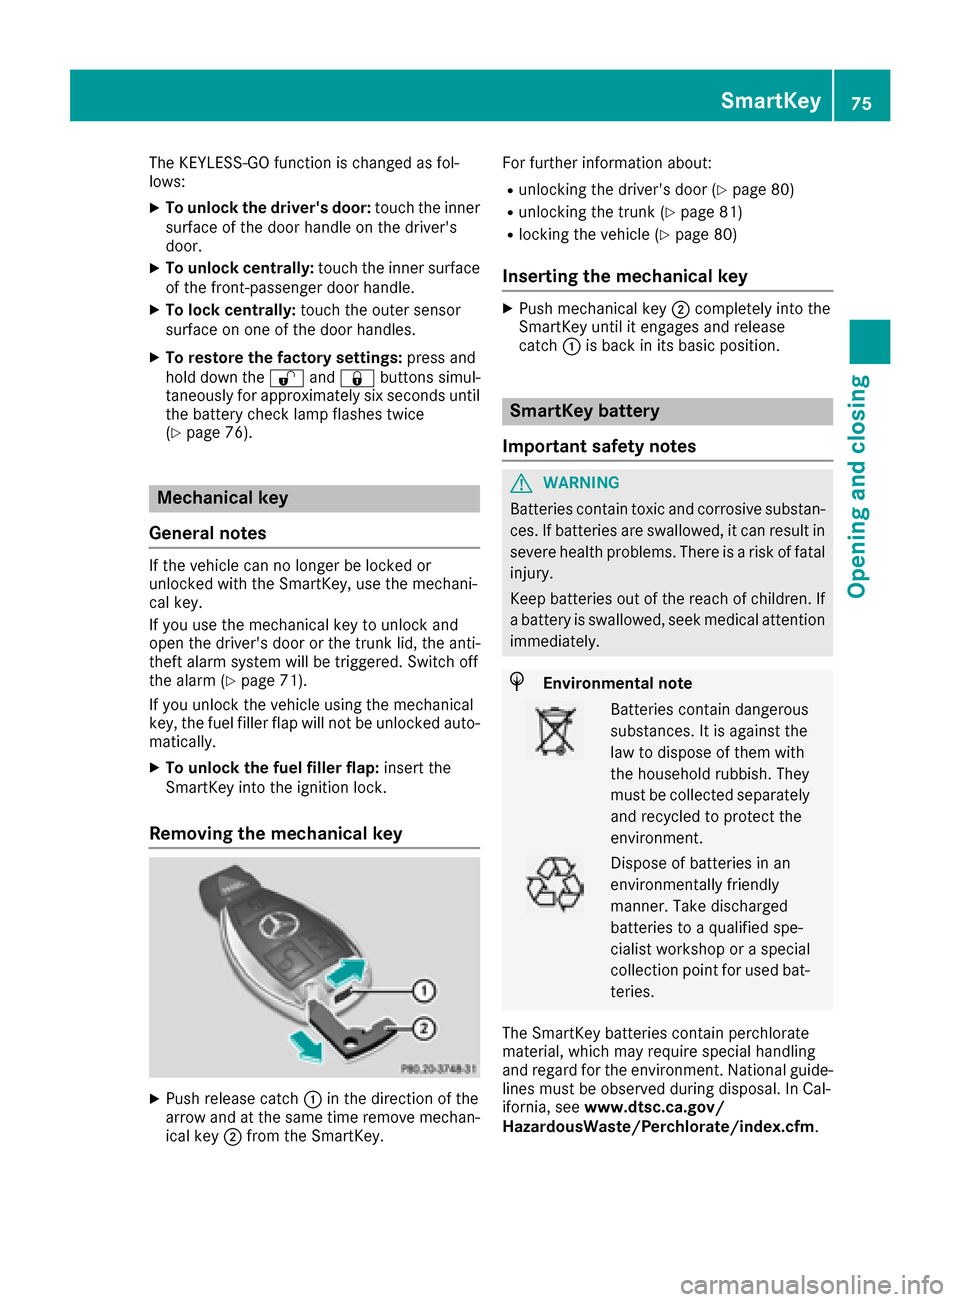
Removing the mechanical key
XPush release catch :in the direction of the
arrow and at the same time remove mechan- ical key ;from the SmartKey. For further information about:
Runlocking the driver's door (Ypage 80)
Runlocking the trunk (Ypage 81)
Rlocking the vehicle (Ypage 80)
Inserting the mechanical key
XPush mechanical key
;completely into the
SmartKey until it engages and release
catch :is back in its basic position.
SmartKey battery
Important safety notes
GWARNING
Batteries contain toxic and corrosive substan- ces. If batteries are swallowed, it can result in
severe health problems. There is a risk of fatalinjury.
Keep batteries out of the reach of children. If
a battery is swallowed, seek medical attention
immediately.
HEnvironmental note
Batteries contain dangerous
substances. It is against the
law to dispose of them with
the household rubbish. They
must be collected separately and recycled to protect the
environment.
Dispose of batteries in an
environmentally friendly
manner. Take discharged
batteries to a qualified spe-
cialist workshop or a special
collection point for used bat-
teries.
The SmartKey batteries contain perchlorate
material, which may require special handling
and regard for the environment. National guide-
lines must be observed during disposal. In Cal-
ifornia, see www.dtsc.ca.gov/
HazardousWaste/Perchlorate/index.cfm.
SmartKey75
Opening and closing
Z
Page 78 of 322
Mercedes-Benz recommends that you have the
batteries replaced at a qualified specialist work-
shop.
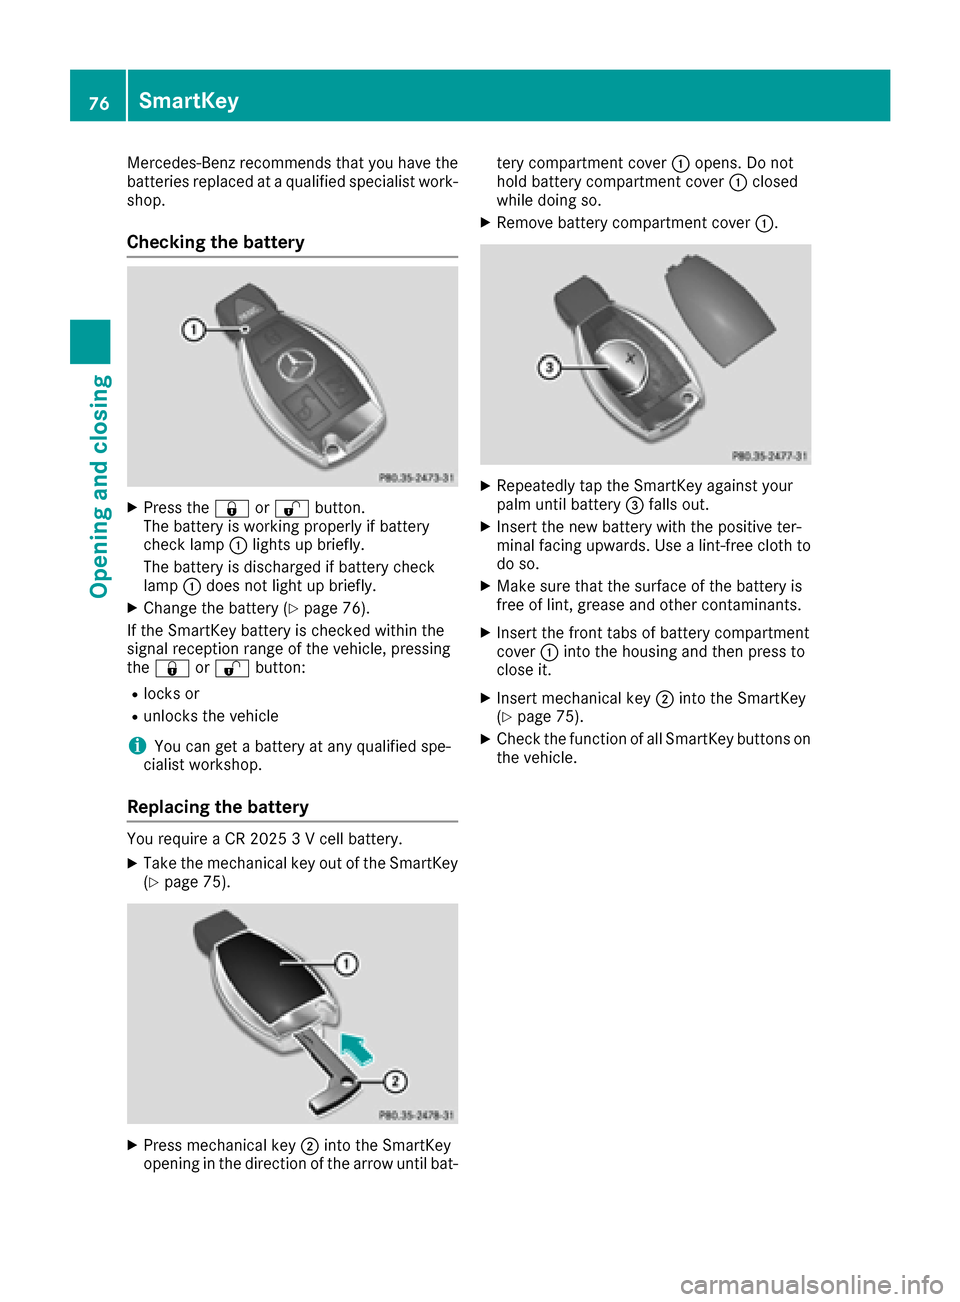
Checking the battery
XPress the&or% button.
The battery is working properly if battery
check lamp :lights up briefly.
The battery is discharged if battery check
lamp :does not light up briefly.
XChange the battery (Ypage 76).
If the SmartKey battery is checked within the
signal reception range of the vehicle, pressing
the & or% button:
Rlocks or
Runlocks the vehicle
iYou can get a battery at any qualified spe-
cialist workshop.
Replacing the battery
You require a CR 2025 3 V cell battery.
XTake the mechanical key out of the SmartKey
(Ypage 75).
XPress mechanical key ;into the SmartKey
opening in the direction of the arrow until bat- tery compartment cover
:opens. Do not
hold battery compartment cover :closed
while doing so.
XRemove battery compartment cover :.
XRepeatedly tap the SmartKey against your
palm until battery=falls out.
XInsert the new battery with the positive ter-
minal facing upwards. Use a lint-free cloth to
do so.
XMake sure that the surface of the battery is
free of lint, grease and other contaminants.
XInsert the front tabs of battery compartment
cover :into the housing and then press to
close it.
XInsert mechanical key ;into the SmartKey
(Ypage 75).
XCheck the function of all SmartKey buttons on
the vehicle.
76SmartKey
Opening and closing
Page 81 of 322
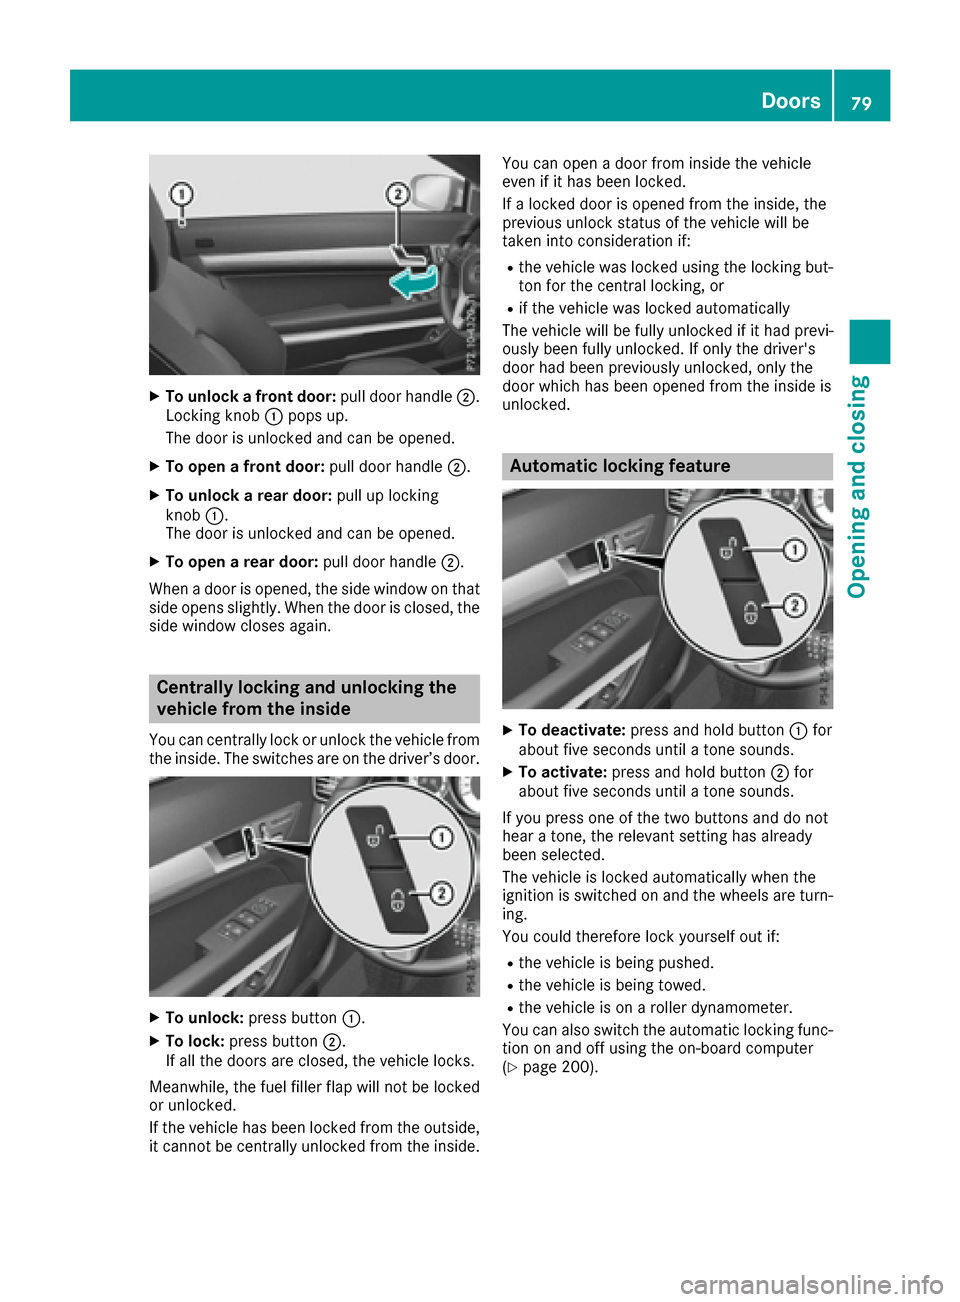
XTo unlock a front door:pull door handle;.
Locking knob :pops up.
The door is unlocked and can be opened.
XTo open a front door: pull door handle;.
XTo unlock a rear door: pull up locking
knob :.
The door is unlocked and can be opened.
XTo open a rear door: pull door handle;.
When a door is opened, the side window on that
side opens slightly. When the door is closed, the
side window closes again.
Centrally locking and unlocking the
vehicle from the inside
You can centrally lock or unlock the vehicle from
the inside. The switches are on the driver’s door.
XTo unlock: press button :.
XTo lock:press button ;.
If all the doors are closed, the vehicle locks.
Meanwhile, the fuel filler flap will not be locked
or unlocked.
If the vehicle has been locked from the outside,
it cannot be centrally unlocked from the inside. You can open a door from inside the vehicle
even if it has been locked.
If a locked door is opened from the inside, the
previous unlock status of the vehicle will be
taken into consideration if:
Rthe vehicle was locked using the locking but-
ton for the central locking, or
Rif the vehicle was locked automatically
The vehicle will be fully unlocked if it had previ-
ously been fully unlocked. If only the driver's
door had been previously unlocked, only the
door which has been opened from the inside is
unlocked.
Automatic locking feature
XTo deactivate: press and hold button :for
about five seconds until a tone sounds.
XTo activate: press and hold button ;for
about five seconds until a tone sounds.
If you press one of the two buttons and do not
hear a tone, the relevant setting has already
been selected.
The vehicle is locked automatically when the
ignition is switched on and the wheels are turn-
ing.
You could therefore lock yourself out if:
Rthe vehicle is being pushed.
Rthe vehicle is being towed.
Rthe vehicle is on a roller dynamometer.
You can also switch the automatic locking func-
tion on and off using the on-board computer
(
Ypage 200).
Doors79
Opening and closing
Z
Page 99 of 322
GWARNING
You could lose control of your vehicle if you do the following while driving:
Radjust the driver's seat, head restraint,
steering wheel or mirrors
Rfasten the seat belt
There is a risk of an accident.
Adjust the driver's seat, head restraint, steer-
ing wheel and mirror and fasten your seat belt before starting the engine.
GWARNING
If you adjust the seat height carelessly, you or
other vehicle occupants could be trapped and
thereby injured. Children in particular could
accidentally press the electrical seat adjust-
ment buttons and become trapped. There is a
risk of injury.
While moving the seats, make sure that your
hands or other body parts do not get under the
lever assembly of the seat adjustment sys-
tem.
GWARNING
When you adjust a seat, you or other vehicle
occupants could become trapped, e.g. on the seat guide rail. There is a risk of injury.
Make sure when adjusting a seat that no one
has any body parts in the sweep of the seat.
!To avoid damage to the seats and the seat
heating, observe the following information:
Rkeep liquids from spilling on the seats. If
liquid is spilled on the seats, dry them as
soon as possible.
Rif the seat covers are damp or wet, do not
switch on the seat heating. The seat heat-
ing should also not be used to dry the seats.
Rclean the seat covers as recommended;
see "Interior care".
Rdo not transport heavy loads on the seats.
Do not place sharp objects on the seat
cushions, e.g. knives, nails or tools. The
seats should only be occupied by passen-
gers, if possible.
Rwhen the seat heating is in operation, do
not cover the seats with insulating materi- als, e.g. blankets, coats, bags, seat covers,
child seats or booster seats.
!Make sure that there are no objects in the
footwell under or behind the seats when mov-
ing the seats back. There is a risk that the
seats and/or the objects could be damaged.
iThe head restraints in the front seats are
installed with the NECK-PRO system
(
Ypage 55). For this reason, it is not possible
to remove the head restraints from the front
seats.
For more information, contact a qualified spe-
cialist workshop.
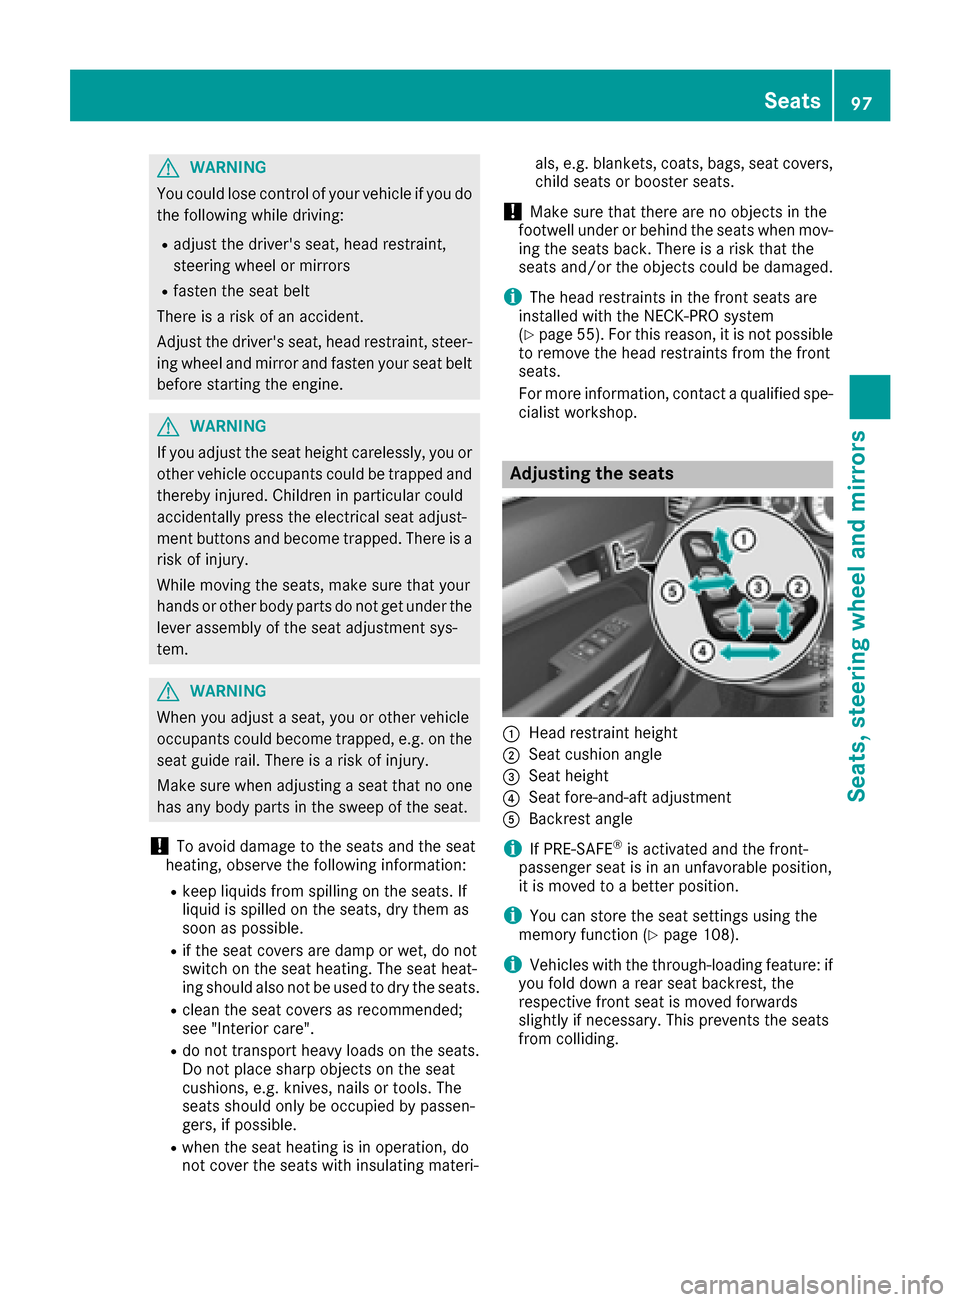
Adjusting the seats
:Head restraint height
;Seat cushion angle
=Seat height
?Seat fore-and-aft adjustment
ABackrest angle
iIf PRE-SAFE®is activated and the front-
passenger seat is in an unfavorable position,
it is moved to a better position.
iYou can store the seat settings using the
memory function (Ypage 108).
iVehicles with the through-loading feature: if
you fold down a rear seat backrest, the
respective front seat is moved forwards
slightly if necessary. This prevents the seats
from colliding.
Seats97
Seats, steering wheel and mirrors
Z
Page 103 of 322
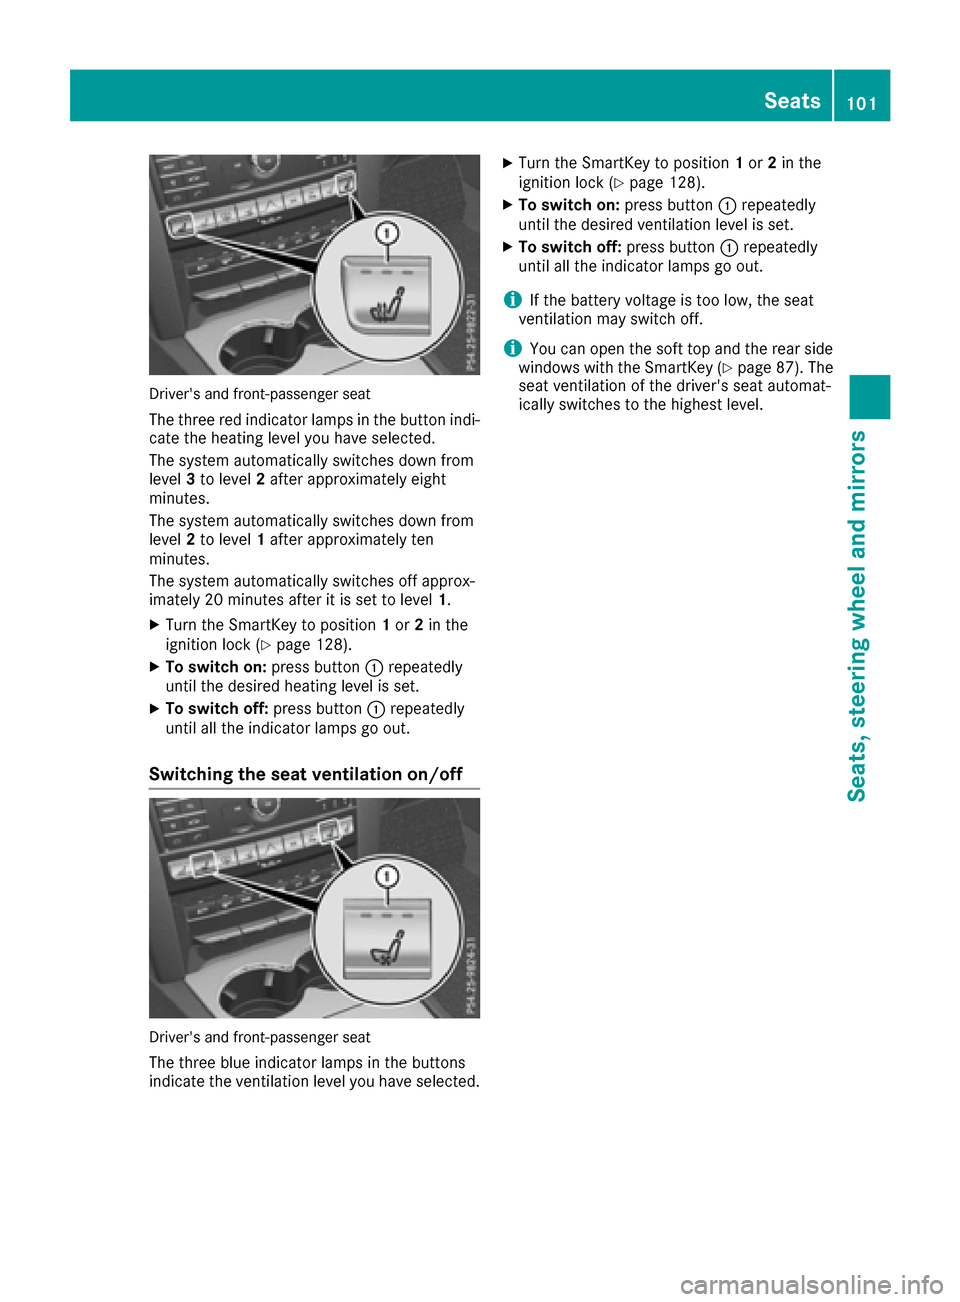
Driver's and front-passenger seat
The three red indicator lamps in the button indi-
cate the heating level you have selected.
The system automatically switches down from
level3to level 2after approximately eight
minutes.
The system automatically switches down from
level 2to level 1after approximately ten
minutes.
The system automatically switches off approx-
imately 20 minutes after it is set to level 1.
XTurn the SmartKey to position 1or 2in the
ignition lock (Ypage 128).
XTo switch on: press button:repeatedly
until the desired heating level is set.
XTo switch off: press button:repeatedly
until all the indicator lamps go out.
Switching the seat ventilation on/off
Driver's and front-passenger seat
The three blue indicator lamps in the buttons
indicate the ventilation level you have selected.
XTurn the SmartKey to position 1or 2in the
ignition lock (Ypage 128).
XTo switch on: press button:repeatedly
until the desired ventilation level is set.
XTo switch off: press button:repeatedly
until all the indicator lamps go out.
iIf the battery voltage is too low, the seat
ventilation may switch off.
iYou can open the soft top and the rear side
windows with the SmartKey (Ypage 87). The
seat ventilation of the driver's seat automat-
ically switches to the highest level.
Seats101
Seats, steering wheel and mirrors
Z