buttons MERCEDES-BENZ E-Class COUPE 2014 C207 Owner's Manual
[x] Cancel search | Manufacturer: MERCEDES-BENZ, Model Year: 2014, Model line: E-Class COUPE, Model: MERCEDES-BENZ E-Class COUPE 2014 C207Pages: 394, PDF Size: 5.28 MB
Page 19 of 394
SRS
see SRS (Supplemental Restraint
System)
SRS (Supplemental Restraint
System)
Display message ............................ 253
Introduction ..................................... 43
Warning lamp ................................. 281
Warning lamp (function) ................... 43
Standing lamps
Display message ............................ 259
Switching on/off ........................... 137
Start/stop function
see ECO start/stop function
Starting (engine) ................................ 166
STEE RCONTROL .................................. 78
Steering (display message) ..............273
Steering Assist (DISTRONIC PLUS) Activating/deactivating .................242
Display message ............................ 268
Steering wheel
Adjusting (electrically). ..................125
Button overview ............................... 33
Buttons (on-board computer) ......... 233
Cleaning ......................................... 325
Important safety notes ..................124
Paddle shifters ............................... 176
Steering wheel heating ..................125
Storing settings (memory function) 130
Steering wheel heating
Problem (malfunction) ...................126
Switching on/off ........................... 125
Steering wheel paddle shifters ........176
Stowage areas ................................... 288
Stowage compartments Armrest (under) ............................. 289
Center console .............................. 289
Cuph olders ................................... 293
Glove box ...................................... .289
Important safety information .........288
Stowage net ................................... 290
Under driver's seat/front-
passenger sea t.............................. 290
Stowage net ....................................... 290
Stowage well beneath the trunk
floor .................................................... 292
Summer tires ..................................... 346Sun visor
............................................ 294
Surround lighting (on-board
computer) .......................................... 245
Switching air-recirculation mode
on/off ................................................. 158
Switching off the alarm (ATA) ............78 T
Tachometer ........................................ 232
Tail lamps Display message ............................ 258
Tank content
Fuel gauge ....................................... 31
Technical data
Capacities ...................................... 384
Emergency spare wheel .................379
Information .................................... 382
Tires/wheels ................................. 372
Vehicle data ................................... 390
TELEAID
Call priority .................................... 301
Downloading destinations
(COMAND) ..................................... 301
Downloading route s....................... 304
Emergency call .............................. 298
Geo fencing ................................... 305
Locating astolen vehicl e............... 303
MB info call button ........................300
Remote vehicle locking ..................303
Roadside Assistance button ..........299
Search &Send ............................... 302
Self-test ......................................... 297
Speed alert .................................... 305
System .......................................... 297
Triggering the vehicle alarm ........... 305
Vehicle remote malfunction
diagnosi s....................................... 303
Vehicle remote unlocking ..............302
Tele Aid
General notes ................................ 297
Telephone
Accepting acall............................. 239
Display message ............................ 273
Menu (on-board computer) ............239
Number from the phone book ....... .239
Redialing ........................................ 240
Rejecting/ending acall................. 239 Index
17
Page 40 of 394
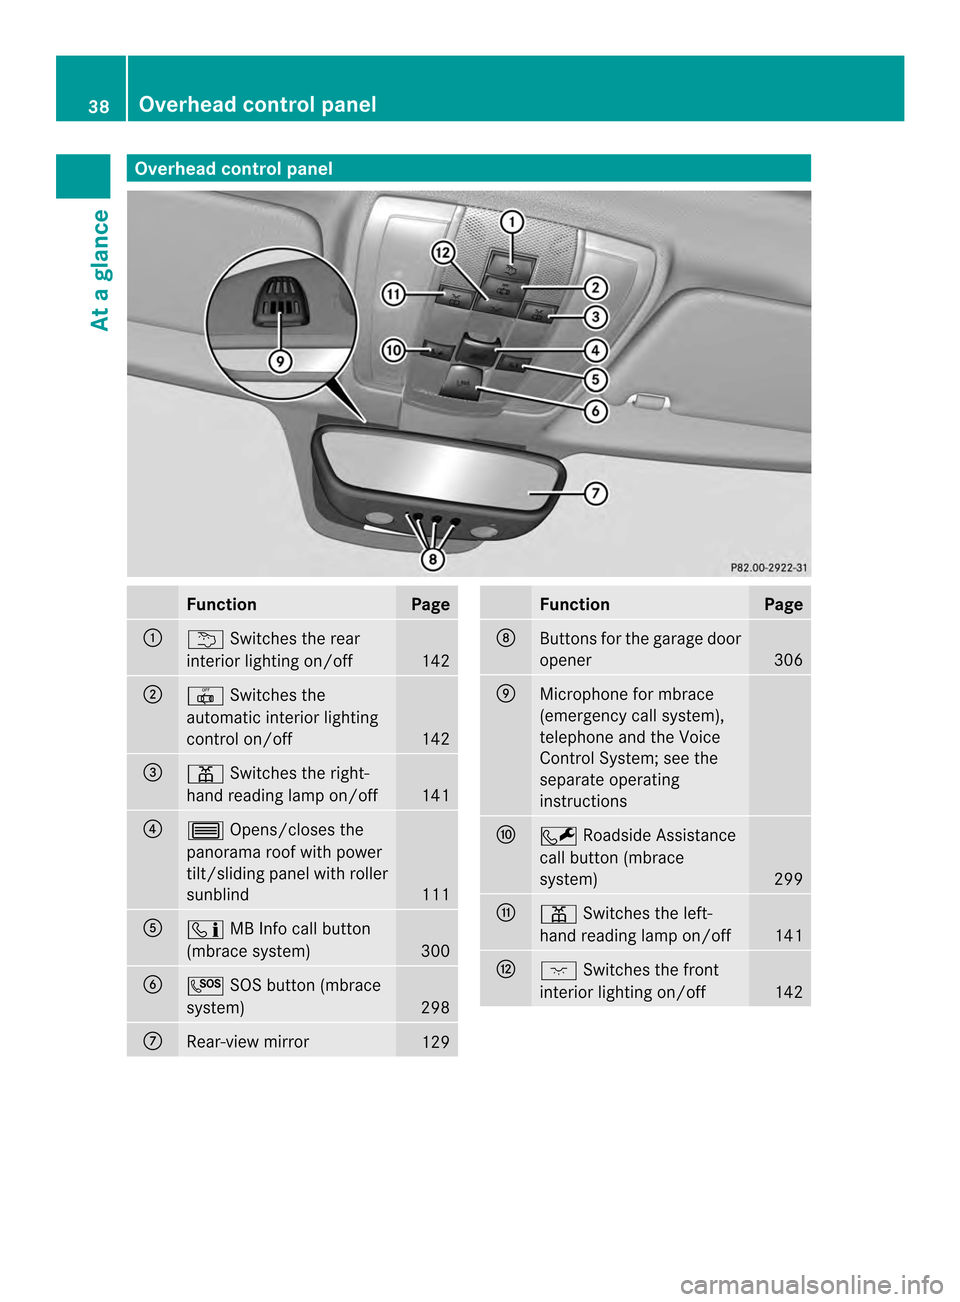
Overhea
dcontrol panel Function Page
0002
0001
Switches the rear
interio rlighting on/off 142
0003
001B
Switches the
automatic interior lighting
control on/off 142
0023
0012
Switches the right-
hand reading lamp on/off 141
0022
0002
Opens/closes the
panorama roof with power
tilt/sliding panel with roller
sunblind 111
0020
0009
MB Info call button
(mbrace system) 300
0021
0008
SOS button (mbrace
system) 298
0014
Rear-view mirror
129 Function Page
0015
Buttons for the garage door
opener 306
0016
Microphone for mbrace
(emergency call system),
telephone and the Voice
Control System; see the
separate operating
instructions 0017
0007
Roadside Assistance
call button (mbrace
system) 299
0018
0012
Switches the left-
hand reading lamp on/off 141
001A
0004
Switches the front
interior lighting on/off 14238
Overhead control panelAt a glance
Page 85 of 394
If you do not open the vehicle within
approximately 40 seconds of unlocking:
R
the vehicle is locked again.
R the theft deterrent locking system is
armed again.
X To lockc entrally:press the 000Dbutton.
The SmartKey centrally locks/unlocks:
R the doors
R the trunk lid
R the fuel filler flap
The tur nsignals flash onc ewhen unlocking
and three times when locking.
You can also set an audible signal to confirm
that the vehicle has been locked. The audible
signal can be activated and deactivated using
the on-board computer (Y page 246).
When it is dark, the surround lighting also
comes on if it is activated in the on-board
computer (Y page 245). KEYLESS-GO
General notes Bear in mind that the engine can be started
by any of the vehicle occupants if there is a
KEYLESS-GO key in the vehicle.
Locking/unlocking centrally You can start, lock or unlock the vehicle using
KEYLESS-GO. To do this, you only need carry
the SmartKey with you. You can combine the
functions of KEYLESS-GO with those of a
conventional SmartKey. Unlock the vehicle
by using KEYLESS-GO, for instance, and lock
it using the 000Dbutton on the SmartKey.
When locking or unlocking with KEYLESS-GO,
the distance between the SmartKey and the
corresponding door handle must not be
greater than 3 ft (1 m). Ac
heck which periodically establishes a radio
connection between the vehicle and the
SmartKey determines whether a valid
SmartKey is in the vehicle. This occurs, for
example:
R when the external door handles are
touched
R when starting the engine
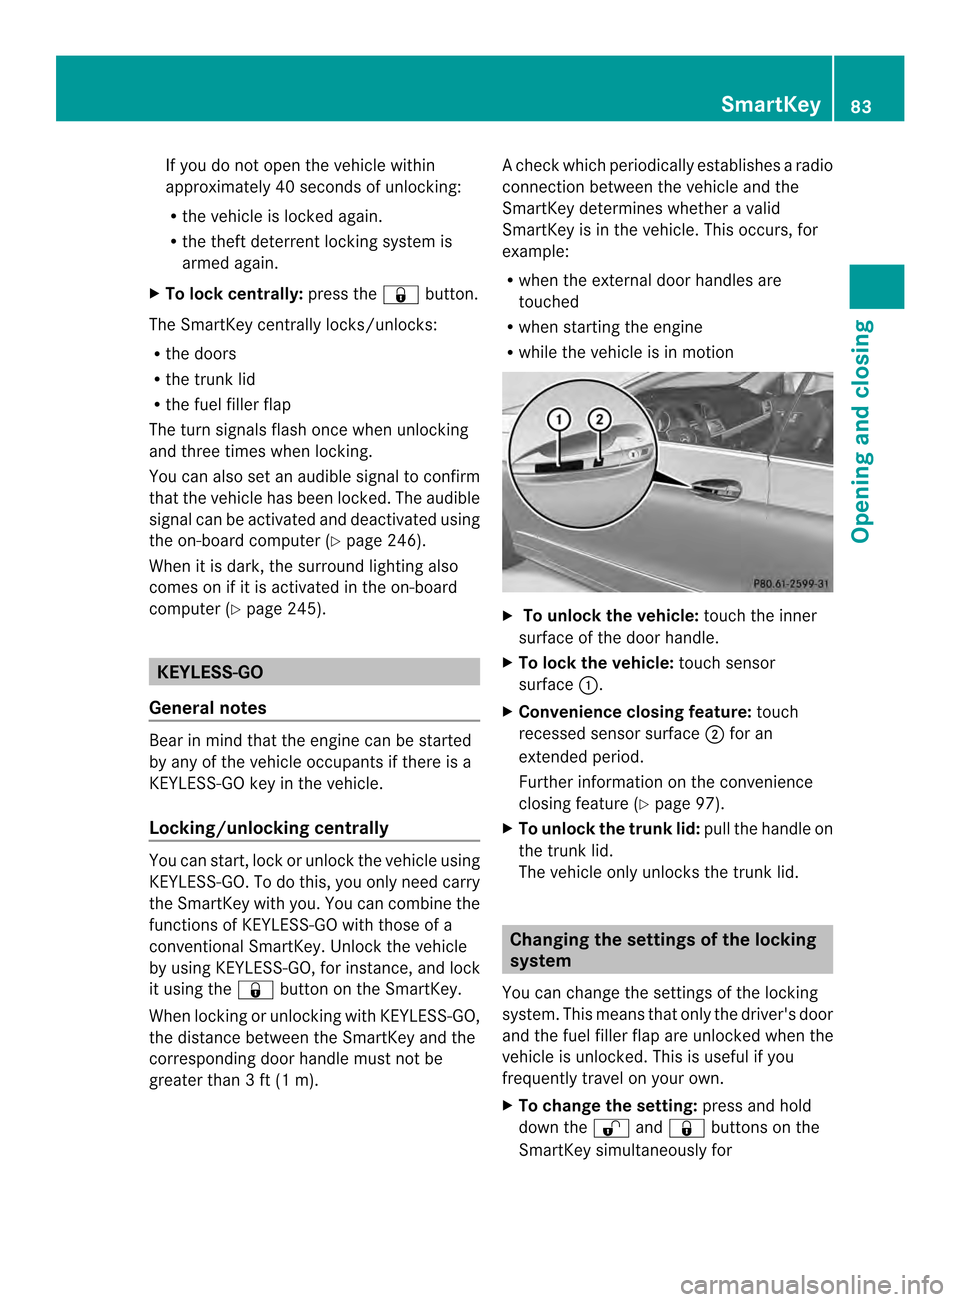
R while the vehicle is in motion X
To unlock the vehicle: touch the inner
surface of the door handle.
X To lock the vehicle: touch sensor
surface 0002.
X Convenience closing feature: touch
recessed sensor surface 0003for an
extended period.
Further information on the convenience
closing feature (Y page 97).
X To unlock the trunk lid: pull the handle on
the trunk lid.
The vehicle only unlocks the trunk lid. Changing the settings of the locking
system
You can change the settings of the locking
system. This means that only the driver's door
and the fuel filler flap are unlocked when the
vehicle is unlocked. This is useful if you
frequently travel on your own.
X To change the setting: press and hold
down the 000Eand000D buttons on the
SmartKey simultaneously for SmartKey
83Opening and closing Z
Page 86 of 394

approximately six seconds until the battery
check lamp flashes twice (Y
page 85).
i If the setting of the locking system is
changed within the signal range of the
vehicle, pressing the 000Dor000E button:
R locks or
R unlocks the vehicle
The SmartKey now functions as follows:
X To unlock the driver's door: press the
000E button once.
X To unlock centrally: press the000E
butto ntwice.
X To lock centrally: press the000Dbutton.
The KEYLESS-GO function is changed as
follows:
X To unlock the driver's door: touch the
inner surface of the door handle on the
driver's door.
X To unlock centrally: touch the inner
surface of the front-passenger door handle.
X To lock centrally: touch the outersensor
surface on one of the door handles.
X To restore the factory settings: press
and hold down the 000Eand000D buttons
simultaneously for approximately six
seconds until the battery chec klamp
flashes twice ( Ypage 85). Mechanical key
General notes If the vehicle can no longer be locked or
unlocked with the SmartKey, use the
mechanical key.
If you use the mechanical key to unlock and
open the driver's door or the trunk lid, the
anti-thef talarm system will be triggered
(Y page 78). There are several ways to tur
noff the alarm:
X To turn the alarm off with the
SmartKey: press the000Eor000D button
on the SmartKey.
or
X Insert the SmartKey into the ignition lock.
or
X To disarm the alarm with KEYLESS-GO:
press the Start/Stop button in the ignition
lock. The SmartKey must be in the vehicle.
or
X Lock or unlock the vehicle using KEYLESS-
GO. The SmartKey must be outside the
vehicle.
Removing the mechanical key 0002
Release catch
0003 Mechanical key
X Push release catch 0002in the direction of
the arrow and at the same time remove
mechanical key 0003from the SmartKey.
For further information about:
R unlocking the driver's door (Y page 90)
R unlocking the trunk (Y page 93)
R locking the vehicle (Y page 90)84
SmartKeyOpening and closing
Page 88 of 394
X
Make sure that the surface of the battery is
free of lint, grease and other contaminants.
X Insert the front tabs of battery
compartment cover 0002into the housing
first and then press to close it.
X Insert mechanical key 0003into the
SmartKey (Y page 84).
X Check the function of all SmartKey buttons
on the vehicle. 86
SmartKeyOpening and closing
Page 92 of 394

X
To deactivate: press and hold button 0002
for abou tfive seconds until a tone sounds.
X To activate: press and hold button 0003for
about five seconds until a tone sounds.
i If you press one of the two buttons and
do not hear a tone, the relevant setting has
already been selected.
The vehicle is locked automatically when the
ignition is switched on and the wheels are
turning.
You could therefore lock yourself out if:
R the vehicle is being pushed.
R the vehicle is being towed.
R the vehicle is on a roller dynamometer.
You can also switch the automatic locking
function on and off using the on-board
computer (Y page 245). Unlocking the driver's door
(mechanical key)
If the vehicle can no longer be unlocked with
the SmartKey, use the mechanical key.
X Take the mechanical key out of the
SmartKey (Y page 84).
X Insert the mechanical key into the lock of
the driver's door as far as it will go. 0006
To unlock X
Turn the mechanical key counter-clockwise
to position 0006.
The door is unlocked.
X Turn the mechanical key back and remove
it.
X Insert the mechanical key into the
SmartKey.
If you use the mechanical key to unloc kand
open the driver's door, the anti-thef talarm
system will be triggered ( Ypage 78). Locking the vehicle (mechanical key)
If the vehicle can no longer be locked with the
SmartKey, use the mechanical key.
X Open the driver's door.
X Close the front-passenger door and the
trunk lid.
X Press the locking button (Y page 89).
X Check whether the locking knob on the
front-passenger door is still visible. If
necessary, press the locking knob down by
hand (Y page 88).
X Close the driver's door.
X Take the mechanical key out of the
SmartKey (Y page 84).
X Insert the mechanical key into the lock of
the driver's door as far as it will go. 0006
To lock
X Turn the mechanical key clockwise as far
as it will go to position 0006.
X Turn the mechanical key back and remove
it. 90
DoorsOpening and closing
Page 119 of 394
The seat belt should:
R
fit snugly across your body
R be routed across the middle of your
shoulder
R be routed in your pelvic area across the hip
joints
X Before starting off, adjust the rear-view
mirror and the exterior mirrors in such a
way that you have a good view of road and
traffic conditions (Y page 127).
X Vehicles with a memory function: save
the seat, steering wheel and exterior mirror
settings with the memory function
(Y page 130). Seats
Important safety notes
G
WARNING
Children could become trapped if they adjust
the seats, particularly when unattended.
There is a risk of injury.
When leaving the vehicle, always take the
SmartKey with you and lock the vehicle. Never
leave children unsupervised in the vehicle. G
WARNING
You could lose control of your vehicle if you
do the following while driving:
R adjust the driver's seat, head restraint,
steering wheel or mirrors
R fasten the seat belt
There is a risk of an accident.
Adjust the driver's seat, head restraint,
steering wheel and mirror and fasten your
seat belt before starting the engine. G
WARNING
If you adjust the seat height carelessly, you or
other vehicle occupants could be trapped and
thereby injured. Children in particular could
accidentally press the electrical seat adjustmen
tbuttons and become trapped.
There is a ris kofinjury.
While moving the seats, make sure tha tyour
hands or other body parts do not get under
the lever assembly of the seat adjustment
system. G
WARNING
When you adjust a seat, you or other vehicle
occupants could become trapped, e.g. on the
seat guide rail. There is arisk of injury.
Make sure when adjusting aseat that no one
has any body parts in the sweep of the seat. G
WARNING
If head restraints are not installed and
adjusted correctly, they cannot provide
protection as intended. There is an increased
risk of injury in the head and neck area, e.g.
in the event of an accident or when braking.
Always drive with the head restraints
installed. Before driving off, make sure for
every vehicle occupant that the center of the
head restraint supports the back of the head
at about eye level. G
WARNING
The seat belt does not offer the intended level
of protection if you have not moved the
backrest to an almost vertical position .When
braking or in the event of an accident, you
could slide underneath the seat belt and
sustain abdomen or neck injuries, for
example. This poses an increased risk of
injury or even fatal injury.
Adjust the seat properly before beginning
your journey. Always ensure that the backrest
is in an almost vertical position and that the
shoulder section of your seat belt is routed
across the center of your shoulder. Seats
117Seats, steering wheel and mirrors Z
Page 125 of 394
Problems with the seat heating
Problem Possible causes/consequences and
0001 Solutions
The seat heating has
switched off
prematurely or cannot
be switched on. The on-board voltage is too low because too many electrical
consumers are switched on.
X
Switch off electrical consumers that you do not need, such as
the rear window defroster or interior lighting.
Once the battery is sufficiently charged, the seat heating will
switch back on automatically. Switching the seat ventilation on/off
Activating/deactivating Driver's and front-passenger seat
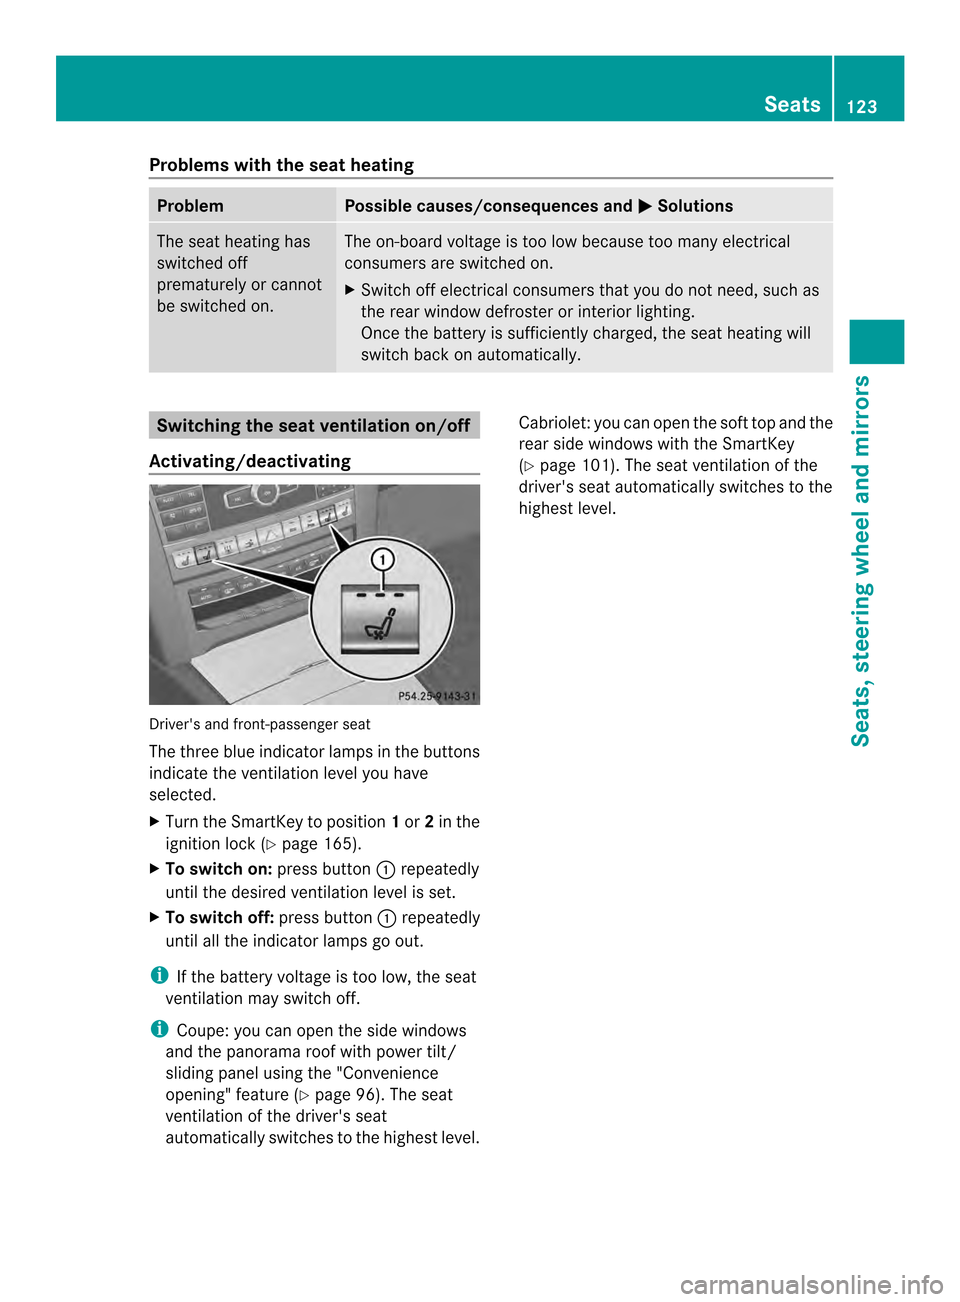
The three blue indicator lamps in the buttons
indicate the ventilation level you have
selected.
X Turn the SmartKey to position 1or 2in the
ignition lock (Y page 165).
X To switch on: press button0002repeatedly
until the desired ventilation level is set.
X To switch off: press button0002repeatedly
until all the indicator lamps go out.
i If the battery voltage is too low, the seat
ventilation may switch off.
i Coupe: you can open the side windows
and the panorama roof with power tilt/
sliding panel using the "Convenience
opening" feature (Y page 96). The seat
ventilation of the driver's seat
automatically switches to the highest level. Cabriolet: you can open the soft top and the
rear side windows with the SmartKey
(Y
page 101). The seat ventilation of the
driver's seat automatically switches to the
highest level. Seats
123Seats, steering wheel and mirrors Z
Page 128 of 394
Problems with the steering wheel heating
Problem Possible causes/consequences and
0001 Solutions
The steering wheel
heating has switched
off prematurely or
cannot be switched on. The on-board voltage is too low because too many electrical
consumers are switched on.
X
Switch off electrical consumers that you do not need, such as
the rear window defroster or interior lighting.
Once the battery is sufficiently charged, the steering wheel
heating will switch back on automatically. EASY-ENTRY/EXIT feature
Important safety notes G
WARNING
When the EASY-ENTRY/EXIT feature adjusts
the steering wheel, you and other vehicle
occupants –particularly childre n–could
become trapped. There is a risk of injury.
While the EASY-ENTRY/EXIT feature is
making adjustments, make sure that no one
has any body parts in the sweep of the
steering wheel.
If somebody becomes trapped:
R press one of the memory function position
buttons, or
R move the switch for steering wheel
adjustmen tinthe opposite direction to that
in which the steering wheel is moving.
The adjustment process is stopped. G
WARNING
If children activate the EASY-ENTRY/EXIT
feature, they can become trapped,
particularly when unattended. There is a risk
of injury.
When leaving the vehicle, always take the
SmartKey with you and lock the vehicle. Never
leave children unsupervised in the vehicle. G
WARNING
If you drive off while the EASY-ENTRY/EXIT
feature is making adjustments, you could lose control of the vehicle. There is a risk of an
accident.
Always wait until the adjustment process is
complete before driving off.
The EASY-ENTRY/EXIT feature makes getting
in and out of your vehicle easier.
You can activate and deactivate the EASY-
ENTRY/EXIT feature in the on-board
computer (Y page 246).
Position of the steering wheel when the
EASY-ENTRY/EXIT featurei s active The steering wheel swings upwards when
you:
R
remove the SmartKey from the ignition lock
R with KEYLESS-GO: open the driver's door;
KEYLESS-GO must be in position 1
R with the SmartKey: open the driver's
door; the SmartKey must be in position 0
or 1in the ignition lock (Y page 165)
i The steering wheel only moves upwards if
it has not already reached the upper end
stop. 126
Steering wheelSeats, steering wheel and mirrors
Page 133 of 394
G
WARNING
Childre ncould become trapped if they
activate the memory function, particularly
when unattended. There is arisk of injury.
When leaving the vehicle, always take the
SmartKey with you and lock the vehicle. Never
leave children unsupervised in the vehicle.
With the memory function, you can store up
to three different settings, e.g. for three
differen tpeople.
The following settings are stored as a single
memory preset:
R position of the seat, backrest and head
restraint
R driver's side: position of the exterior
mirrors on the driver's and front-passenger
sides X
Adjust the seat (Y page 118).
X On the driver's side, adjust the steering
wheel (Y page 125)a nd the exterio rmirrors
(Y page 127).
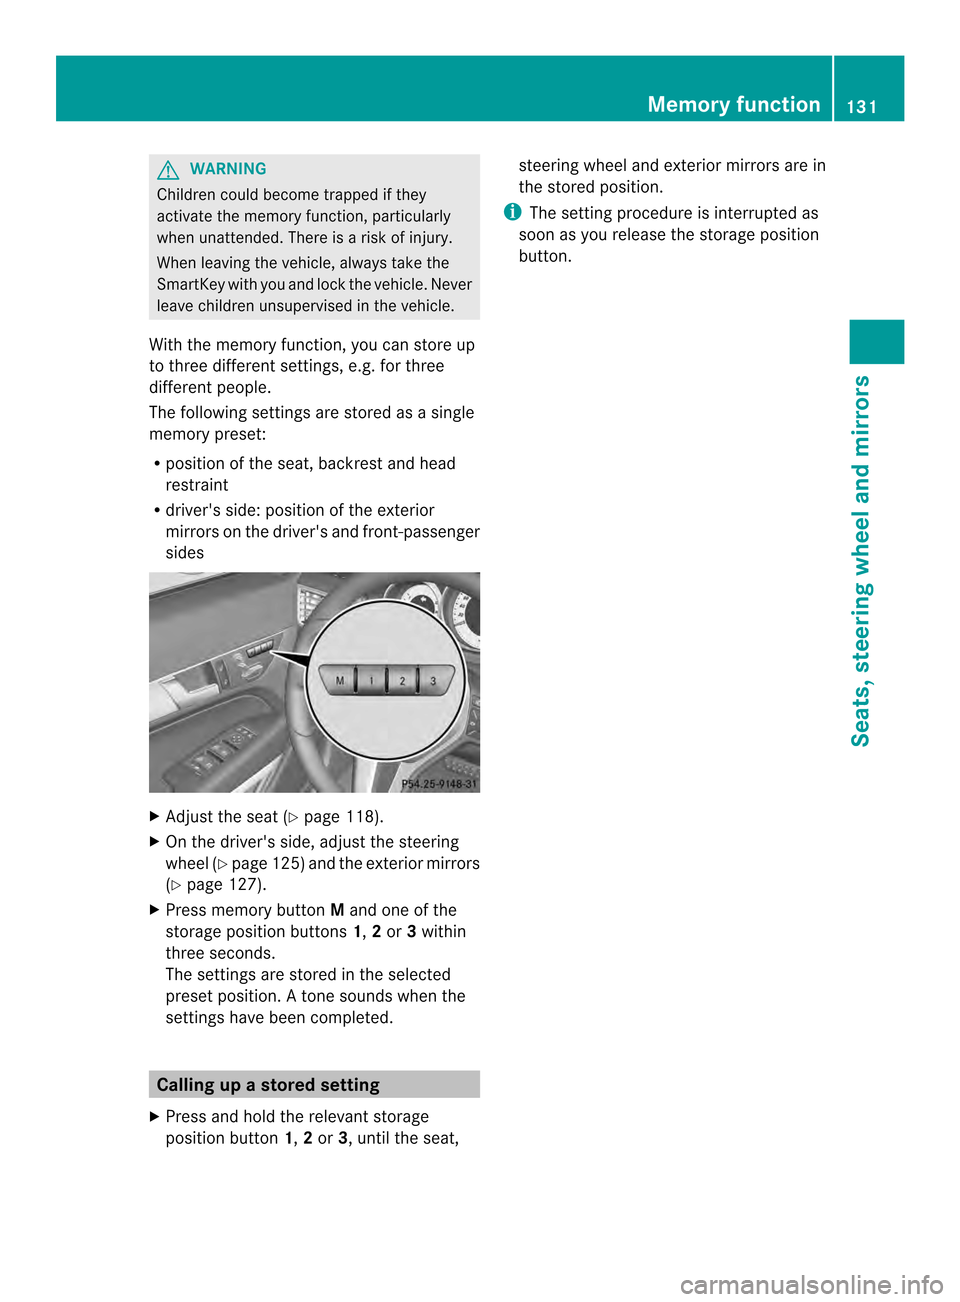
X Press memory button Mand one of the
storage position buttons 1,2or 3within
three seconds.
The settings are stored in the selected
prese tposition. Atone sounds when the
settings have been completed. Calling up
astore dsetting
X Press and hold the relevant storage
position button 1,2or 3, until the seat, steering wheel and exterio
rmirrors are in
the stored position.
i The setting procedure is interrupted as
soon as you release the storage position
button. Memory function
131Seats, steering wheel and mirrors Z