headlamp MERCEDES-BENZ G-Class 2014 W463 User Guide
[x] Cancel search | Manufacturer: MERCEDES-BENZ, Model Year: 2014, Model line: G-Class, Model: MERCEDES-BENZ G-Class 2014 W463Pages: 354, PDF Size: 7.63 MB
Page 104 of 354
X
To switch on the rear fog lamp: turn the
SmartKey in the ignition lock to position 2
or start the engine.
X Turn the light switch to 0058or0058.
X Press the 005Ebutton.
The yellow 005Eindicator lamp in the
instrument cluster lights up.
X To switch off the rear fog lamp: press the
005E button.
The yellow 005Eindicator lamp in the
instrument cluster goes out. Parking lamps
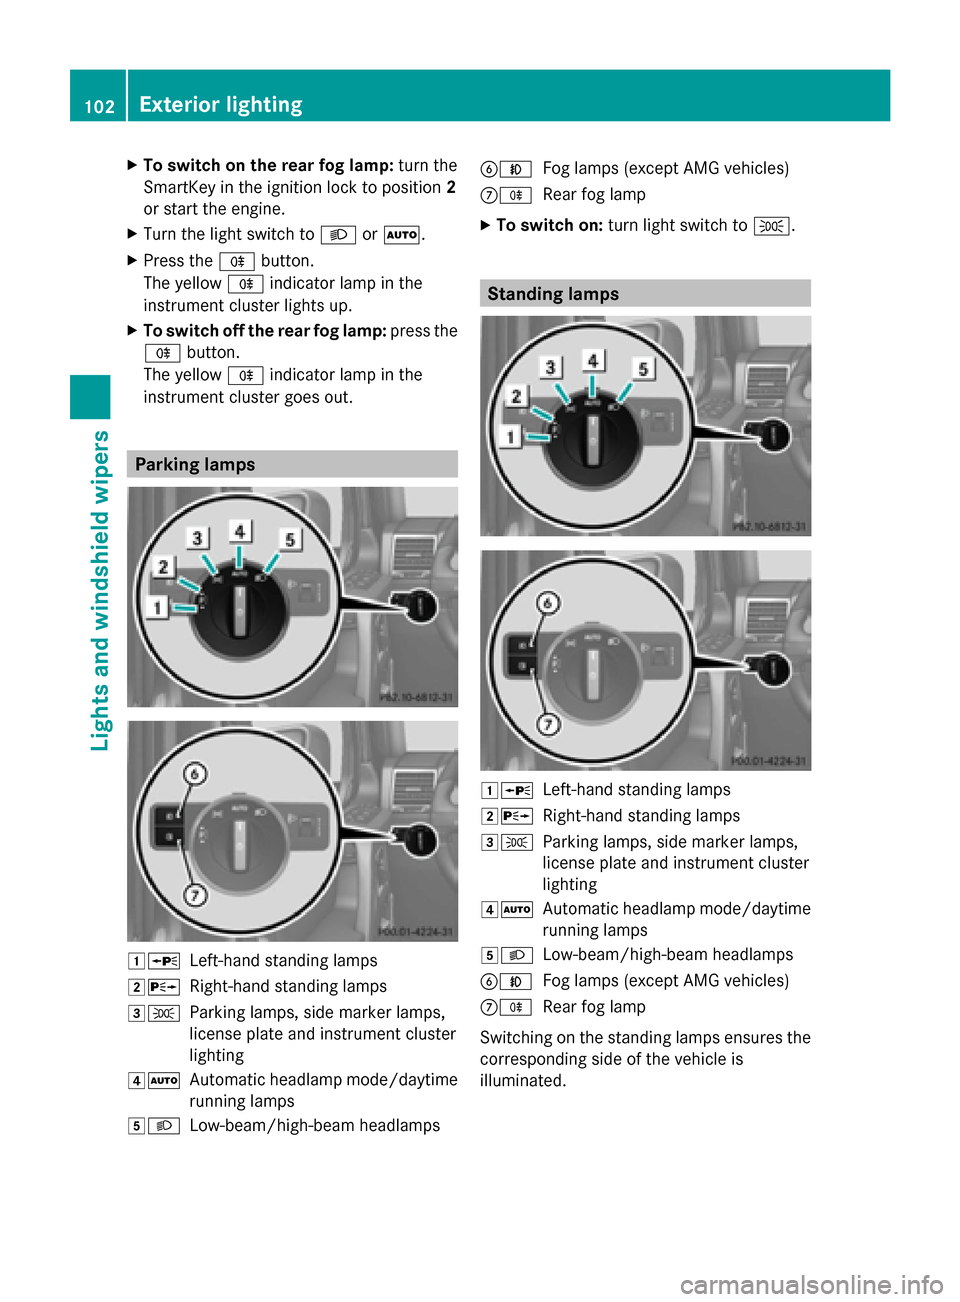
00470063
Left-hand standing lamps
00480064 Right-hand standing lamps
00490060 Parking lamps, side marker lamps,
license plate and instrument cluster
lighting
004A0058 Automatic headlamp mode/daytime
running lamps
004B0058 Low-beam/high-beam headlamps 0084005A
Fog lamps (except AMG vehicles)
006B005E Rear fog lamp
X To switch on: turn light switch to 0060. Standing lamps
00470063
Left-hand standing lamps
00480064 Right-hand standing lamps
00490060 Parking lamps, side marker lamps,
license plate and instrument cluster
lighting
004A0058 Automatic headlamp mode/daytime
running lamps
004B0058 Low-beam/high-beam headlamps
0084005A Fog lamps (except AMG vehicles)
006B005E Rear fog lamp
Switching on the standing lamps ensures the
corresponding side of the vehicle is
illuminated. 102
Exterior lightingLights and
windshield wipers
Page 105 of 354
X
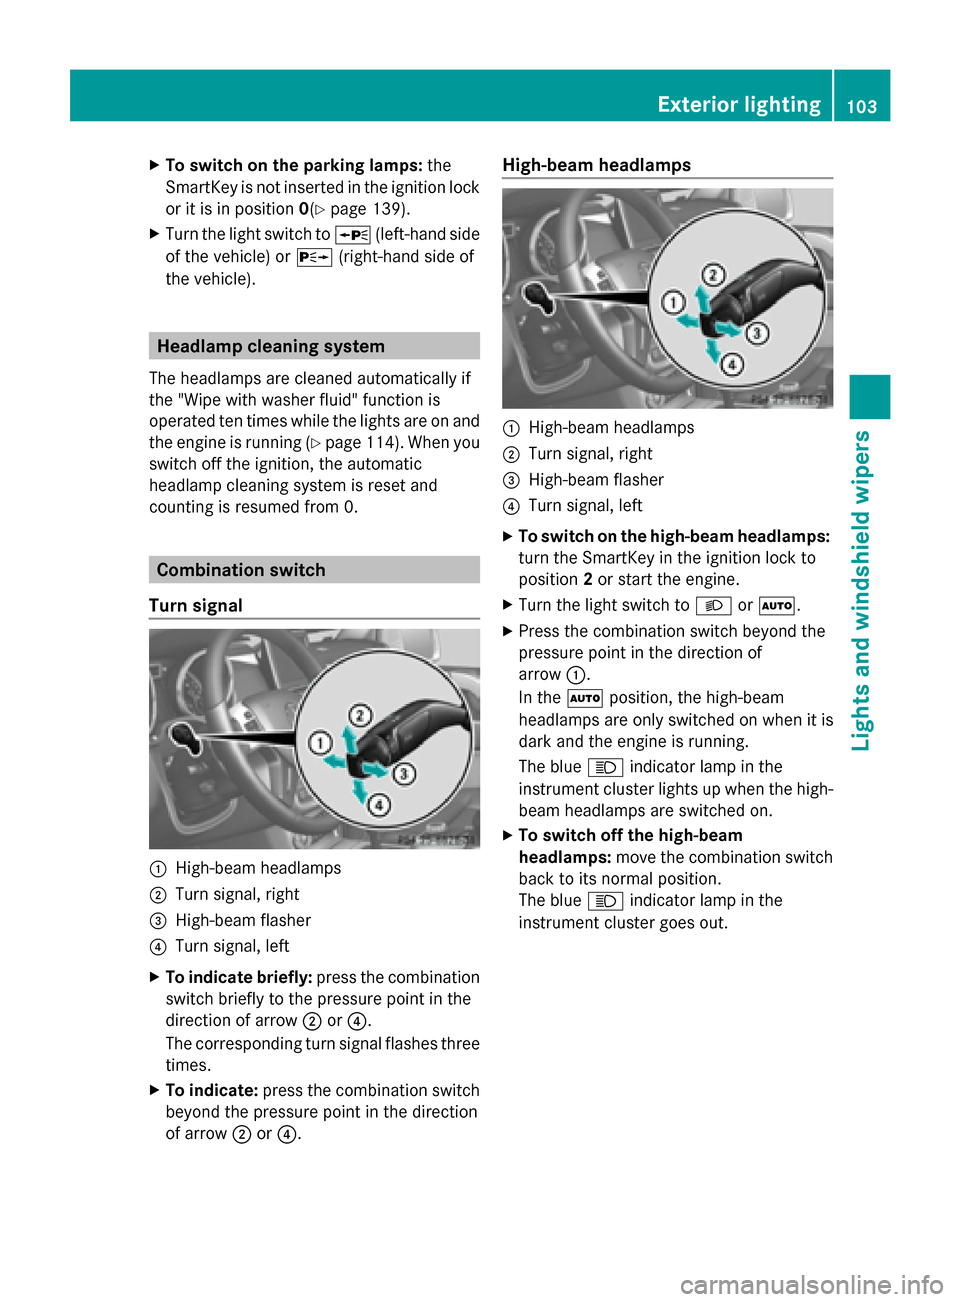
To switch on the parking lamps: the
SmartKey is not inserted in the ignition lock
or it is in position 0(Ypage 139).
X Turn the light switch to 0063(left-hand side
of the vehicle) or 0064(right-hand side of
the vehicle). Headlamp cleaning system
The headlamps are cleaned automatically if
the "Wipe with washer fluid" function is
operated ten times while the lights are on and
the engine is running (Y page 114). When you
switch off the ignition, the automatic
headlamp cleaning system is reset and
counting is resumed from 0. Combination switch
Turn signal 0043
High-beam headlamps
0044 Turn signal, right
0087 High-beam flasher
0085 Turn signal, left
X To indicate briefly: press the combination
switch briefly to the pressure point in the
direction of arrow 0044or0085.
The corresponding turn signal flashes three
times.
X To indicate: press the combination switch
beyond the pressure point in the direction
of arrow 0044or0085. High-beam headlamps
0043
High-beam headlamps
0044 Turn signal, right
0087 High-beam flasher
0085 Turn signal, left
X To switch on the high-beam headlamps:
turn the SmartKey in the ignition lock to
position 2or start the engine.
X Turn the light switch to 0058or0058.
X Press the combination switch beyond the
pressure point in the direction of
arrow 0043.
In the 0058position, the high-beam
headlamps are only switched on when it is
dark and the engine is running.
The blue 0057indicator lamp in the
instrument cluster lights up when the high-
beam headlamps are switched on.
X To switch off the high-beam
headlamps: move the combination switch
back to its normal position.
The blue 0057indicator lamp in the
instrument cluster goes out. Exterior lighting
103Lights andwindshield wipers Z
Page 106 of 354
High-beam flasher
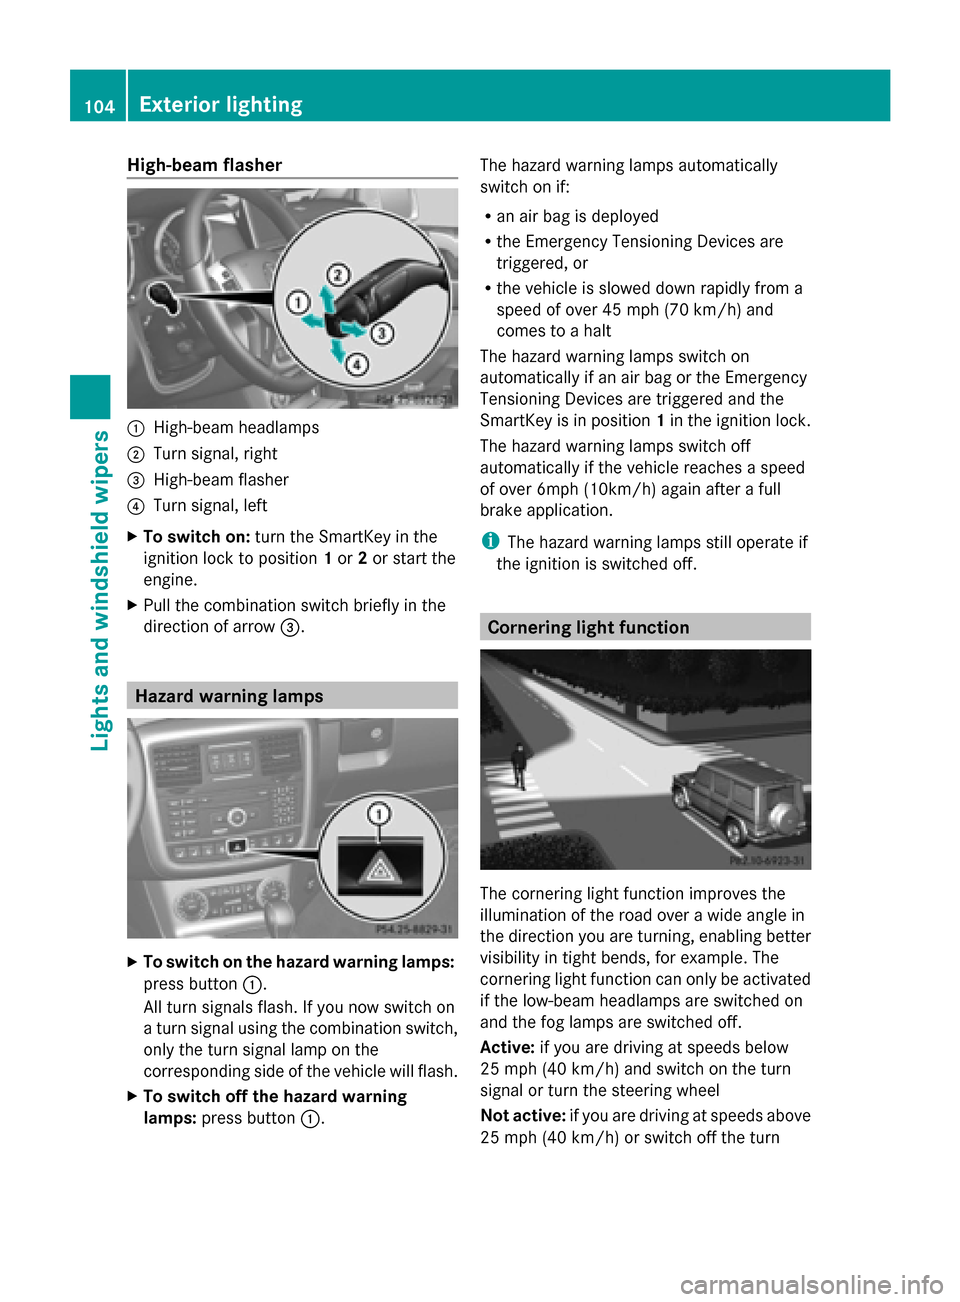
0043
High-beam headlamps
0044 Turn signal, right
0087 High-beam flasher
0085 Turn signal, left
X To switch on: turn the SmartKey in the
ignition lock to position 1or 2or start the
engine.
X Pull the combination switch briefly in the
direction of arrow 0087.Hazard warning lamps
X
To switch on the hazard warning lamps:
press button 0043.
All turn signals flash. If you now switch on
a turn signal using the combination switch,
only the turn signal lamp on the
corresponding side of the vehicle will flash.
X To switch off the hazard warning
lamps: press button 0043. The hazard warning lamps automatically
switch on if:
R
an air bag is deployed
R the Emergency Tensioning Devices are
triggered, or
R the vehicle is slowed down rapidly from a
speed of over 45 mph (70 km/h) and
comes to a halt
The hazard warning lamps switch on
automatically if an air bag or the Emergency
Tensioning Devices are triggered and the
SmartKey is in position 1in the ignition lock.
The hazard warning lamps switch off
automatically if the vehicle reaches a speed
of over 6mph (10km/h) again after a full
brake application.
i The hazard warning lamps still operate if
the ignition is switched off. Cornering light function
The cornering light function improves the
illumination of the road over a wide angle in
the direction you are turning, enabling better
visibility in tight bends, for example. The
cornering light function can only be activated
if the low-beam headlamps are switched on
and the fog lamps are switched off.
Active:
if you are driving at speeds below
25 mph (40 km/h) and switch on the turn
signal or turn the steering wheel
Not active: if you are driving at speeds above
25 mph (40 km/h) or switch off the turn 104
Exterior lightingLights and windshield wipers
Page 107 of 354
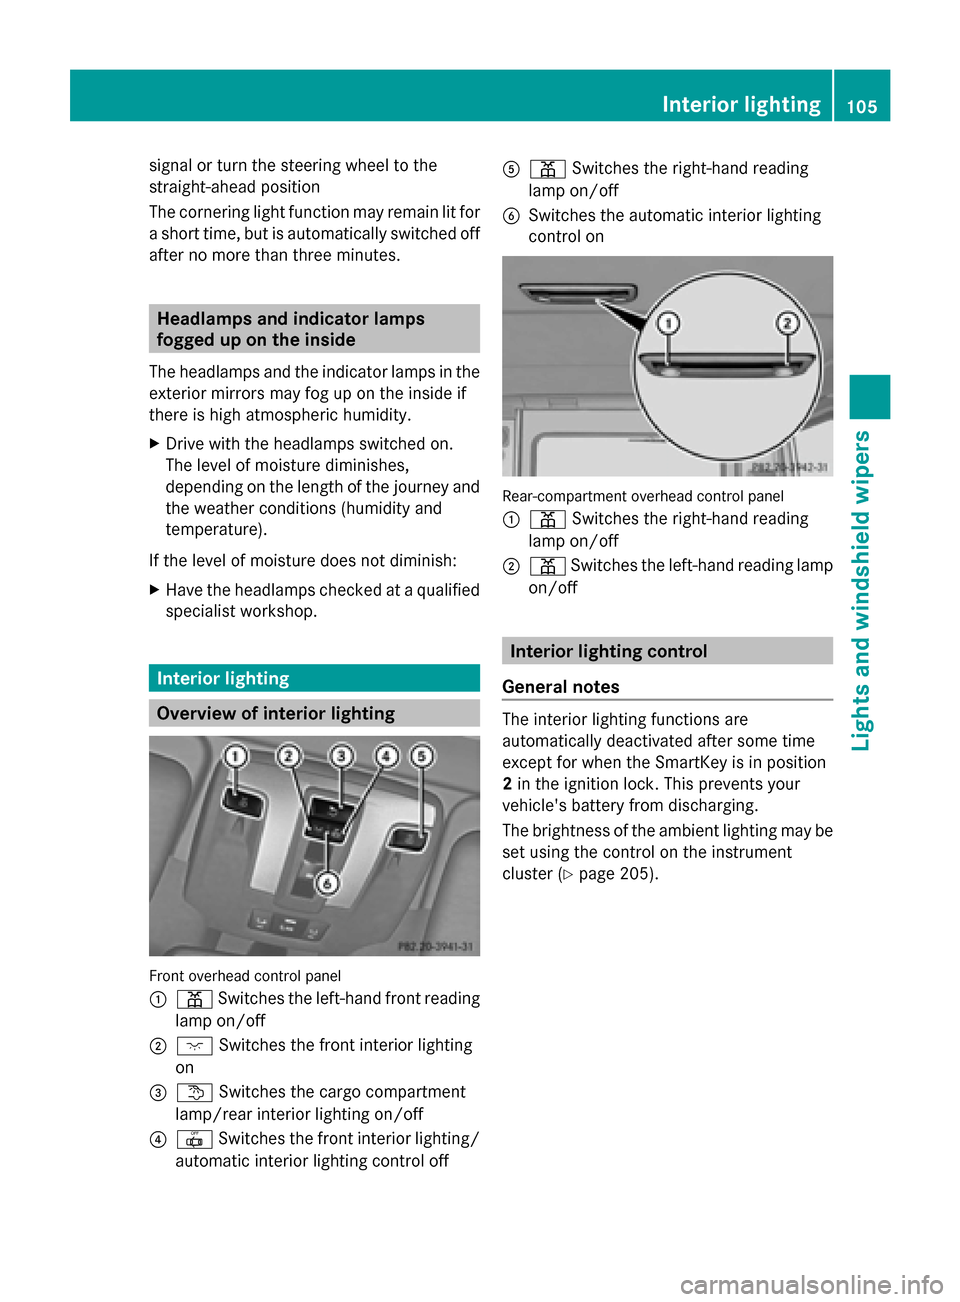
signal or turn the steering wheel to the
straight-ahead position
The cornering light function may remain lit for
a short time, but is automatically switched off
after no more than three minutes. Headlamps and indicator lamps
fogged up on the inside
The headlamps and the indicator lamps in the
exterior mirrors may fog up on the inside if
there is high atmospheric humidity.
X Drive with the headlamps switched on.
The level of moisture diminishes,
depending on the length of the journey and
the weather conditions (humidity and
temperature).
If the level of moisture does not diminish:
X Have the headlamps checked at a qualified
specialist workshop. Interior lighting
Overview of interior lighting
Front overhead control panel
0043
003D Switches the left-hand front reading
lamp on/off
0044 004A Switches the front interior lighting
on
0087 0041 Switches the cargo compartment
lamp/rear interior lighting on/off
0085 0033 Switches the front interior lighting/
automatic interior lighting control off 0083
003D Switches the right-hand reading
lamp on/off
0084 Switches the automatic interior lighting
control on Rear-compartment overhead control panel
0043
003D Switches the right-hand reading
lamp on/off
0044 003D Switches the left-hand reading lamp
on/off Interior lighting control
General notes The interior lighting functions are
automatically deactivated after some time
except for when the SmartKey is in position
2
in the ignition lock. This prevents your
vehicle's battery from discharging.
The brightness of the ambient lighting may be
set using the control on the instrument
cluster (Y page 205). Interior lighting
105Lights and windshield wipers Z
Page 110 of 354
X
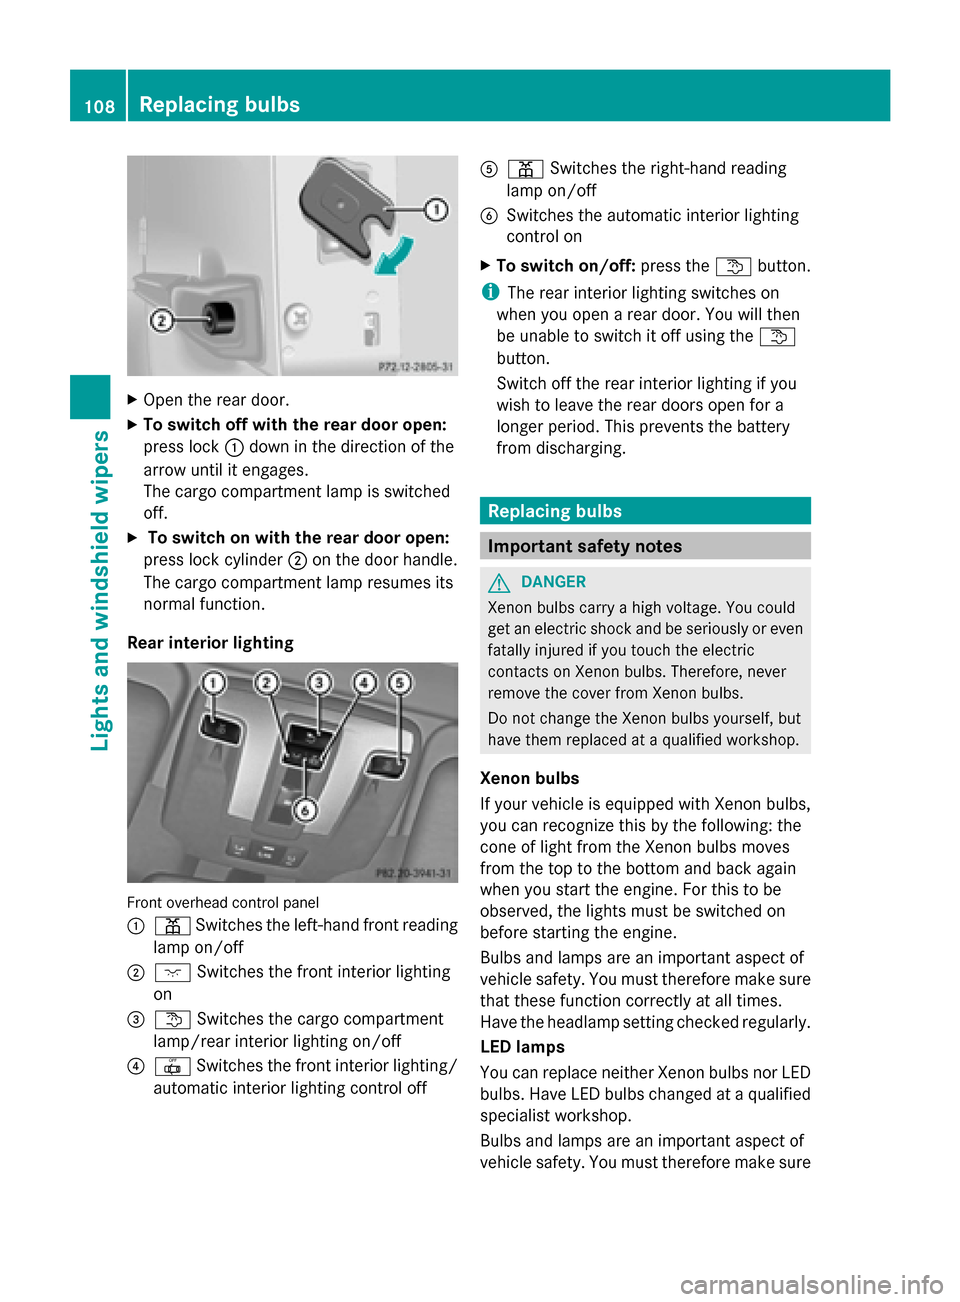
Open the rear door.
X To switch off with the rear door open:
press lock 0043down in the direction of the
arrow until it engages.
The cargo compartment lamp is switched
off.
X To switch on with the rear door open:
press lock cylinder 0044on the door handle.
The cargo compartment lamp resumes its
normal function.
Rear interior lighting Front overhead control panel
0043
003D Switches the left-hand front reading
lamp on/off
0044 004A Switches the front interior lighting
on
0087 0041 Switches the cargo compartment
lamp/rear interior lighting on/off
0085 0033 Switches the front interior lighting/
automatic interior lighting control off 0083
003D Switches the right-hand reading
lamp on/off
0084 Switches the automatic interior lighting
control on
X To switch on/off: press the0041button.
i The rear interior lighting switches on
when you open a rear door. You will then
be unable to switch it off using the 0041
button.
Switch off the rear interior lighting if you
wish to leave the rear doors open for a
longer period. This prevents the battery
from discharging. Replacing bulbs
Important safety notes
G
DANGER
Xenon bulbs carry a high voltage. You could
get an electric shock and be seriously or even
fatally injured if you touch the electric
contacts on Xenon bulbs. Therefore, never
remove the cover from Xenon bulbs.
Do not change the Xenon bulbs yourself, but
have them replaced at a qualified workshop.
Xenon bulbs
If your vehicle is equipped with Xenon bulbs,
you can recognize this by the following: the
cone of light from the Xenon bulbs moves
from the top to the bottom and back again
when you start the engine. For this to be
observed, the lights must be switched on
before starting the engine.
Bulbs and lamps are an important aspect of
vehicle safety. You must therefore make sure
that these function correctly at all times.
Have the headlamp setting checked regularly.
LED lamps
You can replace neither Xenon bulbs nor LED
bulbs. Have LED bulbs changed at a qualified
specialist workshop.
Bulbs and lamps are an important aspect of
vehicle safety. You must therefore make sure 108
Replacing bulbsLights and windshield wipers
Page 111 of 354
that these function correctly at all times.
Have the headlamp setting checked regularly.
Before changing bulbs
Have the following bulbs changed at a
qualified specialist workshop:
R Additional turn signals in the exterior
mirrors
R High-mounted brake lamp
R High-beam/low-beam headlamps (Xenon
bulbs)
R Daytime running lamps
R Parking lamps/standing lamps
R License plate lamp
i Individual segments of the license plate
lamp LEDs may fail without a display
message appearing in the multifunction
display. Regularly check the license plate
lamp. If necessary, visit a qualified
specialist workshop.
You can replace the following bulbs:
R Fog lamp/cornering light with fog lamp
function
R Turn signal lamp (front)
R Brake/tail lamp
R Turn signal lamp (rear)
R Tail lamps/standing lamps
R Backup lamp
R Rear fog lamp
R Side marker lamps G
WARNING
Bulbs and lamps can become very hot. For
this reason, allow them to cool down before
changing them. Otherwise, you could burn
yourself when you touch them.
Keep bulbs out of the reach of children.
Otherwise, they could, for example, damage
the bulbs and injure themselves.
Never use a bulb which has been dropped.
Such a bulb may explode and injure you.
Halogen bulbs are pressurized and could
explode when you change them, especially if
they are very hot. You should therefore wear eye protection and gloves when you are
changing them.
Other bulbs
There are bulbs other than the Xenon bulbs
that you cannot replace. Replace only the
bulbs listed (Y page 109). Have the bulbs that
you cannot replace yourself changed at a
qualified specialist workshop.
If you require assistance changing bulbs,
consult a qualified specialist workshop.
Do not touch the glass tube of new bulbs with
your bare hands. Even minor contamination
can burn into the glass surface and reduce
the service life of the bulbs. Always use a lint-
free cloth or only touch the base of the bulb
when installing.
Only use bulbs of the correct type.
If the new bulb still does not light up, consult
a qualified specialist workshop.
Bulbs and lamps are an important aspect of
vehicle safety. You must therefore make sure
that these function correctly at all times.
Have the headlamp setting checked regularly. Overview: changing bulbs/bulb types
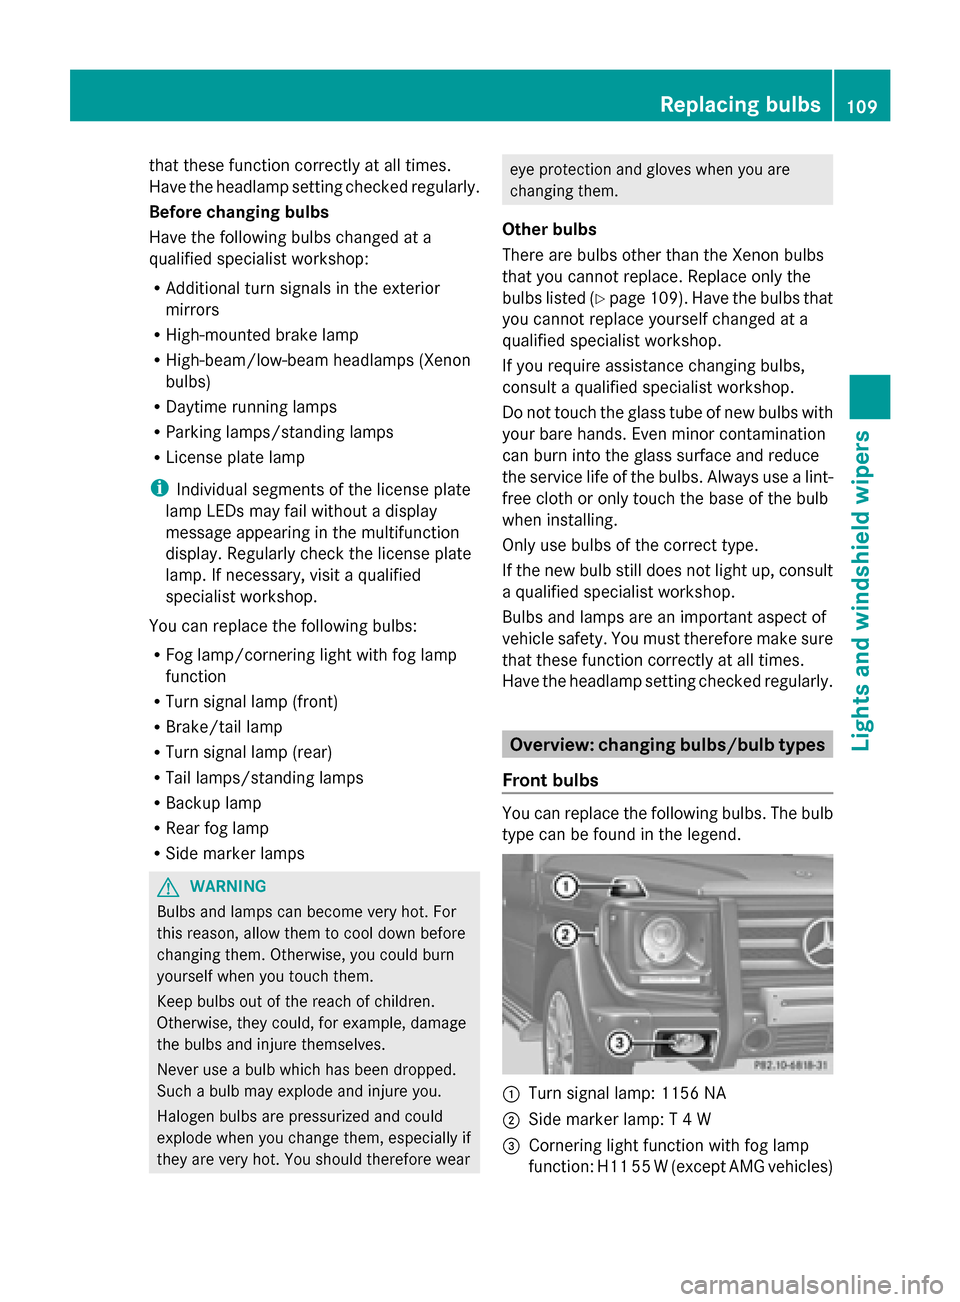
Front bulbs You can replace the following bulbs. The bulb
type can be found in the legend.
0043
Turn signal lamp: 1156 NA
0044 Side marker lamp: T 4 W
0087 Cornering light function with fog lamp
function: H11 55 W (except AMG vehicles) Replacing bulbs
109Lights andwindshield wipers Z
Page 168 of 354
Checklist after driving off-road
Driving over rough terrain places greater
demands on your vehicle than driving on
normal roads. After driving off-road, check
the vehicle. This allows you to detect damage
promptly and reduce the risk of an accident
to yourself and other road users.
X Shift the transfer case to HIGH
RANGE(Y page 194).
X Disengage the differential locks
(Y page 198).
X Clean the headlamps and rear lights and
check for damage.
X Clean the front and rear license plates.
X Clean the wheels and tires with a water jet
and remove any foreign objects.
X Clean the wheels, tires, wheel housings and
the vehicle underside with a water jet;
check for any foreign objects and damage.
X Check whether twigs or other parts of
plants have become trapped. These
increase the risk of fire and can damage
fuel pipes, brake hoses or the rubber
bellows of the axle joints and propeller
shafts.
X After the trip, examine without fail the
entire undercarriage, wheels, tires, brakes,
bodywork structure, steering, chassis and
exhaust system for damage.
X After driving for extended periods across
sand, mud, gravel, water or in similarly dirty
conditions, have the brake discs, wheels,
brake pads/linings and axle joints checked
and cleaned.
X If you notice strong vibrations after off-road
driving, check for foreign objects in the
wheels and drive train and, if necessary,
remove them.
Foreign objects can disturb the balance
and cause vibrations.
X Test the brakes. Driving on sand Observe the following rules when driving on
sand:
R Shift the transfer case to LOW
RANGE(Y page 194).
R Avoid high engine speeds.
R Limit the shift range of the automatic
transmission according to the off-road
conditions.
R Drive quickly to overcome the rolling
resistance. Otherwise the vehicle's wheels
could become stuck in loose ground.
R Drive in the tracks of other vehicles if
possible. When doing so, make sure that:
- the tire ruts are not too deep.
- the sand is sufficiently firm.
- your vehicle has sufficient ground
clearance
Tire ruts and gravel roads !
Check that the ruts are not too deep and
that your vehicle has sufficient clearance.
Otherwise, your vehicle could be damaged
or bottom out and get stuck.
Observe the following rules when driving
along ruts in off-road terrain or on roads with
loose gravel:
R Shift the transfer case to LOW
RANGE(Y page 194).
R Avoid high engine speeds.
R Observe the safety notes (Y page 164) and
the general notes (Y page 164) on off-road
driving.
R Restrict the shift range of the automatic
transmission to 1(Ypage 150).
R Drive slowly.
R Where ruts are too deep, drive with the
wheels of one side on the center grassy
area, if possible. 166
Driving tipsDriving and parking
Page 217 of 354
Selecting the permanent display function
You can determine whether the multifunction
display permanently shows your speed or the
outside temperature.
X Press the 0059or0065 button on the
steering wheel to select the Sett.
Sett. menu.
X Press the 0064or0063 button to select the
Instr. Cluster
Instr. Cluster submenu.
X Press 0076to confirm.
X Press the 0064or0063 button to select the
Permanent Display:
Permanent Display: function.
You will see the selected setting: Outside Outside
Temperature
Temperature orSpeedometer [mph]
Speedometer [mph].
X Press the 0076button to save the setting.
i Speed is displayed in mph.
Lights Setting the daytime running lamps
i
This function is not available in Canada.
X Press the 0059or0065 button on the
steering wheel to select the Sett.
Sett. menu.
X Press the 0064or0063 button to select the
Lights
Lights submenu.
X Press 0076to confirm.
X Press 0064or0063 to select the Daytime Daytime
Running Lights
Running Lights function.
If the Daytime Running Lights: Daytime Running Lights: have
been switched on, the cone of light and the
0086 symbol in the multifunction display
are shown in red.
X Press the 0076button to save the setting.
Further information on daytime running
lamps (Y page 99).
Surround lighting and exterior lighting
delayed switch-off
X Press the 0059or0065 button on the
steering wheel to select the Sett.
Sett. menu.
X Press the 0064or0063 button to select the
Lights
Lights submenu.
X Press 0076to confirm. X
Press 0064or0063 to select the
Surround Lighting Surround Lighting function.
When the Surround Lighting
Surround Lighting function is
activated, the cone of light in the
multifunction display is shown in red.
X Press the 0076button to save the setting.
Deactivating delayed switch-off of the
exterior lighting temporarily:
X Before leaving the vehicle, turn the
SmartKey to position 0(Ypage 139) in the
ignition lock.
X Turn the SmartKey to position 2in the
ignition lock (Y page 139).
The exterior lighting delayed switch-off is
deactivated.
Delayed switch-off of the exterior lighting is
reactivated the next time you start the
engine.
If you have activated the Surround Surround
Lighting Lighting function and the light switch is set
to 0058, the following functions are activated
when it is dark:
R Surround lighting: the exterior lighting
remains lit for 40 seconds after unlocking
with the SmartKey. If you start the engine,
the surround lighting is switched off and
automatic headlamp mode is activated
(Y page 100).
R Exterior lighting delayed switch-off: the
exterior lighting remains lit for
60 seconds after the engine is switched off.
If you close all the doors and the trunk lid,
the exterior lighting goes off after
15 seconds.
i Depending on your vehicle's equipment,
when the surround lighting and delayed
switch-off exterior lighting are on, the
following light up:
R Parking lamps
R Front fog lamps
R Low-beam headlamps
R Daytime running lamps
R Side marker lamps
R Surround lighting in the exterior mirrors Menus and submenus
215On-board computer and displays Z
Page 228 of 354
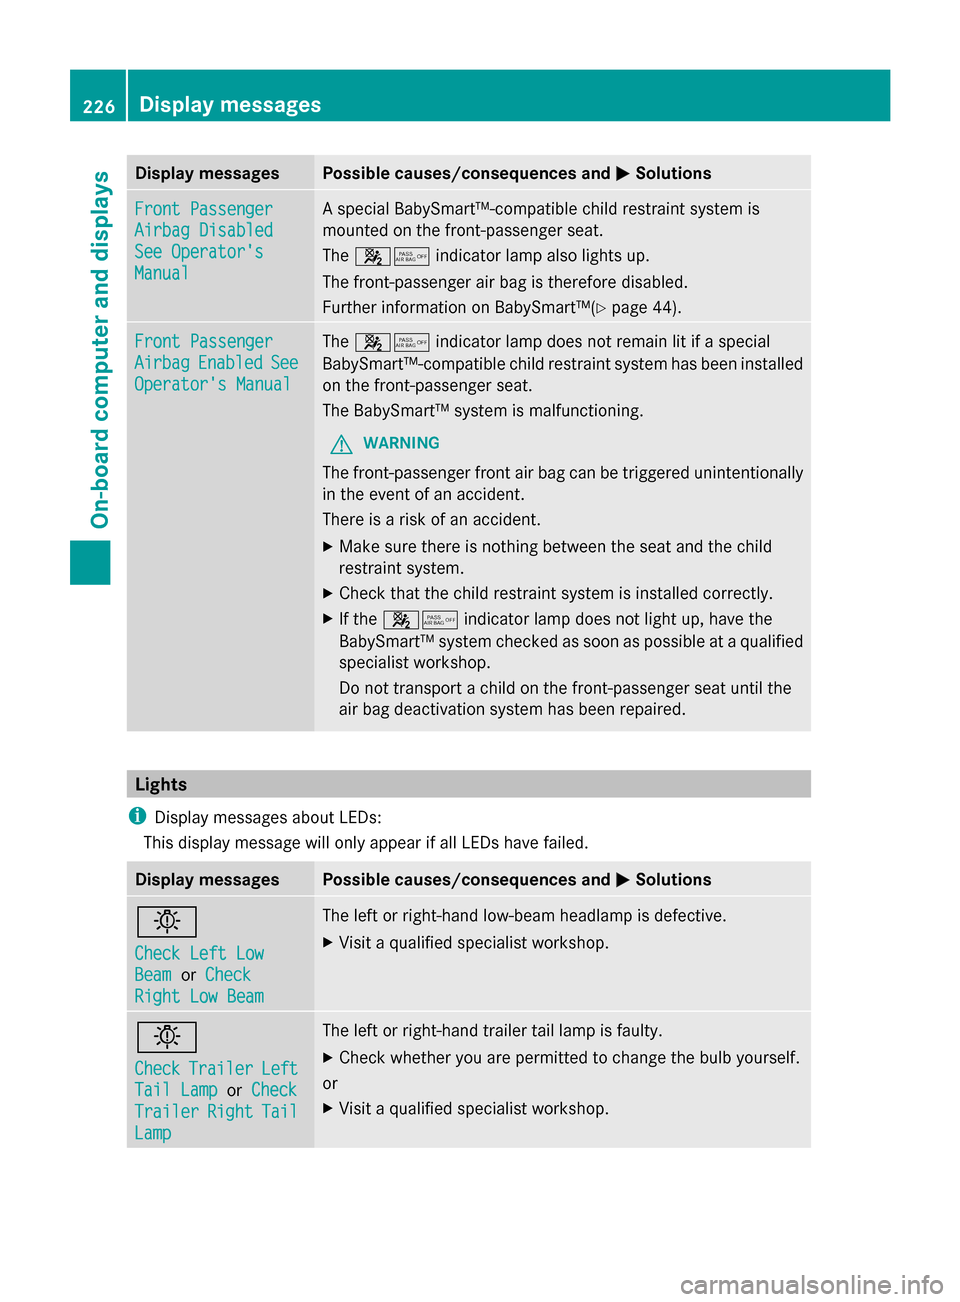
Display messages Possible causes/consequences and
0050
0050Solutions Front Passenger
Front Passenger
Airbag Disabled Airbag Disabled
See Operator's See Operator's
Manual Manual A special BabySmart™-compatible child restraint system is
mounted on the front-passenger seat.
The
00730074 indicator lamp also lights up.
The front-passenger air bag is therefore disabled.
Further information on BabySmart™(Y page 44).Front Passenger Front Passenger
Airbag Airbag
Enabled
Enabled See
See
Operator's Manual
Operator's Manual The
00730074 indicator lamp does not remain lit if a special
BabySmart™-compatible child restraint system has been installed
on the front-passenger seat.
The BabySmart™ system is malfunctioning.
G WARNING
The front-passenger front air bag can be triggered unintentionally
in the event of an accident.
There is a risk of an accident.
X Make sure there is nothing between the seat and the child
restraint system.
X Check that the child restraint system is installed correctly.
X If the 00730074 indicator lamp does not light up, have the
BabySmart™ system checked as soon as possible at a qualified
specialist workshop.
Do not transport a child on the front-passenger seat until the
air bag deactivation system has been repaired. Lights
i Display messages about LEDs:
This display message will only appear if all LEDs have failed. Display messages Possible causes/consequences and
0050 0050Solutions 0049
Check Left Low Check Left Low
Beam Beam
orCheck
Check
Right Low Beam
Right Low Beam The left or right-hand low-beam headlamp is defective.
X
Visit a qualified specialist workshop. 0049
Check Check
Trailer
Trailer Left
Left
Tail Lamp
Tail Lamp orCheck
Check
Trailer
Trailer Right
RightTail
Tail
Lamp
Lamp The left or right-hand trailer tail lamp is faulty.
X
Check whether you are permitted to change the bulb yourself.
or
X Visit a qualified specialist workshop. 226
Display
messagesOn-board computer and displays
Page 244 of 354
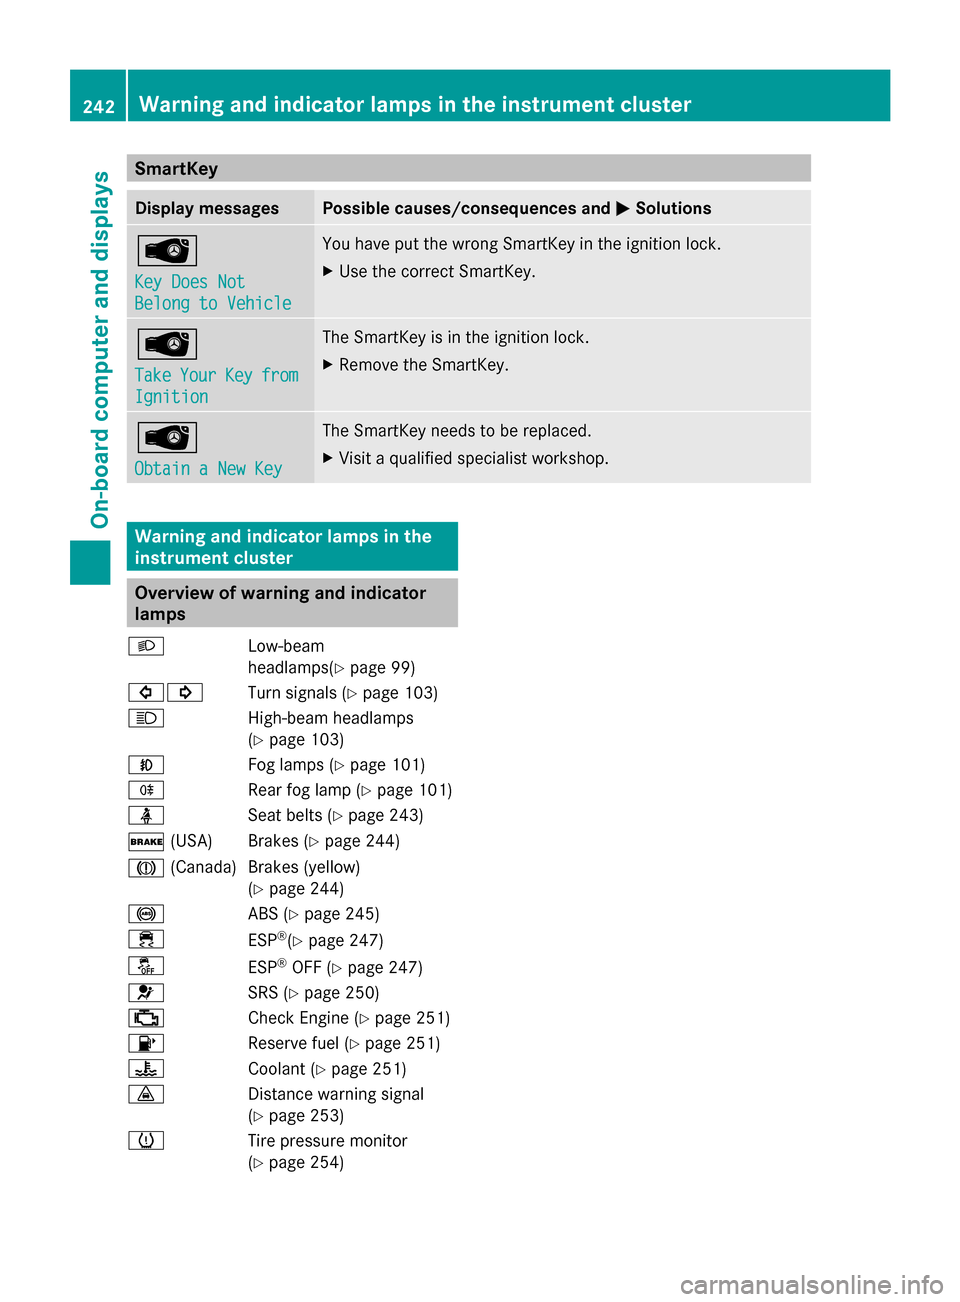
SmartKey
Display messages Possible causes/consequences and
0050
0050Solutions 00AF
Key Does Not Key Does Not
Belong to Vehicle Belong to Vehicle You have put the wrong SmartKey in the ignition lock.
X
Use the correct SmartKey. 00AF
Take Take
Your
YourKey
Keyfrom
from
Ignition
Ignition The SmartKey is in the ignition lock.
X
Remove the SmartKey. 00AF
Obtain a New Key Obtain a New Key The SmartKey needs to be replaced.
X
Visit a qualified specialist workshop. Warning and indicator lamps in the
instrument cluster Overview of warning and indicator
lamps
0058 Low-beam
headlamps(Ypage 99)
003E003D Turn signals (Ypage 103)
0057 High-beam headlamps
(Ypage 103)
005A Fog lamps (Ypage 101)
005E Rear fog lamp (Y page 101)
00E9 Seat belts (Ypage 243)
0027 (USA) Brakes (Y page 244)
004D (Canada)B rakes (yellow)
(Y page 244)
0025 ABS (Ypage 245)
00E5 ESP®
(Y page 247)
00BB ESP®
OFF (Y page 247)
0075 SRS (Ypage 250)
00B9 Check Engine (Y page 251)
00B6 Reserve fuel (Ypage 251)
00AC Coolant (Ypage 251)
00BA Distance warning signal
(Ypage 253)
0077 Tire pressure monitor
(Ypage 254) 242
Warning and indicator lamps in the instrument clusterOn-board computer and displays