MERCEDES-BENZ G-CLASS SUV 2018 Owners Manual
Manufacturer: MERCEDES-BENZ, Model Year: 2018, Model line: G-CLASS SUV, Model: MERCEDES-BENZ G-CLASS SUV 2018Pages: 549, PDF Size: 10.22 MB
Page 421 of 549
Fo
r more information on wheels and tyres, con‐
ta ct a qualified specialist workshop.
Be sure toalso obse rveth efo llowing fur ther
re lated subjects:
R Notes on tyre pressure (/ page 409)
R Tyre pressure table (/ page410)
R Notes on the emer gency spa rewheel
(/ page 424) Note
s on inter changing wheels &
WARNING Risk of inju rythro ugh dif fer‐
ent wheel sizes
Inter changing the front and rear wheels if the
wheels or tyres ha vediffere nt dimensions
may se verely impair the driving characteris‐
tics.
The disk brakes or wheel suspension compo‐
nents may also be damaged. #
Rotate front and rear wheels on lyifthe
wheels and tyres are of the same
dimensions. Inter
changing the front and rear wheels if the
wheels or tyres ha vediffere nt dimensions can
re nder thege neral operating pe rmit in valid.
The wear pat tern s on the front and rear wheels
dif fer:
R Front wheels wear more on the shoulder of
th e tyre
R Rear wheels wear more in the cent reofthe
tyre
On vehicles with the same front and rear wheel
size, you can inter change the wheels every
5,000 to10,000 km, depending on thewe ar.
Ensure the direction of rotation is maintained for
th e wheels.
It is imperative toobser vethe instructions and
saf ety no tes on "Changing a wheel" when doing
so Preparing theve hicle for a wheel
ch ange( /page 419). Note
s onstoring wheels When
storing wheels, obser vethefo llowing
no tes:
R Afterre moving wheels, store them in a cool,
dry and preferably dark place.
R Protect the tyres from conta ct withoil,
grease or fuel. Ve
hicle tool kit overview The
vehicle tool kit contains:
R vehicle tool bag with:
- pump le verfo r jack
- wheel spanner with T-piece
- screwdriver (inser ted in a pump le ver)
- dismantling tool forro of rack (inser ted in
a pump le ver)
R jack with adapter 41 8
Wheels and tyres
Page 422 of 549
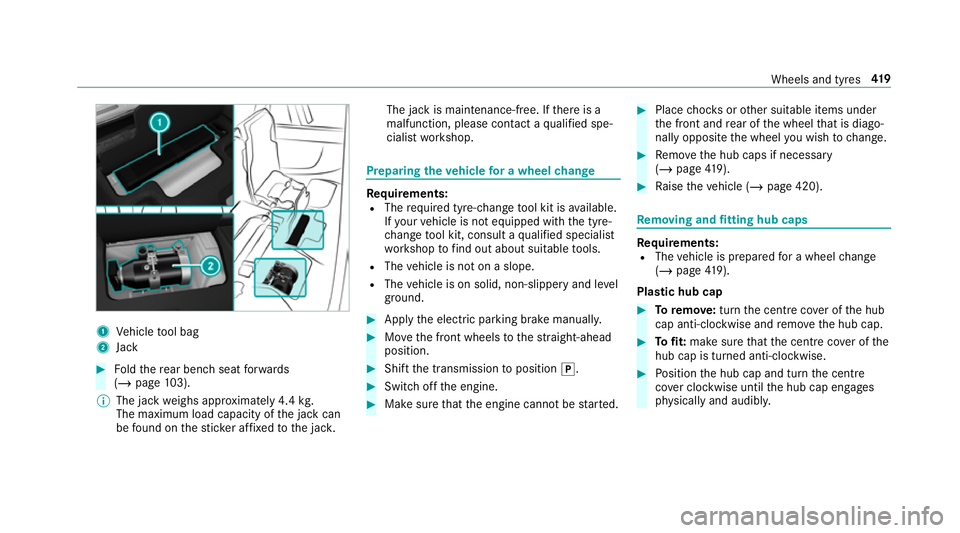
1
Vehicle tool bag
2 Jack #
Foldthere ar ben chseat forw ards
(/ page 103).
% The jack weighs appr oximately 4.4 kg.
The maximum load capacity of the jack can
be found on thest icke r af fixe dto the jac k. The jack is maintenance-free. If
there is a
malfunction, please conta ct aqualified spe‐
cialist workshop. Preparing
theve hicle for a wheel change Re
quirements:
R The requ ired tyre-change tool kit is available.
If yo ur vehicle is not equipped with the tyre-
ch ange tool kit, consult a qualified specialist
wo rkshop tofind out about suitable tools.
R The vehicle is not on a slope.
R The vehicle is on solid, non-slippery and le vel
ground. #
Apply the electric parking brake manually. #
Movethe front wheels tothest ra ight-ahead
position. #
Shift the transmission toposition j. #
Switch off the engine. #
Make sure that the engine cann otbe star ted. #
Place choc ks orother suitable items under
th e front and rear of the wheel that is diago‐
nally opposite the wheel you wish tochange. #
Remo vethe hub caps if necessary
(/ page 419). #
Raise theve hicle (/ page 420). Re
moving and fitting hub caps Re
quirements:
R The vehicle is prepared for a wheel change
(/ page 419).
Plas tic hub cap #
Toremo ve:turn the cent recover of the hub
cap anti-clockwise and remo vethe hub cap. #
Tofit: make sure that the cent recover of the
hub cap is turned anti-clockwise. #
Position the hub cap and turn the cent re
co ver clockwise until the hub cap engages
ph ysically and audibly. Wheels and tyres
419
Page 423 of 549
Ra
ising theve hicle when changing a wheel Re
quirements:
R There are no persons in theve hicle.
R The vehicle has been prepared for a wheel
ch ange (/ page419).
R The hub caps havebeen remo ved
( / page 419).
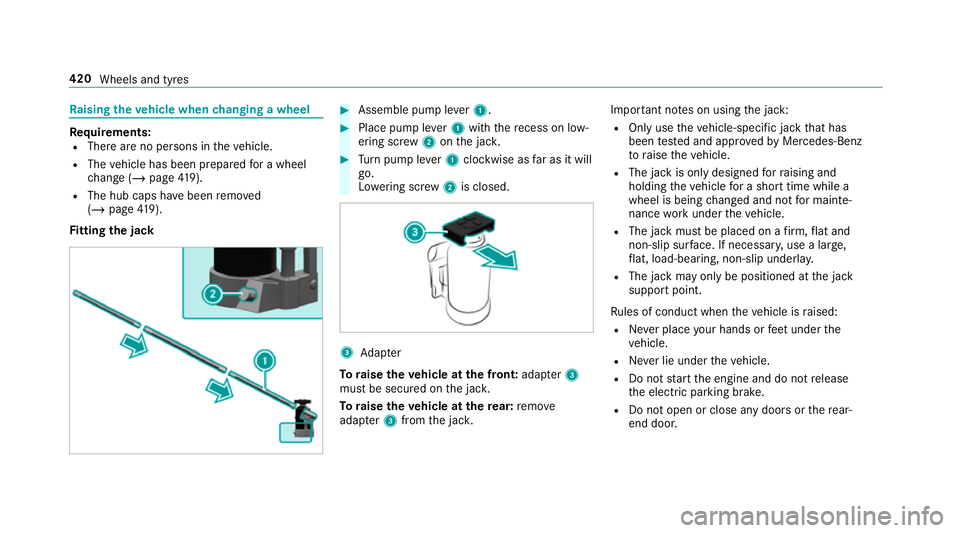
Fi tting the jack #
Assemble pu mpleve r1. #
Place pump le ver1 with there cess on low‐
ering scr ew2 onthe jac k. #
Turn pump le ver1 clockwise as far as it will
go.
Lo we ring scr ew2 is closed. 3
Adapter
To raise theve hicle at the front: adapter3
must be secured on the jac k.
To raise theve hicle at there ar: remo ve
adap ter3 from the jac k. Impor
tant no tes on using the jack:
R Only use theve hicle-specific jack that has
been tested and appr ovedby Mercedes-Benz
to raise theve hicle.
R The jack is only designed forra ising and
holding theve hicle for a short time while a
wheel is being changed and not for mainte‐
nance workunder theve hicle.
R The jack must be placed on a firm ,fl at and
non-slip sur face. If necessar y,use a lar ge,
fl at, load-bearing, non-slip unde rlay.
R The jack may only be positioned at the jack
support point.
Ru les of conduct when theve hicle is raised:
R Never place your hands or feet under the
ve hicle.
R Never lie under theve hicle.
R Do not start the engine and do not release
th e electric parking brake.
R Do not open or close any doors or there ar-
end door. 420
Wheels and tyres
Page 424 of 549
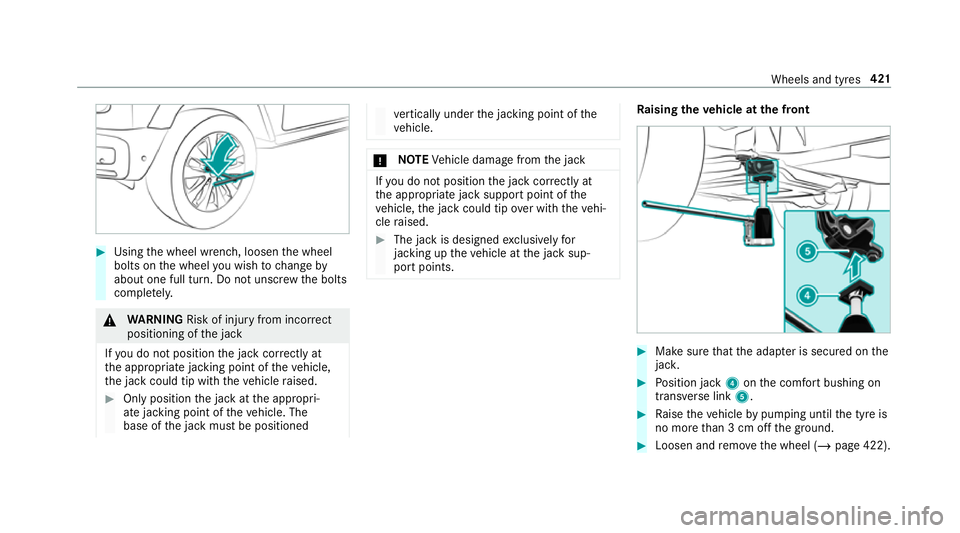
#
Using the wheel wrench, loosen the wheel
bolts on the wheel you wish tochange by
about one full turn. Do not unscr ewthe bolts
comple tely. &
WARNING Risk of inju ryfrom incor rect
positioning of the jack
If yo u do not position the jack cor rectly at
th e appropriate jacking point of theve hicle,
th e jack could tip with theve hicle raised. #
Only position the jack at the appropri‐
ate jacking point of theve hicle. The
base of the jack must be positioned ve
rtically under the jacking point of the
ve hicle. *
NO
TEVehicle damage from the jack If
yo u do not position the jack cor rectly at
th e appropriate jack support point of the
ve hicle, the jack could tip over with theve hi‐
cle raised. #
The jack is designed exclusively for
jacking up theve hicle at the jack sup‐
port points. Ra
ising theve hicle at the front #
Make sure that the adap ter is secured on the
jac k. #
Position jack 4onthe comfort bushing on
transverse link 5. #
Raise theve hicle bypumping until the tyre is
no more than 3 cm off the ground. #
Loosen and remo vethe wheel (/ page 422). Wheels and tyres
421
Page 425 of 549
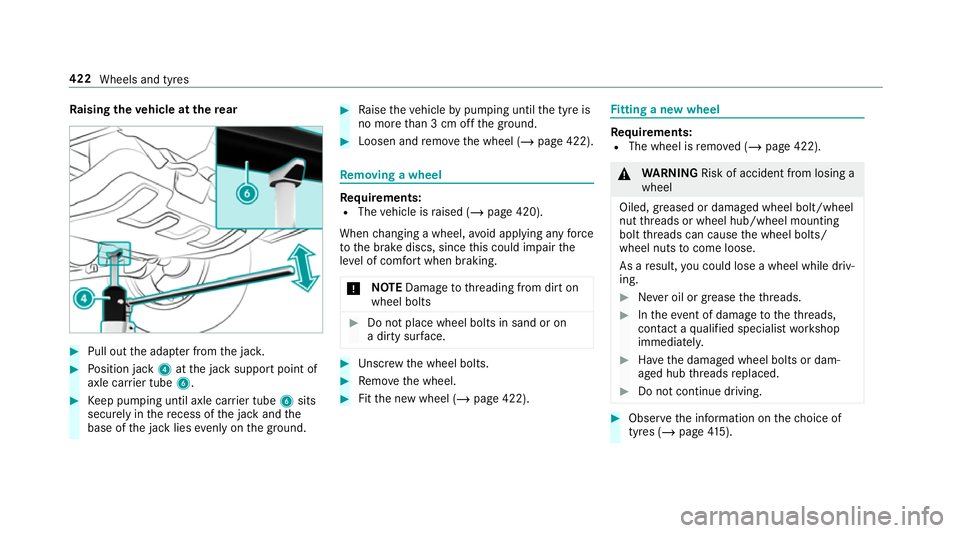
Ra
ising theve hicle at there ar #
Pull out the adap ter from the jac k. #
Position jack 4atthe jack support point of
axle car rier tube 6. #
Keep pumping until axle car rier tube 6sits
securely in there cess of the jack and the
base of the jack lies evenly on the ground. #
Raise theve hicle bypumping until the tyre is
no more than 3 cm off the ground. #
Loosen and remo vethe wheel (/ page 422). Re
moving a wheel Re
quirements:
R The vehicle is raised (/ page 420).
When changing a wheel, avoid applying any force
to the brake discs, since this could impair the
le ve l of com fort when braking.
* NO
TEDama getothre ading from dirt on
wheel bolts #
Do not place wheel bolts in sand or on
a dirty sur face. #
Unscr ew the wheel bolts. #
Remo vethe wheel. #
Fitthe new wheel (/ page 422). Fi
tting a new wheel Re
quirements:
R The wheel is remo ved (/ page 422). &
WARNING Risk of accident from losing a
wheel
Oiled, greased or damaged wheel bolt/wheel
nut thre ads or wheel hub/wheel mounting
bolt thre ads can cause the wheel bolts/
wheel nuts tocome loose.
As a result, you could lose a wheel while driv‐
ing. #
Never oil or grease theth re ads. #
Intheeve nt of dama getotheth re ads,
con tact a qualified specialist workshop
immediatel y. #
Have the damaged wheel bolts or dam‐
aged hub thre ads replaced. #
Do not continue driving. #
Obser vethe information on thech oice of
tyres (/ page415). 422
Wheels and tyres
Page 426 of 549
Fo
r tyres with a specified direction of rotat ion,
an ar rowonthe side wall of the tyre indicates
th e cor rect di rection of rotation. Obse rvethe
direction of rotation when fitting. #
Place the wheel tobe fitted on the wheel hub
and push it on. &
WARNING Risk of inju ryfrom tightening
wheel bolts and nuts
If yo u tighten the wheel bolts or wheel nuts
when theve hicle is raised, the jack could tip. #
Only tighten wheel bolts or wheel nuts
when theve hicle is on the ground. #
For saf etyre asons, on lyuse wheel bolts
which ha vebeen appr ovedby Mercedes-
Benz and forth e wheel in question. #
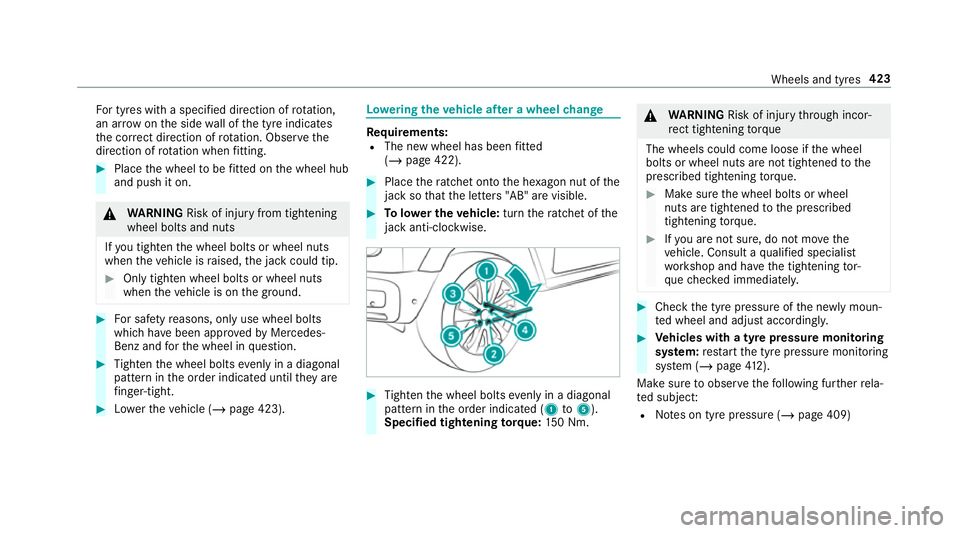
Tighten the wheel bolts evenly in a diagonal
pattern in the order indicated until they are
fi nger-tight. #
Lowe rth eve hicle (/ page 423). Lo
weri ngtheve hicle af ter a wheel change Re
quirements:
R The new wheel has been fitted
(/ page 422). #
Place thera tchet onto the he xagon nut of the
jack so that the letters "AB" are visible. #
Tolowe r the vehicle: turnthera tchet of the
jack anti-clo ckwise. #
Tighten the wheel bolts evenly in a diagonal
pattern in the order indicated (1 to5 ).
Specified tightening torq ue: 150 Nm. &
WARNING Risk of inju rythro ugh incor‐
re ct tigh tening torque
The wheels could come loose if the wheel
bolts or wheel nuts are not tightened tothe
prescribed tightening torque. #
Makesure the wheel bolts or wheel
nuts are tightened tothe prescribed
tightening torque. #
Ifyo u are not sure, do not mo vethe
ve hicle. Consult a qualified specialist
wo rkshop and ha vethe tightening tor‐
qu ech ecked immediately. #
Check the tyre pressure of the newly moun‐
te d wheel and adjust according ly. #
Vehicles with a tyre pressure monitoring
sy stem: restart the tyre pressure monitoring
sy stem (/ page412).
Ma kesure toobser vethefo llowing fur ther rela‐
te d subjec t:
R Notes on tyre pressure (/ page 409) Wheels and tyres
423
Page 427 of 549
Emer
gency spare wheel Note
s onthe emer gency spare wheel &
WARNING Risk of accident caused by
incor rect wheel and tyre dimensions
The wheel or tyre size and the tyre type of
th e emer gency spa rewheel or spare wheel
and the wheel tobe replaced may dif fer.
Mounting an emer gency spa rewheel/spare
wheel may se verely impair the driving char‐
acteristics.
To preve nt hazardous situations: #
Adapt your driving style according lyand
drive carefull y. #
Neverfit more than one emer gency
spa rewheel or spare wheel that dif fers
in size. #
Only use an emer gency spa rewheel or
spare wheel of a dif fere nt size brie fly. #
Do not switch off ESP ®
. #
Have the emer gency spa rewheel or
spare wheel of a dif fere nt size replaced
at the nearest qualified specialist work‐ shop. The new wheel must ha
vethe
cor rect dimensions. Check
the tyre pressure of the emer gency spa re
wheel fitted. Co rrect the pressure as necessar y.
The maximum permissible speed with an emer‐
ge ncy spa rewheel fitted is 80 km/h.
Do not fit th e emer gency spa rewheel with sn ow
ch ains.
Re place the emer gency spa rewheel af ter six
ye ars at the latest, rega rdless of wear.
Be sure toalso obse rveth efo llowing fur ther
re lated subjects:
R Notes on tyre pressure (/ page 409)
R Tyre pressure table (/ page410) 424
Wheels and tyres
Page 428 of 549
Note
s ontech nical data
Mercedes-AMG vehicles: be sure toobser ve
th e no tes in the Supplement. Otherwise, you
may failto recognise dangers.
The tech nical da tawa s de term ined in accord‐
ance with EU Directives. The data stated on ly
applies tovehicles with standard equipment. Yo u
can obtain fur ther information from a Mercedes-
Benz Service Centre.
Only for ce rtain countries: you can find vehi‐
cle-specific vehicle data in the EC-Certificate of
Conformity (CERTIFIC ATE OF CONFORMITY).
These documents are deli vered with your vehi‐
cle. On-board electronics
Note
s on tampering with the engine elec‐
tronics *
NO
TEPremature wearthro ugh improper
main tenance Improper maintenance may cause
vehicle
components towe ar more quickly and the
ve hicle's operating permit may be in valida‐
te d. #
Alw ays ha vewo rkon the engine elec‐
tronics and related components car ried
out at a qualified specialist workshop. Tw
o-w ayradios Note
s onfitting two-w ayradios &
WARNING Risk of accident due to
improper workon two-w ayradios
The elect romagnetic radiation from two-w ay
ra dios can inter fere with the on-board elec‐ tronics if RF transmit
ters are manipulated or
re trofitted inco rrectly.
This could jeopardise the operating saf ety of
th eve hicle. #
You should ha veall workon electrical
and electronic components car ried out
at a qualified specialist workshop. &
WARNING Risk of accident from incor‐
re ct ope ration of two-w ayradios
If yo u operate two- wayra dios inco rrectly in
th eve hicle, the electromagnetic radiation
could inter fere with the on-board electronics,
e.g.:
R ifth e two-w ayradio is not connec tedto
an exterior aerial
R ifth eex terior aerial is not cor rectly
mounted or is not of low reflection
This could jeopardise the operating saf ety of
th eve hicle. #
Have the lo w-reflection exterior aerial
fi tted at a qualified specialist workshop. Te
ch nical da ta425
Page 429 of 549
#
When operating two-w ayradios in the
ve hicle, alw ays connect them tothe
lo w- reflection exterior aerial. *
NO
TEInva lidation of the operating per‐
mit due tofailure tocomply wi th the
instructions for ins tallation and use The operating permit may be in
validated if
th e instructions for ins tallation and use of
two-w ayradios are not obser ved. #
Only use appr oved frequency bands. #
Obser vethe maximum permissible out‐
put po wer in these frequency bands. #
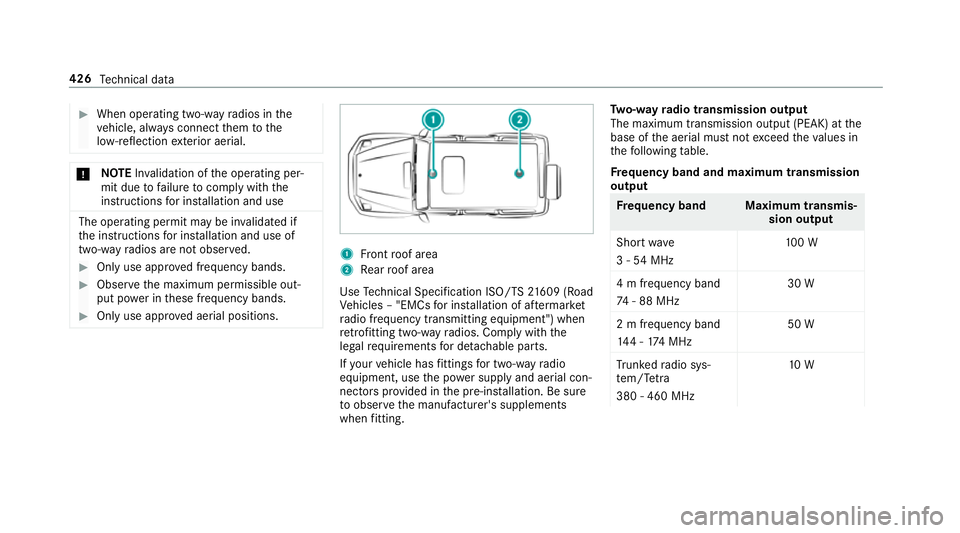
Only use appr oved aerial positions. 1
Front roof area
2 Rear roof area
Use Tech nical Specification ISO/TS 21609 (Road
Ve hicles – "EMCs for ins tallation of af term arket
ra dio frequency transmitting equipment") when
re trofitting two-w ayradios. Comply with the
legal requirements for de tach able parts.
If yo ur vehicle has fittings for two-w ayradio
equipment, use the po wer supp lyand aerial con‐
nec tors prov ided in the pre-ins tallation. Be sure
to obser vethe manufacturer's supplements
when fitting. Tw
o-w ayradio transmission output
The maximum transmission output (PEAK) at the
base of the aerial must not exceed theva lues in
th efo llowing table.
Fr equency band and maximum transmission
output Fr
equency band Maximum transmis‐
sion output
Sho rtwa ve
3 - 54 MHz 10
0 W
4 m frequency band
74 - 88 MHz 30 W
2 m frequency band
14 4 - 174 MHz 50 W
Tr unked radio sys‐
te m/T etra
380 - 460 MHz 10 W426
Tech nical da ta
Page 430 of 549
Fr
equency band Maximum transmis‐
sion output
70 cm frequency
band
420 - 450 MHz 35 W
Tw o-w ayradio
(2G/3G/4G) 10 WThe
following devices can be used in theve hicle
without restrictions:
R two-w ayradios with a maximum transmission
output of up to100 mW
R two-w ayradios with transmit ter frequencies
in the 380 - 410 MHz frequency band and a
maximum transmission output of up to2 W
(trunked radio sy stem/T etra)
R mobile phones (2G/3G/4G)
There are no restrictions when positioning the
aerial on the outside of theve hicle forth efo llow‐
ing frequency bands:
R Trunked radio sy stem/T etra
R 70 cm frequency band R
2G/3G/4G Ve
hicle identification plate, VIN and engine
number
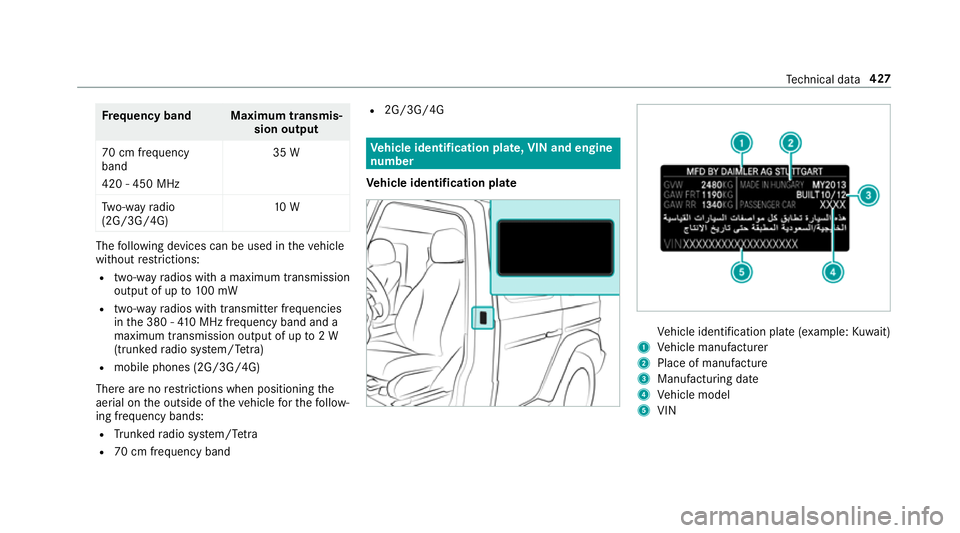
Ve hicle identification plate Ve
hicle identification plate (e xample:Kuwa it)
1 Vehicle manufacturer
2 Place of manufacture
3 Manufacturing date
4 Vehicle model
5 VIN Te
ch nical da ta427