key MERCEDES-BENZ GL-Class 2013 X166 Owner's Manual
[x] Cancel search | Manufacturer: MERCEDES-BENZ, Model Year: 2013, Model line: GL-Class, Model: MERCEDES-BENZ GL-Class 2013 X166Pages: 454, PDF Size: 6.31 MB
Page 350 of 454

X
To open: briefly press cover 0003at the top.
The ashtray opens.
X To remove the insert: push into recess
0021 from the right.
Ashtray insert 0002slides ou tslightly to the
right.
X Lift insert 0002up and out.
X To re-install the insert: place insert0002
into the holder and press down on the right
until it engages.
Vehicles without a Rear Seat Entertainment
System have an ashtray in the center console
in the rear compartment. Cigarette lighter
G
WARNING
You can burn yourself if you touch the hot
heating elemen torthe socket of the cigarette
lighter.
In addition, flammable materials can ignite if:
R the hot cigarette lighter falls
R a child holds the hot cigarette lighter to
objects, for example
There is a risk of fire and injury.
Always hold the cigarette lighter by the knob.
Always make sure that the cigarette lighter is
out of reach of children. Never leave children
unsupervised in the vehicle.
! The cigarette lighter in the center console
in the front compartment is not intended
for operating the tire inflation compressor. Your attention must always be focused on the
traffic conditions. Only use the cigarette
lighter when road and traffic conditions
permit.
X
Turn the SmartKey to position 2in the
ignition lock (Y page 163).
X To open: slide cover 0002to its foremost
position.
X Press in cigarette lighter 0003.
Cigarette lighter 0003will pop out
automatically when the heating element is
red-hot.
X To close: pull cover 0002back as far as it will
go. 12
Vsockets
General notes X
Turn the SmartKey to position 1in the
ignitio nlock (Y page 163).
With the exception of the socket in the front
center console, all socket scan be used for
accessories with a maximum curren tdraw of
240 W (20 A). The socket in the front center
console can be used for accessories with a
maximum current draw of 180 W (15 A).
Accessories include such items as lamps or
chargers for mobile phones.
If you use the sockets for long periods when
the engine is switched off, the battery may
discharge.
i An emergency cut-out ensures that the
on-board voltage does not drop too low.If 348
FeaturesStowage and features
Page 359 of 454
sent. If you have multiple Mercedes-Benz
vehicles with mbrace and active mbrace
accounts:
if multiple vehicles are registered under the
same e-mail address, the destination will
be sent to all the vehicles.
Vehicle remote opening You can use the vehicle remote opening if you
have unintentionally locked your vehicle and
a replacement SmartKey is not available. The
vehicle can be opened by the Mercedes-Benz
Customer Assistance Center.
The vehicle can be immediately opened
remotely within four daysoft he ignition being
turned off. After this time, the remote opening
may be delayed by 15 to 60 minutes. After
30 days the vehicle can no longer be opened
remotely.
X Contact the following service hotlines:
R
USA: Mercedes-Ben zCustomer
Assistance Cente rat
1-800-FOR-MERCedes
(1-800-367-6372) or 1-866-990-9007
R Canada: Customer Service at
1-888-923-8367
You will be asked for you rpassword.
X Return to your vehicle at the time agreed
upon with the Mercedes-Ben zCustomer
Assistance Center.
US Ao nly:alternatively, the vehicle can be
opened via:
R the Internet, under the "Owners Online"
section
R the telephone application (e.g .iPhone ®
,
Blackberry)
To do this, you will need your identification
number and password.
i Vehicle remote opening is only possible if
the corresponding mobile phone network
is accessible. Vehicle remote closing The remote closing feature can be used when
you have forgotten to lock the vehicle and you
are no longer nearby. The vehicle can then be
locked by the Mercedes-Benz Customer
Assistance Center.
The vehicle can be immediately remotely
locked within four days of the ignition being
turned off. After this time, the remote closing
may be delayed by 15 to 60 minutes. After
30 days the vehicle can no longer be closed
remotely.
X
Contact the following service hotlines:
R
USA: Mercedes-Benz Customer
Assistance Center at
1-800-FOR-MERCedes
(1-800-367-6372) or 1-866-990-9007
R Canada: Customer Service at
1-888-923-8367
You will be asked for your PIN.
The next time you are inside the vehicle and
you switch on the ignition, the Doors Locked Remotely message appears in the
multifunction display.
USA only: alternatively, the vehicle can be
locked via:
R the Internet, under the "Owners Online"
section
R the telephone application (e.g. iPhone ®
,
Blackberry)
To do this, you will need your identification
number and password.
i The vehicle remote closing feature is
available when the relevant mobile phone
network is available and data connection is
possible. Features
357Stowage and features Z
Page 360 of 454
Stolen vehicle recovery service
If your vehicle has been stolen:
X Notify the police.
The police will issue a numbered incident
report.
X This number will be forwarded to the
Mercedes-Benz Customer Assistance
Center together with your PIN.
The Mercedes-Benz Customer Assistance
Center then attempts to locate the mbrace
system. The Mercedes-Benz Customer
Assistance Center contacts you and the
local law enforcement agency if the vehicle
is located. However, only the law
enforcement agency is informed of the
location of the vehicle.
i If the anti-theft alarm system is activated
for longer than 30 seconds, the Mercedes-
Benz Customer Assistance center is
automatically informed.
Vehicle remote malfunction diagnosis With the vehicle remote malfunction
diagnosis (Vehicle Health Check), the
Customer Assistance center can provide
improved support for problems with your
vehicle. During an existing call, vehicle data
is transferred to the Customer Assistance
center. The customer service representative
can use the received data to decide what kind
of assistance is required. You are then, for
example, guided to the nearest Mercedes-
Benz Service center or a recovery vehicle is
called.
If vehicle data needs to be transferred during
an MB Info call or a Roadside Assistance call,
this is initiated by the Customer Assistance
center. You will see the
RoadsideAssistance Connected message in the
COMAND display.Ift he vehicle remote
malfunction diagnosis is able to be started,
the Request for vehicle diagnosis received. Start vehicle diagnosis?
message appears in the display. X
Press Yes to confirm the message.
X If the Vehicle Diagnosis: Please switch on ignition. message appears:
turn the key to position 2in the ignition
lock.
X If the Please follow the instructions received by phone and
move your vehicle to a safe
position. message appears: follow the
instructions of the customer service
representative.
The message in the display disappears.
If you select Cancel , the vehicle remote
malfunction diagnosis is canceled
completely.
The vehicle operating state check begins.
Meanwhile, the Vehicle diagnosis activated message appears.
When the check is finished, the Sending vehicle diagnosis data...(Voice
connection may be interrupted
during data transfer.) message
appears. The vehicle data can now be sent to
the Customer Assistance center.
X Press OK to confirm the message.
The voice connection with the Customer
Assistance center is terminated.
The Vehicle Diagnosis: Transferring data... appears.
The vehicle data is sent to the Customer
Assistance center.
Depending on what the customer service
representative agreed with you, the voice
connection is re-established after the transfer
is complete. If necessary, you will be
contacted at a later time by another means,
e.g. by E-Mail or telephone.
Further functions of the vehicle remote
malfunction diagnosis include, for example:
R transfer of service data to the Customer
Assistance center. If aservice is overdue,
the COMAND display shows a message 358
FeaturesStowage and features
Page 362 of 454
Triggering the vehicle alarm
With this function, you can trigge
rthe
vehicle's panic alarm via SMS. An alarm
sounds and the exterior lighting flashes.
Depending on the setting, the panic alarm
lasts five or ten seconds. Afterwards, the
alarm switches off. Garage door opener
Important safety notes G
WARNING
When you operate or program the garage door
with the integrated garage door opener,
persons in the range of movement of the
garage door can become trapped or struck by
the garage door. There is arisk of injury.
When using the integrated garage door
opener, always make sure that nobody is
within the range of movement of the garage
door. G
WARNING
Combustion engines emit poisonous exhaust
gases such as carbo nmonoxide. Inhaling
these exhaust gases leads to poisoning. There
is a risk of fatal injury. Therefore never leave
the engine running in enclosed spaces
without sufficient ventilation.
The HomeLink ®
garage door opener
integrated in the rear-view mirror allows you
to operate up to three different door and gate
systems.
Only operate garage doors using the
integrated garage door opener if:
R they are equipped with a safety stop and
reverse feature, and
R they conform to the current U.S. safety
standards.
When programming a garage door opener,
park vehicle outside the garage.
i Certain garage door drives are
incompatible with the integrated garage door opener. If you have difficulty
programming the integrated garage door
opener, contact an authorized Mercedes-
Benz Center.
Alternatively, you can call the following
telephone assistance services:
R
USA: Mercedes-Benz Customer
Assistance Center at
1-800-FOR-MERCedes
R Canada: Customer Service at
1-800-387-0100
R HomeLink ®
hotline 1-800-355-3515
(free of charge)
More information on HomeLink ®
and/or
compatible products is also available
online at http://www.homelink.com.
i Notes on the declaration of conformity
(Y page 27).
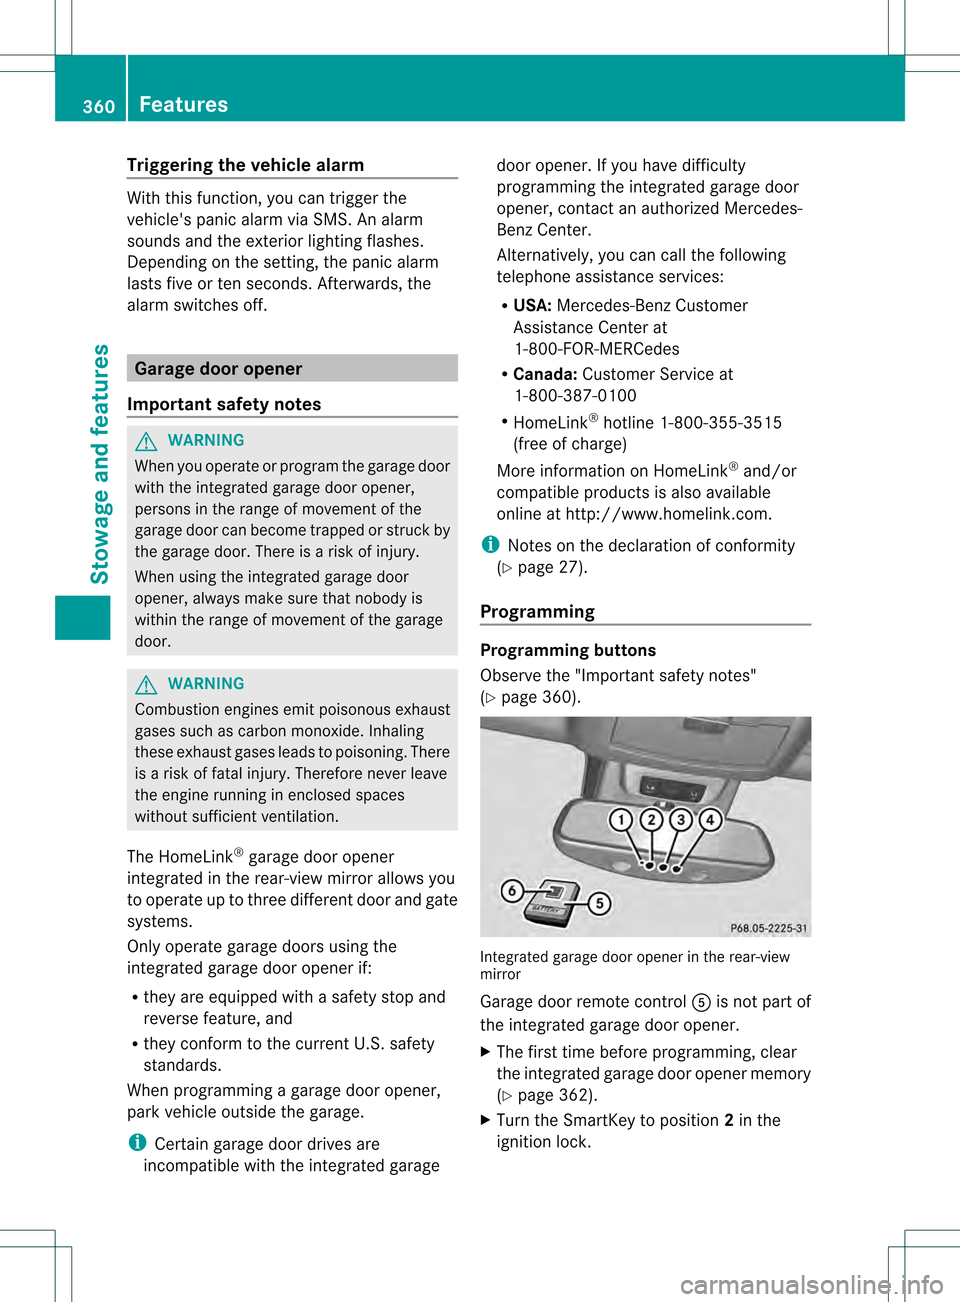
Programming Programming buttons
Observe the "Important safety notes"
(Y
page 360). Integrated garage door opener in the rear-view
mirror
Garage door remote control
001Eis not part of
the integrated garage door opener.
X The first time before programming, clear
the integrated garage door opener memory
(Y page 362).
X Turn the SmartKey to position 2in the
ignition lock. 360
FeaturesStowage and features
Page 363 of 454
X
Press and hold one of buttons 0003to0020 on
the integrated garage door opener.
After a short time, indicator lamp 0002lights
up yellow.
i Indicator lamp 0002lights up yellow as soon
as button 0003,0021or0020 is programmed for
the first time. If the selected button has
already been programmed, indicator
lamp 0002will only light up yellow after ten
seconds have elapsed.
X Release button 0003,0021or0020. Indicator
lamp 0002flashes yellow.
X Point garage door remote control 001E
towards buttons 0003to0020 on the rear-view
mirror at a distance of 2 to 8 inches (5 to
20 cm).
i The required distance between remote
control 001Eand the integrated garage door
opener depends on the garage door drive
system. Several attempts might be
necessary. You should test every position
for at least 25 seconds before trying
another position.
X Press and hold button 001Fon remot econtrol
001E until indicator lamp 0002lights up green.
If indicator lamp 0002lights up green or
flashes, then programming has been
successful.
X Release button 001Fon remote control 001Efor
the garage door drive system.
X If indicator lamp 0002lights up red: repeat
the programming procedure for the
corresponding button on the rear-view
mirror. When doing so, vary the distance
between remote control 001Eand the rear-
view mirror.
i If the indicator lamp flashes green after
successful programming, the garage door
system is using a rolling code. After
programming, you must synchronize the
garage door opener integrated in the rear-
view mirror with the receiver of the garage
door system. Synchronizing the rolling code
Observe the "Important safety notes"
(Y
page 360).
Your vehicle must be within reach of the
garage door or exterior gate drive. Make sure
that neither your vehicle nor any persons/
objects are present within the sweep of the
door or gate.
X Turn the SmartKey to position 2in the
ignition lock.
X Press the program button of the door or
gate drive (see the door or gate drive
operating instructions, e.g. under
"programming of additional remote
controls").
i Usually, you now have 30seconds to
initiate the next step.
X Press previously programmed button 0003,
0021 or0020 of the integrated garage door
opener until the door closes.
The rolling code synchronization is then
complete.
Notes on programming the remote
control
Canadia nradio frequency laws require a
"break" (or interruption) of the transmission
signals after broadcasting for a few seconds.
Therefore, these signals may no tlast long
enough for the integrated garage door
opener. The signal is no trecognized during
programming. Comparable with Canadian
law, some U.S.g arage door openers also
feature a "break".
Proceed as follows:
R if you live in Canada
R if you have difficulties programming the
garage door opener (regardless of where
you live) when using the programming
steps Features
361Stowage and features Z
Page 364 of 454
X
Press and hold one of buttons 0003to0020 on
the integrated garage door opener.
After a short time, indicator lamp 0002lights
up yellow.
X Release the button.
Indicator lamp 0002flashes yellow.
X Press button 001Fof garage door remote
control 001Efor two seconds, then release it
for two seconds.
X Press button 001Fagain for two seconds.
X Repeat this sequence on button 001Fof
remote control 001Euntil indicator lamp 0002
lights up green.
If indicator lamp 0002turns red, repeat the
process.
X Continue with the other programming
steps (see above).
Problems when programming
If you are experiencing problems
programming the integrated garage door
opener on the rear-view mirror, take note of
the following instructions:
R Check the transmitter frequency of garage
door drive remote control 001E.This can
usually be found on the back of the remote
control.
The integrated garage door opener is
compatible with devices that have units
which operate in the frequency range of
280to 433MHz.
R Replace the batteries in garage door
remote control 001E.This increases the
likelihood that garage door remote control
001E will transmit a stronga nd precise signal
to the integrated garage door opene rinthe
rear-view mirror.
R When programming, hold remote control
001E at varying distances and angles from the
button that you are programming. Try
various angles at a distance between 2and
12 inches (5to 30 cm) or at the same angle
but at varying distances.
R If another remote control for the same
garage door drive is available, repeat the same programming steps with this remote
control. Before performing these steps,
make sure that new batteries have been
installed in garage door drive remote
control
001E.
R Note that some remote controls only
transmit for a limited amount of time (the
indicator lamp on the remote control goes
out). Press button 001Fon remote control
001E again before transmission ends.
R Align the antenna cable of the garage door
opener unit. This can improve signal
reception/transmission.
Opening/closing the garage door After it has been programmed, the integrated
garage door opener performs the function of
the garage door system remote control.
Please also read the operating instructions
for the garage door system.
X
Turn the SmartKey to position 2in the
ignition lock.
X Press button 0003,0021or0020 which you have
programmed to operate the garage door.
Garage door system with a fixed code:
indicator lamp 0002lights up green.
Garage door system with a rolling code:
indicator lamp 0002flashes green.
i The transmitter will transmit a signal as
long as the button is pressed. The
transmission is halted after a maximum of
ten seconds and indicator lamp 0002lights
up yellow. Press button 0003,0021or0020 again
if necessary.
Clearing the memory X
Turn the SmartKey to position 2in the
ignition lock.
X Press buttons 0003and 0020.
The indicator lamp lights up yellow.
X Press and hold buttons 0003and 0020until the
indicator lamp turns green. 362
FeaturesStowage and features
Page 371 of 454

Example: engine oil cap
X
Turn cap 0002counter-clockwise and remove
it.
X Add engine oil.
If the oil level is at or below the MIN mark
on the oil dipstick, add 1.1 US qt (1.0 liter)
of engine oil.
X Replace cap 0002on the filler neck and turn
clockwise.
Ensure that the cap locks into place
securely.
X Check the oil level agai nwith the oil
dipstick (Y page 368).
Further information on engine oil
(Y page 443). Additional service products
Checking coolant level G
WARNING
The engine cooling system is pressurized,
particularly when the engine is warm. When
opening the cap, you could be scalded by hot
coolan tspraying out. There is a risk of injury.
Let the engine cool down before opening the
cap. Wear eye and hand protection when
opening the cap. Open the cap slowly half a
turn to allow pressure to escape. X
Park the vehicle on a level surface.
Only chec kthe coolant level when the
vehicle is on a level surface and the engine
has cooled down.
X Turn the SmartKey to position 2in the
ignition lock (Y page 163).
On vehicles with KEYLESS-GO, press the
Start/Stop button twice (Y page 163).
X Check the coolant temperature gauge in
the multifunction display.
The coolant temperature must be below
158 ‡ (70 †).
X Turn the SmartKey to position
0(Y page 163) in the ignition lock.
X Slowly turn cap 0002half a turn counter-
clockwise to allow excess pressure to
escape.
X Turn cap 0002further counter-clockwise and
remove it.
If the coolant is at the level of marker bar
0021 in the filler neck when cold, there is
enough coolant in coolant expansion
tank 0003.
If the coolant level is approximately 0.6 in
(1.5 cm) above marker bar 0021in the fuel
filler neck when warm, there is enough
coolant in expansion tank 0003.
X If necessary, add coolant that has been
tested and approved by Mercedes-Benz.
X Replace cap 0002and turn it clockwise as far
as it will go.
For further information on coolant, see
(Y page 445). Engine compartment
369Maintenance and care Z
Page 374 of 454
should drive for a few minutes after
cleaning. Braking heats the brake discs and
the brake pads/linings, thus drying them.
The vehicle can then be parked.
Regular care of your vehicle is a condition for
retaining the quality in the long term.
Use care products and cleaning agents
recommended and approved by Mercedes-
Benz. Washing the vehicle and cleaning the
paintwork
Automatic car wash G
WARNING
Braking efficiency is reduced after washing
the vehicle. There is a risk of an accident.
After the vehicle has been washed, brake
carefully while paying attention to the traffic
conditions until full braking power is restored.
! If DISTRONIC PLUS or the HOLD function
is activated, the vehicle brakes
automatically in certain situations. To
prevent damage to the vehicle, deactivate
DISTRONIC PLUS and the HOLD function in
the following or other similars ituations:
R when towing the vehicle
R in the car wash
! Neve rclean your vehicle in a Touchless
Automatic Car Wash as these use special
cleaning agents. These cleaning agents can
damage the paintwork or plastic parts.
! Make sure that:
R the side windows and the sliding sunroof
are fully closed.
R the ventilation/heating is switched off
(the OFF button has been pressed).
R the windshield wiper switch is in position
0.
Otherwise, the vehicle might be damaged.
! In car washes with a towing mechanism,
make sure that the automatic transmission is in transmission position
N, otherwise the
vehicle could be damaged.
R Vehicles with a SmartKey:
Do not remove the SmartKey from the
ignition lock. Do not open the driver's
door or front-passenger door when the
engine is switched off .Otherwise, the
automatic transmission selects park
position Pautomatically and locks the
wheels .You can prevent this by shifting
the automatic transmission to N
beforehand.
R Vehicles with KEYLESS-GO:
Do not open the driver's door or front-
passenger door when the engine is
switched off. Otherwise, the automatic
transmission selects park position P
automatically and locks the wheels.
Observe the following to make sure that the
automatic transmission stays in position N:
X Make sure the vehicle is stationary and the
ignition is switched off.
X Turn the SmartKey to position
2(Y page 163) in the ignition lock.
Use the SmartKey instead of the Start/
Stop button on vehicles with KEYLESS-GO.
X Depress and hold the brake pedal.
X Shift the automatic transmission to
position N.
X Release the brake pedal.
X Release the electric parking brake.
X Switch off the ignition and leave the
SmartKey in the ignition lock.
You can wash the vehicle in an automatic car
wash from the very start.
If the vehicle is very dirty, pre-wash it before
cleaning it in an automatic car wash.
After using an automatic car wash, wipe off
wax from the windshield and the wiper
blades. This will prevent smears and reduce
wiping noises caused by residue on the
windshield. 372
CareMaintenance and care
Page 378 of 454
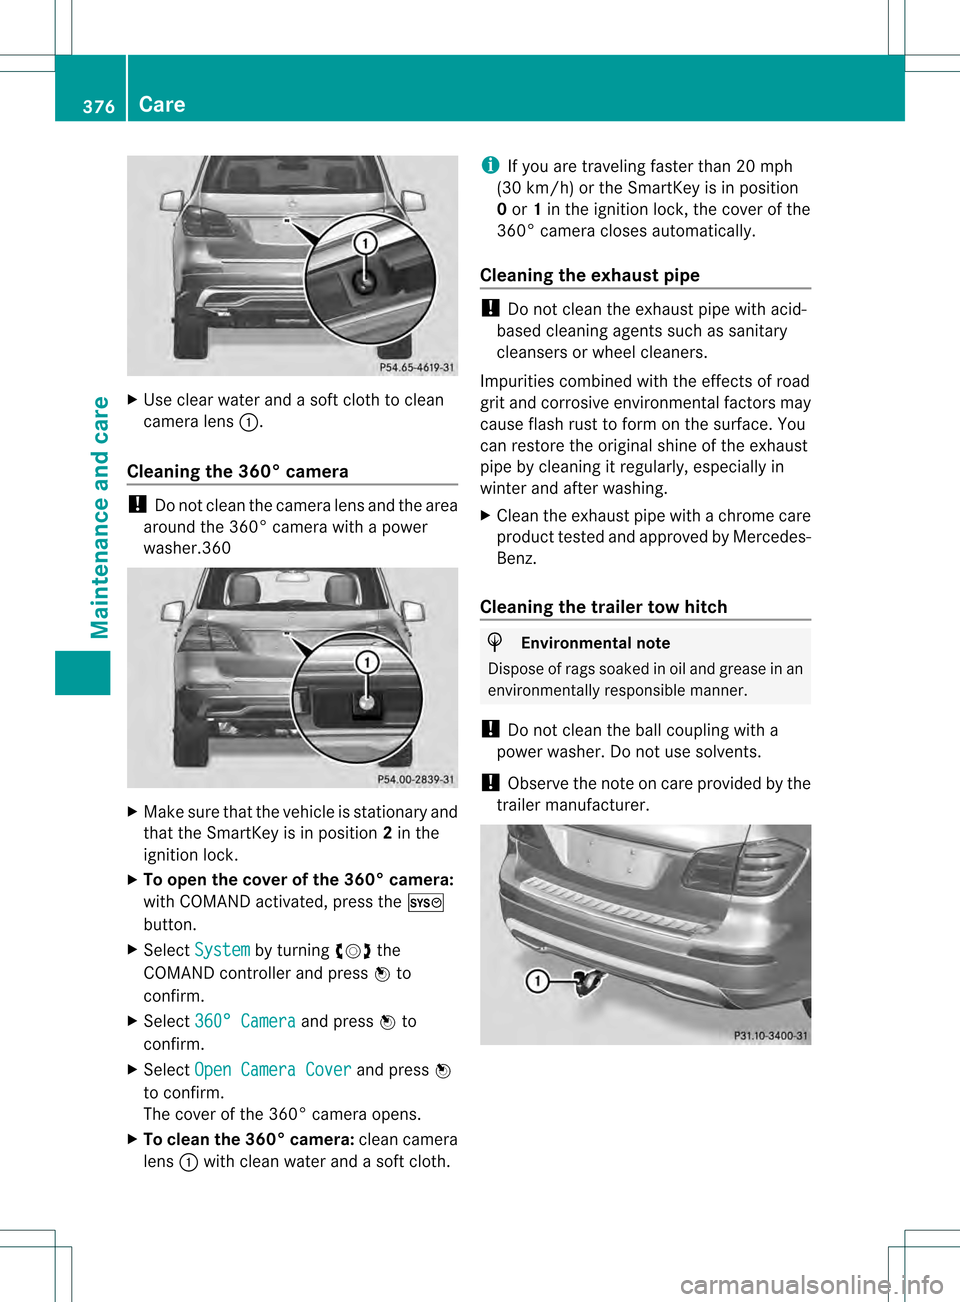
X
Use clear water and a soft cloth to clean
camera lens 0002.
Cleaning the 360° camera !
Do not clean the camera lens and the area
around the 360° camera with a power
washer.360 X
Make sure that the vehicle is stationary and
that the SmartKey is in position 2in the
ignition lock.
X To open the cover of the 360° camera:
with COMAND activated, press the 0003
button.
X Select System by turning
000E0002000Fthe
COMAND controller and press 000Cto
confirm.
X Select 360° Camera and press
000Cto
confirm.
X Select Open Camera Cover and press
000C
to confirm.
The cover of the 360° camera opens.
X To clean the 360° camera: clean camera
lens 0002with clean water and a soft cloth. i
If you are traveling faster than 20 mph
(30 km/h) or the SmartKey is in position
0 or 1in the ignition lock, the cover of the
360° camera closes automatically.
Cleaning the exhaust pipe !
Do not clean the exhaust pipe with acid-
based cleaning agents such as sanitary
cleansers or wheel cleaners.
Impurities combined with the effects of road
grit and corrosive environmental factors may
cause flash rust to form on the surface. You
can restore the original shine of the exhaust
pipe by cleaning it regularly, especially in
winter and after washing.
X Cleant he exhaust pipe with a chrome care
product tested and approved by Mercedes-
Benz.
Cleaning the trailer tow hitch H
Environmental note
Dispose of rags soaked in oil and grease in an
environmentally responsible manner.
! Do not clean the ball coupling with a
power washer. Do not use solvents.
! Observe the note on care provided by the
trailer manufacturer. 376
CareMaintenance and care
Page 385 of 454
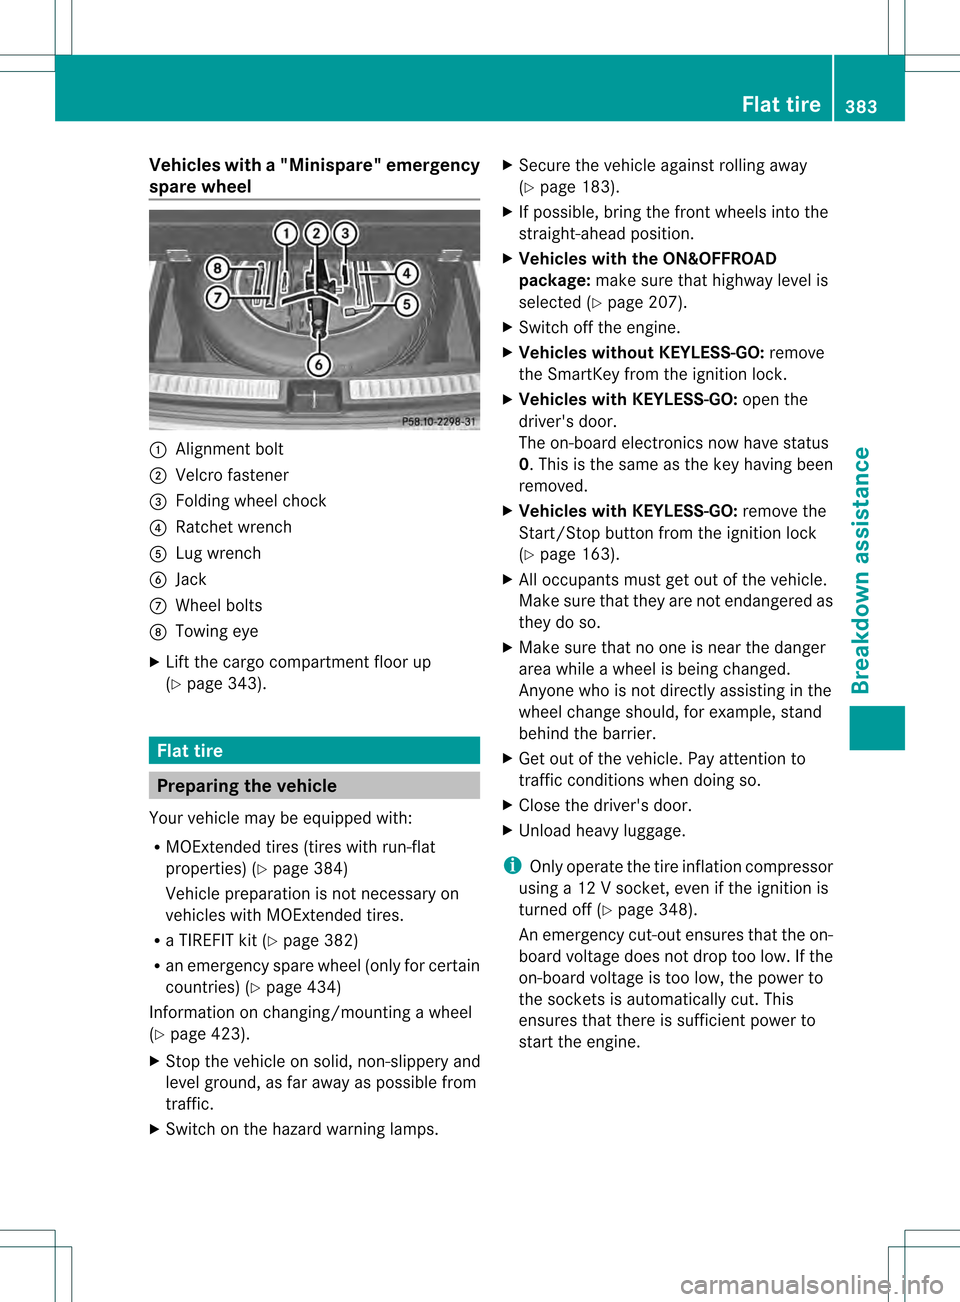
Vehicles with
a"Minispare" emergency
spare wheel 0002
Alignment bolt
0003 Velcro fastener
0021 Folding wheel chock
0020 Ratchet wrench
001E Lug wrench
001F Jack
0013 Wheel bolts
0014 Towing eye
X Lift the cargo compartment floor up
(Y page 343). Flat tire
Preparing the vehicle
Yourv ehicle may be equipped with:
R MOExtended tires (tires with run-flat
properties) (Y page 384)
Vehicle preparation is not necessary on
vehicles with MOExtended tires.
R a TIREFIT kit (Y page 382)
R an emergency spare wheel (only for certain
countries) (Y page 434)
Information on changing/mounting a wheel
(Y page 423).
X Stop the vehicle on solid, non-slippery and
level ground, as far away as possible from
traffic.
X Switch on the hazard warning lamps. X
Secure the vehicle against rolling away
(Y page 183).
X If possible, bring the fron twheels into the
straight-ahead position.
X Vehicles with the ON&OFFROAD
package: make sure that highway level is
selected (Y page 207).
X Switch off the engine.
X Vehicles without KEYLESS-GO: remove
the SmartKey from the ignition lock.
X Vehicles with KEYLESS-GO: open the
driver's door.
The on-board electronics now have status
0.T his is the same as the key having been
removed.
X Vehicles with KEYLESS-GO: remove the
Start/Stop button from the ignition lock
(Y page 163).
X All occupants must get out of the vehicle.
Make sure that they are not endangered as
they do so.
X Make sure that no one is near the danger
area while a wheel is being changed.
Anyone who is not directly assisting in the
wheel change should, for example, stand
behind the barrier.
X Get out of the vehicle. Pay attention to
traffic conditions when doing so.
X Close the driver's door.
X Unload heavy luggage.
i Only operate the tire inflation compressor
using a 12 V socket, even if the ignition is
turned off (Y page 348).
An emergency cut-out ensures that the on-
board voltage does not drop too low. If the
on-board voltage is too low, the power to
the sockets is automatically cut. This
ensures that there is sufficient power to
start the engine. Flat tire
383Breakdown assistance