start stop button MERCEDES-BENZ GL-Class 2015 X166 Owner's Guide
[x] Cancel search | Manufacturer: MERCEDES-BENZ, Model Year: 2015, Model line: GL-Class, Model: MERCEDES-BENZ GL-Class 2015 X166Pages: 462, PDF Size: 9.09 MB
Page 177 of 462
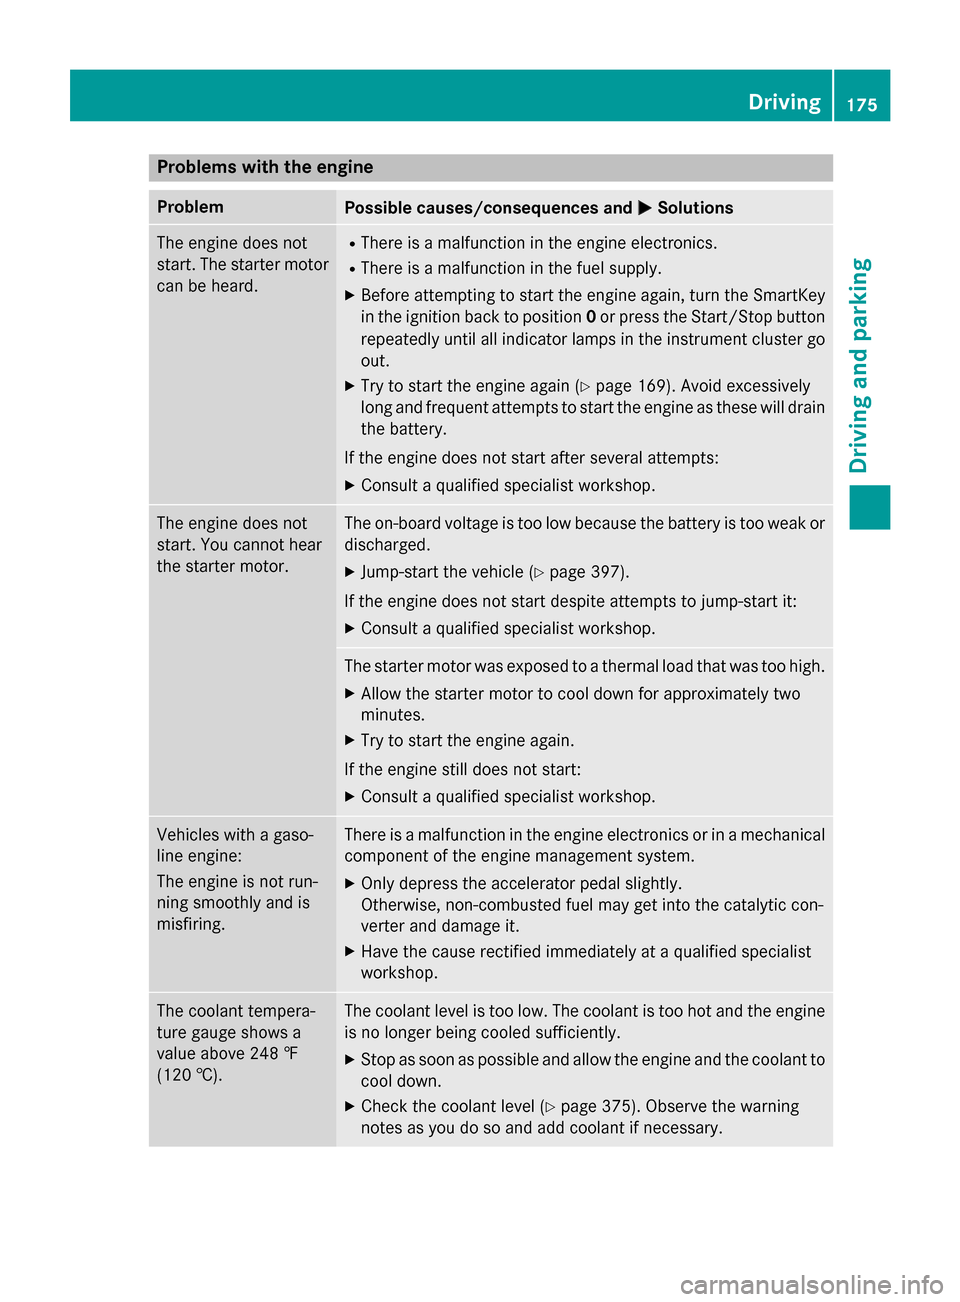
Problems with the engine
Problem
Possible causes/consequences and
0050
0050Solutions The engine does not
start. The starter motor
can be heard. R
There is a malfunction in the engine electronics.
R There is a malfunction in the fuel supply.
X Before attempting to start the engine again, turn the SmartKey
in the ignition back to position 0or press the Start/Stop button
repeatedly until all indicator lamps in the instrument cluster go out.
X Try to start the engine again (Y page 169). Avoid excessively
long and frequent attempts to start the engine as these will drain
the battery.
If the engine does not start after several attempts:
X Consult a qualified specialist workshop. The engine does not
start. You cannot hear
the starter motor. The on-board voltage is too low because the battery is too weak or
discharged.
X Jump-start the vehicle (Y page 397).
If the engine does not start despite attempts to jump-start it:
X Consult a qualified specialist workshop. The starter motor was exposed to a thermal load that was too high.
X Allow the starter motor to cool down for approximately two
minutes.
X Try to start the engine again.
If the engine still does not start:
X Consult a qualified specialist workshop. Vehicles with a gaso-
line engine:
The engine is not run-
ning smoothly and is
misfiring. There is a malfunction in the engine electronics or in a mechanical
component of the engine management system.
X Only depress the accelerator pedal slightly.
Otherwise, non-combusted fuel may get into the catalytic con-
verter and damage it.
X Have the cause rectified immediately at a qualified specialist
workshop. The coolant tempera-
ture gauge shows a
value above 248 ‡
(120 †). The coolant level is too low. The coolant is too hot and the engine
is no longer being cooled sufficiently.
X Stop as soon as possible and allow the engine and the coolant to
cool down.
X Check the coolant level (Y page 375). Observe the warning
notes as you do so and add coolant if necessary. Driving
175Driving and parking Z
Page 179 of 462
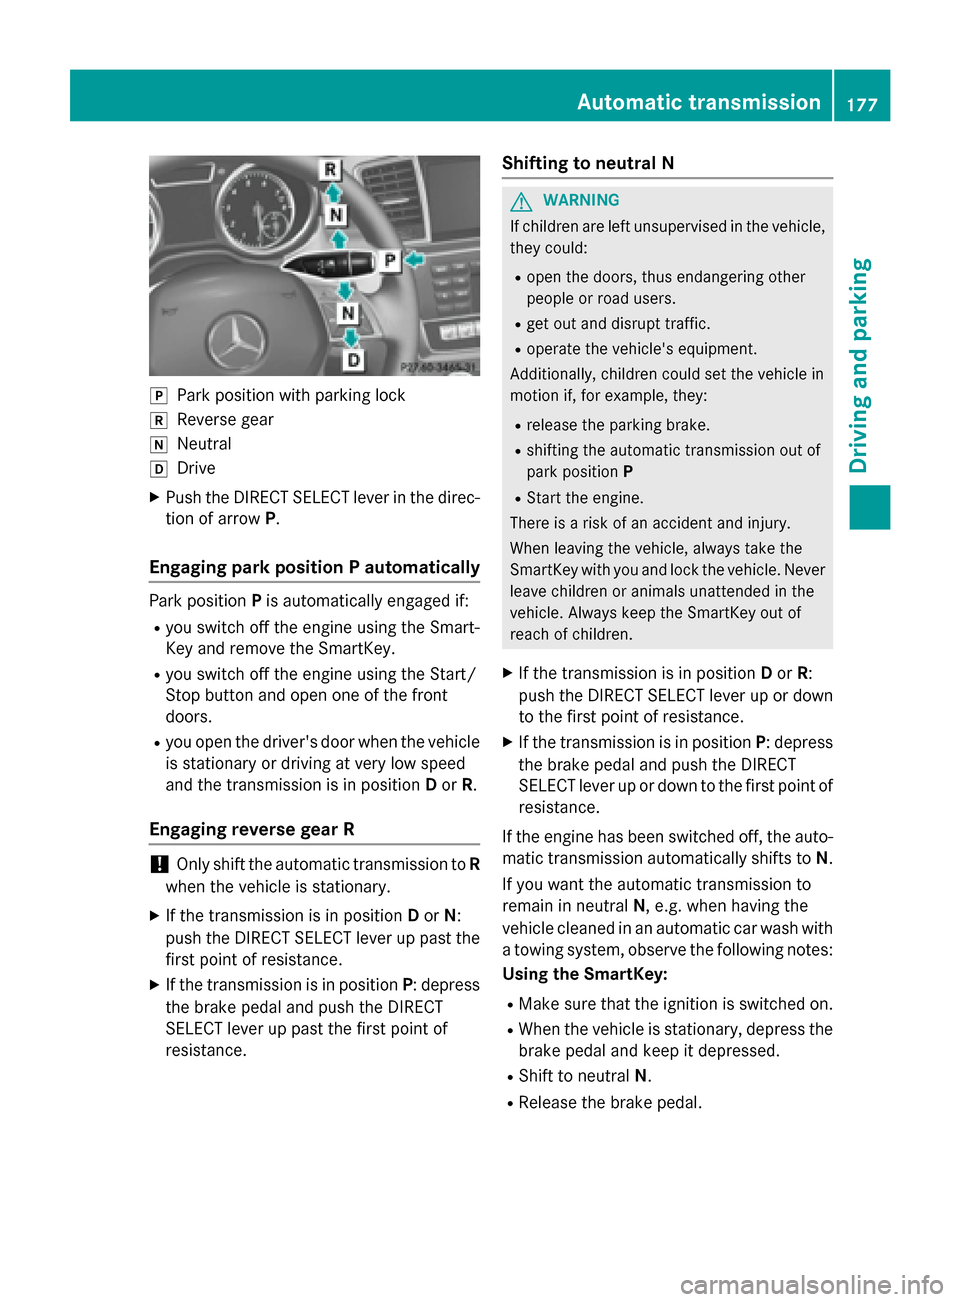
005D
Park position with parking lock
005E Reverse gear
005C Neutral
005B Drive
X Push the DIRECT SELECT lever in the direc-
tion of arrow P.
Engaging park position P automatically Park position
Pis automatically engaged if:
R you switch off the engine using the Smart-
Key and remove the SmartKey.
R you switch off the engine using the Start/
Stop button and open one of the front
doors.
R you open the driver's door when the vehicle
is stationary or driving at very low speed
and the transmission is in position Dor R.
Engaging reverse gear R !
Only shift the automatic transmission to
R
when the vehicle is stationary.
X If the transmission is in position Dor N:
push the DIRECT SELECT lever up past the
first point of resistance.
X If the transmission is in position P: depress
the brake pedal and push the DIRECT
SELECT lever up past the first point of
resistance. Shifting to neutral N G
WARNING
If children are left unsupervised in the vehicle, they could:
R open the doors, thus endangering other
people or road users.
R get out and disrupt traffic.
R operate the vehicle's equipment.
Additionally, children could set the vehicle in
motion if, for example, they:
R release the parking brake.
R shifting the automatic transmission out of
park position P
R Start the engine.
There is a risk of an accident and injury.
When leaving the vehicle, always take the
SmartKey with you and lock the vehicle. Never
leave children or animals unattended in the
vehicle. Always keep the SmartKey out of
reach of children.
X If the transmission is in position Dor R:
push the DIRECT SELECT lever up or down to the first point of resistance.
X If the transmission is in position P: depress
the brake pedal and push the DIRECT
SELECT lever up or down to the first point of
resistance.
If the engine has been switched off, the auto- matic transmission automatically shifts to N.
If you want the automatic transmission to
remain in neutral N, e.g. when having the
vehicle cleaned in an automatic car wash with a towing system, observe the following notes:
Using the SmartKey:
R Make sure that the ignition is switched on.
R When the vehicle is stationary, depress the
brake pedal and keep it depressed.
R Shift to neutral N.
R Release the brake pedal. Automatic transmission
177Driving and parking Z
Page 180 of 462
R
If the electric parking brake is engaged,
release it.
R Switch off the ignition and leave the Smart-
Key in the ignition lock.
Using KEYLESS-GO:
R Make sure that the ignition is switched on.
R When the vehicle is stationary, depress the
brake pedal and keep it depressed.
R Engage park position P.
R Release the brake pedal.
R Remove the Start/Stop button from the
ignition lock.
R Insert the SmartKey into the ignition lock.
R Switch on the ignition.
R Depress the brake pedal and keep it
depressed.
R Shift to neutral N.
R Release the brake pedal.
R If the electric parking brake is engaged,
release it.
R Switch off the ignition and leave the Smart-
Key in the ignition lock.
Engaging drive position D X
If the transmission is in position Ror N:
push the DIRECT SELECT lever down past
the first point of resistance.
X If the transmission is in position P: depress
the brake pedal and push the DIRECT
SELECT lever down past the first point of
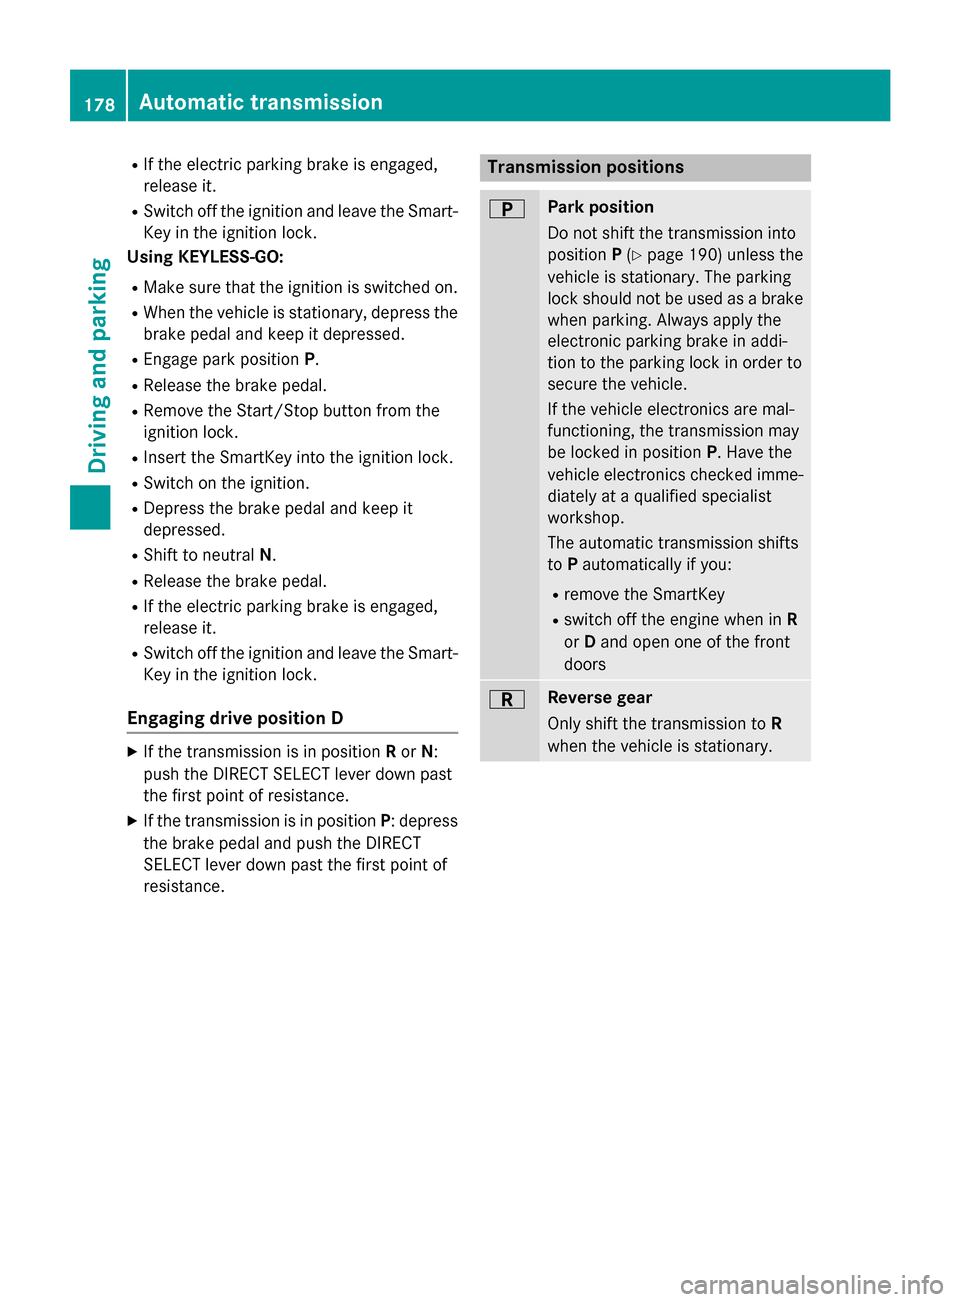
resistance. Transmission positions
0045 Park position
Do not shift the transmission into
position
P(Y page 190) unless the
vehicle is stationary. The parking
lock should not be used as a brake when parking. Always apply the
electronic parking brake in addi-
tion to the parking lock in order to
secure the vehicle.
If the vehicle electronics are mal-
functioning, the transmission may
be locked in position P. Have the
vehicle electronics checked imme-
diately at a qualified specialist
workshop.
The automatic transmission shifts
to Pautomatically if you:
R remove the SmartKey
R switch off the engine when in R
or Dand open one of the front
doors 0046 Reverse gear
Only shift the transmission to
R
when the vehicle is stationary. 178
Automatic transmissionDriving and parking
Page 181 of 462
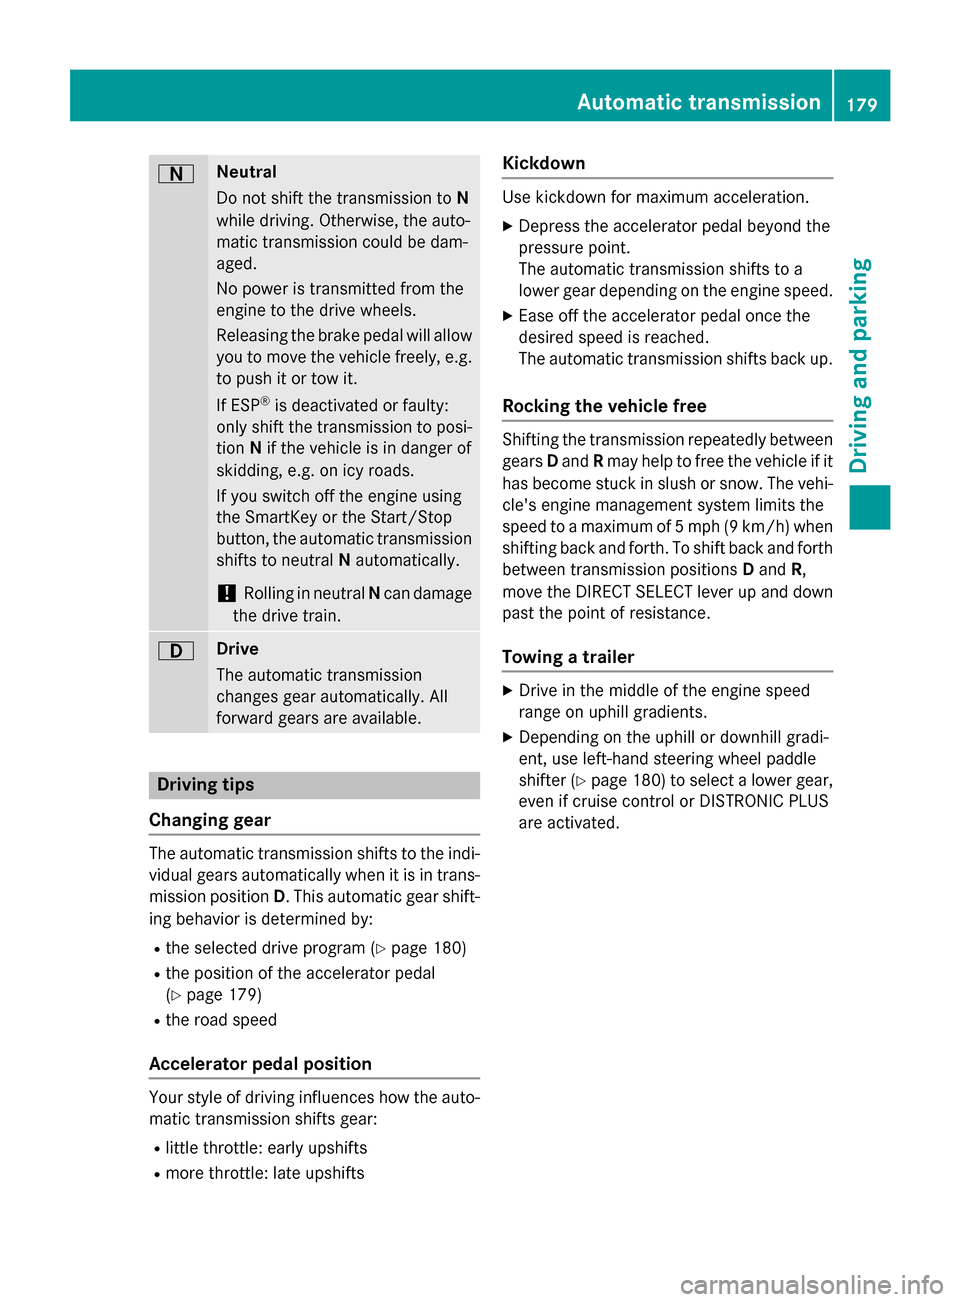
0044 Neutral
Do not shift the transmission to
N
while driving. Otherwise, the auto-
matic transmission could be dam-
aged.
No power is transmitted from the
engine to the drive wheels.
Releasing the brake pedal will allow
you to move the vehicle freely, e.g. to push it or tow it.
If ESP ®
is deactivated or faulty:
only shift the transmission to posi-
tion Nif the vehicle is in danger of
skidding, e.g. on icy roads.
If you switch off the engine using
the SmartKey or the Start/Stop
button, the automatic transmission shifts to neutral Nautomatically.
! Rolling in neutral
Ncan damage
the drive train. 003A Drive
The automatic transmission
changes gear automatically. All
forward gears are available.
Driving tips
Changing gear The automatic transmission shifts to the indi-
vidual gears automatically when it is in trans-
mission position D. This automatic gear shift-
ing behavior is determined by:
R the selected drive program (Y page 180)
R the position of the accelerator pedal
(Y page 179)
R the road speed
Accelerator pedal position Your style of driving influences how the auto-
matic transmission shifts gear:
R little throttle: early upshifts
R more throttle: late upshifts Kickdown Use kickdown for maximum acceleration.
X Depress the accelerator pedal beyond the
pressure point.
The automatic transmission shifts to a
lower gear depending on the engine speed.
X Ease off the accelerator pedal once the
desired speed is reached.
The automatic transmission shifts back up.
Rocking the vehicle free Shifting the transmission repeatedly between
gears Dand Rmay help to free the vehicle if it
has become stuck in slush or snow. The vehi-
cle's engine management system limits the
speed to a maximum of 5 mph (9 km/h) when shifting back and forth. To shift back and forth
between transmission positions Dand R,
move the DIRECT SELECT lever up and down past the point of resistance.
Towing a trailer X
Drive in the middle of the engine speed
range on uphill gradients.
X Depending on the uphill or downhill gradi-
ent, use left-hand steering wheel paddle
shifter (Y page 180) to select a lower gear,
even if cruise control or DISTRONIC PLUS
are activated. Automatic transmission
179Driving and parking Z
Page 187 of 462
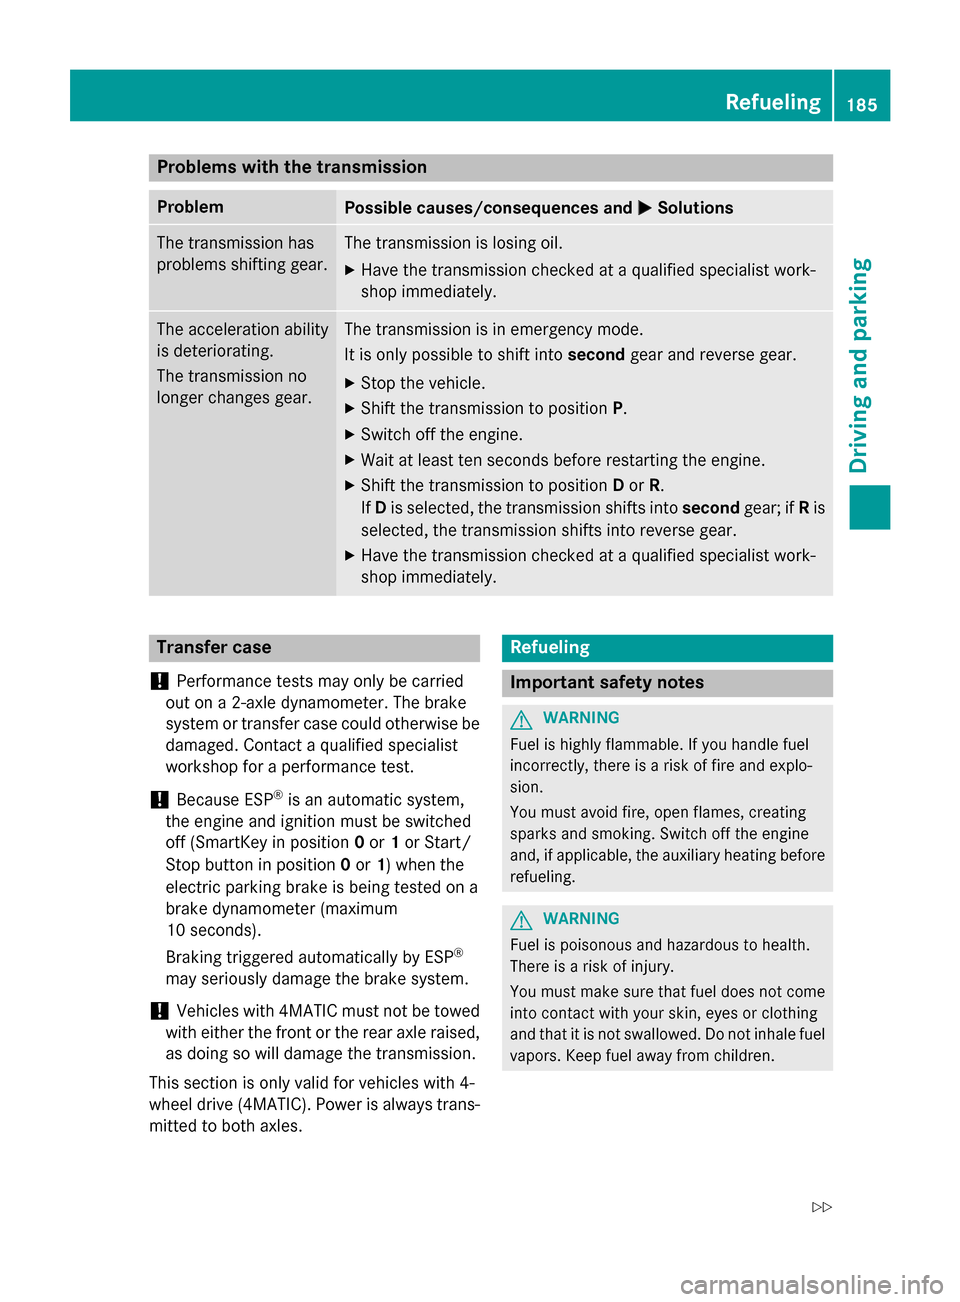
Problems with the transmission
Problem
Possible causes/consequences and
0050
0050Solutions The transmission has
problems shifting gear. The transmission is losing oil.
X Have the transmission checked at a qualified specialist work-
shop immediately. The acceleration ability
is deteriorating.
The transmission no
longer changes gear. The transmission is in emergency mode.
It is only possible to shift into
secondgear and reverse gear.
X Stop the vehicle.
X Shift the transmission to position P.
X Switch off the engine.
X Wait at least ten seconds before restarting the engine.
X Shift the transmission to position Dor R.
If D is selected, the transmission shifts into secondgear; ifRis
selected, the transmission shifts into reverse gear.
X Have the transmission checked at a qualified specialist work-
shop immediately. Transfer case
! Performance tests may only be carried
out on a 2-axle dynamometer. The brake
system or transfer case could otherwise be
damaged. Contact a qualified specialist
workshop for a performance test.
! Because ESP ®
is an automatic system,
the engine and ignition must be switched
off (SmartKey in position 0or 1or Start/
Stop button in position 0or 1) when the
electric parking brake is being tested on a
brake dynamometer (maximum
10 seconds).
Braking triggered automatically by ESP ®
may seriously damage the brake system.
! Vehicles with 4MATIC must not be towed
with either the front or the rear axle raised,
as doing so will damage the transmission.
This section is only valid for vehicles with 4-
wheel drive (4MATIC). Power is always trans- mitted to both axles. Refueling
Important safety notes
G
WARNING
Fuel is highly flammable. If you handle fuel
incorrectly, there is a risk of fire and explo-
sion.
You must avoid fire, open flames, creating
sparks and smoking. Switch off the engine
and, if applicable, the auxiliary heating before refueling. G
WARNING
Fuel is poisonous and hazardous to health.
There is a risk of injury.
You must make sure that fuel does not come into contact with your skin, eyes or clothing
and that it is not swallowed. Do not inhale fuel
vapors. Keep fuel away from children. Refueling
185Driving and parking
Z
Page 193 of 462
more effort to steer and brake. There is a risk
of an accident.
Do not switch off the ignition while driving. G
WARNING
If you leave children unsupervised in the vehi- cle, they could set it in motion by, for example:
R release the parking brake.
R shift the automatic transmission out of the
parking position P.
R start the engine.
In addition, they may operate vehicle equip-
ment and become trapped. There is a risk of
an accident and injury.
When leaving the vehicle, always take the
SmartKey with you and lock the vehicle. Never
leave children unsupervised in the vehicle.
! Always secure the vehicle correctly
against rolling away. Otherwise, the vehicle
or its drivetrain could be damaged.
To ensure that the vehicle is secured against rolling away unintentionally:
R the electric parking brake must be applied.
R the transmission must be in position Pand
the SmartKey must be removed from the
ignition lock.
R the front wheels must be turned towards
the curb on steep uphill or downhill gradi-
ents.
R the empty vehicle must be secured at the
front axle with a wheel chock or similar, for
example, on uphill or downhill gradients.
R a laden vehicle must also be secured at the
rear axle with a wheel chock or similar, for
example, on uphill or downhill gradients. Switching off the engine
Important safety notes G
WARNING
The automatic transmission switches to neu-
tral position Nwhen you switch off the engine. The vehicle may roll away. There is a risk of an
accident.
After switching off the engine, always switch
to parking position P. Prevent the parked vehi-
cle from rolling away by applying the parking
brake.
Using the SmartKey X
Apply the electric parking brake.
X Shift the transmission to position P.
X Turn the SmartKey to position 0in the igni-
tion lock and remove it.
The immobilizer is activated.
i If you turn off the engine with the Smart-
Key and then remove it from the ignition
lock or open a front door, the automatic
transmission shifts to Pautomatically.
If you shift the automatic transmission to N
before switching off the engine, the auto-
matic transmission remains in Neven if a
door is opened.
Using KEYLESS-GO X
Apply the electric parking brake.
X Shift the transmission to position P.
X Press the Start/Stop button (Y page 167).
The engine stops and all the indicator
lamps in the instrument cluster go out.
i If you turn off the engine with the Start/
Stop button, the automatic transmission
shifts to N. If you then open one of the front
doors, the automatic transmission shifts to P.
i In the event of an emergency, the engine
can be turned off while the vehicle is in
motion by pressing and holding the Start/
Stop button for three seconds. Parking
191Driving and parking Z
Page 194 of 462
Electric parking brake
General notes G
WARNING
If you leave children unsupervised in the vehi- cle, they could set it in motion by, for example:
R release the parking brake.
R shift the automatic transmission out of the
parking position P.
R start the engine.
In addition, they may operate vehicle equip-
ment and become trapped. There is a risk of
an accident and injury.
When leaving the vehicle, always take the
SmartKey with you and lock the vehicle. Never
leave children unsupervised in the vehicle.
The function of the electric parking brake is
dependent on the on-board voltage. If the on-
board voltage is low or there is a malfunction in the system, it may not be possible to apply
the released parking brake.
X If this is the case, only park the vehicle on
level ground and secure it to prevent it roll- ing away.
X Shift the automatic transmission to posi-
tion P.
It may not be possible to release an applied
parking brake if the on-board voltage is low or
there is a malfunction in the system. Contact a qualified specialist workshop.
i The electric parking brake performs a
function test at regular intervals while the
engine is switched off. The sounds that can
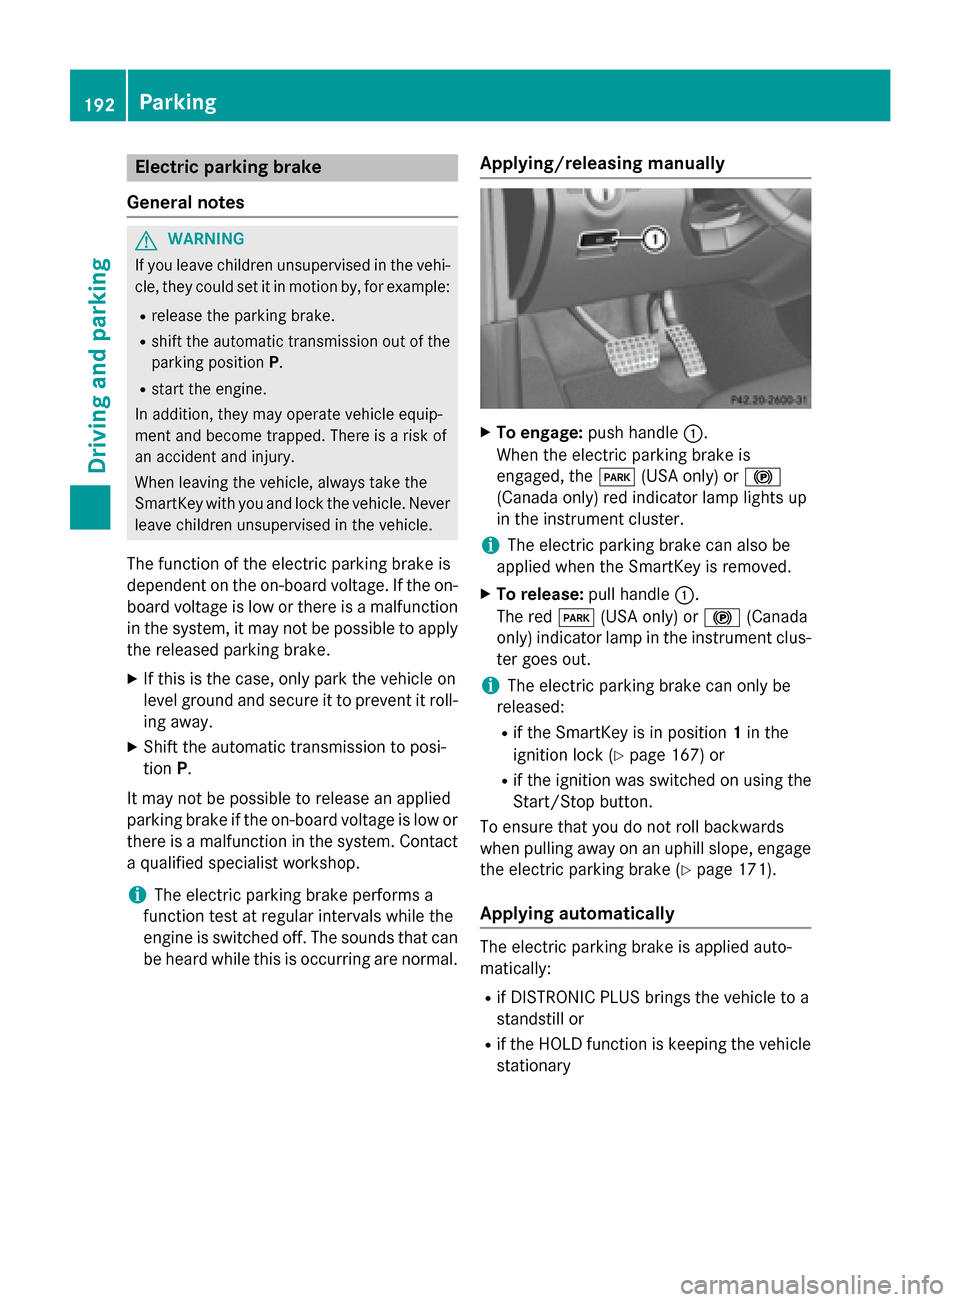
be heard while this is occurring are normal. Applying/releasing manually X
To engage: push handle 0043.
When the electric parking brake is
engaged, the 0049(USA only) or 0024
(Canada only) red indicator lamp lights up
in the instrument cluster.
i The electric parking brake can also be
applied when the SmartKey is removed.
X To release: pull handle0043.
The red 0049(USA only) or 0024(Canada
only) indicator lamp in the instrument clus- ter goes out.
i The electric parking brake can only be
released:
R if the SmartKey is in position 1in the
ignition lock (Y page 167) or
R if the ignition was switched on using the
Start/Stop button.
To ensure that you do not roll backwards
when pulling away on an uphill slope, engage
the electric parking brake (Y page 171).
Applying automatically The electric parking brake is applied auto-
matically:
R if DISTRONIC PLUS brings the vehicle to a
standstill or
R if the HOLD function is keeping the vehicle
stationary 192
ParkingDriving and parking
Page 199 of 462
Servicing the brakes
!
If the red brake warning lamp lights up in
the instrument cluster and you hear a warn- ing tone while the engine is running, the
brake fluid level may be too low. Observe
additional warning messages in the multi-
function display.
The brake fluid level may be too low due to brake pad wear or leaking brake lines.
Have the brake system checked immedi-
ately. This work should be carried out at a
qualified specialist workshop.
! A function or performance test should
only be carried out on a 2-axle dynamom-
eter. If you are planning to have the vehicle tested on such a dynamometer, contact an
authorized Mercedes-Benz Center to
obtain further information first. Otherwise,
you could damage the drive train or the
brake system.
! Because ESP ®
is an automatic system,
the engine and ignition must be switched
off (SmartKey in position 0or 1or Start/
Stop button in position 0or 1) when the
electric parking brake is being tested on a
brake dynamometer (maximum
10 seconds).
Braking triggered automatically by ESP ®
may seriously damage the brake system.
All checks and maintenance work on the
brake system must be carried out at a quali-
fied specialist workshop. Consult a qualified
specialist workshop to arrange this.
Have brake pads installed and brake fluid
replaced at a qualified specialist workshop.
If the brake system has only been subject to
moderate loads, you should test the function- ality of your brakes at regular intervals. To doso, depress the brake pedal firmly when driv-
ing at a high speed. This improves the grip of
the brake pads.
You can find a description of Brake Assist
(BAS) on (Y page 69) or of BAS PLUS on
(Y page 69). Mercedes-Benz recommends that you only
have brake pads/linings installed on your
vehicle which have been approved for
Mercedes-Benz vehicles or which correspond
to an equivalent quality standard. Brake
pads/linings which have not been approved
for Mercedes-Benz vehicles or which are not
of an equivalent quality could affect your vehi-
cle's operating safety.
Mercedes-Benz recommends that you only
use brake fluid that has been specially
approved for your vehicle by Mercedes-Benz,
or which corresponds to an equivalent quality standard. Brake fluid which has not been
approved for Mercedes-Benz vehicles or
which is not of an equivalent quality could
affect your vehicle's operating safety.
High-performance brake system for
AMG vehicles The high-performance brake system is only
available on AMG vehicles.
The high-performance brake system is
designed for heavy loads. This may lead to
noise when braking. This will depend on:
R speed
R braking force
R environmental conditions, such as temper-
ature and humidity
The wear of individual components of the
brake system, such as the brake pads/linings
or brake discs, depends on the individual driv-
ing style and operating conditions.
For this reason, it is impossible to state a
mileage that will be valid under all circum-
stances. An aggressive driving style will lead
to high wear. You can obtain further informa- tion about this from your authorized
Mercedes-Benz Center.
New and replaced brake pads and discs only
reach their optimum braking effect after sev-
eral hundred kilometers of driving. Compen-
sate for this by applying greater force to the
brake pedal. Keep this in mind, and adapt Driving tips
197Driving and parking Z
Page 218 of 462
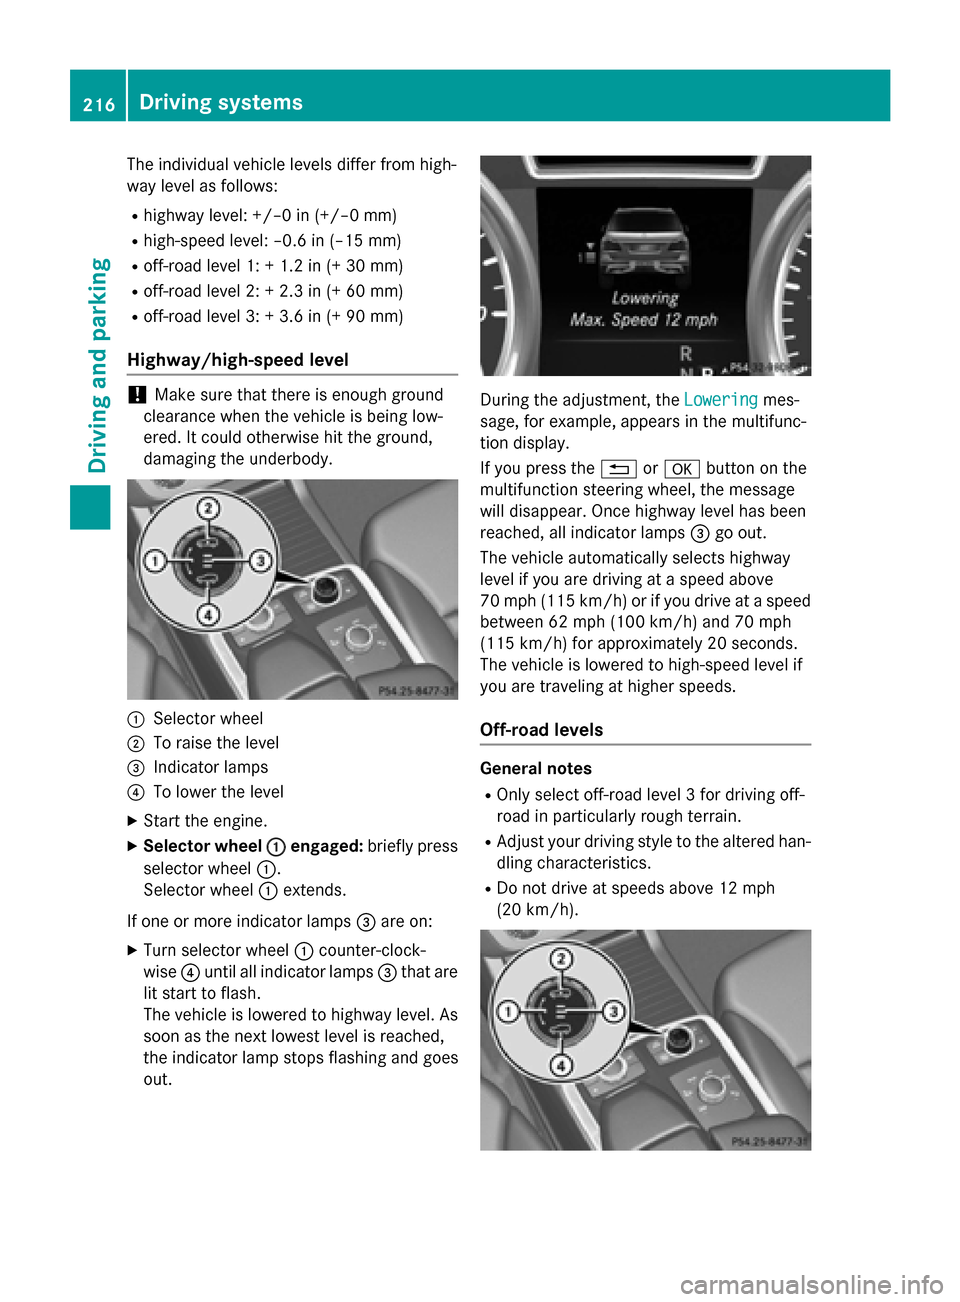
The individual vehicle levels differ from high-
way level as follows:
R highway level: +/–0 in (+/–0 mm)
R high-speed level: –0.6 in (–15 mm)
R off-road level 1: + 1.2 in (+ 30 mm)
R off-road level 2: + 2.3 in (+ 60 mm)
R off-road level 3: + 3.6 in (+ 90 mm)
Highway/high-speed level !
Make sure that there is enough ground
clearance when the vehicle is being low-
ered. It could otherwise hit the ground,
damaging the underbody. 0043
Selector wheel
0044 To raise the level
0087 Indicator lamps
0085 To lower the level
X Start the engine.
X Selector wheel 0043 0043engaged: briefly press
selector wheel 0043.
Selector wheel 0043extends.
If one or more indicator lamps 0087are on:
X Turn selector wheel 0043counter-clock-
wise 0085until all indicator lamps 0087that are
lit start to flash.
The vehicle is lowered to highway level. As soon as the next lowest level is reached,
the indicator lamp stops flashing and goes
out. During the adjustment, the
Lowering Loweringmes-
sage, for example, appears in the multifunc-
tion display.
If you press the 0038or0076 button on the
multifunction steering wheel, the message
will disappear. Once highway level has been
reached, all indicator lamps 0087go out.
The vehicle automatically selects highway
level if you are driving at a speed above
70 mph (115 km/h) or if you drive at a speed
between 62 mph (100 km/h) and 70 mph
(115 km/h) for approximately 20 seconds.
The vehicle is lowered to high-speed level if
you are traveling at higher speeds.
Off-road levels General notes
R Only select off-road level 3 for driving off-
road in particularly rough terrain.
R Adjust your driving style to the altered han-
dling characteristics.
R Do not drive at speeds above 12 mph
(20 km/h). 216
Driving systemsDriving and parking
Page 219 of 462
Only select an off-road level when this is
appropriate for road conditions. Otherwise,
fuel consumption increases and handling may
be affected.
X Start the engine.
X Selector wheel 0043
0043 engaged: briefly press
selector wheel 0043.
Selector wheel 0043extends.
X To raise: turn selector wheel 0043clock-
wise 0044.
The vehicle is raised.
or
X To lower: turn selector wheel 0043counter-
clockwise 0085.
The vehicle is lowered.
Indicator lamps 0087for the desired off-road
level flash:
R Off-road level 1: the lower indicator lamp
flashes
R Off-road level 2: the lower and center indi-
cator lamps flash
R Off-road level 3: all three indicator lamps
flash
The vehicle adjusts to the off-road level selec-
ted. As soon as an off-road level is reached,
the corresponding indicator lamp stops flash- ing and lights up constantly.
Raising the vehicle
During the adjustment, the Vehicle Rising
Vehicle Rising
message, for example, appears in the multi-
function display.
The vehicle rises from highway level to off-
road level 1.
If you press the 0038or0076 button on the
multifunction steering wheel, the message
will disappear.
i Up to off-road level 2, you can hide the
messages using the 0038or0076 button
on the multifunction steering wheel.
Once off-road level 2 has been reached, the
lower and center indicator lamps of the selec- tor wheel are on. While the adjustment from off-road level 2 to
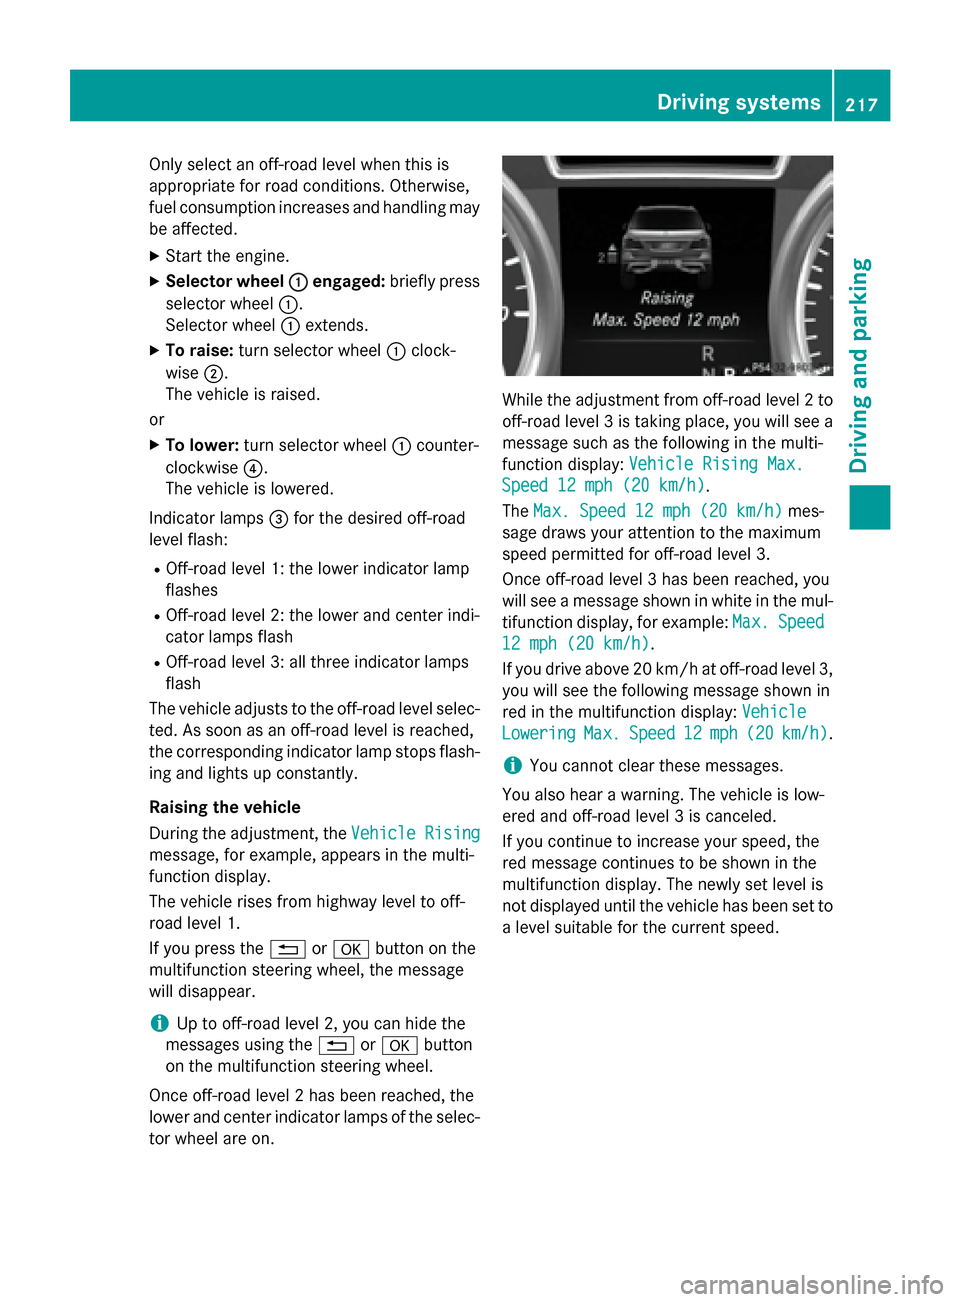
off-road level 3 is taking place, you will see a message such as the following in the multi-
function display: Vehicle Rising Max. Vehicle Rising Max.
Speed 12 mph (20 km/h)
Speed 12 mph (20 km/h).
The Max. Speed 12 mph (20 km/h) Max. Speed 12 mph (20 km/h) mes-
sage draws your attention to the maximum
speed permitted for off-road level 3.
Once off-road level 3 has been reached, you
will see a message shown in white in the mul-
tifunction display, for example: Max. Max.Speed
Speed
12 mph (20 km/h)
12 mph (20 km/h).
If you drive above 20 km/h at off-road level 3, you will see the following message shown in
red in the multifunction display: Vehicle Vehicle
Lowering
Lowering Max.
Max.Speed
Speed 12
12mph (
mph (20 20km/h)
km/h).
i You cannot clear these messages.
You also hear a warning. The vehicle is low-
ered and off-road level 3 is canceled.
If you continue to increase your speed, the
red message continues to be shown in the
multifunction display. The newly set level is
not displayed until the vehicle has been set to
a level suitable for the current speed. Driving systems
217Driving and parking Z