tow MERCEDES-BENZ M-Class 2015 W166 Owner's Manual
[x] Cancel search | Manufacturer: MERCEDES-BENZ, Model Year: 2015, Model line: M-Class, Model: MERCEDES-BENZ M-Class 2015 W166Pages: 466, PDF Size: 8.92 MB
Page 388 of 466
X
Press on/off switch 0087on the tire inflation
compressor to I.
The tire inflation compressor is switched
on. The tire is inflated.
i First, tire sealant is pumped into the tire.
The pressure can briefly rise to approx-
imately 500 kPa (5 bar/73 psi).
Do not switch off the tire inflation com-
pressor during this phase.
X Allow the tire inflation compressor to run
for five minutes. The tire should then have
attained a pressure of at least 180 kPa
(1.8 bar/26 psi).
If a tire pressure of 180 kPa (1.8 bar/26 psi) has been attained after five minutes:
(Y page 386).
If a tire pressure of 180 kPa (1.8 bar/26 psi) has not been attained after five minutes:
(Y page 386).
i If tire sealant leaks out, allow it to dry. It
can then be removed like a layer of film.
If your clothes are soiled with tire sealant,
have them cleaned with perchloroethylene at a dry cleaner as soon as possible.
Tire pressure not reached If a pressure of 180 kPa (1.8 bar/26 psi) has
not been attained after five minutes:
X Switch off the tire inflation compressor.
X Unscrew the filler hose from the valve of
the faulty tire.
X Very slowly drive forwards or reverse
approximately 30 ft (10 m).
X Pump up the tire again.
After a maximum of five minutes the tire
pressure must be at least 180 kPa (1.8 bar/ 26 psi). G
WARNING
If the required tire pressure is not reached
after the specified time, the tire is too badly
damaged. The tire sealant cannot repair the
tire in this instance. Damaged tires and a tire pressure that is too low can significantly impair the vehicle's braking and driving char-
acteristics. There is a risk of accident.
Do not continue driving. Contact a qualified
specialist workshop.
Tire pressure reached G
WARNING
A tire temporarily sealed with tire sealant
impairs the driving characteristics and is not
suitable for higher speeds. There is a risk of
accident.
You should therefore adapt your driving style
accordingly and drive carefully. Do not exceed the specified maximum speed with a tire that
has been repaired using tire sealant.
! Residue from the tire sealant may come
out of the filler hose after use. This could
cause stains.
Therefore, place the filler hose in the plastic
bag which contained the TIREFIT kit. H
Environmental note
Have the used tire sealant bottle disposed of
professionally, e.g. at a qualified specialist
workshop.
If a tire pressure of 180 kPa (1.8 bar/26 psi) has been attained after five minutes:
X Switch off the tire inflation compressor.
X Unscrew the filler hose from the valve of
the faulty tire.
X Stow the tire sealant bottle and the tire
inflation compressor.
X Pull away immediately.
The maximum speed for a tire sealed with
tire sealant is 50 mph (80 km/h). The upper
part of the TIREFIT sticker must be affixed
to the instrument cluster in the driver's
field of vision.
X Stop after driving for approximately ten
minutes and check the tire pressure with
the tire inflation compressor.
The tire pressure must now be at least
130 kPa (1.3 bar/19 psi). 386
Flat tireBreakdown assistance
Page 389 of 466
G
WARNING
If the required tire pressure is not reached
after driving for a short period, the tire is too
badly damaged. The tire sealant cannot repair the tire in this instance. Damaged tires and a
tire pressure that is too low can significantly
impair the vehicle's braking and driving char-
acteristics. There is a risk of accident.
Do not continue driving. Contact a qualified
specialist workshop.
i In cases such as the one mentioned
above, contact an authorized Mercedes-
Benz Center. Or call 1-800-FOR-MERCedes
(in the USA) or 1-800-387-0100 (in Can-
ada).
X Correct the tire pressure if it is still at least
130 kPa (1.3 bar/19 psi). See the Tire and
Loading Information placard on the driver's side B-pillar or the tire pressure table in the fuel filler flap for values.
X To increase the tire pressure: switch on
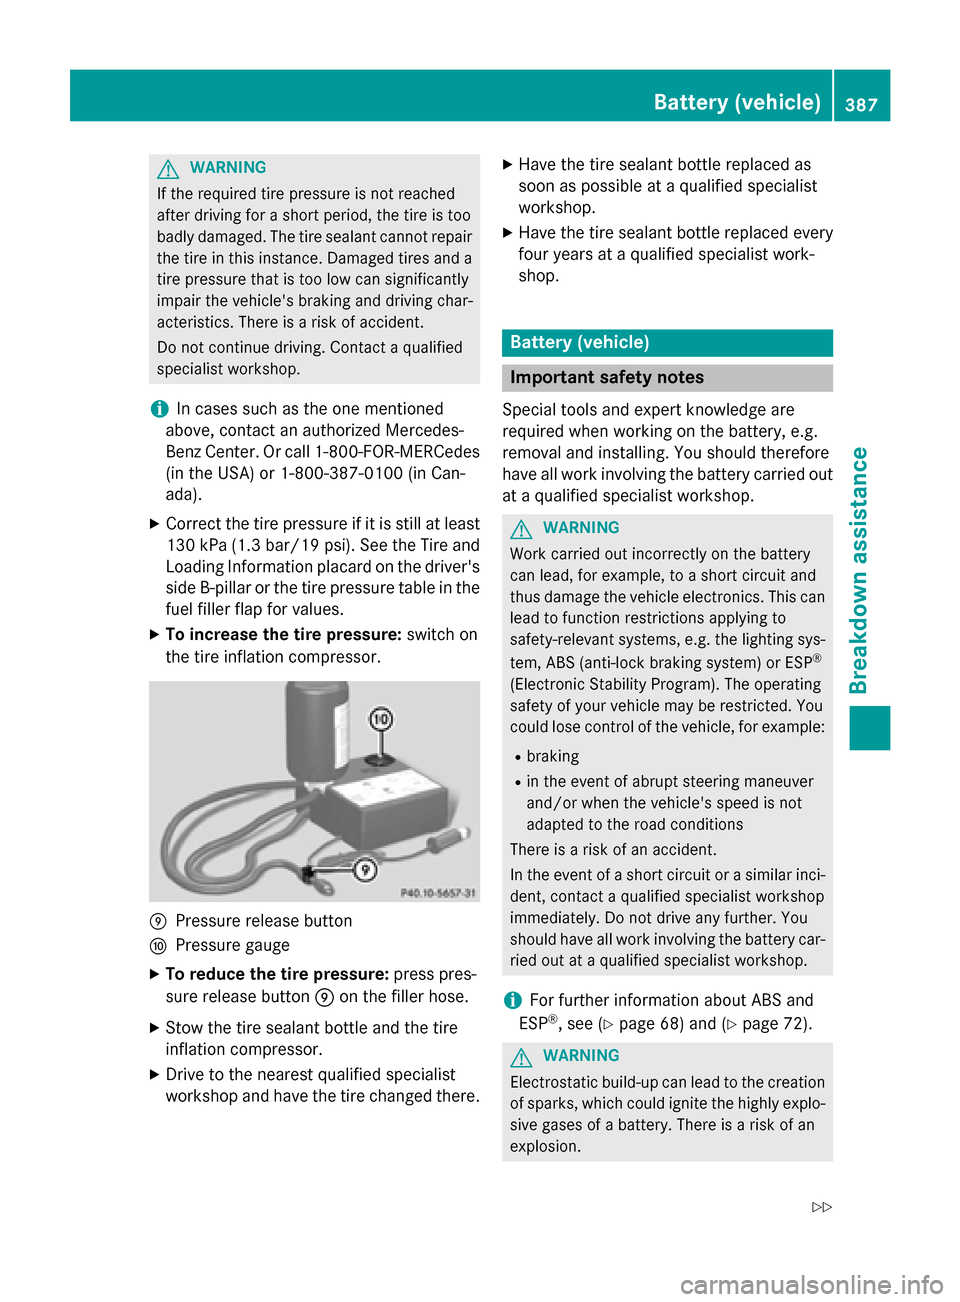
the tire inflation compressor. 006D
Pressure release button
006E Pressure gauge
X To reduce the tire pressure: press pres-
sure release button 006Don the filler hose.
X Stow the tire sealant bottle and the tire
inflation compressor.
X Drive to the nearest qualified specialist
workshop and have the tire changed there. X
Have the tire sealant bottle replaced as
soon as possible at a qualified specialist
workshop.
X Have the tire sealant bottle replaced every
four years at a qualified specialist work-
shop. Battery (vehicle)
Important safety notes
Special tools and expert knowledge are
required when working on the battery, e.g.
removal and installing. You should therefore
have all work involving the battery carried out
at a qualified specialist workshop. G
WARNING
Work carried out incorrectly on the battery
can lead, for example, to a short circuit and
thus damage the vehicle electronics. This can lead to function restrictions applying to
safety-relevant systems, e.g. the lighting sys-
tem, ABS (anti-lock braking system) or ESP ®
(Electronic Stability Program). The operating
safety of your vehicle may be restricted. You
could lose control of the vehicle, for example:
R braking
R in the event of abrupt steering maneuver
and/or when the vehicle's speed is not
adapted to the road conditions
There is a risk of an accident.
In the event of a short circuit or a similar inci- dent, contact a qualified specialist workshop
immediately. Do not drive any further. You
should have all work involving the battery car-
ried out at a qualified specialist workshop.
i For further information about ABS and
ESP ®
, see (Y page 68) and (Y page 72). G
WARNING
Electrostatic build-up can lead to the creation of sparks, which could ignite the highly explo-
sive gases of a battery. There is a risk of an
explosion. Battery (vehicle)
387Breakdown assistance
Z
Page 395 of 466
Position number
0084identifies the charged battery of the other vehicle or an equivalent jump-
starting device.
X Slide cover 0043of positive terminal 0044in the direction of the arrow.
X Connect positive terminal 0044on your vehicle to positive terminal 0087of donor battery 0084
using the jumper cable, always begin with positive terminal 0044on your own vehicle first.
X Start the engine of the donor vehicle and run it at idling speed.
X Connect negative terminal 0085of donor battery 0084to ground point 0083of your vehicle using
the jumper cable, connecting the jumper cable to battery of other vehicle 0084first.
X Start the engine.
X Before disconnecting the jumper cables, let the engine run for several minutes.
X First, remove the jumper cables from ground point 0083and negative terminal 0085, then from
positive clamp 0044and positive terminal 0087. Begin each time at the contacts on your own
vehicle first.
X Close cover 0043of positive terminal 0044after removing the jumper cables.
X Have the battery checked at a qualified specialist workshop.
i Jump-starting is not considered to be a normal operating condition.
i Jumper cables and further information regarding jump-starting can be obtained at any
qualified specialist workshop. Towing and tow-starting
Important safety notes
G
WARNING
Functions relevant to safety are restricted or
no longer available if:
R the engine is not running.
R the brake system or the power steering is
malfunctioning.
R there is a malfunction in the voltage supply
or the vehicle's electrical system.
If your vehicle is being towed, much more
force may be necessary to steer or brake.
There is a risk of an accident.
In such cases, use a tow bar. Before towing,
make sure that the steering moves freely. G
WARNING
If the weight of the vehicle to be towed or tow- started is greater than the permissible gross
weight of your vehicle:
R the towing eye could detach itself
R the vehicle/trailer combination could roll-
over.
There is a risk of an accident.
When towing or tow-starting another vehicle,
its weight should not be greater than the per-
missible gross weight of your vehicle.
! If DISTRONIC PLUS or the HOLD function
is activated, the vehicle brakes automati-
cally in certain situations. To prevent dam-
age to the vehicle, deactivate DISTRONIC
PLUS and the HOLD function in the follow- ing or other similar situations:
R when towing the vehicle
R in the car wash
! Make sure that the electric parking brake
is released. If the electric parking brake is
faulty, visit a qualified specialist workshop. Towing and tow-starting
393Breakdown assistance Z
Page 396 of 466
!
Only secure the tow rope or tow bar at the
towing eyes. Otherwise, the vehicle could
be damaged.
! Do not use the trailer tow hitch for recov-
ery or towing. Do not use the towing eye for
recovery. this could damage the vehicle. If
in doubt, have the vehicle recovered using
a crane.
! When towing, pull away slowly and
smoothly. Pull the towed vehicle as straight
as possible and not at an acute angle.
Excessive tractive power could damage the
vehicles.
i When towing, it is preferable to use a rigid
towing bar as opposed to a tow rope. A rigid
towing bar helps to keep the tractive power low.
! When towing vehicles with KEYLESS-GO,
use the key instead of the Start/Stop but-
ton. Otherwise, the automatic transmission
may shift to position Pwhen the driver's or
front-passenger door are opened, which
could lead to damage to the transmission.
! Do not tow with sling-type equipment.
This could damage the vehicle.
! Vehicles with differential locks: make
sure the differential locks are in automatic
mode. When towing, the differential locks
must not be switched on. The transmission
may otherwise be damaged.
! The vehicle can be towed a maximum of
30 miles (50km). The towing speed of
30 mph (50 km/h) must not be exceeded.
If the vehicle has to be towed more than
30 miles (50km), the entire vehicle must be
raised and transported.
! If you tow or tow-start another vehicle, its
weight must not exceed the maximum per- missible gross vehicle weight of your vehi-
cle.
i Information on your vehicle's gross vehi-
cle weight rating can be found on the vehi-
cle identification plate (Y page 446).It is better to have the vehicle transported
than to have it towed.
If the vehicle has suffered transmission dam-
age, have it transported on a transporter or
trailer.
The automatic transmission must be in posi-
tion Nwhen the vehicle is being towed.
The battery must be connected and charged.
Otherwise, you:
R cannot turn the SmartKey to position 2in
the ignition lock
R cannot release the electric parking brake
R cannot shift the automatic transmission to
position N
i Disarm the automatic locking feature
before the vehicle is towed (Y page 279).
You could otherwise be locked out when
pushing or towing the vehicle. Installing/removing the towing eye
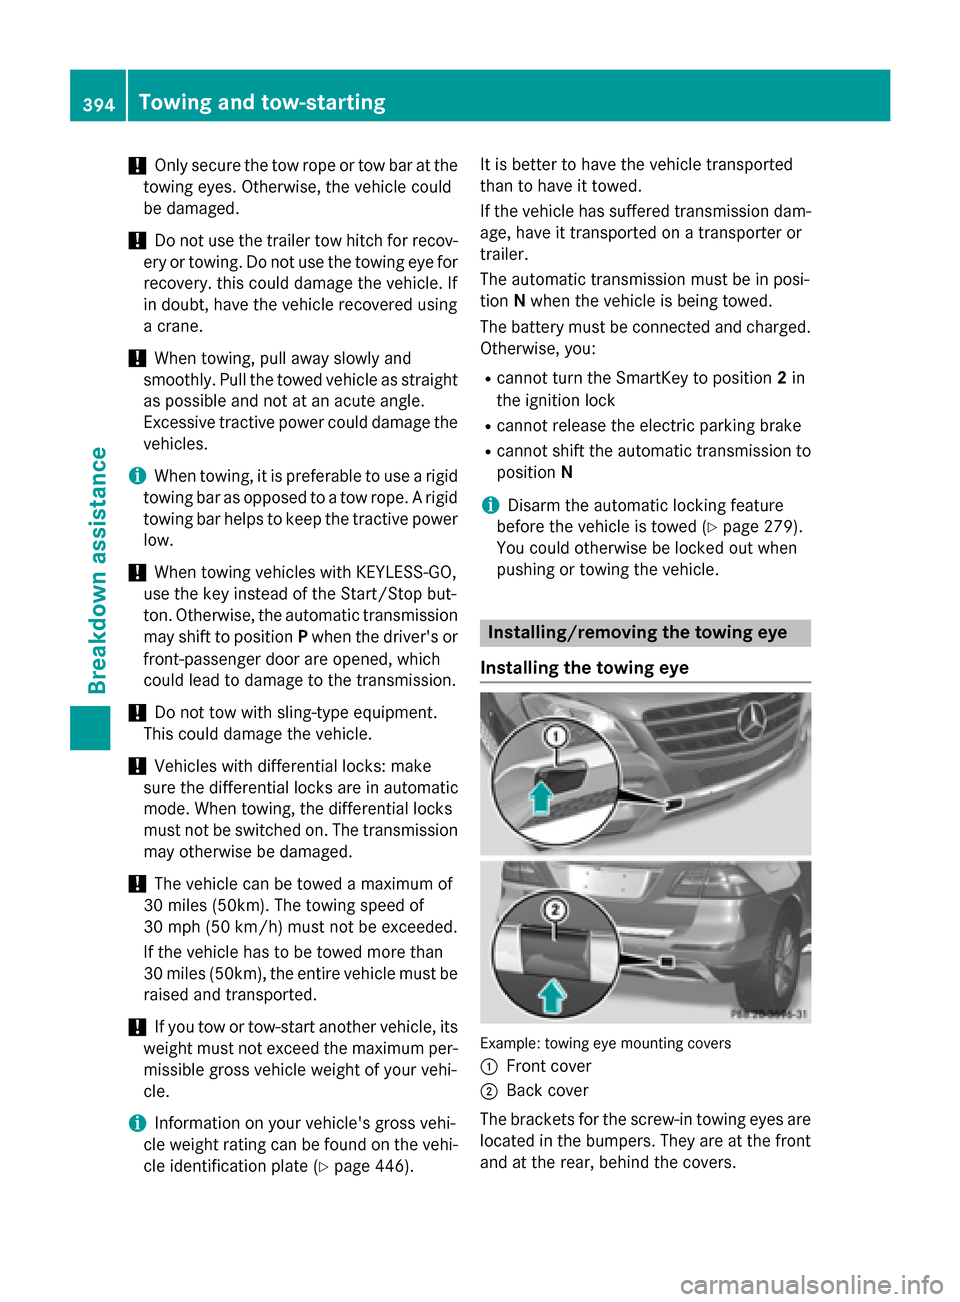
Installing the towing eye Example: towing eye mounting covers
0043 Front cover
0044 Back cover
The brackets for the screw-in towing eyes are
located in the bumpers. They are at the front and at the rear, behind the covers. 394
Towing and tow-startingBreakdown assistance
Page 397 of 466
X
Remove the towing eye from the vehicle
tool kit (Y page 382).
X To open the cover at the front: press the
mark on cover 0043inwards in the direction
of the arrow.
X To open the cover at the rear: insert a
flat, blunt object into the cutout and lever
cover 0044out of the bumper.
X Take cover 0043or0044 off the opening.
X Screw in and tighten the towing eye clock-
wise to the stop.
Removing the towing eye X
Unscrew and remove the towing eye.
X Attach cover 0043or0044 to the bumper and
press until it engages.
X Place the towing eye in the vehicle tool kit. Towing the vehicle with the rear axle
raised
! The ignition must be switched off if you
are towing the vehicle with the rear axle
raised. Intervention by ESP ®
could other-
wise damage the brake system.
Only possible for vehicles without
4MATIC.
X Switch on the hazard warning lamps
(Y page 124).
X Bring the front wheels into the straight-
ahead position.
X Turn the SmartKey to position 0in the igni-
tion lock and remove the SmartKey from
the ignition lock.
X When leaving the vehicle, take the Smart-
Key or the KEYLESS-GO key with you.
When towing your vehicle with the rear axle
raised, it is important that you observe the
safety instructions (Y page 393). Towing a vehicle with both axles on
the ground
It is important that you observe the safety
instructions when towing away your vehicle
(Y page 393).
The automatic transmission automatically
shifts to position Pwhen you open the driver's
or front-passenger door or when you remove the SmartKey from the ignition lock.
In order to ensure that the automatic trans-
mission stays in position Nwhen towing the
vehicle, you must observe the following
points:
X Make sure that the vehicle is stationary and
the SmartKey in the ignition lock is in posi-
tion 0.
X Turn the SmartKey to position 2in the igni-
tion lock.
On vehicles with KEYLESS-GO, use the
SmartKey instead of the Start/Stop button
(Y page 158).
X Depress and hold the brake pedal.
X Shift the automatic transmission to posi-
tion N.
X Release the brake pedal.
X Release the electric parking brake.
X Leave the SmartKey in position 2in the
ignition lock.
X Switch on the hazard warning lamps
(Y page 124).
i In order to signal a change of direction
when towing the vehicle with the hazard
warning lamps switched on, use the com-
bination switch as usual. In this case, only
the indicator lamps for the direction of
travel flash. After resetting the combina-
tion switch, the hazard warning lamp starts
flashing again. Transporting the vehicle
! You may only secure the vehicle by the
wheels, not by parts of the vehicle such as Towing and tow-starting
395Breakdown assistance Z
Page 398 of 466
axle or steering components. Otherwise,
the vehicle could be damaged.
The towing eye can be used to pull the vehicle
onto a trailer or transporter for transporting
purposes.
X Turn the SmartKey to position 2in the igni-
tion lock.
X Shift the automatic transmission to posi-
tion N.
As soon as the vehicle has been loaded:
X Prevent the vehicle from rolling away by
applying the electric parking brake.
X Shift the automatic transmission to posi-
tion P.
X Turn the SmartKey to position 0in the igni-
tion lock and remove it.
X Secure the vehicle. Information on 4MATIC vehicles
! Vehicles with 4MATIC must not be towed
with either the front or the rear axle raised,
as doing so will damage the transmission.
If the vehicle has transmission damage or
damage to the front or rear axle, have it trans- ported on a transporter or trailer.
In the event of damage to the electrical
system
If the battery is defective, the automatic
transmission will be locked in position P. To
shift the automatic transmission to position
N, you must provide power to the vehicle's
electrical system in the same way as when
jump-starting (Y page 391).
Have the vehicle transported on a transporter
or trailer. Tow-starting (emergency engine
starting)
! Vehicles with automatic transmission
must not be tow-started. You could other-
wise damage the automatic transmission. i
You can find information on "Jump-start-
ing" under (Y page 391). Fuses
Important safety notes
G
WARNING
If you manipulate or bridge a faulty fuse or if
you replace it with a fuse with a higher amper- age, the electric cables could be overloaded.
This could result in a fire. There is a risk of an
accident and injury.
Always replace faulty fuses with the specified
new fuses having the correct amperage.
! For the fuse boxes in the engine compart-
ment and under the rear bench seat, only
use fuses with the suffix "S". Otherwise,
components or systems could be dam-
aged.
The fuses in your vehicle serve to close down faulty circuits. If a fuse blows, all the compo- nents on the circuit and their functions stop
operating.
Blown fuses must be replaced with fuses of
the same rating, which you can recognize by
the color and value. The fuse ratings are listed in the fuse allocation chart.
If a newly inserted fuse also blows, have the
cause traced and rectified at a qualified spe-
cialist workshop, e.g. an authorized
Mercedes-Benz Center. Before changing a fuse
Observe the important safety notes
(Y page 396)
X Secure the vehicle against rolling away
(Y page 182).
X Switch off all electrical consumers.
X Turn the SmartKey to position 0in the igni-
tion lock and remove it (Y page 157). On396
FusesBreakdown assistance
Page 410 of 466
R
you adopt a very sporty driving style (cor-
nering at high speeds or driving with high
rates of acceleration).
R you are towing a very heavy or large trailer.
R you are driving with a heavy load (in the
vehicle or on the roof).
Restarting the tire pressure loss warn-
ing system Restart the tire pressure loss warning system
if you have:
R changed the tire pressure
R changed the wheels or tires
R mounted new wheels or tires
X Before restarting, make sure that the tire
pressures are set properly on all four tires
for the respective operating conditions.
The recommended tire pressures can be
found on the Tire and Loading Information
placard on the B-pillar on the driver's side
or the tire pressure table on the fuel filler
flap.
The tire pressure loss warning system can
only give reliable warnings if you have set
the correct tire pressure. If an incorrect tire
pressure is set, these incorrect values will
be monitored.
X Also observe the notes in the section on tire
pressures (Y page 404).
X Make sure that the SmartKey is in position
2 in the ignition lock (Y page 157).
X Press the 0059or0065 button on the steer-
ing wheel to select the Service
Service menu.
X Press the 0063or0064 button to select
Tire Pressure
Tire Pressure.
X Press the 0076button.
The Run Flat Indicator Active Run Flat Indicator Active
Press 'OK' to Restart
Press 'OK' to Restart message
appears in the multifunction display. If you wish to confirm the restart:
X Press the 0076button.
The Tire Pressure Now OK? Tire Pressure Now OK? message
appears in the multifunction display.
X Press the 0063or0064 button to select
Yes Yes .
X Press the 0076button.
The Run Flat Indicator Restarted
Run Flat Indicator Restarted
message appears in the multifunction dis-
play.
After a teach-in period, the tire pressure
loss warning system will monitor the set
tire pressures of all four tires.
If you wish to cancel the restart:
X Press the 0038button.
or
X If the Tire Pressure Now OK? Tire Pressure Now OK? message
appears, use the 0063or0064 button to
select Cancel
Cancel .
X Press the 0076button.
The tire pressure values stored at the last
restart will continue to be monitored. Tire pressure monitor
General notes If a tire pressure monitor is installed, the vehi-
cle's wheels have sensors that monitor the
tire pressures in all four tires. The tire pres-
sure monitor warns you if the pressure drops
in one or more of the tires. The tire pressure
monitor only functions if the correct sensors
are installed on all wheels.
Information on tire pressures is displayed in
the multifunction display. After a few minutes of driving, the current tire pressure of each
tire is shown in the Service Servicemenu of the mul-
tifunction display. 408
Ti
re pressureWhe els and tires
Page 416 of 466
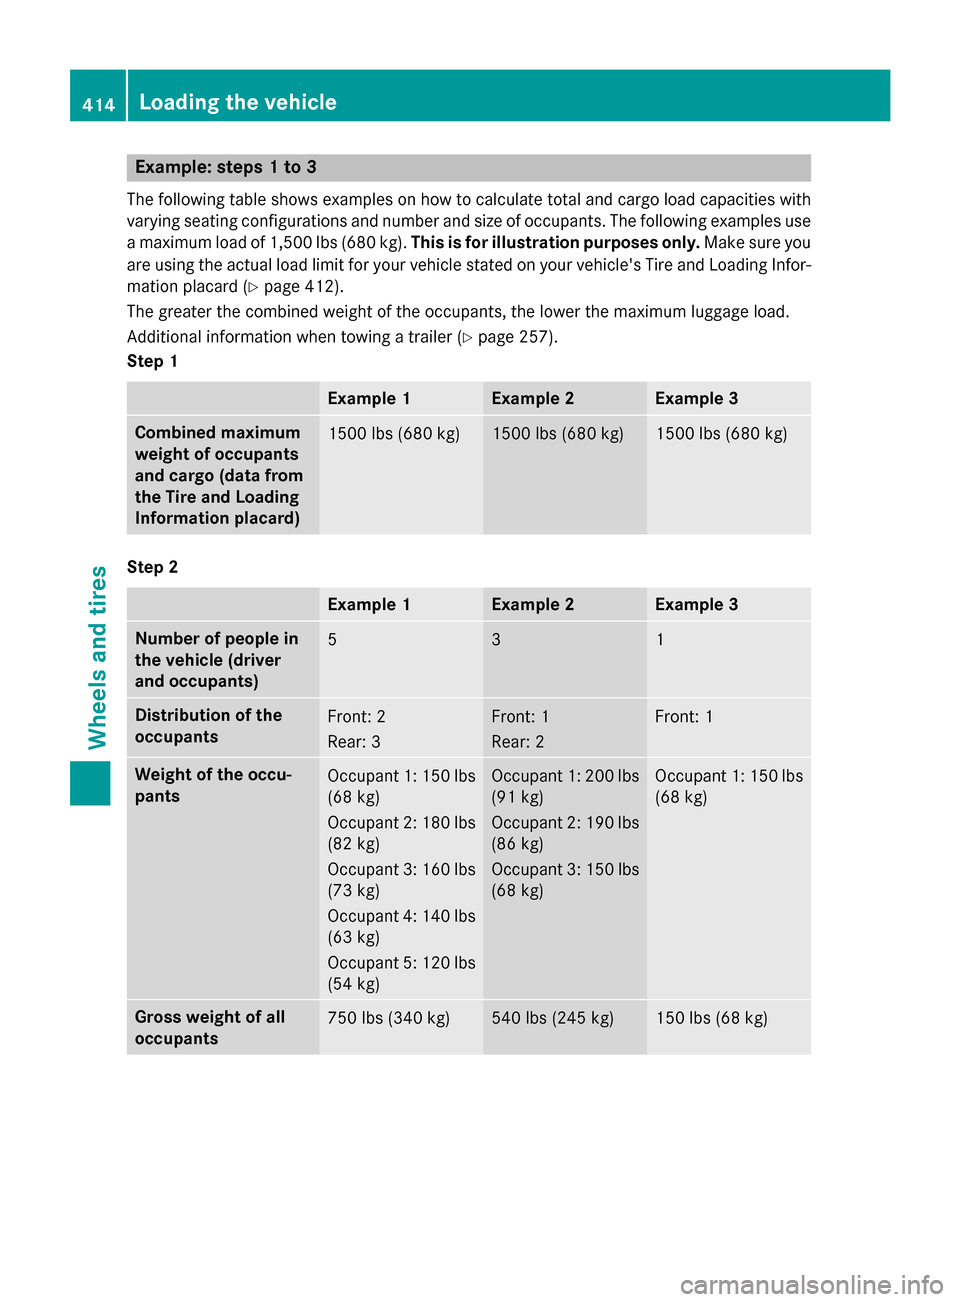
Example: steps 1 to 3
The following table shows examples on how to calculate total and cargo load capacities with varying seating configurations and number and size of occupants. The following examples usea maximum load of 1,500 lbs (680 kg). This is for illustration purposes only. Make sure you
are using the actual load limit for your vehicle stated on your vehicle's Tire and Loading Infor- mation placard (Y page 412).
The greater the combined weight of the occupants, the lower the maximum luggage load.
Additional information when towing a trailer (Y page 257).
Step 1 Example 1 Example 2 Example 3
Combined maximum
weight of occupants
and cargo (data from
the Tire and Loading
Information placard)
1500 lbs (680 kg) 1500 lbs (680 kg) 1500 lbs (680 kg)
Step 2
Example 1 Example 2 Example 3
Number of people in
the vehicle (driver
and occupants)
5 3 1
Distribution of the
occupants
Front: 2
Rear: 3 Front: 1
Rear: 2 Front: 1
Weight of the occu-
pants
Occupant 1: 150 lbs
(68 kg)
Occupant 2: 180 lbs
(82 kg)
Occupant 3: 160 lbs (73 kg)
Occupant 4: 140 lbs
(63 kg)
Occupant 5: 120 lbs
(54 kg) Occupant 1: 200 lbs
(91 kg)
Occupant 2: 190 lbs
(86 kg)
Occupant 3: 150 lbs (68 kg) Occupant 1: 150 lbs
(68 kg) Gross weight of all
occupants
750 lbs (340 kg) 540 lbs (245 kg) 150 lbs (68 kg)414
Loading the vehicleWheels and tires
Page 424 of 466
the tire. This specifies the load-bearing capa-
city more precisely.
Curb weight
The weight of a vehicle with standard equip-
ment including the maximum capacity of fuel,
oil and coolant. It also includes the air-condi- tioning system and optional equipment if
these are installed in the vehicle, but does notinclude passengers or luggage.
Maximum load rating
The maximum tire load is the maximum per-
missible weight in kilograms or lbs for which a
tire is approved.
Maximum permissible tire pressure
Maximum permissible tire pressure for one
tire.
Maximum load on one tire
Maximum load on one tire. This is calculated
by dividing the maximum axle load of one axle
by two.
PSI (pounds per square inch)
A standard unit of measure for tire pressure.
Aspect ratio
Relationship between tire height and tire
width in percent.
Tire pressure
This is pressure inside the tire applying an
outward force to each square inch of the tire's surface. The tire pressure is specified in
pounds per square inch (psi), in kilopascal
(kPa) or in bar. The tire pressure should only
be corrected when the tires are cold.
Cold tire pressure
The tires are cold:
R if the vehicle has been parked without
direct sunlight on the tires for at least three
hours and
R if the vehicle has been driven for less than
1 mile (1.6 km). Tread
The part of the tire that comes into contact
with the road.
Bead
The tire bead ensures that the tire sits
securely on the wheel. There are several steel
wires in the bead to prevent the tire from
coming loose from the wheel rim.
Sidewall
The part of the tire between the tread and the bead.
Weight of optional extras
The combined weight of those optional extras
that weigh more than the replaced standard
parts and more than 2.3 kilograms (5 lbs).
These optional extras, such as high-perform-
ance brakes, level control, a roof rack or a
high-performance battery, are not included in the curb weight and the weight of the acces-
sories.
TIN (Tire Identification Number)
This is a unique identifier which can be used
by a tire manufacturer to identify tires, for
example for a product recall, and thus identify
the purchasers. The TIN is made up of the
manufacturer's identity code, tire size, tire
type code and the manufacturing date.
Load bearing index
The load bearing index (also load index) is a
code that contains the maximum load bearing capacity of a tire.
Traction
Traction is the result of friction between the
tires and the road surface.
TWR (Tongue Weight Rating)
The TWR specifies the maximum permissible
weight that the ball coupling of the trailer tow
hitch can support. 422
All about
wheels and tiresWheels and tires
Page 430 of 466
X
Clean the wheel and wheel hub contact
surfaces.
X Slide the wheel to be mounted onto the
alignment bolt and push it on.
X Tighten the wheel bolts until they are fin-
ger-tight.
X Unscrew the alignment bolt.
X Tighten the last wheel bolt until it is finger-
tight.
Lowering the vehicle G
WARNING
The wheels could work loose if the wheel nuts and bolts are not tightened to the specified
tightening torque. There is a risk of accident.
Have the tightening torque immediately
checked at a qualified specialist workshop
after a wheel is changed. X
Place the ratchet wrench onto the hexagon
nut of the jack so that the letters ABare
visible.
X Turn the ratchet wrench until the vehicle is
once again standing firmly on the ground.
X Place the jack to one side.
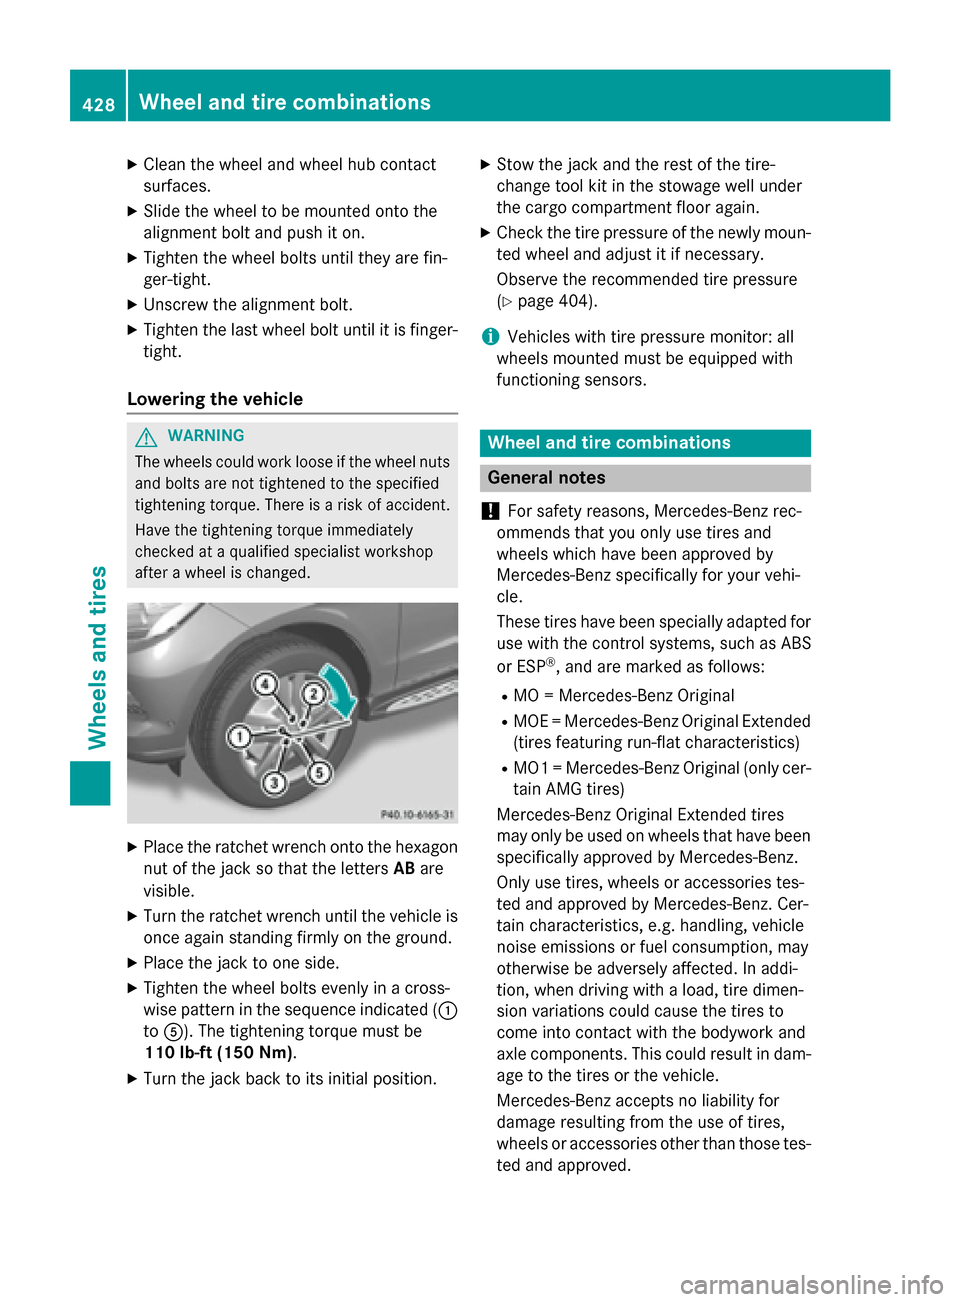
X Tighten the wheel bolts evenly in a cross-
wise pattern in the sequence indicated ( 0043
to 0083). The tightening torque must be
110 lb-ft (150 Nm).
X Turn the jack back to its initial position. X
Stow the jack and the rest of the tire-
change tool kit in the stowage well under
the cargo compartment floor again.
X Check the tire pressure of the newly moun-
ted wheel and adjust it if necessary.
Observe the recommended tire pressure
(Y page 404).
i Vehicles with tire pressure monitor: all
wheels mounted must be equipped with
functioning sensors. Wheel and tire combinations
General notes
! For safety reasons, Mercedes-Benz rec-
ommends that you only use tires and
wheels which have been approved by
Mercedes-Benz specifically for your vehi-
cle.
These tires have been specially adapted for
use with the control systems, such as ABS
or ESP ®
, and are marked as follows:
R MO = Mercedes-Benz Original
R MOE = Mercedes-Benz Original Extended
(tires featuring run-flat characteristics)
R MO1 = Mercedes-Benz Original (only cer-
tain AMG tires)
Mercedes-Benz Original Extended tires
may only be used on wheels that have been
specifically approved by Mercedes-Benz.
Only use tires, wheels or accessories tes-
ted and approved by Mercedes-Benz. Cer-
tain characteristics, e.g. handling, vehicle
noise emissions or fuel consumption, may
otherwise be adversely affected. In addi-
tion, when driving with a load, tire dimen-
sion variations could cause the tires to
come into contact with the bodywork and
axle components. This could result in dam- age to the tires or the vehicle.
Mercedes-Benz accepts no liability for
damage resulting from the use of tires,
wheels or accessories other than those tes-
ted and approved. 428
Wheel and tire combinationsWheels and tires