AUX MERCEDES-BENZ METRIS 2019 MY19 Operator’s Manual
[x] Cancel search | Manufacturer: MERCEDES-BENZ, Model Year: 2019, Model line: METRIS, Model: MERCEDES-BENZ METRIS 2019Pages: 318, PDF Size: 5.07 MB
Page 44 of 318
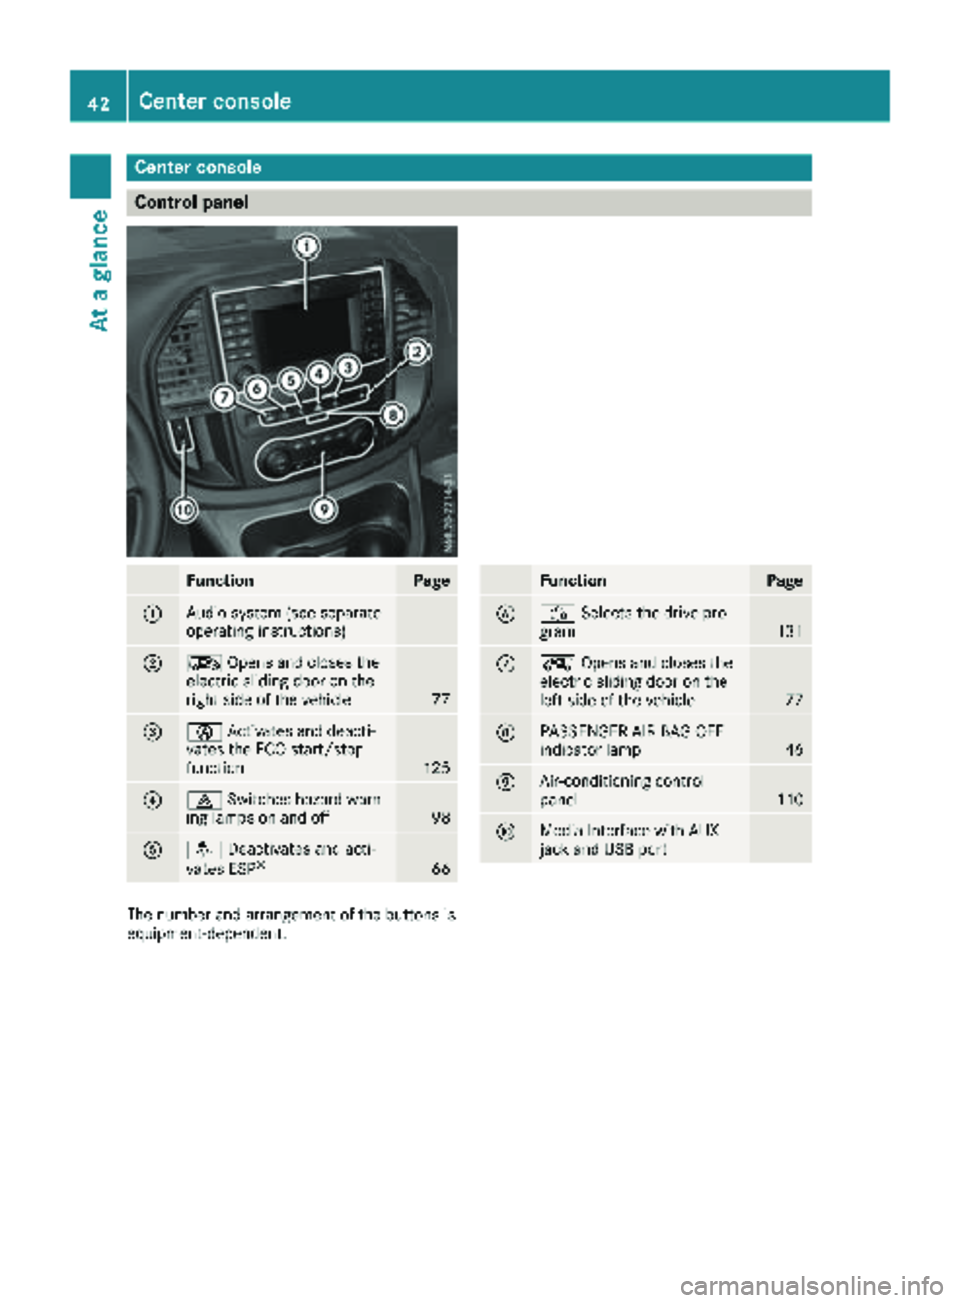
Center console
Control panel
FunctionPage
:Audio system (see separate
operating instructions)
;ÆOpens and closes the
electric sliding door on the
right side of the vehicle
77
=è Activates and deacti-
vates the ECO start/stop
function
125
?£ Switches hazard warn-
ing lamps on and off98
Aå Deactivates and acti-
vates ESP®66
FunctionPage
BÉ Selects the drive pro-
gram131
CÅ Opens and closes the
electric sliding door on the
left side of the vehicle
77
DPASSENGER AIR BAG OFF
indicator lamp46
EAir-conditioning control
panel110
FMedia Interface with AUX
jack and USB port
The number and arrangement of the buttons is
equipment-dependent.
42Center console
At a glance
Page 121 of 318
quickly, in particular at low outside tempera-
tures. Only switch on air-recirculation mode for
a short time.
Air-conditioning system or dual-zone
automatic climate control
XSwitch on climate control (Ypage 113).
XPress thehbutton.
If the indicator lamp in the hbutton lights
up, air-recirculation mode is activated.
Air-recirculation mode switches on automati-
cally:
Rat high outside temperatures.
Rwhile driving in a tunnel (only vehicles with a
navigation system).
The indicator lamp in the hbutton is then not
lit up. Outside air is added automatically after
about 30 minutes.
Air-recirculation mode is deactivated automati-
cally:
Rafter approximately five minutes at outside
temperatures below about 45 ‡ (7 †)
Rafter approximately five minutes when the
cooling with air-dehumidification function is
deactivated
Rafter approximately 30 minutes at outside
temperatures above about 45 ‡ (7 †) and
when the cooling with air-dehumidification
function is active
Convenience opening/pre-entry cli-
mate control
GWARNING
During convenience opening, body parts
could be drawn in or become trapped
between the side window and the door frame.
There is a risk of injury.
Monitor the entire opening procedure when
using convenience opening. When opening,
make sure that nobody touches the side win- dow. Release the %switch immediately if
somebody becomes trapped, to interrupt the
opening procedure.
XPre-entry climate control and conveni-
ence opening with the key: press and hold
the % button on the key.
The side windows open automatically and the
blower of the climate control system is acti-
vated.
XRelease the %button.
iAt high interior temperatures, the blower is
also switched on when a door is opened. This
means that slightly cooled air enters the vehi-
cle interior after the engine is started, to cool
the vehicle more rapidly.
Switching the residual heat function
on/off
General notes
Only vehicles with dual-zone automatic climate
control have the residual heat function.
Once the engine is switched off, it is possible to
make use of the residual heat of the engine to
continue heating or ventilating the front com-
partment of the vehicle for approximately
30 minutes. The heating or ventilation time
depends on the set interior temperature.
Switching the function on/off
XTurn the key to position 0in the ignition lock
or remove it.
XPress the Ìbutton.
If the residual heat function is activated, the
indicator lamp in the Ìbutton comes on.
The blower will run at a low speed regardless
of the airflow setting.
If you activate the residual heat function at
high temperatures, only the auxiliary ventila-
tion will be activated. The blower then runs at
medium speed.
The residual heat function switches off auto-
matically
Rafter approximately 30 minutes
Rif the starter battery's condition of charge is
too low
Rwhen you switch on the ignition
Operating the climate control system119
Climate control
Z
Page 136 of 318
Problems with the transmission
ProblemPossible causes/consequences andMSolutions
The transmission is
locked in positionP.The vehicle electronics are malfunctioning.
XHave the vehicle electronics checked immediately at a qualified
specialist workshop.
The acceleration charac-
teristics have deteriora-
ted noticeably.
The transmission does
not shift.The transmission is in emergency mode.
It is only possible to shift into second gear or reverse gear R.
XStop the vehicle.
XDepress the brake pedal.
XMove the selector lever to positionP.
XSwitch off the engine.
XWait at least ten seconds before restarting the engine.
XDepress the brake pedal.
XMove the selector lever to positionDor R.
In position D, the transmission shifts into second gear; in position R,
the transmission shifts into reverse gear.
XHave the transmission checked immediately at a qualified specialist
workshop.
Refueling
Important safety notes
GWARNING
Fuel is highly flammable. Improper handling of
fuel creates a risk of fire and explosion.
Avoid fire, open flames, smoking and creating
sparks under all circumstances. Switch off the
engine and, if applicable, the auxiliary heating
before refueling.
GWARNING
Fuel is poisonous and hazardous to health.
There is a risk of injury.
You must make sure that fuel does not come into contact with your skin, eyes or clothing
and that it is not swallowed. Do not inhale fuel
vapors. Keep fuel away from children.
If you or others come into contact with fuel,
observe the following:
RWash away fuel from skin immediately
using soap and water.
RIf fuel comes into contact with your eyes,
immediately rinse them thoroughly with
clean water. Seek medical assistance with-
out delay.
RIf fuel is swallowed, seek medical assis-
tance without delay. Do not induce vomit-
ing.
RImmediately change out of clothing which
has come into contact with fuel.
GWARNING
Electrostatic buildup can create sparks and
ignite fuel vapors. There is a risk of fire and
explosion.
Always touch the vehicle body before opening
the fuel filler flap or touching the fuel pump
nozzle. Any existing electrostatic buildup is
thereby discharged.
134Refueling
Driving and parking
Page 186 of 318
Operating the audio medium
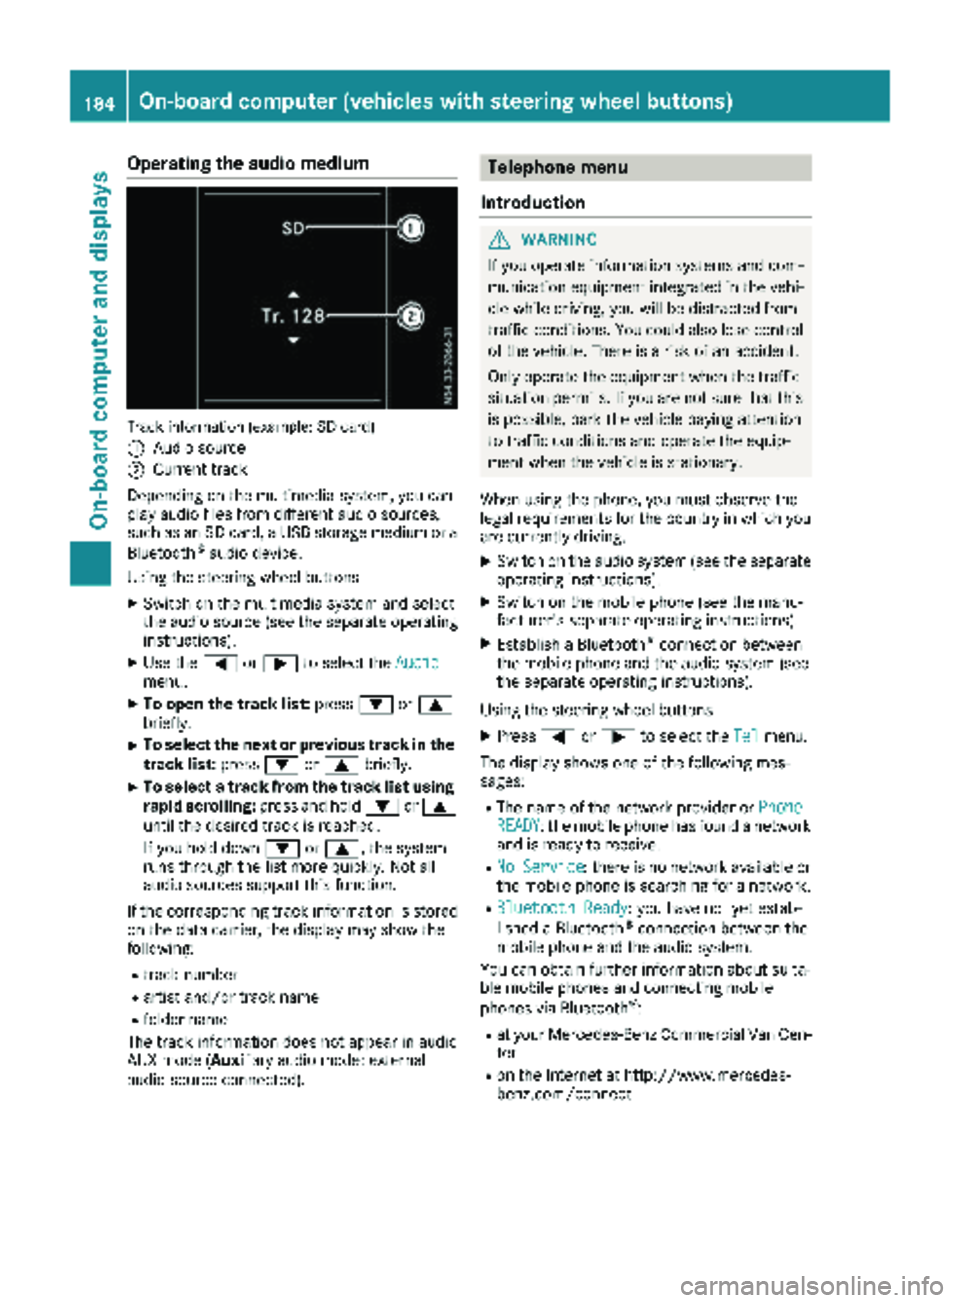
Track information (example: SD card)
:
Audio source
;Current track
Depending on the multimedia system, you can
play audio files from different audio sources,
such as an SD card, a USB storage medium or a Bluetooth
®audio device.
Using the steering wheel buttons
XSwitch on the multimedia system and select
the audio source (see the separate operating
instructions).
XUse the =or; to select the Audiomenu.
XTo open the track list: press:or9
briefly.
XTo select the next or previous track in the
track list: press:or9 briefly.
XTo select a track from the track list using
rapid scrolling: press and hold:or9
until the desired track is reached.
If you hold down :or9, the system
runs through the list more quickly. Not all
audio sources support this function.
If the corresponding track information is stored
on the data carrier, the display may show the
following:
Rtrack number
Rartist and/or track name
Rfolder name
The track information does not appear in audio
AUX mode (Aux iliary audio mode: external
audio source connected).
Telephone menu
Introduction
GWARNING
If you operate information systems and com-
munication equipment integrated in the vehi-
cle while driving, you will be distracted from
traffic conditions. You could also lose control
of the vehicle. There is a risk of an accident.
Only operate the equipment when the traffic
situation permits. If you are not sure that this
is possible, park the vehicle paying attention
to traffic conditions and operate the equip-
ment when the vehicle is stationary.
When using the phone, you must observe the
legal requirements for the country in which you
are currently driving.
XSwitch on the audio system (see the separate
operating instructions).
XSwitch on the mobile phone (see the manu-
facturer's separate operating instructions).
XEstablish a Bluetooth®connection between
the mobile phone and the audio system (see
the separate operating instructions).
Using the steering wheel buttons
XPress =or; to select the Telmenu.
The display shows one of the following mes-
sages:
RThe name of the network provider or PhoneREADY: the mobile phone has found a network
and is ready to receive.
RNo Service: there is no network available or
the mobile phone is searching for a network.
RBluetooth Ready: you have not yet estab-
lished a Bluetooth®connection between the
mobile phone and the audio system.
You can obtain further information about suita-
ble mobile phones and connecting mobile
phones via Bluetooth
®:
Rat your Mercedes-Benz Commercial Van Cen-
ter
Ron the Internet at http://www.mercedes-
benz.com/connect
184On-board computer (vehicles with steering wheel buttons)
On-board computer and displays
Page 222 of 318
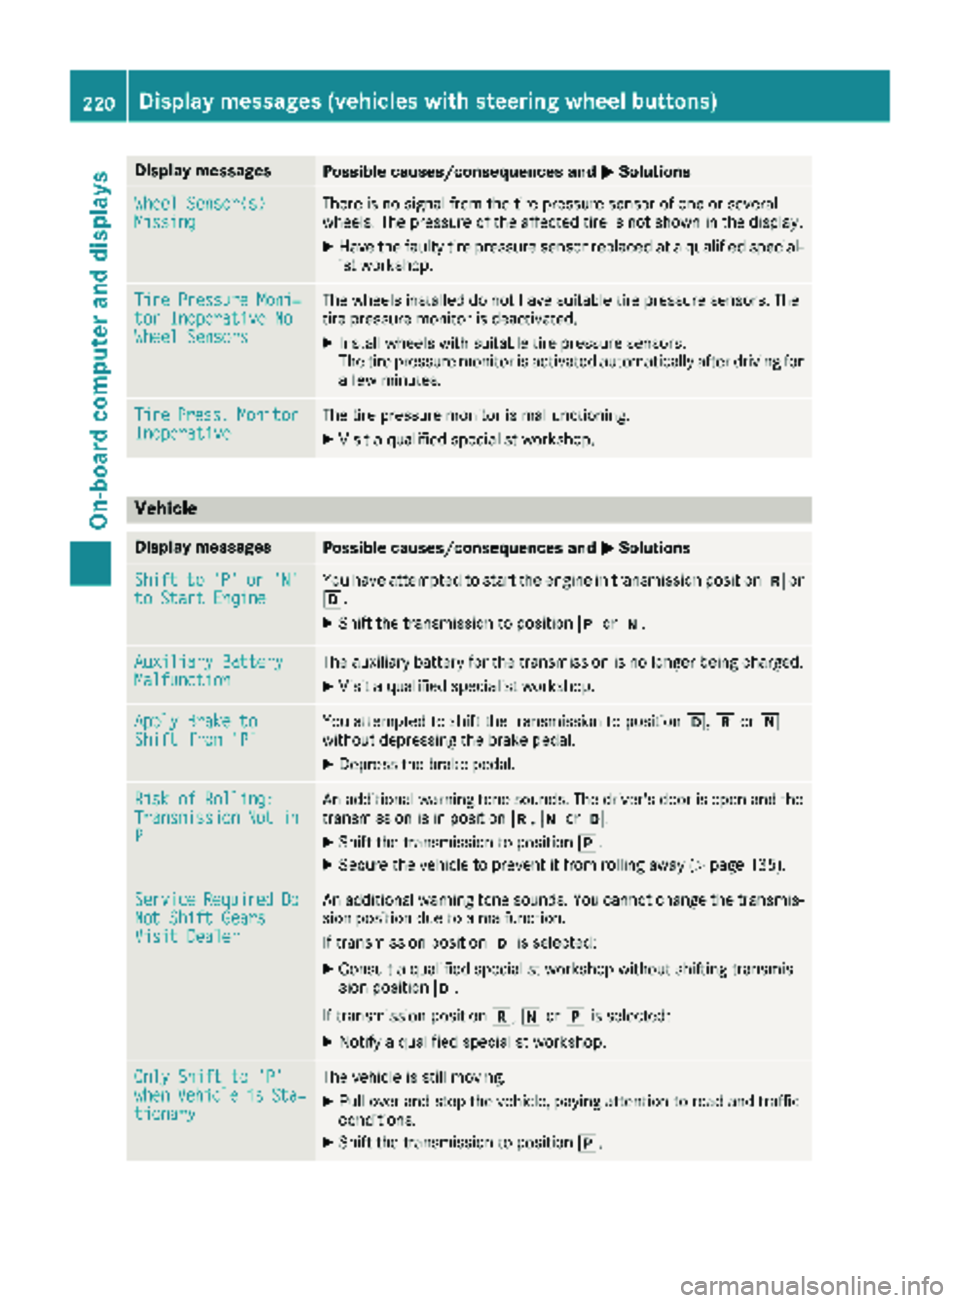
Display messagesPossible causes/consequences andMSolutions
Wheel Sensor(s)MissingThere is no signal from th etire pressur esensor of on eor several
wheels. The pressur eof th eaffecte dtire is no tshown in th edisplay.
XHav eth efault ytire pressur esensor replace dat aqualified special -
ist workshop .
TirePressure Moni‐tor Inoperative NoWheel Sensor s
The wheels installed do no thav esuitable tire pressur esensors. The
tire pressur emonitor is deactivated.
XInstall wheels wit hsuitable tire pressur esensors.
The tire pressur emonitor is activated automatically after drivin gfor
a few minutes.
Tir ePress.Monito rInoperativeThe tire pressur emonitor is malfunctioning .
XVisitaqualified specialist workshop .
Vehicle
Display messagesPossible causes/consequences and MSolutions
Shiftto'P'or'N'to Start EngineYou haveattempte dto start th eengin ein transmission position kor
h.
XShift th etransmission to position jori.
Auxiliary Batter yMalfunctionThe auxiliary battery for th etransmission is no longer bein gcharged.
XVisit aqualified specialist workshop .
Apply Brake toShift from'P'You attempte dto shift th etransmission to position h,kori
without depressing th ebrak epedal .
XDepress th ebrak epedal .
Riskof Rolling:TransmissionNotinP
An additional warning tone sounds. The driver's door is open and th e
transmission is in position k,iorh.
XShift th etransmission to position j.
XSecureth evehicl eto preven tit from rollin gaway (Ypage 135).
Servic eRequiredDoNot Shift GearsVisit Dealer
An additional warning tone sounds. You canno tchang eth etransmis -
sion position due to amalfunction .
If transmission position his selected:
XConsult aqualified specialist workshop without shifting transmis -
sion position h.
If transmission position k,iorj is selected:
XNotify aqualified specialist workshop .
OnlyShift to 'P'whe nVehicl eisSta‐tionar y
The vehicl eis still moving .
XPull overand stop th evehicle, payin gattention to roa dand traffic
conditions.
XShift th etransmission to position j.
220Display messages (vehicles withsteering whee lbu ttons)
On-board computer and displays
Page 238 of 318
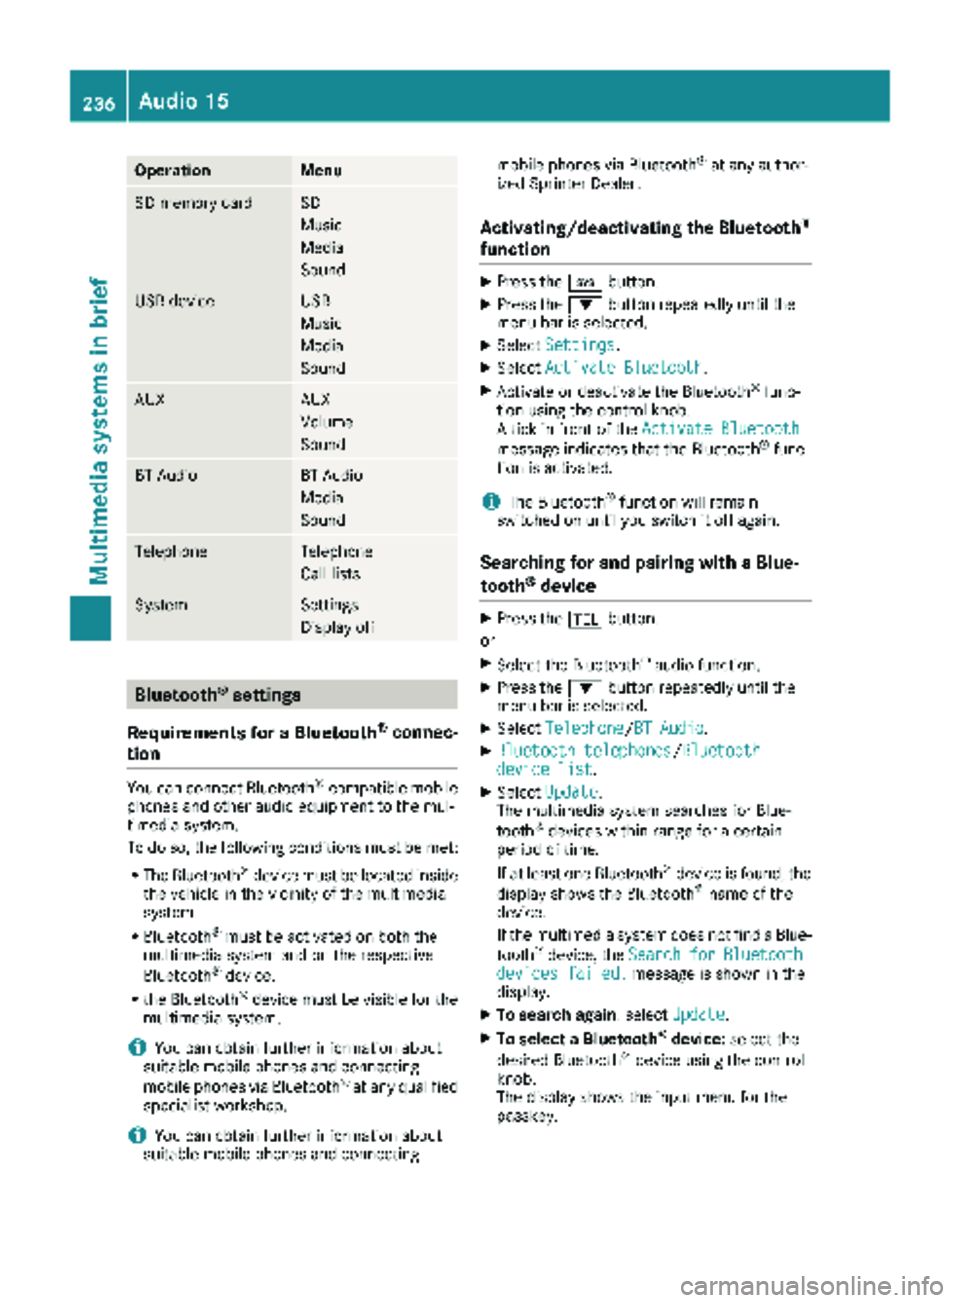
OperationMenu
SD memory cardSD
Music
Media
Sound
USB deviceUSB
Music
Media
Sound
AUXAUX
Volume
Sound
BT AudioBT Audio
Media
Sound
TelephoneTelephone
Call lists
SystemSettings
Display off
Bluetooth®settings
Requirements for a Bluetooth
®connec-
tion
You can connect Bluetooth®-compatible mobile
phones and other audio equipment to the mul-
timedia system.
To do so, the following conditions must be met:
RThe Bluetooth®device must be located inside
the vehicle in the vicinity of the multimedia
system.
RBluetooth®must be activated on both the
multimedia system and on the respective
Bluetooth
®device.
Rthe Bluetooth®device must be visible for the
multimedia system.
iYou can obtain further information about
suitable mobile phones and connecting
mobile phones via Bluetooth
®at any qualified
specialist workshop.
iYou can obtain further information about
suitable mobile phones and connecting mobile phones via Bluetooth
®at any author-
ized Sprinter Dealer.
Activating/deactivating the Bluetooth®
function
XPress the ibutton.
XPress the :button repeatedly until the
menu bar is selected.
XSelect Settings.
XSelectActivate Bluetooth.
XActivate or deactivate the Bluetooth®func-
tion using the control knob.
A tick in front of the Activate Bluetooth
message indicates that the Bluetooth®func-
tion is activated.
iThe Bluetooth®function will remain
switched on until you switch it off again.
Searching for and pairing with a Blue-
tooth®device
XPress the %button.
or
XSelect the Bluetooth®audio function.
XPress the :button repeatedly until the
menu bar is selected.
XSelect Telephone/BT Audio.
XBluetooth telephones/Bluetoothdevice list.
XSelectUpdate.
The multimedia system searches for Blue-
tooth
®devices within range for a certain
period of time.
If at least one Bluetooth
®device is found, the
display shows the Bluetooth®name of the
device.
If the multimedia system does not find a Blue-
tooth
®device, the SearchforBluetoothdevices failed.message is shown in the
display.
XTo search again: select Update.
XTo select a Bluetooth®device:select the
desired Bluetooth®device using the control
knob.
The display shows the input menu for the
passkey.
236Audio 15
Multimedia systems in brief
Page 240 of 318
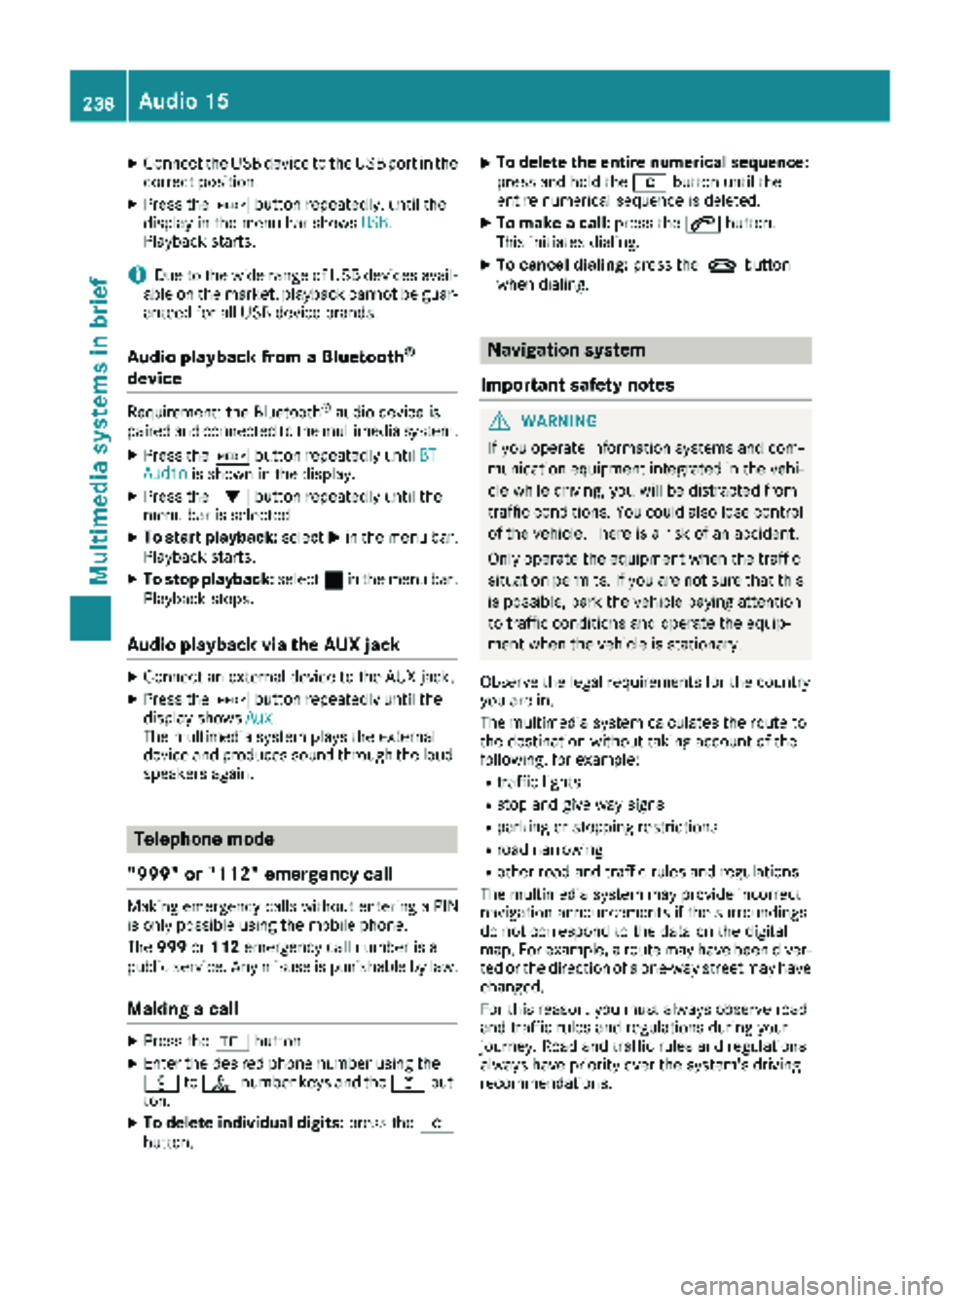
XConnect the USB device to the USB portinthe
correct position.
XPress the Õbutton repeatedly, unt ilthe
displ ayinthe menu bar shows USB.
Playback starts.
iDue to the widerange of USB devices avail-
able on the market, playback cannot beguar-
anteed for all USB device brands.
Audio playback from a Bluetooth®
device
Requir ement: the Bluetooth®audio device is
paired and connected to the multimedia system.
XPress theÕbutton repeatedly untilBTAudiois shown in thedispl ay.
XPress the :button repeatedly untilthe
menu bar isselected.
XTo start playback: selectMinthe menu bar.
Playback starts.
XTo stop playback: select¯inthe menu bar.
Playback stops.
Audio playback via the AUX jack
XConnect an external device to the AUX jack.
XPress the Õbutton repeatedly untilthe
displ ay shows Aux.
The multimedia system plays the external
device and produces sound through the loud-
speakers again.
Telephone mode
"999" or "112" emergency call
Making emergency calls without entering a PIN
is only possible using the mob ilephone.
The 999 or112 emergency call number isa
public service. Any misuse ispunishable by law.
Making a call
XPress the%button.
XEnter the desired phone number using the
xtos number keys and the lbut-
ton.
XTo delete individual digits: press theí
button.
XTo delete the entire numerical sequence:
press and hold the íbutton until the
entire numerical sequence isdeleted.
XTo make a call: press the6button.
This initiates dialing.
XTo cancel dialing: press the~button
when dialing.
Navigation system
Important safety notes
GWARNING
If you operate information systems and com-
munication equipment integrated in the veh i-
cle while driving, you will be distracted from
traffic conditions. You could also lose control
of the vehicle. There is a risk of an accident.
Only operate the equipment when the traffic
situation permits. If you are not sure that this
is possible, park the vehicle paying attention
to traff icconditions and operate the equip-
ment when the vehicle isstationary.
Observe the legal requirements for the country
you are in.
The multimedia system calculates the route to
the destination without taking account of the
following, for example:
Rtraff iclights
Rstop and giveway signs
Rparking or stopping restrictions
Rroad narrowing
Rother road and traffic rules and regulations
The multimedia system may provide incorrect
navigation announcements if the surroundings
do not correspond to the data on the digital
map. For example, a route may have been diver-
ted or the direction of a one-way street may have
changed.
For this reason, you must always observe road
and traffic rules and regulations during your
jo urney. Road and traffic rules and regulations
always have priority over the system's driving
recommendations.
238Audio 15
Multimedia systems in brief
Page 263 of 318
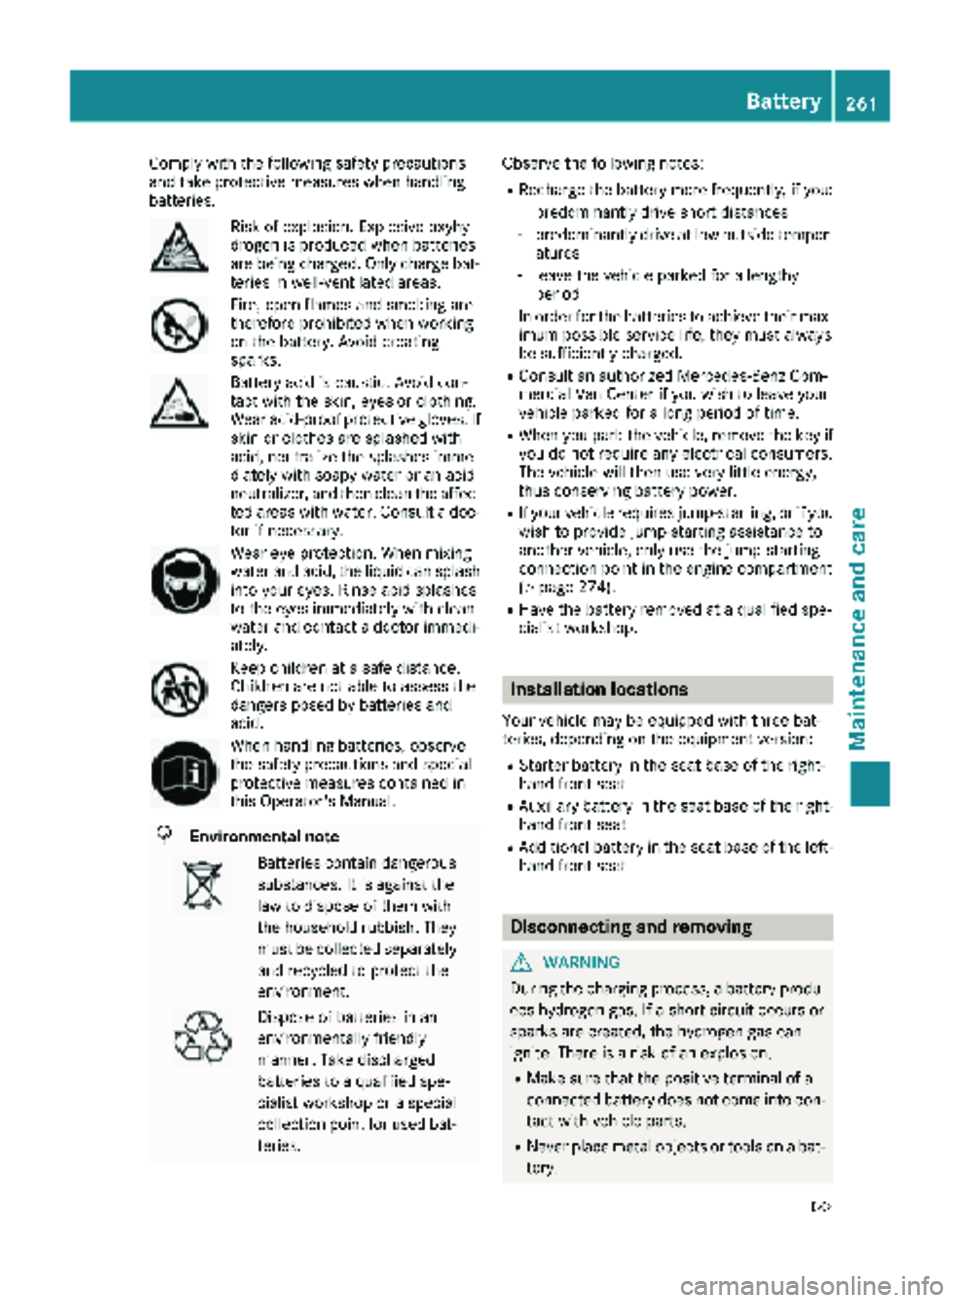
Comply with the foll owing safety precautions
and take protective measures when handlin g
batteries.
Risk of explos ion. Explosive oxyhy-
drogen isproduced when batteries
are bein g charge d.Only charge bat-
teries in well- ventilated areas.
Fire, open flames and smoking are
therefore pro hibited when working
on the battery. Avoid creating
sparks.
Battery acid iscaustic. Avoid con-
tact with the skin, eyes or clothing.
Wear acid-proof protective gloves. If
skin or clothes are splashed with
acid, neutr alize the splashes imme-
diat elywith soapy water or an acid
neutr alizer, and then clean the affec-
ted areas with water. Consult a doc-
tor ifnecessary.
Wear eye protection. When mixing
water and acid, the liquidcan splash
into your eyes. Rinse acid splashes
to the eyes immediately with clean
water and contact a doctor immedi-
ately.
Keep ch ildren at a safe distance.
Childr en are not ableto assess the
dangers posed bybatteries and
acid.
When handlin g batteries, observe
the safety precautions and special
protective measures contained in
th is Operator's Manual.
HEnvironmental note
Batteries contain dangerous
substances. It isagainst the
law to dispose of them with
the household rubbish. They
must becollec ted separate ly
and recycled to protect the
environment.
Dispose of batteries inan
environmentally friendly
manner. Take discharged
batteries to a qualified spe-
cialist workshop or a special
co llec tion point for used bat-
teries. Observe the foll
owing notes:
RRecharge the battery more frequently, if you:
-predominantly drive short distances
-predominantly drive at low outside temper-
atures
-leave the vehicle parked for a lengthy
period
In order for the batteries to achieve their max-
imum possible service life, they must always
be sufficiently charge d.
RConsult an authorized Mercedes-Benz Com-
mercial Van Centerifyou wish to leave your
vehicle parked for a long period of time.
RWhen you park the vehicle, remove the key if
you do not require any electrical consumers.
The vehicle will then use very little energy,
thus conserving battery power.
RIf your vehicle requires jump-starting, or if you
wish to provide jump-starting assistance to
another vehicle, only use the jump-starting
connection point in the engine compartment
(
Ypage 274).
RHave the battery removed at a qualified spe-
cialist workshop.
Installation locations
Your vehicle may be equipped with three bat-
teries, depending on the equipment version:
RStarter battery in the seat base of the right-
hand front seat
RAuxiliary battery inthe seat base of the right-
hand front seat
RAdditional battery inthe seat base of the left-
hand front seat
Disconnecting and removing
GWARNING
During the charging process, a battery produ-
ces hydrogen gas. If a short circuit occurs or
sparks are created, the hydrogen gas can
ignite. There is a risk of an explosion.
RMake sure that the positive terminal of a
connected battery does not come into con- tact with vehicle parts.
RNever place metal objects or tools on a bat-
tery.
Battery261
Maintenance and care
Z
Page 264 of 318
RIt is important that you observe the descri-
bed order of the battery terminals when
connecting and disconnecting a battery.
RWhen jump-starting, make sure that the
battery poles with identical polarity are
connected.
RIt is particularly important to observe the
described order when connecting and dis-
connecting the jumper cables.
RNever connect or disconnect the battery
terminals while the engine is running.
GWARNING
Battery acid is caustic. There is a risk of injury.
Avoid contact with skin, eyes or clothing. Do
not inhale any battery gases. Do not lean over
the battery. Keep children away from batter-
ies. Wash away battery acid immediately with
plenty of clean water and seek medical atten-
tion.
!You should have all work involving the bat-
tery carried out at a qualified specialist work-
shop.
If, in exceptional circumstances, you need to
disconnect the battery yourself, please make
sure that:
RSecure the vehicle to prevent it from rolling
away.
RYou have switched off the engine and
removed the key. Make sure the ignition is
switched off. Check to see that there are no
indicator lamps lighting in the instrument
cluster. Electronic components such as the
alternator may otherwise be damaged.
RAfter the battery has been disconnected,
the parking brake is automatically
engaged. You can then no longer move the
vehicle.
RFor vehicles with automatic transmission,
the transmission is locked in position P
after disconnecting the battery. You can
then no longer move the vehicle.
RYou have first removed the negative termi- nal and then the positive terminal. Never
mix up the terminal clamp disconnection/
connection order and never mix up the ter-
minal clamps. The vehicle's electronics
may otherwise be damaged. The battery and the cover of the positive ter-
minal clamp must be installed securely during
operation.
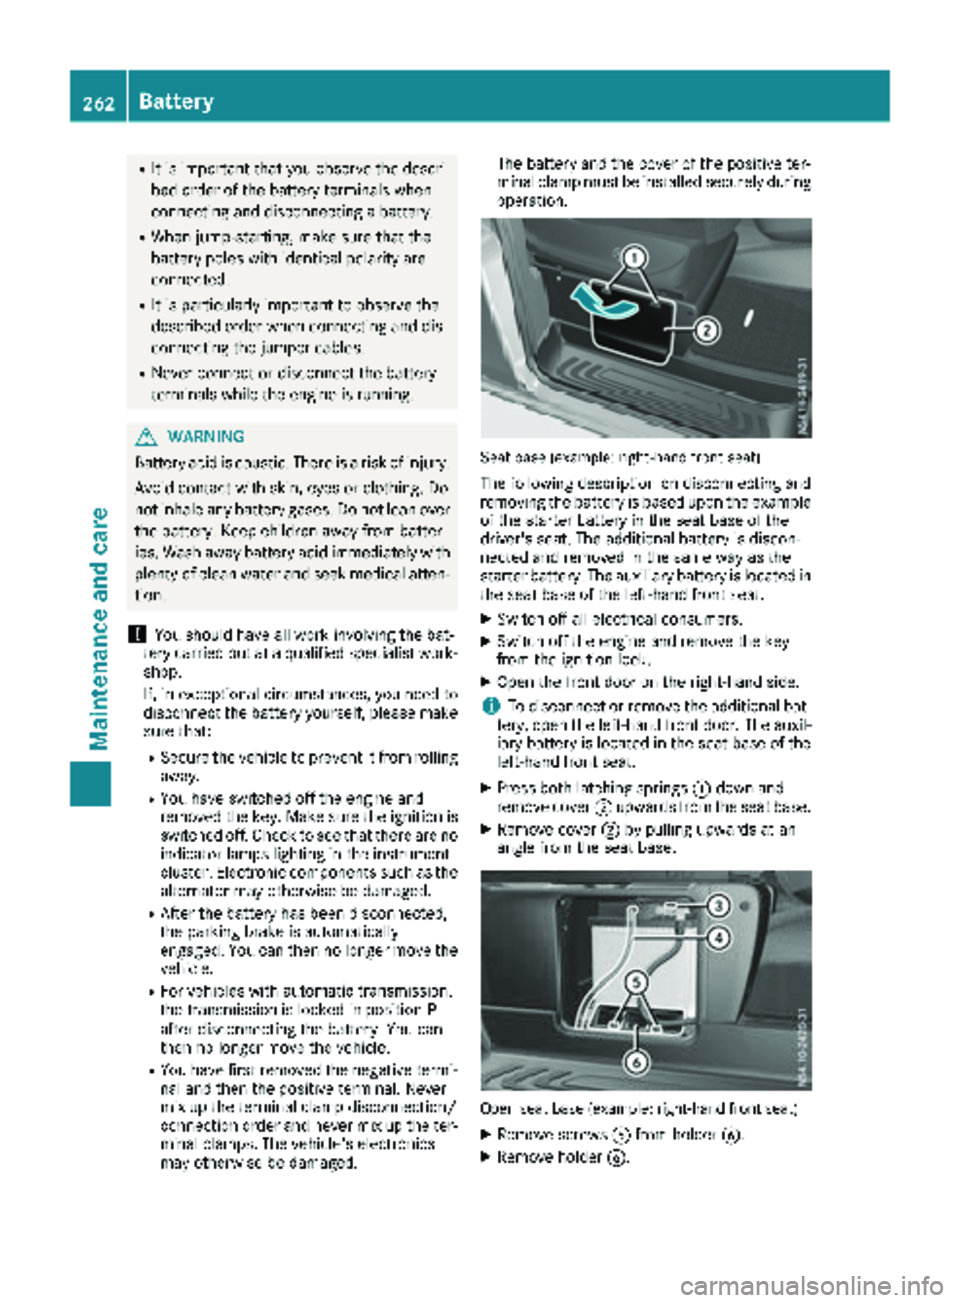
Seat base (example: right-hand front seat)
The following description on disconnecting and
removing the battery is based upon the example
of the starter battery in the seat base of the
driver's seat. The additional battery is discon-
nected and removed in the same way as the
starter battery. The auxiliary battery is located in the seat base of the left-hand front seat.
XSwitch off all electrical consumers.
XSwitch off the engine and remove the key
from the ignition lock.
XOpen the front door on the right-hand side.
iTo disconnect or remove the additional bat-
tery, open the left-hand front door. The auxil-
iary battery is located in the seat base of the
left-hand front seat.
XPress both latching springs :down and
remove cover ;upwards from the seat base.
XRemove cover ;by pulling upwards at an
angle from the seat base.
Open seat base (example: right-hand front seat)
XRemove screws Afrom holder B.
XRemove holder B.
262Battery
Maintenance and care
Page 265 of 318
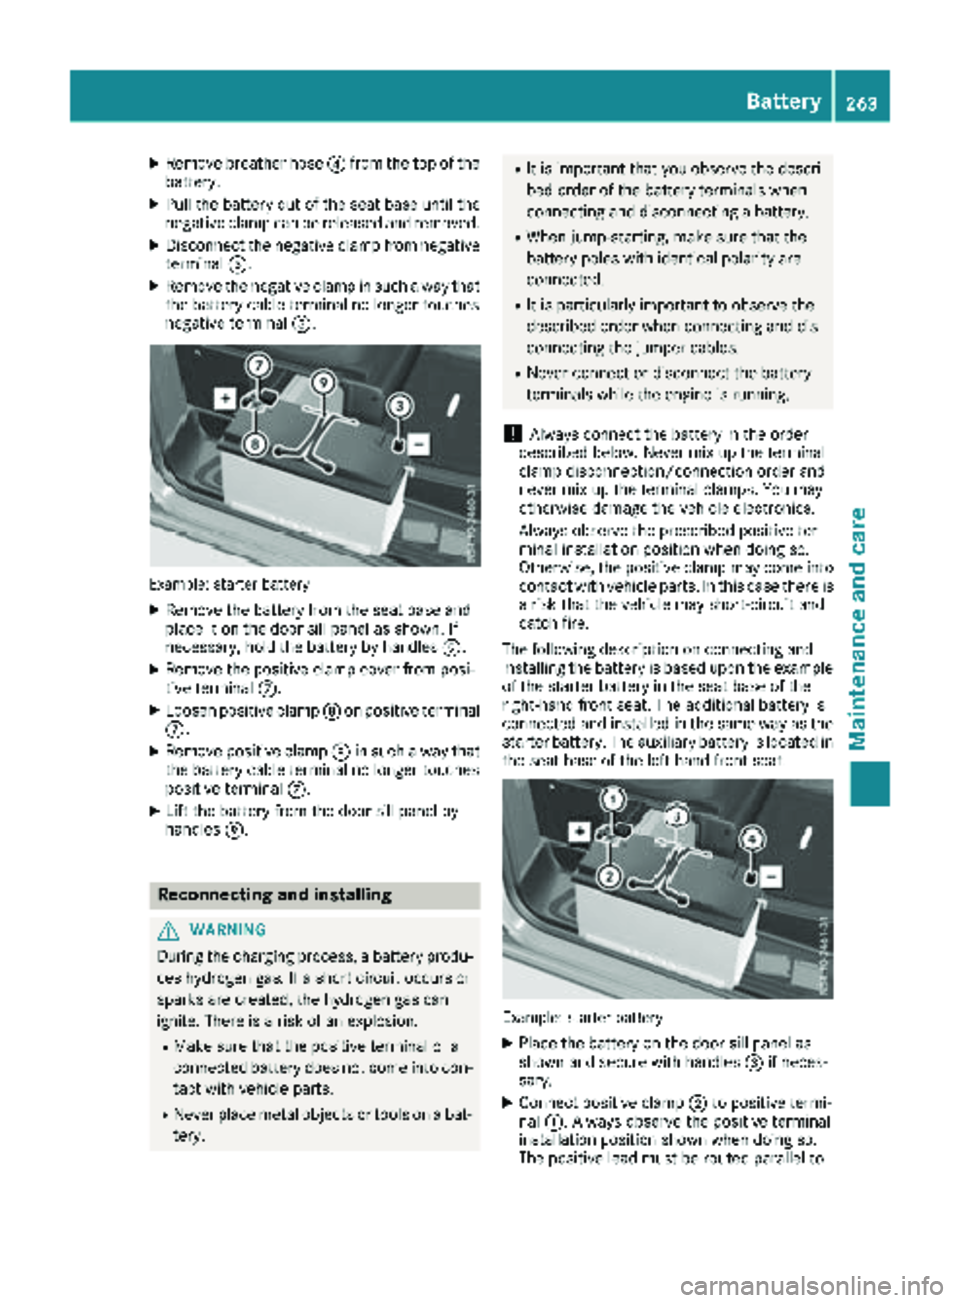
XRemove breather hose? from th eto pof th e
battery.
XPull th ebattery out of th eseat base until th e
negative clam pcan be release dand removed.
XDisconnect th enegative clam pfrom negative
termina l=.
XRemove th enegative clam pin suc h away that
th ebattery cable termina lno longer touches
negative termina l=.
Example: starter battery
XRemove th ebattery from th eseat base and
plac eit on th edoor sill panel as shown. If
necessary, hold th ebattery by handles E.
XRemove thepositive clam pcover from posi-
tive termina lC.
XLoosen positive clam pD on positive termina l
C.
XRemove positive clam pD in suc h away that
th ebattery cable termina lno longer touches
positive termina lC.
XLif tth ebattery from th edoor sill panel by
handles E.
Reconnecting and installing
GWARNIN G
During th echarging process, abattery produ-
ce shydrogen gas. If ashort circuit occur sor
sparks are created, th ehydrogen gas can
ignite. There is aris kof an explosion .
RMakesur ethat th epositive termina lof a
connecte dbattery does no tcome int ocon-
tac twit hvehicl eparts.
RNever plac emetal objects or tools on abat -
tery.
RIt is important that you observ eth edescri-
bed order of th ebattery terminals when
connecting and disconnecting abattery.
RWhen jump-starting ,mak esur ethat th e
battery pole swit hidentical polarit yare
connected.
RIt is particularly important to observ eth e
describe dorder when connecting and dis-
connecting th ejumper cables.
RNever connec tor disconnect th ebattery
terminals while th eengin eis running.
!Always connec tth ebattery in th eorder
describe dbelow. Never mix up th etermina l
clam pdisconnection/connection order and
never mix up th etermina lclamps. You may
otherwise damag eth evehicl eelectronics .
Always observ eth eprescribe dpositive ter-
minal installation position when doin gso.
Otherwise, th epositive clam pmay come int o
contact wit hvehicl eparts. In this cas ethere is
a ris kthat th evehicl emay short-circuit and
catch fire.
The followin gdescription on connecting and
installin gth ebattery is base dupon th eexampl e
of th estarter battery in th eseat base of th e
right-hand fron tseat .The additional battery is
connecte dand installed in th esam eway as th e
starter battery. The auxil
iary battery is locate
din
th eseat base of th eleft-han dfron tseat .
Example: starter battery
XPlaceth ebattery on th edoor sill panel as
shown and secure wit hhandles =if neces-
sary.
XConnect positive clam p; to positive termi-
nal :. Always observ eth epositive termina l
installation position shown when doin gso.
The positive lead mus tbe routed parallel to
Battery263
Maintenance and care
Z