key MERCEDES-BENZ S-CLASS SEDAN 2012 User Guide
[x] Cancel search | Manufacturer: MERCEDES-BENZ, Model Year: 2012, Model line: S-CLASS SEDAN, Model: MERCEDES-BENZ S-CLASS SEDAN 2012Pages: 536, PDF Size: 39.39 MB
Page 23 of 536

Important safety notes ..................107
Multicontour seat .......................... 112
Seat heating problem ....................113
Seat ventilation problem ................114
Selecting (COMAND) .....................274
Storing settings (memory
function) ........................................ 118
Switching seat heating on/off .......113
Switching seat ventilation on/off ..113
Selecting stations (radio)
Using station presets .....................216
Using station search ......................216
Sending DTMF tones ......................... 207
Sensors (cleaning instructions) ....... 470
Service Center see Qualified specialist workshop
Service interval display
Displaying service messages .........465
Hiding service messages ...............465
Notes ............................................. 465
Service messages ..........................465
Service menu (on-board computer) . 387
Service products Brake fluid ..................................... 529
Coolant (engine) ............................ 530
DEF special additives .....................527
Engine oil ....................................... 528
Fuel ................................................ 525
Important safety notes ..................524
Washer fluid ................................... 531
Setting a station (radio)
Via manual frequency entry ...........217
Settings
Display ........................................... 147
Menu overview .............................. 125
On-board computer .......................387
Picture (COMAND) .........................244
Picture (Rear Seat Entertainment
System) ......................................... 253
Sound settings ............................... 139
System settings ............................. 147
Setting the language
COMAND ....................................... 153
Rear Seat Entertainment System ...262
Setting the night design ................... 147
Setting the text reader speed .......... 149
Setting the vehicle level ................... 349Setting the volume
Telephone calls .............................. 138
Video AUX ..................................... 250
Side impact air bag ............................. 52
Side marker lamp (display
message) ............................................ 405
Side windows Convenience closing feature ............97
Convenience opening feature ..........96
Important safety information ...........95
Opening/closing .............................. 96
Problem (malfunction) .....................98
Resetting ......................................... 98
Sliding sunroof
Important safety notes ....................98
Opening/closing .............................. 99
Problem (malfunction) ...................103
Resetting ....................................... 100
see Panorama roof with power
tilt/sliding panel
SmartKey
Changing the battery .......................85
Changing the programming .............84
Checking the battery .......................85
Convenience closing feature ............97
Convenience opening feature ..........96
Display message ............................ 421
Door central locking/unlocking .......82
Important safety notes ....................82
Loss ................................................. 87
Mechanical key ................................ 84
Positions (ignition lock) .................307
Problem (malfunction) .....................87
Starting the engine ........................309
SMS message
see Text message
Snow chains ...................................... 495
Socket Glove box ....................................... 444
Sockets
Points to observe before use .........443
Rear compartment .........................444
Trunk ............................................. 444
Sound menu ....................................... 139
Sounds see Sound settings Index21
Page 25 of 536
 ............................ 245
Switching between summer time
and standard time ............................. 148
Switching off the alarm (ATA) ......")
Switching between picture
formats (TV, video) ............................ 245
Switching between summer time
and standard time ............................. 148
Switching off the alarm (ATA) ............ 79
Switching the hands-free
microphone on/off ............................ 205
Switching wavebands (radio) ........... 216
System settings
Bluetooth ®
..................................... 151
Date ............................................... 148
Language ....................................... 153
Programmable button (COMAND) ..124
Text reader speed ..........................149
Time ............................................... 148
Time zone ...................................... 148
Voice Control System ....................149
T
Tachometer ........................................ 375
Tail lamps Display message ............................ 404
Tank
see Fuel tank
Tank content
Fuel gauge ....................................... 37
Technical data
Notes ............................................. 522
Tires/wheels ................................. 515
Vehicle data ................................... 531
TELEAID
Automatic retrieval of vehicle data
(service due date) ..........................451
Call priority .................................... 449
Display message ............................ 398
Downloading destinations
(COMAND) ..................................... 449
Emergency call .............................. 446
Important safety notes ..................445
Locating a stolen vehicle ...............452
MB info call button ........................448
Remote vehicle locking ..................451
Roadside Assistance button ..........447
Search & Send ............................... 450
Self-test ......................................... 446
System .......................................... 445
Vehicle remote unlocking ..............451
Telephone
Accepting/ending a call ................203
Accepting a call ............................. 384
Adjusting the volume for calls .......138
Basic menu (Bluetooth ®
interface) ....................................... 202
Calling (outgoing call) ....................204
Calling voicemail ............................ 205
Conference connection .................. 205
Connecting a mobile phone
(general information) .....................199
De-authorizing a mobile phone ......202
Ending an active call ......................205
Entering a number .........................204
External authorization
(Bluetooth ®
) ................................... 201
Function restrictions ......................198
General notes ................................ 197
Keypad ........................................... 124
Menu (on-board computer) ............384
Number from the phone book ........ 384
Operating options ..........................198
Overview of functions ....................205
Reception and transmission
volume ........................................... 203
Redialing ........................................ 385
Rejecting/ending a call .................384
Rejecting a call .............................. 203
Rejecting or accepting a waiting
call ................................................. 205
Safety notes .................................. 197
Sending DTMF tones ...................... 207
Switching hands-free microphone
on/off ............................................ 205
Toggling ......................................... 205
Using the telephone ....................... 203
see Bluetooth ®
see Call lists
Telephone mode
Redialing ........................................ 204
Telephone module with
Bluetooth ®
SIM Access Profile
see Separate installation instructions
Temperature
Coolant .......................................... 374
Coolant (on-board computer) ......... 381
Engine oil (on-board computer) ...... 381Index23
Page 27 of 536
 ....................512
Unladen weight (definition) ............513
Wear indicator (definition) .............514
Wheel rim (definition) ........")
Uniform Tire Quality Grading
Standards (definition) ....................512
Unladen weight (definition) ............513
Wear indicator (definition) .............514
Wheel rim (definition) ....................512
see Flat tire
Tonal properties
see Sound settings
Top Tether ............................................ 69
Towing Important safety guidelines ...........485
Installing the towing eye ................485
Removing the towing eye ...............486
With the rear axle raised ................486
Towing away
With both axles on the ground .......486
Tow-starting
Emergency engine starting ............487
Important safety notes ..................485
Track
Selecting (CD, DVD, MP3) .............. 229
Traffic Announcements (TA)
Switching off .................................. 138
Traffic jam function ........................... 175
Traffic jam message see Dynamic route guidance/TMC
Traffic reports
Real-time traffic report ..................181
Switching on/off ........................... 178
Transfer case ..................................... 321
Transmission see Automatic transmission
Transporting the vehicle .................. 487
Treble, adjusting (sound) .................. 139
Trim pieces (cleaning instructions) . 472
Trip computer (on-board
computer) .......................................... 378
Trip meter see Trip odometer
Trip odometer
Calling up ....................................... 378
Resetting (on-board computer) ......379
Trunk
Emergency release ....................94, 95
Important safety notes ....................91
Limiting the opening angle ............. 269
Locking separately ...........................94Opening/closing (automatically
from inside) ...................................... 93
Opening/closing (automatically
from outside) ................................... 93
Trunk lid
Display message ............................ 420
Opening/closing .............................. 91
Power closing feature ......................90
Trunk lid opening height
restriction .......................................... 269
Turn signals Display message ............................ 403
Switching on/off ........................... 283
TV
Automatic picture shutoff ..............244
Picture settings .............................. 244
Type identification plate
see Vehicle identification plate
U
Unlocking Emergency unlocking .......................90
From inside the vehicle (central
unlocking button) ............................. 89
USB
see Media Interface
V
Vanity mirror (in the sun visor) ........ 440
Vehicle Correct use ...................................... 31
Data acquisition ............................... 32
Display message ............................ 419
Emergency unlocking ................. 90, 91
Equipment ....................................... 28
Individual settings ..........................387
Limited Warranty ............................. 32
Loading .......................................... 502
Locking (in an emergency) ...............91
Locking (SmartKey) .......................... 82
Lowering ........................................ 479
Maintenance .................................... 29
Parking for a long period ................ 329
Pulling away ................................... 309
Raising ........................................... 476
Reporting problems .........................32
Index25
Page 28 of 536
 ...........90
Unlocking (SmartKey) ......................82
Vehicl")
Towing away .................................. 485
Transporting .................................. 487
Unlocking (in an emergency) ...........90
Unlocking (SmartKey) ......................82
Vehicle data ................................... 531
Vehicle battery
see Battery (vehicle)
Vehicle data ....................................... 531
Vehicle dimensions ........................... 531
Vehicle emergency locking ................ 91
Vehicle identification number see VIN
Vehicle identification plate .............. 523
Vehicle level Active Body Control (ABC) .............348
AIRMATIC ...................................... 347
Display message ............................ 412
Vehicle level (display message) ....... 411
Vehicle tool kit .................................. 474
Video see Video DVD
Video AUX
Setting the picture .........................244
Video DVD
Automatic picture shutoff ..............244
DVD menu ..................................... 248
Fast forward/rewind ...................... 247
Function restrictions ......................246
Interactive content ........................250
Notes on discs ............................... 245
Operation ....................................... 245
Pause function ............................... 247
Playing conditions .......................... 245
Rear Seat Entertainment System ...258
Safety notes .................................. 245
Selecting ........................................ 247
Selecting a film/title ...................... 248
Selecting a scene/chapter ............247
Setting the audio format ................249
Setting the language ......................249
Setting the picture .........................244
Showing/hiding the control menu . 246
Showing/hiding the menu .............246
Stop function ................................. 247
Subtitles ........................................ 249
Switching to ................................... 246
VIN ...................................................... 523Voice Control System
Settings ......................................... 149
Volume, adjusting
COMAND ....................................... 138
Headphones .................................. 146
Navigation messages .....................138
Using the remote control (Rear
Seat Entertainment System) ..........144
W
Waiting call ........................................ 205
Warning and indicator lamps ABS ................................................ 425
Brakes ........................................... 424
Check Engine ................................. 429
Distance warning ........................... 430
DISTRONIC PLUS ........................... 430
ESP ®
.............................................. 426
ESP ®
OFF ....................................... 427
Fuel tank ........................................ 430
Overview .......................................... 38
PASSENGER AIR BAG OFF
indicator lamp .................................. 54
Reserve fuel ................................... 430
Seat belt ........................................ 422
SRS ................................................ 428
Tire pressure monitor ....................431
Warranty ............................................ 523
Washer fluid Display message ............................ 420
Weather Band
Searching for a channel .................218
Switching on .................................. 218
Wheel bolt tightening torque ........... 479
Wheel chock ...................................... 476
Wheels Changing a wheel .......................... 475
Checking ........................................ 493
Cleaning ......................................... 468
Important safety notes ..................492
Interchanging/changing ................515
Mounting a new wheel ...................478
Removing a wheel ..........................478
Storing ........................................... 515
Tightening torque ........................... 479
Wheel size/tire size .......................515
26Index
Page 43 of 536

Center consoleFunctionPage:Function button for the
radio and CD/DVD/SD
card
123
;Back button123=Hazard warning lamps283?Lumbar support274Multicontour seat274AFunction button for the
telephone and navigation
system
155
BSwitches COMAND on/off137FunctionPageCAdjusts the volume138DProgrammable button124ETelephone keypad124FRear window roller sunblind441GRetracts the rear seat head
restraints
111
HSelects the drive program317ICOMAND controller122Center console41At a glance
Page 58 of 536

with the weight of a standard appropriate
child restraint on the front-passenger seat.
R A child in a rear-facing child restraint on the
front-passenger seat will be seriously
injured or even killed if the front-passenger
front air bag inflates in a collision which
could occur under some circumstances,
even with the air bag technology installed
in your vehicle. The only means to eliminate
this risk completely is never to place a child
in a rear-facing child restraint in the front-
passenger seat. We therefore strongly
recommend that you always place a child
in a rear-facing child restraint on the rear
seat.
R If you install a rear-facing child restraint on
the front-passenger seat, make sure the
42 indicator lamp is
illuminated, indicating that the front-
passenger front air bag is deactivated.
Should the 42 indicator lamp
not illuminate or go out while the restraint
is installed, please check installation.
Periodically check the 42
indicator lamp while driving to make sure
the 42 indicator lamp is
illuminated. If the 42 indicator
lamp goes out or remains out, do not
transport a child on the front-passenger
seat until the system has been repaired.
A child in a rear-facing child restraint on the
front-passenger seat will be seriously
injured or even killed if the front-passenger
front air bag inflates.
R If you place a child in a forward-facing child
restraint on the front-passenger seat:
- move the seat as far back as possible
- use the proper child restraint
recommended for the age, size and
weight of the child
- secure child restraint with the vehicle's
seat belt according to the child seat
manufacturer's instructions
R For children larger than a typical 12-month-
old child, the front-passenger front air bag
can be activated or deactivated.If the driver's air bag deploys, this does not
mean that the front-passenger front air bag
will also deploy.
The OCS may have detected that the seat:
R is either empty or occupied by a person
with a weight up to that of a typical twelve-
month-old child seated in a standard child
restraint
R is occupied by a small individual, such as a
young teenager or a small adult
R is occupied by a child in a child restraint
system, whose weight is greater than that
of a typical twelve-month-old child.
These are examples of when the OCS
deactivates the front-passenger front air bag.
Deactivation takes place although the
collision fulfills the criteria for deploying the
driver's air bag.
If the SmartKey has been removed from the
ignition lock or is in position 0,
42 indicator lamp : does not
light up.
GWARNING
If the red SRS 6 indicator lamp in the
instrument cluster and the 42
indicator lamp are lit at the same time, there
is a malfunction in the OCS. The front
passenger front air bag will be deactivated in
this case. Have the system checked by
qualified technicians as soon as possible.
Contact an authorized Mercedes-Benz
Center.
Only have the seat repaired or replaced at an
authorized Mercedes-Benz Center.
56Occupant safetySafety
Page 59 of 536

In order to ensure proper operation of the air
bag system and OCS:
R Sit with the seat belt properly fastened in a
position that is as upright as possible with
your back against the seat backrest.
R When seated, a passenger should not
position him/herself in such a way as to
cause the passenger's weight to be lifted
from the seat cushion as this may result in
the OCS being unable to correctly
approximate the passenger's weight
category.
R Read and observe all warnings in this
chapter.
System self-test
The 42 indicator lamp
illuminates when you:
R turn the SmartKey to position 1 or 2 in the
ignition lock
R press the KEYLESS-GO Start/Stop button
once or twice
If an adult occupant is sitting properly on the
front-passenger seat and the OCS classifies
the occupant as an adult, the
42 indicator lamp will illuminate
and go out again after approximately six
seconds.
If the seat is not occupied and the OCS
classifies the front passenger seat as being
unoccupied, the 42 indicator
lamp will illuminate and not go out.
GWARNING
If the 4 2 indicator lamp does
not illuminate, the system is not functioning.
You must contact an authorized Mercedes-
Benz Center before seating any child on the
front passenger seat.
For more information, see "Problems with the
Occupant Classification System"
( Y page 58).
GWARNING
Never place anything between seat cushion
and child seat (e.g. a pillow), since it reduces
the effectiveness of the OCS. The underside
and rear side child restraint system must be
placed entirely on the seat cushion and the
backrest of the front-passenger seat
backrest.
If necessary, adjust the tilt of the passenger
seat backrest.
An incorrectly mounted child seat could cause
injuries to the child in case of an accident,
instead of increasing protection for the child.
Follow the manufacturer's instructions for
installation of child restraint systems.
Occupant safety57SafetyZ
Page 64 of 536

be replaced and their anchoring points must
also be checked.
Only use seat belts which have been approved
by Mercedes-Benz.
Do not make any modifications to the seat
belts. This can lead to unintended activation
of the ETDs or to their failure to activate when
necessary.
Do not bleach or dye seat belts as this may
severely weaken them. In a crash they may
not be able to provide adequate protection.
Have all work carried out only by qualified
technicians. Contact an authorized
Mercedes-Benz Center.
Correct use of the seat beltsGWARNING
USE SEAT BELTS PROPERLY
R Seat belts can only work when used
properly. Never wear seat belts in any other
way than as described in this section, as
that could result in serious injuries in the
event of an accident.
R Each occupant should wear their seat belt
at all times, because seat belts help reduce
the likelihood of and potential severity of
injuries in accidents, including rollovers.
The integrated restraint system includes
SRS (driver front air bag, front-passenger
front air bag, side impact air bags, window
curtain air bags for the side windows),
Emergency Tensioning Devices, seat belt
force limiters, and front seat knee bolsters.
The system is designed to enhance the
protection offered to properly belted
occupants in certain frontal (front air bags
and ETDs) and side (side impact air bags,
window curtain air bags, and ETDs) impacts
which exceed preset deployment
thresholds and in certain rollovers (window
curtain air bags and ETDs).
R Never wear the shoulder belt under your
arm, across your neck or off your shoulder.
In a frontal crash, your body would move
too far forward. That would increase the
chance of head and neck injuries. The seat
belt would also apply too much force to the
ribs or abdomen, which could severely
injure internal organs such as your liver or
spleen.
Adjust the seat belt so that the shoulder
section is located as close as possible to
the middle of the shoulder. It should not
touch the neck. Never pass the shoulder
portion of the seat belt under your arm. For
this purpose, you can adjust the height of
the seat belt outlet.
R Position the lap belt as low as possible on
your hips and not across the abdomen. If
the lap belt is positioned across your
abdomen, it could cause serious injuries in
a crash.
R Never wear seat belts over rigid or
breakable objects in or on your clothing,
such as eyeglasses, pens, keys etc., as
these might cause injuries.
R Make sure the seat belt is always routed
snugly. Take special care of this when
wearing loose clothing.
R Never use a seat belt for more than one
person at a time. Do not fasten a seat belt
around a person and another person or
other objects at the same time.
R Seat belts should not be worn twisted. In a
crash, you would not have the full width of
the seat belt to distribute impact forces.
The twisted seat belt against your body
could cause injuries.
R Pregnant women should also always use a
lap-shoulder belt. The lap belt portion
should be positioned as low as possible on
the hips to avoid any possible pressure on
the abdomen.
R Place the seat backrest in a position that is
as upright as possible.
R Check your seat belt during travel to make
sure it is properly positioned.
R Never place your feet on the instrument
panel, dashboard, or on the seat. Always62Occupant safetySafety
Page 66 of 536
For more information about releasing the seat
belt with release button ?, see "Releasing
seat belts" ( Y page 64).
Seat belt adjustment
The seat-belt adjustment function adjusts the
driver's and front-passenger seat belt to the
upper body of the occupants.
The belt strap is tightened slightly when:
R you engage the belt tongue in the belt
buckle and you then turn the SmartKey to
position 2 in the ignition lock.
R the SmartKey is in position 2 in the ignition
lock and you then engage the belt tongue
in the buckle.
The seat-belt adjustment will apply a
retraction force if any slack is detected
between the occupant and the seat belt. Do
not hold on to the seat belt tightly while it is
adjusting. You can switch the seat-belt
adjustment on and off in the on-board
computer ( Y page 388).
The seat-belt adjustment is an integral part of
the PRE-SAFE ®
convenience function. More
information about PRE-SAFE ®
can be found
in the "PRE-SAFE ®
(preventative occupant
protection)" section ( Y page 59).
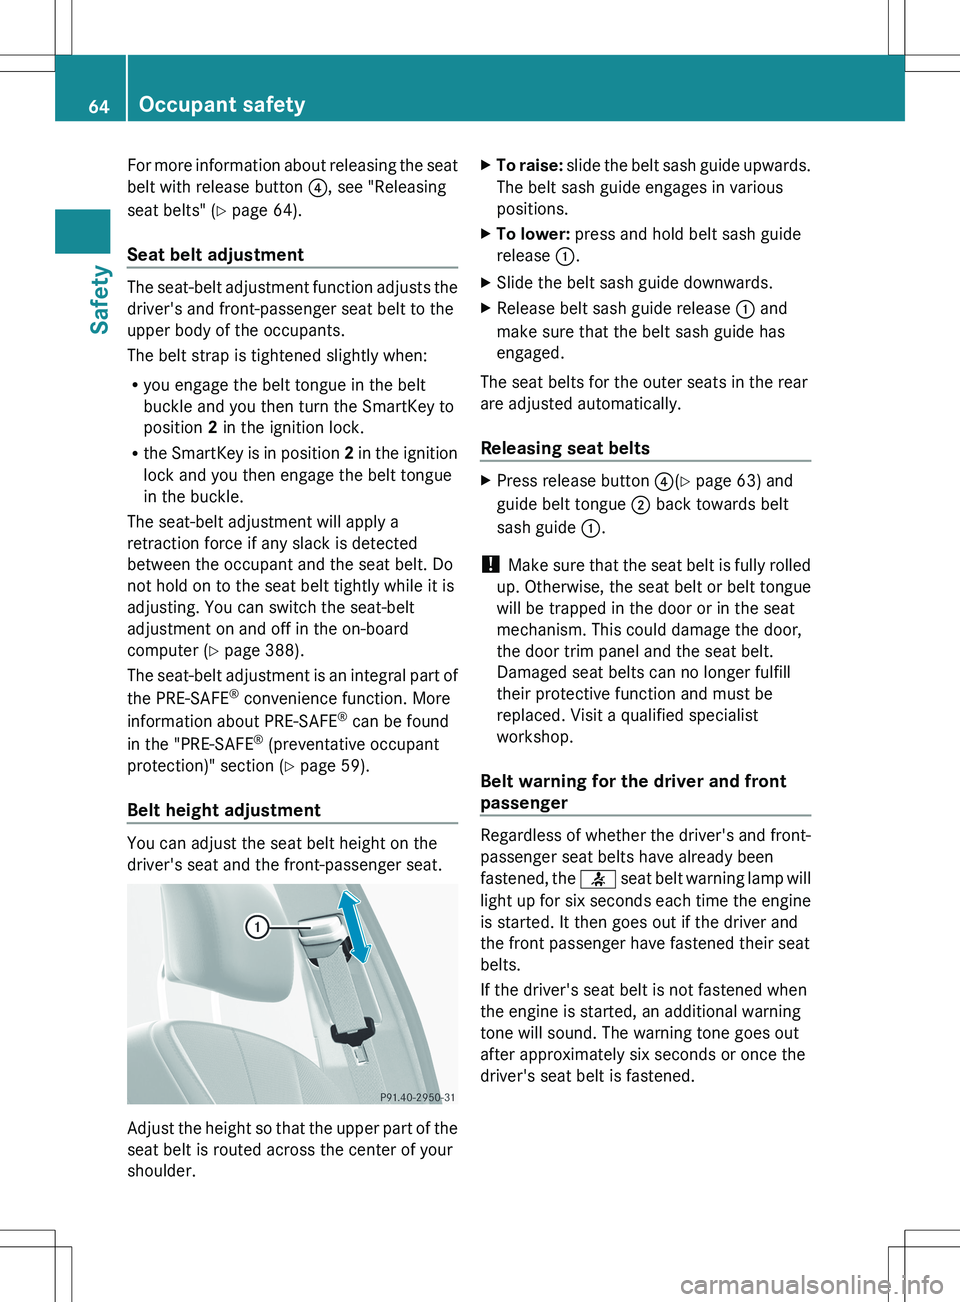
Belt height adjustment
You can adjust the seat belt height on the
driver's seat and the front-passenger seat.
Adjust the height so that the upper part of the
seat belt is routed across the center of your
shoulder.
XTo raise: slide the belt sash guide upwards.
The belt sash guide engages in various
positions.XTo lower: press and hold belt sash guide
release :.XSlide the belt sash guide downwards.XRelease belt sash guide release : and
make sure that the belt sash guide has
engaged.
The seat belts for the outer seats in the rear
are adjusted automatically.
Releasing seat belts
XPress release button ?(Y page 63) and
guide belt tongue ; back towards belt
sash guide :.
!
Make sure that the seat belt is fully rolled
up. Otherwise, the seat belt or belt tongue
will be trapped in the door or in the seat
mechanism. This could damage the door,
the door trim panel and the seat belt.
Damaged seat belts can no longer fulfill
their protective function and must be
replaced. Visit a qualified specialist
workshop.
Belt warning for the driver and front
passenger
Regardless of whether the driver's and front-
passenger seat belts have already been
fastened, the 7 seat belt warning lamp will
light up for six seconds each time the engine
is started. It then goes out if the driver and
the front passenger have fastened their seat
belts.
If the driver's seat belt is not fastened when
the engine is started, an additional warning
tone will sound. The warning tone goes out
after approximately six seconds or once the
driver's seat belt is fastened.
64Occupant safetySafety
Page 70 of 536

GWARNING
When leaving the vehicle, always remove the
SmartKey from the ignition lock. Always take
the SmartKey with you and lock the vehicle.
Do not leave children unattended in the
vehicle, even if they are secured in a child
restraint system, or with access to an
unlocked vehicle. A child's unsupervised
access to a vehicle could result in an accident
and/or serious personal injury. The children
could:
R injure themselves on parts of the vehicle
R be seriously or fatally injured through
excessive exposure to extreme heat or cold
R injure themselves or cause an accident with
vehicle equipment that can be operated
even if the SmartKey is removed from the
ignition lock or removed from the vehicle,
such as seat adjustment, steering wheel
adjustment, or the memory function
If children open a door, they could injure other
persons or get out of the vehicle and injure
themselves or be injured by following traffic.
Do not expose the child restraint system to
direct sunlight. The child restraint system's
metal parts, for example, could become very
hot, and the child could be burned on these
parts.
GWARNING
Do not carry heavy or hard objects in the
passenger compartment or trunk unless they
are firmly secured in place.
Unsecured or improperly positioned cargo
increases a child's risk of injury in the event
of
R strong braking maneuvers
R sudden changes of direction
R an accident
Special seat belt retractor
All seat belts except the driver's seat belt are
equipped with a special seat belt retractor.
When activated, the special seat belt
retractor ensures the seat belt will not
slacken once the child restraint system has
been secured.
Installing a child restraint system:XAlways comply with the manufacturer's
installation instructions.XPull the seat belt smoothly from the inertia
reel.XEngage the seat belt tongue in the belt
buckle.
Activating the special seat belt retractor:
XPull the seat belt out fully and let the inertia
reel retract it again.
While the seat belt is retracting, you should
hear a ratcheting sound. The special seat
belt retractor is enabled.XPush down on the child restraint system to
take up any slack.
Removing a child restraint system/
deactivating the special seat belt retractor:
XAlways comply with the manufacturer's
installation instructions.XPress the seat belt release button and
guide the belt tongue to the belt outlet.
The special seat belt retractor is
deactivated.GWARNING
Never release the seat belt buckle while the
vehicle is in motion, since the special seat belt
retractor will be deactivated.
LATCH-type (ISOFIX) child seat anchors
in the rear
GWARNING
Children that are too large for a child restraint
must travel in seats using normal seat belts.
Position shoulder belt across the chest and
shoulder, not face or neck.
A booster seat may be necessary to achieve
proper seat belt positioning for children over
41 lb (18 kg) until they reach a height where
68Children in the vehicleSafety