MERCEDES-BENZ SL-Class 2001 R129 Manual PDF
Manufacturer: MERCEDES-BENZ, Model Year: 2001, Model line: SL-Class, Model: MERCEDES-BENZ SL-Class 2001 R129Pages: 302, PDF Size: 7.21 MB
Page 71 of 302
67 Restraint systems
Te ch n ica l
data Instruments
and controlsOperationDrivingInstrument
cluster displayPractical hints Car care Index Safety guidelines for the seat belt, emergency
tensioning retractor and airbag
Wa r n i n g !
• Damaged seat belts or belts that were highly
stressed in an accident must be replaced and
their anchoring points must also be checked.
Use only belts installed or supplied by an
authorized Mercedes-Benz Center.• Do not pass belts over sharp edges.• Do not make any modification that could
change the effectiveness of the belts.• Airbags and ETR’s are designed to function on
a one-time-only basis. An airbag or emergency
tensioning retractor (ETR) that was activated
must be replaced.
• No modifications of any kind may be made to
any components or wiring of the “SRS”. This
includes changing or removing any component
or part of the “SRS”, the installation of
additional trim material, badges etc. over the
steering wheel hub, passenger airbag cover, or
door trim panels, and installation of additional
electrical/electronic equipment on or near
“SRS” components and wiring. Keep area
between airbags and occupants free of objects
(e.g. packages, purses, umbrellas, etc.).• An airbag system component within the
steering wheel gets hot after the airbag has
inflated. Do not touch.• Improper work on the system, including
incorrect installation and removal, can lead to
possible injury through an unintended
activation of the “SRS”.• In addition, through improper work there is
the risk of rendering the “SRS” inoperative or
causing unintended airbag deployment. Work
on the “SRS” must therefore only be performed
by an authorized Mercedes-Benz Center.
Page 72 of 302
68 Restraint systems
Te ch n ica l
data Instruments
and controlsOperationDrivingInstrument
cluster displayPractical hints Car care Index
When you sell the vehicle we strongly urge you to give
notice to the subsequent owner that it is equipped with
an “SRS” by alerting him to the applicable section in the
Operator’s Manual.Infant and child restraint systems
Use only a BabySmart
TM compatible child restraint in
this vehicle.
We recommend that all infants and children be properly
restrained at all times while the vehicle is in motion.
The passenger lap-shoulder belt has a special seat belt
retractor for secure fastening of a child restraint.
To fasten a child restraint follow child restraint
instructions for routing. Then pull shoulder belt out
completely. Slide switch located on side of passenger
seat to position N. Let the belt retract. During the
seat belt retraction a ratcheting sound can be heard to
indicate that the special seat belt retractor is activated.
The belt is now locked. Push down on child restraint to
take up any slack.
To deactivate, release seat belt buckle and let seat belt
retract completely. The seat belt can again be used in
the usual manner.
• For your protection and the protection of
others, when scrapping the airbag unit or
emergency tensioning retractor, our safety
instructions must be followed. These
instructions are available at your authorized
Mercedes-Benz Center.• Given the considerable deployment speed and
the textile structure of the airbags, there is the
possibility abrasions or other injuries
resulting from airbag deployment.
Wa r n i n g !
Never release the seat belt buckle while vehicle is
in motion, since the special seat belt retractor will
be deactivated.
Page 73 of 302
69 Restraint systems
Te ch n ica l
data Instruments
and controlsOperationDrivingInstrument
cluster displayPractical hints Car care Index Important!
The use of infant or child restraints is required by law in
all 50 states and all Canadian provinces.
Infants and small children should be seated in an
appropriate infant or child restraint system properly
secured by a lap-shoulder belt, and that complies with
U.S. Federal Motor Vehicle Safety Standard 213 and
Canadian Motor Vehicle Safety Standard 213.
A statement by the child restraint manufacturer of
compliance with this standard can be found on the
instruction label on the restraint and in the instruction
manual provided with the restraint.
When using any infant or child restraint system, be sure
to carefully read and follow all manufacturer’s
instructions for installation and use.
Please read and observe warning labels affixed to inside
of vehicle and to infant or child restraints.
U.S.A. Mod els only:
Since 1986 all U.S. child restraints comply with
U.S. regulations without the use of a tether strap.
Wa r n i n g !
Children 12 years old and under must never ride in
this vehicle, except in a Mercedes-Benz authorized
BabySmart
TM compatible child seat, which operates
with the BabySmart
TM system installed in the
vehicle to deactivate the passenger front airbag
when it is properly installed. Otherwise they will
be struck by the airbag when it inflates in a crash.
If this happens, serious or fatal injury can result.
Infants and small children must be seated in an
appropriate infant or child restraint system, which
is properly secured with the vehicle’s seat belt,
fully in accordance with the child seat
manufacturer’s instructions.Infants and small children should never share a
seat belt with another occupant. During an
accident, they could be crushed between the
occupant and seat belt.When the child restraint is not in use, remove it
from the vehicle or secure it with the seat belt to
prevent the child restraint from becoming a
projectile in the event of an accident.
Page 74 of 302
70 Adjusting steering column
Te ch n ica l
data Instruments
and controlsOperationDrivingInstrument
cluster displayPractical hints Car care Index
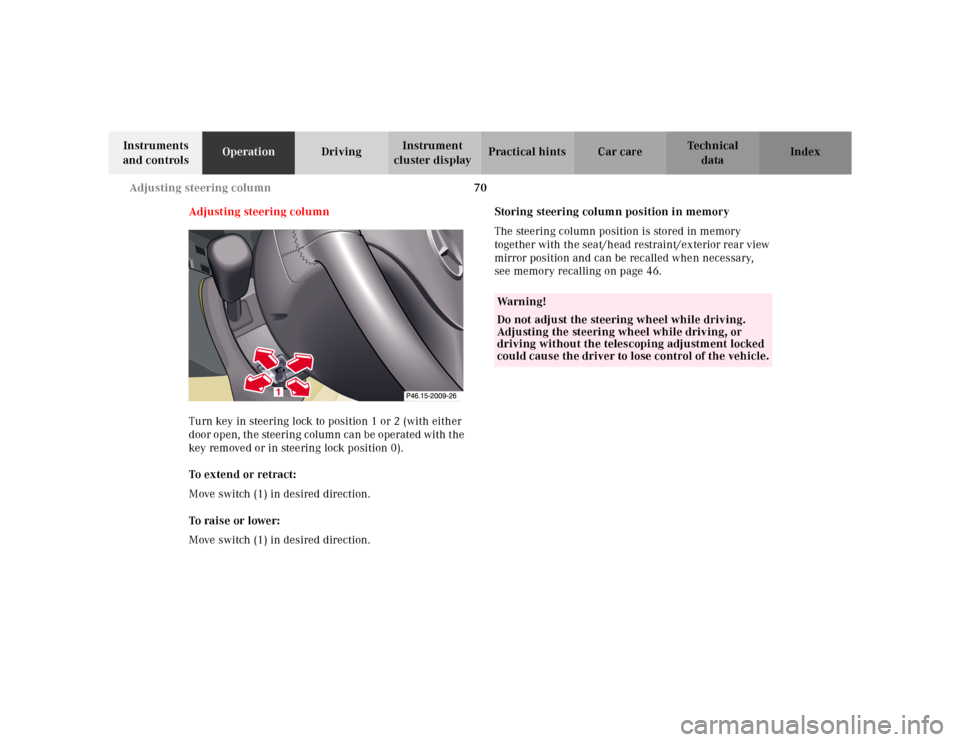
Adju st in g steerin g c olu mn
Turn key in steering lock to position 1 or 2 (with either
door open, the steering column can be operated with the
key removed or in steering lock position 0).
To extend or retract:
Move switch (1) in desired direction.
To raise or lower:
Move switch (1) in desired direction.Storing steering column position in memory
The steering column position is stored in memory
together with the seat/head restraint/exterior rear view
mirror position and can be recalled when necessary,
see memory recalling on page 46.
Wa r n i n g !
Do not adjust the steering wheel while driving.
Adjusting the steering wheel while driving, or
driving without the telescoping adjustment locked
could cause the driver to lose control of the vehicle.
Page 75 of 302
71 Rear view mirrors
Te ch n ica l
data Instruments
and controlsOperationDrivingInstrument
cluster displayPractical hints Car care Index Rear view mirrors
Inside rear view mirror
Manually adjust the mirror.
Use your inside mirror to determine the size and
distance of objects seen in the passenger side convex
mirror.
Antiglare night position
With the key in steering lock position 2, the mirror
reflection brightness responds to changes in light
sensitivity.
With gear selector lever in position “R”, or with the
interior lamp switched on, the mirror brightness does
not respond to changes in light sensitivity.Note:
The automatic antiglare function does not react, if
incoming light is not aimed directly at sensors in the
mirror.
Wa r n i n g !
In the case of an accident liquid electrolyte may
escape the mirror housing when the mirror glass
breaks.Electrolyte has an irritating effect. Do not allow the
liquid come into contact with eyes, skin, clothing,
or respiratory system. In cases it does, immediately
flush affected area with water, and seek medical
help if necessary.
Page 76 of 302
72 Rear view mirrors
Te ch n ica l
data Instruments
and controlsOperationDrivingInstrument
cluster displayPractical hints Car care Index
Exterior rear view mirrors
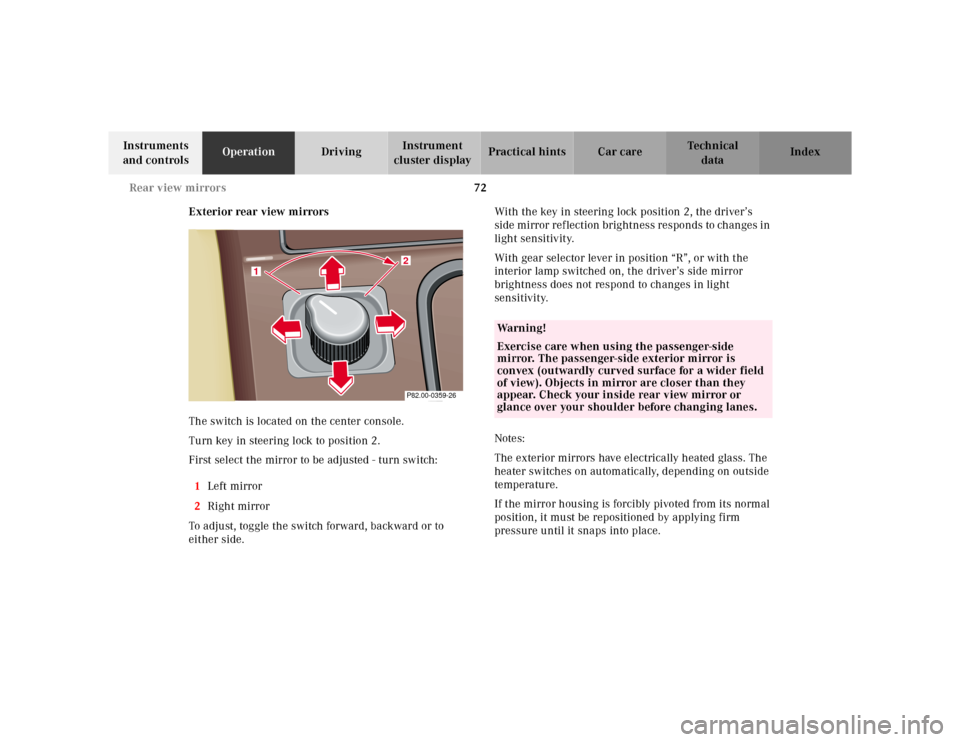
The switch is located on the center console.
Turn key in steering lock to position 2.
First select the mirror to be adjusted - turn switch:
1Left mirror
2Right mirror
To adjust, toggle the switch forward, backward or to
either side.With the key in steering lock position 2, the driver’s
side mirror reflection brightness responds to changes in
light sensitivity.
With gear selector lever in position “R”, or with the
interior lamp switched on, the driver’s side mirror
brightness does not respond to changes in light
sensitivity.
Notes:
The exterior mirrors have electrically heated glass. The
heater switches on automatically, depending on outside
temperature.
If the mirror housing is forcibly pivoted from its normal
position, it must be repositioned by applying firm
pressure until it snaps into place.
2
1
P82.00-0359-26
Wa r n i n g !
Exercise care when using the passenger-side
mirror. The passenger-side exterior mirror is
convex (outwardly curved surface for a wider field
of view). Objects in mirror are closer than they
appear. Check your inside rear view mirror or
glance over your shoulder before changing lanes.
Page 77 of 302
73 Rear view mirrors
Te ch n ica l
data Instruments
and controlsOperationDrivingInstrument
cluster displayPractical hints Car care Index Important!
Electrolyte drops coming into contact with the vehicle
paint finish can only be completely removed while in
their liquid state, by applying plenty of water.Storing mirror positions in memory
The exterior rear view mirror positions are stored in
memory with the seat/head restraint/steering column
position and can be recalled when necessary,
see memory recalling on page 46.
Wa r n i n g !
In the case of an accident liquid electrolyte may
escape the mirror housing when the mirror glass
breaks.Electrolyte has an irritating effect. Do not allow the
liquid come into contact with eyes, skin, clothing,
or respiratory system. In cases it does, immediately
flush affected area with water, and seek medical
help if necessary.
Page 78 of 302

74 Instrument cluster
Te ch n ica l
data Instruments
and controlsOperationDrivingInstrument
cluster displayPractical hints Car care Index
Instrument cluster
Page 79 of 302
75 Instrument cluster
Te ch n ica l
data Instruments
and controlsOperationDrivingInstrument
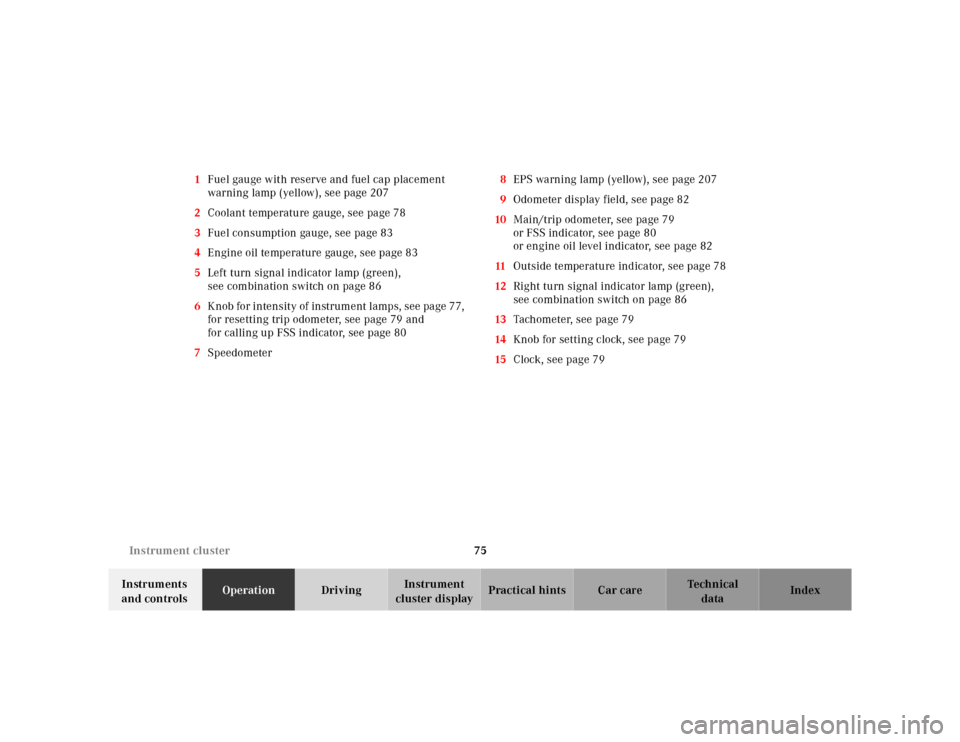
cluster displayPractical hints Car care Index 1Fuel gauge with reserve and fuel cap placement
warning lamp (yellow), see page 207
2Coolant temperature gauge, see page 78
3Fuel consumption gauge, see page 83
4Engine oil temperature gauge, see page 83
5Left turn signal indicator lamp (green),
see combination switch on page 86
6K nob for intensity of instrum ent l amps, see pa ge 77,
for resetting trip odometer, see page 79 and
for calling up FSS indicator, see page 80
7Speedometer8EPS warning lamp (yellow), see page 207
9Odometer display field, see page 82
10Main/trip odometer, see page 79
or FSS indicator, see page 80
or engine oil level indicator, see page 82
11Outside temperature indicator, see page 78
12Right turn signal indicator lamp (green),
see combination switch on page 86
13Tachometer, see page 79
14Knob for setting clock, see page 79
15Clock, see page 79
Page 80 of 302
76 Instrument cluster
Te ch n ica l
data Instruments
and controlsOperationDrivingInstrument
cluster displayPractical hints Car care Index
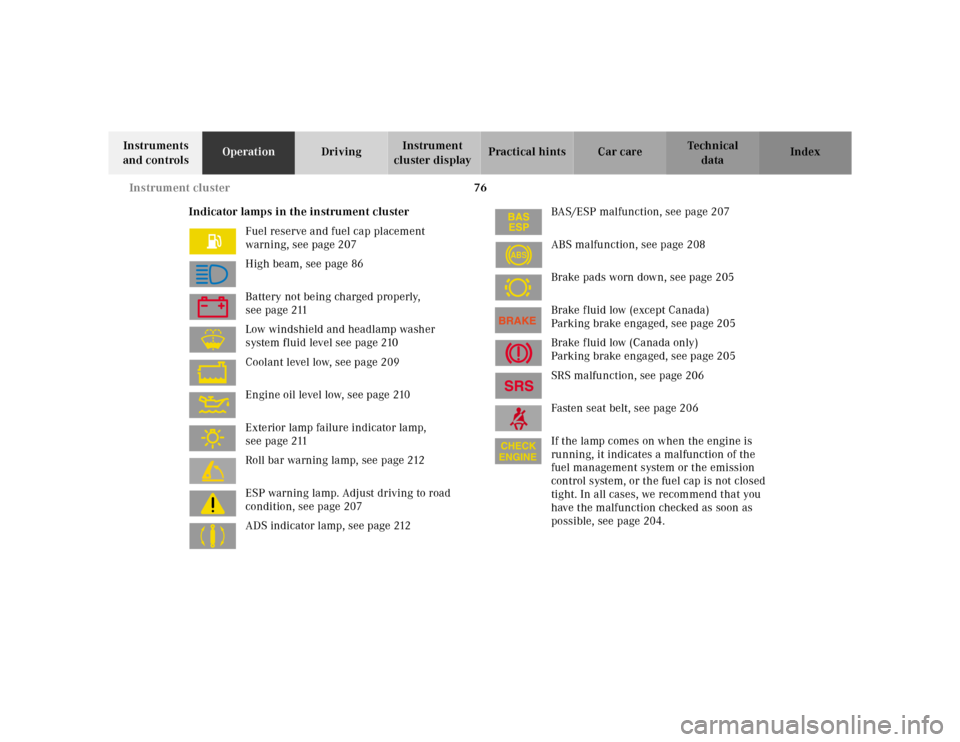
Indicator lamps in the instrument cluster
Fuel reserve and fuel cap placement
warning, see page 207
High beam, see page 86
Battery not being charged properly,
see page 211
Low windshield and headlamp washer
system fluid level see page 210
Coolant level low, see page 209
Engine oil level low, see page 210
Exterior lamp failure indicator lamp,
see page 211
Roll bar warning lamp, see page 212
ESP warning lamp. Adjust driving to road
condition, see page 207
ADS indicator lamp, see page 212BAS/ESP malfunction, see page 207
ABS malfunction, see page 208
Brake pads worn down, see page 205
Brake fluid low (except Canada)
Parking brake engaged, see page 205
Brake fluid low (Canada only)
Parking brake engaged, see page 205
SRS malfunction, see page 206
Fasten seat belt, see page 206
If the lamp comes on when the engine is
running, it indicates a malfunction of the
fuel management system or the emission
control system, or the fuel cap is not closed
tight. In all cases, we recommend that you
have the malfunction checked as soon as
possible, see page 204.
ABS