key MERCEDES-BENZ SL-Class 2013 R131 Owner's Manual
[x] Cancel search | Manufacturer: MERCEDES-BENZ, Model Year: 2013, Model line: SL-Class, Model: MERCEDES-BENZ SL-Class 2013 R131Pages: 590, PDF Size: 9.73 MB
Page 464 of 590
Malfunction messages appearw
hile the
device is being activated if:
R the connected device is not supported
(External Device Unavailable message).
R the connected device consumes too much
power.
R the Media Interface connection is faulty.
R a mass storage device (e.g. a USB memory
stick or USB hard drive) is connected to the
Media Interface.
In this case the Please connect the device to the other USB port
message appears.
i The separate USB connection ensures
quick access and expanded media content
options.
i Consult an authorized Mercedes-Benz
Center if you have further questions.
Switching to Media Interface mode General notes
In extreme cases, starting up individual
functions can take up to several minutes –
this depends on the external device and its
content (e.g. video podcasts).
Only use the original software to save files on
iPods
®
or MP3 players. Otherwise, some or
all functions may not be available.
Switching on automatically
X Connect an external device (Y page 461).
COMAND activates the device (if
connected via iPod ®
connector or USB
socket). Afterwards, the basic display
appears.
Switching modes using the function
button
The external device is connected to the Media
Interface.
X Press the 0009function button one or more
times. By pressing the function button repeatedly,
you can change the operating mode in the
following order:
R
CD/audio DVD/MP3 (disc)
R Memory card mode
R MUSIC REGISTER
R USB storage device
R Media Interface or audio AUX mode
R Bluetooth ®
audio mode
Switching on using anumber key
X Press the 001Enumber key (for a DVD
changer) or the 002Fnumber key (for a
single DVD drive) numbe rkey.
This selects the connected external audio
device directly.
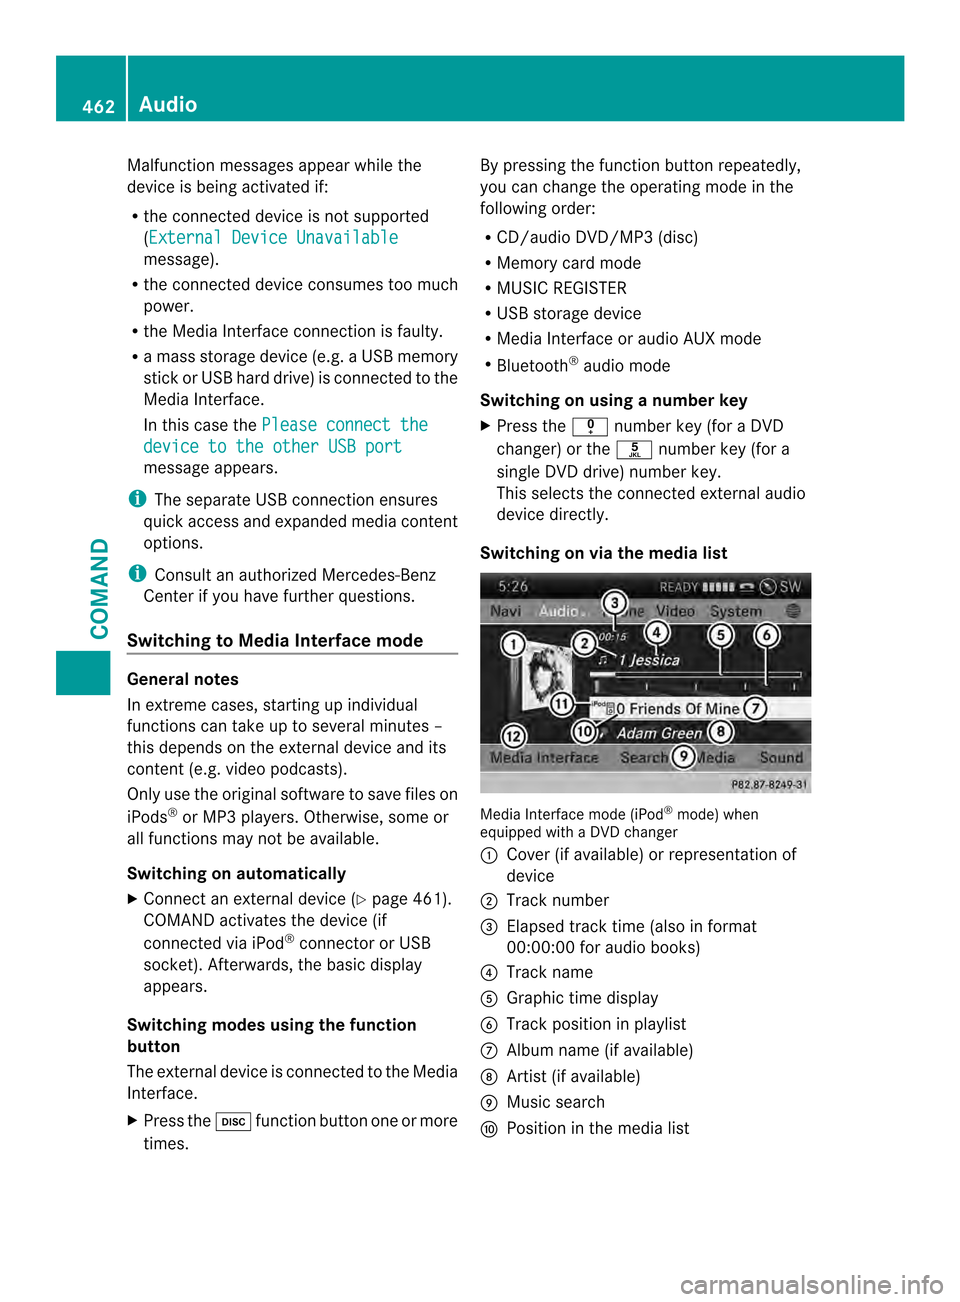
Switching on via the media list Media Interface mode (iPod
®
mode) when
equipped with a DVD changer
0002 Cover (if available) or representation of
device
0003 Track number
0027 Elapsed trac ktime (also in format
00:00:00 for audio books)
0026 Track name
0024 Graphic time display
0025 Trac kposition in playlist
0016 Album name (if available)
0017 Artist (if available)
0018 Music search
0019 Position in the media list 462
AudioCOMAND
Page 465 of 590
001A
Type of data medium
001D Playback options
X Select the entry under position 0 (DVD
changer) or position 5(single DVD drive) in
the media list by turning 003E0012003Fthe COMAND
controller and press 0039to confirm
(Y page 441).
COMAND activates the connected device.
You will see a message to this effect. The
basic display then appears.
If no device is connected, you will see the
Media Interface entry instead of a
device name.
The type of device connected is indicated by
the corresponding symbol for iPod ®
(iPhone ®
) or MP3 player.
The current playback option is shown with a
symbol after the albumn ame (no display for
Normal Track Sequence ) (Y
page 466).
i If the device connected does not contain
any playable tracks, a message appears to
this effect.
Selecting music files Note
COMAND displays the data stored on the
iPod ®
, iPhone ®
or MP3 player according to
the file structure used in the respective
medium.
Selecting by skipping to atrack
X To skip forwards or back to a track: turn
003E0012003F the COMAND controller when the
display/selectio nwindow is active.
or
X Press the 0001or0002 button.
The skip forward function skips to the next
track. The skip back function skips to the
beginning of the current track if the track
has been playing for more than eight
seconds .Ifthe track has been playing for
less than eight seconds, it skips to the start
of the previous track.Ify ou have selected
a playback option other than Normal Track Sequence , the track sequence is
random.
Selecting using the number keypad
X To makeane ntry:press the 000Fbutton.
An input menu appears. The number of
characters available for input depends on
the number of stored tracks.
X To enter a track number: press a number
key, e.g. 0031.
The digit is entered in the first position in
the input line.
i COMAND will ignore and not display an
invalid digit.
X Enter more numbers if desired.
The trac kplays after the last possible
number is entered.
i Pressing and holding a number key for
more than two seconds completes the
entry, and the corresponding track is
played.
Fast forwarding/rewinding
X While the display/selection window is
active, slide 003600120037and hold the COMAND
controller until the desire dposition has
been reached.
or
X Press and hold the 0002or0001 button
until the desired position is reached.
i On an iPod ®
or iPhone ®
, fast rewind only
functions within the current track.
Selecting acategory/playlist/folder Overview
For an iPod
®
, iPhone ®
or certai nMP3 players,
you can select tracks using categories or
folders.
Depending on the device connected, the
following categories may be available, for
example:
R Current Tracklist R
Select By Cover R
Keyword Search Audio
463COMAND Z
Page 466 of 590
R
Playlists (e.g.
All )
R Artists R
Albums R
Tracks R
Podcasts R
Genres R
Composers R
Audiobooks R
Videos i
Some playback categories contain the
entry All .Ift
his entry has been selected,
the entire content of the category selected
will be played.
The Videos category is available for
iPods ®
and iPhones ®
.
i The functions are available as soon as the
entire media content has been read and
analyzed. For certain functions, such as
keyword search and selection by cover, this
can take several minutes, depending on the
scope of media and the connected device.
If the same device is reconnected with
unchanged media content, these functions
are available much more quickly.
However, if you change the media content,
it has to be read and analyzed again. Calling up
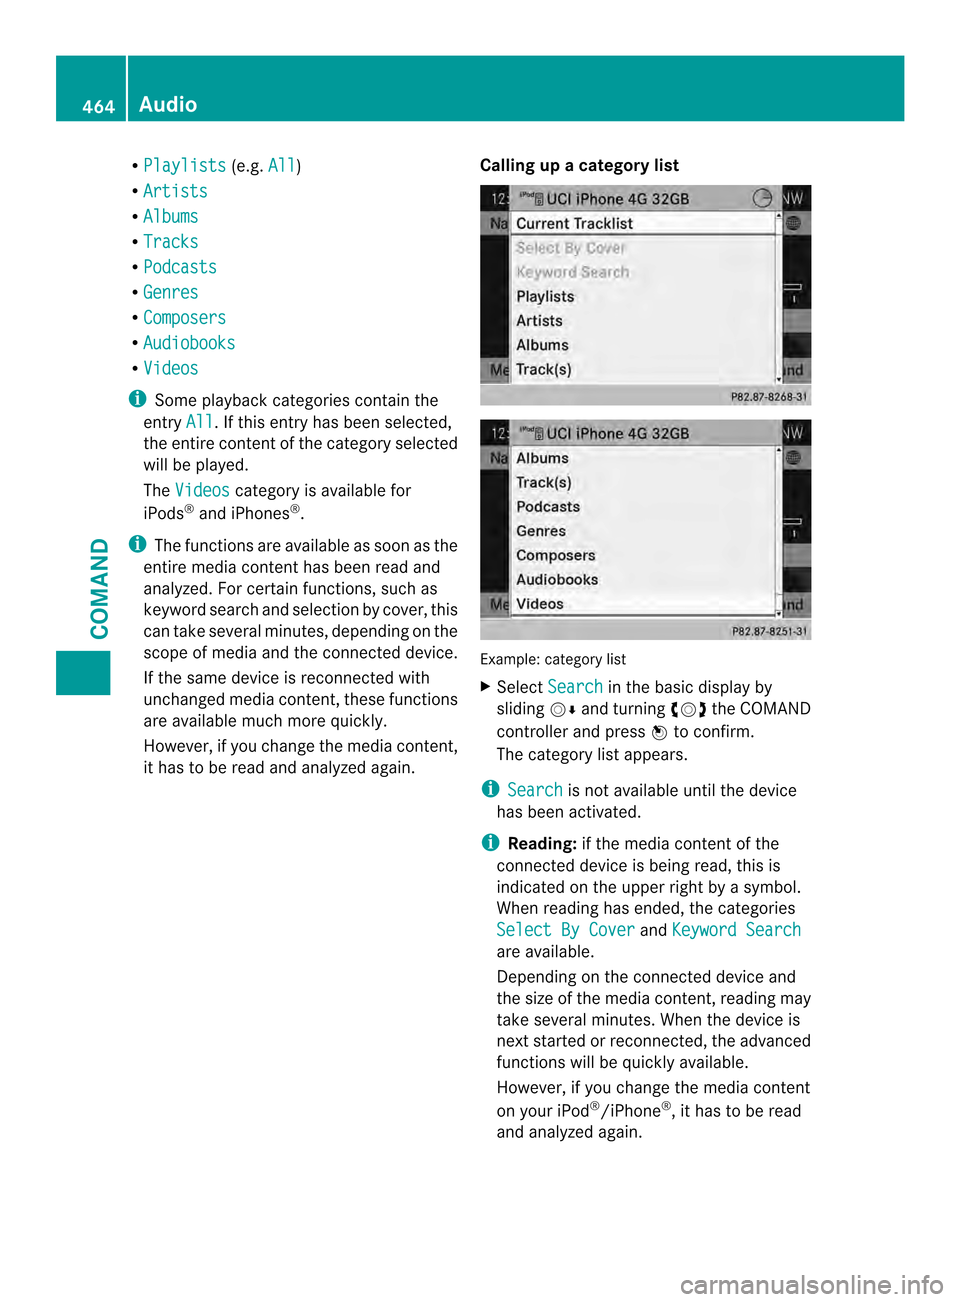
acategory list Example: category list
X
Select Search in the basic display by
sliding 0012000Aand turning 003E0012003Fthe COMAND
controlle rand press 0039to confirm.
The category list appears.
i Search is not available until the device
has been activated.
i Reading: if the media content of the
connected device is being read, this is
indicated on the uppe rright by a symbol.
When reading has ended, the categories
Select By Cover and
Keyword Search are available.
Depending on the connected device and
the size of the media content, reading may
take several minutes. When the device is
nex
tstarted or reconnected, the advanced
functions will be quickly available.
However, if you change the media content
on your iPod ®
/iPhone ®
, it has to be read
and analyzed again. 464
AudioCOMAND
Page 467 of 590
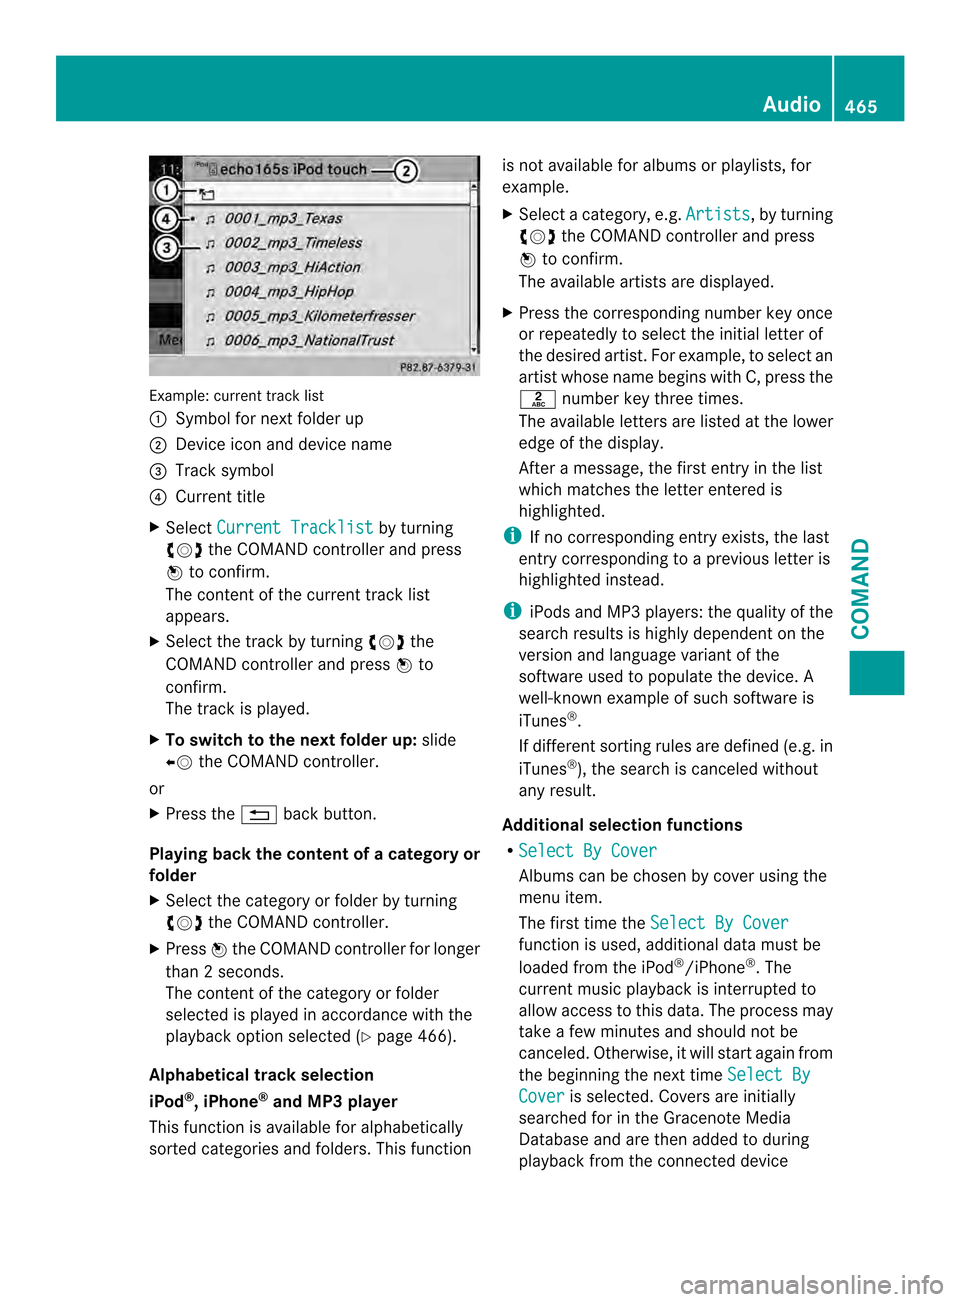
Example: current track list
0002
Symbol for next folder up
0003 Device icon and device name
0027 Track symbol
0026 Current title
X Select Current Tracklist by turning
003E0012003F the COMAND controller and press
0039 to confirm.
The content of the current track list
appears.
X Select the track by turning 003E0012003Fthe
COMAND controller and press 0039to
confirm.
The trac kis played.
X To switch to the next folder up: slide
00360012 the COMAND controller.
or
X Press the 001Fback button.
Playing back the content of a category or
folder
X Select the category or folder by turning
003E0012003F the COMAND controller.
X Press 0039the COMAND controller for longer
than 2seconds.
The contentoft he category or folder
selected is played in accordance with the
playback option selected (Y page 466).
Alphabetical track selection
iPod ®
,i Phone ®
and MP3 player
This function is available for alphabetically
sorted categories and folders. This function is not available for albums or playlists, for
example.
X
Select a category, e.g. Artists , by turning
003E0012003F the COMAND controller and press
0039 to confirm.
The available artists are displayed.
X Press the corresponding number key once
or repeatedly to select the initial letter of
the desired artist. For example, to select an
artist whose name begins with C, press the
002D number key three times.
The available letters are listed at the lower
edge of the display.
After a message, the first entry in the list
which matches the letter entered is
highlighted.
i If no corresponding entry exists, the last
entry corresponding to aprevious letter is
highlighted instead.
i iPods and MP3 players :the quality of the
search results is highly dependent on the
version and language variant of the
software used to populate the device. A
well-known example of such software is
iTunes ®
.
If different sorting rules are defined (e.g. in
iTunes ®
), the search is canceled without
any result.
Additional selection functions
R Select By Cover Albums can be chosen by cover using the
menu item.
The first time the
Select By Cover function is used, additional data must be
loaded from the iPod
®
/iPhone ®
.T he
current music playback is interrupted to
allow access to this data. The process may
take a few minutes and should not be
canceled. Otherwise, it will start again from
the beginning the next time Select By Cover is selected. Covers are initially
searched for in the Gracenote Media
Database and are then added to during
playback from the connected device Audio
465COMAND Z
Page 468 of 590
(Y
page 444). The availability depends on
the use and the tracks already selected.
R Keyword Search Selecting keyword search allows you to
search through all categories on the
connected device for keywords.
i For more information on Select ByCover and
Keyword Search can be found
under "Music search, selecting category"
(Y page 463).
i For an iPod ®
/iPhone ®
, the available
covers are added most efficiently if the
entire media content is in the current
playlist. This is the case if you have selected
the playback option Tracks or
Random Medium (Y
page 466).
Playback options X
To select a playback option: select
Media Interface in the basic display by
sliding 0012000Aand turning 003E0012003Fthe COMAND
controller and press 0039to confirm.
The options list appears. The 0021dot
indicates the option selected.
X Select an option and press 0039to confirm.
The following options are available:
R Normal Track Sequence Normal trac
ksequence: you hear the
tracks in their normal order (e.g. numerical
or alphabetical).
R Random Medium All the tracks on the medium are played in
random order.
R Random Track List The tracks in the currently active category
or folder, including any subfolders, are
played in random order. MP3 player instructions General information
Up to 30,000 tracks per medium are
supported.
You can speed up some functions and
improve the search results by:
R
making sure the names of tracks, albums
and artists, for example, are written the
same way
R labeling albums featuring various artists as
"compilations"
i Multiple entries of tracks in playlists are
filtered out for some players.
Data formats
MP3 and WMA are supported as data formats
with fixed and variable bit rates (up to
320 kbits/s).
Special considerations when using MP3
players
Up to eight directory levels with up to 1,000
tracks per directory are supported.
Do not use USB extension leads or adapters.
They can impair functionality.
i DRM (Digital Rights Management)
protected files are not supported by the
Media Interface. Audio AUX mode
Notes on audio AUX mode G
WARNING
External audio sources may have different
volumes, which can mean that system
messages such as traffic announcements and
navigation system announcements are much
louder. If necessary, please deactivate the
system messages or adjust their volume
manually.
You can connect an external audio source
(AUX) to COMAND. You will find the socket in
the center console stowage compartment. 466
AudioCOMAND
Page 482 of 590
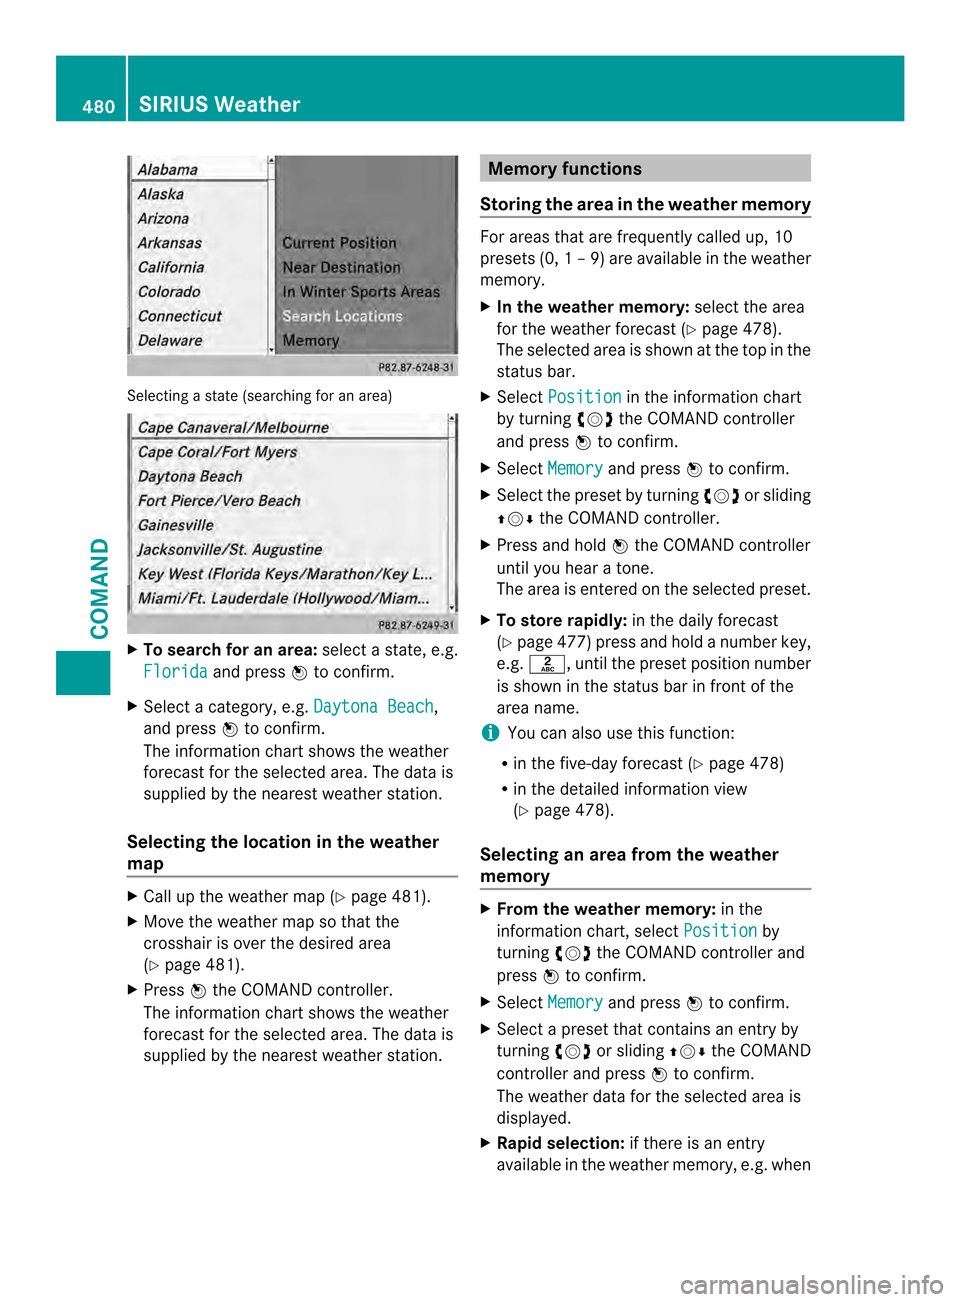
Selecting a state (searching for an area)
X
To search for an area: select a state, e.g.
Florida and press
0039to confirm.
X Select a category, e.g. Daytona Beach ,
and press 0039to confirm.
The information chart shows the weather
forecas tfor the selected area. The data is
supplied by the nearest weather station.
Selecting the location in the weather
map X
Call up the weather map (Y page 481).
X Move the weather map so that the
crosshair is over the desired area
(Y page 481).
X Press 0039the COMAND controller.
The information chart shows the weather
forecast for the selected area. The data is
supplied by the nearest weather station. Memory functions
Storing the area in the weather memory For areas that are frequently called up, 10
presets (0,
1–9) are available in the weather
memory.
X In the weather memory: select the area
for the weather forecast (Y page 478).
The selected area is shown at the top in the
status bar.
X Select Position in the information chart
by turning 003E0012003Fthe COMAND controller
and press 0039to confirm.
X Select Memory and press
0039to confirm.
X Selec tthe preset by turning 003E0012003For sliding
00380012000A the COMAND controller.
X Press and hold 0039the COMAND controller
until you hear a tone.
The area is entered on the selected preset.
X To store rapidly: in the daily forecast
(Y page 477) press and hold a number key,
e.g. 002D, until the preset position number
is shown in the status bar in front of the
area name.
i You can also use this function:
R in the five-day forecast (Y page 478)
R in the detailed information view
(Y page 478).
Selecting an area from the weather
memory X
From the weather memory: in the
information chart, select Position by
turning 003E0012003Fthe COMAND controller and
press 0039to confirm.
X Select Memory and press
0039to confirm.
X Select a preset that contains an entry by
turning 003E0012003For sliding 00380012000Athe COMAND
controller and press 0039to confirm.
The weather data for the selected area is
displayed.
X Rapid selection: if there is an entry
available in the weather memory, e.g. when 480
SIRIUS WeatherCOMAND
Page 483 of 590
the daily forecast is shown, briefly press a
numbe rkey, such as 002D.
The weather data for the selected area is
displayed. Weather map
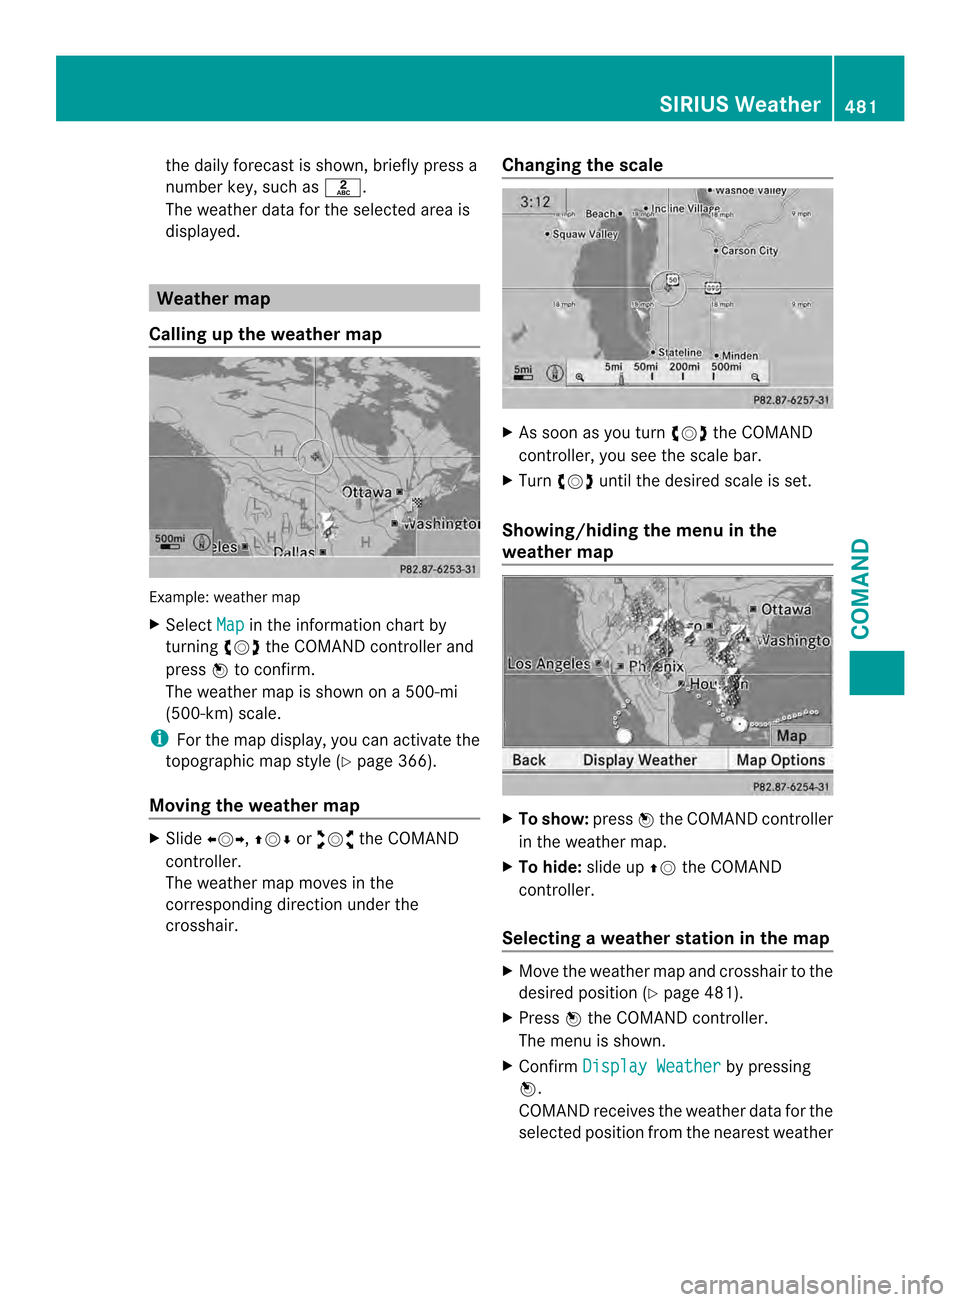
Calling up the weather map Example: weather map
X
Select Map in the information chart by
turning 003E0012003Fthe COMAND controller and
press 0039to confirm.
The weather map is shown on a 500-mi
(500-km) scale.
i For the map display, you can activate the
topographic map style (Y page 366).
Moving the weather map X
Slide 003600120037, 00380012000Aor00340012003D the COMAND
controller.
The weather map moves in the
corresponding direction under the
crosshair. Changing the scale X
As soon as you turn 003E0012003Fthe COMAND
controller, you see the scale bar.
X Turn 003E0012003F until the desired scale is set.
Showing/hiding the menu in the
weather map X
To show: press0039the COMAND controller
in the weather map.
X To hide: slide up00380012the COMAND
controller.
Selecting a weather station in the map X
Move the weather map and crosshair to the
desired position ( Ypage 481).
X Press 0039the COMAND controller.
The menu is shown.
X Confirm Display Weather by pressing
0039.
COMAND receives the weather data for the
selected position from the nearest weather SIRIUS Weather
481COMAND Z
Page 492 of 590

Useful information
i This Operator's Manual describes all
models and all standard and optional
equipment of your vehicle available at the
time of publication of the Operator's
Manual. Country-specific differences are
possible. Please note that your vehicle may
not be equipped with all features
described. This also applies to safety-
related systems and functions.
i Read the information on qualified
specialist workshops: (Y page 38).Stowage areas
Stowage space
Important safety notes G
WARNING
If you do not correctly store objects in the
vehicle interior, they can slip or be flung
around, thus striking vehicle occupants.
There is a risk of injury, especially when
braking or abruptly changing directions.
R Always store objects so that they cannot be
flung around in these or in similar
situations.
R Always make sure that objects do not
protrude from stowage compartments,
parcel nets or stowage nets.
R Close lockable stowage compartments
while driving.
R Stow and secure objects that are heavy,
hard, pointy, sharp-edged, fragile or too
large in the trunk. Glove box X
To open: pull handle 0002and open glove box
flap 0003.
X To close: fold glove box flap 0003upwards
until it engages.
In the glove box, there are a coin holder, a
map holder and a pen holder.
i The glove box can be ventilated
(Y page 150). The glove box can be locked and unlocked
using the mechanical key.
X
To lock: insertthe mechanical key into the
lock and turn it to position 0008.
X To unlock: insert the mechanical key into
the lock and turn it to position 0007.490
Stowage areasStowage and features
Page 498 of 590

Ashtray
X
To open: open stowage compartment 0002
(Y page 491).
X To remove the insert: pull insert0003up in
the direction of the arrow, out of the cup
holder.
X To re-install the insert: push insert0003on
the left-hand side into the cup holder.
i Only re-install insert 0003on the left-hand
side of the cup holder. Cigarette lighter
G
WARNING
You can burn yourself if you touch the hot
heating elemen torthe socket of the cigarette
lighter.
In addition, flammable materials can ignite if:
R the hot cigarette lighter falls
R a child holds the hot cigarette lighter to
objects, for example
There is a risk of fire and injury.
Always hold the cigarette lighter by the knob.
Always make sure that the cigarette lighter is
out of reach of children. Never leave children
unsupervised in the vehicle. Your attention must always be focused on the
traffic conditions. Only use the cigarette
lighter when road and traffic conditions
permit.
X
Turn the SmartKey to position 2in the
ignition lock (Y page 155).
X To open: open stowage compartment 0002
under the armrest (Y page 491).
X Press in cigarette lighter 0003.
Cigarette lighter 0003will pop out
automatically when the heating element is
red-hot. 12
Vsockets
General notes X
Turn the SmartKey to position 1in the
ignitio nlock (Y page 155).
The sockets can be used for accessories with
a maximum draw of 180 W (15 A).
Accessories include such items as lamps or
chargers for mobile phones.
If you use the sockets for long periods when
the engine is switched off, the battery may
discharge.
i An emergency cut-out ensures that the
on-board voltage does not drop too low. If
the on-board voltage is too low, the power
to the sockets is automatically cut. This
ensures that there is sufficient power to
start the engine. 496
FeaturesStowage and features
Page 505 of 590
vehicles with mbrace and active mbrace
accounts:
if multiple vehicles are registered under the
same e-mail address, the destination will
be sent to all the vehicles.
Vehicle remote opening You can use the vehicle remote opening if you
have unintentionally locked yourv
ehicle and
a replacemen tSmartKey is not available.T he
vehicle can be opened by the Mercedes-Benz
Customer Assistance Center.
The vehicle can be immediately opened
remotely within four days of the ignition being
turned off. After this time, the remote opening
may be delayed by 15 to 60 minutes. After
30 days the vehicle can no longer be opened
remotely.
X Contact the following service hotlines:
R
USA: Mercedes-Ben zCustomer
Assistance Cente rat
1-800-FOR-MERCedes
(1-800-367-6372) or 1-866-990-9007
R Canada: Customer Service at
1-888-923-8367
You will be asked for you rpassword.
X Return to your vehicle at the time agreed
upon with the Mercedes-Ben zCustomer
Assistance Center.
US Ao nly:alternatively, the vehicle can be
opened via:
R the Internet, under the "Owners Online"
section
R the telephone application (e.g .iPhone ®
,
Blackberry)
To do this, you will need your identification
number and password.
i Vehicle remote opening is only possible if
the corresponding mobile phone network
is accessible. Vehicle remote closing The remote closing feature can be used when
you have forgotten to lock the vehicle and you
are no longer nearby. The vehicle can then be
locked by the Mercedes-Benz Customer
Assistance Center.
The vehicle can be immediately remotely
locked within four days of the ignition being
turned off. After this time, the remote closing
may be delayed by 15 to 60 minutes. After
30 days the vehicle can no longer be closed
remotely.
X
Contact the following service hotlines:
R
USA: Mercedes-Benz Customer
Assistance Center at
1-800-FOR-MERCedes
(1-800-367-6372) or 1-866-990-9007
R Canada: Customer Service at
1-888-923-8367
You will be asked for your PIN.
The next time you are inside the vehicle and
you switch on the ignition, the Doors Locked Remotely message appears in the
multifunction display.
USA only: alternatively, the vehicle can be
locked via:
R the Internet, under the "Owners Online"
section
R the telephone application (e.g. iPhone ®
,
Blackberry)
To do this, you will need your identification
number and password.
i The vehicle remote closing feature is
available when the relevant mobile phone
network is available and data connection is
possible. Features
503Stowage and features Z