key MERCEDES-BENZ SL-Class 2013 R131 User Guide
[x] Cancel search | Manufacturer: MERCEDES-BENZ, Model Year: 2013, Model line: SL-Class, Model: MERCEDES-BENZ SL-Class 2013 R131Pages: 590, PDF Size: 9.73 MB
Page 26 of 590
Checking ........................................ 545
Definition of term s......................... 563
Direction of rotatio n...................... 566
Display message ............................ 262
Distributio nofthe vehicle
occupants (definition) ....................565
DOT, Tire Identification Number
(TIN) .............................................. .562
DOT (Department of
Transportation) (definition) ............563
GAWR (Gross Axle Weight Rating)
(definition) ..................................... 563
GVW (Gross Vehicle Weight)
(definition) ..................................... 563
GVWR (Gross Vehicle Weight
Rating) (definition) .........................563
Important safety notes ..................544
Increased vehicle weight due to
optional equipment (definition) ......563
Kilopascal (kPa) (definition) ...........564
Labeling (overview )........................ 559
Load bearing index (definition) ......565
Load index ..................................... 561
Load index (definition) ...................564
M+S tires ....................................... 546
Maximum loaded vehicle weight
(definition) ..................................... 564
Maximum load on a tire (definition) 564
Maximum permissible tire
pressure (definition) ....................... 564
Maximum tire loa d......................... 562
Maximum tire load (definition) .......564
MOExtended tires ..........................546
Optional equipment weight
(definition) ..................................... 564
Overview ........................................ 544
PSI (pounds per square inch)
(definition) ..................................... 564
Replacing ....................................... 565
Service life ..................................... 546
Sidewall (definition) .......................564
Speed rating (definition) ................563
Storing ........................................... 566
Structure and characteristics
(definition) ..................................... 563
Summer tires ................................. 546
Temperature .................................. 558TIN (Tire Identification Number)
(definition)
..................................... 564
Tire bea d(definition) ...................... 564
Tire pressure (definition) ................564
Tire pressures (recommended )...... 563
Tire size (data) ............................... 570
Tire size designation, load-bearing
capacity, speed rating .................... 559
Tire tread ....................................... 545
Tire tread (definition) .....................564
Total load limit (definition) .............565
Traction ......................................... 558
Traction (definition) .......................565
Trea dwear ..................................... 558
Uniform Tire Quality Grading
Standard s...................................... 557
Uniform Tire Quality Grading
Standard s(definition) .................... 563
Unladen weight (definition) ............564
Wea rindicato r(definition) .............565
Whee lrim (definition ).................... 563
see Flat tire
Tone settings
Balance and fade r.......................... 295
Towing
Important safety guidelines ...........536
Installing the towing eye ................536
Removing the towing eye. ..............537
With the rear axle raised ................537
Towing away
With both axles on the ground .......538
Tow-starting
Emergency engine starting ............538
Important safety notes ..................536
Track
Selecting (CD, DVD, MP3) .............. 442
Selecting using the numbe rkeypad 443
Traffic jam function ...........................346
Traffic reports Calling up alist .............................. 354
Reading out on route .....................356
Real-time traffic report ..................356
Transmission
Selector leve r................................ 163
see Automatic transmission
Transporting the vehicle ..................538
Treble ,adjusting (sound) ..................295
Trim pieces (cleaning instructions) .523 24
Index
Page 27 of 590
Trip computer (on-board computer)
225
Trip odometer Calling up ....................................... 225
Resetting (on-board computer) ......226
True Image™ ...................................... 298
Trunk Emergency release ..........................98
Important safety notes ....................93
Locking separatel y........................... 98
Opening/closing (automatically
from inside) ...................................... 97
Opening/closing (automatically
from outside) ................................... 95
Opening/closing (from outside,
HANDS-FREE ACCESS) ....................96
Opening/closing (manually from
outside) ............................................ 94
Overview .......................................... 93
Trunk lid
Display message ............................ 266
Opening/closing .............................. 93
Opening dimensions ......................585
Power closing feature ......................92
Trunk load (maximum) ......................585
Trunk partition Display message ............................ 267
General notes ................................ 106
Installing ........................................ 106
Opening/closing ............................ 106
Removing ....................................... 106
Turn signals
Display message ............................ 251
Switching on/off ........................... 129
TV
Automatic picture shutoff ..............468
Picture settings .............................. 468
Sound settings (balance, bass,
treble )............................................ 295
Type identification plate
see Vehicle identification plate U
Umbrella holder ................................. 491
Unlocking Emergency unlocking .......................92
From inside the vehicle (central
unlocking button) ............................. 91Updating the digital map
..................372
USB see Medi aInterface V
Vanity mirror (in the sun visor) ........ 495
Vehicle Correct us e...................................... 38
Data acquisition ............................... 39
Display message ............................ 265
Equipment ....................................... 35
Individua lsettings .......................... 232
Limited Warranty ............................. 39
Loading .......................................... 555
Locking (in an emergency) ...............93
Locking (SmartKey) .......................... 84
Lowering ........................................ 569
Maintenance .................................... 36
Parking for a long period ................ 178
Pulling away ................................... 158
Raising ........................................... 567
Reporting problems .........................38
Securing from rolling away ............566
Towing away .................................. 536
Tow-starting ................................... 536
Transporting .................................. 538
Unlocking (in an emergency) ...........92
Unlocking (SmartKey) ......................84
Vehicle data ................................... 585
Vehicle battery
see Battery (vehicle)
Vehicle data ....................................... 585
Vehicle dimensions ...........................585
Vehicle emergency locking ................93
Vehicle identification number see VIN
Vehicle identification plate ..............577
Vehicle level Active Body Control (AMG vehicles) 200
Active Body Control (except AMG
vehicles) ........................................ 198
Display message ............................ 257
Vehicle tool kit .................................. 526
Video Operating the DVD ......................... 229
see Video DVD Index
25
Page 30 of 590
Introduction
In addition to the printed Operator's Manual,
the vehicle documen twallet also contains
further operating instructions, such as:
R Digital Operator's Manual on CD
R Maintenance Booklet
R Equipment-dependen tsupplements
The printed Operator's Manual provides
information on selected functions of your
vehicle.
You can also access the Digital Operator's
Manual via COMAND .Ifyou have further
questions that are not covered in the printed
Operator's Manual, please consult the Digital
Operator's Manual.
i You will not incur any costs when calling
up the Digital Operator's Manual. It works
without connecting to the Internet.
In the following sections you will find further
information about:
R how to operate the Digital Operator's
Manual
R the differing access options from the basic
menu
There are three options for accessing via the
basic menu of the Digital Operator's Manual:
R Visual search
R Keyword search
R Contents Installation
Check whether or not the Digital Operator's
Manual has already been installed. To do so,
call up the Digital Operator's Manual via
COMAND as follows: X
Using the COMAND controller, select the
000C symbol in the menu bar on the COMAND
display and confirm with 0039.
X Choose the "Operator's Manual" selection
card and confirm with 0039.
There are two possibilities:
1. The Digital Operator's Manual is
installed. The basic menu for the Digital
Operator's Manual opens.
2. The Digital Operator's Manual is not
installed. The following message appears:
The Operator's Manual has not yet been installed. Please insert the
correct disc.
If the Digital Operator's Manual has not yet
been installed, you have the option of
installing it yourself. You will find the
installation CD required in the vehicle
document wallet.
The duration of the installation process can
vary.
The installation process takes approximately
5m inutes. This timespan only applies if you
install the Digital Operator's Manual while the
vehicle is at a standstill and no other
COMAND functions are in use at the time. The
duration of the installation process may
increase accordingly if other
COMAND functions such as navigation or
telephony are in use at the time.
If you encounter any problems during
installation, please contac tyour authorized
Mercedes-Benz Center.
X To install the Digital Operator's
Manual: stop the vehicle safely, paying
attention to road and traffic conditions.
X Turn the SmartKey to position 2in the
ignition lock.
X Switch on COMAND.
X Insert the installation CD into the CD/DVD
drive.
X Follow the installation steps on the
COMAND display.
i If the check was not successful, a
message appears, e.g. The Operator's28
Digital Operator's Manual
Page 31 of 590
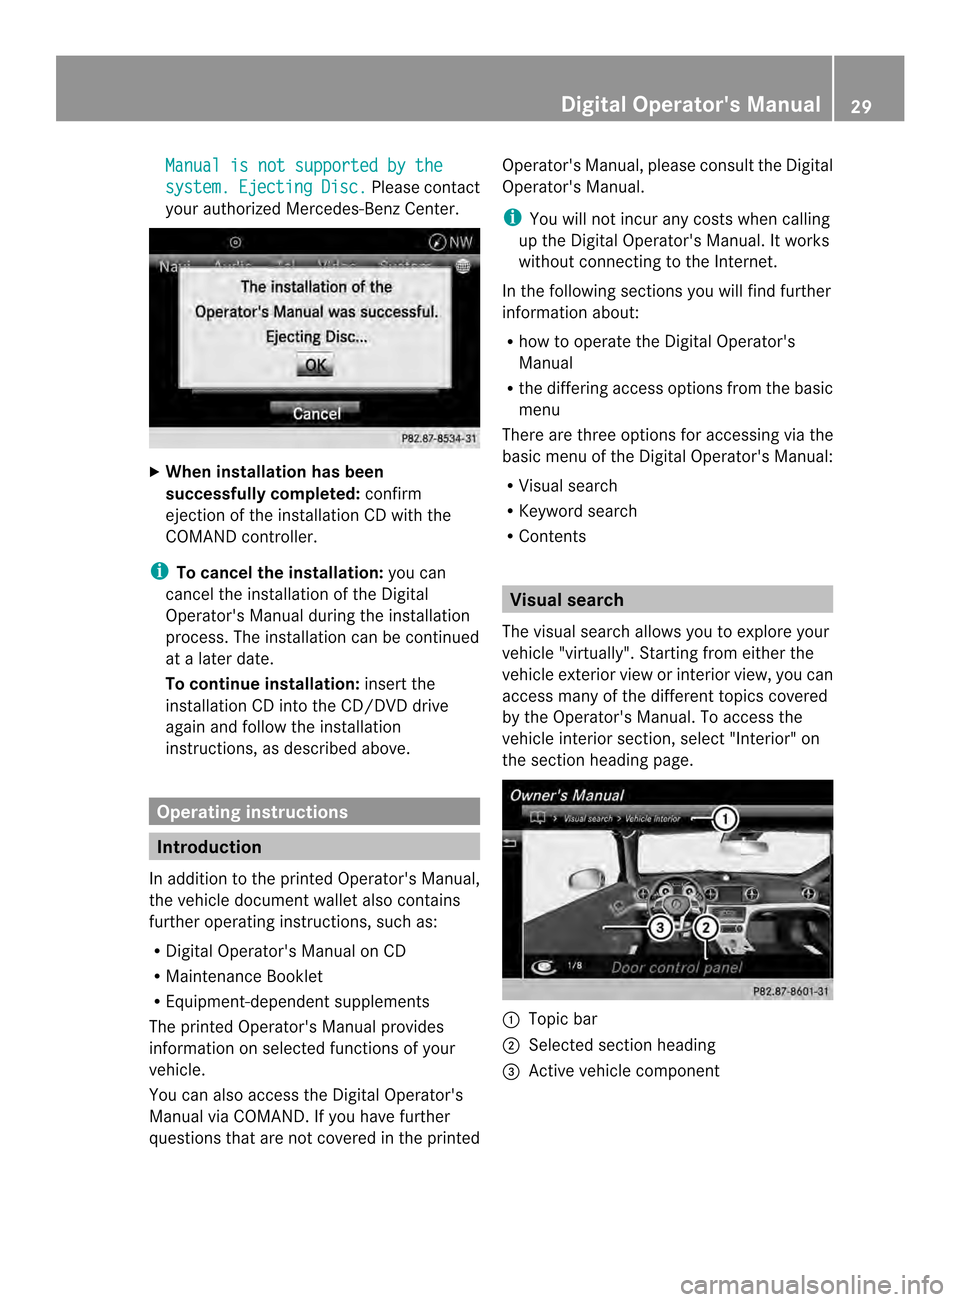
Manual is not supported by the
system. Ejecting Disc. Please contact
your authorized Mercedes-Benz Center. X
When installation has been
successfully completed: confirm
ejection of the installation CD with the
COMAND controller.
i To cancel the installation: you can
cancel the installation of the Digital
Operator's Manual during the installation
process. The installation can be continued
at a later date.
To continue installation: insert the
installation CD into the CD/DVD drive
againa nd follow the installation
instructions, as described above. Operating instructions
Introduction
In additio nto the printed Operator's Manual,
the vehicle document walleta lso contains
further operating instructions, such as:
R Digital Operator's Manual on CD
R Maintenance Booklet
R Equipment-dependent supplements
The printed Operator's Manual provides
information on selected functions of your
vehicle.
You can also access the Digital Operator's
Manual via COMAND .Ifyou have further
questions that are not covered in the printed Operator's Manual, please consult the Digital
Operator's Manual.
i
You will not incur any costs when calling
up the Digital Operator's Manual. It works
without connecting to the Internet.
In the following sections you will find further
information about:
R how to operate the Digital Operator's
Manual
R the differing access options from the basic
menu
There are three options for accessing via the
basic menu of the Digital Operator's Manual:
R Visual search
R Keyword search
R Contents Visual search
The visual search allows you to explore your
vehicle "virtually" .Starting fro meithe rthe
vehicle exterior view or interior view, you can
access many of the different topics covered
by the Operator's Manual. To access the
vehicle interior section, select "Interior" on
the section heading page. 0002
Topic bar
0003 Selected section heading
0027 Active vehicle component Digital Operator's Manual
29
Page 32 of 590
X
Turn 003E0012003F or slide 003600120037the COMAND
controller to select individual vehicle
components.
Individual vehicle components are
highlighted in color. Just one vehicle
component per view is highlighted.
X To confirm the currently selected section,
press 0039the COMAND controller.
After you have selected asection, one of the
following happens:
R you go straight to the corresponding
section in the Digital Operator's Manual.
R a list opens up with further, in-depth
headings that you can select using the
COMAND controller.
R you go down a level to the visual search.
You can refine your search here. Turn
003E0012003F or slide 003600120037the COMAND controller
to select individual vehicle components
highlighted in red 0027.
X To return to the previous page: press
the 001F button next to the COMAND
controller.
The previous page opens. Keyword search
The keyword search allows you to perform a
keyword search using character entry. A
detailed description of character entry can be
found in the section "COMAND" under
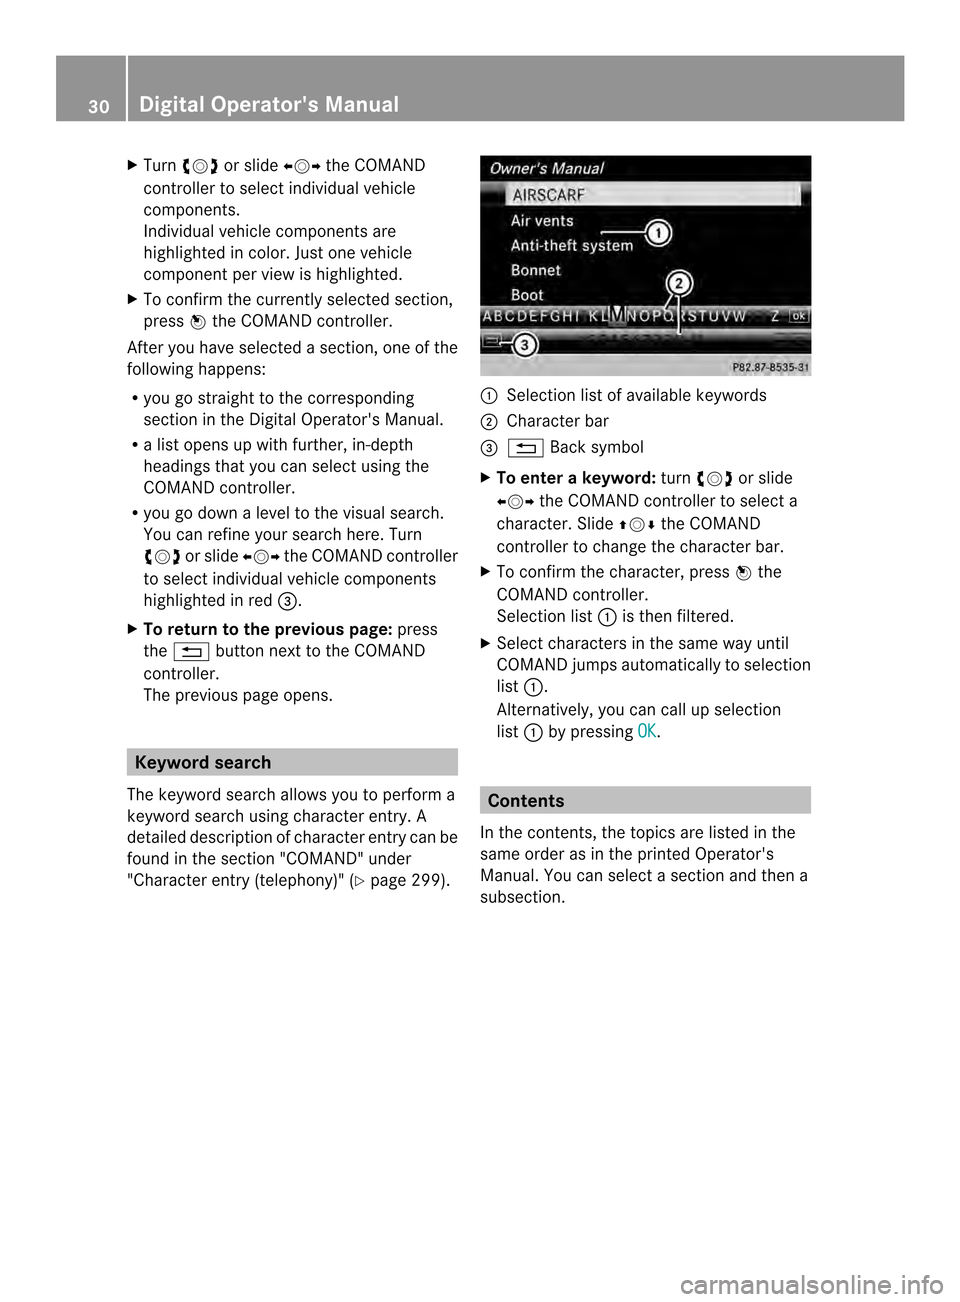
"Character entry (telephony)" (Y page 299). 0002
Selection list of available keywords
0003 Character bar
0027 001F Back symbol
X To enter a keyword: turn003E0012003F or slide
003600120037 the COMAND controller to select a
character. Slide 00380012000Athe COMAND
controller to change the character bar.
X To confirm the character, press 0039the
COMAND controller.
Selection list 0002is then filtered.
X Select characters in the same way until
COMAND jumps automatically to selection
list 0002.
Alternatively, you can call up selection
list 0002by pressing OK .
Contents
In the contents, the topics are listed in the
same order as in the printed Operator's
Manual. You can select a section and then a
subsection. 30
Digital Operator's Manual
Page 54 of 590
Useful information
i This Operator's Manual describes all
models and all standard and optional
equipment of your vehicle available at the
time of publication of the Operator's
Manual. Country-specific differences are
possible. Please note that your vehicle may
not be equipped with all features
described. This also applies to safety-
related systems and functions.
i Read the information on qualified
specialist workshops: (Y page 38).Panic alarm
X
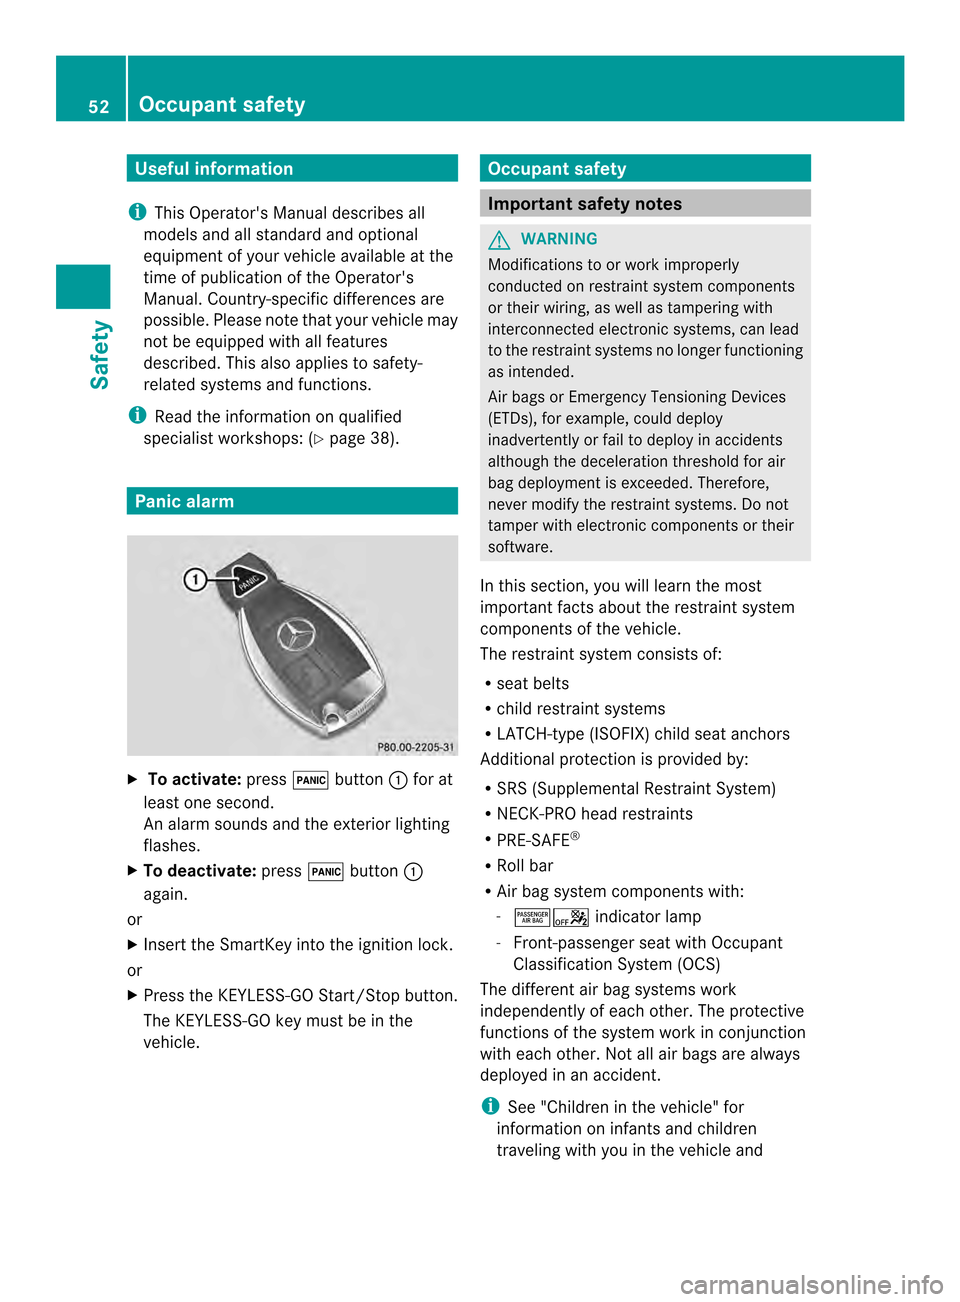
To activate: press000Fbutton 0002for at
least one second.
An alarm sounds and the exterior lighting
flashes.
X To deactivate: press000Fbutton 0002
again.
or
X Insert the SmartKey into the ignition lock.
or
X Press the KEYLESS-GO Start/Stop button.
The KEYLESS-GO key must be in the
vehicle. Occupant safety
Important safety notes
G
WARNING
Modifications to or work improperly
conducted on restraint system components
or their wiring, as well as tampering with
interconnected electronic systems, can lead
to the restraint system sno longer functioning
as intended.
Air bags or Emergency Tensioning Devices
(ETDs), for example, could deploy
inadvertently or fail to deploy in accidents
although the deceleration threshold for air
bag deployment is exceeded. Therefore,
never modify the restraint systems. Do not
tamper with electronic components or their
software.
In this section, you will learn the most
important facts about the restraint system
components of the vehicle.
The restraint system consists of:
R seat belts
R child restraint systems
R LATCH-type (ISOFIX) child seat anchors
Additional protection is provided by:
R SRS (Supplemental Restraint System)
R NECK-PRO head restraints
R PRE-SAFE ®
R Roll bar
R Air bag system components with:
-00040006 indicator lamp
- Front-passenger seat with Occupant
Classification System (OCS)
The different air bag systems work
independently of each other. The protective
functions of the system work in conjunction
with each other. Not all air bags are always
deployed in an accident.
i See "Children in the vehicle" for
information on infants and children
traveling with you in the vehicle and 52
Occupant safetySafety
Page 63 of 590
R
When securing a child in achild restraint
system on the front-passenger seat, you
must:
- move the front-passenger seat as far
back as possible
- use a child restraint system that is
suitable for the age, size and weight of
the child
- observe the manufacturer's installation
instructions in order to install and secure
the child restraint system correctly.
R For children larger than the typical 12-
month-old child, the front-passenger front
air bag may or may not be activated. G
WARNING
If the red 001BSRS warning lamp in the
instrument cluster and the 0016PASSENGER
AIR BAG OFF indicator lamp light up
simultaneously, the OCS is malfunctioning.
The front-passenger front air bag and the
front-passenger knee bag will be deactivated
in this case. Have the system checked as soon
as possible by qualified technicians. Consult
an authorized Mercedes-Ben zCenter.
Only have the seat repaired at an authorized
Mercedes-Benz Center.
In order to ensure correct operation of the air
bag system and OCS:
R sit with the seat belt fastened correctly and
in a position that is as upright as possible
with your back against the backrest.
R while seated, an occupant should not
position themselves in such away as to
cause their weigh tto be lifted from the seat
cushion as this may result in OCS being
unable to correctly assess the occupant's
weight category.
R read and observe all warnings in this
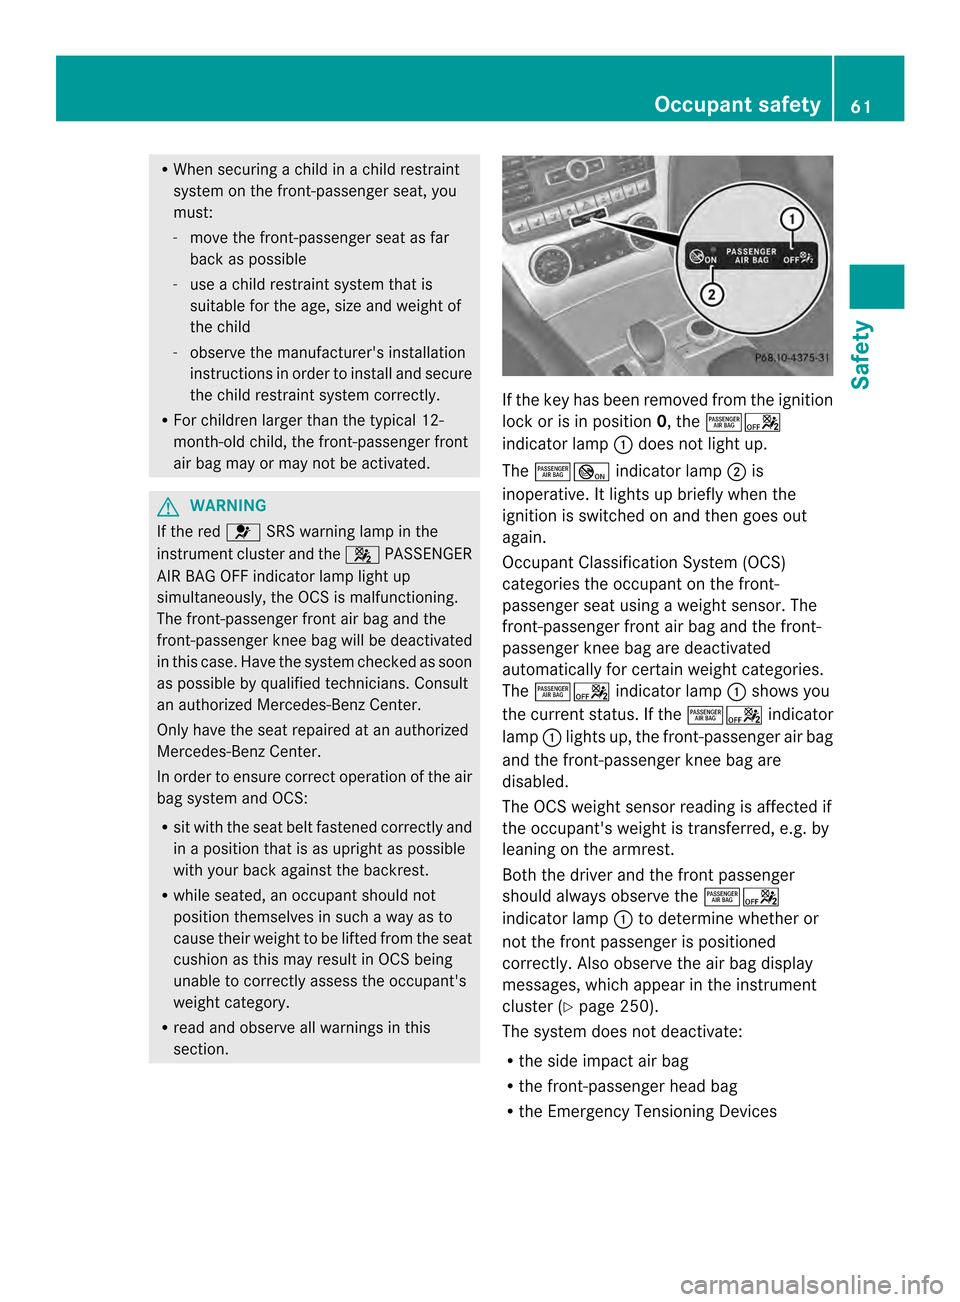
section. If the key has been removed from the ignition
lock or is in position
0, the00040006
indicator lamp 0002does not light up.
The 00040005 indicator lamp 0003is
inoperative. It lights up briefly when the
ignition is switched on and then goes out
again.
Occupant Classification System (OCS)
categories the occupant on the front-
passenger seat using a weight sensor. The
front-passenger front air bag and the front-
passenger knee bag are deactivated
automatically for certain weight categories.
The 00040006 indicator lamp 0002shows you
the current status. If the 00040006indicator
lamp 0002lights up, the front-passenger air bag
and the front-passenger knee bag are
disabled.
The OCS weight sensor reading is affected if
the occupant's weight is transferred, e.g. by
leaning on the armrest.
Both the driver and the front passenger
should always observe the 00040006
indicator lamp 0002to determine whether or
not the front passenger is positioned
correctly. Also observe the air bag display
messages, which appear in the instrument
cluster (Y page 250).
The system does not deactivate:
R the side impact air bag
R the front-passenger head bag
R the Emergency Tensioning Devices Occupant safety
61Safety Z
Page 64 of 590
To be classified correctly, the frontp
assenger
must sit:
R with the seat belt fastened correctly
R in a positio nthat is as upright as possible
with their back against the seat backrest
R with their feet on the floor
If the driver's air bag deploys, this does not
mean that the front-passenger front air bag
will also deploy.
The OCS may have detected that the seat:
R is empty or occupied by the weight of a
typical child up to twelve months old,
seated in a child restraint system
R is occupied by a small individual, such as a
young teenager or a small adult
R is occupied by a child in a child restraint
system whose weight is greater than that
of a typical twelve month old child.
These are examples of when the OCS
deactivates the front-passenger front air bag
and front-passenger knee bag. Deactivation
takes place although the collision fulfills the
criteria for deploying the driver's air bag.
If the front-passenger seat, the seat cover or
the seat cushion are damaged, have the
necessary repair work carried out at a
qualified specialist workshop.
Mercedes-Ben zrecommends that you only
use seat accessories which have been
approved by Mercedes-Benz.
System self-test G
WARNING
If the 0016 PASSENGER AIR BAG OFF
indicator lamp does not illuminate, the system
is not functioning. Consult an authorized
Mercedes-Benz Center before seating a child
on the front-passenger seat. G
WARNING
Never place anything between seat cushion
and child seat (e.g. a pillow), since it reduces
the effectiveness of the OCS. The underside
and rear side child restraint system must be placed entirely on the seat cushion and the
backrest of the front-passenger seat
backrest.
If necessary, adjust the tilt of the passenger
seat backrest.
An incorrectly mounted child seat could cause
injuries to the child in case of an accident,
instead of increasing protection for the child.
Follow the manufacturer's instructions for
installation of child restraint systems.
The 00040006 indicator lamp lights up:
R if you turn the SmartKey in the ignition lock
to position 1or 2
R if you press the KEYLESS-GO Start/Stop
button once or twice on vehicles with
KEYLESS-GO
R if an adult is seated properly on the front-
passenger seat and the OCS classifies the
occupant as an adult
The 00040006 indicator lamp goes out after
approximately 6seconds.
If the seat is not occupied and the OCS
detects that the front-passenger seat is
empty, the 00040006indicator lamp will
continue to light up. The 00040006front-
passenger fron tair bag warning lamp then
stays lit continuously.
For more information about the OCS, see
"Problems with the Occupant Classification
System" (Y page 63). 62
Occupant safetySafety
Page 69 of 590
R
Position the lap belt as low as possible on
your hips and not across the abdomen. If
the lap belt is positioned across your
abdomen, it could cause serious injuries in
a crash.
R Never wear seat belts over rigid or
breakable objects in or on your clothing,
such as eyeglasses, pens, keys etc., as
these might cause injuries.
R Make sure the seat belt is always fitted
snugly. Take special care of this when
wearing loose clothing.
R Never use a seat belt for more than one
person at a time. Do not fasten a seat belt
around a person and another person or
other objects at the same time.
R Seat belts should not be worn twisted. In a
crash, you would not have the full width of
the seat belt to distribute impact forces.
The twisted seat belt against your body
could cause injuries.
R Pregnant women should also always use a
lap-shoulder belt. The lap belt portion
should be positioned as low as possible on
the hips to avoid any possible pressure on
the abdomen.
R Place the seat backrest in a position that is
as upright as possible.
R Check your seat belt during travel to make
sure it is properly positioned.
R Never place your feet on the instrument
panel, dashboard, or on the seat. Always
keep both feet on the floor in front of the
seat.
R When using a seat belt to secure infant
restraints, toddler restraints, or children in
booster seats, always follow the child seat
manufacturer's instructions. G
WARNING
Do not pass seat belts over sharp edges. They
could tear.
Do not allow the seat belt to get caught in the
door or in the seat adjustment mechanism.
This could damage the seat belt. Never attempt to make modifications to seat
belts. This could impair the effectiveness of
the seat belts.
Fastening seat belts G
WARNING
Children 12 years old and under must be
seated and properly secured in an
appropriately sized infant restraint, child
restraint system, or booster seat
recommended for the size and weight of the
child. For additional information, see the
"Children in the vehicle" section.
Ac hild's risk of serious or fatal injuries is
significantly increased if the child restraints
are not properly secured in the vehicle and/
or the child is not properly secured in the child
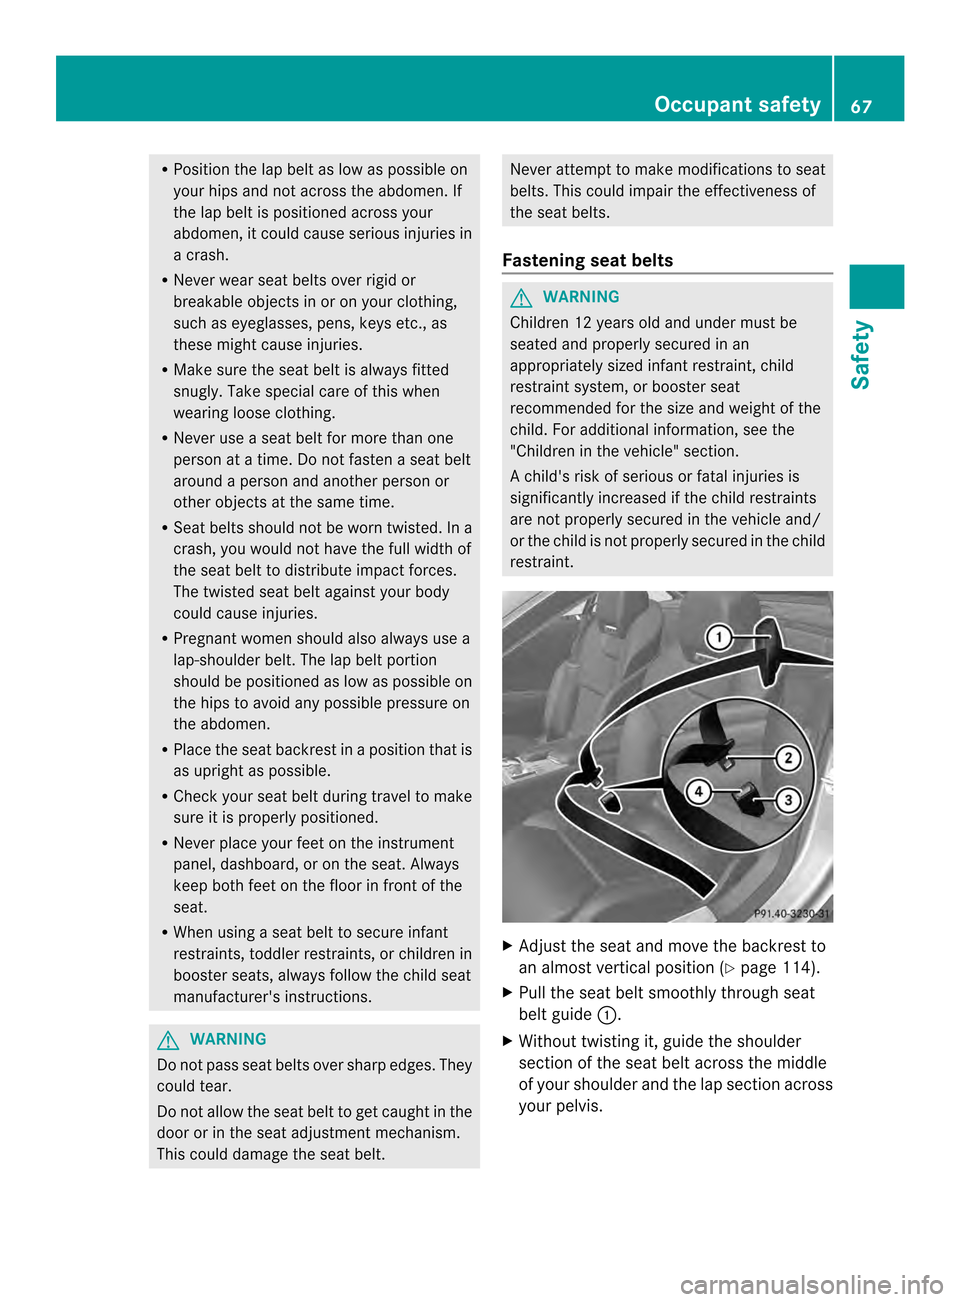
restraint. X
Adjust the seat and move the backrest to
an almost vertical position (Y page 114).
X Pull the seat belt smoothly through seat
belt guide 0002.
X Without twisting it, guide the shoulder
section of the seat belt across the middle
of your shoulder and the lap section across
your pelvis. Occupant safety
67Safety Z
Page 70 of 590
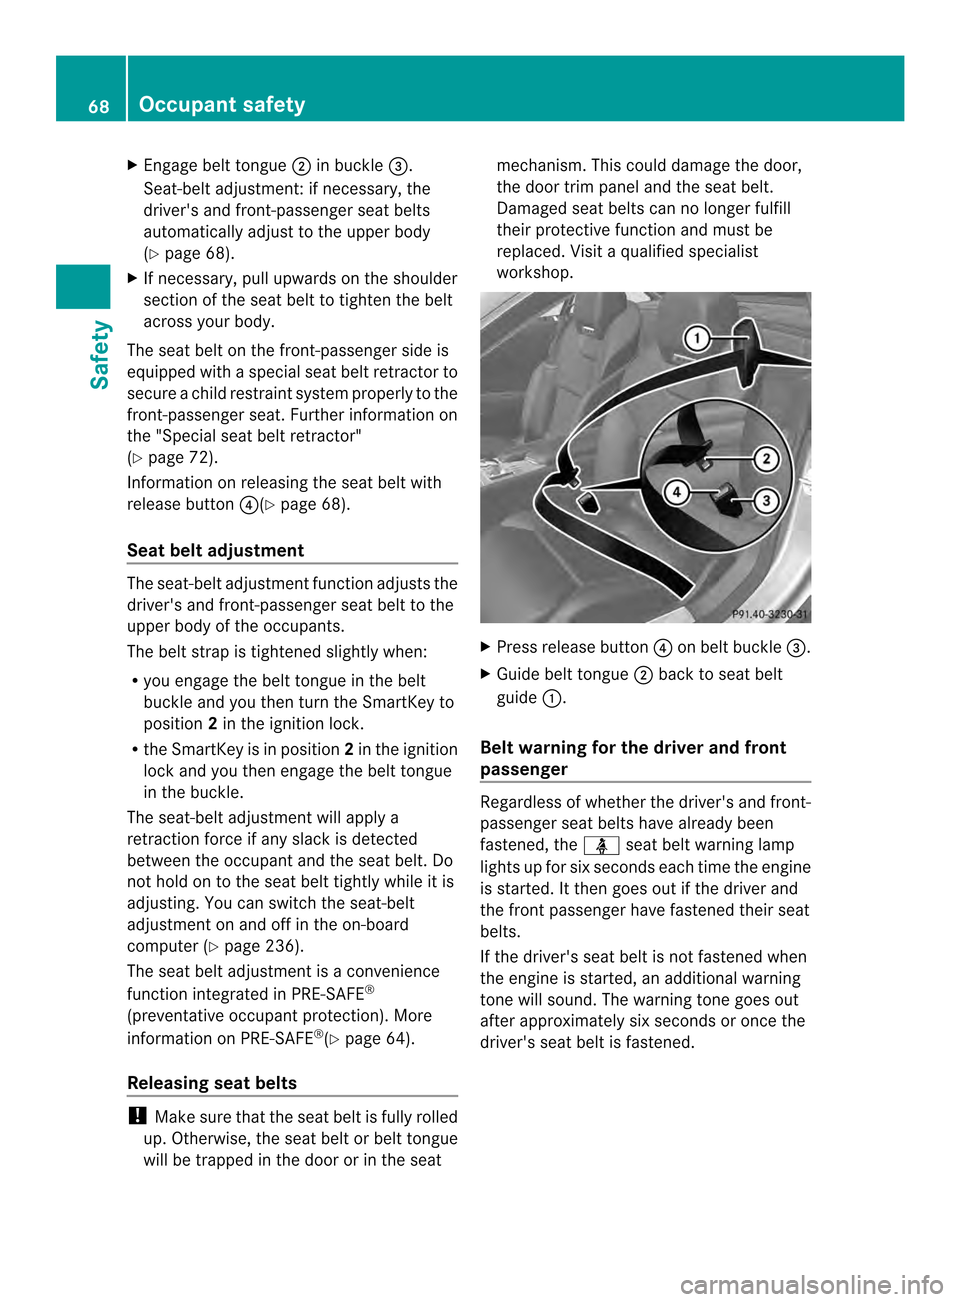
X
Engage belt tongue 0003in buckle 0027.
Seat-belt adjustment: if necessary, the
driver's and front-passenge rseat belts
automatically adjust to the upper body
(Y page 68).
X If necessary, pull upwards on the shoulder
section of the seat belt to tighten the belt
across your body.
The seat belt on the front-passenger side is
equipped with a special seat belt retractor to
secure a child restraint system properly to the
front-passenger seat. Further information on
the "Special seat belt retractor"
(Y page 72).
Information on releasing the seat belt with
release button 0026(Ypage 68).
Seat belt adjustment The seat-belt adjustment function adjusts the
driver's and front-passenger seat belt to the
upper body of the occupants.
The belt strap is tightened slightly when:
R
you engage the belt tongue in the belt
buckle and you then turn the SmartKey to
position 2in the ignition lock.
R the SmartKey is in position 2in the ignition
lock and you then engage the belt tongue
in the buckle.
The seat-belt adjustment will apply a
retraction force if any slack is detected
between the occupan tand the sea tbelt. Do
not hold on to the seat belt tightly while it is
adjusting. You can switch the seat-belt
adjustment on and off in the on-board
computer (Y page 236).
The seat belt adjustment is a convenience
function integrated in PRE-SAFE ®
(preventative occupant protection). More
information on PRE-SAFE ®
(Y page 64).
Releasing seat belts !
Make sure that the seat belt is fully rolled
up. Otherwise, the seat belt or belt tongue
will be trapped in the door or in the seat mechanism. This could damage the door,
the door trim panel and the seat belt.
Damaged seat belts can no longer fulfill
their protective function and must be
replaced. Visit a qualified specialist
workshop.
X
Press release button 0026on belt buckle 0027.
X Guide belt tongue 0003back to seat belt
guide 0002.
Belt warning for the driver and front
passenger Regardless of whether the driver's and front-
passenger seat belts have already been
fastened, the
000Fseat belt warning lamp
lights up for six seconds each time the engine
is started. It then goes out if the driver and
the fron tpassenger have fastened their seat
belts.
If the driver's seat belt is no tfastened when
the engine is started, an additional warning
tone will sound. The warning tone goes out
after approximately six seconds or once the
driver's seat belt is fastened. 68
Occupant safetySafety