AUX MERCEDES-BENZ SL-Class 2014 R131 Comand Manual
[x] Cancel search | Manufacturer: MERCEDES-BENZ, Model Year: 2014, Model line: SL-Class, Model: MERCEDES-BENZ SL-Class 2014 R131Pages: 274, PDF Size: 5.76 MB
Page 219 of 274

Switching to Bluetooth
®
audio mode
The Bluetooth ®
audio basic display Example: Bluetooth
®
audio basic display
0001 Track name
0002 Current playback settings (no symbol for
"Normal track sequence")
0014 Album name
0013 Sound settings
0011 Media list
0012 Artist
0005 To stop 0014or start 0004playback
0006 To connect a Bluetooth ®
audio device, to
increase the volume on COMAND
0007 Bluetooth ®
audio data medium type
0008 Data medium position in the media list
i If the Bluetooth ®
audio device connected
supports metadata and corresponding data
is available, then the artist, track and album
name can be displayed.
Using the Bluetooth ®
audio basic
display X
Connect a Bluetooth ®
audio device
(Y page 213)
or
X Reconnec tthe Bluetooth ®
audio device
(Y page 215).
COMAND activates the Bluetooth ®
audio
device. The basic display appears and the
device starts playing. Using the function button X
Press the 0007function button one or more
times.
By pressing the function button repeatedly,
you can change the operating mode in the
following order:
R CD/audio DVD/MP3 (disc)
R Memory card mode
R MUSIC REGISTER
R USB storage device
R Media Interface or audio AUX mode
R Bluetooth ®
audio mode
Using the media list X
Select Bluetooth Audio in the media list
by turning 003C0012003Dthe COMAND controller
and press 0037to confirm (Y page 199).
COMAND activates the connected device.
You will see a message to this effect.T he
basic display then appears. Starting/stopping playback
X To start playback: select0004by sliding
00120008 and turning 003C0012003Dthe COMAND
controller and press 0037to confirm.
Playback starts. 0014is selected.
X To stop playback: select0014by turning
003C0012003D the COMAND controller and press
0037 to confirm.
Am essage appears. 0004is selected.
X To continue playback: select0004by
turning 003C0012003Dthe COMAND controller and
press 0037to confirm.
Am essage appears. 0014is selected. Bluetooth
®
audio mode 217Audio Z
Page 221 of 274

Increasing the volume on COMAND
X
Select BT Audio by sliding
00120008and turning
003C0012003D the COMAND controller and press
0037 to confirm.
X Select Volume and press
0037to confirm.
Am enu appears. The 000Fdot indicates the
current setting.
X Select Standard or
Boost and press
0037to
confirm.
Information about sound settings
(Y page 30)
You will find further information in the "Audio
AUX mode" section (Y page 225)Operation with the Media Interface
Connection options
Overview The connection sockets are located in the
stowage compartment in the center console.
Device-specific adapter cables are required
to connect external devices to the Media
Interface. Country-specific versions are
supplied with the Media Interface
(Y page 219).
You can connectt he following data carriers
to COMAND via the Media Interface:
R iPod ®
R iPhone ®
R certain MP3 players
i Store individual parts in asafe place. Only use genuine Mercedes-Benz
connection cables.
i iPod ®
and iPhone ®
are registered
trademarks of Apple Inc., Cupertino,
California, USA.
i MP3 players that support MTP ( Media
Transfer Protocol) can be used.
This allows the MP3 player to be easily
connected to the Media Interface and
removed after use. Audio data is played
without problem.
On some MP3 players, you have to activate
the relevan tfunction; see the MP3 player
operating instructions.
Supported devices Fo
rd etails and a list of supported devices,
visit http://www.mbusa-mobile.com. Or
call the Mercedes-BenzC ustomerAssistance
Center at
1-800-FOR-MERCedes(1-800-367-6372) (for
the USA) or Customer Relations at
1-800-387-0100 (for Canada). Connecting an external device
Do not leave external devices in the vehicle.
They may malfunction in extreme
temperatures; see the operating instructions
for the respective device. Examples of
extreme temperatures are direct sunlight or
very low outside temperatures. Mercedes-
Benz USA, LLC accepts no liability for damage
to external devices.
i Never connect more than one device at a
time. You will otherwise not be able to play
back from the external device.
USB hubs (devices with several USB
connections) are not supported. Operation with the Media Interface
219Audio Z
Page 223 of 274
R
USB storage device
R Media Interface or audio AUX mode
R Bluetooth ®
audio mode
Switching on using anumber key X
Press the 001Dnumber key (for a DVD
changer) or the 002Dnumber key (for a
single DVD drive).
This selects the connected external audio
device directly.
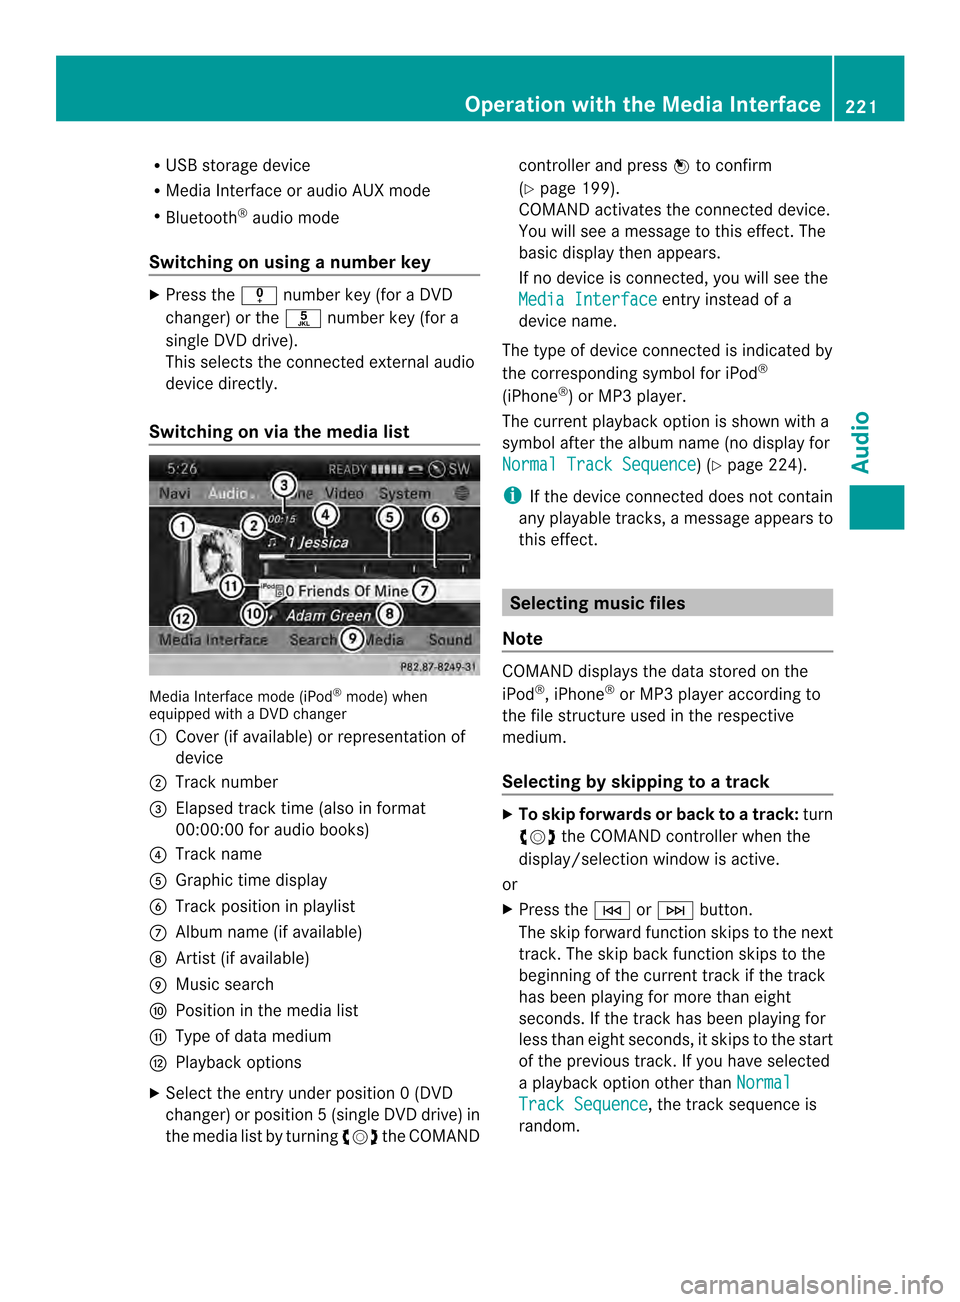
Switching on via the media list Media Interface mode (iPod
®
mode) when
equipped with a DVD changer
0001 Cove r(if available) or representation of
device
0002 Track number
0014 Elapsed track time (also in format
00:00:00 for audio books)
0013 Track name
0011 Graphic time display
0012 Trac kposition in playlist
0005 Album name (if available)
0006 Artist (if available)
0007 Music search
0008 Position in the media list
0009 Type of data medium
000B Playback options
X Select the entry under position 0 (DVD
changer) or position 5(single DVD drive) in
the media list by turning 003C0012003Dthe COMAND controller and press
0037to confirm
(Y page 199).
COMAND activates the connected device.
You will see a message to this effect. The
basic display then appears.
If no device is connected, you will see the
Media Interface entry instead of a
device name.
The type of device connected is indicated by
the corresponding symbol for iPod ®
(iPhone ®
) or MP3 player.
The current playback option is shown with a
symbol after the albumn ame (no display for
Normal Track Sequence ) (Y
page 224).
i If the device connected does not contain
any playable tracks, a message appears to
this effect. Selecting music files
Note COMAND displays the data stored on the
iPod
®
, iPhone ®
or MP3 player according to
the file structure used in the respective
medium.
Selecting by skipping to atrack X
To skip forwards or back to a track: turn
003C0012003D the COMAND controller when the
display/selectio nwindow is active.
or
X Press the 0001or0002 button.
The skip forward function skips to the next
track. The skip back function skips to the
beginning of the current track if the track
has been playing for more than eight
seconds .Ifthe track has been playing for
less than eight seconds, it skips to the start
of the previous track.Ify ou have selected
a playback option other than Normal Track Sequence , the track sequence is
random. Operation with the Media Interface
221Audio Z
Page 227 of 274
All the tracks on the mediu
mare played in
random order.
R Random Tracks The tracks in the currently active category
or folder, including any subfolders, are
played in random order.
i If the connected iPod ®
/iPhone ®
is not
functioning or paused, the playback
options are inactive. The display of options
is grayed out. MP3 player instructions
General information Up to 30,000 tracks per medium are
supported.
You can speed up some functions and
improve the search results by:
R
making sure the names of tracks, albums
and artists, for example, are written the
same way
R labeling albums featuring various artists as
"compilations"
i Multiple entries of tracks in playlists are
filtered out for some players.
Data formats MP3 and WMA are supported as data formats
with fixed and variable bit rates (up to
320 kbits/s).
Special considerations when using MP3
players Up to eigh
tdirectory levels with up to 1,000
tracks per directory are supported.
Do not use USB extension leads or adapters.
They can impair functionality.
i DRM (Digital Rights Management)
protected files are not supported by the
Media Interface. Audio AUX mode
Notes on audio AUX mode
External audio sources may have different
volumes, which can mean that system
messages such as traffic announcements and
navigation system announcements are much
louder. If necessary, deactivate the system
messages or adjust their volume manually.
You can connect an external audio source
(AUX) to COMAND. You will find the socket in
the center console stowage compartment.
If COMAND is equipped with the Media
Interface, external audio sources are
connected using the cable set provided. An
AUX socket is not provided. The connections
for the Media Interface are located in the
stowage compartmen tinthe center console.
i You will find further information online at
http://www.mbusa-mobile.com.Orc all
the Mercedes-Ben zCustome rAssistance
Center at
1-800-FOR-MERCedes(1-800-367-6372)
(for the USA) or Customer Relations at
1-800-387-0100 (for Canada). Activating audio AUX mode
Switching modes using the function
button The external device is connected to the audio
AUX in.
X
Press the 0007function button one or more
times.
By pressing the function button repeatedly,
you can change the operating mode in the
following order:
R CD/audio DVD/MP3 (disc)
R Memory card mode
R MUSIC REGISTER
R USB storage device
R Media Interface or audio AUX mode
R Bluetooth ®
audio mode Audio AUX mode
225Audio Z
Page 228 of 274
Switching modes via the audio menu
When you connect an external audio source,
audio AUX is not selected automatically.
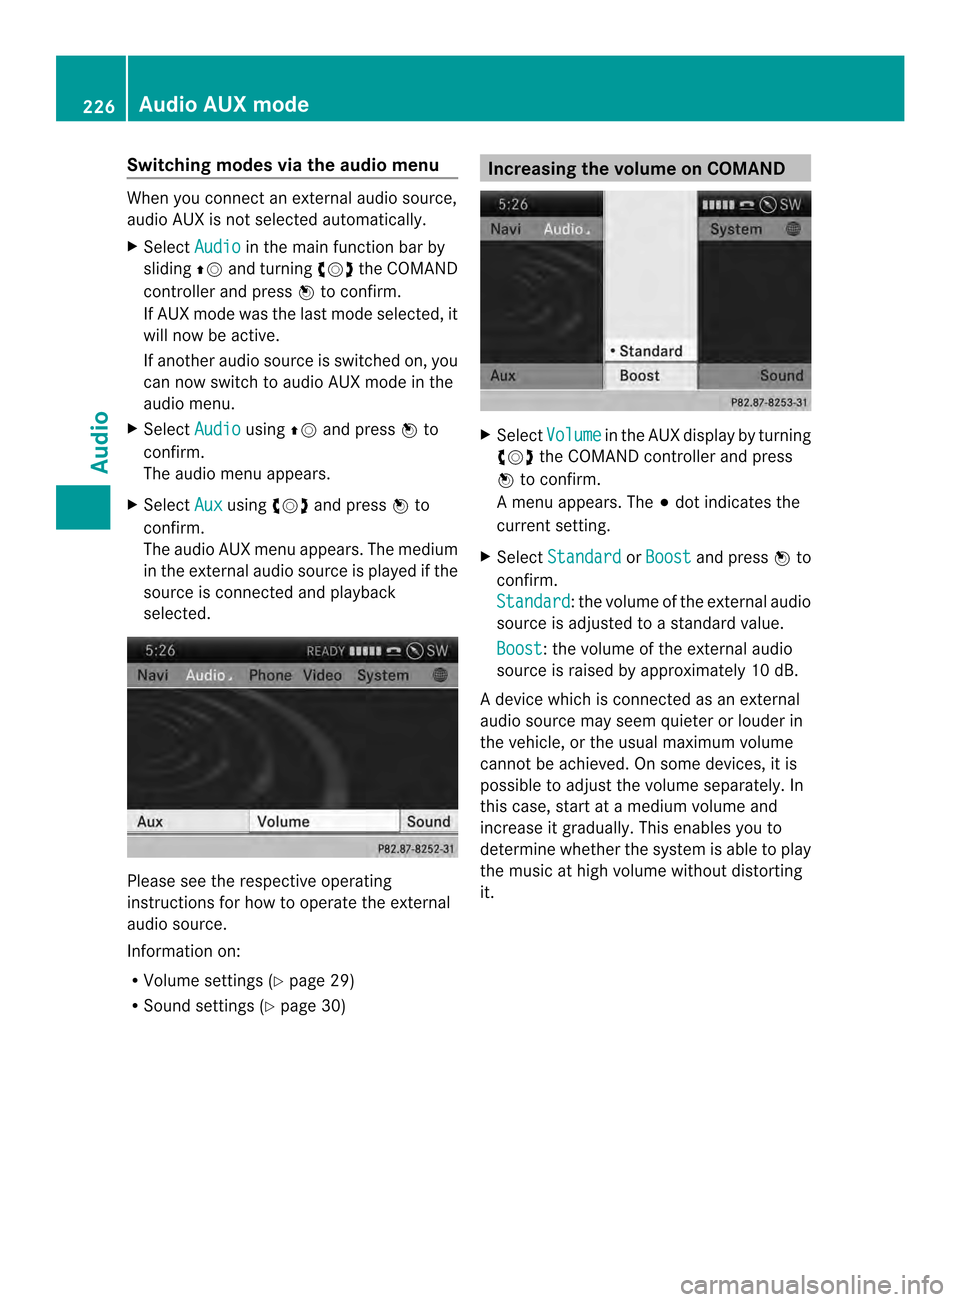
X Select Audio in the main function bar by
sliding 00360012and turning 003C0012003Dthe COMAND
controller and press 0037to confirm.
If AUX mode was the last mode selected, it
will now be active.
If another audio source is switched on, you
can now switch to audio AUX mode in the
audio menu.
X Select Audio using
00360012and press 0037to
confirm.
The audio menu appears.
X Select Aux using
003C0012003Dand press 0037to
confirm.
The audio AUX menu appears. The medium
in the external audio source is played if the
source is connected and playback
selected. Please see the respective operating
instructions for how to operate the external
audio source.
Information on:
R
Volume settings (Y page 29)
R Sound settings (Y page 30) Increasing the volume on COMAND
X
Select Volume in the AUX display by turning
003C0012003D the COMAND controller and press
0037 to confirm.
Am enu appears. The 000Fdot indicates the
current setting.
X Select Standard or
Boost and press
0037to
confirm.
Standard :t
he volume of the external audio
source is adjusted to a standard value.
Boost :t
he volume of the external audio
source is raised by approximately 10 dB.
A device which is connected as an external
audio source may seem quieter or louder in
the vehicle, or the usual maximum volume
cannot be achieved. On some devices, it is
possible to adjust the volume separately. In
this case, start at a medium volume and
increase it gradually. This enables you to
determine whether the system is able to play
the music at high volume without distorting
it. 226
Audio AUX modeAudio
Page 229 of 274
Your COMAND equipment
................228
General information .........................228
Basic settings .................................... 228
Video DVD mode ............................... 228
AUX video mode ................................ 234
Picture viewer ................................... 235 227Video
Page 230 of 274
Your COMAND equipment
These operating instructions describe all the
standard and optional equipmen tfor your
COMAND system, as available at the time of
going to print. Country-specific differences
are possible. Please note that your COMAND
system may not be equipped with all the
features described. General information
Automatic picture shutoff
The video image is shown only when the
transmission selector lever is in position P.
When the transmission lever is disengaged
from position P, the following message
appears in the display: In order not todistract you from the traffic
situation, the picture is faded out
while the vehicle is in motion.
As soon as the selector lever of the
transmission is returned to position
P, the
video image is shown. Basic settings
Adjusting the brightness, contrast or
color
X In video DVD or video AUX mode, press the
0037 COMAND Controller.
The menu is shown.
X Select DVD-Video or
Aux by turning
003C0012003D
the COMAND controller and press 0037to
confirm.
Am enu appears.
X Select Brightness ,
Contrast or
Color by
turning 003C0012003Dthe COMAND controller and
press 0037to confirm.
X Set the value between -5and+5a nd press
0037 to confirm. Changing the picture format
X Press 0037the COMAND controller.
The menu is shown.
X Select DVD-Video by sliding
00120008and
turning 003C0012003Dthe COMAND controller and
press 0037to confirm.
Am enu appears.
X Select 16:9 Optimized ,
4:3 or
Widescreen and press
0037to confirm.
The dot in front of the entry indicates the
currently selected format.
X Select a setting by turning 003C0012003Dthe
COMAND controller and press 0037to
confirm. Video DVD mode
Important safety notes
G
WARNING
The CD/DVD drive is a class 1laser product.
If you open the CD/DV Ddrive housing, you
could be exposed to invisible laser radiation.
This laser radiation could damage yourr etina.
There is a risk of injury.
Never open the housing. Always have
maintenance and repair work carried out at a
qualified specialist workshop. G
WARNING
Handling discs while driving may distrac tyou
from traffic conditions. You could also lose
control of the vehicle. There is a risk of an
accident.
Handle discs only when the vehicle is
stationary.
Bear in mind that at a speed of just 30 mph
(approximately 50 km/h), your vehicle is
covering a distance of 44 feet (approximately
14 m) every second. 228
Video DVD modeVideo
Page 232 of 274
Switching modes using the function
button
X
Press the 0007function button.
COMAND switches to the previous disc
operating mode.
By pressing the function button repeatedly,
you can change the operating mode in the
following order:
R Video DVD/CD/audio DVD/MP3 in the
DVD changer or DVD single drive (disc
mode)
R Memory card mode
R MUSIC REGISTER
R USB storage device
R Media Interface or audio AUX mode
R Bluetooth ®
audio mode
X DVD changer: selectMedia by sliding
00120008 and turning 003C0012003Dthe COMAND
controller and press 0037to confirm.
Single DVD drive: selectMedia by sliding
00120008 and turning 003C0012003Dthe COMAND
controller and press 0037to confirm.
X Select a ývideo DVD from the media list
(Y page 232).
Switching on with the video menu X
Select Video in the main function bar by
sliding 00360012and turning 003C0012003Dthe COMAND
controller and press 0037to confirm.
Video DVD mode is switched on. Showing/hiding the control menu
X To show: in DVD video mode, slide 003600120008
the COMAND controller.
X To hide: slide003600120008 the COMAND
controller.
or
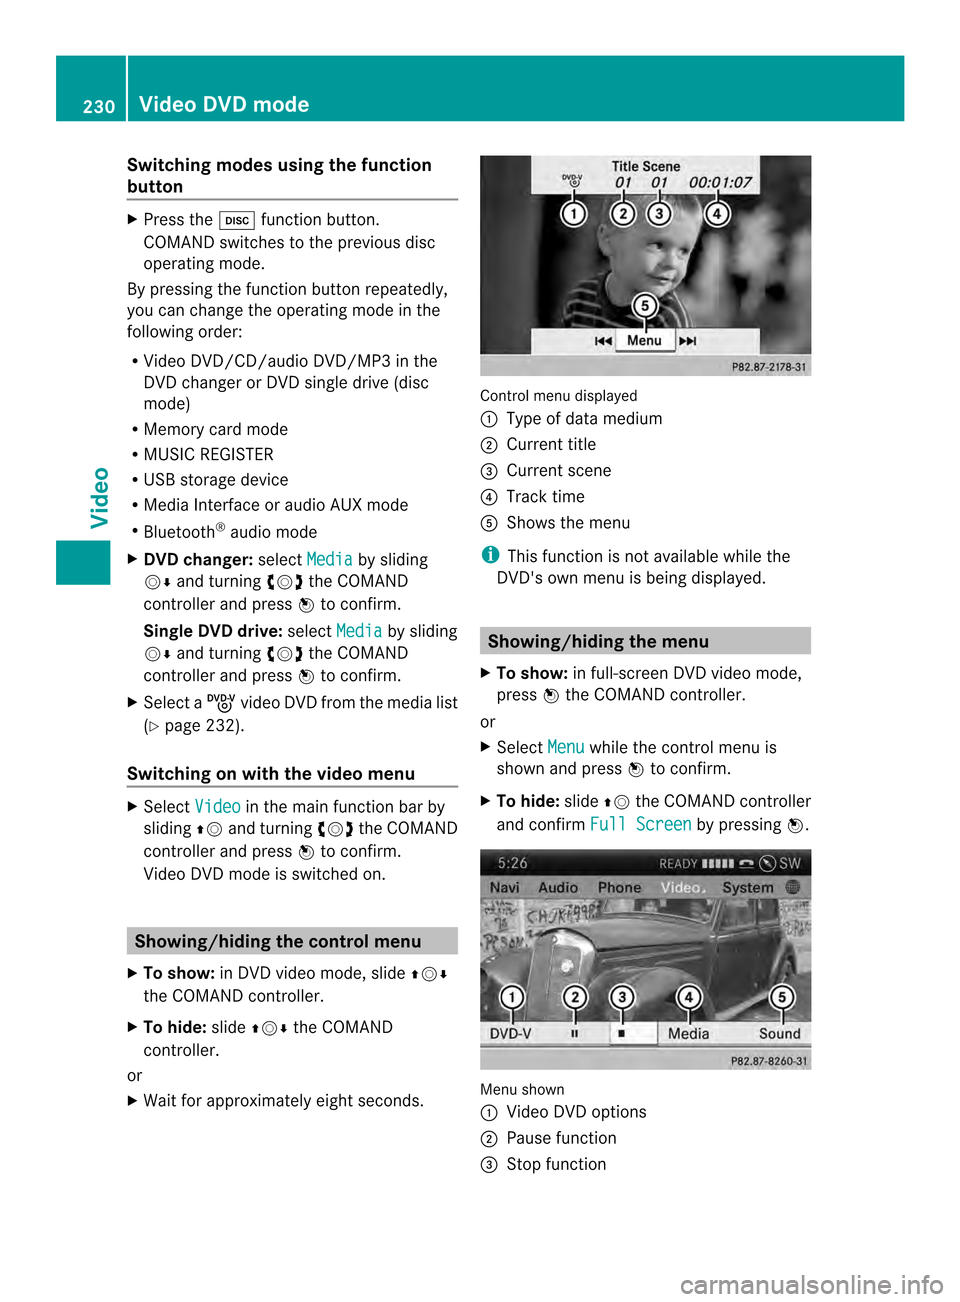
X Wait for approximately eight seconds. Control menu displayed
0001
Type of data medium
0002 Current title
0014 Current scene
0013 Track time
0011 Shows the menu
i This function is not available while the
DVD's own menu is being displayed. Showing/hiding the menu
X To show: in full-screen DVD video mode,
press 0037the COMAND controller.
or
X Select Menu while the control menu is
shown and press 0037to confirm.
X To hide: slide00360012the COMAND controller
and confirm Full Screen by pressing
0037. Menu shown
0001
Video DVD options
0002 Pause function
0014 Stop function 230
Video DVD modeVideo
Page 236 of 274
you may be able to influence events by
selecting and triggering actions. The type and
number of actions depend on the DVD.
X
Selec tanaction by sliding 003600120008or003400120035 the
COMAND controlle rand press 0037to
execute it.
A menu appears and the first entry,
Select , is highlighted.
X Press 0037the COMAND controller. AUX video mode
Connecting external video sources
External video sources may have different
volumes, which can mea nthat system
messages such as traffic announcements and
navigation system announcements are much
louder. If necessary, deactivate the system
messages or adjust their volume manually.
If your vehicle is equipped with Media
Interface, you can connect an external video
source (AUX video) (Y page 219).
The 1/8 inch audio/video jacks are in the
center console stowage compartment.
i In vehicles with a rear view camera, the
AUX video jack cannot be used for external
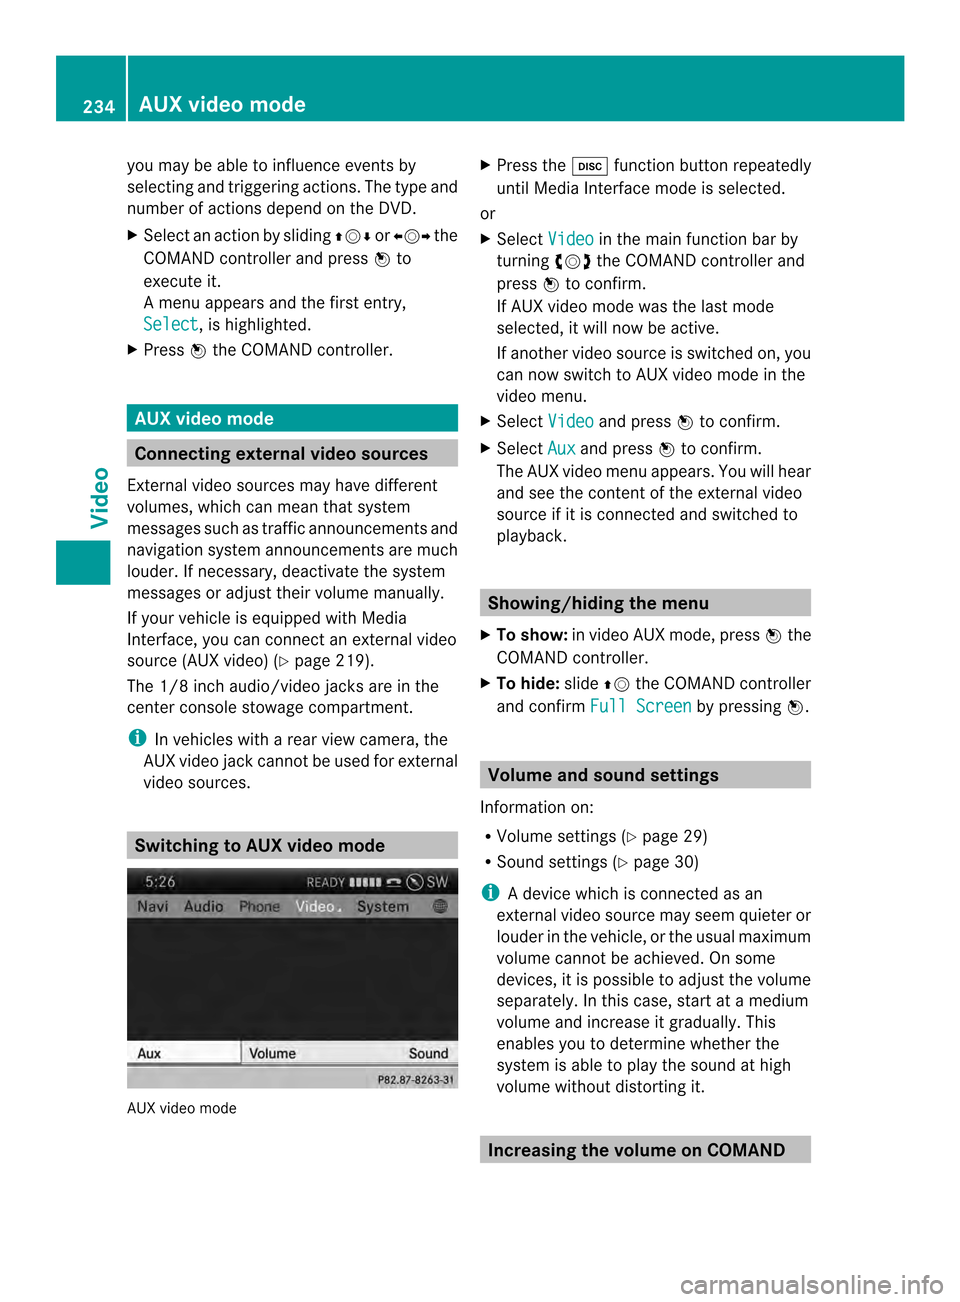
video sources. Switching to AUX video mode
AUX video mode X
Press the 0007function button repeatedly
until Media Interface mode is selected.
or
X Select Video in the main function bar by
turning 003C0012003Dthe COMAND controller and
press 0037to confirm.
If AUX video mode was the last mode
selected, it will now be active.
If another video source is switched on, you
can now switch to AUX video mode in the
video menu.
X Select Video and press
0037to confirm.
X Select Aux and press
0037to confirm.
The AUX video menu appears. You will hear
and see the content of the external video
source if it is connected and switched to
playback. Showing/hiding the menu
X To show: in video AUX mode, press 0037the
COMAND controller.
X To hide: slide00360012the COMAND controller
and confirm Full Screen by pressing
0037. Volume and sound settings
Information on:
R Volume settings (Y page 29)
R Sound settings (Y page 30)
i Adevice which is connected as an
external video source may seem quieter or
louder in the vehicle, or the usual maximum
volume cannot be achieved. On some
devices, it is possible to adjust the volume
separately. In this case, start at a medium
volume and increase it gradually .This
enables you to determine whether the
system is able to play the sound at high
volume without distorting it. Increasing the volume on COMAND234
AUX video modeVideo
Page 237 of 274
X
Show the video AUX menu (Y page 234).
X Select Volume by turning
003C0012003Dthe
COMAND controlle rand press 0037to
confirm.
Am enu appears. The 000Fdot indicates the
current setting.
X Select Standard or
Boost and press
0037to
confirm.
Standard :t
he volume of the external video
source is adjusted to a standard value.
Boost : the volume of the external video
source is raised by approximately 10 dB. Picture viewer
Introduction
If there are pictures on the active data
medium, you can look at them. You can
display pictures with a resolution of up to 20
megapixels. Data medium Supported picture
formats
CD/DVD with
picture files bmp, jpeg, jpg, png
USB devices (sticks,
hard drives)
SD memory card bmp, jpeg, jpg, png
Calling up
acategory list
X Select a data medium with pictures (e.g. a
memory card):
R in the Audio menu (Y page 184)
R in the media lis t(Ypage 199)
X Select Search in the basic display by
sliding 00120008and turning 003C0012003Dthe COMAND
controller and press 0037to confirm.
The category list appears ( Ypage 206). Displaying pictures
X Select (Y page 206)Photos in the category
list by turning 003C0012003Dthe COMAND controller
and press 0037to confirm.
Af older directory appears.
X Select a folder with photos and press 0037to
confirm.
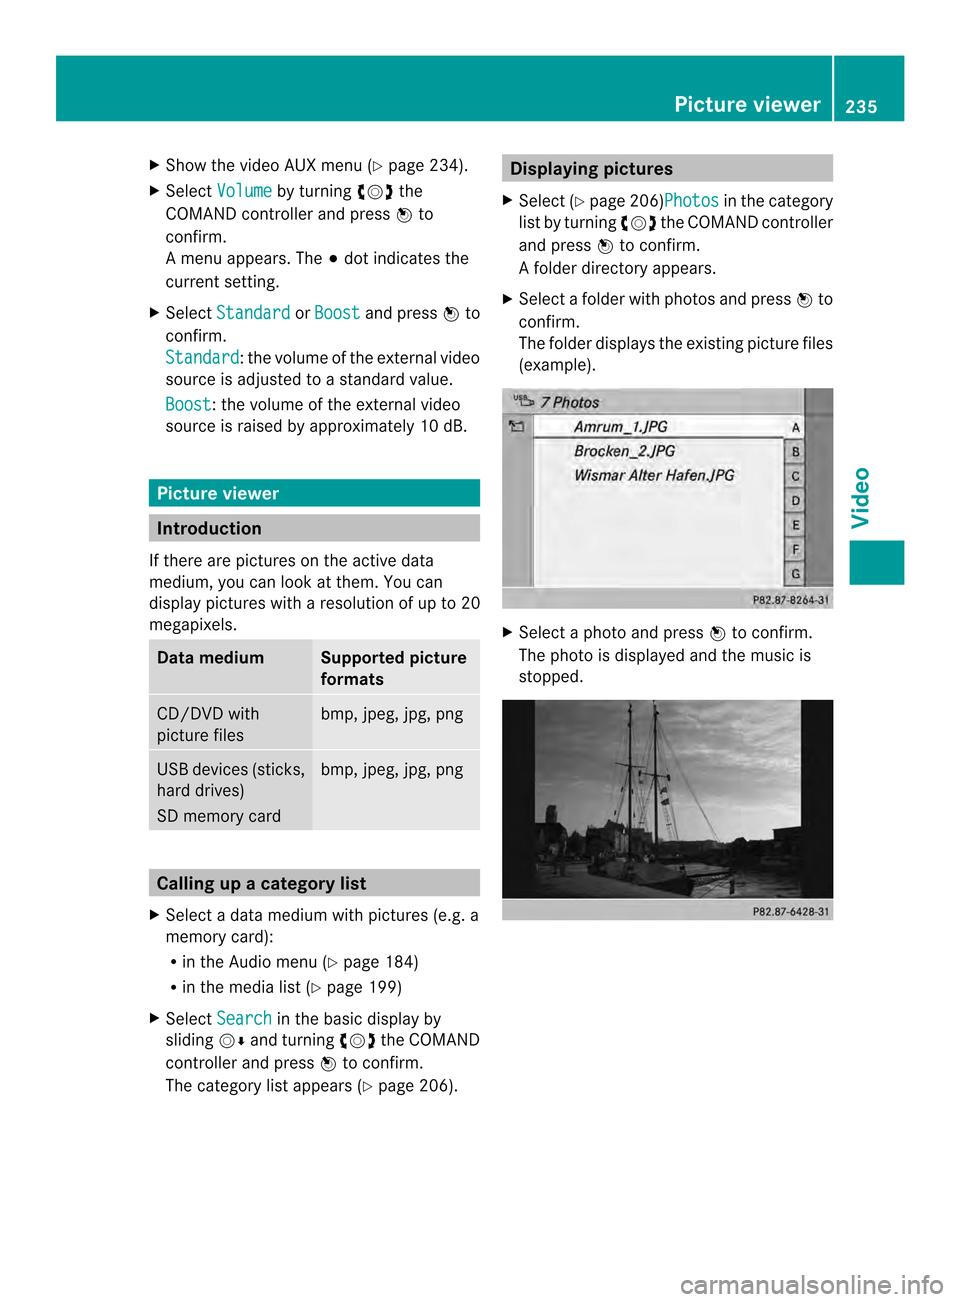
The folder displays the existing picture files
(example). X
Select a photo and press 0037to confirm.
The photo is displayed and the music is
stopped. Picture viewer
235Video Z