ignition Mercury Milan 2009 s Repair Manual
[x] Cancel search | Manufacturer: MERCURY, Model Year: 2009, Model line: Milan, Model: Mercury Milan 2009Pages: 317, PDF Size: 2.67 MB
Page 220 of 317

The RSS detects obstacles up to six
feet (two meters) from the rear
bumper with a decreased coverage
area at the outer corners of the
bumper, (refer to the figures for
approximate zone coverage areas).
As you move closer to the obstacle,
the rate of the tone increases. When
the obstacle is less than 10 inches
(25.0 cm) away, the tone will sound
continuously. If the RSS detects a
stationary or receding object further
than 10 inches (25.0 cm) from the
side of the vehicle, the tone will
sound for only three seconds. Once
the system detects an object
approaching, the tone will sound
again.
While receiving a warning the radio volume will be reduced to a
predetermined level. After the warning goes away, the radio will return
to the previous value.
The RSS automatically turns on when the gear selector is placed in R
(Reverse) and the ignition is on. A control in the message center allows
the driver to disable the system only when the ignition is on and the
gear selector is in R (Reverse). Refer toMessage centerin theDriver
Controlschapter for more information.
Keep the RSS sensors (located on the rear bumper/fascia) free
from snow, ice and large accumulations of dirt (do not clean the
sensors with sharp objects). If the sensors are covered, it will
affect the accuracy of the RSS.
If your vehicle sustains damage to the rear bumper/fascia, leaving
it misaligned or bent, the sensing zone may be altered causing
inaccurate measurement of obstacles or false alarms.
ALL WHEEL DRIVE (AWD) SYSTEM (IF EQUIPPED)
Your vehicle may be equipped with a full-time All Wheel Drive (AWD)
system. The AWD system is an active system, meaning it not only
responds to wheel slip between the front and rear axles but also has the
2009 Milan(mln)
Owners Guide, 2nd Printing
USA(fus)
Driving
220
Page 222 of 317

•It often may be less risky to strike small objects, such as highway
reflectors, with minor damage to your vehicle rather than attempt a
sudden return to the pavement which could cause the vehicle to slide
sideways out of control or rollover. Remember, your safety and the
safety of others should be your primary concern.
If your vehicle gets stuck
If your vehicle gets stuck in mud or snow it may be rocked out by
shifting between forward and reverse gears, stopping between shifts, in a
steady pattern. Press lightly on the accelerator in each gear.
If your vehicle is equipped with Traction Control™, it may be beneficial
to disengage the Traction Control™ system while attempting to rock the
vehicle.
Do not rock the vehicle if the engine is not at normal operating
temperature or damage to the transmission may occur.
Do not rock the vehicle for more than a few minutes or damage
to the transmission and tires may occur or the engine may
overheat.
WARNING:Always set the parking brake fully and make sure
the gearshift is latched in P (Park). Turn the ignition to the off
position and remove the key whenever you leave your vehicle.
WARNING:If the parking brake is fully released, but the brake
warning lamp remains illuminated, the brakes may not be
working properly. See your authorized dealer.
WARNING:Do not spin the wheels at over 35 mph (56 km/h).
The tires may fail and injure a passenger or bystander.
Emergency maneuvers
•In an unavoidable emergency situation where a sudden sharp turn
must be made, remember to avoid “over-driving” your vehicle (i.e.,
turn the steering wheel only as rapidly and as far as required to avoid
the emergency). Excessive steering will result in less vehicle control,
not more. Additionally, smooth variations of the accelerator and/or
brake pedal pressure should be utilized if changes in vehicle speed are
called for. Avoid abrupt steering, acceleration or braking which could
result in an increased risk of loss of vehicle control, vehicle rollover
2009 Milan(mln)
Owners Guide, 2nd Printing
USA(fus)
Driving
222
Page 223 of 317

and/or personal injury. Use all available road surface to return the
vehicle to a safe direction of travel.
•In the event of an emergency stop, avoid skidding the tires and do not
attempt any sharp steering wheel movements.
•If the vehicle goes from one type of surface to another (i.e., from
concrete to gravel) there will be a change in the way the vehicle
responds to a maneuver (steering, acceleration or braking). Again,
avoid these abrupt inputs.
AWD Systems (if equipped)
AWD uses all four wheels to power the vehicle. This increases traction,
enabling you to drive over terrain and road conditions that a
conventional two-wheel drive vehicle cannot.
Sand
When driving over sand, try to keep all four wheels on the most solid
area of the trail. Avoid reducing the tire pressures but shift to a lower
gear and drive steadily through the terrain. Apply the accelerator slowly
and avoid spinning the wheels.
When driving at slow speeds in deep sand under high outside
temperatures, use a low gear or (L) when possible. L (Low) gear
operation will maximize the engine and transmission cooling capability.
Under severe operating conditions, the A/C may cycle on and off to
protect overheating of the engine.
Avoid excessive speed because vehicle momentum can work against you
and cause the vehicle to become stuck to the point that assistance may
be required from another vehicle. Remember, you may be able to back
out the way you came if you proceed with caution.
Mud and water
If you must drive through high water, drive slowly. Traction or brake
capability may be limited.
When driving through water, determine the depth; avoid water higher
than the bottom of the wheel rims (if possible) and proceed slowly. If the
ignition system gets wet, the vehicle may stall.
Once through water, always try the brakes. Wet brakes do not stop the
vehicle as effectively as dry brakes. Drying can be improved by moving
your vehicle slowly while applying light pressure on the brake pedal.
Be cautious of sudden changes in vehicle speed or direction when you
are driving in mud. Even AWD vehicles can lose traction in slick mud. As
2009 Milan(mln)
Owners Guide, 2nd Printing
USA(fus)
Driving
223
Page 228 of 317

•towing of your disabled vehicle
•emergency travel expense reimbursement
•travel planning benefits
In Canada, for uninterrupted Roadside Assistance coverage, you may
purchase extended coverage prior to your Basic Warranty’s Roadside
Assistance expiring. For more information and enrollment, contact
1–877–294–2582 or visit our website at www.ford.ca.
Using roadside assistance
Complete the roadside assistance identification card and place it in your
wallet for quick reference. In the United States, this card is found in the
Owner Guide portfolio in the glove compartment. In Canada, the card is
found in theCustomer Information Guidein the glove compartment.
U.S. Ford, Mercury and Lincoln vehicle customers who require Roadside
Assistance, call 1-800-241-3673.
Canadian customers who require roadside assistance, call
1-800-665-2006.
If you need to arrange roadside assistance for yourself, Ford Motor
Company will reimburse a reasonable amount for towing to the nearest
dealership within 35 miles. To obtain reimbursement information, U.S.
Ford, Mercury and Lincoln vehicle customers call 1-800-241-3673.
Customers will be asked to submit their original receipts.
Canadian customers who need to obtain reimbursement information, call
1–800–665–2006.
HAZARD FLASHER CONTROL
The hazard flasher control is located
on the instrument panel by the
radio. The hazard flashers will
operate when the ignition is in any
position or if the key is not in the
ignition.
Push in the flasher control and all front and rear direction signals will
flash. Press the flasher control again to turn them off. Use it when your
vehicle is disabled and is creating a safety hazard for other motorists.
Note:With extended use, the flasher may run down your battery.
FUEL PUMP SHUT-OFF SWITCH
This device stops the electric fuel pump from sending fuel to the engine
when your vehicle has had a substantial jolt.
2009 Milan(mln)
Owners Guide, 2nd Printing
USA(fus)
Roadside Emergencies
228
Page 229 of 317

After an accident, if the engine cranks but does not start, this switch
may have been activated.
The fuel pump shut-off switch is
located in the front passenger
footwell area in the right upper
corner.
To reset the switch:
1. Turn the ignition to the off
position.
2. Check the fuel system for leaks.
3. If no leaks are apparent, reset the
switch by pushing in on the reset
button.
4. Turn the ignition to the on
position.
5. Wait a few seconds and return
the key to off position.
6. Make another check for leaks.
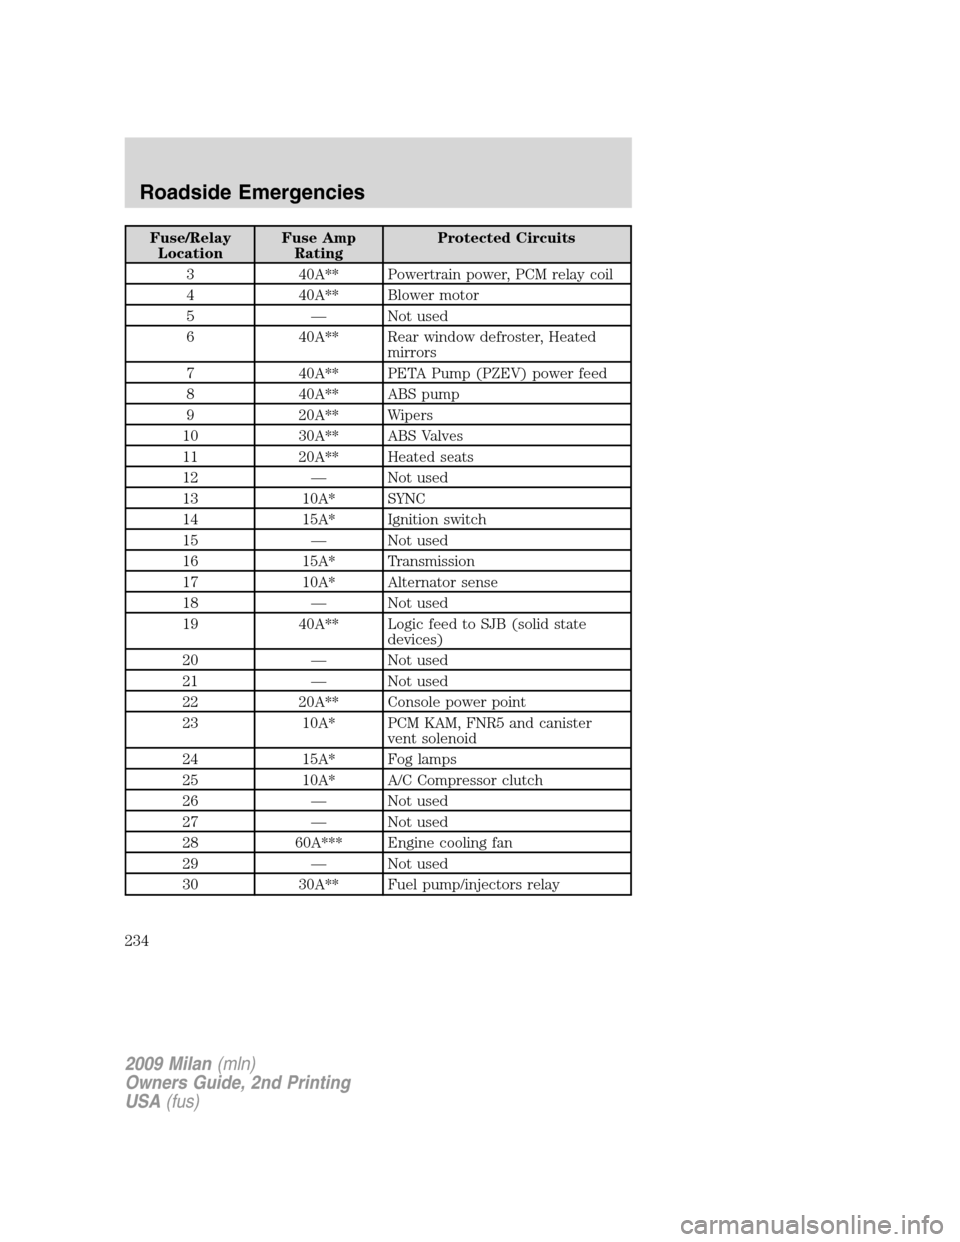
FUSES AND RELAYS
Fuses
If electrical components in the
vehicle are not working, a fuse may
have blown. Blown fuses are
identified by a broken wire within
the fuse. Check the appropriate
fuses before replacing any electrical
components.
Note:Always replace a fuse with one that has the specified amperage
rating. Using a fuse with a higher amperage rating can cause severe wire
damage and could start a fire.
15
2009 Milan(mln)
Owners Guide, 2nd Printing
USA(fus)
Roadside Emergencies
229
Page 234 of 317

Fuse/Relay
LocationFuse Amp
RatingProtected Circuits
3 40A** Powertrain power, PCM relay coil
4 40A** Blower motor
5 — Not used
6 40A** Rear window defroster, Heated
mirrors
7 40A** PETA Pump (PZEV) power feed
8 40A** ABS pump
9 20A** Wipers
10 30A** ABS Valves
11 20A** Heated seats
12 — Not used
13 10A* SYNC
14 15A* Ignition switch
15 — Not used
16 15A* Transmission
17 10A* Alternator sense
18 — Not used
19 40A** Logic feed to SJB (solid state
devices)
20 — Not used
21 — Not used
22 20A** Console power point
23 10A* PCM KAM, FNR5 and canister
vent solenoid
24 15A* Fog lamps
25 10A* A/C Compressor clutch
26 — Not used
27 — Not used
28 60A*** Engine cooling fan
29 — Not used
30 30A** Fuel pump/injectors relay
2009 Milan(mln)
Owners Guide, 2nd Printing
USA(fus)
Roadside Emergencies
234
Page 288 of 317

could cause damage to the fuel system. Repairs to correct the effects of
using an aftermarket product in your fuel may not be covered by your
warranty.
Many of the world’s automakers approved the World-Wide Fuel Charter
that recommends gasoline specifications to provide improved
performance and emission control system protection for your vehicle.
Gasolines that meet the World-Wide Fuel Charter should be used when
available. Ask your fuel supplier about gasolines that meet the
World-Wide Fuel Charter.
Cleaner air
Ford endorses the use of reformulated “cleaner-burning” gasolines to
improve air quality, per the recommendations in theChoosing the right
fuelsection.
Running out of fuel
Avoid running out of fuel because this situation may have an adverse
effect on powertrain components.
If you have run out of fuel:
•You may need to cycle the ignition from off to on several times after
refueling to allow the fuel system to pump the fuel from the tank to
the engine. On restarting, cranking time will take a few seconds longer
than normal.
•Normally, adding 1 gallon (3.8L) of fuel is enough to restart the
engine. If the vehicle is out of fuel and on a steep grade, more than
1 gallon (3.8L) may be required.
•TheService engine soon
indicator may come on. For more
information on theService engine soon
indicator, refer to
Warning lights and chimesin theInstrument Clusterchapter.
ESSENTIALS OF GOOD FUEL ECONOMY
Measuring techniques
Your best source of information about actual fuel economy is you, the
driver. You must gather information as accurately and consistently as
possible. Fuel expense, frequency of fill-ups or fuel gauge readings are
NOT accurate as a measure of fuel economy. We do not recommend
taking fuel economy measurements during the first 1,000 miles
(1,600 km) of driving (engine break-in period). You will get a more
accurate measurement after 2,000 miles–3,000 miles
(3,000 km–5,000 km).
2009 Milan(mln)
Owners Guide, 2nd Printing
USA(fus)
Maintenance and Specifications
288
Page 289 of 317

Filling the tank
The advertised fuel capacity of the fuel tank on your vehicle is equal to
the rated refill capacity of the fuel tank as listed in theMaintenance
product specifications and capacitiessection of this chapter.
The advertised capacity is the amount of the indicated capacity and the
empty reserve combined. Indicated capacity is the difference in the
amount of fuel in a full tank and a tank when the fuel gauge indicates
empty. Empty reserve is the small amount of fuel remaining in the fuel
tank after the fuel gauge indicates empty.
The amount of usable fuel in the empty reserve varies and should
not be relied upon to increase driving range. When refueling your
vehicle after the fuel gauge indicates empty, you might not be
able to refuel the full amount of the advertised capacity of the
fuel tank due to the empty reserve still present in the tank.
For consistent results when filling the fuel tank:
•Turn the engine/ignition switch to the off position prior to refueling,
an error in the reading will result if the engine is left running.
•Use the same filling rate setting (low — medium — high) each time
the tank is filled.
•Allow no more than two automatic click-offs when filling.
•Always use fuel with the recommended octane rating.
•Use a known quality gasoline, preferably a national brand.
•Use the same side of the same pump and have the vehicle facing the
same direction each time you fill up.
•Have the vehicle loading and distribution the same every time.
Your results will be most accurate if your filling method is consistent.
Calculating fuel economy
1. Fill the fuel tank completely and record the initial odometer reading
(in miles or kilometers).
2. Each time you fill the tank, record the amount of fuel added (in
gallons or liters).
3. After at least three to five tank fill-ups, fill the fuel tank and record
the current odometer reading.
4. Subtract your initial odometer reading from the current odometer
reading.
2009 Milan(mln)
Owners Guide, 2nd Printing
USA(fus)
Maintenance and Specifications
289
Page 292 of 317

•Avoid running out of fuel.
•Do not turn off the ignition while your vehicle is moving, especially at
high speeds.
•Have the items listed inscheduled maintenance information
performed according to the specified schedule.
The scheduled maintenance items listed inscheduled maintenance
informationare essential to the life and performance of your vehicle
and to its emissions system.
If other than Ford, Motorcraft or Ford-authorized parts are used for
maintenance replacements or for service of components affecting
emission control, such non-Ford parts should be equivalent to genuine
Ford Motor Company parts in performance and durability.
WARNING:Do not park, idle, or drive your vehicle in dry grass
or other dry ground cover. The emission system heats up the
engine compartment and exhaust system, which can start a fire.
Illumination of theService engine soon
indicator, charging system
warning light or the temperature warning light, fluid leaks, strange odors,
smoke or loss of engine power could indicate that the emission control
system is not working properly.
An improperly operating or damaged exhaust system may allow exhaust
to enter the vehicle. Have a damaged or improperly operating exhaust
system inspected and repaired immediately.
WARNING:Exhaust leaks may result in entry of harmful and
potentially lethal fumes into the passenger compartment.
Do not make any unauthorized changes to your vehicle or engine. By
law, vehicle owners and anyone who manufactures, repairs, services,
sells, leases, trades vehicles, or supervises a fleet of vehicles are not
permitted to intentionally remove an emission control device or prevent
it from working. Information about your vehicle’s emission system is on
the Vehicle Emission Control Information Decal located on or near the
engine. This decal also lists engine displacement.
Please consult yourWarranty Guide/Customer Information Guidefor
complete emission warranty information.
On board diagnostics (OBD-II)
Your vehicle is equipped with a computer that monitors the engine’s
emission control system. This system is commonly known as the On
2009 Milan(mln)
Owners Guide, 2nd Printing
USA(fus)
Maintenance and Specifications
292
Page 294 of 317

If the vehicle’s engine or transmission has just been serviced, or the
battery has recently run down or been replaced, the OBD-II system may
indicate that the vehicle is not ready for I/M testing. To determine if the
vehicle is ready for I/M testing, turn the ignition key to the on position
for 15 seconds without cranking the engine. If theService engine
soon
indicator blinks eight times, it means that the vehicle is not
ready for I/M testing; if theService engine soon
indicator stays on
solid, it means that the vehicle is ready for I/M testing.
The OBD-II system is designed to check the emission control system
during normal driving. A complete check may take several days. If the
vehicle is not ready for I/M testing, the following driving cycle consisting
of mixed city and highway driving may be performed:
15 minutes of steady driving on an expressway/highway followed by
20 minutes of stop-and-go driving with at least four 30-second idle
periods.
Allow the vehicle to sit for at least eight hours without starting the
engine. Then, start the engine and complete the above driving cycle. The
engine must warm up to its normal operating temperature. Once started,
do not turn off the engine until the above driving cycle is complete. If
the vehicle is still not ready for I/M testing, the above driving cycle will
have to be repeated.
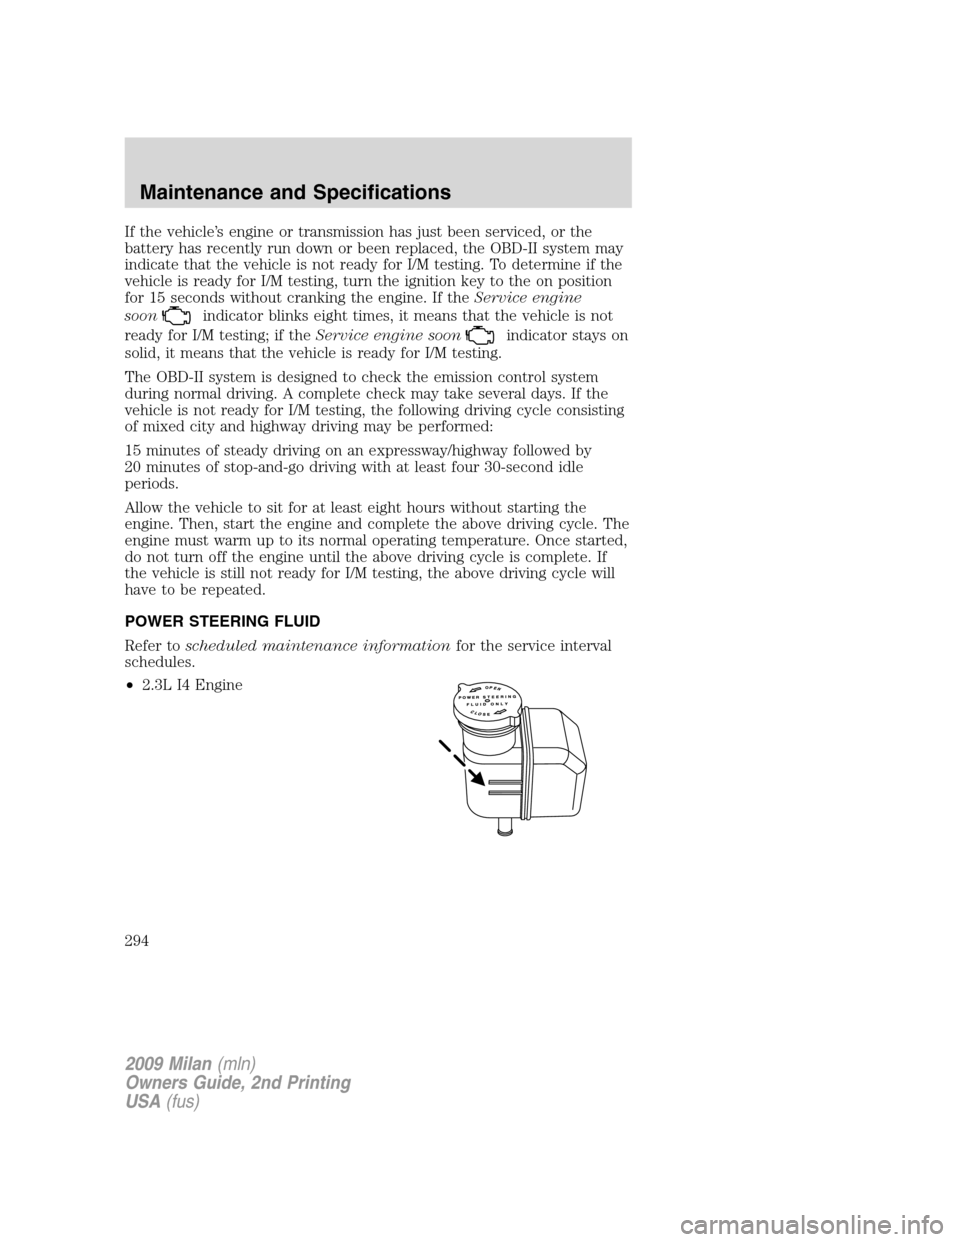
POWER STEERING FLUID
Refer toscheduled maintenance informationfor the service interval
schedules.
•2.3L I4 Engine
2009 Milan(mln)
Owners Guide, 2nd Printing
USA(fus)
Maintenance and Specifications
294