Mercury Monterey 2005 Owner's Manuals
Manufacturer: MERCURY, Model Year: 2005, Model line: Monterey, Model: Mercury Monterey 2005Pages: 304, PDF Size: 3.45 MB
Page 171 of 304

higher than the manufacturer’s recommended cold inflation pressure
which can be found on either the tire label or certification label which is
located on the B-Pillar or the edge of the driver’s door. The cold inflation
pressure should never be set lower than the recommended pressure on
the tire label or certification label.
When weather temperature changes occur, tire inflation pressures also
change. A 10° F (6° C) temperature drop can cause a corresponding
drop of 1 psi (7 kPa) in inflation pressure. Check your tire pressures
frequently and adjust them to the proper pressure which can be found
on the tire label or certification label.
If you are checking tire pressure when the tire is hot, (i.e. driven more
than 1 mile [1.6 km]), never “bleed” or reduce air pressure. The tires are
hot from driving and it is normal for pressures to increase above
recommended cold pressures. A hot tire at or below recommended cold
inflation pressure could be significantly under-inflated.
To check the pressure in your tire(s):
1. Make sure the tires are cool, meaning they are not hot from driving
even a mile.
Note:If you have to drive a distance to get air for your tire(s), check
and record the tire pressure first and add the appropriate air pressure
when you get to the pump. It is normal for tires to heat up and the air
pressure inside to go up as you drive. Never “bleed” or reduce air
pressure when tires are hot.
2. Remove the cap from the valve on one tire, then firmly press the tire
gauge onto the valve and measure the pressure with the tire gauge.
3. Add enough air to reach the recommended air pressure
Note:If you overfill the tire, release air by pushing on the metal stem in
the center of the valve. Then recheck the pressure with your tire gauge.
4. Replace the valve cap.
5. Repeat this procedure for each tire, including the spare.
Note:Some spare tires require higher inflation pressure than the other
tires. Check the tire label on the B pillar or the edge of the driver’s door
for the recommended spare tire pressure.
6. Visually inspect the tires to make sure there are no nails or other
objects embedded that could poke a hole in the tire and cause an air
leak.
7. Check the sidewalls to make sure there are no gouges, cuts or bulges.
2005 Monterey(mty)
Owners Guide (post-2002-fmt)
USA_English(fus)
Tires, Wheels and Loading
171
Page 172 of 304

TIRE REPLACEMENT REQUIREMENTS
Your vehicle is equipped with tires designed to provide a safe ride and
handling capability.
Only use replacement tires and wheels that are the same size
and type (such as P-metric versus LT-metric or all-season versus
all-terrain) as those originally provided by Ford. Use of any tire or
wheel not recommended by Ford can affect the safety and
performance of your vehicle, which could result in an increased risk of
loss of vehicle control, vehicle rollover, personal injury and death.
Additionally the use of non-recommended tires and wheels could cause
steering, suspension, axle or transfer case/power transfer unit failure. If
you have questions regarding tire replacement, see an authorized Ford
or Lincoln/Mercury dealer.
Make sure all tires and wheels on the vehicle are of the same size, type,
tread design, brand, load-carrying capacity and speed rating because it
can affect the safety and performance of your vehicle, which could result
in an increased risk of loss of vehicle control, vehicle rollover, personal
injury and death.
Important:Remember to replace the spare tire when you replace the
road tires at the end of their useful life. Even if it has never been used,
the spare tire should be replaced because tires degrade over time.
Important:Remember to replace the wheel air valves when the road
tires are replaced at the end of their useful life.
CHANGING A FLAT TIRE
If you get a flat tire while driving:
•do not brake heavily.
•gradually decrease the vehicle’s speed.
•hold the steering wheel firmly.
•slowly move to a safe place on the side of the road.
•If your low tire warning light is on, refer toLow tire warningin this
chapter.
The use of tire sealants is not recommended and may damage
your tires. The use of tire sealants may also affect your Tire
Pressure Monitoring System (if equipped).
2005 Monterey(mty)
Owners Guide (post-2002-fmt)
USA_English(fus)
Tires, Wheels and Loading
172
Page 173 of 304

Temporary spare tire information
Your vehicle may have a temporary spare tire. The temporary spare tire
for your vehicle is labeled as such. It is smaller than a regular tire and is
designed for emergency use only. Replace this tire with a full-size tire as
soon as possible.
Note:The Low Tire Pressure
Warning system (if equipped) will
detect the temporary spare tire and
illuminate the low tire warning light
until the spare tire is replaced with
a proper full-size tire. To reset the system, refer toLow tire warning –
Indirectin this chapter.
If you use the temporary spare tire continuously or do not follow
these precautions, the tire could fail, causing you to lose control
of the vehicle, possibly injuring yourself or others.
When driving with the temporary spare tiredo not:
•use more than one temporary spare tire at a time
•exceed 50 mph (80 km/h) or drive further than 2,000 miles (3,200
km) total under any circumstances
•load the vehicle beyond maximum vehicle load rating listed on the
Safety Compliance Label
•tow a Class III trailer
•use tire chains
•drive through an automatic car wash, because of the vehicle’s reduced
ground clearance
•try to repair the temporary spare tire or remove it from its wheel
•use the wheel for any other type of vehicle
Use of a temporary spare tire at any one wheel location can lead to
impairment of the following:
•handling, stability and braking performance
•comfort and noise
•ground clearance and parking at curbs
•Winter driving capability
2005 Monterey(mty)
Owners Guide (post-2002-fmt)
USA_English(fus)
Tires, Wheels and Loading
173
Page 174 of 304

Dissimilar spare tire/wheel information (if equipped)
Failure to follow these guidelines could result in an increased
risk of loss of vehicle control, injury or death.
Your vehicle may be equipped with a dissimilar spare tire/wheel. A
dissimilar spare tire/wheel is defined as a spare tire and/or wheel that is
different in brand, size or appearance from the road tires and wheels. If
you have a dissimilar spare tire/wheel, then it is intended for temporary
use only. This means that if you need to use it, you should replace it as
soon as possible with a road tire/wheel that is the same size and type as
the road tires and wheels that were originally provided by Ford. If the
dissimilar spare tire or wheel is damaged, it should be replaced rather
than repaired.
When driving with the dissimilar spare tire/wheel,do not:
•Exceed 70 mph (113 km/h)
•Use more than one dissimilar spare tire/wheel at a time
•Use commercial car washing equipment
•Use snow chains on the end of the vehicle with the dissimilar spare
tire/wheel
The usage of a dissimilar spare tire/wheel can lead to impairment of the
following:
•Handling, stability and braking performance
•Comfort and noise
•Ground clearance and parking at curbs
•Winter weather driving capability
•Wet weather driving capability
•All-Wheel driving capability (if applicable)
•Load leveling adjustment (if applicable)
When driving with the dissimilar spare tire/wheel additional caution
should be given to:
•Towing a trailer
•Driving vehicles equipped with a camper body
•Driving vehicles with a load on the cargo rack
Drive cautiously when using a dissimilar spare tire/wheel and seek
service as soon as possible.
2005 Monterey(mty)
Owners Guide (post-2002-fmt)
USA_English(fus)
Tires, Wheels and Loading
174
Page 175 of 304

Location of the spare tire and tools
The spare tire and tools for your vehicle are stowed in the following
locations:
Item Location
Spare tire Under the vehicle, just forward of
the rear bumper.
Jack Behind the access panel located
on the right rear quarter panel
interior trim.
Jack handle Attached to the jack with a clip.
Flat tire tether, wing screw Inside tire tether kit, next to jack.
Removing the jack and tools
1. Locate the access panel on the interior trim. Rotate the panel
retaining clip and remove the panel.
2. Remove the jack and lug nut wrench by turning the thumbscrew
counterclockwise to relieve tension against the stowage bracket.
Removing the spare tire
1. Open liftgate and lift flap in the
carpeting on the rear tub cargo floor
to expose the hex nut. Insert the
lug nut wrench on the hex nut in
cargo floor.
2005 Monterey(mty)
Owners Guide (post-2002-fmt)
USA_English(fus)
Tires, Wheels and Loading
175
Page 176 of 304

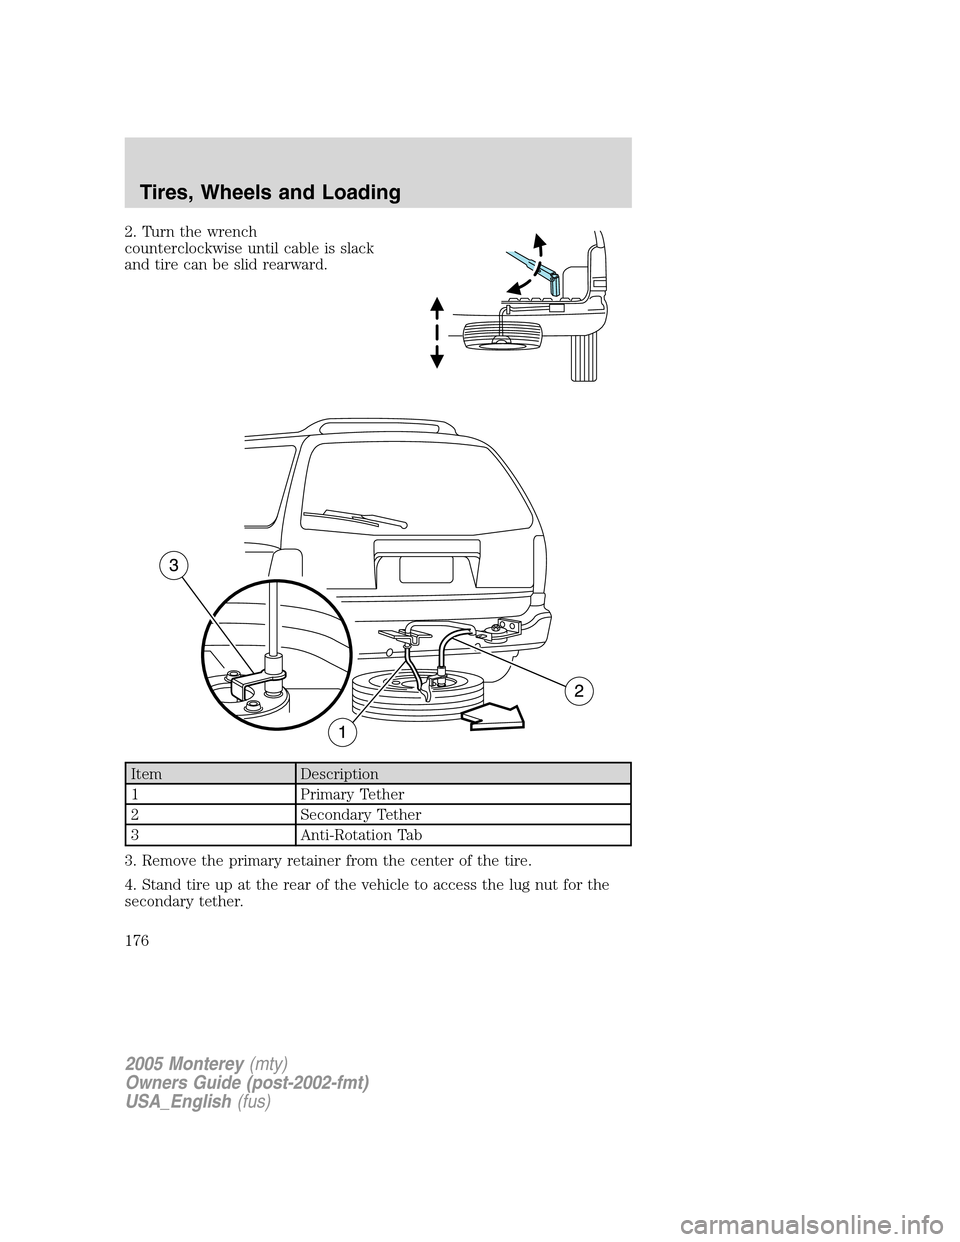
2. Turn the wrench
counterclockwise until cable is slack
and tire can be slid rearward.
Item Description
1 Primary Tether
2 Secondary Tether
3 Anti-Rotation Tab
3. Remove the primary retainer from the center of the tire.
4. Stand tire up at the rear of the vehicle to access the lug nut for the
secondary tether.
2005 Monterey(mty)
Owners Guide (post-2002-fmt)
USA_English(fus)
Tires, Wheels and Loading
176
Page 177 of 304

5. Use the lug wrench provided to turn the lug nut counter clock wise to
loosen, and remove the lug nut.
6. Lay the tire down and remove the secondary tether.
Note:Do not stow the full size tire or any flat tire under the vehicle.
Stowing the primary and secondary tether
Note:Ifno tireis to be stowed
under the vehicle, attach the
secondary tether to the primary
using the Velcro that’s attached to
the secondary tether.
Wrap the Velcro around the primary
cable and tightly back around the
secondary, overlapping itself to
secure.
Note:Store secondary lug nut with
the tether kit.
Tire change procedure
When one of the front wheels is off the ground, the transaxle
alone will not prevent the vehicle from moving or slipping off the
jack, even if the vehicle is in P (Park).
To help prevent the vehicle from moving when you change a tire,
be sure the parking brake is set, then block (in both directions)
the wheel that is diagonally opposite (other side and end of the
vehicle) to the tire being changed.
2005 Monterey(mty)
Owners Guide (post-2002-fmt)
USA_English(fus)
Tires, Wheels and Loading
177
Page 178 of 304

If the vehicle slips off the jack, you or someone else could be
seriously injured.
1. Park on a level surface, activate
hazard flashers and set parking
brake.
2. Place gearshift lever in P (Park),
turn engine off, and block the
diagonally opposite wheel.
3. Remove the spare tire, jack and
lug wrench.
4. Removing the optional wheel
cover or center ornament:
•To remove a bolt-on wheel cover
(if equipped) loosen the plastic
nuts on the center ornament with
the wheel nut wrench. Then,
remove the wheel cover with the
tapered end of the wheel nut
wrench.
•Remove the center ornament (if
equipped) from the wheel with the tapered end of the wheel nut
wrench. Insert and twist the handle, then pry against the wheel.
2005 Monterey(mty)
Owners Guide (post-2002-fmt)
USA_English(fus)
Tires, Wheels and Loading
178
Page 179 of 304

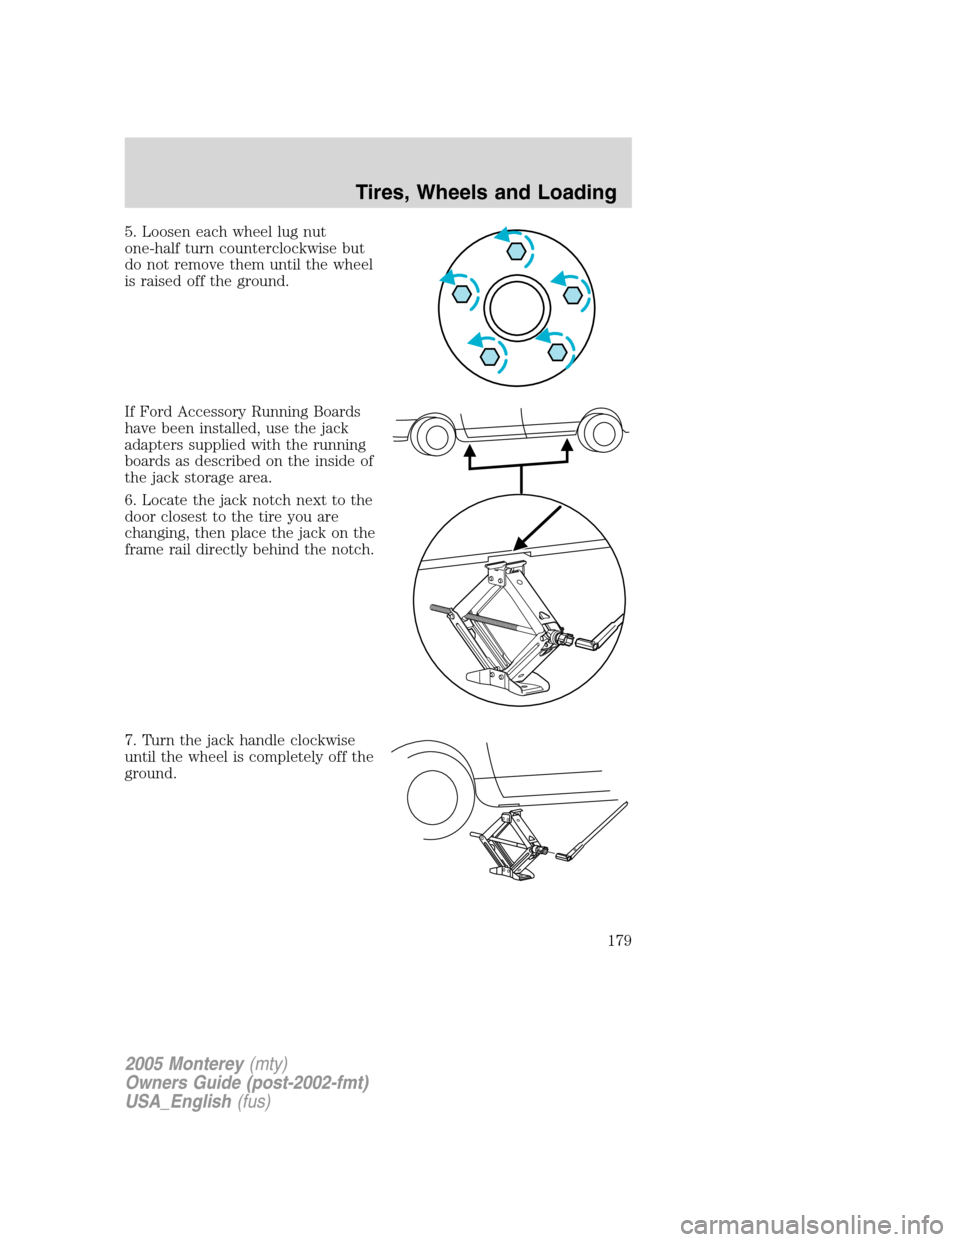
5. Loosen each wheel lug nut
one-half turn counterclockwise but
do not remove them until the wheel
is raised off the ground.
If Ford Accessory Running Boards
have been installed, use the jack
adapters supplied with the running
boards as described on the inside of
the jack storage area.
6. Locate the jack notch next to the
door closest to the tire you are
changing, then place the jack on the
frame rail directly behind the notch.
7. Turn the jack handle clockwise
until the wheel is completely off the
ground.
2005 Monterey(mty)
Owners Guide (post-2002-fmt)
USA_English(fus)
Tires, Wheels and Loading
179
Page 180 of 304

To lessen the risk of personal injury, do not put any part of your
body under the vehicle while changing a tire. Do not start the
engine when your vehicle is on the jack. The jack is only meant for
changing the tire.
8. Remove the lug nuts with the lug wrench.
9. Replace the flat tire with the spare tire, making sure the valve stem is
facing outward. Reinstall lug nuts until the wheel is snug against the hub.
Do not fully tighten the lug nuts until the wheel has been lowered.
10. Lower the wheel by turning the jack handle counterclockwise.
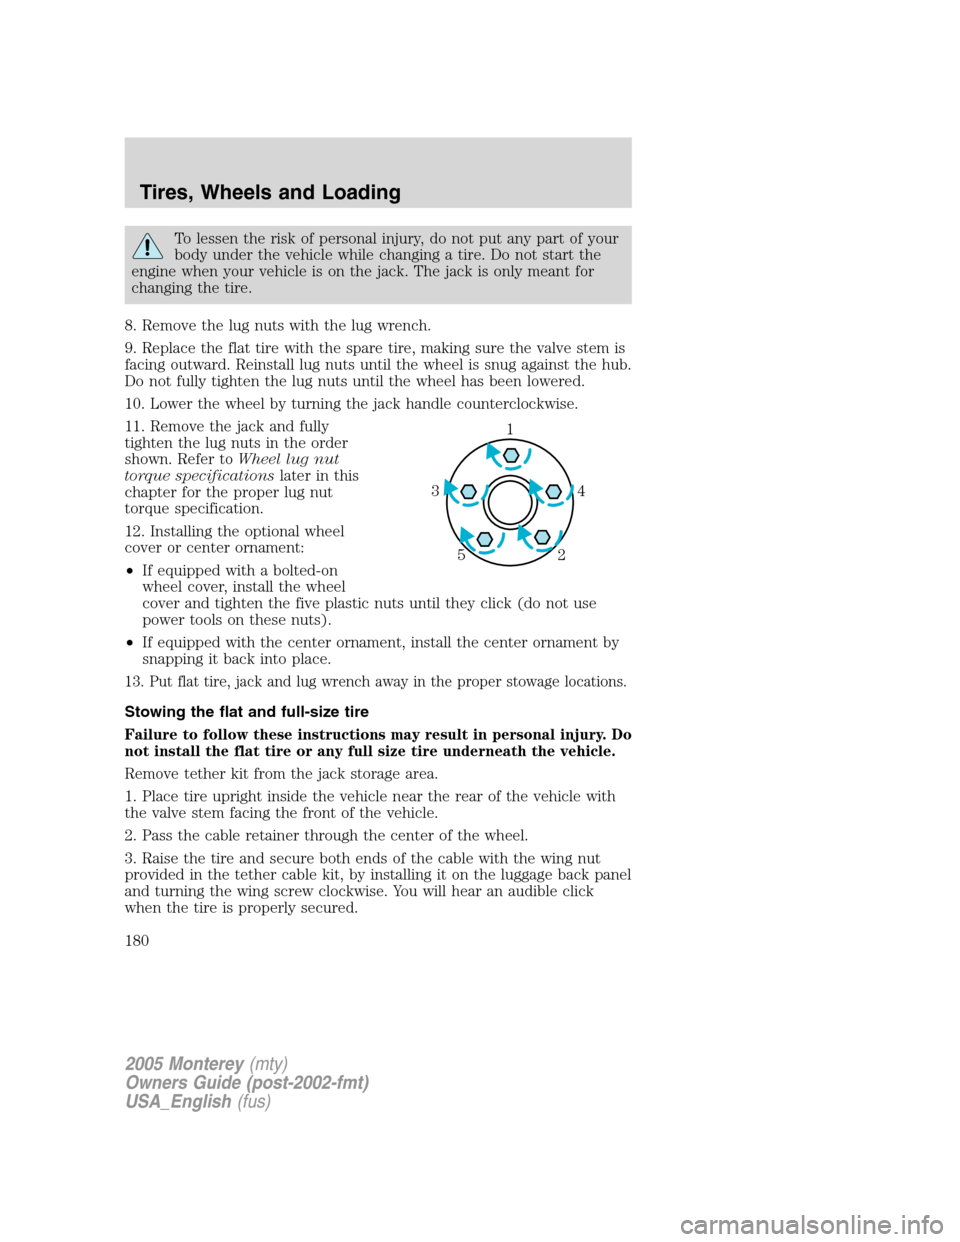
11. Remove the jack and fully
tighten the lug nuts in the order
shown. Refer toWheel lug nut
torque specificationslater in this
chapter for the proper lug nut
torque specification.
12. Installing the optional wheel
cover or center ornament:
•If equipped with a bolted-on
wheel cover, install the wheel
cover and tighten the five plastic nuts until they click (do not use
power tools on these nuts).
•If equipped with the center ornament, install the center ornament by
snapping it back into place.
13. Put flat tire, jack and lug wrench away in the proper stowage locations.
Stowing the flat and full-size tire
Failure to follow these instructions may result in personal injury. Do
not install the flat tire or any full size tire underneath the vehicle.
Remove tether kit from the jack storage area.
1. Place tire upright inside the vehicle near the rear of the vehicle with
the valve stem facing the front of the vehicle.
2. Pass the cable retainer through the center of the wheel.
3. Raise the tire and secure both ends of the cable with the wing nut
provided in the tether cable kit, by installing it on the luggage back panel
and turning the wing screw clockwise. You will hear an audible click
when the tire is properly secured.
1
4 3
2 5
2005 Monterey(mty)
Owners Guide (post-2002-fmt)
USA_English(fus)
Tires, Wheels and Loading
180