spare tire Mercury Monterey 2006 s User Guide
[x] Cancel search | Manufacturer: MERCURY, Model Year: 2006, Model line: Monterey, Model: Mercury Monterey 2006Pages: 320, PDF Size: 3.57 MB
Page 196 of 320
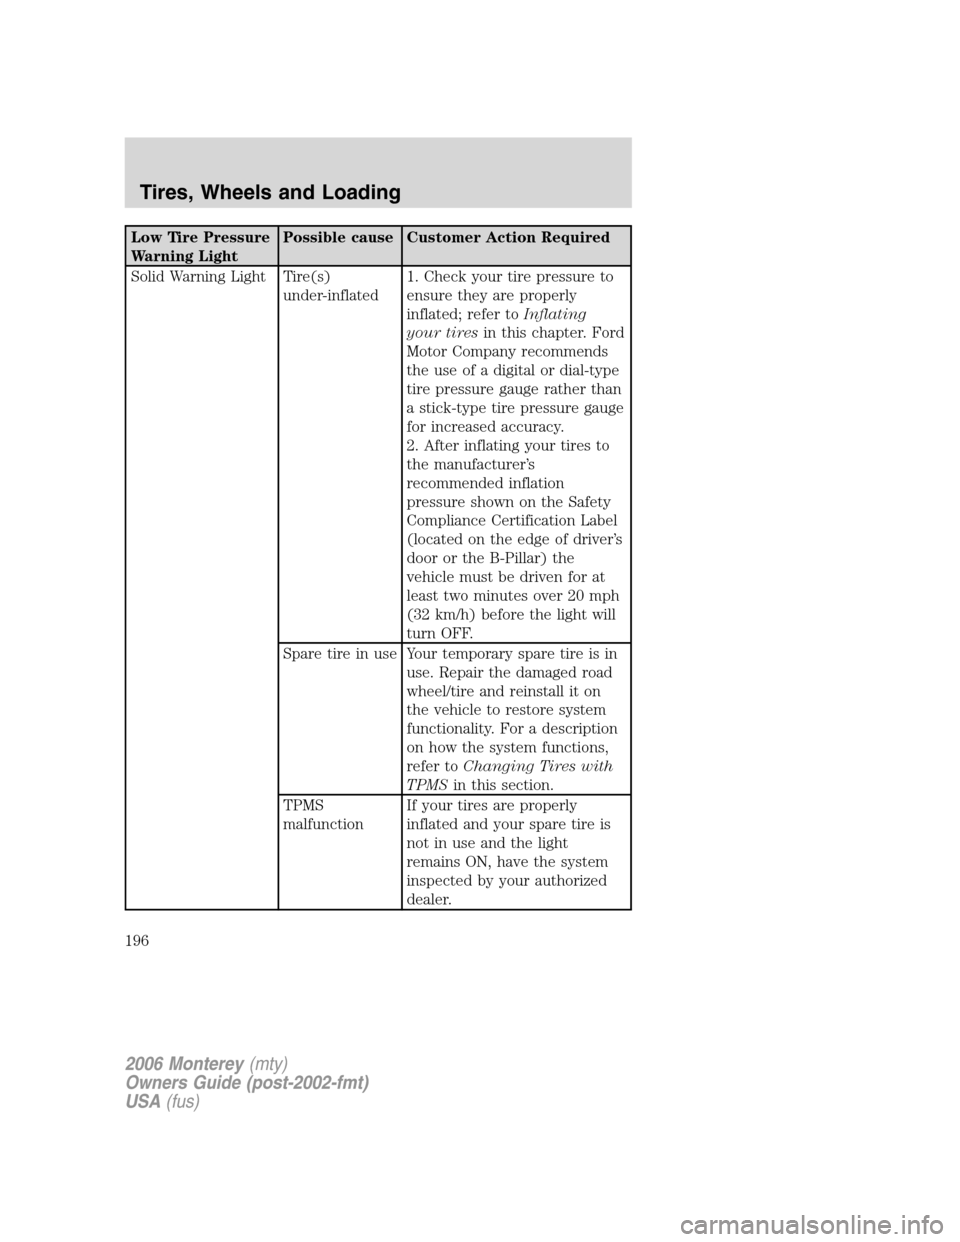
Low Tire Pressure
Warning LightPossible cause Customer Action Required
Solid Warning Light Tire(s)
under-inflated1. Check your tire pressure to
ensure they are properly
inflated; refer toInflating
your tiresin this chapter. Ford
Motor Company recommends
the use of a digital or dial-type
tire pressure gauge rather than
a stick-type tire pressure gauge
for increased accuracy.
2. After inflating your tires to
the manufacturer’s
recommended inflation
pressure shown on the Safety
Compliance Certification Label
(located on the edge of driver’s
door or the B-Pillar) the
vehicle must be driven for at
least two minutes over 20 mph
(32 km/h) before the light will
turn OFF.
Spare tire in use Your temporary spare tire is in
use. Repair the damaged road
wheel/tire and reinstall it on
the vehicle to restore system
functionality. For a description
on how the system functions,
refer toChanging Tires with
TPMSin this section.
TPMS
malfunctionIf your tires are properly
inflated and your spare tire is
not in use and the light
remains ON, have the system
inspected by your authorized
dealer.
2006 Monterey(mty)
Owners Guide (post-2002-fmt)
USA(fus)
Tires, Wheels and Loading
196
Page 197 of 320
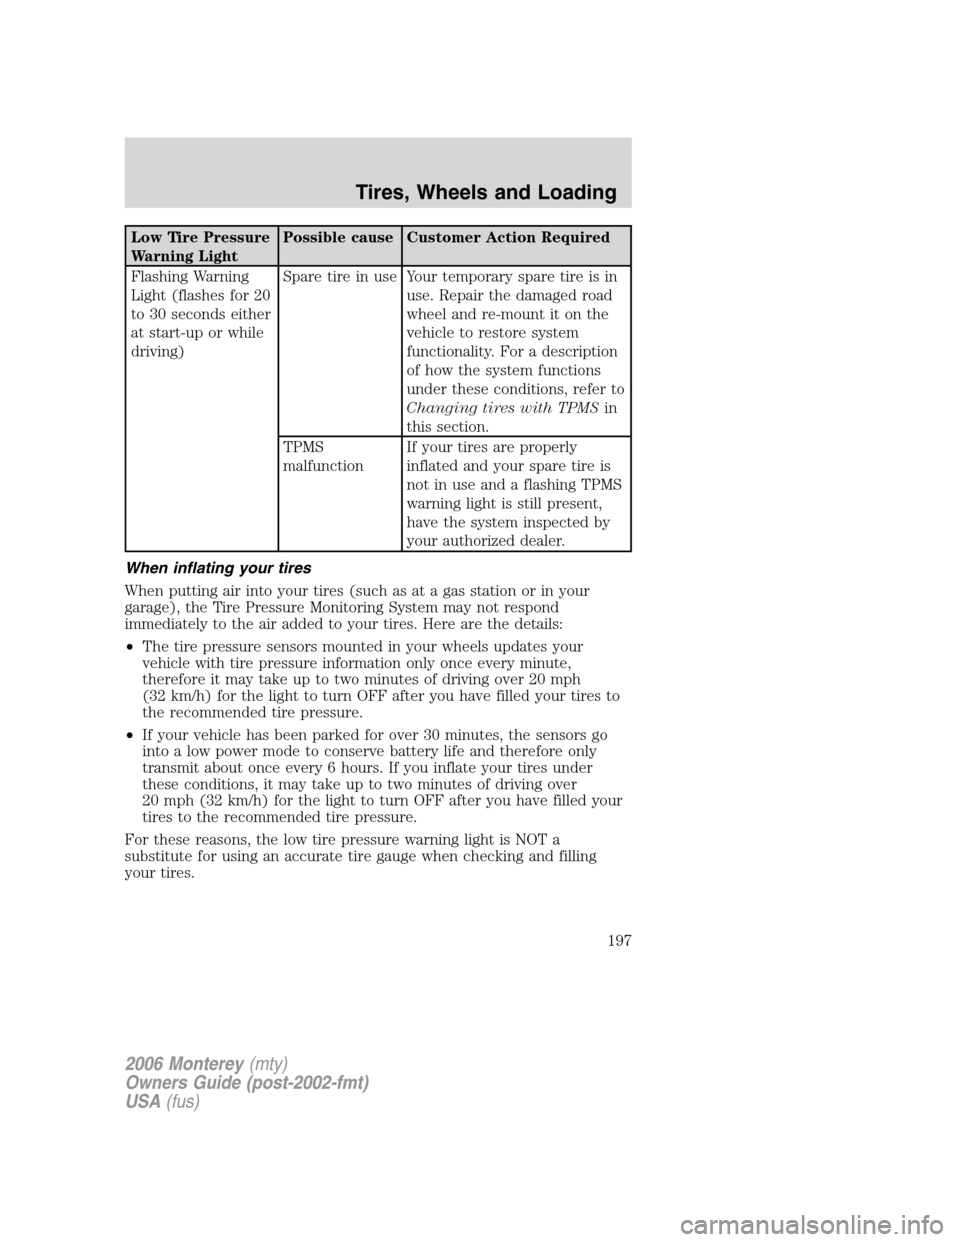
Low Tire Pressure
Warning LightPossible cause Customer Action Required
Flashing Warning
Light (flashes for 20
to 30 seconds either
at start-up or while
driving)Spare tire in use Your temporary spare tire is in
use. Repair the damaged road
wheel and re-mount it on the
vehicle to restore system
functionality. For a description
of how the system functions
under these conditions, refer to
Changing tires with TPMSin
this section.
TPMS
malfunctionIf your tires are properly
inflated and your spare tire is
not in use and a flashing TPMS
warning light is still present,
have the system inspected by
your authorized dealer.
When inflating your tires
When putting air into your tires (such as at a gas station or in your
garage), the Tire Pressure Monitoring System may not respond
immediately to the air added to your tires. Here are the details:
•The tire pressure sensors mounted in your wheels updates your
vehicle with tire pressure information only once every minute,
therefore it may take up to two minutes of driving over 20 mph
(32 km/h) for the light to turn OFF after you have filled your tires to
the recommended tire pressure.
•If your vehicle has been parked for over 30 minutes, the sensors go
into a low power mode to conserve battery life and therefore only
transmit about once every 6 hours. If you inflate your tires under
these conditions, it may take up to two minutes of driving over
20 mph (32 km/h) for the light to turn OFF after you have filled your
tires to the recommended tire pressure.
For these reasons, the low tire pressure warning light is NOT a
substitute for using an accurate tire gauge when checking and filling
your tires.
2006 Monterey(mty)
Owners Guide (post-2002-fmt)
USA(fus)
Tires, Wheels and Loading
197
Page 227 of 320

ROADSIDE ASSISTANCE
Getting roadside assistance
To fully assist you should you have a vehicle concern, Ford Motor
Company offers a complimentary roadside assistance program. This
program is separate from the New Vehicle Limited Warranty. The service
is available:
•24–hours, seven days a week
•for the New Vehicle Limited Warranty period of three years or
36,000 miles (60,000 km), whichever occurs first on Ford and Mercury
vehicles, and four years or 50,000 miles (80,000 km) on Lincoln
vehicles.
Roadside assistance will cover:
•a flat tire change with a good spare (except Ford GT which has a tire
inflation kit)
•battery jump start
•lock-out assistance (key replacement cost is the customer’s
responsibility)
•fuel delivery (2.0 gallons [7.5L], maximum two occurrences within
12 month period)
•towing of your disabled vehicle to the nearest authorized dealer, or
your selling authorized dealer if within 35 miles (56.3 km) of the
nearest authorized dealer (one tow per disablement). Even
non-warranty related tows, like accidents, are covered (some
exclusions apply, such as impound towing or repossession).
Canadian customers refer to your Owner Information Guide for
information on:
•coverage period
•exact fuel amounts
•towing of your disabled vehicle
•emergency travel expense reimbursement
•travel planning benefits
Using roadside assistance
Complete the roadside assistance identification card and place it in your
wallet for quick reference. In the United States, this card is found in the
Owner Guide portfolio in the glove compartment. In Canada, the card is
found in theOwner Information Guidein the glove compartment.
2006 Monterey(mty)
Owners Guide (post-2002-fmt)
USA(fus)
Roadside Emergencies
227
Page 238 of 320
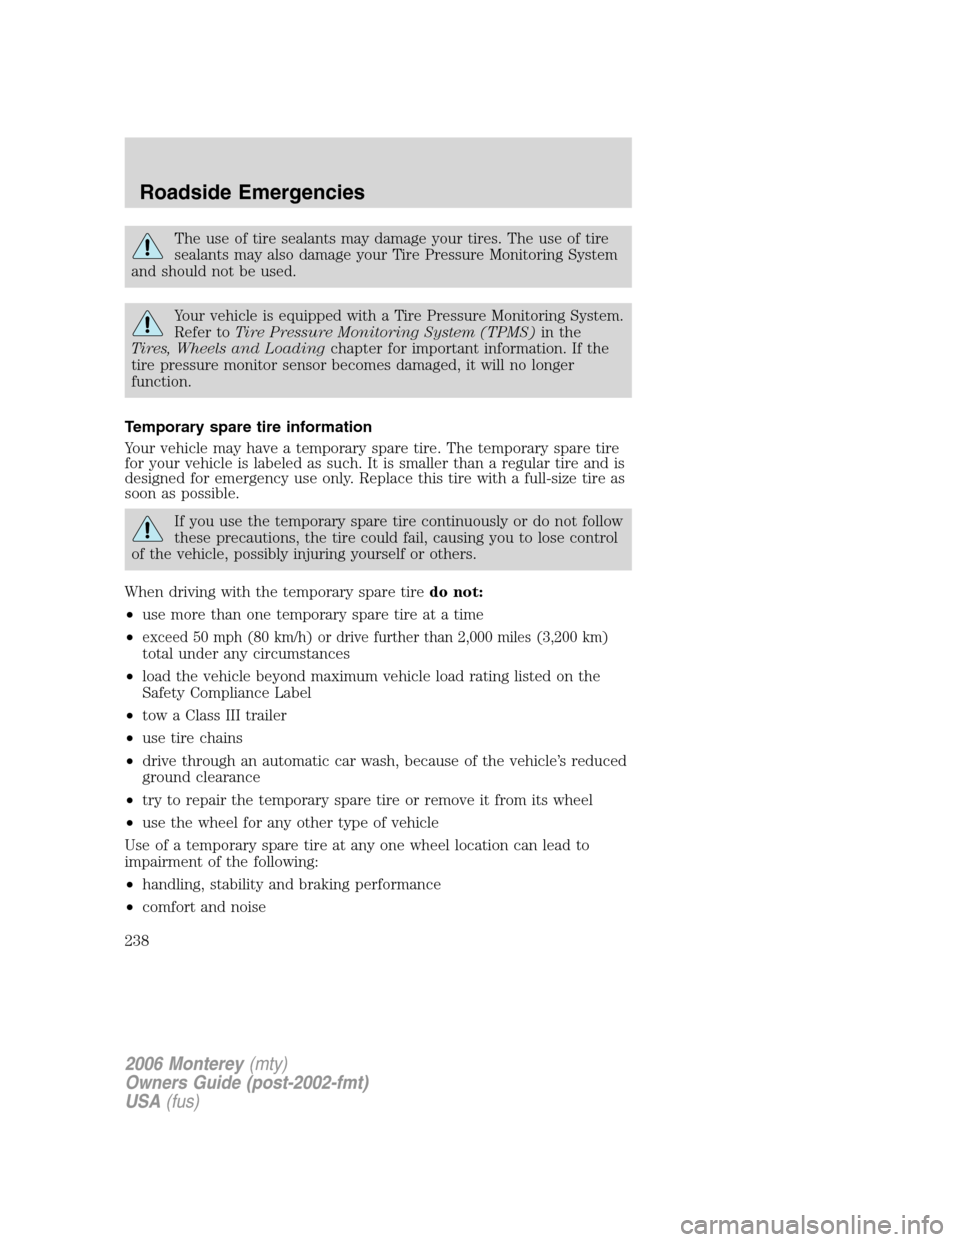
The use of tire sealants may damage your tires. The use of tire
sealants may also damage your Tire Pressure Monitoring System
and should not be used.
Your vehicle is equipped with a Tire Pressure Monitoring System.
Refer toTire Pressure Monitoring System (TPMS)in the
Tires, Wheels and Loadingchapter for important information. If the
tire pressure monitor sensor becomes damaged, it will no longer
function.
Temporary spare tire information
Your vehicle may have a temporary spare tire. The temporary spare tire
for your vehicle is labeled as such. It is smaller than a regular tire and is
designed for emergency use only. Replace this tire with a full-size tire as
soon as possible.
If you use the temporary spare tire continuously or do not follow
these precautions, the tire could fail, causing you to lose control
of the vehicle, possibly injuring yourself or others.
When driving with the temporary spare tiredo not:
•use more than one temporary spare tire at a time
•
exceed 50 mph (80 km/h) or drive further than 2,000 miles (3,200 km)
total under any circumstances
•load the vehicle beyond maximum vehicle load rating listed on the
Safety Compliance Label
•tow a Class III trailer
•use tire chains
•drive through an automatic car wash, because of the vehicle’s reduced
ground clearance
•try to repair the temporary spare tire or remove it from its wheel
•use the wheel for any other type of vehicle
Use of a temporary spare tire at any one wheel location can lead to
impairment of the following:
•handling, stability and braking performance
•comfort and noise
2006 Monterey(mty)
Owners Guide (post-2002-fmt)
USA(fus)
Roadside Emergencies
238
Page 239 of 320

•ground clearance and parking at curbs
•Winter driving capability
Dissimilar spare tire/wheel information
Failure to follow these guidelines could result in an increased
risk of loss of vehicle control, injury or death.
If you have a dissimilar spare tire/wheel, then it is intended for
temporary use only. This means that if you need to use it, you should
replace it as soon as possible with a road tire/wheel that is the same size
and type as the road tires and wheels that were originally provided by
Ford. If the dissimilar spare tire or wheel is damaged, it should be
replaced rather than repaired.
A dissimilar spare tire/wheel is defined as a spare tire and/or wheel that
is different in brand, size or appearance from the road tires and wheels
and can be one of three types:
1.T-type mini-spare:This spare tire begins with the letter “T” for tire
size and may have “Temporary Use Only” molded in the sidewall
2.Full-size dissimilar spare with label on wheel:This spare tire has
a label on the wheel that states: “THIS TIRE AND WHEEL FOR
TEMPORARY USE ONLY”
When driving with one of the dissimilar spare tires listed above,do not:
•Exceed 50 mph (80 km/h)
•Load the vehicle beyond maximum vehicle load rating listed on the
Safety Compliance Label
•Tow a trailer
•Use snow chains on the end of the vehicle with the dissimilar spare
tire
•Use more than one dissimilar spare tire at a time
•Use commercial car washing equipment
•Try to repair the dissimilar spare tire
Use of one of the dissimilar spare tires listed above at any one wheel
location can lead to impairment of the following:
•Handling, stability and braking performance
•Comfort and noise
•Ground clearance and parking at curbs
2006 Monterey(mty)
Owners Guide (post-2002-fmt)
USA(fus)
Roadside Emergencies
239
Page 240 of 320
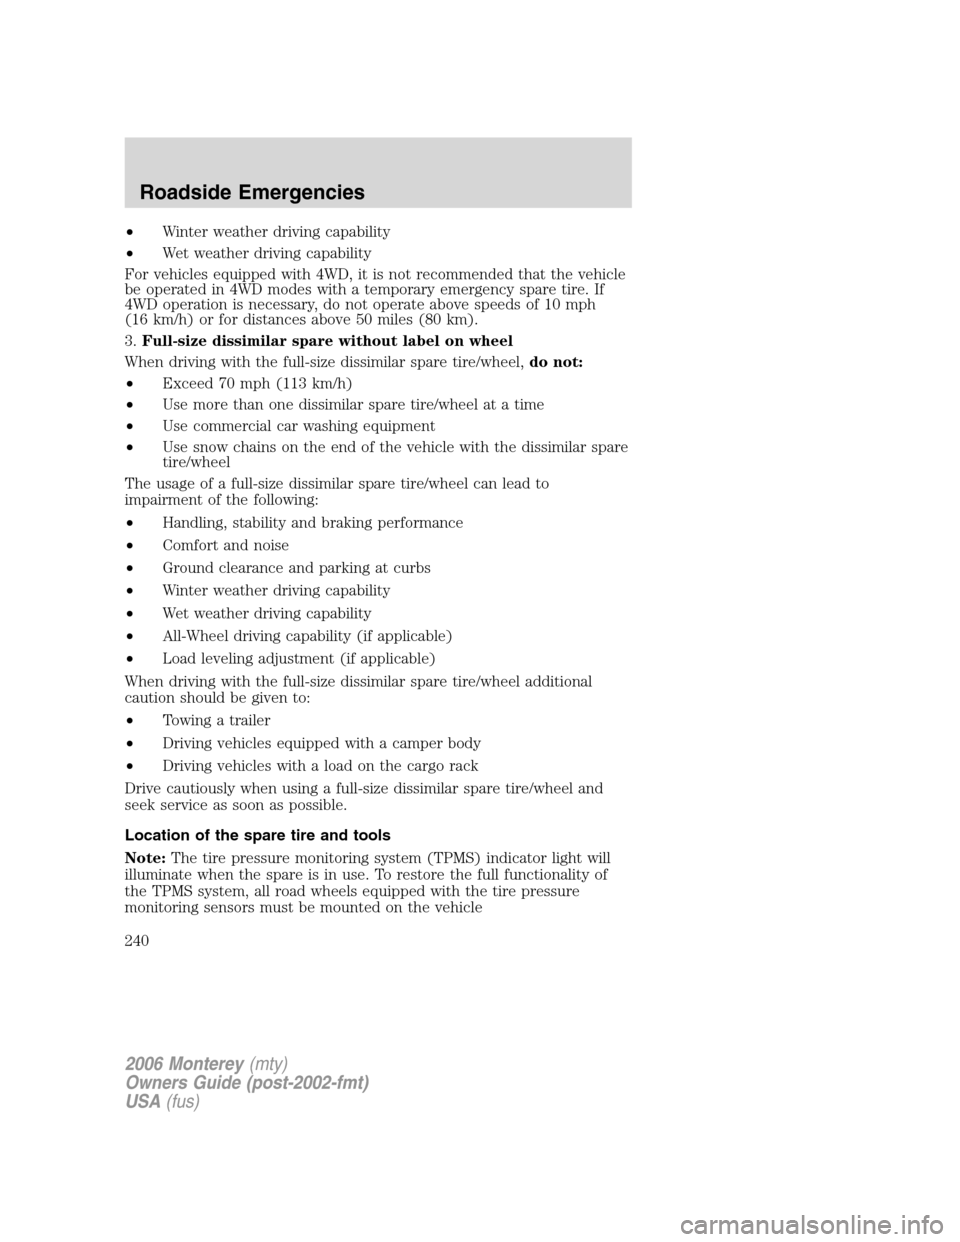
•Winter weather driving capability
•Wet weather driving capability
For vehicles equipped with 4WD, it is not recommended that the vehicle
be operated in 4WD modes with a temporary emergency spare tire. If
4WD operation is necessary, do not operate above speeds of 10 mph
(16 km/h) or for distances above 50 miles (80 km).
3.Full-size dissimilar spare without label on wheel
When driving with the full-size dissimilar spare tire/wheel,do not:
•Exceed 70 mph (113 km/h)
•Use more than one dissimilar spare tire/wheel at a time
•Use commercial car washing equipment
•Use snow chains on the end of the vehicle with the dissimilar spare
tire/wheel
The usage of a full-size dissimilar spare tire/wheel can lead to
impairment of the following:
•Handling, stability and braking performance
•Comfort and noise
•Ground clearance and parking at curbs
•Winter weather driving capability
•Wet weather driving capability
•All-Wheel driving capability (if applicable)
•Load leveling adjustment (if applicable)
When driving with the full-size dissimilar spare tire/wheel additional
caution should be given to:
•Towing a trailer
•Driving vehicles equipped with a camper body
•Driving vehicles with a load on the cargo rack
Drive cautiously when using a full-size dissimilar spare tire/wheel and
seek service as soon as possible.
Location of the spare tire and tools
Note:The tire pressure monitoring system (TPMS) indicator light will
illuminate when the spare is in use. To restore the full functionality of
the TPMS system, all road wheels equipped with the tire pressure
monitoring sensors must be mounted on the vehicle
2006 Monterey(mty)
Owners Guide (post-2002-fmt)
USA(fus)
Roadside Emergencies
240
Page 241 of 320
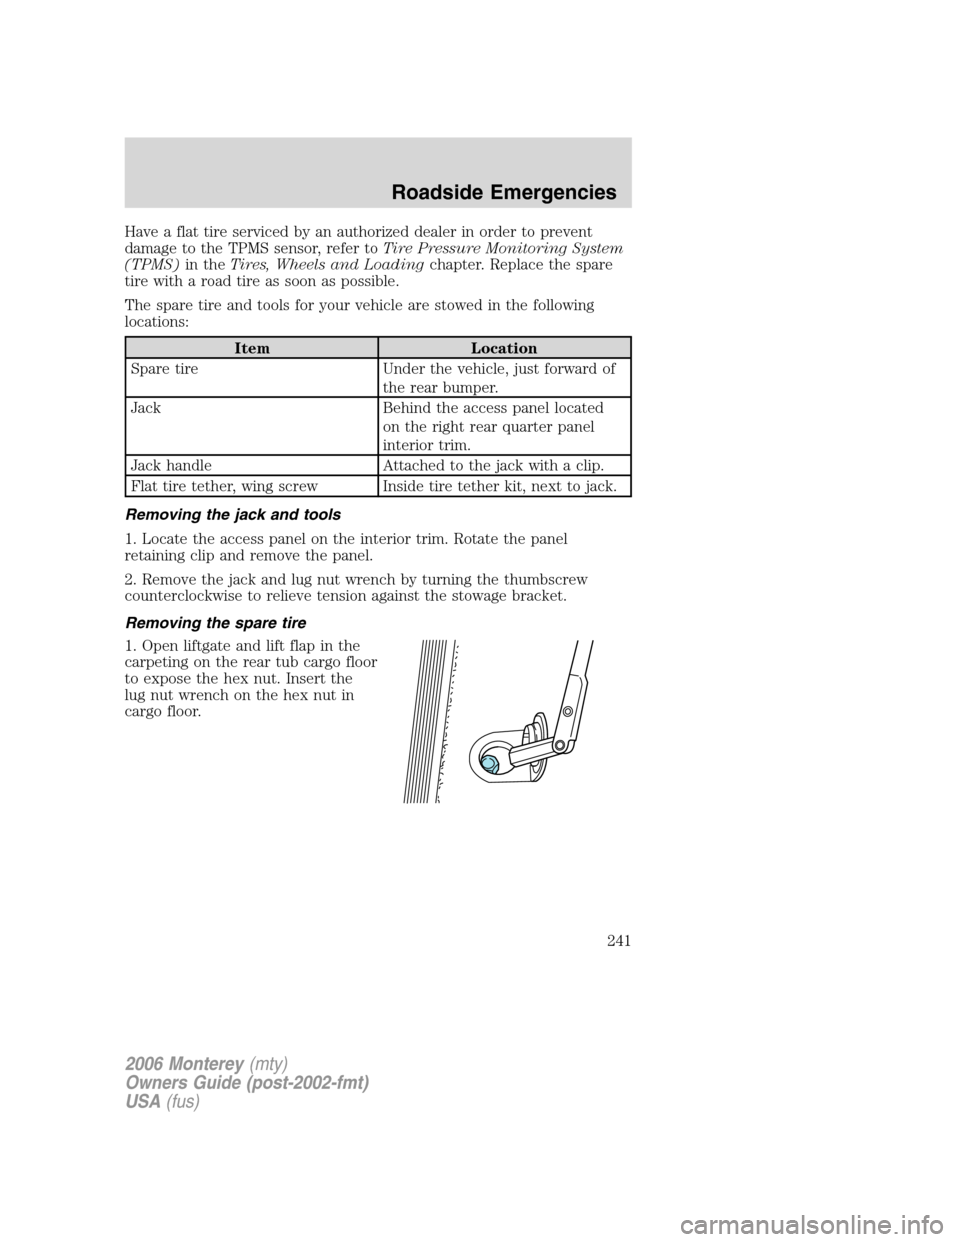
Have a flat tire serviced by an authorized dealer in order to prevent
damage to the TPMS sensor, refer toTire Pressure Monitoring System
(TPMS)in theTires, Wheels and Loadingchapter. Replace the spare
tire with a road tire as soon as possible.
The spare tire and tools for your vehicle are stowed in the following
locations:
Item Location
Spare tire Under the vehicle, just forward of
the rear bumper.
Jack Behind the access panel located
on the right rear quarter panel
interior trim.
Jack handle Attached to the jack with a clip.
Flat tire tether, wing screw Inside tire tether kit, next to jack.
Removing the jack and tools
1. Locate the access panel on the interior trim. Rotate the panel
retaining clip and remove the panel.
2. Remove the jack and lug nut wrench by turning the thumbscrew
counterclockwise to relieve tension against the stowage bracket.
Removing the spare tire
1. Open liftgate and lift flap in the
carpeting on the rear tub cargo floor
to expose the hex nut. Insert the
lug nut wrench on the hex nut in
cargo floor.
2006 Monterey(mty)
Owners Guide (post-2002-fmt)
USA(fus)
Roadside Emergencies
241
Page 243 of 320

1. Park on a level surface, activate
hazard flashers and set parking
brake.
2. Place gearshift lever in P (Park),
turn engine off, and block the
diagonally opposite wheel.
3. Remove the spare tire, jack and
lug wrench.
4. Removing the optional wheel
cover or center ornament:
•To remove a bolt-on wheel cover
(if equipped) loosen the plastic
nuts on the center ornament with
the wheel nut wrench. Then,
remove the wheel cover with the
tapered end of the wheel nut
wrench.
•Remove the center ornament (if
equipped) from the wheel with the tapered end of the wheel nut
wrench. Insert and twist the handle, then pry against the wheel.
5. Loosen each wheel lug nut
one-half turn counterclockwise but
do not remove them until the wheel
is raised off the ground.
2006 Monterey(mty)
Owners Guide (post-2002-fmt)
USA(fus)
Roadside Emergencies
243
Page 244 of 320

If Ford Accessory Running Boards
have been installed, use the jack
adapters supplied with the running
boards as described on the inside of
the jack storage area.
6. Locate the jack notch next to the
door closest to the tire you are
changing, then place the jack on the
frame rail directly behind the notch.
7. Turn the jack handle clockwise
until the wheel is completely off the
ground.
To lessen the risk of
personal injury, do not put
any part of your body under the
vehicle while changing a tire. Do
not start the engine when your
vehicle is on the jack. The jack is
only meant for changing the tire.
8. Remove the lug nuts with the lug wrench.
9. Replace the flat tire with the spare tire, making sure the valve stem is
facing outward. Reinstall lug nuts until the wheel is snug against the hub.
Do not fully tighten the lug nuts until the wheel has been lowered.
10. Lower the wheel by turning the jack handle counterclockwise.
2006 Monterey(mty)
Owners Guide (post-2002-fmt)
USA(fus)
Roadside Emergencies
244
Page 245 of 320

11. Remove the jack and fully
tighten the lug nuts in the order
shown. Refer toWheel lug nut
torque specificationslater in this
chapter for the proper lug nut
torque specification.
12. Installing the optional wheel
cover or center ornament:
•If equipped with a bolted-on
wheel cover, install the wheel
cover and tighten the five plastic nuts until they click (do not use
power tools on these nuts).
•If equipped with the center ornament, install the center ornament by
snapping it back into place.
13. Put flat tire, jack and lug wrench away in the proper stowage
locations.
Stowing the flat and full-size tire
Failure to follow these instructions may result in personal injury.
Do not install the flat tire or any full size tire underneath the
vehicle.
Remove tether kit from the jack storage area.
1. Place tire upright inside the vehicle near the rear of the vehicle with
the valve stem facing the front of the vehicle.
2. Pass the cable retainer through the center of the wheel.
3. Raise the tire and secure both ends of the cable with the wing nut
provided in the tether cable kit, by installing it on the luggage back panel
and turning the wing screw clockwise. You will hear an audible click
when the tire is properly secured.
4. Check that the flat tire is properly secured.
Stowing the spare tire
1. Lay the spare, inflated tire on the ground with the valve stem facing
down.
2. Insert the primary wheel retainer through the center of the wheel.
3. Use the winch mechanism to pull, and raise the tire under the vehicle.
4. Raise the tire by turning the lug nut wrench clockwise until the hex
nut ratchets.
1
4 3
2 5
2006 Monterey(mty)
Owners Guide (post-2002-fmt)
USA(fus)
Roadside Emergencies
245