headlamp Mercury Sable 2003 s User Guide
[x] Cancel search | Manufacturer: MERCURY, Model Year: 2003, Model line: Sable, Model: Mercury Sable 2003Pages: 216, PDF Size: 1.66 MB
Page 42 of 216

Replacing license plate lamp bulbs
Wagon
1. Make sure headlamp switch is in
OFF position and remove screw and
the license plate lamp assembly
from liftgate.
2. Remove bulb socket by turning
counterclockwise.
3. Carefully pull the bulb out from
the socket and push in the new
bulb.
4. Install the lamp assembly on
liftgate with screw.
Sedan
1. Make sure headlamp switch is in
OFF position and remove two
screws, grommets and the license
plate lamp assembly from the trunk
lid.
2. Carefully pull the bulb from the
socket and push in the new bulb.
3. Install the lamp assembly on
trunk lid with two grommets,
ensuring the grommets are pushed all the way in to the trunk lid and
secure with two screws.
Lights
42
Page 43 of 216
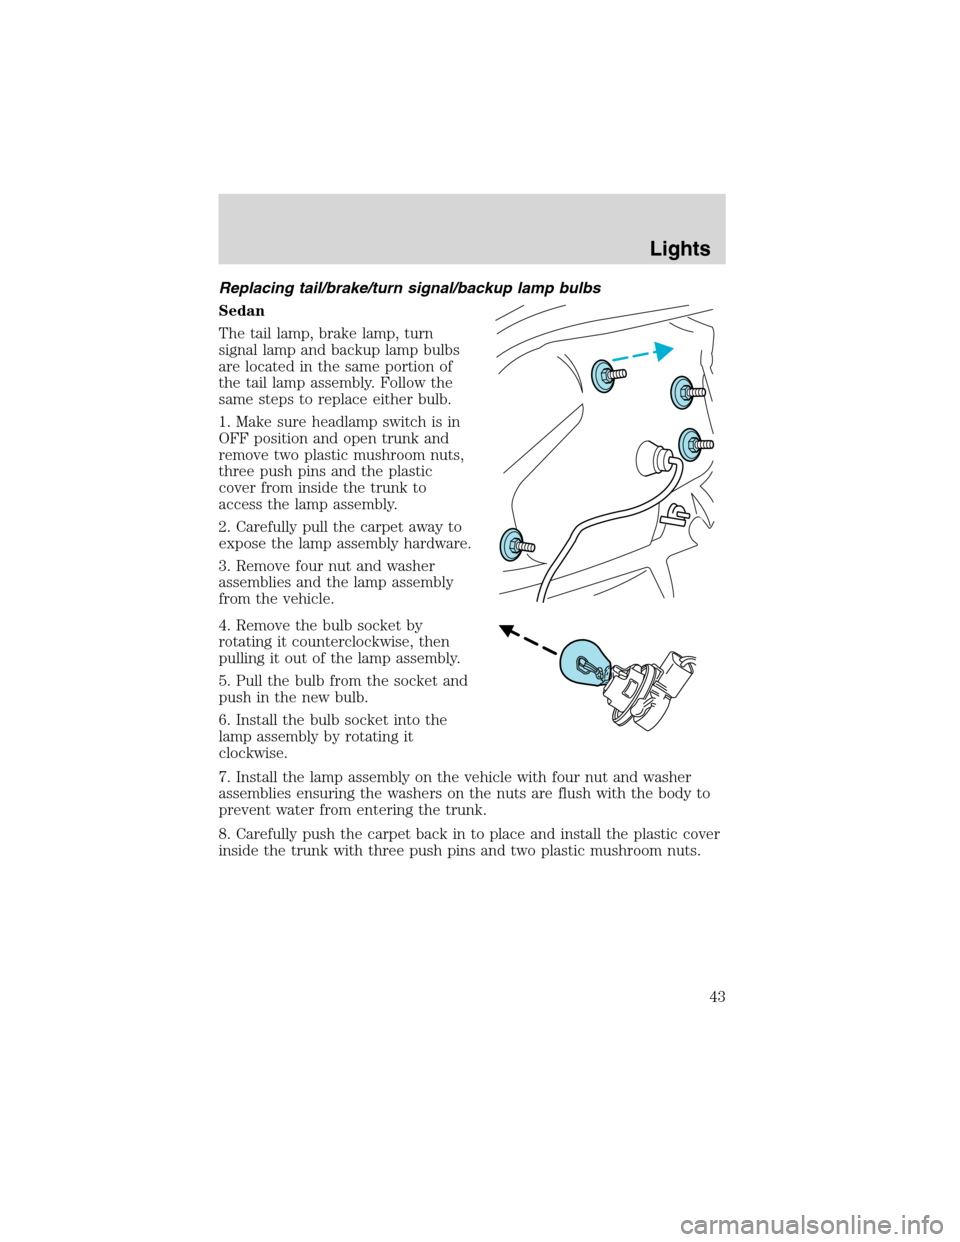
Replacing tail/brake/turn signal/backup lamp bulbs
Sedan
The tail lamp, brake lamp, turn
signal lamp and backup lamp bulbs
are located in the same portion of
the tail lamp assembly. Follow the
same steps to replace either bulb.
1. Make sure headlamp switch is in
OFF position and open trunk and
remove two plastic mushroom nuts,
three push pins and the plastic
cover from inside the trunk to
access the lamp assembly.
2. Carefully pull the carpet away to
expose the lamp assembly hardware.
3. Remove four nut and washer
assemblies and the lamp assembly
from the vehicle.
4. Remove the bulb socket by
rotating it counterclockwise, then
pulling it out of the lamp assembly.
5. Pull the bulb from the socket and
push in the new bulb.
6. Install the bulb socket into the
lamp assembly by rotating it
clockwise.
7. Install the lamp assembly on the vehicle with four nut and washer
assemblies ensuring the washers on the nuts are flush with the body to
prevent water from entering the trunk.
8. Carefully push the carpet back in to place and install the plastic cover
inside the trunk with three push pins and two plastic mushroom nuts.
Lights
43
Page 44 of 216

Wagon
The tail lamp/turn lamp bulbs are
located in the same portion of the
tail lamp assembly, one just below
the other. Follow the same steps to
replace either bulb:
1. Make sure headlamp switch is in
OFF position and open the liftgate
to expose the lamp assemblies.
2. Remove the two bolts from the
tail lamp assembly.
3. Carefully pull the lamp assembly
from the tailgate.
4. Twist the bulb socket
counterclockwise and remove from
lamp assembly.
5. Pull the bulb straight out of the
socket and push in the new bulb.
6. Install bulb socket in lamp assembly by turning clockwise.
7. Carefully install the tail lamp assembly on tailgate and secure with two
bolts.
Lights
44
Page 45 of 216
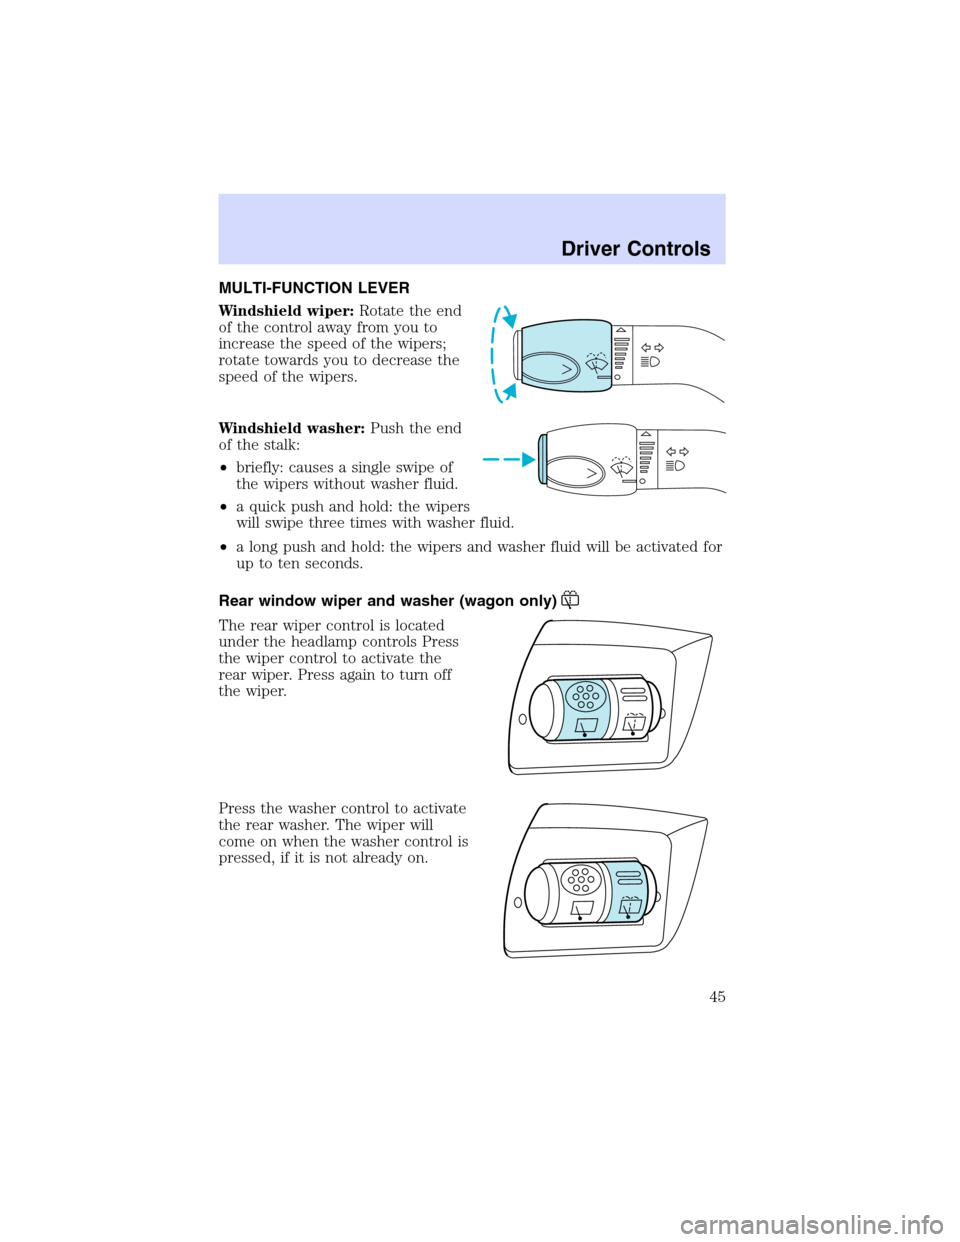
MULTI-FUNCTION LEVER
Windshield wiper:Rotate the end
of the control away from you to
increase the speed of the wipers;
rotate towards you to decrease the
speed of the wipers.
Windshield washer:Push the end
of the stalk:
•briefly: causes a single swipe of
the wipers without washer fluid.
•a quick push and hold: the wipers
will swipe three times with washer fluid.
•a long push and hold: the wipers and washer fluid will be activated for
up to ten seconds.
Rear window wiper and washer (wagon only)
The rear wiper control is located
under the headlamp controls Press
the wiper control to activate the
rear wiper. Press again to turn off
the wiper.
Press the washer control to activate
the rear washer. The wiper will
come on when the washer control is
pressed, if it is not already on.
Driver Controls
Driver Controls
45
Page 71 of 216

7. Within twenty seconds of removing the previously programmed coded
key, insert the unprogrammed key (new/valet key) into the ignition.
8. Turn the ignition from the 3 (OFF) position to the 4 (ON) position.
Keep the ignition in the 4 (ON) position for at least one second.
9. Your new unprogrammed key is now programmed.
If the key has been successfully programmed it will start the vehicle’s
engine and the theft indicator light will illuminate for three seconds and
then go out. If the key was not successfully programmed, it will not start
your vehicle’s engine and the theft indicator light will flash on and off
rapidly. If failure repeats, bring your vehicle to your dealer to have the
new key(s) programmed.
To program additional new unprogrammed key(s), repeat this procedure
from step 1 for each additional key.
PERIMETER ALARM SYSTEM (IF EQUIPPED)
The perimeter anti-theft system will help prevent your vehicle from
unauthorized entry.
If there is any potential perimeter anti-theft problem with your vehicle,
ensureALL remote entry transmittersare taken to the dealership to
aid in troubleshooting.
Arming the system
When armed, this system will respond if unauthorized entry is
attempted. When unauthorized entry occurs, the system will flash the
headlamps and/or parking lamps and will sound the horn.
The system is ready to arm whenever key is removed from the ignition.
Either of the following actions will prearm the alarm system:
•Press the
control on the remote entry transmitter.
•Press the 7•8 and the 9•0 on the keyless entry keypad
(if equipped) at the same time.
•Open a door and press the power door lock control to lock all the
doors.
Locks and Security
71
Page 89 of 216
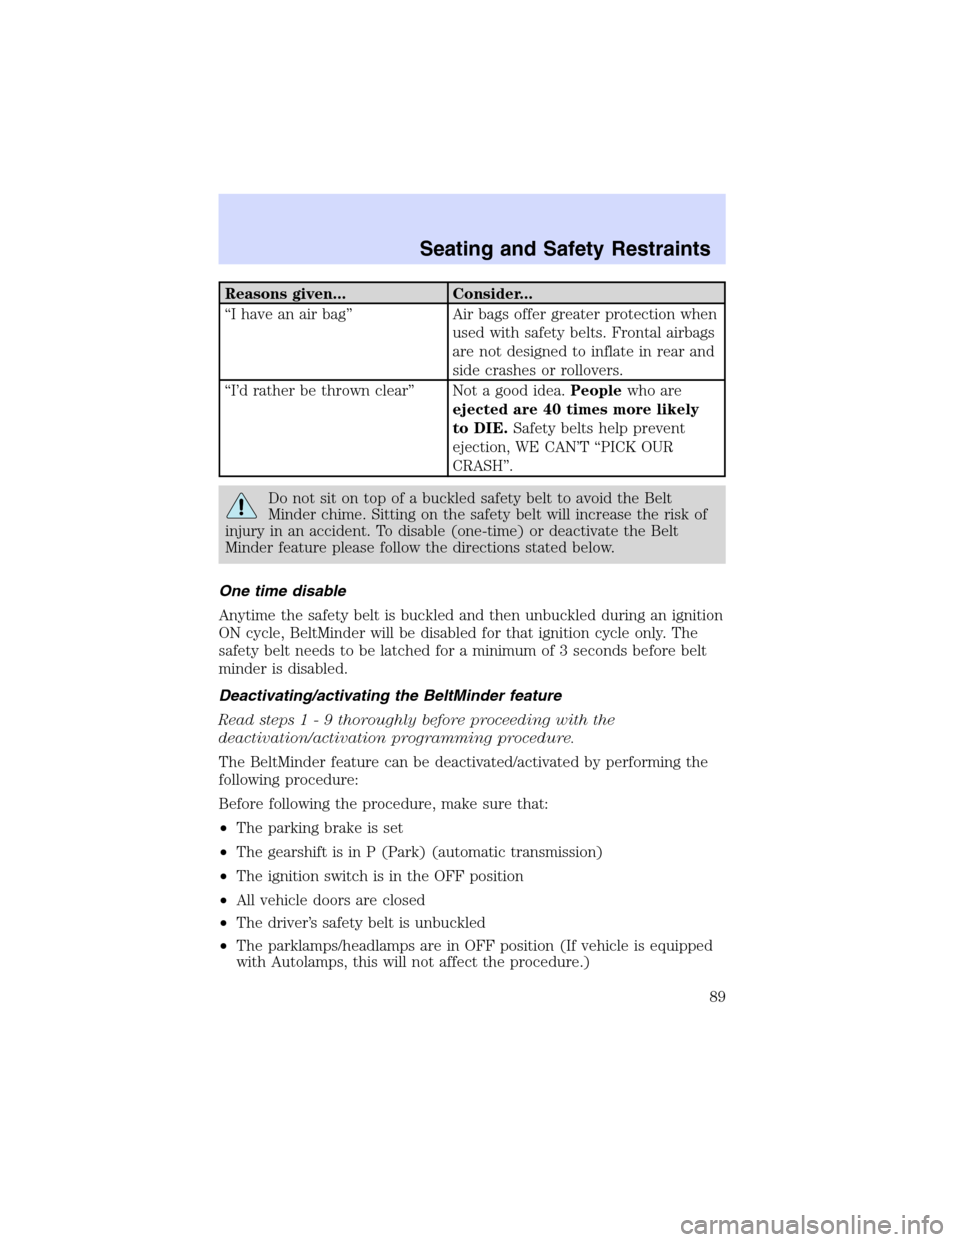
Reasons given... Consider...
“I have an air bag”Air bags offer greater protection when
used with safety belts. Frontal airbags
are not designed to inflate in rear and
side crashes or rollovers.
“I’d rather be thrown clear”Not a good idea.Peoplewho are
ejected are 40 times more likely
to DIE.Safety belts help prevent
ejection, WE CAN’T“PICK OUR
CRASH”.
Do not sit on top of a buckled safety belt to avoid the Belt
Minder chime. Sitting on the safety belt will increase the risk of
injury in an accident. To disable (one-time) or deactivate the Belt
Minder feature please follow the directions stated below.
One time disable
Anytime the safety belt is buckled and then unbuckled during an ignition
ON cycle, BeltMinder will be disabled for that ignition cycle only. The
safety belt needs to be latched for a minimum of 3 seconds before belt
minder is disabled.
Deactivating/activating the BeltMinder feature
Read steps1-9thoroughly before proceeding with the
deactivation/activation programming procedure.
The BeltMinder feature can be deactivated/activated by performing the
following procedure:
Before following the procedure, make sure that:
•The parking brake is set
•The gearshift is in P (Park) (automatic transmission)
•The ignition switch is in the OFF position
•All vehicle doors are closed
•The driver’s safety belt is unbuckled
•The parklamps/headlamps are in OFF position (If vehicle is equipped
with Autolamps, this will not affect the procedure.)
Seating and Safety Restraints
89
Page 90 of 216

To reduce the risk of injury, do not deactivate/activate the Belt
Minder feature while driving the vehicle.
1. Turn the ignition switch to the RUN (or ON) position. (DO NOT
START THE ENGINE)
2. Wait until the safety belt warning light turns off. (Approximately 1–2
minutes)
•Steps 3–5 must be completed within 60 seconds or the procedure will
have to be repeated.
3. Buckle then unbuckle the safety belt three times, ending with the
safety belt unbuckled. This can be done before or during BeltMinder
warning activation.
4. Turn on the parklamps/headlamps, turn off the parklamps/headlamps.
5. Buckle then unbuckle the safety belt three times, ending with the
safety belt unbuckled.
•After step 5 the safety belt warning light will be turned on for three
seconds.
6. Within seven seconds of the safety belt warning light turning off,
buckle then unbuckle the safety belt.
•This will disable BeltMinder if it is currently enabled, or enable
BeltMinder if it is currently disabled.
7. Confirmation of disabling BeltMinder is provided by flashing the safety
belt warning light four times per second for three seconds.
8. Confirmation of enabling BeltMinder is provided by flashing the safety
belt warning light four times per second for three seconds, followed by
three seconds with the safety belt warning light off, then followed by
flashing the safety belt warning light four times per second for three
seconds again.
9. After receiving confirmation, the deactivation/activation procedure is
complete.
Safety belt extension assembly
If the safety belt is too short when fully extended, there is a 20 cm (8
inch) safety belt extension assembly that can be added (part number
611C22). This assembly can be obtained from your dealer at no cost.
Use only extensions manufactured by the same supplier as the safety
belt. Manufacturer identification is located at the end of the webbing on
Seating and Safety Restraints
90
Page 110 of 216

Do not park, idle, or drive your vehicle in dry grass or other dry
ground cover. The emission system heats up the engine
compartment and exhaust system, which can start a fire.
Do not start your vehicle in a closed garage or in other enclosed
areas. Exhaust fumes can be toxic. Always open the garage door
before you start the engine. SeeGuarding against exhaust fumesin
this chapter for more instructions.
If you smell exhaust fumes inside your vehicle, have your dealer
inspect your vehicle immediately. Do not drive if you smell
exhaust fumes.
Important safety precautions
A computer system controls the engine’s idle revolutions per minute
(RPM). When the engine starts, the idle RPM runs higher than normal in
order to warm the engine. If the engine idle speed does not slow down
automatically, have the vehicle checked. Do not allow the vehicle to idle
for more than 10 minutes at the higher engine RPM.
Before starting the vehicle:
1. Make sure all occupants buckle their safety belts. For more
information on safety belts and their proper usage, refer to theSeating
and safety restraintschapter.
2. Make sure the headlamps and electrical accessories are off.
Driving
110
Page 132 of 216
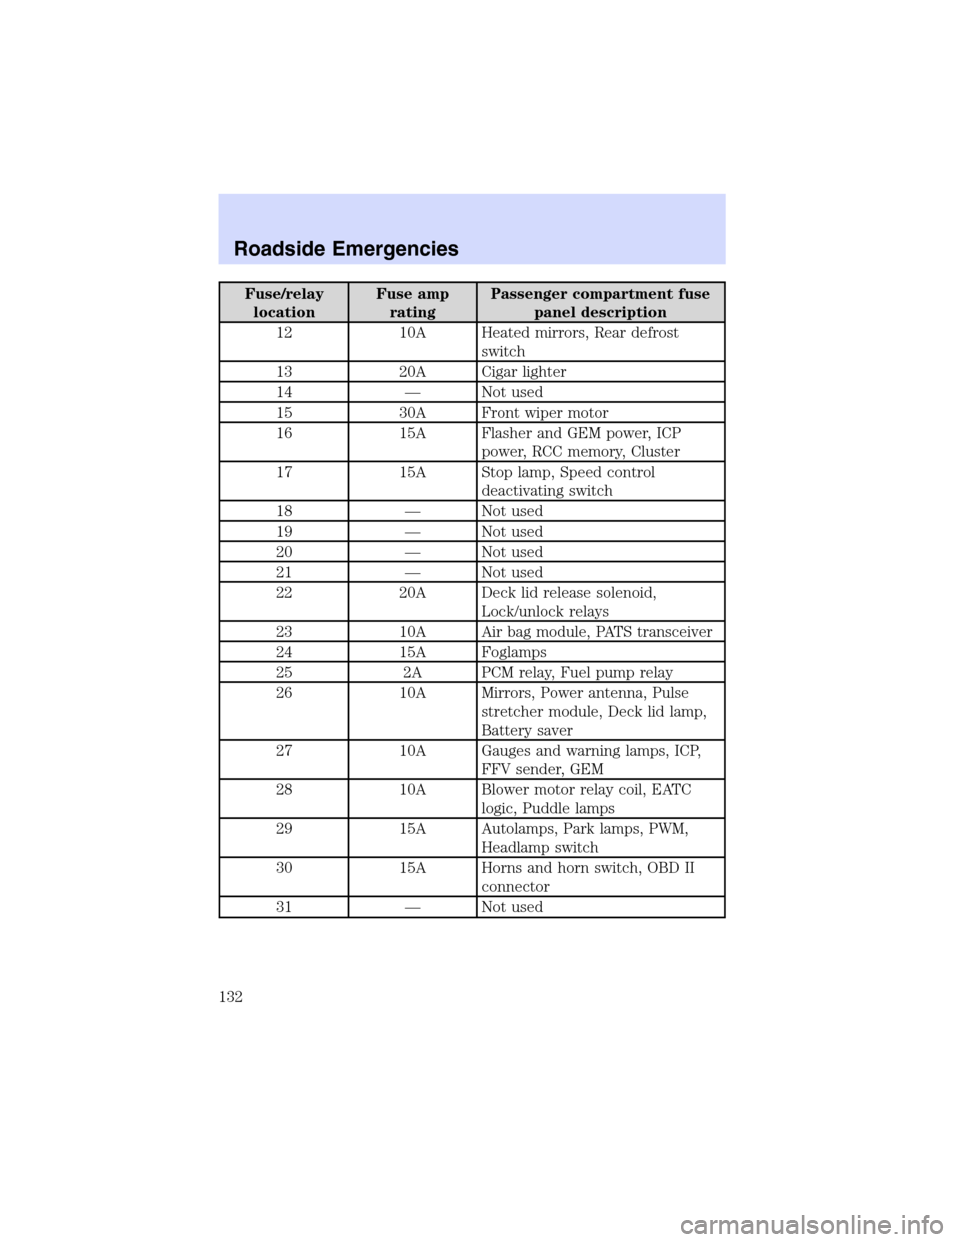
Fuse/relay
locationFuse amp
ratingPassenger compartment fuse
panel description
12 10A Heated mirrors, Rear defrost
switch
13 20A Cigar lighter
14—Not used
15 30A Front wiper motor
16 15A Flasher and GEM power, ICP
power, RCC memory, Cluster
17 15A Stop lamp, Speed control
deactivating switch
18—Not used
19—Not used
20—Not used
21—Not used
22 20A Deck lid release solenoid,
Lock/unlock relays
23 10A Air bag module, PATS transceiver
24 15A Foglamps
25 2A PCM relay, Fuel pump relay
26 10A Mirrors, Power antenna, Pulse
stretcher module, Deck lid lamp,
Battery saver
27 10A Gauges and warning lamps, ICP,
FFV sender, GEM
28 10A Blower motor relay coil, EATC
logic, Puddle lamps
29 15A Autolamps, Park lamps, PWM,
Headlamp switch
30 15A Horns and horn switch, OBD II
connector
31—Not used
Roadside Emergencies
132
Page 135 of 216
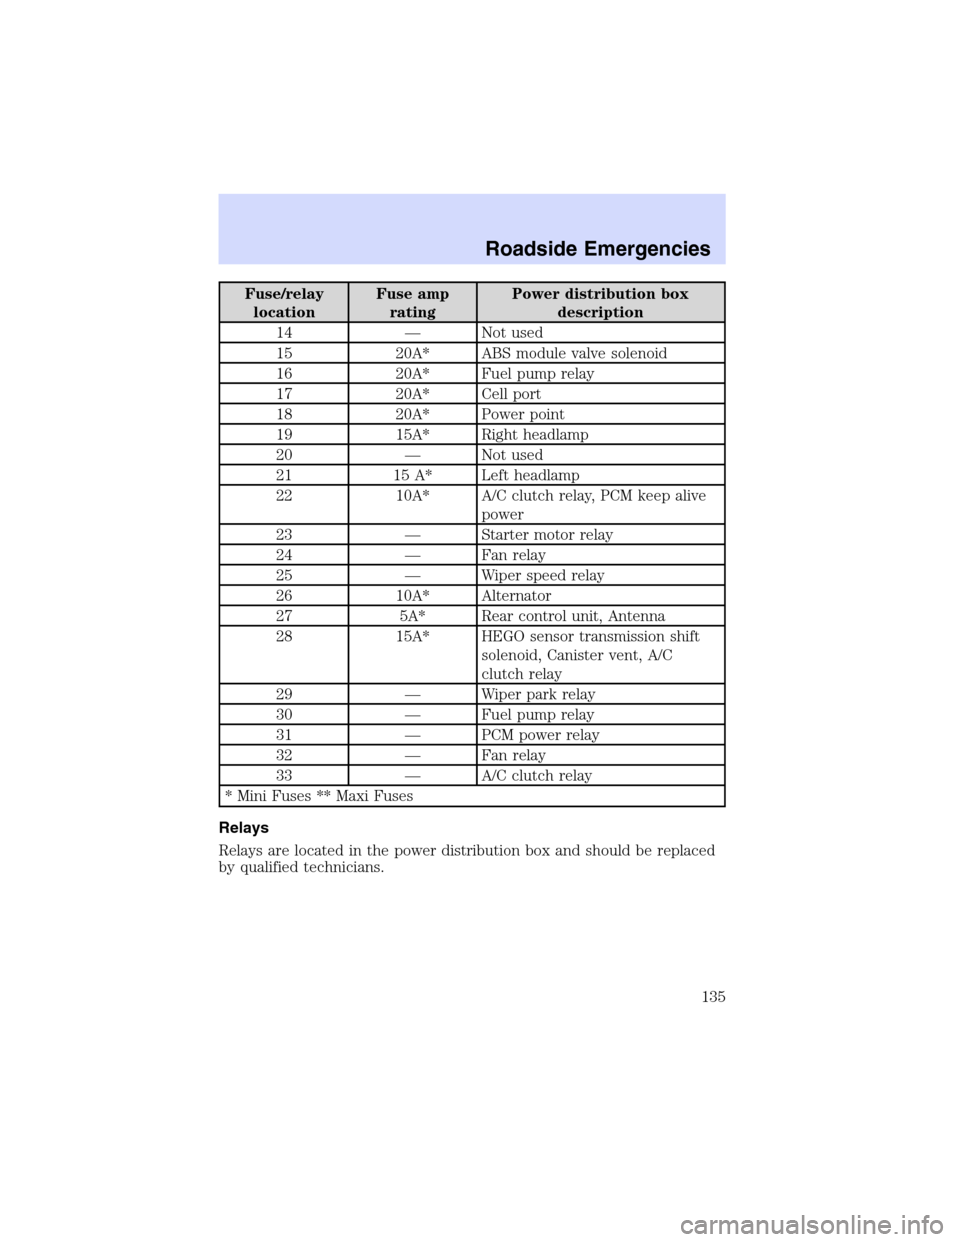
Fuse/relay
locationFuse amp
ratingPower distribution box
description
14—Not used
15 20A* ABS module valve solenoid
16 20A* Fuel pump relay
17 20A* Cell port
18 20A* Power point
19 15A* Right headlamp
20—Not used
21 15 A* Left headlamp
22 10A* A/C clutch relay, PCM keep alive
power
23—Starter motor relay
24—Fan relay
25—Wiper speed relay
26 10A* Alternator
27 5A* Rear control unit, Antenna
28 15A* HEGO sensor transmission shift
solenoid, Canister vent, A/C
clutch relay
29—Wiper park relay
30—Fuel pump relay
31—PCM power relay
32—Fan relay
33—A/C clutch relay
* Mini Fuses ** Maxi Fuses
Relays
Relays are located in the power distribution box and should be replaced
by qualified technicians.
Roadside Emergencies
135