belt Mercury Villager 2000 s Owner's Guide
[x] Cancel search | Manufacturer: MERCURY, Model Year: 2000, Model line: Villager, Model: Mercury Villager 2000Pages: 256, PDF Size: 2.21 MB
Page 142 of 256

7. Pull the lap belt portion across
the child seat toward the buckle and
pull up on the shoulder belt while
pushing down with your knee on the
child seat.
8. Allow the safety belt to retract to
remove any slack in the belt.
9. Before placing the child in the
seat, forcibly tilt the seat forward
and back to make sure the seat is
securely held in place.
10. Try to pull the belt out of the retractor to make sure the retractor is
in the automatic locking mode (you should not be able to pull more belt
out). If the retractor is not locked, unbuckle the belt and repeat steps
two through nine.
Check to make sure the child seat is properly secured before each use.
Installing child safety seats in the lap belt seating positions
1. Lengthen the lap belt. To lengthen the belt, hold the tongue so that its
bottom is perpendicular to the direction of webbing while sliding the
tongue up the webbing.
2. Place the child safety seat in the center seating position.
3. Route the tongue and webbing through the child seat according to the
child seat manufacturer's instructions.
4. Insert the belt tongue into the proper buckle for the center seating
position until you hear a snap and feel it latch. Make sure the tongue is
securely fastened to the buckle by pulling on tongue.
5. Push down on the child seat while pulling on the loose end of the lap
belt webbing to tighten the belt.
Seating and safety restraints
142
Page 146 of 256
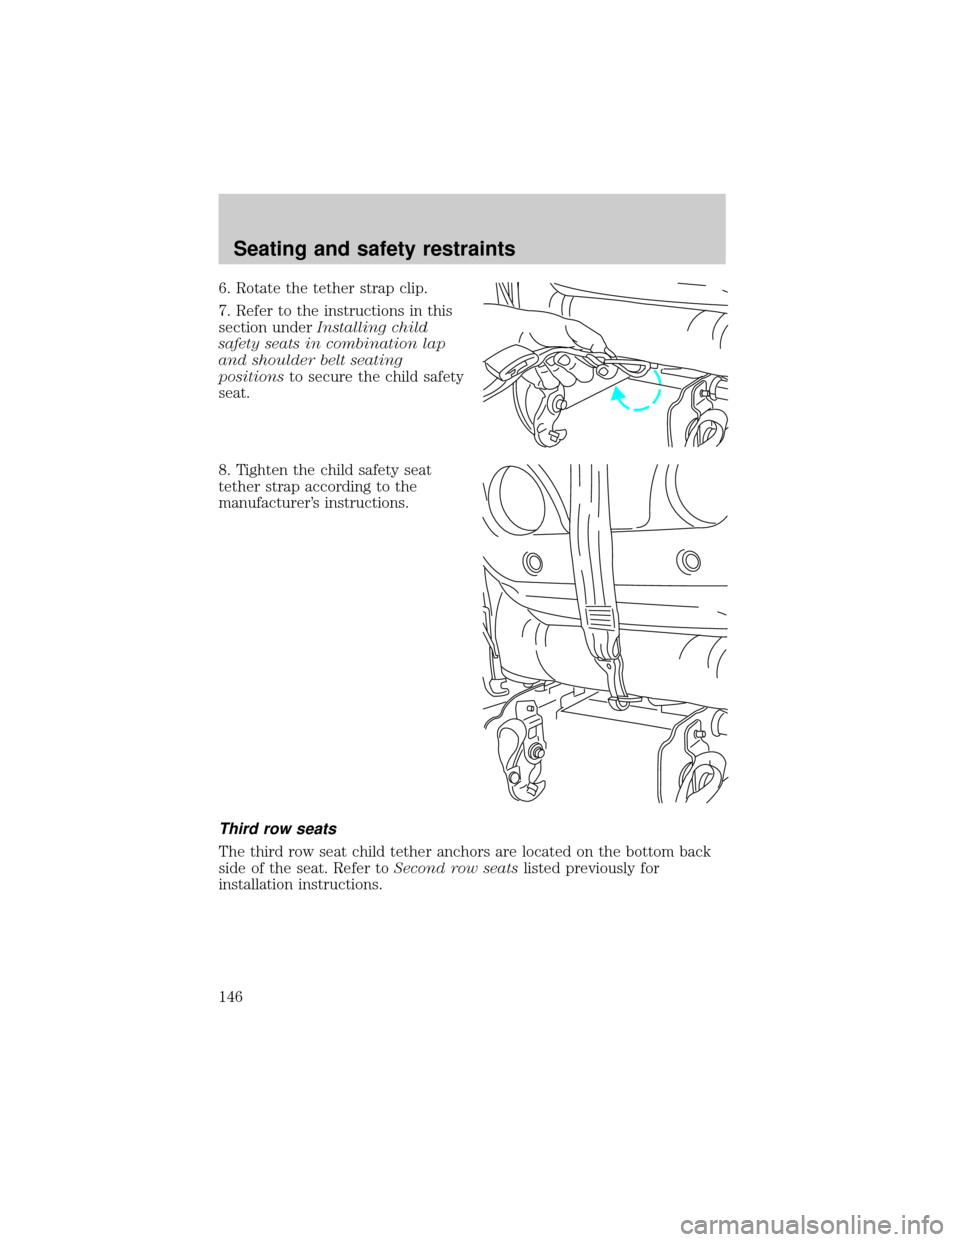
6. Rotate the tether strap clip.
7. Refer to the instructions in this
section underInstalling child
safety seats in combination lap
and shoulder belt seating
positionsto secure the child safety
seat.
8. Tighten the child safety seat
tether strap according to the
manufacturer's instructions.
Third row seats
The third row seat child tether anchors are located on the bottom back
side of the seat. Refer toSecond row seatslisted previously for
installation instructions.
Seating and safety restraints
146
Page 148 of 256
Important safety precautions
A computer system controls the engine's idle revolutions per minute
(RPM). When the engine starts, the idle RPM runs faster to warm the
engine. If the engine idle speed does not slow down automatically, have
the vehicle checked. Do not allow the vehicle to idle for more than 10
minutes at the higher engine RPM.
Before starting the vehicle:
1. Make sure all vehicle occupants have buckled their safety belts. For
more information on safety belts and their proper usage, refer to the
Seating and safety restraintschapter.
2. Make sure the headlamps and vehicle accessories are off.
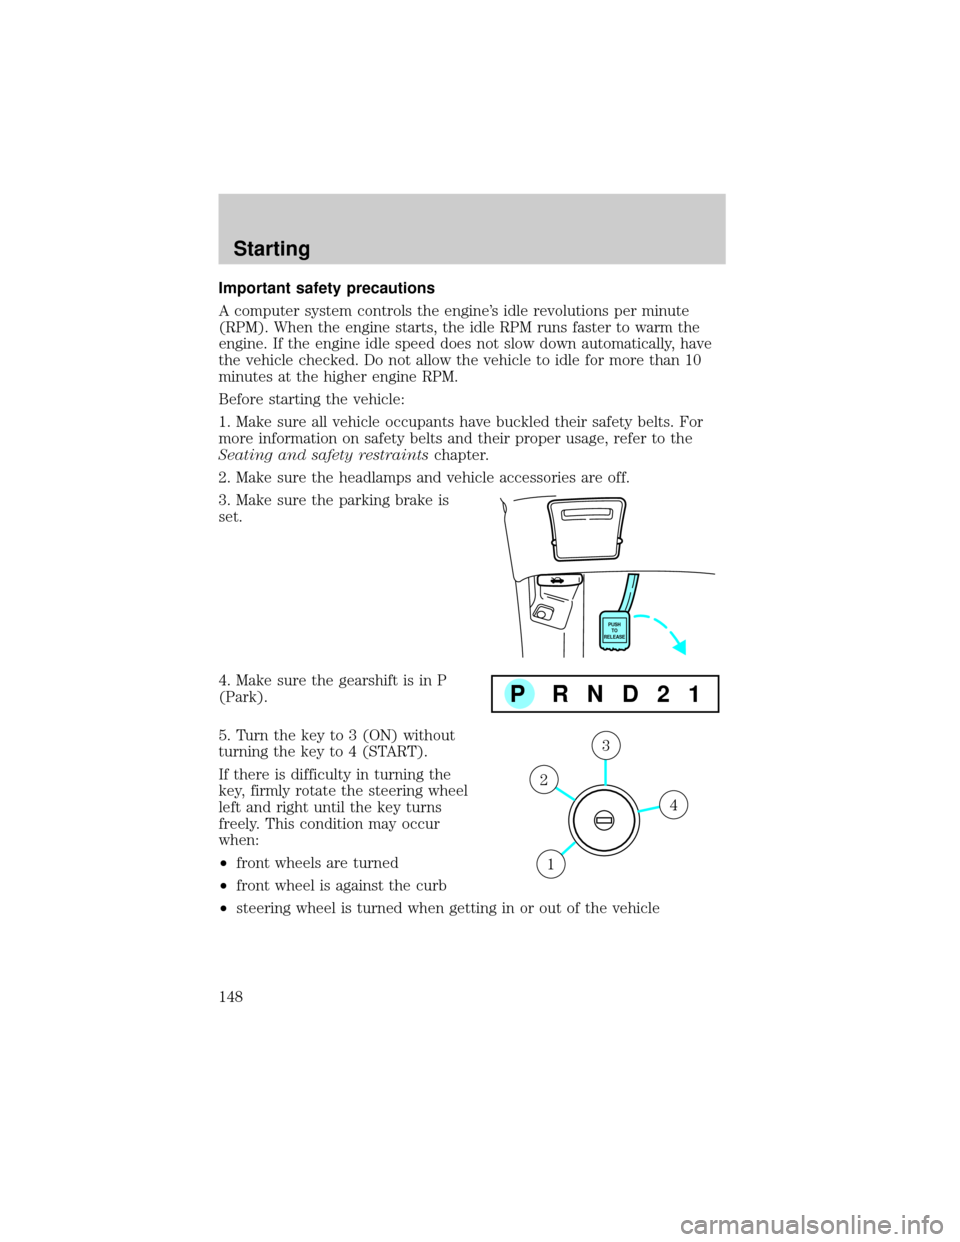
3. Make sure the parking brake is
set.
4. Make sure the gearshift is in P
(Park).
5. Turn the key to 3 (ON) without
turning the key to 4 (START).
If there is difficulty in turning the
key, firmly rotate the steering wheel
left and right until the key turns
freely. This condition may occur
when:
²front wheels are turned
²front wheel is against the curb
²steering wheel is turned when getting in or out of the vehicle
PUSH
TO
RELEASE
P RND21
4
3
2
1
Starting
148
Page 149 of 256
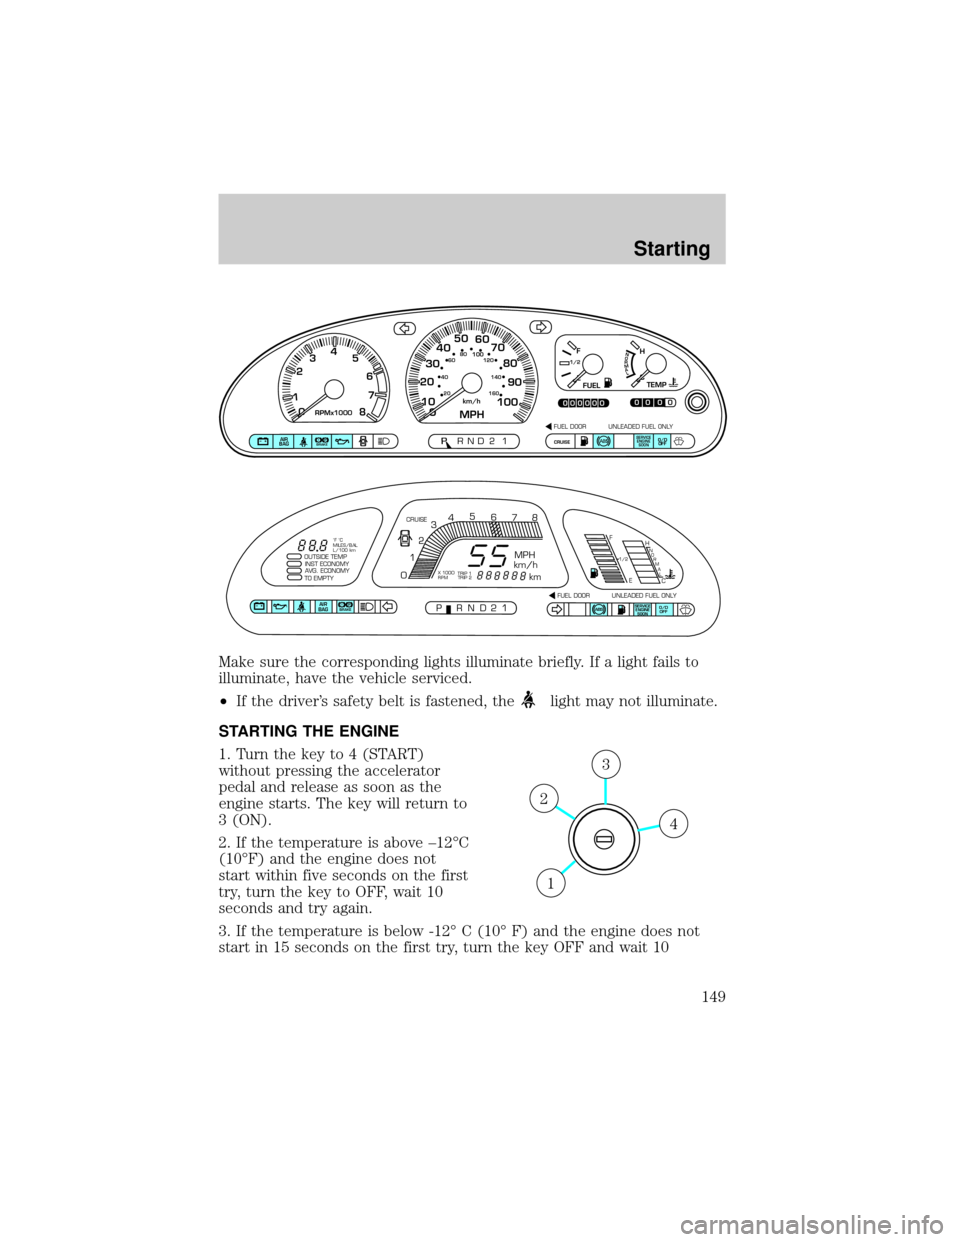
Make sure the corresponding lights illuminate briefly. If a light fails to
illuminate, have the vehicle serviced.
²If the driver's safety belt is fastened, the
light may not illuminate.
STARTING THE ENGINE
1. Turn the key to 4 (START)
without pressing the accelerator
pedal and release as soon as the
engine starts. The key will return to
3 (ON).
2. If the temperature is above ±12ÉC
(10ÉF) and the engine does not
start within five seconds on the first
try, turn the key to OFF, wait 10
seconds and try again.
3. If the temperature is below -12É C (10É F) and the engine does not
start in 15 seconds on the first try, turn the key OFF and wait 10
CE
F
H1/2
FUELTEMP
NORMAL
0
PRND2P1P!
BRAKEAIR
BAGSERVICE
ENGINE
SOONCRUISEO/D
OFF
00000
00000MPHkm/h10 20304050
60
70
80
90
10020 406080
100120
140
160
0 234
5
6
7
8RPMx10001
FUEL DOOR UNLEADED FUEL ONLY
SERVICE
ENGINE
SOONABSAIR
BAGABSO/D
OFF
OUTSIDE TEMP
INST ECONOMY
AVG. ECONOMY
TO EMPTY
PRND21FUEL DOOR UNLEADED FUEL ONLY CRUISE
MPH
km/h
km
F
EH
C
1/2N
O
R
M
A
L
012345
6
78
P!BRAKE
X 1000
RPMTRIP 1
TRIP 2 ˚F ˚C
MILES/BAL
L/100 km
4
3
2
1
Starting
149
Page 183 of 256
Do not connect the end of the second cable to the negative (-)
terminal of the battery to be jumped. A spark may cause an
explosion of the gases that surround the battery.
5. Ensure that the cables are clear of fan blades, belts, moving parts of
both engines, or any fuel delivery system parts.
Jump starting
1. Start the engine of the booster vehicle and run the engine at
moderately increased speed.
2. Start the engine of the disabled vehicle.
3. Once the disabled vehicle has been started, run both engines for an
additional three minutes before disconnecting the jumper cables.
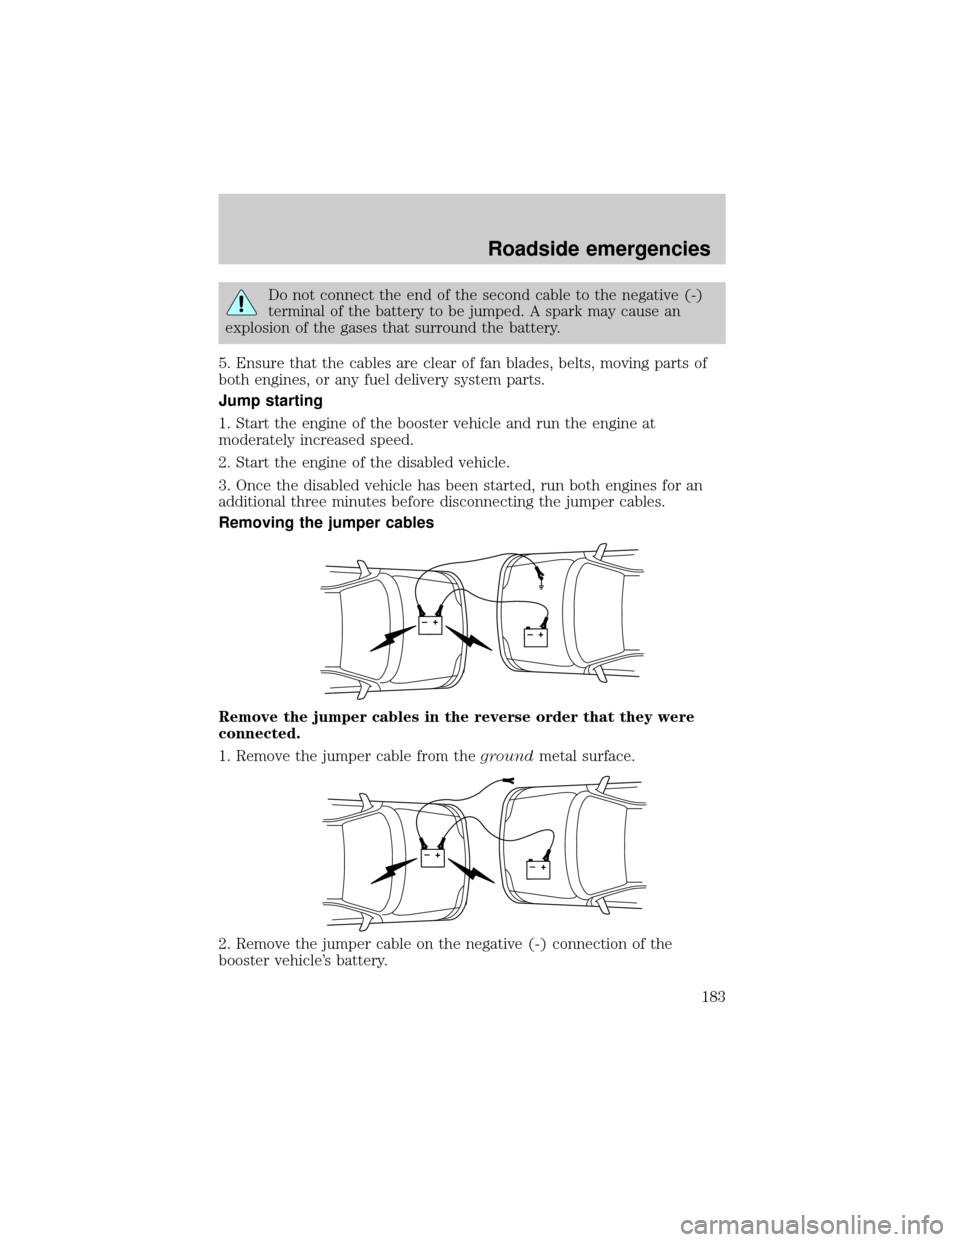
Removing the jumper cables
Remove the jumper cables in the reverse order that they were
connected.
1. Remove the jumper cable from thegroundmetal surface.
2. Remove the jumper cable on the negative (-) connection of the
booster vehicle's battery.
+–+–
+–+–
Roadside emergencies
183
Page 185 of 256
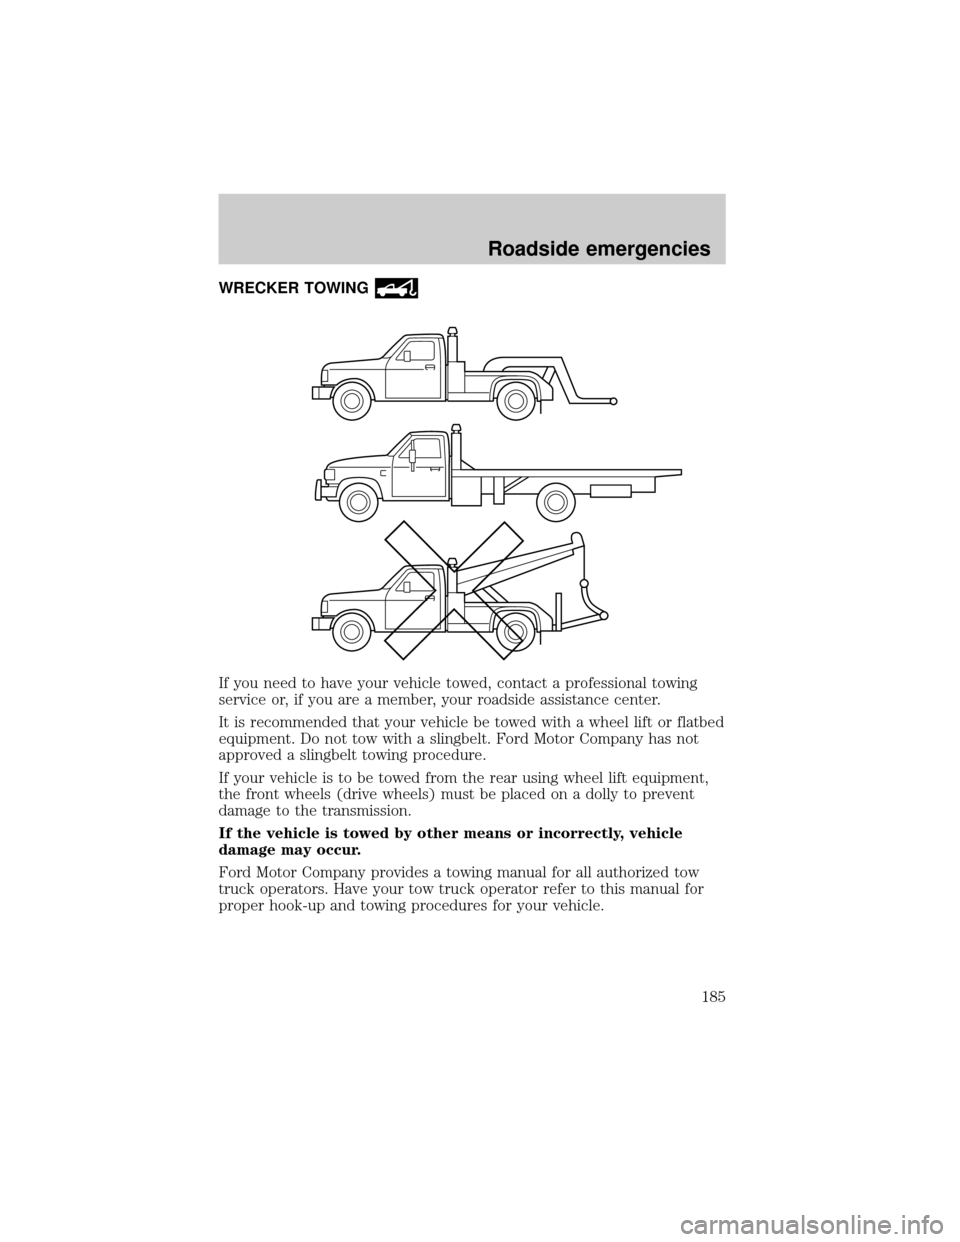
WRECKER TOWING
If you need to have your vehicle towed, contact a professional towing
service or, if you are a member, your roadside assistance center.
It is recommended that your vehicle be towed with a wheel lift or flatbed
equipment. Do not tow with a slingbelt. Ford Motor Company has not
approved a slingbelt towing procedure.
If your vehicle is to be towed from the rear using wheel lift equipment,
the front wheels (drive wheels) must be placed on a dolly to prevent
damage to the transmission.
If the vehicle is towed by other means or incorrectly, vehicle
damage may occur.
Ford Motor Company provides a towing manual for all authorized tow
truck operators. Have your tow truck operator refer to this manual for
proper hook-up and towing procedures for your vehicle.
Roadside emergencies
185
Page 211 of 256

²Four tire rotation
Replacing the tires
Replace the tires when the wear
band is visible through the tire
treads.
When replacing full size tires, never mix radial bias-belted, or
bias-type tires. Use only the tire sizes that are listed on the
Certification Label. Make sure that all tires are the same size, speed
rating, and load-carrying capacity. Use only the tire combinations
recommended on the label. If you do not follow these precautions,
your vehicle may not drive properly and safely.
Make sure that all replacement tires are of the same size, type,
load-carrying capacity and tread design (e.g., ªAll Terrainº, etc.),
as originally offered by Ford.
Maintenance and care
211
Page 229 of 256
The brushes used in some automatic car washes may damage the finish
on your wheels. Before going to a car wash, find out if the brushes are
abrasive.
Cleaning non-painted plastic exterior parts
Use vinyl cleaner for routine cleaning. Clean with a tar remover if
necessary. Do not clean plastic parts with thinners, solvents or
petroleum-based cleaners.
Underbody
Flush the complete underside of vehicle frequently. Keep body drain
holes unplugged. Inspect for road damage.
Cleaning mirrors
Do not clean your mirrors with a dry cloth or abrasive materials. Use a
soft cloth and mild detergent and water. Be careful when removing ice
from outside mirrors because you may damage the reflective surface.
Cleaning the exterior lamps
Wash with the same detergent as the exterior of your vehicle. If
necessary, use a tar remover such as Ford Extra Strength Tar and Road
Oil Remover (B7A-19520±AA).
To avoid scratching the lamps, do not use a dry paper towel, chemical
solvents or abrasive cleaners.
Cleaning the engine
Engines are more efficient when they are clean because grease and dirt
buildup keep the engine warmer than normal. When washing:
²Take care when using a power washer to clean the engine. The high
pressure fluid could penetrate the sealed parts and cause damage.
²Do not spray with cold water to avoid cracking the engine block or
other engine components.
²Never apply anything to the drive belt (including belt dressing).
Maintenance and care
229
Page 232 of 256
Cleaning and maintaining the safety belts
Clean the safety belts with a mild soap solution recommended for
cleaning upholstery or carpets. Do not bleach or dye the belts, because
these actions may weaken the belt webbing.
Check the safety belt system periodically to make sure there are no
nicks, wear or cuts. If your vehicle has been involved in an accident,
refer to theSafety belt maintenancesection in theSeating and safety
restraintschapter.
Cleaning leather seats (if equipped)
To clean, simply use a soft cloth dampened with water and a mild soap.
Wipe the leather again with a damp cloth to remove soap residue. Dry
with a soft cloth. For tougher soiling concerns, Ford recommends using
the Deluxe Leather Care Kit F8AZ-19G253±AA, which is available from
your Ford Dealer. This mild cleaner and special pad, cleans the leather
and maintains its natural beauty. Follow the instructions on the cleaner
label. Regular cleaning of your leather upholstery helps maintain its
resiliency and color.
Do not use household cleaning products, alcohol solutions,
solvents or cleaners intended for rubber, vinyl or plastics.
Cleaning the interior fabric
Remove dust and loose dirt with a whisk broom or a vacuum cleaner.
Remove fresh spots immediately. Do not use household or glass cleaners.
These agents can stain and discolor the fabric. Use a mild soap and
water solution if necessary.
Cleaning the built-in child seat (if equipped)
Clean with mild soap and water. Do not use household cleaning products
because they may weaken the safety belt webbing or damage the vinyl
parts of the seat.
The child seat liner is removable and may be machine-washed and air
dried.
Maintenance and care
232
Page 251 of 256

Accessory delay ..........................91
Air bag supplemental
restraint system .................132,133
and child safety seats ............134
description ..............................133
disposal ....................................137
driver air bag ..........................135
indicator light ......................8,136
operation .................................135
passenger air bag ...................135
Air cleaner filter .........200,201,233
Air conditioning ..........................22
automatic temperature
control system ..........................29
Air filter, cabin ..........................204
Antifreeze
(see Engine coolant) ................194
Anti-lock brake system
(see Brakes) .......................152,153
Anti-theft system ......................105
arming the system ..................105
disarming a
triggered system .....................107
disarming an untriggered
system .....................................107
Audio system (see Radio) .........40
Automatic transaxle .................155
driving with .............................156
fluid, adding ............................198
fluid, checking ........................198
fluid, refill capacities ..............233
fluid, specification ..................235
Auxiliary power point .................81
Axle
lubricant specifications ..........234
Battery .......................................201
acid, treating emergencies .....201
charging system warning light ..8
jumping a disabled battery ....180
maintenance-free ....................201
replacement, specifications ...233
servicing ..................................201Brakes ........................................152
anti-lock ............................152,153
anti-lock brake system
(ABS) warning light ..........10,153
brake warning light ....................9
fluid, checking and adding ....192
fluid, refill capacities ..............233
fluid, specifications ..........234,235
lubricant specifications ...234,235
parking ....................................153
shift interlock ..........................155
Break-in period .............................3
Capacities for refilling fluids ....233
Cargo cover ...............................110
Cargo net ............................109,110
CD changer .................................77
Certification Label ....................237
Child safety restraints ..............137
child safety belts ....................137
Child safety seats ......................138
in front seat ............................140
in rear seat .......................140,142
tether anchorage hardware ...144
Cleaning your vehicle ...............227
built-in child seat ...................232
engine compartment ..............229
exterior .............................228,229
exterior lamps .........................229
instrument panel ....................231
instrument panel lens ............231
interior ..............................231,232
mirrors .....................................229
plastic parts ............................229
safety belts ..............................232
washing ....................................227
waxing .....................................228
wheels ......................................228
windows ..................................231
wiper blades ............................230
woodtone trim ........................231
Climate control (see Air
conditioning or Heating) ............22
Index
251