steering MINI Clubman 2016 Owner's Manual (Mini Connected)
[x] Cancel search | Manufacturer: MINI, Model Year: 2016, Model line: Clubman, Model: MINI Clubman 2016Pages: 246, PDF Size: 5.21 MB
Page 14 of 246
CockpitVehicle features and op‐
tions
This chapter describes all standard, country-
specific and optional features offered with the
series. It also describes features that are not
necessarily available in your car, e. g., due to
the selected options or country versions. This
also applies to safety-related functions and sys‐
tems. The respectively applicable country provi‐
sions must be observed when using the respec‐
tive features and systems.
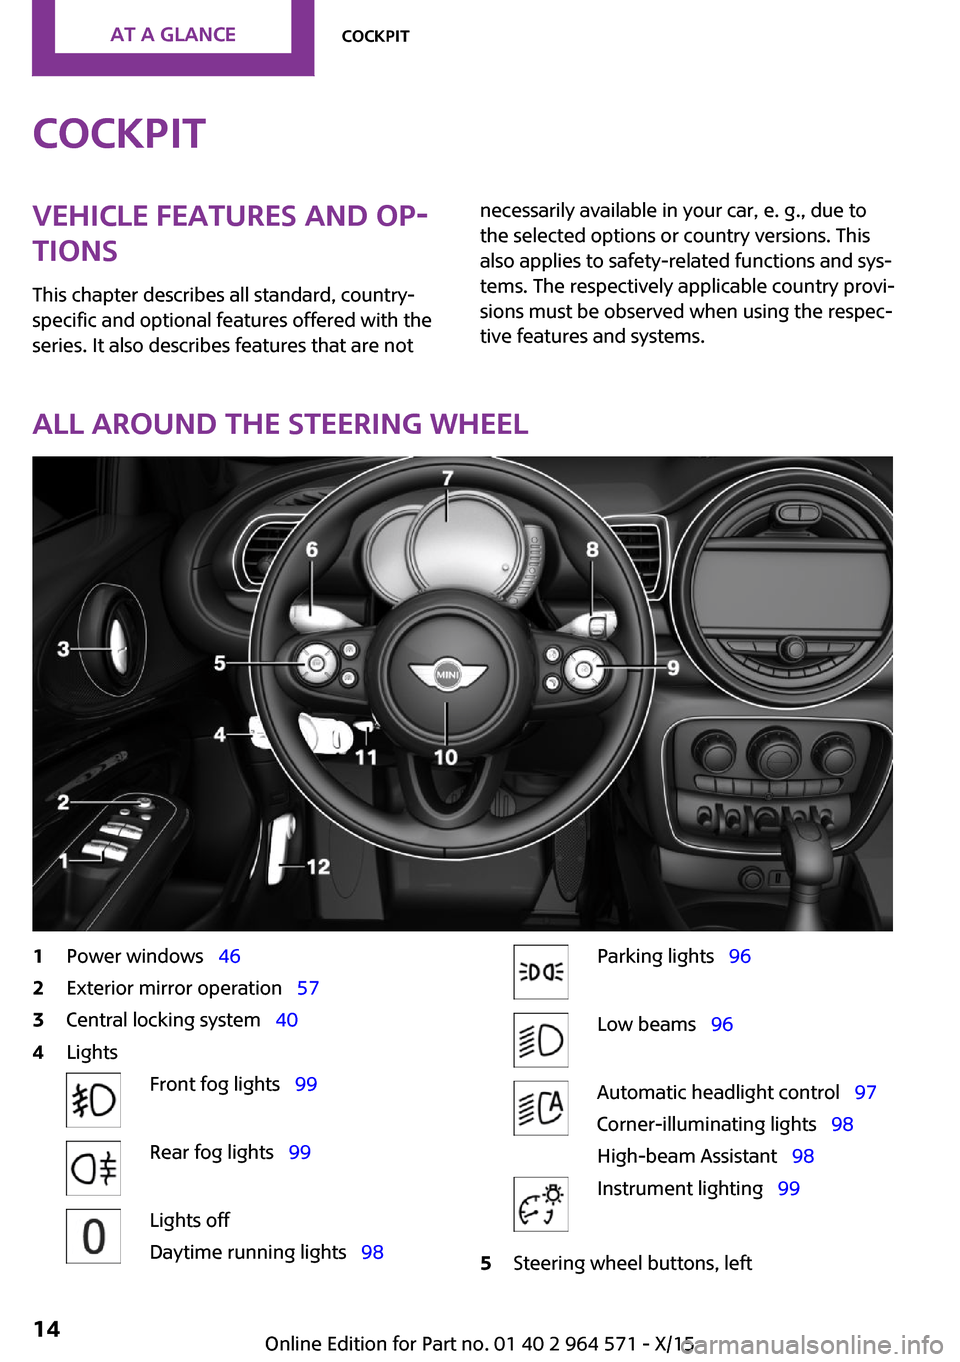
All around the steering wheel
1Power windows 462Exterior mirror operation 573Central locking system 404LightsFront fog lights 99Rear fog lights 99Lights off
Daytime running lights 98
Parking lights 96Low beams 96Automatic headlight control 97
Corner-illuminating lights 98
High-beam Assistant 98
Instrument lighting 995Steering wheel buttons, leftSeite 14AT A GLANCECockpit14
Online Edition for Part no. 01 40 2 964 571 - X/15
Page 15 of 246
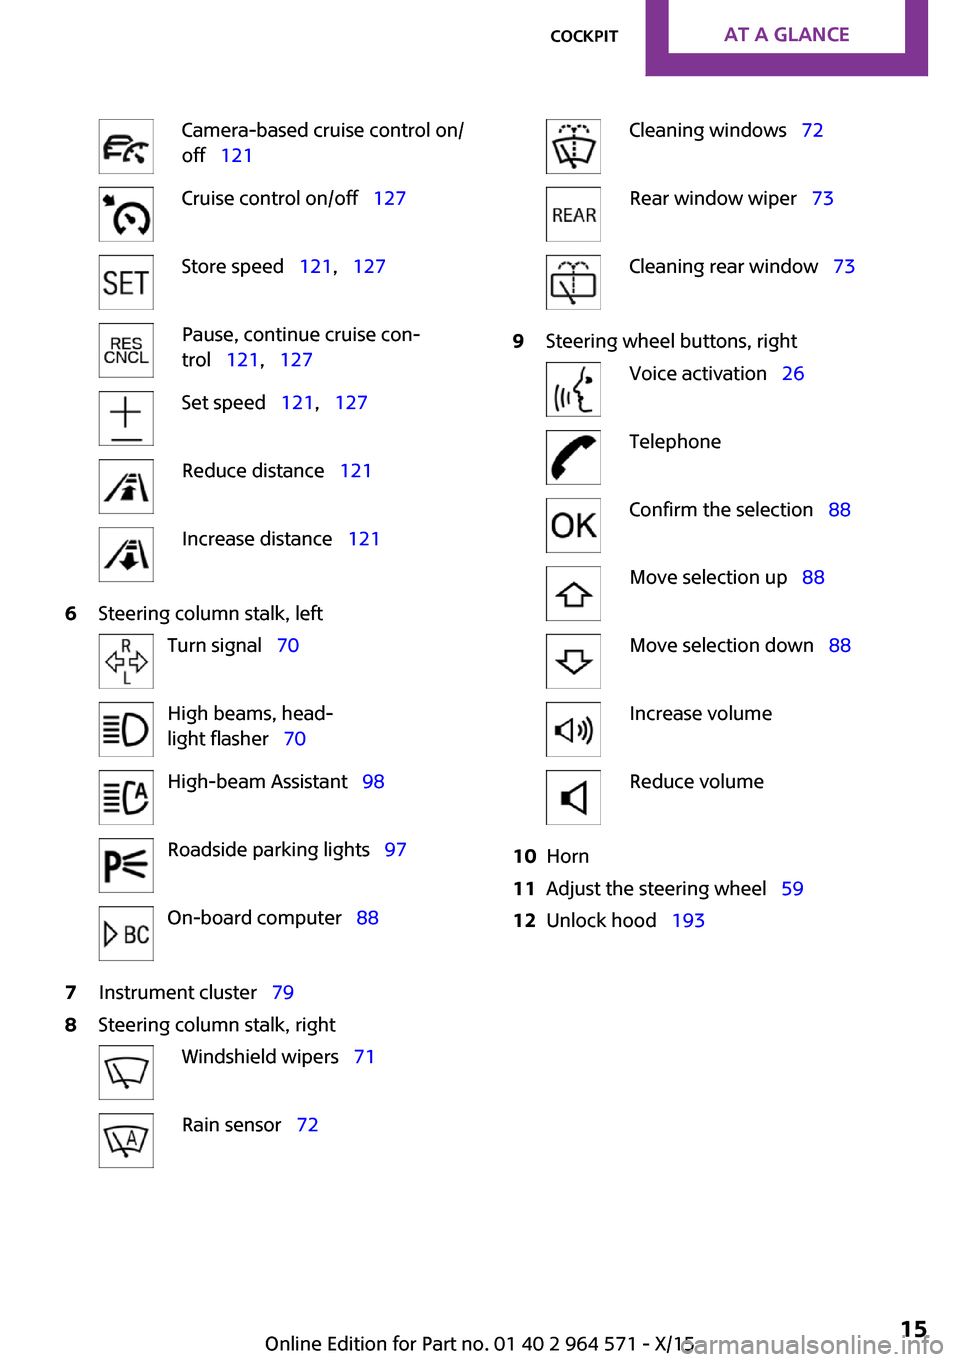
Camera-based cruise control on/
off 121
Cruise control on/off 127Store speed 121, 127Pause, continue cruise con‐
trol 121, 127
Set speed 121, 127Reduce distance 121Increase distance 1216Steering column stalk, leftTurn signal 70High beams, head‐
light flasher 70
High-beam Assistant 98Roadside parking lights 97On-board computer 887Instrument cluster 798Steering column stalk, rightWindshield wipers 71Rain sensor 72Cleaning windows 72Rear window wiper 73Cleaning rear window 739Steering wheel buttons, rightVoice activation 26TelephoneConfirm the selection 88Move selection up 88Move selection down 88Increase volumeReduce volume10Horn11Adjust the steering wheel 5912Unlock hood 193Seite 15CockpitAT A GLANCE15
Online Edition for Part no. 01 40 2 964 571 - X/15
Page 26 of 246
Voice activation systemVehicle features and op‐
tions
This chapter describes all standard, country-
specific and optional features offered with the
series. It also describes features that are not
necessarily available in your car, e. g., due to
the selected options or country versions. This
also applies to safety-related functions and sys‐
tems. The respectively applicable country provi‐
sions must be observed when using the respec‐
tive features and systems.
The concept
▷Most functions displayed on the Control
Display can be operated by voice com‐
mands via the voice activation system. The
system supports you with announcements
during input.
▷Functions that can only be used when the
vehicle is stationary cannot be used via the
voice activation system.
▷The system uses a special microphone on
the driver's side.
▷›...‹ Verbal instructions in the Owner's
Manual to use with the voice activation sys‐
tem.
Requirements
Via the Control Display, set a language that is
also supported by the voice activation system
so that the spoken commands can be identi‐
fied.
Set the language, refer to page 92.
Using voice activation
Activating the voice activation system
1. Press button on the steering wheel.2.Wait for the signal.3.Say the command.
A command that is recognized by the voice
activation system is announced and dis‐
played in the instrument cluster.
This symbol in the instrument cluster indi‐
cates that the voice activation system is active.
If no other commands are available, operate
the function via the onboard monitor.
Terminating the voice activation
system
Briefly press the button on the steering
wheel or ›Cancel‹.
Possible commands
Most menu items on the Control Display can be
voiced as commands.
The available commands depend on the menu
that is currently displayed on the Control Dis‐
play.
There are short commands for many functions.
You may select lists such as phone lists via
voice activation. Read these lists out loud ex‐
actly as they show in the respective list.
Having possible commands read aloud
You can have available commands read out
loud for you: ›Voice commands‹
E. g. if the "Settings" menu is displayed, the
commands for the settings are read out loud.
Seite 26AT A GLANCEVoice activation system26
Online Edition for Part no. 01 40 2 964 571 - X/15
Page 27 of 246
Executing functions using short
commands
Execute functions on the main menu via short
commands. It almost doesn't matter which
menu item is selected, e.g., ›Vehicle status‹.
Help dialog for the voice activation
system
Calling up help dialog: ›Help‹
Additional commands for the help dialog:
▷›Help with examples‹: announces informa‐
tion about the current operating options
and the most important commands for
them.
▷›Help with voice activation‹: information
about the principle of operation for the
voice activation system is announced.
One example: opening the
tone settings
Via the main menu
The commands of the menu items are spoken
just as they are selected via the controller.
1.Turn on the Entertainment sound output if
needed.
2. Press button on the steering wheel.3.›Radio‹4.›Tone‹
Via short command
The desired tone settings can also be started
via a short command.
1.Turn on the Entertainment sound output if
needed.
2. Press button on the steering wheel.3.›Tone‹Setting the voice dialog
Set system to standard dialog or use a short
version.
The short version of the voice dialog plays back
short messages in abbreviated form.
On the Control Display:
1. "Settings"2."Language/Units"3."Speech type:"4.Select setting.
Adjusting the volume
Turn the volume button during the spoken in‐
structions until the desired volume is set.
▷The volume remains constant even if the
volume of other audio sources is changed.
▷The volume is stored for the profile cur‐
rently used.
Information on Emer‐
gency Requests
Do not use the voice activation system to ini‐
tiate an Emergency Request. In stressful situa‐
tions, the voice and vocal pitch can change.
This can unnecessarily delay the establishment
of a phone connection.
Environmental condi‐
tions
▷Say the commands, numbers, and letters
smoothly and with normal volume, empha‐
sis, and speed.
▷Always say commands in the language of
the voice activation system.
▷Keep the doors, windows, and glass sun‐
roof closed to prevent noise interference.
Seite 27Voice activation systemAT A GLANCE27
Online Edition for Part no. 01 40 2 964 571 - X/15
Page 35 of 246
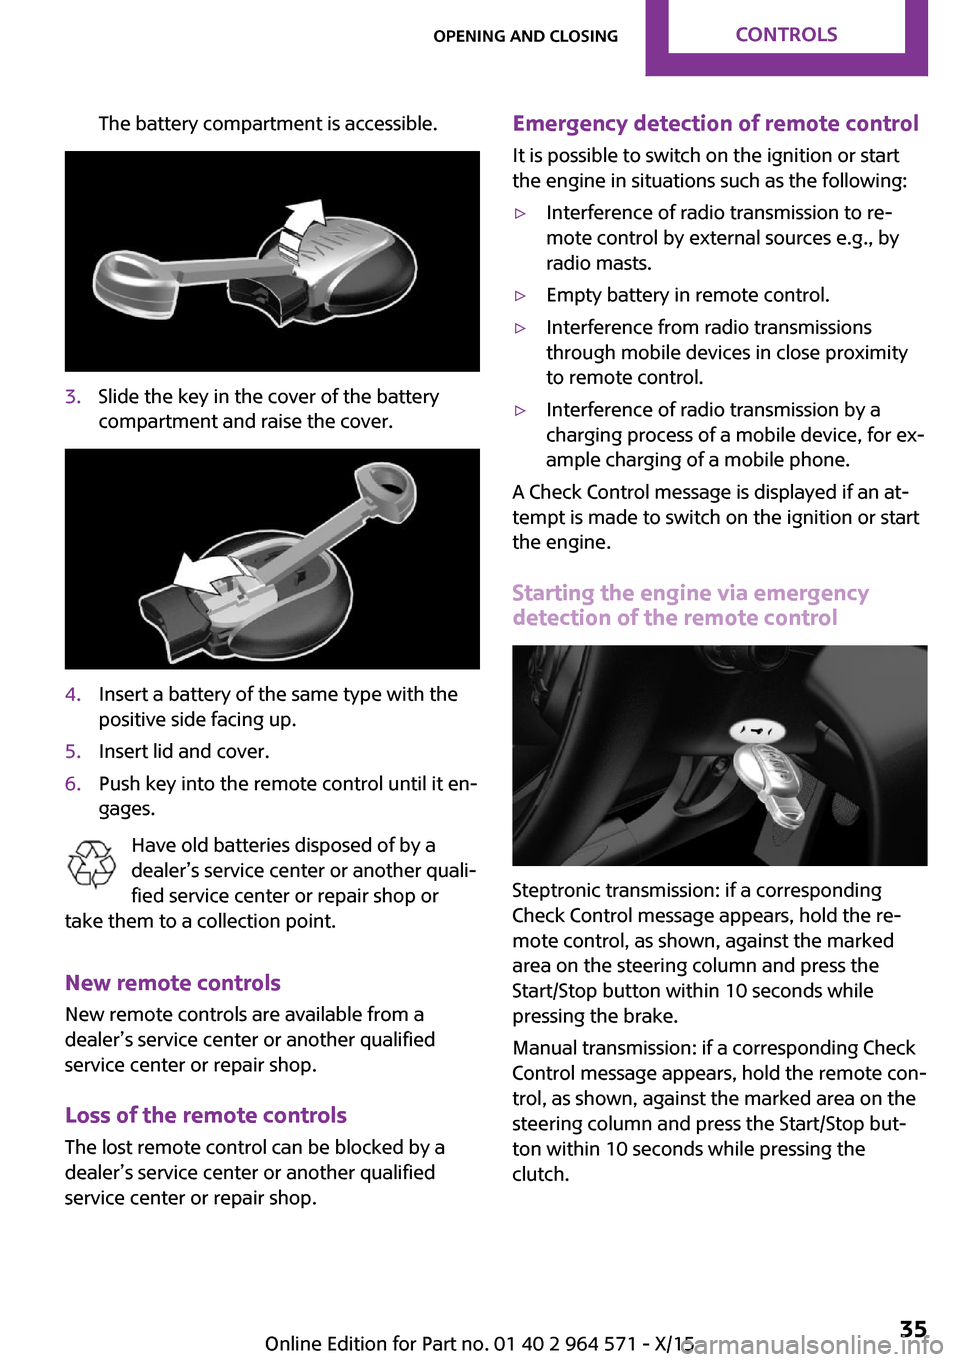
The battery compartment is accessible.3.Slide the key in the cover of the battery
compartment and raise the cover.
4.Insert a battery of the same type with the
positive side facing up.
5.Insert lid and cover.6.Push key into the remote control until it en‐
gages.
Have old batteries disposed of by a
dealer’s service center or another quali‐
fied service center or repair shop or
take them to a collection point.
New remote controls
New remote controls are available from a
dealer’s service center or another qualified
service center or repair shop.
Loss of the remote controls
The lost remote control can be blocked by a
dealer’s service center or another qualified
service center or repair shop.
Emergency detection of remote control
It is possible to switch on the ignition or start
the engine in situations such as the following:
▷Interference of radio transmission to re‐
mote control by external sources e.g., by
radio masts.
▷Empty battery in remote control.▷Interference from radio transmissions
through mobile devices in close proximity
to remote control.
▷Interference of radio transmission by a
charging process of a mobile device, for ex‐
ample charging of a mobile phone.
A Check Control message is displayed if an at‐
tempt is made to switch on the ignition or start
the engine.
Starting the engine via emergency
detection of the remote control
Steptronic transmission: if a corresponding
Check Control message appears, hold the re‐
mote control, as shown, against the marked
area on the steering column and press the
Start/Stop button within 10 seconds while
pressing the brake.
Manual transmission: if a corresponding Check
Control message appears, hold the remote con‐
trol, as shown, against the marked area on the
steering column and press the Start/Stop but‐
ton within 10 seconds while pressing the
clutch.
Seite 35Opening and closingCONTROLS35
Online Edition for Part no. 01 40 2 964 571 - X/15
Page 59 of 246
Interior mirror, manually dimmable
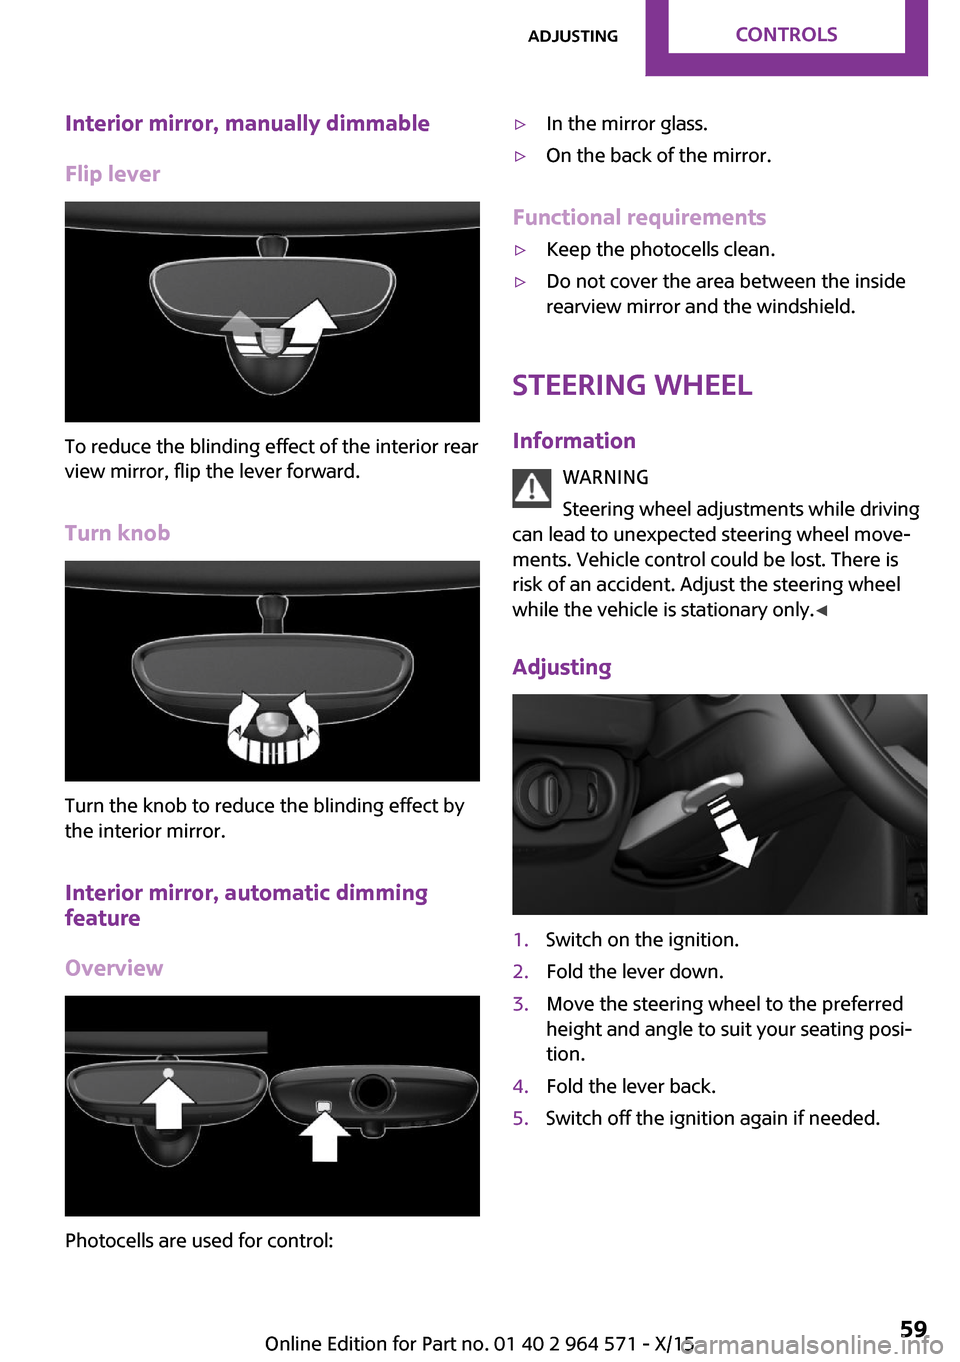
Flip lever
To reduce the blinding effect of the interior rear
view mirror, flip the lever forward.
Turn knob
Turn the knob to reduce the blinding effect by
the interior mirror.
Interior mirror, automatic dimming
feature
Overview
Photocells are used for control:
▷In the mirror glass.▷On the back of the mirror.
Functional requirements
▷Keep the photocells clean.▷Do not cover the area between the inside
rearview mirror and the windshield.
Steering wheel
Information
WARNING
Steering wheel adjustments while driving
can lead to unexpected steering wheel move‐
ments. Vehicle control could be lost. There is
risk of an accident. Adjust the steering wheel
while the vehicle is stationary only.◀
Adjusting
1.Switch on the ignition.2.Fold the lever down.3.Move the steering wheel to the preferred
height and angle to suit your seating posi‐
tion.
4.Fold the lever back.5.Switch off the ignition again if needed.Seite 59AdjustingCONTROLS59
Online Edition for Part no. 01 40 2 964 571 - X/15
Page 67 of 246
▷The selector lever is in selector lever posi‐
tion D.
▷Brake pedal remains depressed while the
vehicle is stopped.
▷The driver's safety belt is buckled or the
driver's door is closed.
In order to be able to release the brake pedal,
engage lever in position P. The engine remains
off.
To continue driving depress the brake pedal.
When a gear is engaged, the engine starts au‐
tomatically.
The air flow from the air conditioner is reduced
when the engine is switched off.
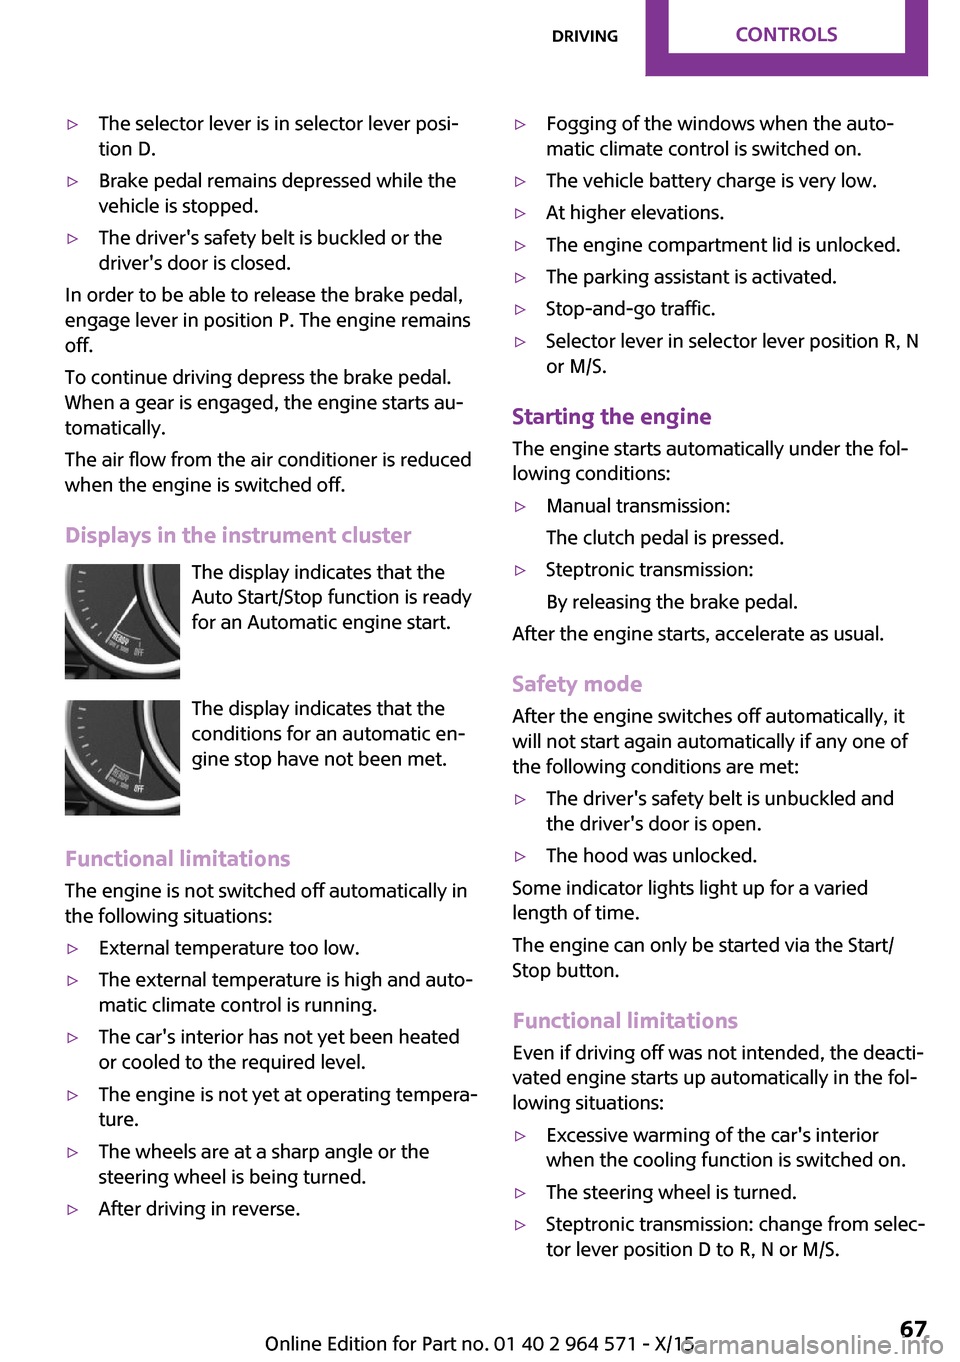
Displays in the instrument cluster
The display indicates that the
Auto Start/Stop function is ready
for an Automatic engine start.
The display indicates that the
conditions for an automatic en‐
gine stop have not been met.
Functional limitations
The engine is not switched off automatically in
the following situations:
▷External temperature too low.▷The external temperature is high and auto‐
matic climate control is running.
▷The car's interior has not yet been heated
or cooled to the required level.
▷The engine is not yet at operating tempera‐
ture.
▷The wheels are at a sharp angle or the
steering wheel is being turned.
▷After driving in reverse.▷Fogging of the windows when the auto‐
matic climate control is switched on.
▷The vehicle battery charge is very low.▷At higher elevations.▷The engine compartment lid is unlocked.▷The parking assistant is activated.▷Stop-and-go traffic.▷Selector lever in selector lever position R, N
or M/S.
Starting the engine
The engine starts automatically under the fol‐
lowing conditions:
▷Manual transmission:
The clutch pedal is pressed.
▷Steptronic transmission:
By releasing the brake pedal.
After the engine starts, accelerate as usual.
Safety mode
After the engine switches off automatically, it
will not start again automatically if any one of
the following conditions are met:
▷The driver's safety belt is unbuckled and
the driver's door is open.
▷The hood was unlocked.
Some indicator lights light up for a varied
length of time.
The engine can only be started via the Start/
Stop button.
Functional limitations
Even if driving off was not intended, the deacti‐
vated engine starts up automatically in the fol‐
lowing situations:
▷Excessive warming of the car's interior
when the cooling function is switched on.
▷The steering wheel is turned.▷Steptronic transmission: change from selec‐
tor lever position D to R, N or M/S.
Seite 67DrivingCONTROLS67
Online Edition for Part no. 01 40 2 964 571 - X/15
Page 76 of 246
Sport program and manual mode M/S
Activating the sport program
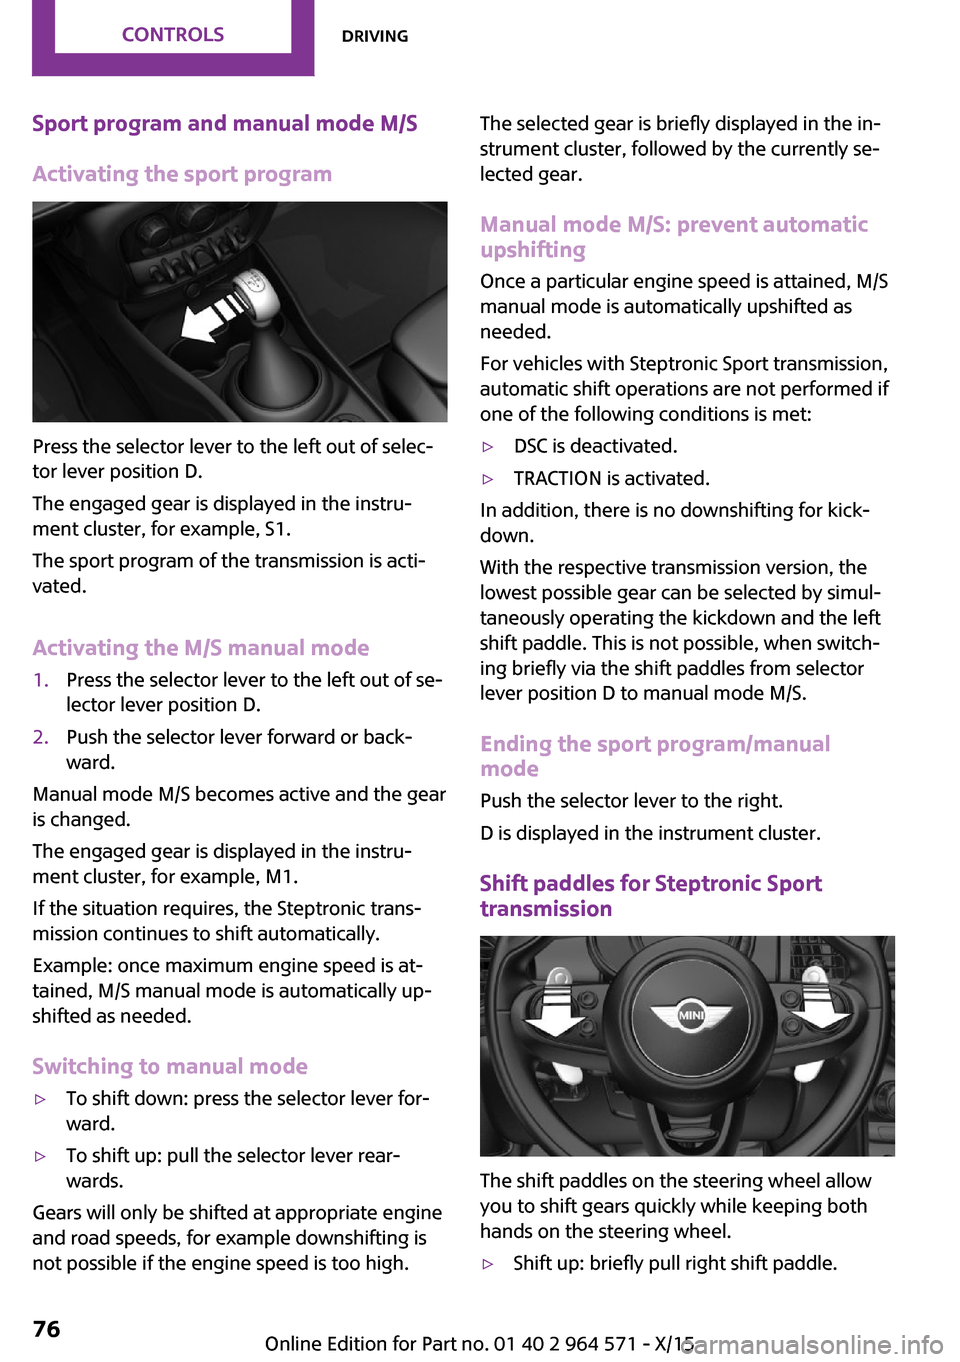
Press the selector lever to the left out of selec‐
tor lever position D.
The engaged gear is displayed in the instru‐
ment cluster, for example, S1.
The sport program of the transmission is acti‐
vated.
Activating the M/S manual mode
1.Press the selector lever to the left out of se‐
lector lever position D.
2.Push the selector lever forward or back‐
ward.
Manual mode M/S becomes active and the gear
is changed.
The engaged gear is displayed in the instru‐
ment cluster, for example, M1.
If the situation requires, the Steptronic trans‐
mission continues to shift automatically.
Example: once maximum engine speed is at‐
tained, M/S manual mode is automatically up‐
shifted as needed.
Switching to manual mode
▷To shift down: press the selector lever for‐
ward.
▷To shift up: pull the selector lever rear‐
wards.
Gears will only be shifted at appropriate engine
and road speeds, for example downshifting is
not possible if the engine speed is too high.
The selected gear is briefly displayed in the in‐
strument cluster, followed by the currently se‐
lected gear.
Manual mode M/S: prevent automatic
upshifting
Once a particular engine speed is attained, M/S
manual mode is automatically upshifted as
needed.
For vehicles with Steptronic Sport transmission,
automatic shift operations are not performed if
one of the following conditions is met:
▷DSC is deactivated.▷TRACTION is activated.
In addition, there is no downshifting for kick‐
down.
With the respective transmission version, the
lowest possible gear can be selected by simul‐
taneously operating the kickdown and the left
shift paddle. This is not possible, when switch‐
ing briefly via the shift paddles from selector
lever position D to manual mode M/S.
Ending the sport program/manual
mode
Push the selector lever to the right.
D is displayed in the instrument cluster.
Shift paddles for Steptronic Sport
transmission
The shift paddles on the steering wheel allow
you to shift gears quickly while keeping both
hands on the steering wheel.
▷Shift up: briefly pull right shift paddle.Seite 76CONTROLSDriving76
Online Edition for Part no. 01 40 2 964 571 - X/15
Page 77 of 246
▷Shift down: briefly pull left shift paddle.▷The lowest possible gear can be selected by
pulling and holding the left shift paddle.
Gears will only be shifted at appropriate engine
and road speeds, for example downshifting is
not possible if the engine speed is too high.
The selected gear is briefly displayed in the in‐
strument cluster, followed by the current gear.
If the shift paddles on the steering wheel are
used to shift gears in automatic mode, the
transmission temporarily switches to manual
mode.
In the manual mode, after conservative driving
for a certain amount of time or if there has
been no acceleration or shifting of the shift
paddles within a certain amount of time, the
transmission switches back to automatic mode.
It is possible to switch into the automatic mode:
▷Pull and hold right shift paddle.
or
▷In addition to the briefly pulled right shift
paddle, briefly pull the left shift paddle.
Displays in the instrument cluster
The selector lever position is dis‐
played, for example: P.
Manually release the transmission lock
Should the selector lever be blocked in selector
lever position P despite the ignition being
turned on, the brake being depressed and the
unlock button being pressed, the transmission
lock can be manually canceled:
Before unlocking the transmission lock man‐
ually, set the parking brake to prevent the vehi‐
cle from rolling away.
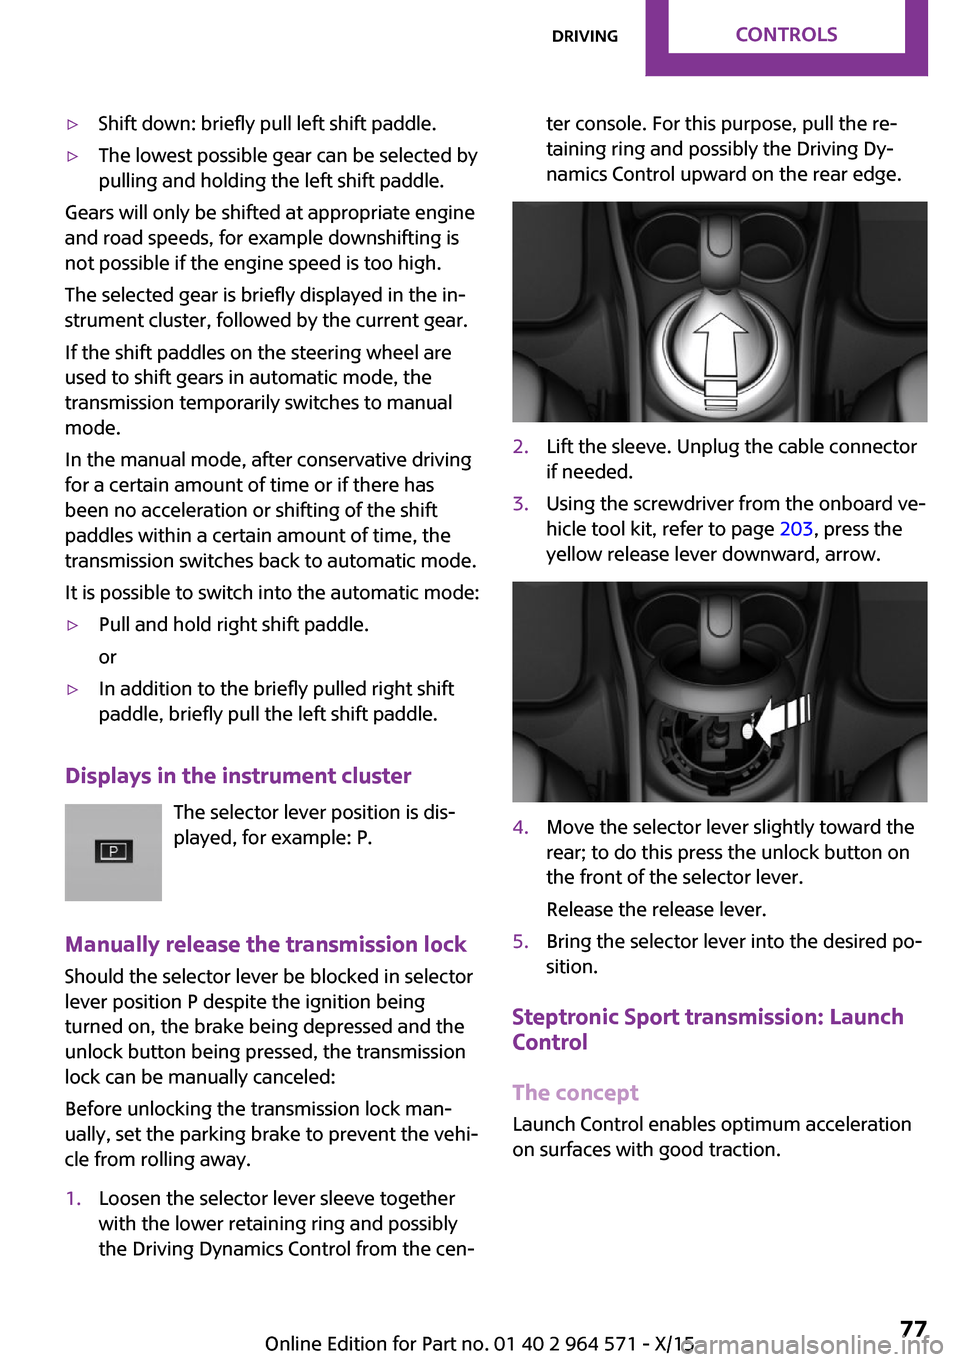
1.Loosen the selector lever sleeve together
with the lower retaining ring and possibly
the Driving Dynamics Control from the cen‐
ter console. For this purpose, pull the re‐
taining ring and possibly the Driving Dy‐
namics Control upward on the rear edge.
2.Lift the sleeve. Unplug the cable connector
if needed.
3.Using the screwdriver from the onboard ve‐
hicle tool kit, refer to page 203, press the
yellow release lever downward, arrow.
4.Move the selector lever slightly toward the
rear; to do this press the unlock button on
the front of the selector lever.
Release the release lever.
5.Bring the selector lever into the desired po‐
sition.
Steptronic Sport transmission: Launch
Control
The concept
Launch Control enables optimum acceleration
on surfaces with good traction.
Seite 77DrivingCONTROLS77
Online Edition for Part no. 01 40 2 964 571 - X/15
Page 78 of 246
General information
The use of Launch Control causes premature
component wear since this function represents
a very heavy load for the vehicle.
Do not use Launch Control during the break-in,
refer to page 162, period.
To increase vehicle stability, activate DSC again
as soon as possible.
An experienced driver may be able to achieve
better acceleration values in DSC OFF mode, re‐
fer to page 117.
Requirements
Launch Control is available when the engine is
warmed up, that is, after uninterrupted driving
of at least 6 miles/10 km.
To start with Launch Control do not steer the
steering wheel.
Start with launch control
While the engine is running:
1. Press button and select SPORT with
Driving Dynamics Control, refer to
page 119.
The instrument cluster displays TRACTION
in combination with SPORT. The DSC OFF
indicator lamp lights up.
2.Engage selector lever position S.3.With the left foot, forcefully press down on
the brake.
4.Step on the accelerator pedal beyond the
resistance point at the full throttle position,
kickdown.
A flag symbol is displayed in the instrument
cluster.
5.The starting engine speed adjusts. Within
3 seconds, release the brake.
Before using Launch Control, allow the trans‐
mission to cool down for approx. 5 minutes.
Seite 78CONTROLSDriving78
Online Edition for Part no. 01 40 2 964 571 - X/15