warning light MINI COUPE ROADSTER CONVERTIBLE 2015 Owner's Manual
[x] Cancel search | Manufacturer: MINI, Model Year: 2015, Model line: COUPE ROADSTER CONVERTIBLE, Model: MINI COUPE ROADSTER CONVERTIBLE 2015Pages: 231, PDF Size: 5.56 MB
Page 99 of 231

▷The transmission position D is disengaged.▷DSC intervenes.
Maintaining, storing the current speedPress button 1 or button 3.
The current speed is maintained and stored. It
is displayed briefly in the tachometer.
On downhill gradients, it may prove impossible
to maintain the set speed if the engine braking
power is insufficient. On uphill gradients, it may
prove impossible to maintain the set speed if
the engine power output is insufficient.
Increasing speed
▷Press button 1 repeatedly until the desired
speed is reached.
Each time the button is pressed, the speed
increases by approx. 1 mph/1 km/h.▷Press and hold button 1 until the desired
speed is reached.
The vehicle accelerates without pressure on
the accelerator pedal. After the button is
released, the achieved speed is maintained
and stored.
Decreasing speed
Press button 3 repeatedly or hold it until the
desired speed is reached.
The functions are the same those when the
speed is increased, only that the speed is re‐
duced.
Resuming a speed stored beforehand Press button 4.
The last stored speed is resumed and main‐
tained.
The stored speed is cleared when the ignition is
switched off.
Display in the tachometer
The selected speed is displayed briefly.
If the display --- mph or --- km/h appears
briefly, conditions may not be adequate to op‐
erate the system.
For better control The indicator lamp lights up in the
speedometer. Cruise control is ready to
operate and can be activated.
Malfunction The warning lamp in the tachometer
lights up.
The system is malfunctioning or has
failed.
Park Distance Control
PDC
The concept
PDC provides support when parking in reverse.
Signal tones indicate that the vehicle is ap‐
proaching an object behind it. Measurements
are made by four ultrasound sensors in the
bumpers.
The range of these sensors is approx. 6 ft/2 m.
An acoustic warning is first given:
▷By the two corner sensors at ap‐
prox. 24 in/60 cm.Seite 97Driving comfortCONTROLS97
Online Edition for Part no. 01 40 2 961 029 - II/15
Page 100 of 231

▷By the rear middle sensors at approx.
5 ft/1.50 m.
Avoid driving quickly with PDC
PDC is a parking aid that can display ob‐
jects when the vehicle approaches them slowly,
as is the case during parking maneuvers. Avoid
driving toward an object quickly as the system
may then be too late in issuing a warning for
technical reasons. ◀
Automatic operation
The system is activated after approx. one sec‐ ond when reverse gear or selector lever posi‐
tion R is engaged while the engine is running or
the ignition is switched on. Await this short pe‐
riod before setting the vehicle into motion.
Signal tones
The closer the vehicle is to the object, the
shorter the intervals become. If the distance to
a detected object is less than approx.
12 in/30 cm, a continuous tone is sounded.
If the distance remains constant, for example
when driving parallel to a wall, the signal tone
is stopped after approx. 3 seconds.
Volume
The signal tone volume can be adjusted.
Radio MINI Boost CD, refer to page 128.
System limits Check the traffic situation as well
PDC cannot serve as a substitute for the
driver's personal judgment of the traffic situa‐
tion. Check the traffic situation around the ve‐
hicle with your own eyes. Otherwise, an acci‐
dent could result from road users or objects
located outside of the PDC detection range.
Loud noises from outside and inside the vehicle
may prevent you from hearing the PDC's signal
tone. ◀
Malfunction
The warning light lights up. PDC is mal‐functioning or has failed. Have the sys‐
tem checked.
To ensure full functionality of the sensors, keep
the sensors clean and free of ice. When using
high-pressure washers, do not spray the sen‐
sors for long periods and maintain a distance of
at least 12 in/30 cm.Seite 98CONTROLSDriving comfort98
Online Edition for Part no. 01 40 2 961 029 - II/15
Page 169 of 231
▷If a warning triangle or portable hazard
warning lamp is required, set it up on the
roadside at an appropriate distance from
the rear of the vehicle. Comply with all
safety guidelines and regulations. ◀
The procedure to correct a flat tire depends on
the equipment in the vehicle:
▷Run-flat tires, refer to page 166.▷MINI Mobility System, refer to page 167.▷Wheel change with a compact wheel, refer
to page 184.
MINI Mobility System
Notes
▷Follow the instructions on using the Mobi‐
lity System found on the compressor and
sealant bottle.▷Use of the Mobility System may be ineffec‐
tive if tire damage is greater than approx.
1/8 in/4 mm in size.▷Contact the nearest service center if the tire
cannot be made drivable.▷If possible, do not remove foreign bodies
that have penetrated the tire.▷Pull the speed limit sticker off the sealant
bottle and apply it to the steering wheel.
Sealant and compressor
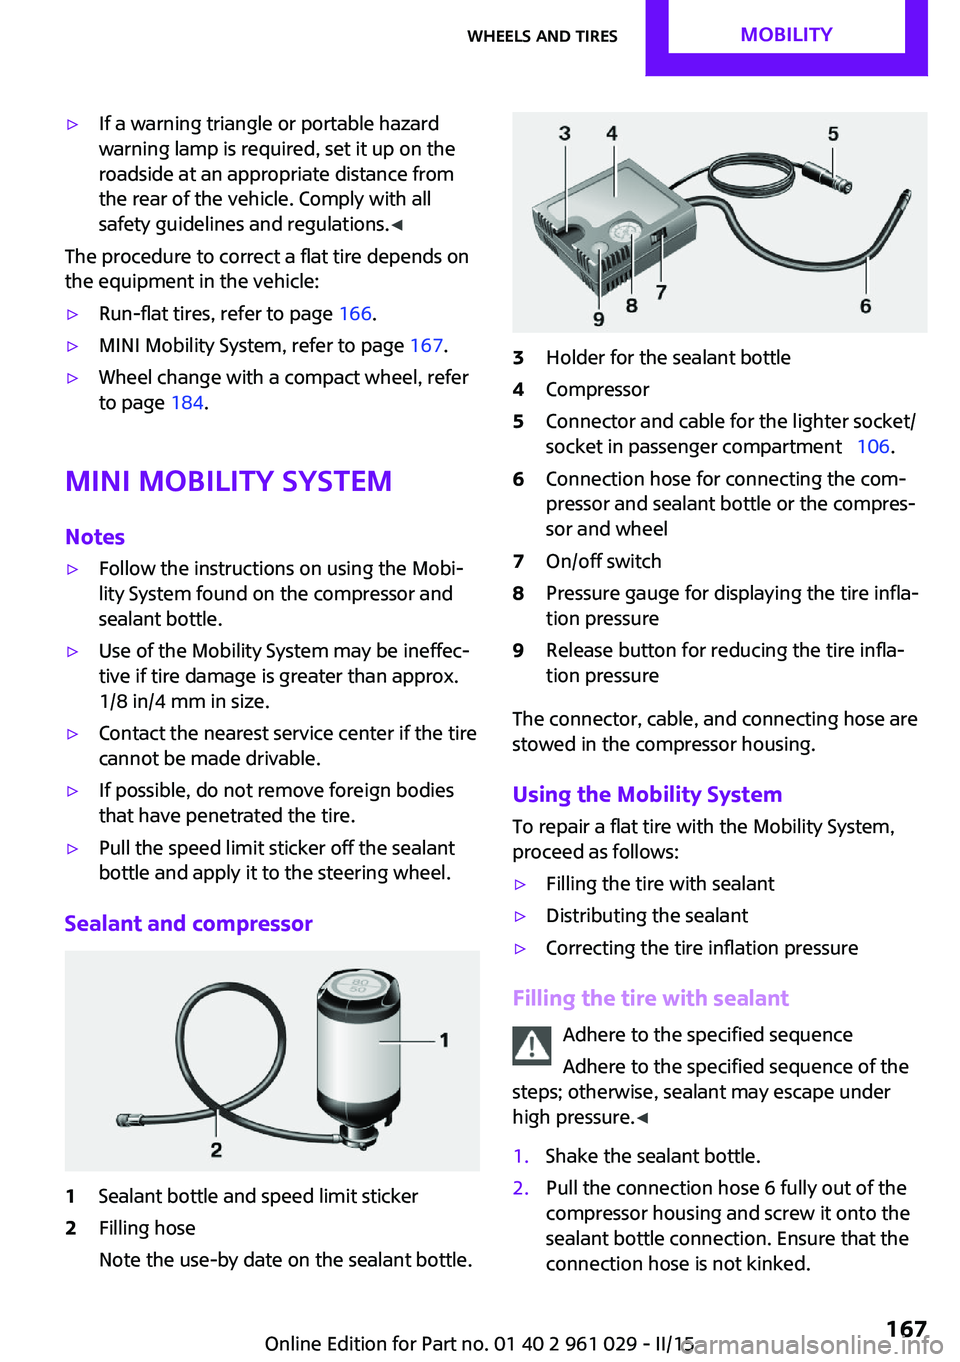
1Sealant bottle and speed limit sticker2Filling hose
Note the use-by date on the sealant bottle.3Holder for the sealant bottle4Compressor5Connector and cable for the lighter socket/
socket in passenger compartment 106.6Connection hose for connecting the com‐
pressor and sealant bottle or the compres‐
sor and wheel7On/off switch8Pressure gauge for displaying the tire infla‐
tion pressure9Release button for reducing the tire infla‐
tion pressure
The connector, cable, and connecting hose are
stowed in the compressor housing.
Using the Mobility System
To repair a flat tire with the Mobility System,
proceed as follows:
▷Filling the tire with sealant▷Distributing the sealant▷Correcting the tire inflation pressure
Filling the tire with sealant
Adhere to the specified sequence
Adhere to the specified sequence of the
steps; otherwise, sealant may escape under
high pressure. ◀
1.Shake the sealant bottle.2.Pull the connection hose 6 fully out of the
compressor housing and screw it onto the
sealant bottle connection. Ensure that the
connection hose is not kinked.Seite 167Wheels and tiresMOBILITY167
Online Edition for Part no. 01 40 2 961 029 - II/15
Page 176 of 231
CoolantVehicle equipment
This chapter describes all series equipment as
well as country-specific and special equipment
offered for this model series. Therefore, it also
describes equipment that may not be found in
your vehicle, for instance due to the selected
special equipment or the country version. This
also applies to safety-related functions and sys‐
tems.
When using the features and systems described
here, adhere to local regulations.
General information Danger of burns from hot engine
Do not open the cooling system while the
engine is hot; otherwise, escaping coolant may
cause burns. ◀
Suitable additives
Only use suitable additives; otherwise,
engine damage may occur. The additives are
harmful to your health. ◀
Coolant consists of water and additives.
Not all commercially available additives are
suitable for your MINI vehicle. Ask your service
center for suitable additives.
Coolant temperature
If the coolant and therefore the engine over‐
heat, a warning lamp lights up, refer to
page 199.Coolant level
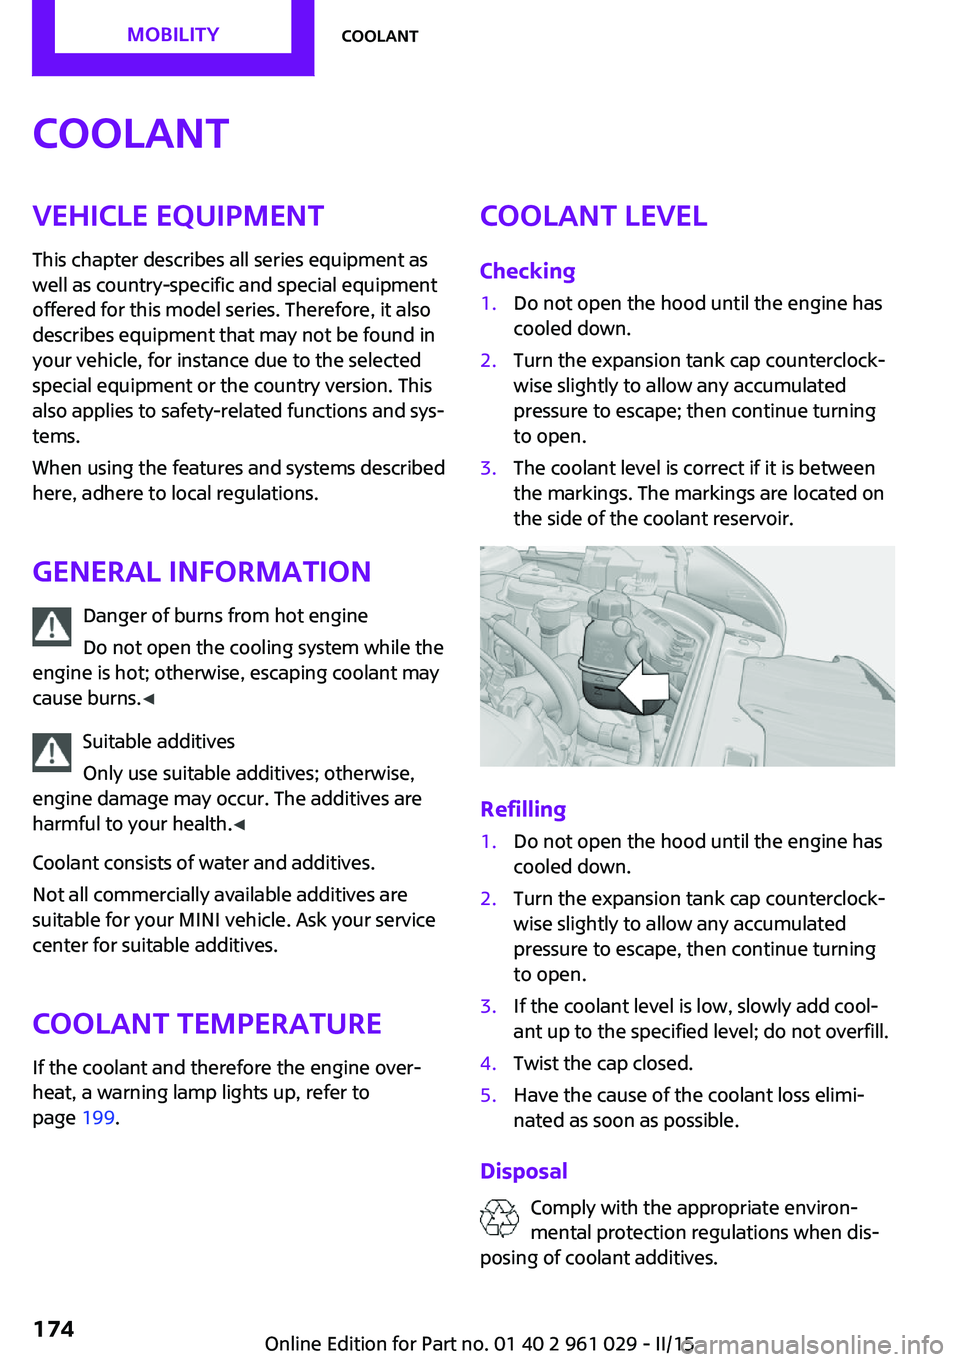
Checking1.Do not open the hood until the engine has
cooled down.2.Turn the expansion tank cap counterclock‐
wise slightly to allow any accumulated
pressure to escape; then continue turning
to open.3.The coolant level is correct if it is between
the markings. The markings are located on
the side of the coolant reservoir.
Refilling
1.Do not open the hood until the engine has
cooled down.2.Turn the expansion tank cap counterclock‐
wise slightly to allow any accumulated
pressure to escape, then continue turning
to open.3.If the coolant level is low, slowly add cool‐
ant up to the specified level; do not overfill.4.Twist the cap closed.5.Have the cause of the coolant loss elimi‐
nated as soon as possible.
Disposal
Comply with the appropriate environ‐mental protection regulations when dis‐
posing of coolant additives.
Seite 174MOBILITYCoolant174
Online Edition for Part no. 01 40 2 961 029 - II/15
Page 178 of 231
Socket for OBD Onboard
Diagnosis
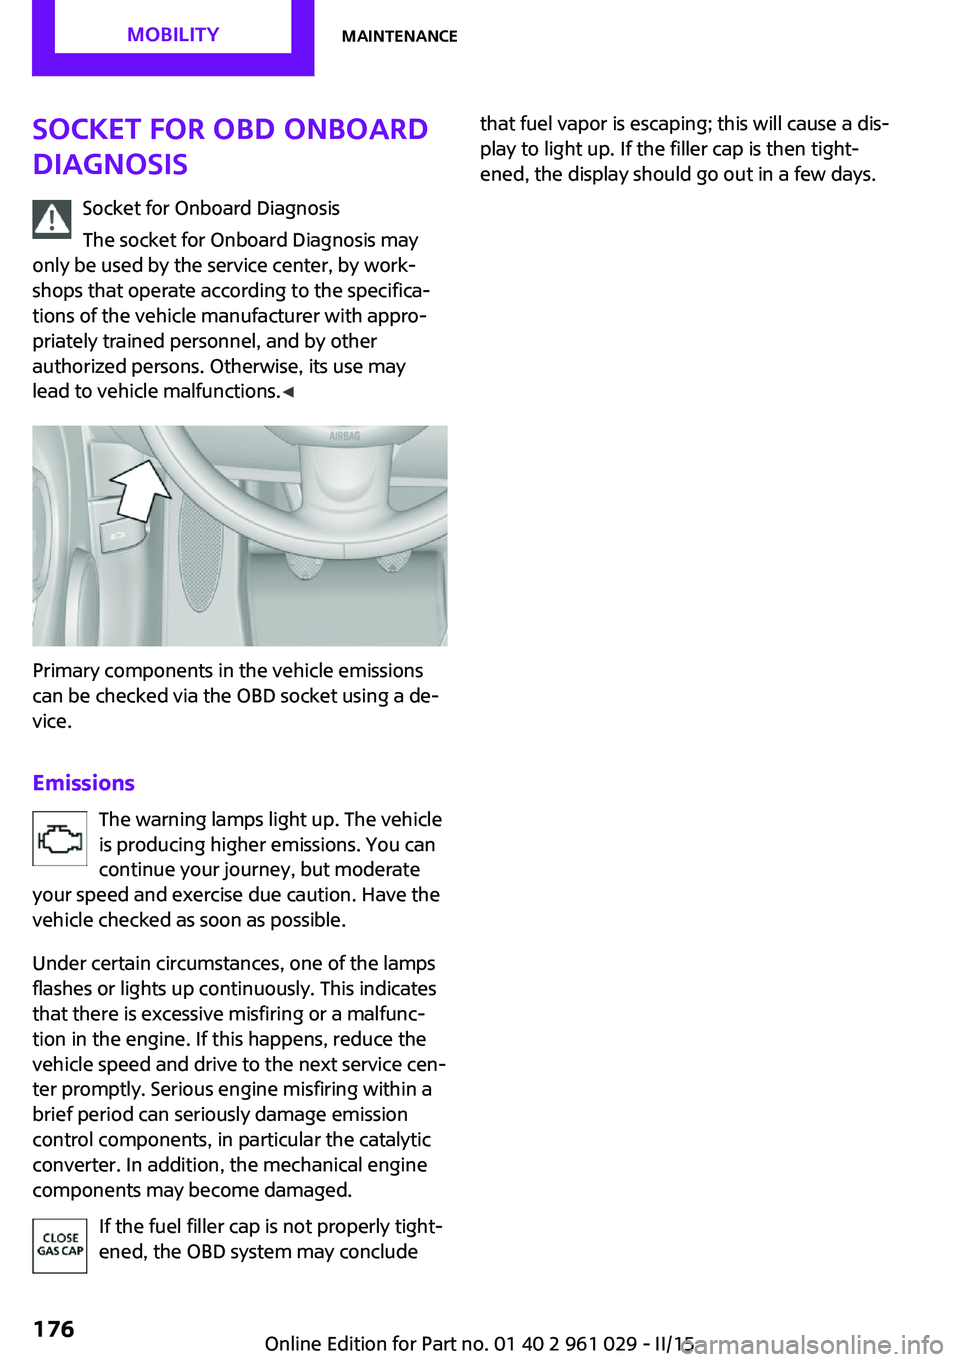
Socket for Onboard Diagnosis
The socket for Onboard Diagnosis may
only be used by the service center, by work‐
shops that operate according to the specifica‐
tions of the vehicle manufacturer with appro‐
priately trained personnel, and by other
authorized persons. Otherwise, its use may
lead to vehicle malfunctions. ◀
Primary components in the vehicle emissions
can be checked via the OBD socket using a de‐
vice.
Emissions The warning lamps light up. The vehicle
is producing higher emissions. You can
continue your journey, but moderate
your speed and exercise due caution. Have the
vehicle checked as soon as possible.
Under certain circumstances, one of the lamps
flashes or lights up continuously. This indicates
that there is excessive misfiring or a malfunc‐
tion in the engine. If this happens, reduce the
vehicle speed and drive to the next service cen‐
ter promptly. Serious engine misfiring within a
brief period can seriously damage emission
control components, in particular the catalytic
converter. In addition, the mechanical engine
components may become damaged.
If the fuel filler cap is not properly tight‐
ened, the OBD system may conclude
that fuel vapor is escaping; this will cause a dis‐
play to light up. If the filler cap is then tight‐
ened, the display should go out in a few days.Seite 176MOBILITYMaintenance176
Online Edition for Part no. 01 40 2 961 029 - II/15
Page 194 of 231
Being towedFollow the towing instructions
Follow all towing instructions, or vehicle
damage or accidents may occur. ◀
▷Make sure that the ignition is switched on;
otherwise, the low beams, tail lights, turn
signals, and windshield wipers may be un‐
available.▷Do not tow the vehicle with the rear axle
tilted, as the front wheels could turn.▷When the engine is stopped, there is no
power assist. Consequently, more force
needs to be applied when braking and
steering.▷Larger steering wheel movements are re‐
quired.▷Switch on the hazard warning system, de‐
pending on local regulations.
Manual transmission
Gearshift lever in neutral position.
Steptronic transmission Towing vehicles with a Steptronic trans‐
mission
Only transport vehicles with a Steptronic trans‐
mission on tow trucks or with raised front
wheels; otherwise, the transmission may be
damaged. ◀
Towing with a tow bar
Light towing vehicle
The towing vehicle must not be lighter
than your vehicle, or it will not be possible to
control vehicle response. ◀
Correctly attach the tow bar
Only secure the tow bar on the tow fit‐
tings; damage can occur when it is secured on
other parts of the vehicle. ◀
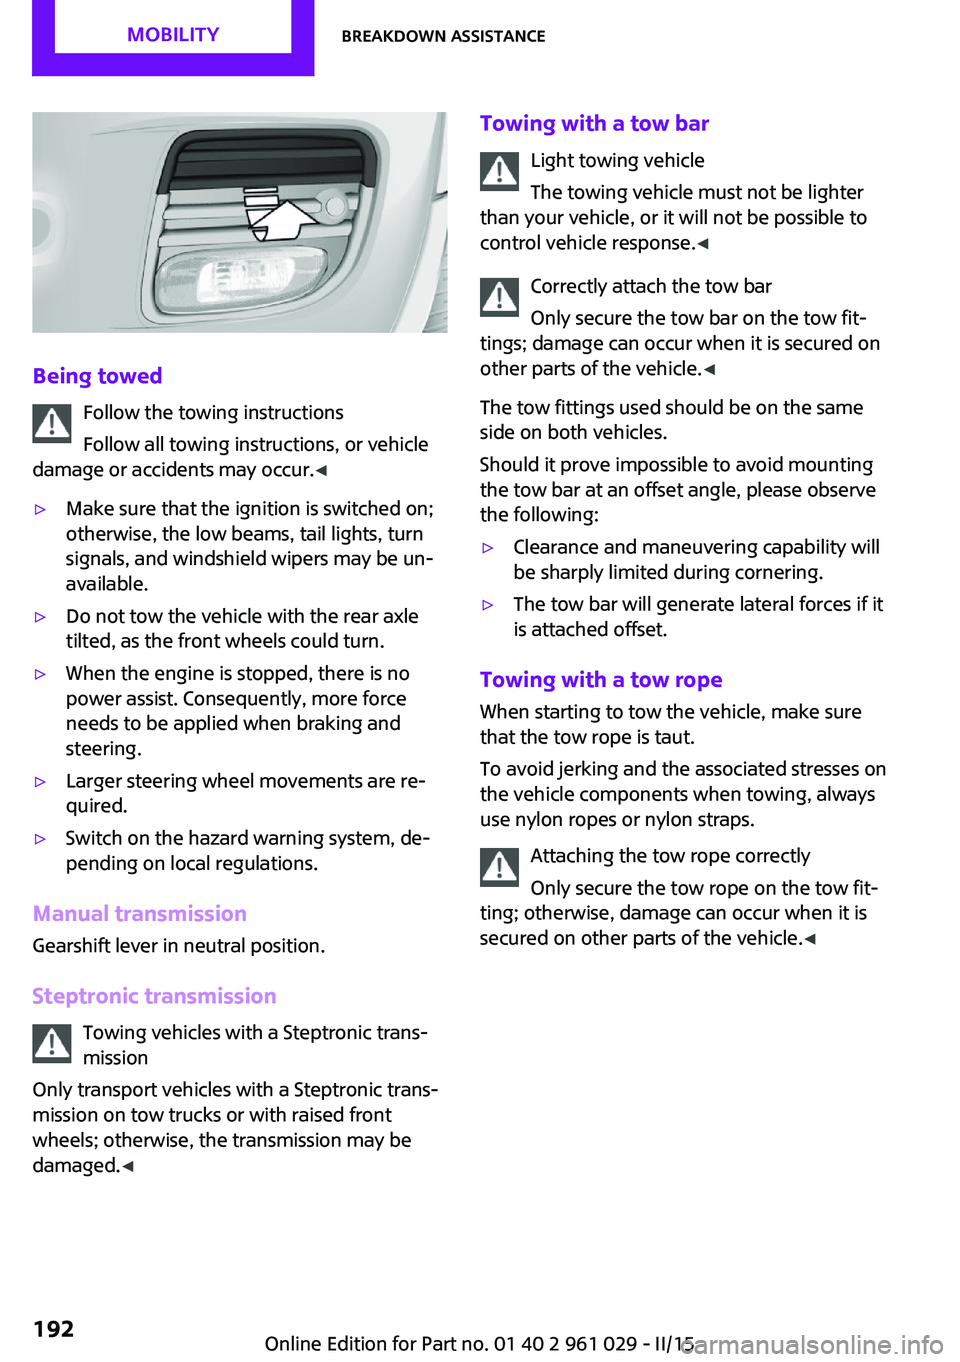
The tow fittings used should be on the same
side on both vehicles.
Should it prove impossible to avoid mounting
the tow bar at an offset angle, please observe
the following:▷Clearance and maneuvering capability will
be sharply limited during cornering.▷The tow bar will generate lateral forces if it
is attached offset.
Towing with a tow rope
When starting to tow the vehicle, make sure
that the tow rope is taut.
To avoid jerking and the associated stresses on
the vehicle components when towing, always
use nylon ropes or nylon straps.
Attaching the tow rope correctly
Only secure the tow rope on the tow fit‐
ting; otherwise, damage can occur when it is
secured on other parts of the vehicle. ◀
Seite 192MOBILITYBreakdown assistance192
Online Edition for Part no. 01 40 2 961 029 - II/15
Page 201 of 231
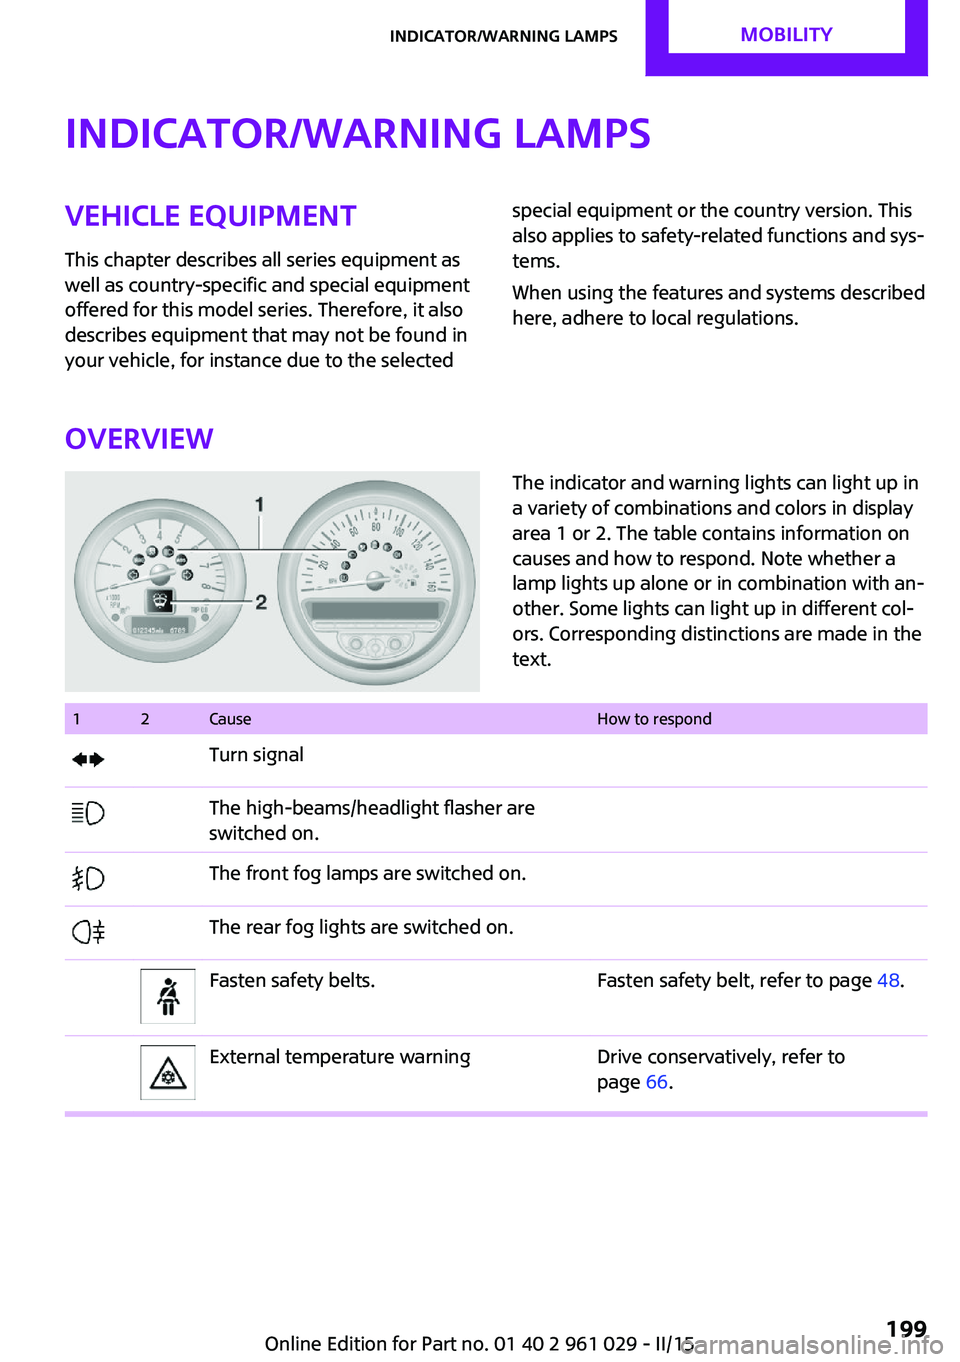
Indicator/warning lampsVehicle equipment
This chapter describes all series equipment as
well as country-specific and special equipment
offered for this model series. Therefore, it also
describes equipment that may not be found in
your vehicle, for instance due to the selectedspecial equipment or the country version. This
also applies to safety-related functions and sys‐
tems.
When using the features and systems described
here, adhere to local regulations.
Overview
The indicator and warning lights can light up in
a variety of combinations and colors in display
area 1 or 2. The table contains information on
causes and how to respond. Note whether a
lamp lights up alone or in combination with an‐
other. Some lights can light up in different col‐
ors. Corresponding distinctions are made in the
text. 12CauseHow to respondTurn signalThe high-beams/headlight flasher are
switched on.The front fog lamps are switched on.The rear fog lights are switched on.Fasten safety belts.Fasten safety belt, refer to page 48.External temperature warningDrive conservatively, refer to
page 66.Seite 199Indicator/warning lampsMOBILITY199
Online Edition for Part no. 01 40 2 961 029 - II/15
Page 202 of 231
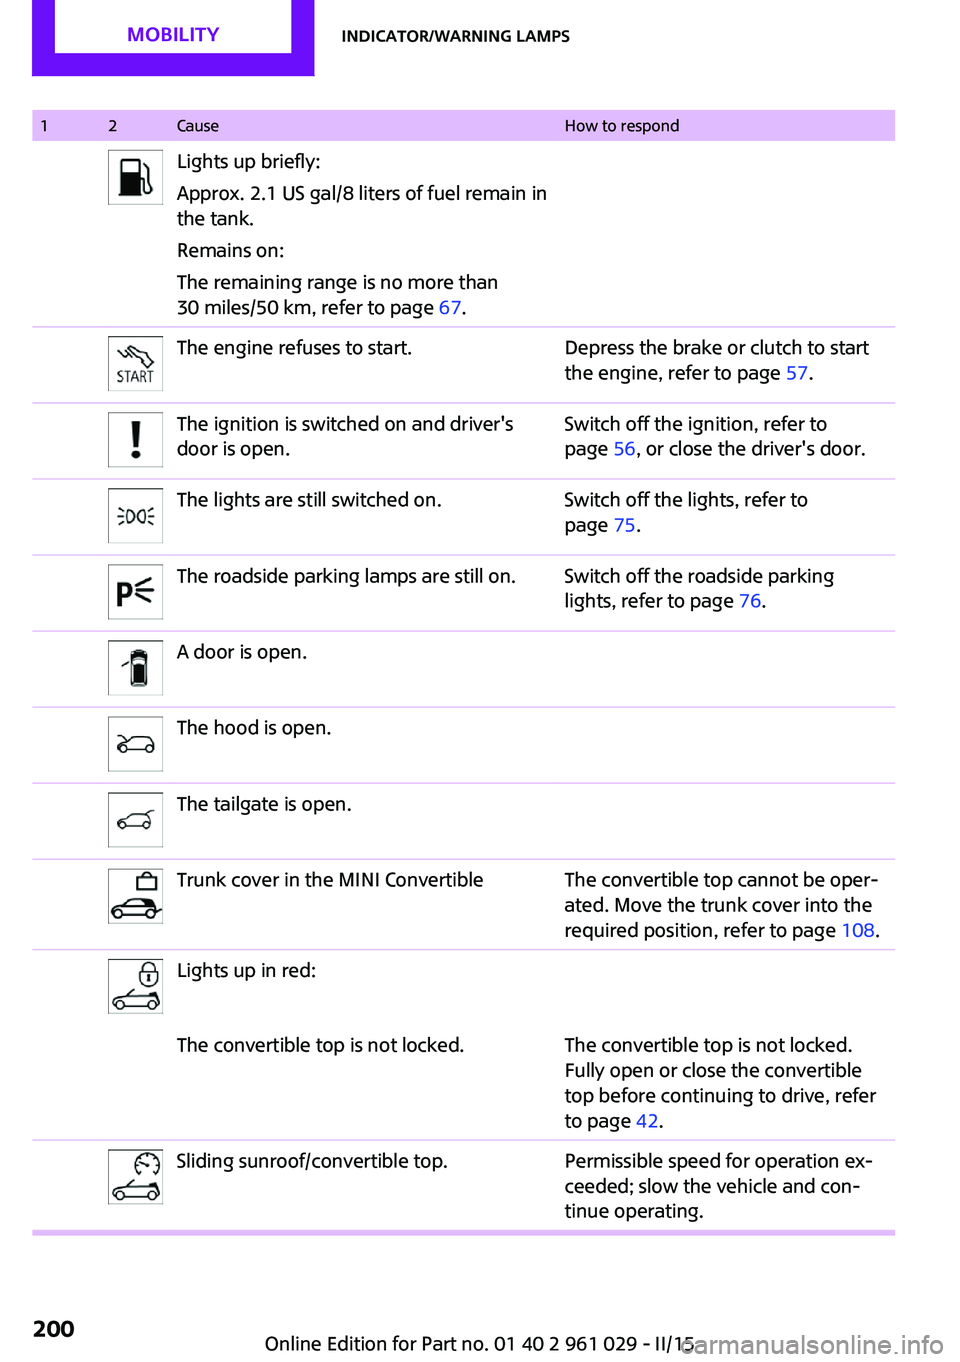
12CauseHow to respondLights up briefly:
Approx. 2.1 US gal/8 liters of fuel remain in
the tank.
Remains on:
The remaining range is no more than
30 miles/50 km, refer to page 67.The engine refuses to start.Depress the brake or clutch to start
the engine, refer to page 57.The ignition is switched on and driver's
door is open.Switch off the ignition, refer to
page 56, or close the driver's door.The lights are still switched on.Switch off the lights, refer to
page 75.The roadside parking lamps are still on.Switch off the roadside parking
lights, refer to page 76.A door is open.The hood is open.The tailgate is open.Trunk cover in the MINI ConvertibleThe convertible top cannot be oper‐
ated. Move the trunk cover into the
required position, refer to page 108.Lights up in red:The convertible top is not locked.The convertible top is not locked.
Fully open or close the convertible
top before continuing to drive, refer
to page 42.Sliding sunroof/convertible top.Permissible speed for operation ex‐
ceeded; slow the vehicle and con‐
tinue operating.Seite 200MOBILITYIndicator/warning lamps200
Online Edition for Part no. 01 40 2 961 029 - II/15
Page 203 of 231
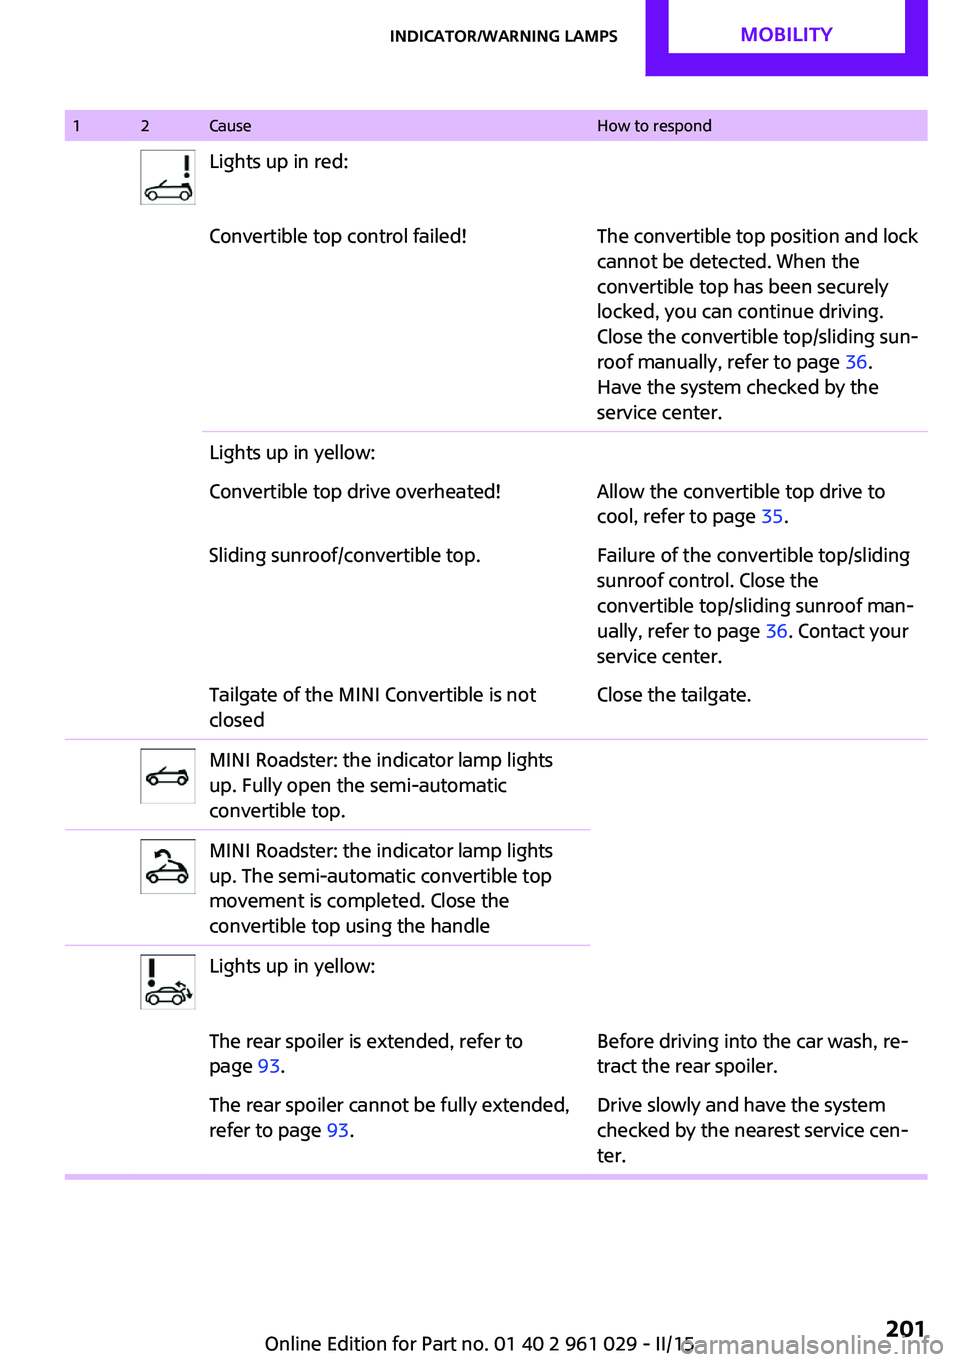
12CauseHow to respondLights up in red:Convertible top control failed!The convertible top position and lock
cannot be detected. When the
convertible top has been securely
locked, you can continue driving.
Close the convertible top/sliding sun‐
roof manually, refer to page 36.
Have the system checked by the
service center.Lights up in yellow:Convertible top drive overheated!Allow the convertible top drive to
cool, refer to page 35.Sliding sunroof/convertible top.Failure of the convertible top/sliding
sunroof control. Close the
convertible top/sliding sunroof man‐
ually, refer to page 36. Contact your
service center.Tailgate of the MINI Convertible is not
closedClose the tailgate.MINI Roadster: the indicator lamp lights
up. Fully open the semi-automatic
convertible top.MINI Roadster: the indicator lamp lights
up. The semi-automatic convertible top
movement is completed. Close the
convertible top using the handleLights up in yellow:The rear spoiler is extended, refer to
page 93.Before driving into the car wash, re‐
tract the rear spoiler.The rear spoiler cannot be fully extended,
refer to page 93.Drive slowly and have the system
checked by the nearest service cen‐
ter.Seite 201Indicator/warning lampsMOBILITY201
Online Edition for Part no. 01 40 2 961 029 - II/15
Page 204 of 231
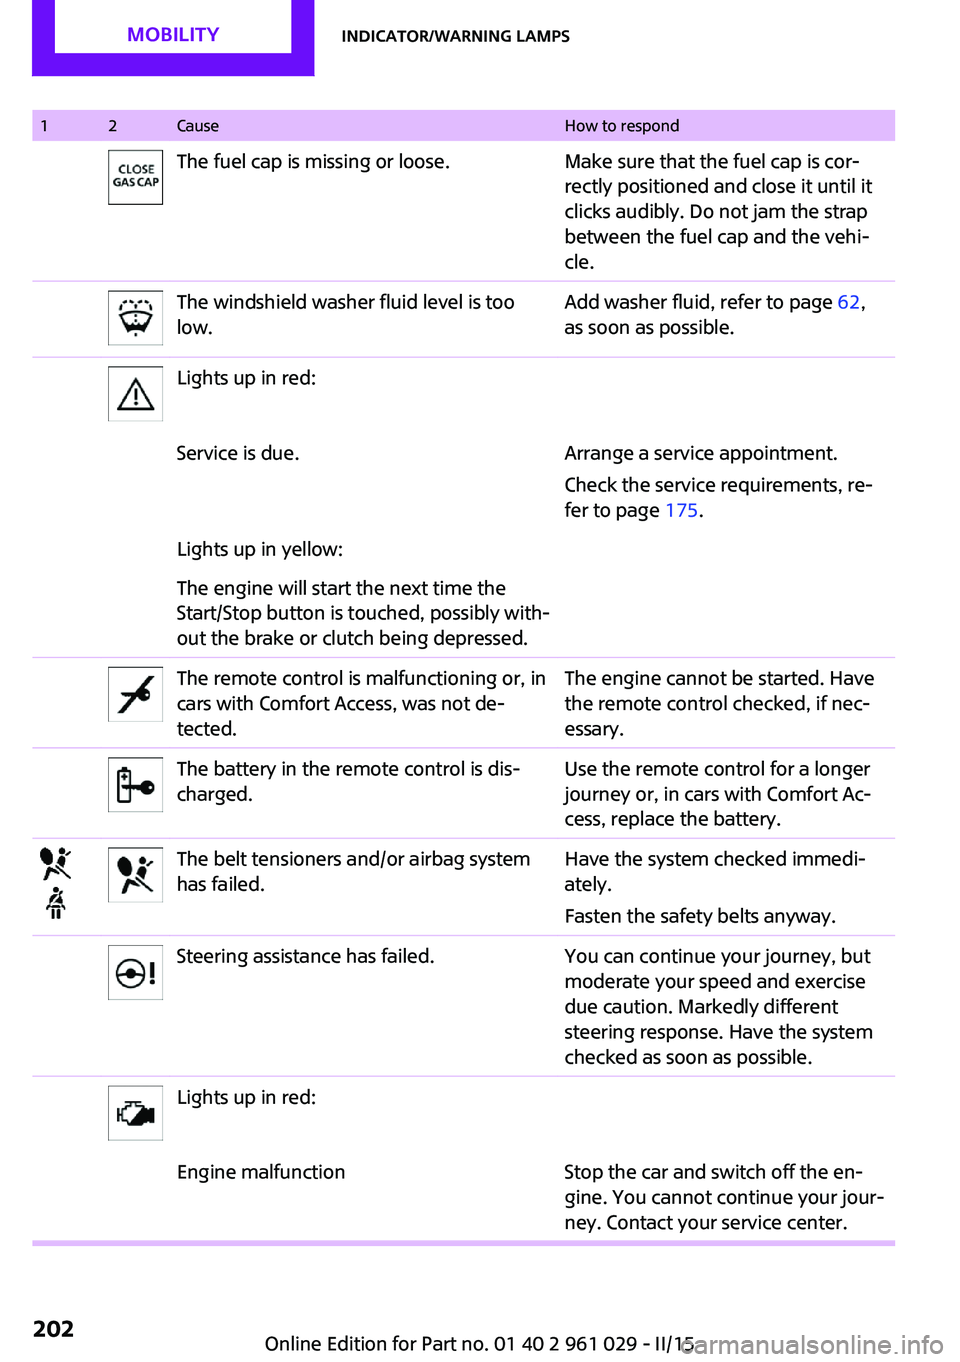
12CauseHow to respondThe fuel cap is missing or loose.Make sure that the fuel cap is cor‐
rectly positioned and close it until it
clicks audibly. Do not jam the strap
between the fuel cap and the vehi‐
cle.The windshield washer fluid level is too
low.Add washer fluid, refer to page 62,
as soon as possible.Lights up in red:Service is due.Arrange a service appointment.
Check the service requirements, re‐
fer to page 175.Lights up in yellow:The engine will start the next time the
Start/Stop button is touched, possibly with‐
out the brake or clutch being depressed.The remote control is malfunctioning or, in
cars with Comfort Access, was not de‐
tected.The engine cannot be started. Have
the remote control checked, if nec‐
essary.The battery in the remote control is dis‐
charged.Use the remote control for a longer
journey or, in cars with Comfort Ac‐
cess, replace the battery.The belt tensioners and/or airbag system
has failed.Have the system checked immedi‐
ately.
Fasten the safety belts anyway.Steering assistance has failed.You can continue your journey, but
moderate your speed and exercise
due caution. Markedly different
steering response. Have the system
checked as soon as possible.Lights up in red:Engine malfunctionStop the car and switch off the en‐
gine. You cannot continue your jour‐
ney. Contact your service center.Seite 202MOBILITYIndicator/warning lamps202
Online Edition for Part no. 01 40 2 961 029 - II/15