lock MINI Hardtop 2 Door 2007 Owner's Guide
[x] Cancel search | Manufacturer: MINI, Model Year: 2007, Model line: Hardtop 2 Door, Model: MINI Hardtop 2 Door 2007Pages: 148, PDF Size: 2.43 MB
Page 96 of 148

Under the bonnet
94
Under the bonnet
Do not work on the car unless you possess
the necessary technical knowledge. If you
are not familiar with the regulations to be
observed, have the necessary work on your
vehicle carried out only by a MINI Dealer or a
workshop that has specially trained personnel
working in accordance with the specifications of
the MINI manufacturer. If this work is not carried
out properly, there is a danger of subsequent
damage and related safety hazards.<
Bonnet
Releasing
Pull the lever.
Do not clean the windshield and head-
lamps if the bonnet is unlocked as this
may damage the headlamp washer system
*.<
Opening
To avoid damage, make sure that the
wiper arms are against the windshield
before you open the bonnet.<
Press the release handle and open the bonnet.
Closing
Close the bonnet from a height of approx. 16 in/
40 cm with momentum. It must be clearly heard
to engage.
If you notice any signs while driving your
vehicle that the bonnet is not completely
closed, stop at once and close it securely.
Make sure that the closing path of the bonnet is
clear, otherwise injuries may result.<
Page 98 of 148
Under the bonnet
96
Adding engine oil
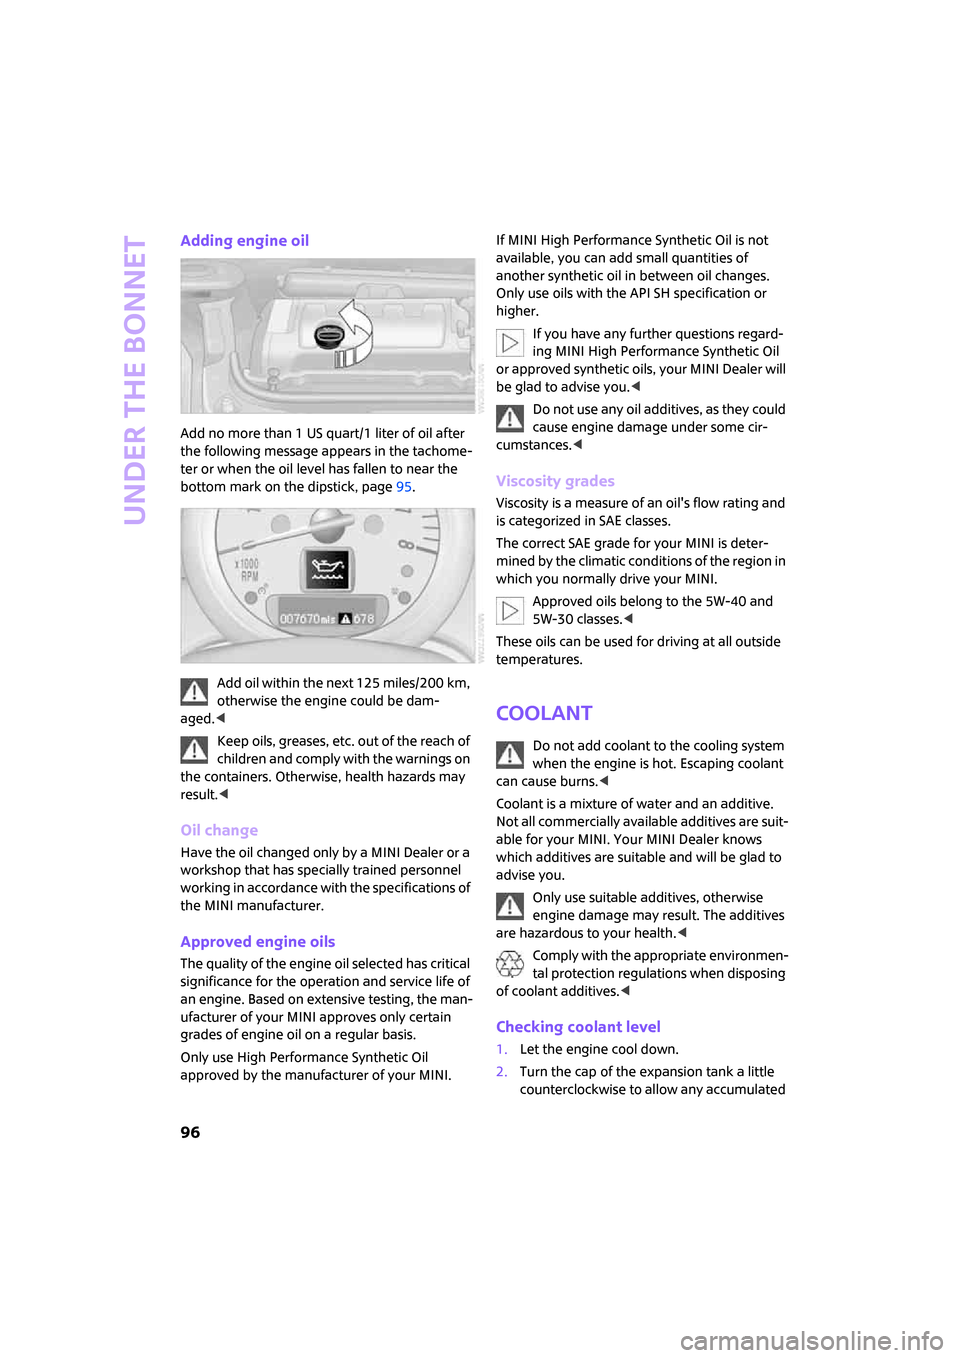
Add no more than 1 US quart/1 liter of oil after
the following message appears in the tachome-
ter or when the oil level has fallen to near the
bottom mark on the dipstick, page95.
Add oil within the next 125 miles/200 km,
otherwise the engine could be dam-
aged.<
Keep oils, greases, etc. out of the reach of
children and comply with the warnings on
the containers. Otherwise, health hazards may
result.<
Oil change
Have the oil changed only by a MINI Dealer or a
workshop that has specially trained personnel
working in accordance with the specifications of
the MINI manufacturer.
Approved engine oils
The quality of the engine oil selected has critical
significance for the operation and service life of
an engine. Based on extensive testing, the man-
ufacturer of your MINI approves only certain
grades of engine oil on a regular basis.
Only use High Performance Synthetic Oil
approved by the manufacturer of your MINI.If MINI High Performance Synthetic Oil is not
available, you can add small quantities of
another synthetic oil in between oil changes.
Only use oils with the API SH specification or
higher.
If you have any further questions regard-
ing MINI High Performance Synthetic Oil
or approved synthetic oils, your MINI Dealer will
be glad to advise you.<
Do not use any oil additives, as they could
cause engine damage under some cir-
cumstances.<
Viscosity grades
Viscosity is a measure of an oil's flow rating and
is categorized in SAE classes.
The correct SAE grade for your MINI is deter-
mined by the climatic conditions of the region in
which you normally drive your MINI.
Approved oils belong to the 5W-40 and
5W-30 classes.<
These oils can be used for driving at all outside
temperatures.
Coolant
Do not add coolant to the cooling system
when the engine is hot. Escaping coolant
can cause burns.<
Coolant is a mixture of water and an additive.
Not all commercially available additives are suit-
able for your MINI. Your MINI Dealer knows
which additives are suitable and will be glad to
advise you.
Only use suitable additives, otherwise
engine damage may result. The additives
are hazardous to your health.<
Comply with the appropriate environmen-
tal protection regulations when disposing
of coolant additives.<
Checking coolant level
1.Let the engine cool down.
2.Turn the cap of the expansion tank a little
counterclockwise to allow any accumulated
Page 106 of 148
Replacing components
104
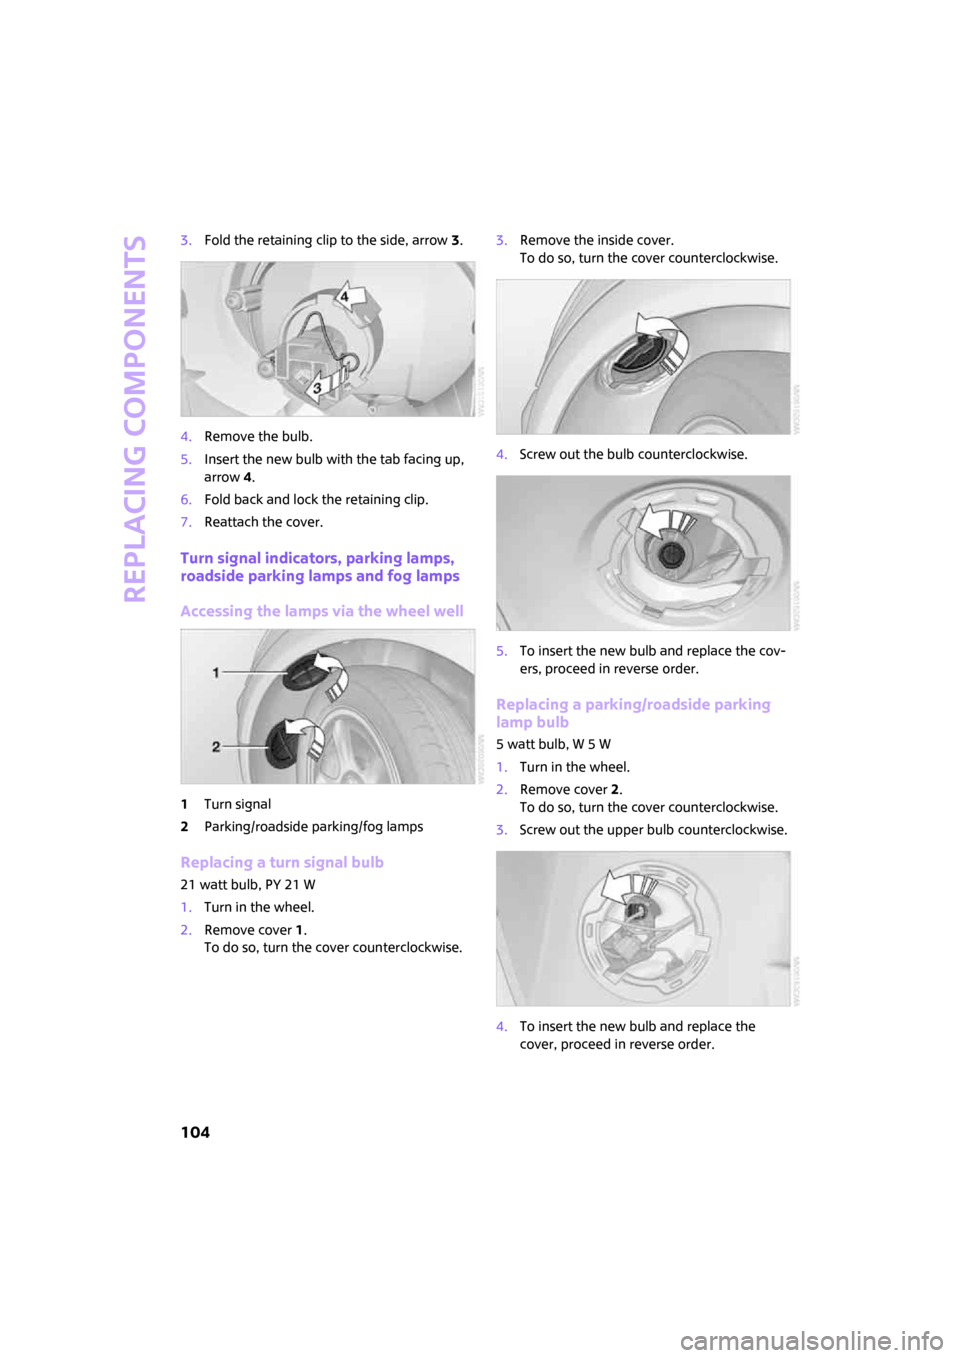
3.Fold the retaining clip to the side, arrow3.
4.Remove the bulb.
5.Insert the new bulb with the tab facing up,
arrow4.
6.Fold back and lock the retaining clip.
7.Reattach the cover.
Turn signal indicators, parking lamps,
roadside parking lamps and fog lamps
Accessing the lamps via the wheel well
1Turn signal
2Parking/roadside parking/fog lamps
Replacing a turn signal bulb
21 watt bulb, PY 21 W
1.Turn in the wheel.
2.Remove cover 1.
To do so, turn the cover counterclockwise.3.Remove the inside cover.
To do so, turn the cover counterclockwise.
4.Screw out the bulb counterclockwise.
5.To insert the new bulb and replace the cov-
ers, proceed in reverse order.
Replacing a parking/roadside parking
lamp bulb
5 watt bulb, W 5 W
1.Turn in the wheel.
2.Remove cover 2.
To do so, turn the cover counterclockwise.
3.Screw out the upper bulb counterclockwise.
4.To insert the new bulb and replace the
cover, proceed in reverse order.
Page 107 of 148
ReferenceAt a glance Controls Driving tips Mobility
105
Replacing a fog lamp bulb
H8 bulb, 35 watts
1.Turn in the wheel.
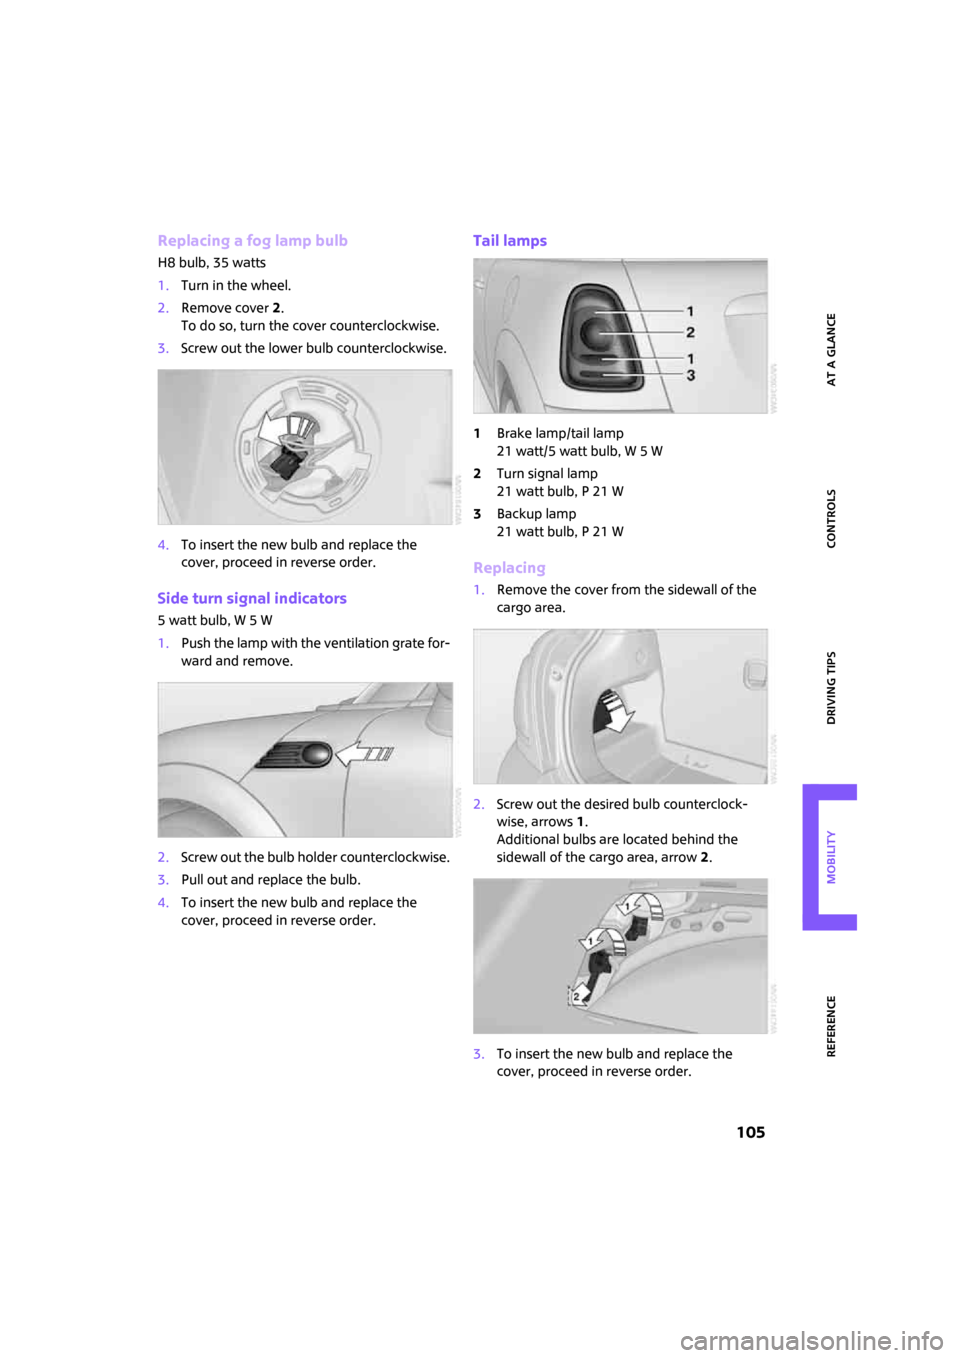
2.Remove cover 2.
To do so, turn the cover counterclockwise.
3.Screw out the lower bulb counterclockwise.
4.To insert the new bulb and replace the
cover, proceed in reverse order.
Side turn signal indicators
5 watt bulb, W 5 W
1.Push the lamp with the ventilation grate for-
ward and remove.
2.Screw out the bulb holder counterclockwise.
3.Pull out and replace the bulb.
4.To insert the new bulb and replace the
cover, proceed in reverse order.
Tail lamps
1Brake lamp/tail lamp
21 watt/5 watt bulb, W 5 W
2Turn signal lamp
21 watt bulb, P 21 W
3Backup lamp
21 watt bulb, P 21 W
Replacing
1.Remove the cover from the sidewall of the
cargo area.
2.Screw out the desired bulb counterclock-
wise, arrows1.
Additional bulbs are located behind the
sidewall of the cargo area, arrow 2.
3.To insert the new bulb and replace the
cover, proceed in reverse order.
Page 108 of 148
Replacing components
106
Rear fog lamp*
2 watt bulb, P 21 W
Access to the lamp via the back or underside of
the bumper.
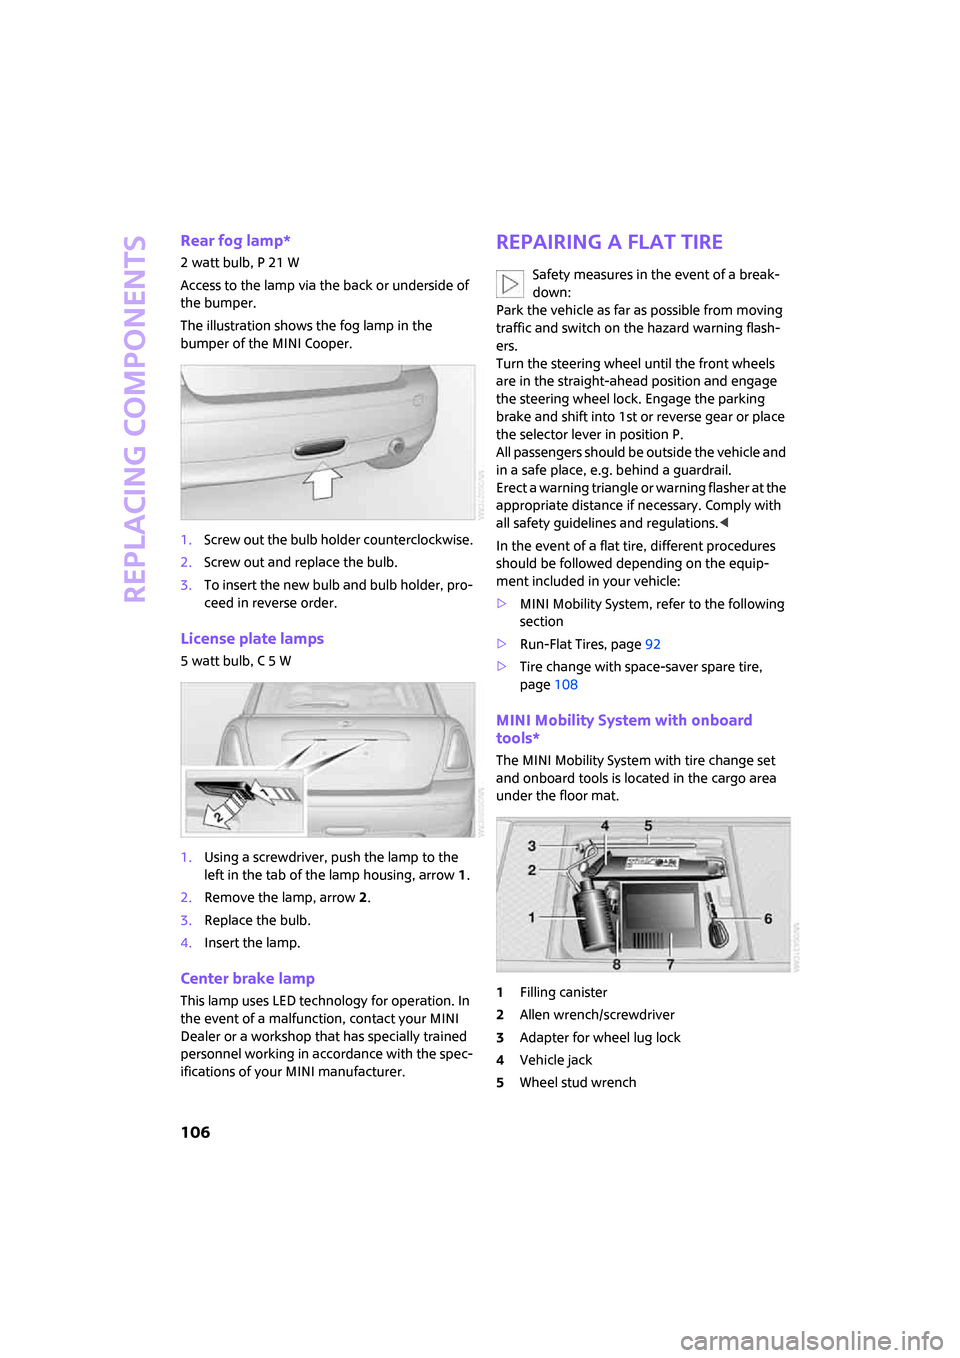
The illustration shows the fog lamp in the
bumper of the MINI Cooper.
1.Screw out the bulb holder counterclockwise.
2.Screw out and replace the bulb.
3.To insert the new bulb and bulb holder, pro-
ceed in reverse order.
License plate lamps
5 watt bulb, C 5 W
1.Using a screwdriver, push the lamp to the
left in the tab of the lamp housing, arrow1.
2.Remove the lamp, arrow 2.
3.Replace the bulb.
4.Insert the lamp.
Center brake lamp
This lamp uses LED technology for operation. In
the event of a malfunction, contact your MINI
Dealer or a workshop that has specially trained
personnel working in accordance with the spec-
ifications of your MINI manufacturer.
Repairing a flat tire
Safety measures in the event of a break-
down:
Park the vehicle as far as possible from moving
traffic and switch on the hazard warning flash-
ers.
Turn the steering wheel until the front wheels
are in the straight-ahead position and engage
the steering wheel lock. Engage the parking
brake and shift into 1st or reverse gear or place
the selector lever in position P.
All passengers should be outside the vehicle and
in a safe place, e.g. behind a guardrail.
Erect a warning triangle or warning flasher at the
appropriate distance if necessary. Comply with
all safety guidelines and regulations.<
In the event of a flat tire, different procedures
should be followed depending on the equip-
ment included in your vehicle:
>MINI Mobility System, refer to the following
section
>Run-Flat Tires, page92
>Tire change with space-saver spare tire,
page108
MINI Mobility System with onboard
tools*
The MINI Mobility System with tire change set
and onboard tools is located in the cargo area
under the floor mat.
1Filling canister
2Allen wrench/screwdriver
3Adapter for wheel lug lock
4Vehicle jack
5Wheel stud wrench
Page 110 of 148
Replacing components
108
Distributing liquid sealant
Immediately drive for approx. 10 minutes, so
that the liquid sealant is uniformly distributed.
Do not exceed a speed of 35 mph/
60 km/h.
If possible, do not drive at a speed lower than
12 mph/20 km/h.<
Checking tire inflation pressure
1.After driving for approx. 10 minutes, pull
over at a suitable location.
2.Screw the hose with manometer back onto
the tire valve.
3.Check the tire inflation pressure.
The tire inflation pressure must be at
least 18.9 psi/1.3 bar. If it is not, do not
continue driving.<
If at least 18.9 psi/1.3 bar are displayed:
1.Switch on the compressor. Correct the tire
inflation pressure to the specified value,
page86.
2.Replace the tire as soon as possible.
Driving on
Do not exceed the permitted maximum
speed of 50 mph/80 km/h; doing so may
result in an accident.<
Replace the defective tire as soon as possible
and have the new wheel/tire assembly bal-
anced.
Have the MINI Mobility System refilled.
Tire change set
When changing a tire, always observe the safety
measures and the procedure for changing tires
described below.
In case of a flat tire the tire change set is
not needed due to the availability of the
MINI Mobility System.<
Changing wheels
Tire change set for space-saver spare
tire*
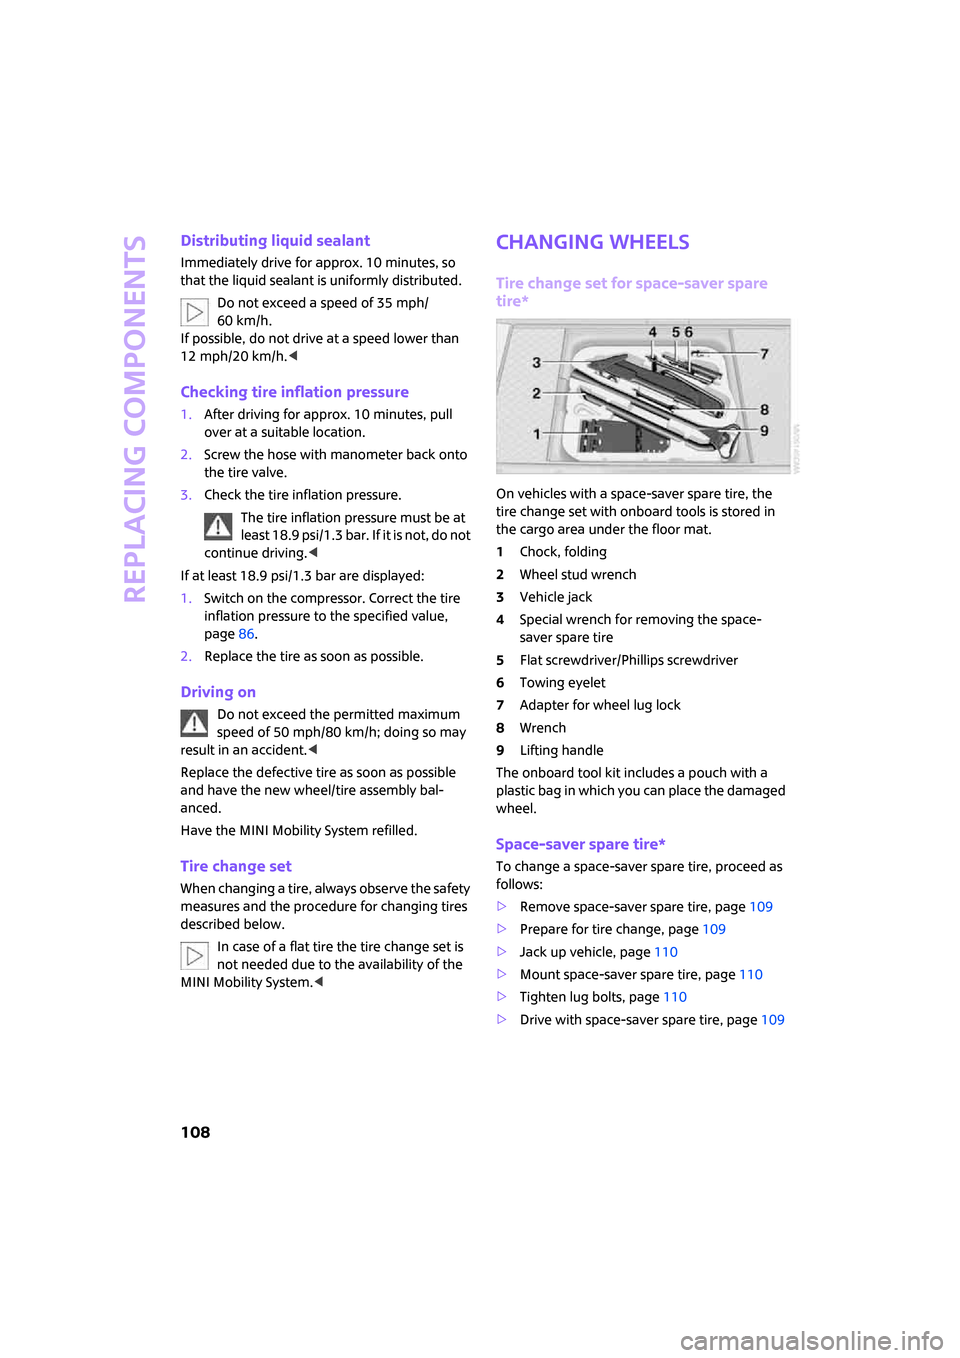
On vehicles with a space-saver spare tire, the
tire change set with onboard tools is stored in
the cargo area under the floor mat.
1Chock, folding
2Wheel stud wrench
3Vehicle jack
4Special wrench for removing the space-
saver spare tire
5Flat screwdriver/Phillips screwdriver
6Towing eyelet
7Adapter for wheel lug lock
8Wrench
9Lifting handle
The onboard tool kit includes a pouch with a
plastic bag in which you can place the damaged
wheel.
Space-saver spare tire*
To change a space-saver spare tire, proceed as
follows:
>Remove space-saver spare tire, page109
>Prepare for tire change, page109
>Jack up vehicle, page110
>Mount space-saver spare tire, page110
>Tighten lug bolts, page110
>Drive with space-saver spare tire, page109
Page 112 of 148
Replacing components
110
Only change the tire when parked on a surface
that is level, firm and not slippery.
The vehicle or the jack could slip sideways on
soft or slippery support surfaces, such as snow,
ice, flagstones, etc.
Do not use a wooden block or similar object as a
support base for the jack, as this would prevent
it from extending to its full support height and
reduce its load-carrying capacity.
Do not lie under the vehicle or start the engine
when the vehicle is supported by the jack; other-
wise there is a risk of fatal injury.<
1.Place the foldable chock
* behind the front
wheel on the other side of the vehicle or in
front of the wheel if the vehicle is on an
incline. If the wheel is changed on a surface
with a more severe slope, take additional
precautions to secure the vehicle from roll-
ing.
2.Uncover the lug bolts if necessary.
If the wheel is equipped with a hub cover,
pry it off using the screwdriver from the tire
change kit.
3.Loosen the lug bolts by a half turn.
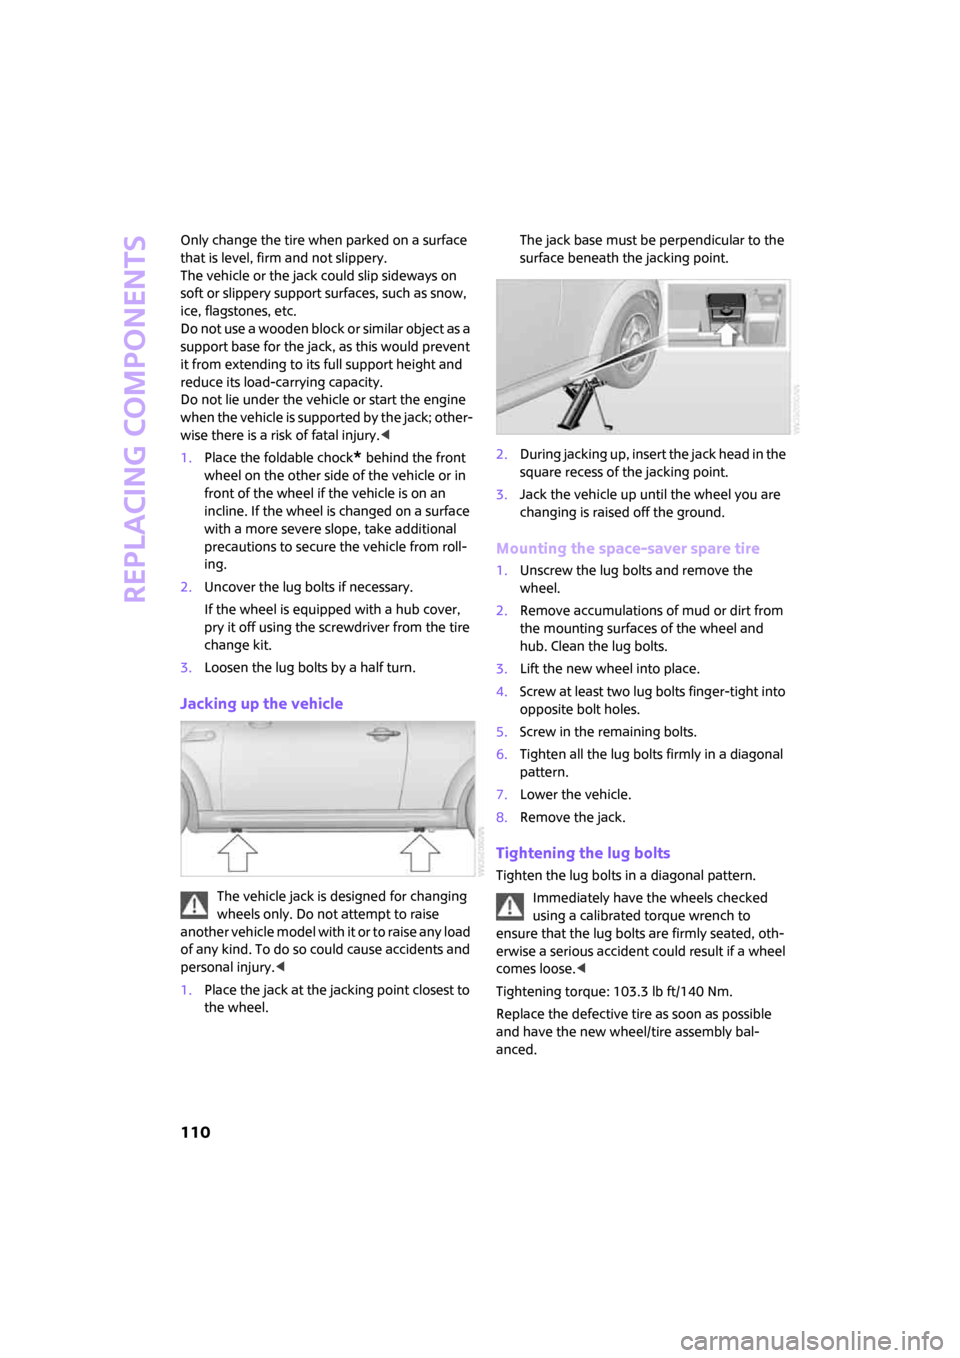
Jacking up the vehicle
The vehicle jack is designed for changing
wheels only. Do not attempt to raise
another vehicle model with it or to raise any load
of any kind. To do so could cause accidents and
personal injury.<
1.Place the jack at the jacking point closest to
the wheel.The jack base must be perpendicular to the
surface beneath the jacking point.
2.During jacking up, insert the jack head in the
square recess of the jacking point.
3.Jack the vehicle up until the wheel you are
changing is raised off the ground.
Mounting the space-saver spare tire
1.Unscrew the lug bolts and remove the
wheel.
2.Remove accumulations of mud or dirt from
the mounting surfaces of the wheel and
hub. Clean the lug bolts.
3.Lift the new wheel into place.
4.Screw at least two lug bolts finger-tight into
opposite bolt holes.
5.Screw in the remaining bolts.
6.Tighten all the lug bolts firmly in a diagonal
pattern.
7.Lower the vehicle.
8.Remove the jack.
Tightening the lug bolts
Tighten the lug bolts in a diagonal pattern.
Immediately have the wheels checked
using a calibrated torque wrench to
ensure that the lug bolts are firmly seated, oth-
erwise a serious accident could result if a wheel
comes loose.<
Tightening torque: 103.3 lb ft/140 Nm.
Replace the defective tire as soon as possible
and have the new wheel/tire assembly bal-
anced.
Page 114 of 148
Giving and receiving assistance
112
Giving and receiving assistance
Roadside Assistance
The Roadside Assistance service is there to assist
you around the clock in the event of a break-
down, including on weekends and public holi-
days.
The phone numbers of the Roadside Assistance
in your home country can be found in the Con-
tact brochure.
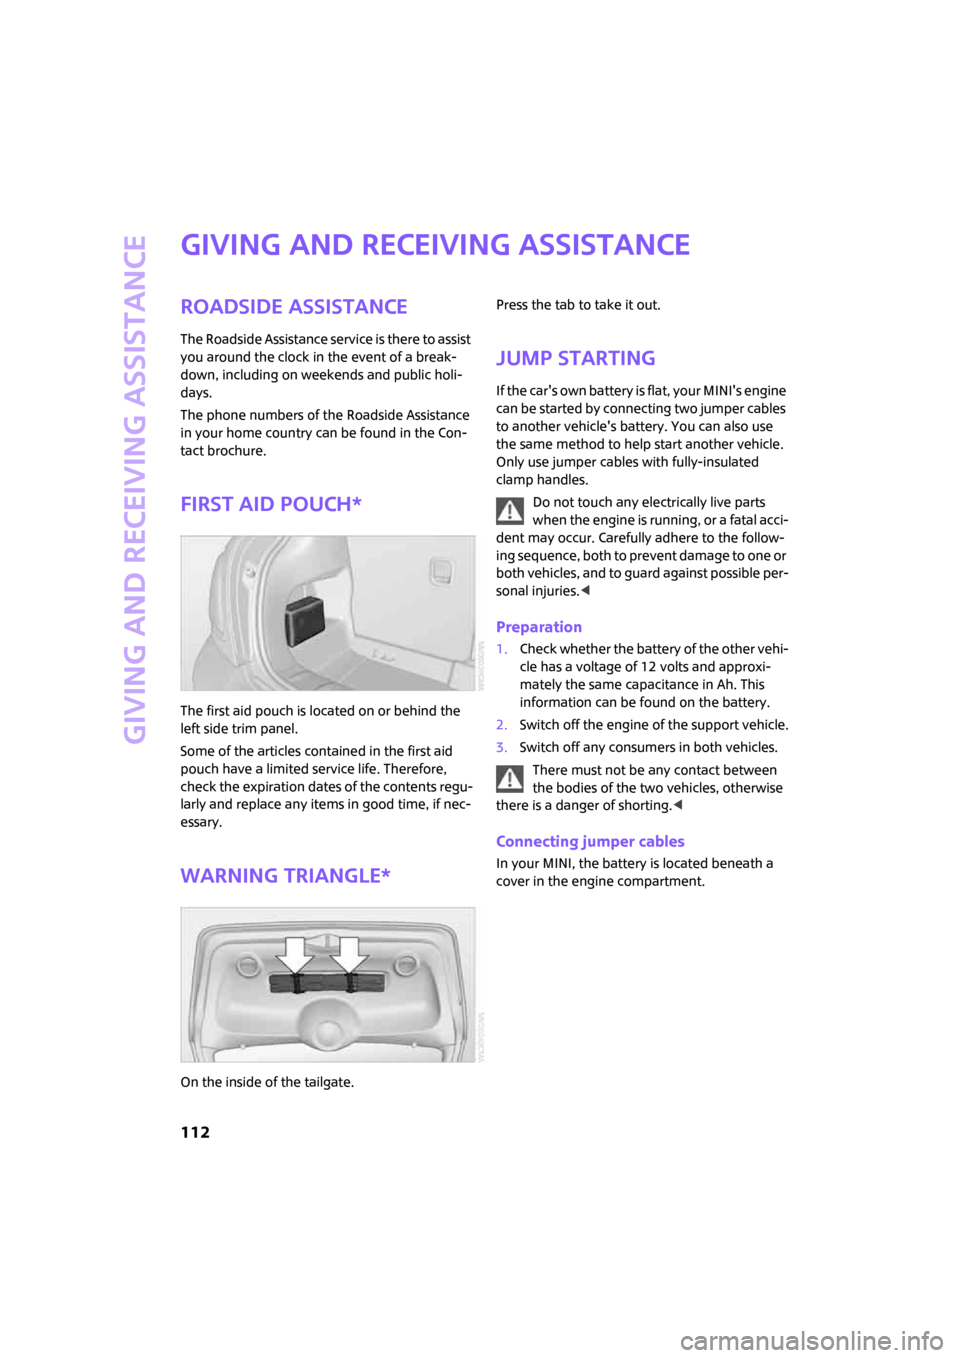
First aid pouch*
The first aid pouch is located on or behind the
left side trim panel.
Some of the articles contained in the first aid
pouch have a limited service life. Therefore,
check the expiration dates of the contents regu-
larly and replace any items in good time, if nec-
essary.
Warning triangle*
On the inside of the tailgate.Press the tab to take it out.
Jump starting
If the car's own battery is flat, your MINI's engine
can be started by connecting two jumper cables
to another vehicle's battery. You can also use
the same method to help start another vehicle.
Only use jumper cables with fully-insulated
clamp handles.
Do not touch any electrically live parts
when the engine is running, or a fatal acci-
dent may occur. Carefully adhere to the follow-
ing sequence, both to prevent damage to one or
both vehicles, and to guard against possible per-
sonal injuries.<
Preparation
1.Check whether the battery of the other vehi-
cle has a voltage of 12 volts and approxi-
mately the same capacitance in Ah. This
information can be found on the battery.
2.Switch off the engine of the support vehicle.
3.Switch off any consumers in both vehicles.
There must not be any contact between
the bodies of the two vehicles, otherwise
there is a danger of shorting.<
Connecting jumper cables
In your MINI, the battery is located beneath a
cover in the engine compartment.
Page 116 of 148

Giving and receiving assistance
114
Front
Rear
Being towed
Check that the car is radio-ready and that
the electric steering wheel lock is not
engaged, otherwise the car would not be steer-
able. If the electrical system fails, do not attempt
to tow-start or tow away the car. The electric
steering wheel lock cannot be disengaged and
the car is not steerable. Jump starting, refer to
page112.<
There is no power assist while the engine is off.
Thus, braking and steering will require increased
effort.
Switch on the hazard warning flashers, depend-
ing on local regulations.
Manual transmission
Gearshift lever in idle position.
Automatic transmission
Tow vehicles with automatic transmission
only with a tow truck or with the front
wheels lifted; otherwise the transmission can be
damaged.<
Towing with a tow bar
The towing vehicle must not be lighter
than the towed vehicle, otherwise it may
be impossible to maintain control.<
The tow fittings used should be on the same side
on both vehicles. Should it prove impossible to
avoid mounting the tow bar at an angle, please
observe the following:
>Clearance and maneuvering capability will
be sharply limited during cornering.
>The tow bar will generate lateral forces if it is
attached offset.
Attach the tow bar to the tow fittings only,
as attaching it to other parts of the vehicle
could result in damage.<
Towing with a tow rope
When starting off in the towing vehicle, make
sure that the tow rope is taut.
To avoid jerking and the associated
stresses on vehicle components when
towing, always use nylon ropes or nylon straps.
Attach the tow rope to the tow fittings only, as
attaching it to other parts of the vehicle could
result in damage.<
Towing with a tow truck
Have the MINI transported with a tow truck with
a so-called lift bar or on a flat bed.
Do not lift the vehicle by a tow fitting or
body and chassis parts, otherwise damage
may result.<
Tow-starting
Avoid tow-starting the vehicle whenever possi-
ble; instead, jump-start the engine, page112.
Page 117 of 148

ReferenceAt a glance Controls Driving tips Mobility
115
Vehicles with a catalytic converter should only
be tow-started when the engine is cold, vehicles
with an automatic transmission cannot be tow-
started at all.
If the electrical system fails, do not tow or
tow-start the vehicle, as it would be
impossible to release the electric steering-wheel
lock and the vehicle could not be steered.<
1.Switch on hazard warning flashers, comply
with local regulations.
2.Switch on the ignition, page35.
3.Shift into 3rd gear.
4.Have the vehicle tow-started with the clutch
completely depressed and then slowly
release the clutch. After the engine starts,
immediately depress the clutch completely
again.
5.Stop at a suitable location, remove the tow
bar or rope and switch off the hazard warn-
ing flashers.
6.Have the vehicle checked.