phone MINI Hardtop 2 Door 2015 Owner's Manual (Mini Connected)
[x] Cancel search | Manufacturer: MINI, Model Year: 2015, Model line: Hardtop 2 Door, Model: MINI Hardtop 2 Door 2015Pages: 244, PDF Size: 11.11 MB
Page 11 of 244

Status of the Owner's
Manual
Basic information
The manufacturer of your vehicle pursues a
policy of constant development that is con‐
ceived to ensure that our vehicles continue to
embody the highest quality and safety stan‐
dards. In rare cases, therefore, the features de‐
scribed in this Owner's Manual may differ from
those in your vehicle.
Updates made after the editorial
deadline
Any updates made after the editorial deadline
can be found in the appendix of the printed
Owner's Handbook for Vehicle.
Own safety
Manufacturer The manufacturer of this MINI is Bayerische
Motoren Werke Aktionengesellschaft, BMW AG.
Warranty
Your vehicle is technically configured for the
operating conditions and registration require‐
ments applying in the country of first delivery -
homologation. If your vehicle is to be operated
in a different country it might be necessary to
adapt your vehicle to potentially differing oper‐
ating conditions and permit requirements. If
your vehicle does not comply with the homolo‐
gation requirements in a certain country you
cannot lodge warranty claims for your vehicle
there. Further information can be obtained
from your Service Centre.
Maintenance and repairs
Advanced technology, e.g., the use of modern
materials and high-performance electronics,
requires suitable maintenance and repair work.Therefore, have this work performed only by a
MINI service center or a workshop that works
according to the manufacturer's repair proce‐
dures for the MINI with respectively trained
personnel.
If work is not carried out properly, there is a
danger of subsequent damage and related
safety hazards.
Parts and Accessories
For your own safety, it is recommended that
you use genuine parts and accessories ap‐
proved by MINI. When you purchase accesso‐
ries tested and approved by MINI and Genuine
MINI Parts, you simultaneously acquire the as‐
surance that they have been thoroughly tested
by MINI to ensure optimum performance when
installed on your vehicle. MINI warrants these
parts to be free from defects in material and
workmanship. MINI will not accept any liability
for damage resulting from installation of parts
and accessories not approved by MINI. MINI
cannot test every product made by other man‐
ufacturers to verify if it can be used on a MINI
safely and without risk to either the vehicle, its
operation, or its occupants. Genuine MINI Parts,
MINI Accessories and other products approved
by MINI, together with professional advice on
using these items, are available from all MINI
centers. Installation and operation of non-MINI
approved accessories such as alarms, radios,
amplifiers, radar detectors, wheels, suspension
components, brake dust shields, telephones,
including operation of any mobile phone from
within the vehicle without using an externally
mounted antenna, or transceiver equipment,
for instance, CBs, walkie-talkies, ham radios or
similar accessories, may cause extensive dam‐
age to the vehicle, compromise its safety, inter‐
fere with the vehicle's electrical system or af‐
fect the validity of the MINI Limited Warranty.
See your MINI center for additional informa‐
tion. Maintenance, replacement, or repair of
the emission control devices and systems may
be performed by any automotive repair estab‐Seite 7Notes7
Online Edition for Part no. 01 40 2 961 168 - II/15
Page 14 of 244
The vehicle identification number can also be
found behind the windshield.
Reporting safety defects For US customers
The following only applies to vehicles owned
and operated in the US.
If you believe that your vehicle has a defect
which could cause a crash or could cause injury
or death, you should immediately inform the
National Highway Traffic Safety Administration
NHTSA, in addition to notifying MINI of North
America, LLC, P.O. Box 1227, Westwood, New
Jersey 07675-1227, Telephone
1-800-831-1117.
If NHTSA receives similar complaints, it may
open an investigation, and if it finds that a
safety defect exists in a group of vehicles, it
may order a recall and remedy campaign.
However, NHTSA cannot become involved in
individual problems between you, your dealer,
or MINI of North America, LLC.
To contact NHTSA, you may call the Vehicle
Safety Hotline toll-free at 1-888-327-4236
(TTY: 1-800-424-9153); go to http://www.safe‐
rcar.gov; or write to: Administrator, NHTSA, 400
Seventh Street, SW., Washington, DC 20590.
You can also obtain other information about
motor vehicle safety from http://www.safe‐
rcar.gov
For Canadian customers
Canadian customers who wish to report a
safety-related defect to Transport Canada, De‐
fect Investigations and Recalls, may call the
toll-free hotline 1-800-333-0510. You can also
obtain other information about motor vehicle
safety from http://www.tc.gc.ca/roadsafety.Seite 10Notes10
Online Edition for Part no. 01 40 2 961 168 - II/15
Page 19 of 244
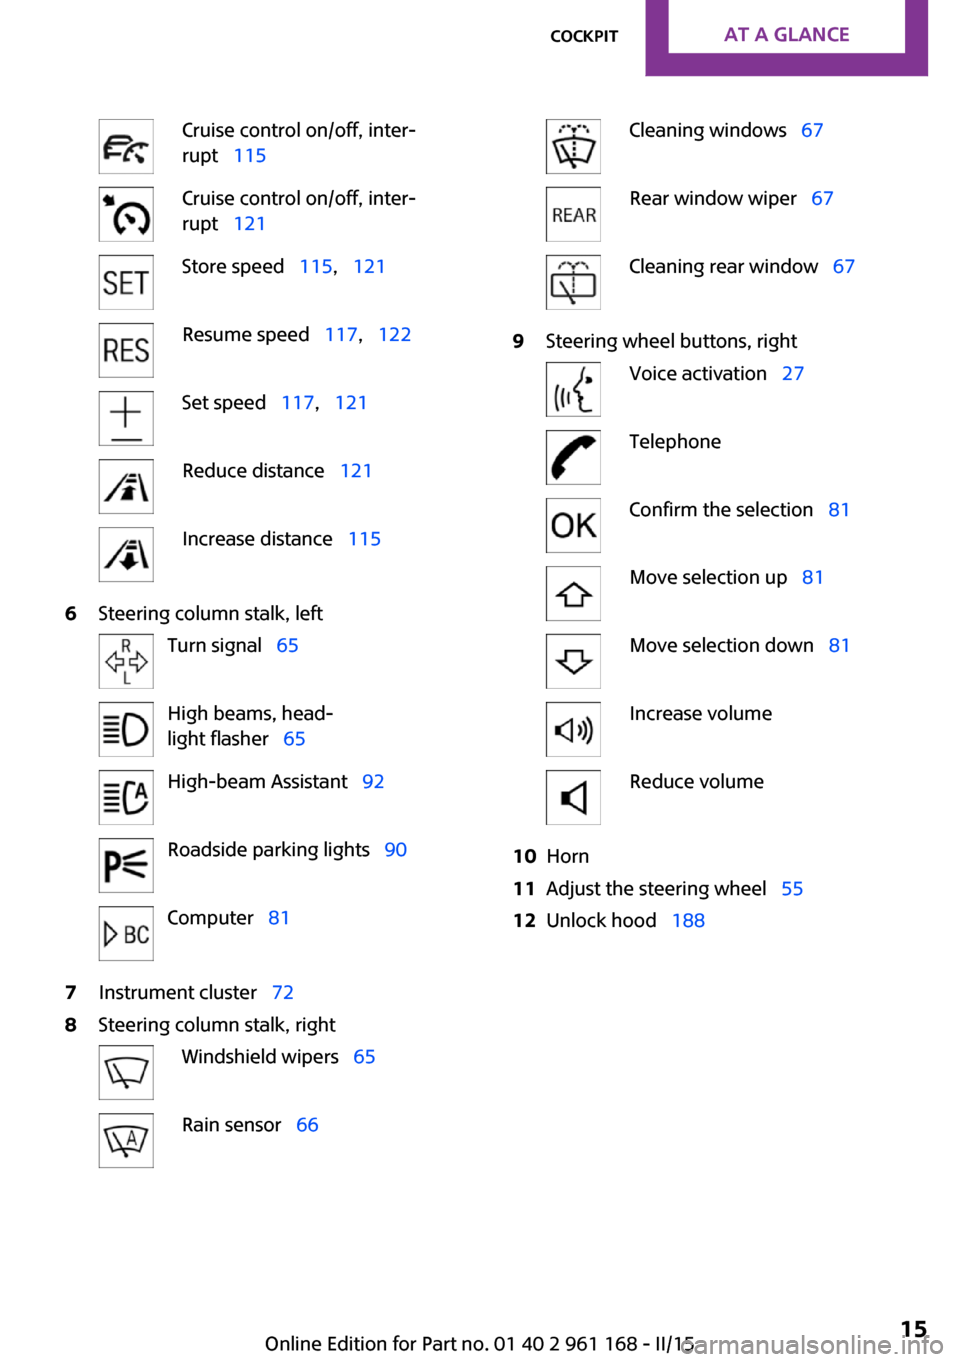
Cruise control on/off, inter‐
rupt 115Cruise control on/off, inter‐
rupt 121Store speed 115, 121Resume speed 117, 122Set speed 117, 121Reduce distance 121Increase distance 1156Steering column stalk, leftTurn signal 65High beams, head‐
light flasher 65High-beam Assistant 92Roadside parking lights 90Computer 817Instrument cluster 728Steering column stalk, rightWindshield wipers 65Rain sensor 66Cleaning windows 67Rear window wiper 67Cleaning rear window 679Steering wheel buttons, rightVoice activation 27TelephoneConfirm the selection 81Move selection up 81Move selection down 81Increase volumeReduce volume10Horn11Adjust the steering wheel 5512Unlock hood 188Seite 15CockpitAT A GLANCE15
Online Edition for Part no. 01 40 2 961 168 - II/15
Page 23 of 244
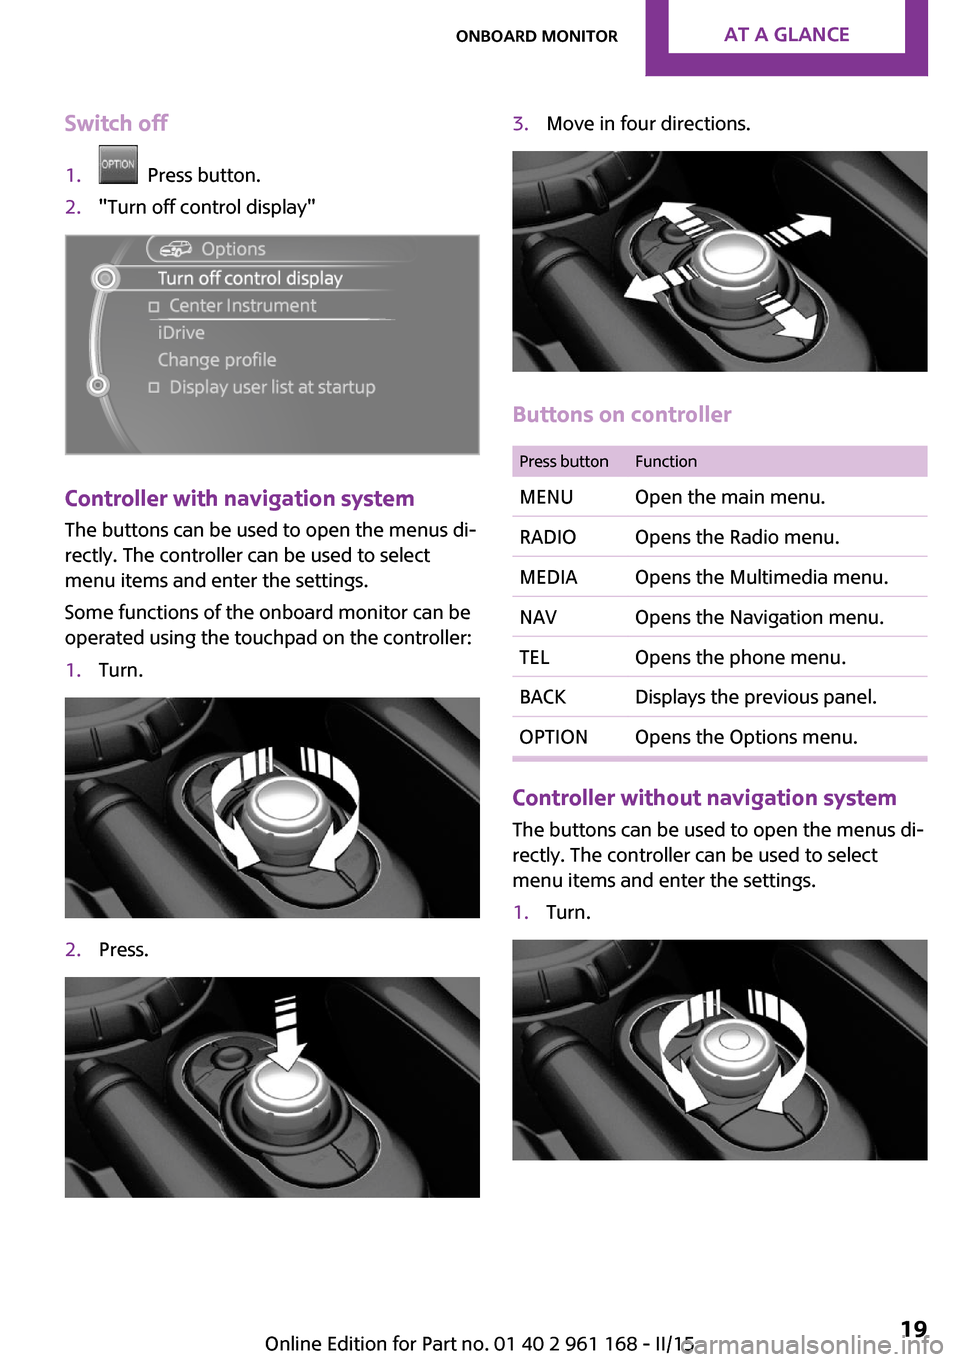
Switch off1. Press button.2."Turn off control display"
Controller with navigation system
The buttons can be used to open the menus di‐
rectly. The controller can be used to select
menu items and enter the settings.
Some functions of the onboard monitor can be
operated using the touchpad on the controller:
1.Turn.2.Press.3.Move in four directions.
Buttons on controller
Press buttonFunctionMENUOpen the main menu.RADIOOpens the Radio menu.MEDIAOpens the Multimedia menu.NAVOpens the Navigation menu.TELOpens the phone menu.BACKDisplays the previous panel.OPTIONOpens the Options menu.
Controller without navigation system
The buttons can be used to open the menus di‐
rectly. The controller can be used to select
menu items and enter the settings.
1.Turn.Seite 19Onboard monitorAT A GLANCE19
Online Edition for Part no. 01 40 2 961 168 - II/15
Page 24 of 244
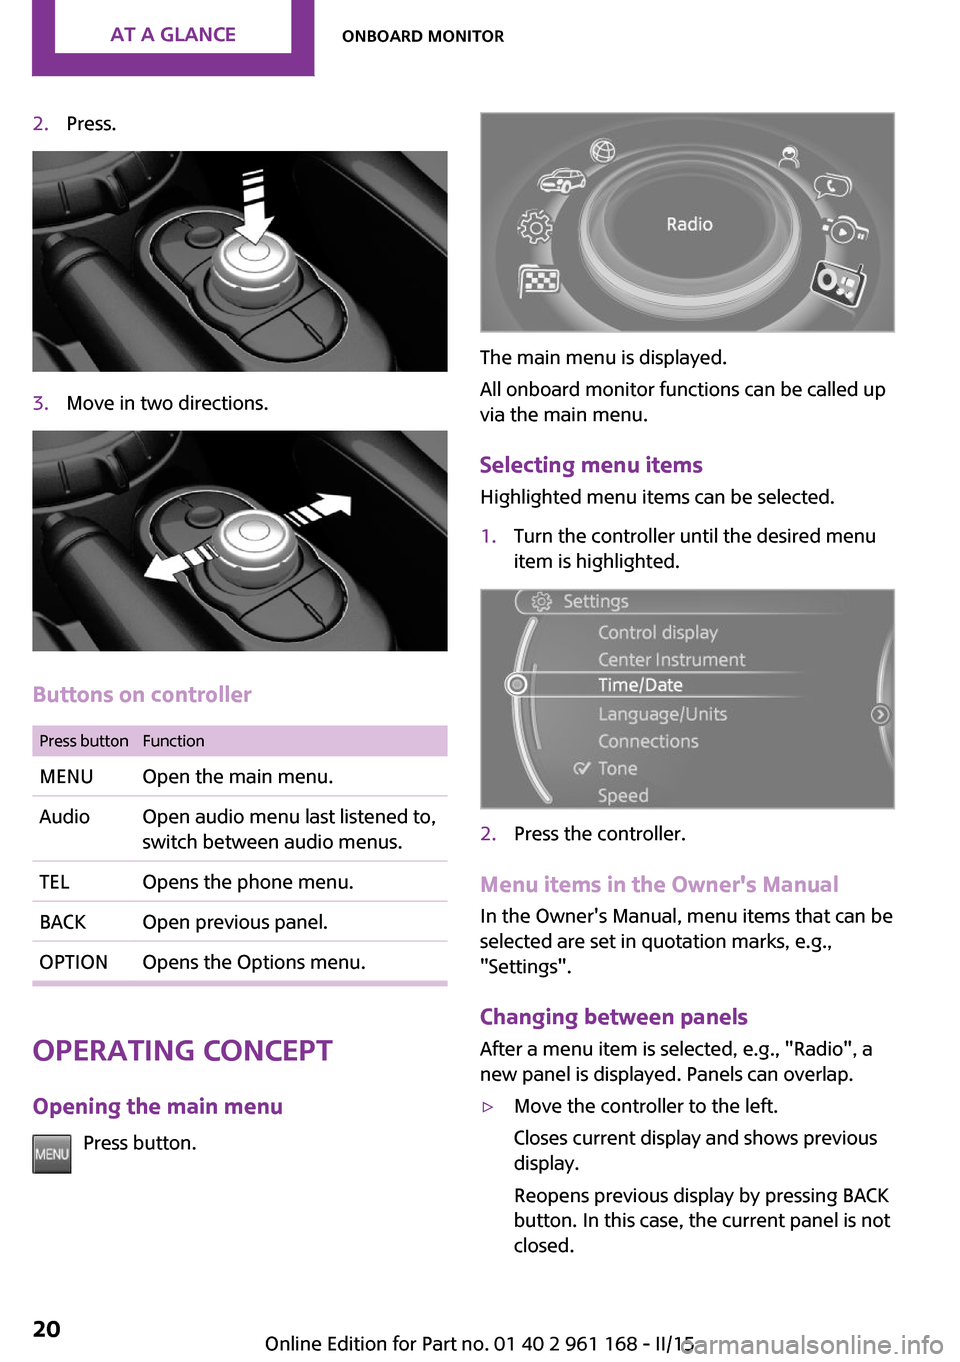
2.Press.3.Move in two directions.
Buttons on controller
Press buttonFunctionMENUOpen the main menu.AudioOpen audio menu last listened to,
switch between audio menus.TELOpens the phone menu.BACKOpen previous panel.OPTIONOpens the Options menu.
Operating concept
Opening the main menu Press button.
The main menu is displayed.
All onboard monitor functions can be called up
via the main menu.
Selecting menu items Highlighted menu items can be selected.
1.Turn the controller until the desired menu
item is highlighted.2.Press the controller.
Menu items in the Owner's Manual
In the Owner's Manual, menu items that can be
selected are set in quotation marks, e.g.,
"Settings".
Changing between panels
After a menu item is selected, e.g., "Radio", a
new panel is displayed. Panels can overlap.
▷Move the controller to the left.
Closes current display and shows previous
display.
Reopens previous display by pressing BACK
button. In this case, the current panel is not
closed.Seite 20AT A GLANCEOnboard monitor20
Online Edition for Part no. 01 40 2 961 168 - II/15
Page 27 of 244
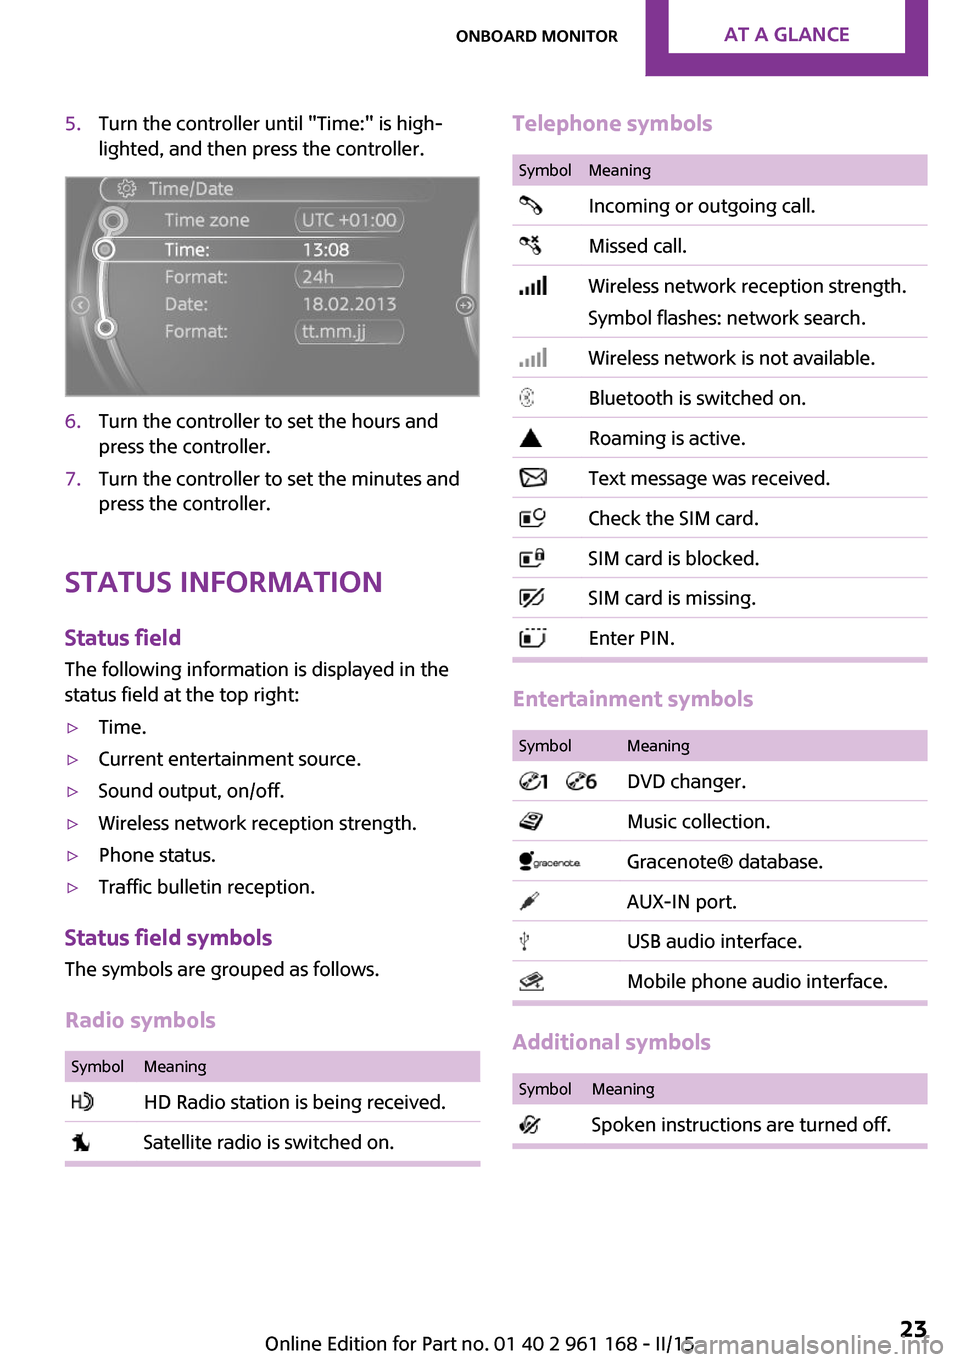
5.Turn the controller until "Time:" is high‐
lighted, and then press the controller.6.Turn the controller to set the hours and
press the controller.7.Turn the controller to set the minutes and
press the controller.
Status information
Status fieldThe following information is displayed in the
status field at the top right:
▷Time.▷Current entertainment source.▷Sound output, on/off.▷Wireless network reception strength.▷Phone status.▷Traffic bulletin reception.
Status field symbols
The symbols are grouped as follows.
Radio symbols
SymbolMeaning HD Radio station is being received. Satellite radio is switched on.Telephone symbolsSymbolMeaning Incoming or outgoing call. Missed call. Wireless network reception strength.
Symbol flashes: network search. Wireless network is not available. Bluetooth is switched on. Roaming is active. Text message was received. Check the SIM card. SIM card is blocked. SIM card is missing. Enter PIN.
Entertainment symbols
SymbolMeaning DVD changer. Music collection. Gracenote® database. AUX-IN port. USB audio interface. Mobile phone audio interface.
Additional symbols
SymbolMeaning Spoken instructions are turned off.Seite 23Onboard monitorAT A GLANCE23
Online Edition for Part no. 01 40 2 961 168 - II/15
Page 28 of 244
Split screen
General information
Additional information can be displayed on the
right side of the split screen, e.g., information
from the on-board comupter.
In the divided screen view, the so-called split
screen, this information remains visible even
when you change to another menu.
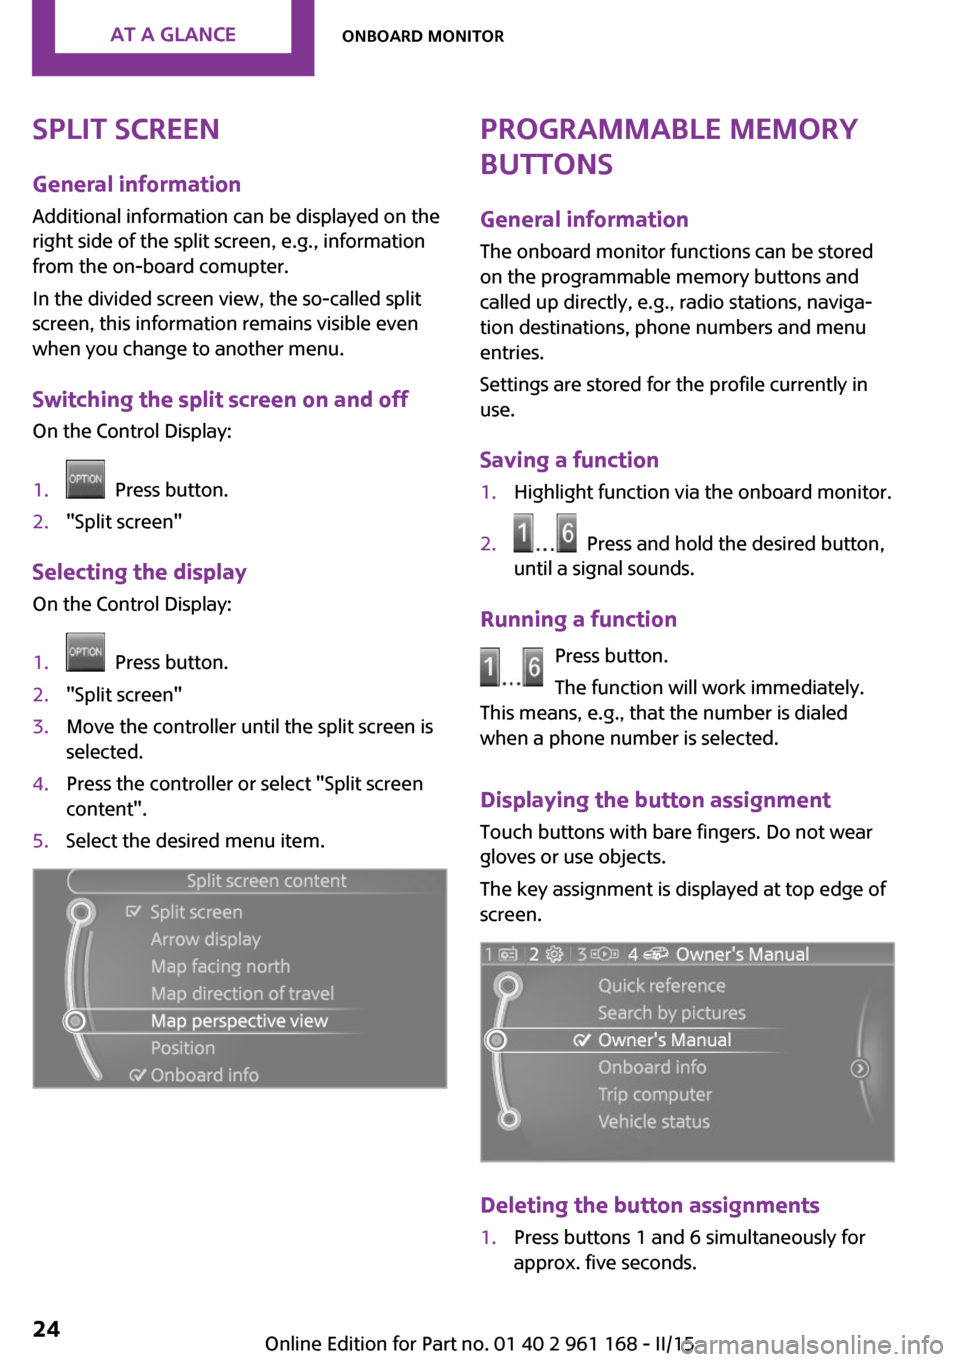
Switching the split screen on and off On the Control Display:1. Press button.2."Split screen"
Selecting the displayOn the Control Display:
1. Press button.2."Split screen"3.Move the controller until the split screen is
selected.4.Press the controller or select "Split screen
content".5.Select the desired menu item.Programmable memory
buttons
General information
The onboard monitor functions can be stored
on the programmable memory buttons and
called up directly, e.g., radio stations, naviga‐
tion destinations, phone numbers and menu
entries.
Settings are stored for the profile currently in
use.
Saving a function1.Highlight function via the onboard monitor.2. Press and hold the desired button,
until a signal sounds.
Running a function
Press button.
The function will work immediately.
This means, e.g., that the number is dialed
when a phone number is selected.
Displaying the button assignment Touch buttons with bare fingers. Do not wear
gloves or use objects.
The key assignment is displayed at top edge of
screen.
Deleting the button assignments
1.Press buttons 1 and 6 simultaneously for
approx. five seconds.Seite 24AT A GLANCEOnboard monitor24
Online Edition for Part no. 01 40 2 961 168 - II/15
Page 29 of 244
2."OK"
Deleting personal in the
vehicle
The concept
Depending on the usage, the vehicle saves per‐
sonal data, such as stored radio stations. These
personal data can be permanently deleted via
the onboard monitor.
General information Depending on the equipment package, the fol‐
lowing data can be deleted:
▷Personal Profile settings.▷Stored radio stations.▷Stored Favorites buttons.▷Travel and computer information.▷Music collection.▷Navigation, e.g. stored destinations.▷Phone book.▷Online data, e.g. Favorites, cookies.▷Voice notes.▷Login accounts.
Altogether, the deletion of the data can take up
to 30 minutes.
Functional requirement Data can only be deleted while stationary.
Deleting data
Heed and follow the instructions on the Control
Display.
1.Switch on the ignition.2. "Settings"3.Open "Options".4."Delete all personal data"5."Continue"6."OK"
Entering letters and
numbers
General information On the Control Display:
1.Turn the controller: select letters or num‐
bers.2.Select additional letters or numbers if
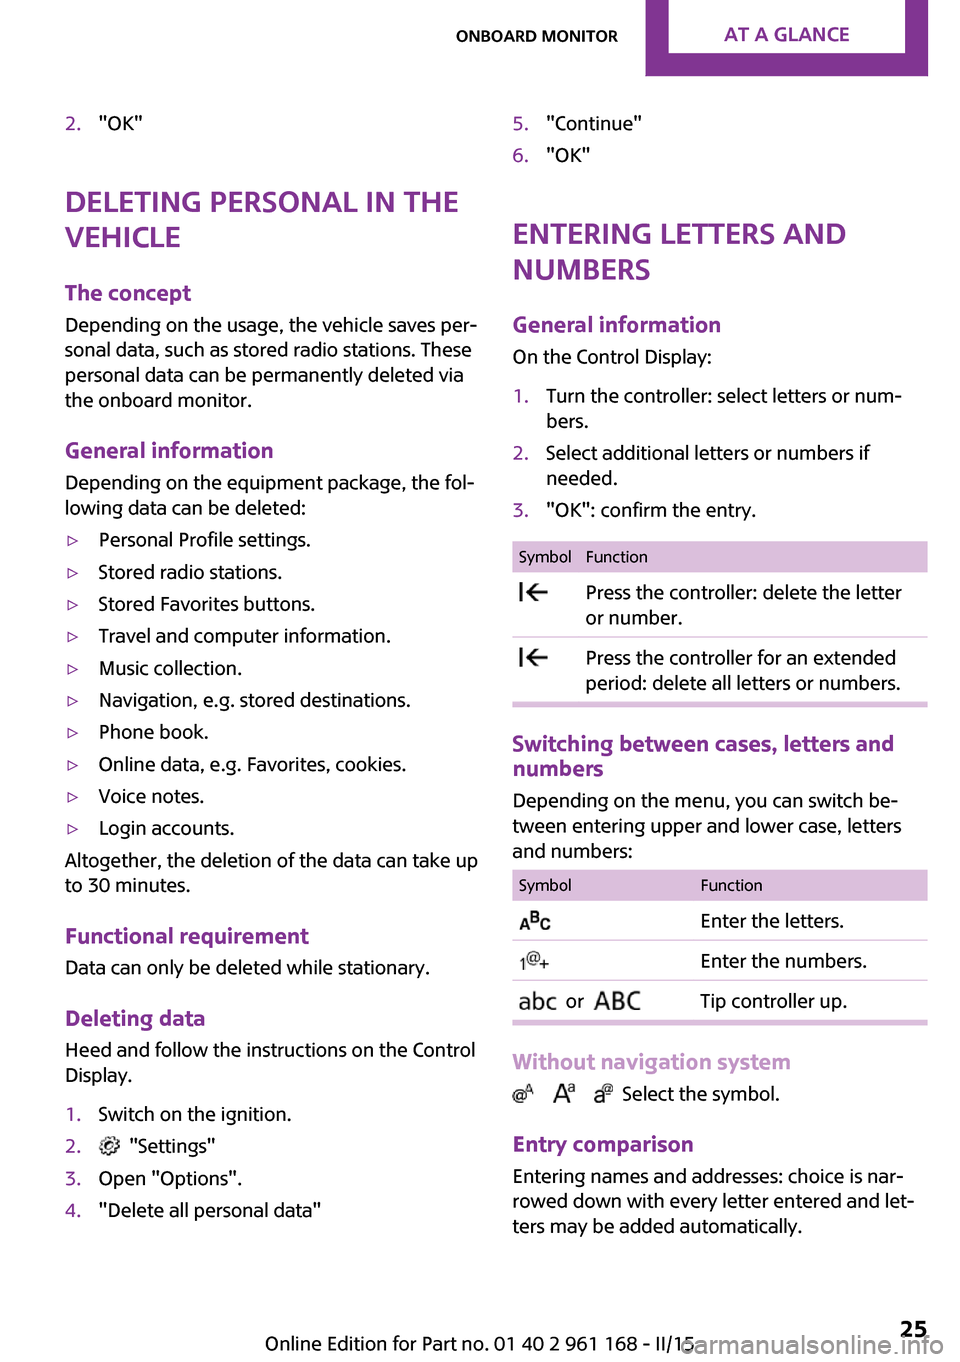
needed.3."OK": confirm the entry.SymbolFunction Press the controller: delete the letter
or number. Press the controller for an extended
period: delete all letters or numbers.
Switching between cases, letters and
numbers
Depending on the menu, you can switch be‐
tween entering upper and lower case, letters
and numbers:
SymbolFunction Enter the letters. Enter the numbers. or Tip controller up.
Without navigation system
Select the symbol.
Entry comparison Entering names and addresses: choice is nar‐
rowed down with every letter entered and let‐
ters may be added automatically.
Seite 25Onboard monitorAT A GLANCE25
Online Edition for Part no. 01 40 2 961 168 - II/15
Page 31 of 244
Voice activation systemVehicle features and op‐
tions
This chapter describes all standard, country-
specific and optional features offered with the
series. It also describes features that are not
necessarily available in your car, e. g., due to
the selected options or country versions. This
also applies to safety-related functions and sys‐
tems. The respectively applicable country provi‐
sions must be observed when using the respec‐
tive features and systems.
The concept▷Most functions displayed on the Control
Display can be operated by voice com‐
mands via the voice activation system. The
system supports you with announcements
during input.▷Functions that can only be used when the
vehicle is stationary cannot be used via the
voice activation system.▷The system uses a special microphone on
the driver's side.▷›...‹ Verbal instructions in the Owner's
Manual to use with the voice activation sys‐
tem.
Requirements
Via the Control Display, set a language that is
also supported by the voice activation system
so that the spoken commands can be identi‐
fied.
Set the language, refer to page 85.
Using voice activation
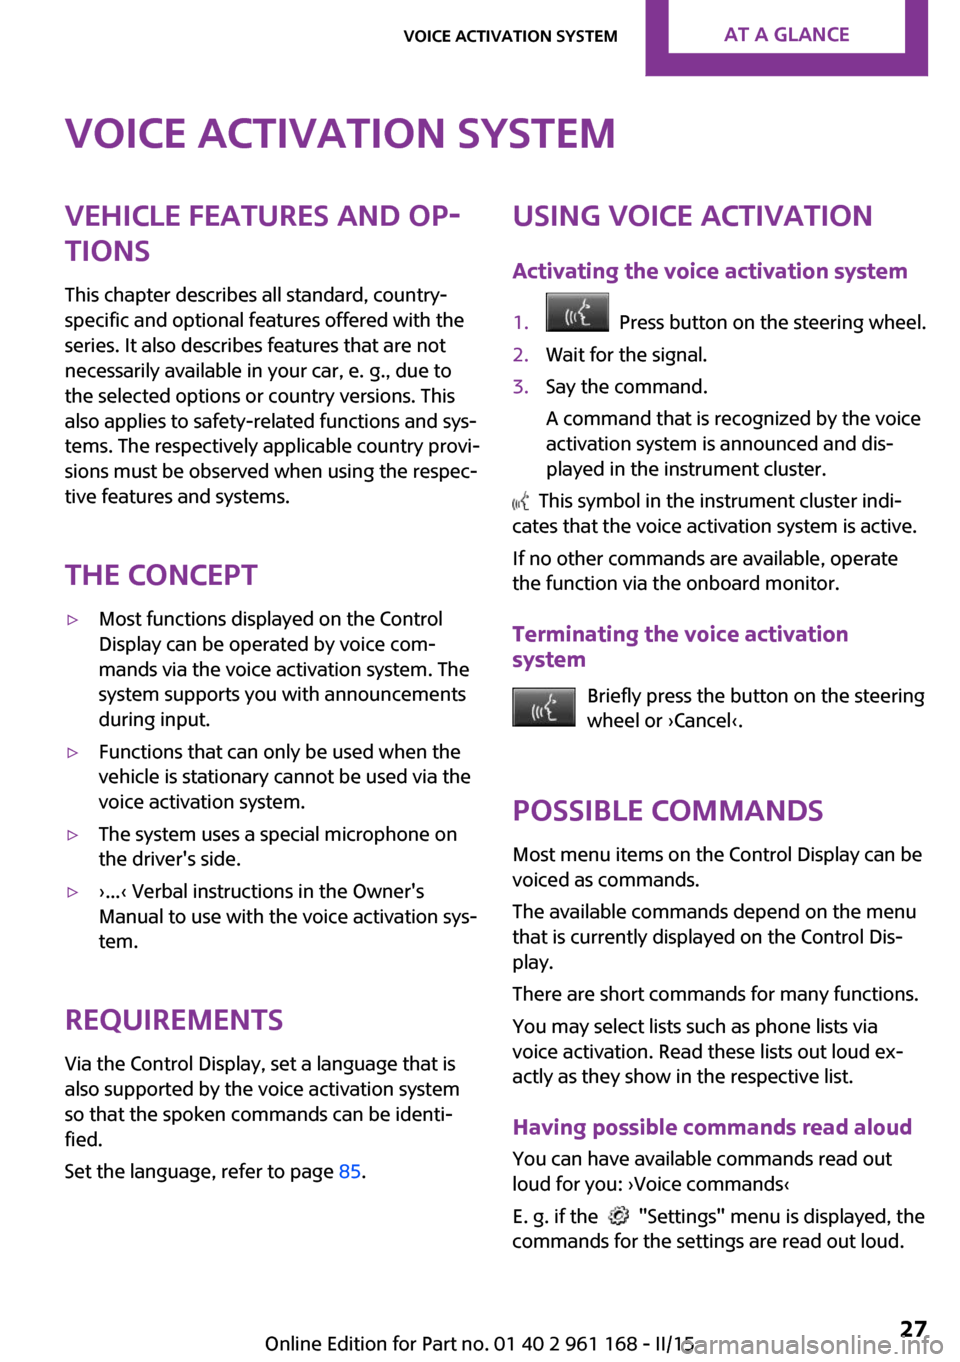
Activating the voice activation system1. Press button on the steering wheel.2.Wait for the signal.3.Say the command.
A command that is recognized by the voice
activation system is announced and dis‐
played in the instrument cluster.
This symbol in the instrument cluster indi‐
cates that the voice activation system is active.
If no other commands are available, operate
the function via the onboard monitor.
Terminating the voice activation
system
Briefly press the button on the steering
wheel or ›Cancel‹.
Possible commands
Most menu items on the Control Display can be
voiced as commands.
The available commands depend on the menu
that is currently displayed on the Control Dis‐
play.
There are short commands for many functions.
You may select lists such as phone lists via
voice activation. Read these lists out loud ex‐
actly as they show in the respective list.
Having possible commands read aloud You can have available commands read out
loud for you: ›Voice commands‹
E. g. if the
"Settings" menu is displayed, the
commands for the settings are read out loud.
Seite 27Voice activation systemAT A GLANCE27
Online Edition for Part no. 01 40 2 961 168 - II/15
Page 32 of 244
Executing functions using short
commands
Execute functions on the main menu via short
commands. It almost doesn't matter which
menu item is selected, e.g., ›Vehicle status‹.
Help dialog for the voice activation
system
Calling up help dialog: ›Help‹
Additional commands for the help dialog:▷›Help with examples‹: announces informa‐
tion about the current operating options
and the most important commands for
them.▷›Help with voice activation‹: information
about the principle of operation for the
voice activation system is announced.
One example: open the
tone settings
Via the main menu
The commands of the menu items are spoken
just as they are selected via the controller.
1.Turn on the Entertainment sound output if
needed.2. Press button on the steering wheel.3.›Radio‹4.›Tone‹
Via short command
The desired tone settings can also be started
via a short command.
1.Turn on the Entertainment sound output if
needed.2. Press button on the steering wheel.3.›Tone‹Setting the voice dialog
Set system to standard dialog or use a short
version.
The short version of the voice dialog plays back short messages in abbreviated form.
On the Control Display:1. "Settings"2."Language/Units"3."Speech type:"4.Select setting.
Adjusting the volume
Turn the volume button while giving an instruc‐
tion until the desired volume is set.
▷The volume remains constant even if the
volume of other audio sources is changed.▷The volume is stored for the profile cur‐
rently in use.
Hints on Emergency Re‐
quests
Do not use the voice activation system to ini‐
tiate an Emergency Request. In stressful situa‐
tions, the voice and vocal pitch can change.
This can unnecessarily delay the establishment
of a phone connection.
Environmental condi‐
tions
▷Say the commands, numbers, and letters
smoothly and with normal volume, empha‐
sis, and speed.▷Always say commands in the language of
the voice activation system.▷Keep the doors, windows, and glass sun‐
roof closed to prevent noise interference.Seite 28AT A GLANCEVoice activation system28
Online Edition for Part no. 01 40 2 961 168 - II/15