MITSUBISHI ASX 2009 1.G Manual PDF
Manufacturer: MITSUBISHI, Model Year: 2009, Model line: ASX, Model: MITSUBISHI ASX 2009 1.GPages: 368, PDF Size: 8.13 MB
Page 71 of 368
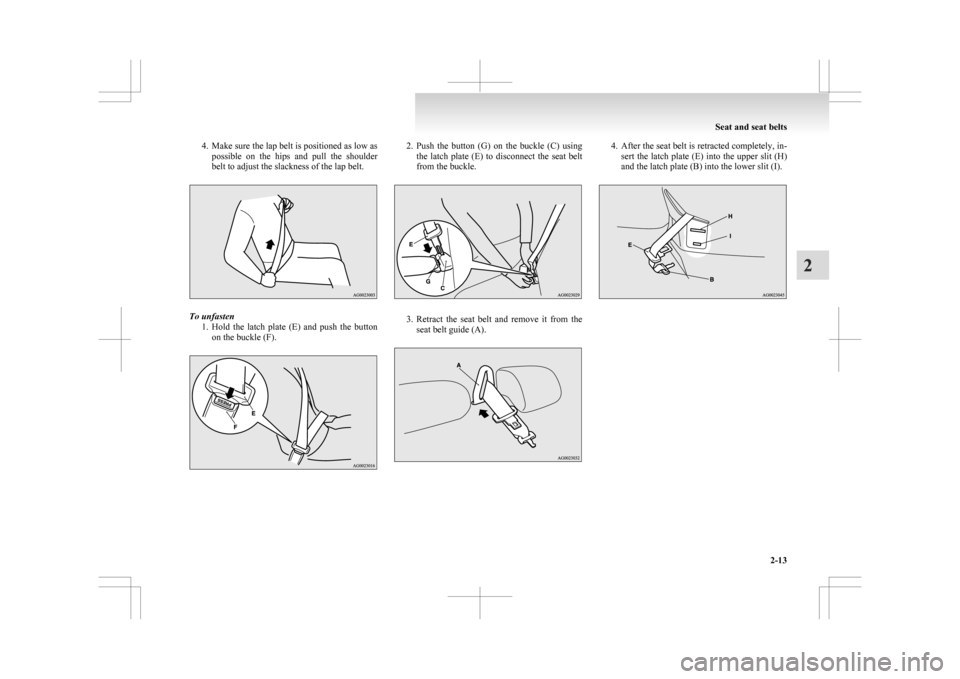
4. Make sure the lap belt is positioned as low as
possible on the hips and pull the shoulder
belt to adjust the slackness of the lap belt. To unfasten
1. Hold
the latch plate (E) and push the button
on the buckle (F). 2. Push
the button (G) on the buckle (C) using
the latch plate (E) to disconnect the seat belt
from the buckle. 3. Retract
the seat belt and remove it from the
seat belt guide (A). 4. After
the seat belt is retracted completely, in-
sert the latch plate (E) into the upper slit (H)
and the latch plate (B) into the lower slit (I). Seat and seat belts
2-13 2
Page 72 of 368
Pregnant women restraint
E00405600077WARNING
l Seat belts work for everyone, including
pregnant women. Pregnant women
should use the available seat belts. This
will reduce the likelihood of injury to
both the woman and the unborn child.
The lap belt should be worn across the
thighs and as snug against the hips as pos-
sible, but not across the waist. Consult
your doctor if you have any additional
questions or concerns. Seat belt pretensioner system and
force limiter system E00405700166
The
driver’s seat and front passenger’s seat each
have a seat belt equipped with a pretensioner system.
Pretensioner system E00405801135
When the ignition switch or the operation mode is
under
the following conditions, if there is a frontal
impact or a side impact (vehicles equipped with
SRS side airbags and SRS curtain airbags) severe
enough to injure the driver and/or front passenger,
the pretensioner system will retract their respective
seat belts instantaneously, thus maximizing the seat
belt’s effectiveness.
[Except for vehicles equipped with keyless opera-
tion system]
The ignition switch is in the “ON” or “START” po-
sition.
[Vehicles equipped with keyless operation system]
The operation mode is in ON. WARNING
l To
obtain the best results from your pre-
tensioner seat belt, make sure you have ad-
justed your seat correctly and wear your
seat belt properly. CAUTION
l
Installation
of audio equipment or re-
pairs in the vicinity of the pretensioner
seat belts or floor console must be per-
formed in line with MITSUBISHI
MOTORS guidelines. It is important to
do so because the work could affect the
pretensioner systems.
l If you need to scrap the vehicle, please con-
sult a MITSUBISHI MOTORS Author-
ized Service Point.
It is important to do so because unexpec-
ted activation of the pretensioner seat
belts could cause injuries.
NOTE l The
pretensioner seat belts will be activated
if the vehicle suffers a severe frontal impact
or a severe side impact (vehicles equipped
with SRS side airbags and SRS curtain air-
bags), even if the seat belts are not worn.
l The pretensioner seat belts are designed to
work only once. After the pretensioner seat
belts have been activated, we recommend
you have it replaced by a MITSUBISHI
MOTORS Authorized Service Point.
SRS warning E00405900243
The same warning lamp/display is shared by the
SRS airbags and the pretensioner seat belts.
Refer
to “SRS warning lamp/display” on page
2-34. Seat and seat belts
2-14
2
Page 73 of 368
Force limiter system
E00406000209
In
the event of a collision, each force limiter sys-
tem will effectively absorb the load applied to the
seat belt to minimize the impact to the passenger. Child restraint
E00406401659
When
transporting children in your vehicle, some
type of child restraint system should always be
used according to the size of the child. This is re-
quired by law in most countries.
The regulations concerning driving with children in
the front seat may differ from country to country.
You are advised to comply with the relevant regula-
tions. WARNING
l When
possible, put children in the rear
seat. Accident statistics indicate that chil-
dren of all sizes and ages are safer when
properly restrained in the rear seat rath-
er than in the front seat.
l Holding a child in your arms is no substi-
tute for a restraint system. Failure to use
a proper restraint system can result in se-
vere or fatal injury to the child.
l Each child restraint device or fixing is to
be used only by one child.
l When attaching a child restraint to the
rear seat, place the front seatbacks in the
upright position.
Otherwise, the child could be seriously in-
jured in the event of hard braking or a col-
lision. Caution for installing the child re-
straint on vehicles with a front passen-
ger airbag
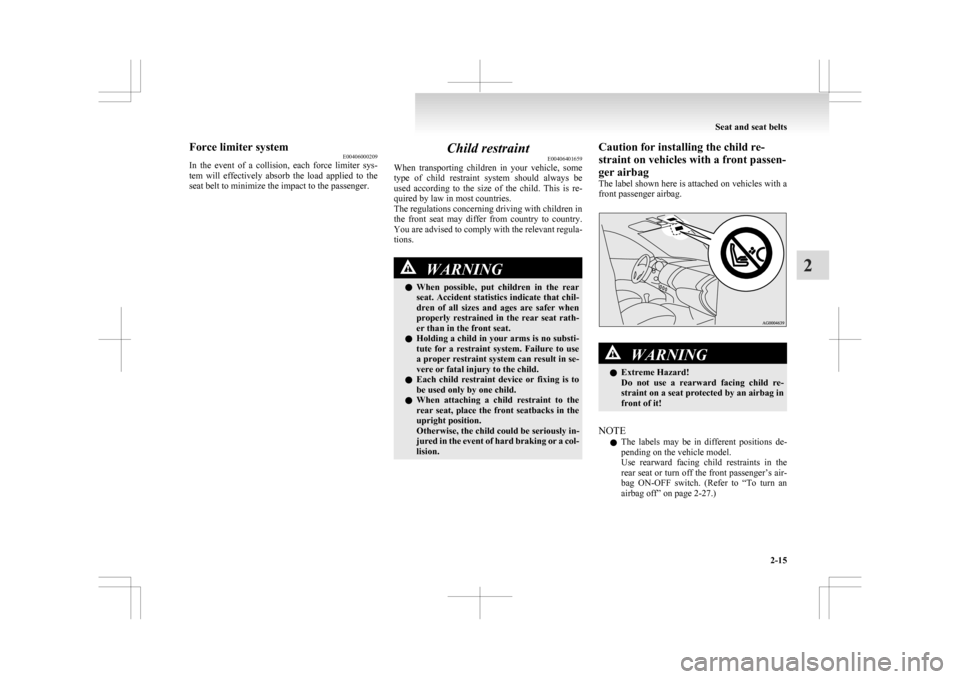
The
label shown here is attached on vehicles with a
front passenger airbag. WARNING
l Extreme Hazard!
Do
not use a rearward facing child re-
straint on a seat protected by an airbag in
front of it!
NOTE l The
labels may be in different positions de-
pending on the vehicle model.
Use rearward facing child restraints in the
rear seat or turn off the front passenger’s air-
bag ON-OFF switch. (Refer to “To turn an
airbag off” on page 2-27.) Seat and seat belts
2-15 2
Page 74 of 368
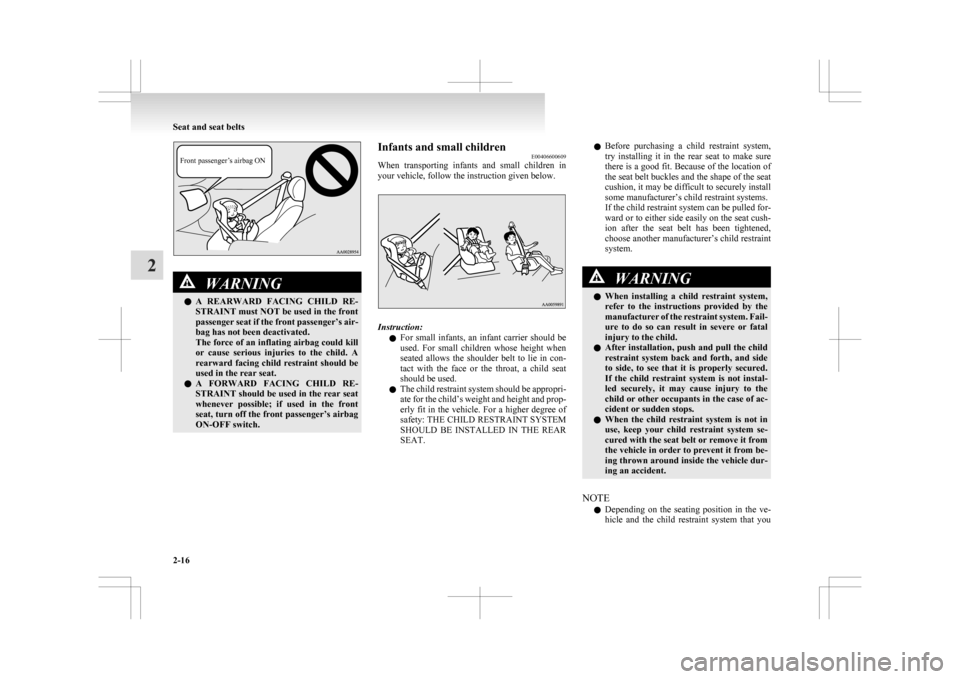
Front passenger’s airbag ONWARNING
l A
REARWARD FACING CHILD RE-
STRAINT must NOT be used in the front
passenger seat if the front passenger’s air-
bag has not been deactivated.
The force of an inflating airbag could kill
or cause serious injuries to the child. A
rearward facing child restraint should be
used in the rear seat.
l A FORWARD FACING CHILD RE-
STRAINT should be used in the rear seat
whenever possible; if used in the front
seat, turn off the front passenger’s airbag
ON-OFF switch. Infants and small children
E00406600609
When
transporting infants and small children in
your vehicle, follow the instruction given below. Instruction:
l For
small infants, an infant carrier should be
used. For small children whose height when
seated allows the shoulder belt to lie in con-
tact with the face or the throat, a child seat
should be used.
l The child restraint system should be appropri-
ate for the child’s weight and height and prop-
erly fit in the vehicle. For a higher degree of
safety: THE CHILD RESTRAINT SYSTEM
SHOULD BE INSTALLED IN THE REAR
SEAT. l
Before
purchasing a child restraint system,
try installing it in the rear seat to make sure
there is a good fit. Because of the location of
the seat belt buckles and the shape of the seat
cushion, it may be difficult to securely install
some manufacturer’s child restraint systems.
If the child restraint system can be pulled for-
ward or to either side easily on the seat cush-
ion after the seat belt has been tightened,
choose another manufacturer’s child restraint
system. WARNING
l When
installing a child restraint system,
refer to the instructions provided by the
manufacturer of the restraint system. Fail-
ure to do so can result in severe or fatal
injury to the child.
l After installation, push and pull the child
restraint system back and forth, and side
to side, to see that it is properly secured.
If the child restraint system is not instal-
led securely, it may cause injury to the
child or other occupants in the case of ac-
cident or sudden stops.
l When the child restraint system is not in
use, keep your child restraint system se-
cured with the seat belt or remove it from
the vehicle in order to prevent it from be-
ing thrown around inside the vehicle dur-
ing an accident.
NOTE l Depending
on the seating position in the ve-
hicle and the child restraint system that you Seat and seat belts
2-16
2
Page 75 of 368
have, the child restraint can be attached us-
ing one of the following two locations:
• To
the lower anchorage in the rear seat
ONLY if the child restraint has ISOFIX
mountings (See page 2-18).
• To the seat belt (See pages 2-10, 2-23).
Older children E00406700277
Children who have outgrown the child restraint sys-
tem should be seated in the rear seat and wear com-
bination lap shoulder belt.
The lap portion of the belt should be snug and posi-
tioned
low on the abdomen so that it is below the
top of the hip-bone. Otherwise, the belt could in-
trude into the child’s abdomen during an accident
and cause injury. Seat and seat belts
2-17 2
Page 76 of 368
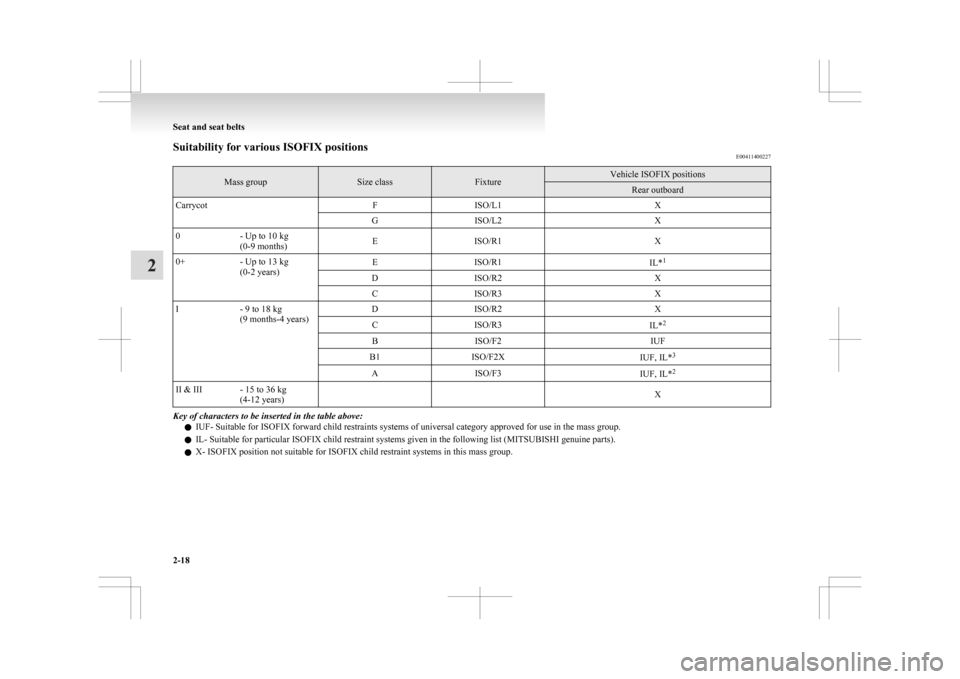
Suitability for various ISOFIX positions
E00411400227Mass group Size class Fixture Vehicle ISOFIX positions
Rear outboard
Carrycot FISO/L1 X
G ISO/L2 X
0 - Up to 10 kg
(0-9 months) E
ISO/R1 X
0+ - Up to 13 kg
(0-2 years) E
ISO/R1
IL*1
D ISO/R2 X
C ISO/R3 X
I - 9 to 18 kg
(9 months-4 years) D
ISO/R2 X
C ISO/R3
IL*2
B ISO/F2 IUF
B1 ISO/F2X
IUF, IL*3
A ISO/F3
IUF, IL*2
II & III - 15 to 36 kg (4-12 years)
XKey of characters to be inserted in the table above:
l IUF- Suitable for ISOFIX forward child restraints systems of universal category approved for use in the mass group.
l IL- Suitable for particular ISOFIX child restraint systems given in the following list (
MITSUBISHI genuine parts).
l X- ISOFIX position not suitable for ISOFIX child restraint systems in this mass group. Seat and seat belts
2-18
2
Page 77 of 368
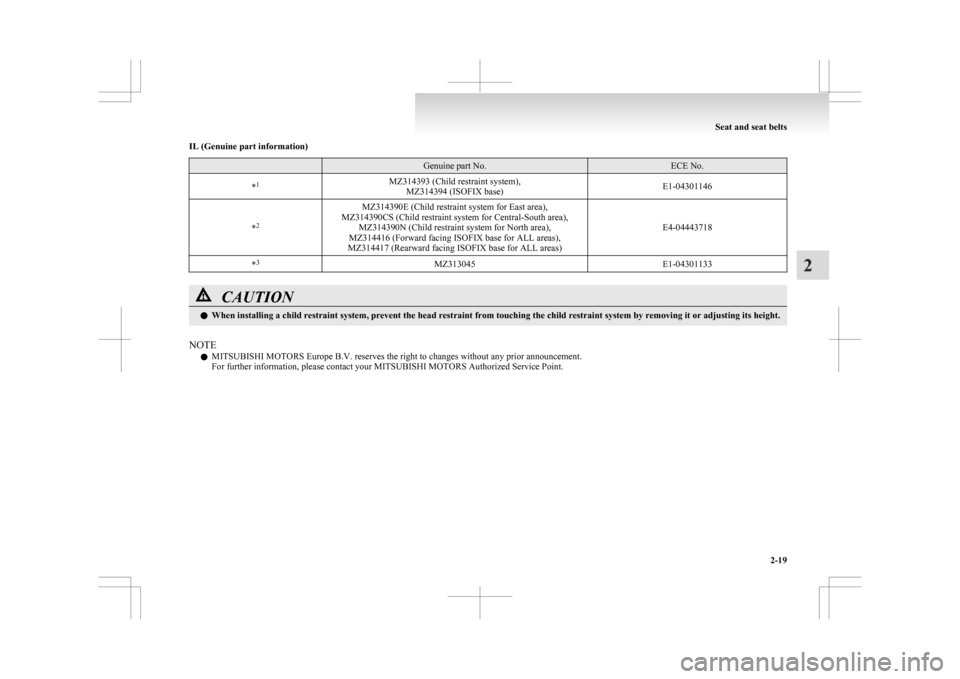
IL (Genuine part information)
Genuine part No. ECE No.
* 1
MZ314393 (Child restraint system),
MZ314394 (ISOFIX base) E1-04301146
* 2 MZ314390E (Child restraint system for East area),
MZ314390CS (Child restraint system for Central-South area), MZ314390N (Child restraint system for North area),
MZ314416 (Forward facing ISOFIX base for ALL areas),
MZ314417 (Rearward facing ISOFIX base for ALL areas) E4-04443718
* 3
MZ313045 E1-04301133CAUTION
l
When installing a child restraint system, prevent the head restraint from touching the child restraint system by removing it or adjusting its height.
NOTE l MITSUBISHI MOTORS
Europe B.V. reserves the right to changes without any prior announcement.
For further information, please contact your MITSUBISHI MOTORS Authorized Service Point. Seat and seat belts
2-19 2
Page 78 of 368
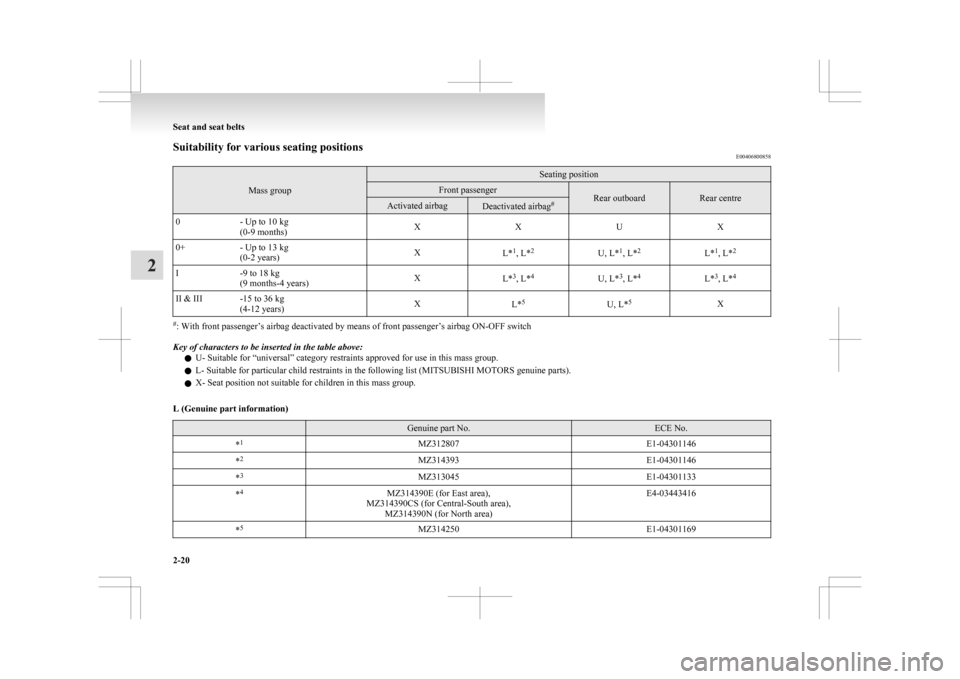
Suitability for various seating positions
E00406800858Mass group Seating position
Front passenger
Rear outboard Rear centre
Activated airbag
Deactivated airbag
#
0 - Up to 10 kg
(0-9 months) X
XUX
0+ - Up to 13 kg
(0-2 years) X
L*1
, L* 2
U, L*1
, L* 2
L*1
, L* 2
I -9 to 18 kg
(9 months-4 years) X
L*3
, L* 4
U, L*3
, L* 4
L*3
, L* 4
II & III -15 to 36 kg (4-12 years) X
L*5
U, L*5
X#
: With front passenger’s airbag deactivated by means of front passenger’s airbag ON-OFF switch
Key of characters to be inserted in the table above:
l U- Suitable for “universal” category restraints approved for use in this mass group.
l L- Suitable for particular child restraints in the following list (
MITSUBISHI MOTORS genuine parts).
l X- Seat position not suitable for children in this mass group.
L (Genuine part information) Genuine part No. ECE No.
* 1
MZ312807 E1-04301146
* 2
MZ314393 E1-04301146
* 3
MZ313045 E1-04301133
* 4
MZ314390E (for East area),
MZ314390CS (for Central-South area), MZ314390N (for North area) E4-03443416
* 5
MZ314250 E1-04301169Seat and seat belts
2-20
2
Page 79 of 368
CAUTION
l
When installing a child restraint system, prevent the head restraint from touching the child restraint system by removing it or adjusting its height.
NOTE l There is no applicable
MITSUBISHI MOTORS Genuine Parts to the Mass Group “0-Up to 10 kg”.
MITSUBISHI MOTORS Europe B.V. reserves the right to changes without any prior announcement.
For further information, please contact your MITSUBISHI MOTORS Authorized Service Point. Seat and seat belts
2-21 2
Page 80 of 368
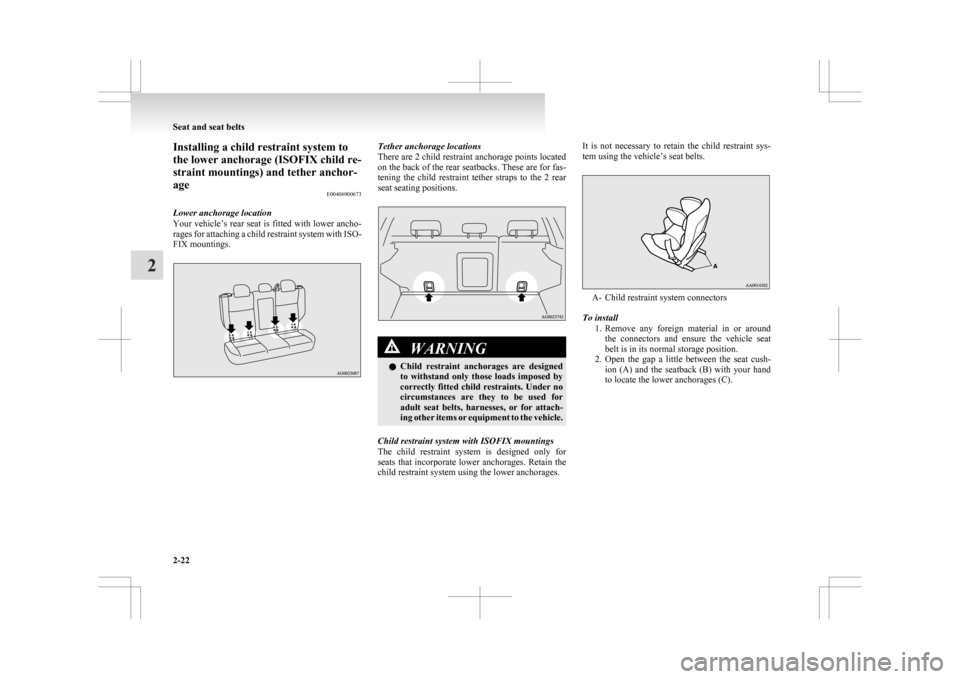
Installing a child restraint system to
the lower anchorage (ISOFIX child re-
straint mountings) and tether anchor-
age
E00406900673
Lower anchorage location
Your
vehicle’s rear seat is fitted with lower ancho-
rages for attaching a child restraint system with ISO-
FIX mountings. Tether anchorage locations
There
are 2 child restraint anchorage points located
on the back of the rear seatbacks. These are for fas-
tening the child restraint tether straps to the 2 rear
seat seating positions. WARNING
l Child
restraint anchorages are designed
to withstand only those loads imposed by
correctly fitted child restraints. Under no
circumstances are they to be used for
adult seat belts, harnesses, or for attach-
ing other items or equipment to the vehicle.
Child restraint system with ISOFIX mountings
The
child restraint system is designed only for
seats that incorporate lower anchorages. Retain the
child restraint system using the lower anchorages. It is not necessary to retain the child restraint sys-
tem using the vehicle’s seat belts.
A- Child restraint system connectors
To install 1. Remove
any foreign material in or around
the connectors and ensure the vehicle seat
belt is in its normal storage position.
2. Open the gap a little between the seat cush- ion (A) and the seatback (B) with your hand
to locate the lower anchorages (C). Seat and seat belts
2-22
2