tow bar MITSUBISHI ASX 2017 (in English) User Guide
[x] Cancel search | Manufacturer: MITSUBISHI, Model Year: 2017, Model line: ASX, Model: MITSUBISHI ASX 2017Pages: 458, PDF Size: 22.98 MB
Page 373 of 458

NOTElWhen the vehicle is to be left unused for a
long period of time, remove the battery and
store it in a place where the battery fluid will not freeze. The battery should be stored only in a fully charged condition.Tyres
E01001300255WARNINGlDriving with tyres that are worn, dam-
aged or improperly inflated can lead to a
loss of control or blow out of the tyres which can result in a collision with serious
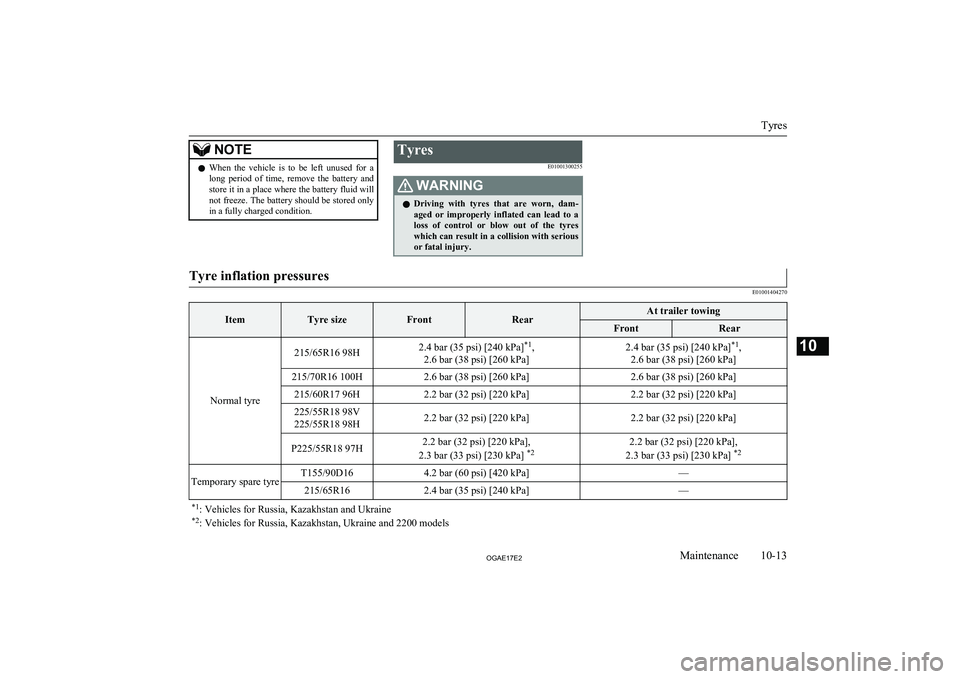
or fatal injury.Tyre inflation pressures
E01001404270ItemTyre sizeFrontRearAt trailer towingFrontRear
Normal tyre
215/65R16 98H2.4 bar (35 psi) [240 kPa] *1
,
2.6 bar (38 psi) [260 kPa]2.4 bar (35 psi) [240 kPa] *1
,
2.6 bar (38 psi) [260 kPa]215/70R16 100H2.6 bar (38 psi) [260 kPa]2.6 bar (38 psi) [260 kPa]215/60R17 96H2.2 bar (32 psi) [220 kPa]2.2 bar (32 psi) [220 kPa]225/55R18 98V
225/55R18 98H2.2 bar (32 psi) [220 kPa]2.2 bar (32 psi) [220 kPa]P225/55R18 97H2.2 bar (32 psi) [220 kPa],
2.3 bar (33 psi) [230 kPa] *22.2 bar (32 psi) [220 kPa],
2.3 bar (33 psi) [230 kPa] *2Temporary spare tyreT155/90D164.2 bar (60 psi) [420 kPa]—215/65R162.4 bar (35 psi) [240 kPa]—*1
: Vehicles for Russia, Kazakhstan and Ukraine
*2 : Vehicles for Russia, Kazakhstan, Ukraine and 2200 models
Tyres
10-13OGAE17E2Maintenance10
Page 374 of 458
![MITSUBISHI ASX 2017 (in English) User Guide ItemTyre sizeFrontRearAt trailer towingFrontRear215/70R162.6 bar (38 psi) [260 kPa]—*1: Vehicles for Russia, Kazakhstan and Ukraine
*2 : Vehicles for Russia, Kazakhstan, Ukraine and 2200 models
Chec MITSUBISHI ASX 2017 (in English) User Guide ItemTyre sizeFrontRearAt trailer towingFrontRear215/70R162.6 bar (38 psi) [260 kPa]—*1: Vehicles for Russia, Kazakhstan and Ukraine
*2 : Vehicles for Russia, Kazakhstan, Ukraine and 2200 models
Chec](/img/19/34865/w960_34865-373.png)
ItemTyre sizeFrontRearAt trailer towingFrontRear215/70R162.6 bar (38 psi) [260 kPa]—*1: Vehicles for Russia, Kazakhstan and Ukraine
*2 : Vehicles for Russia, Kazakhstan, Ukraine and 2200 models
Check the tyre inflation pressure of all the tyres while they are cold; if insufficient or excessive, adjust to the specified value.
After the tyre inflation pressure has been adjusted, check the tyres for damage and air leaks. Be sure to put caps on the valves.
Wheel condition
E01001800885
1- Location of the tread wear indicator
2- Tread wear indicator
Check the tyres for cuts, cracks and other damage. Replace the tyres if there are deep
cuts or cracks. Also check each tyre for pieces of metal or pebbles.
The use of worn tyres can be very dangerous
because of the greater chance of skidding or
hydroplaning. The tread depth of the tyres
must exceed 1.6 mm in order for the tyres to meet the minimum requirement for use.
Tread wear indicators will appear on the sur-
face of the tyre as the tyre wears, thereby in-
dicating that the tyre no longer meets the
minimum requirement for use. When these wear indicators appear, the tyres must be re-
placed with new ones.
On 4-wheel drive vehicles, when replacement of any of the tyres is necessary, replace all of
them.CAUTIONl Always use tyres of the same size, same
type, and same brand, and which have no wear differences.
Using tyres of different size, type, brands or
degree of wear, will increase the differential
oil temperature, resulting in possible damage to the driving system. Further, the drive train
will be subjected to excessive loading, possi- bly leading to oil leakage, component seiz-ure, or other serious faults.
Tyres
10-14OGAE17E2Maintenance10
Page 391 of 458

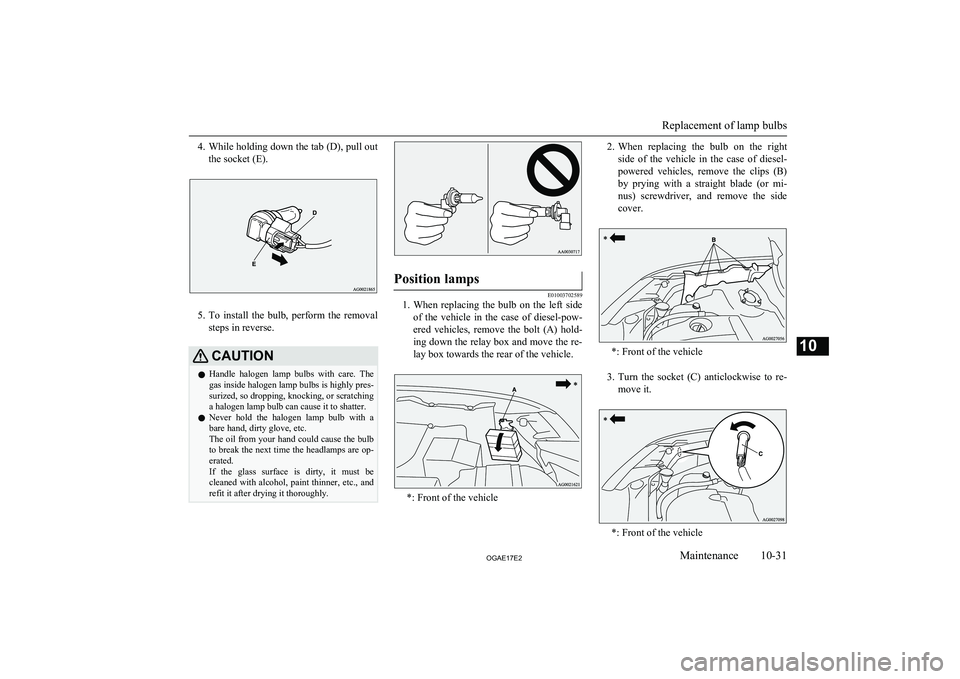
4.While holding down the tab (D), pull out
the socket (E).
5. To install the bulb, perform the removal
steps in reverse.
CAUTIONl Handle halogen lamp bulbs with care. The
gas inside halogen lamp bulbs is highly pres- surized, so dropping, knocking, or scratching
a halogen lamp bulb can cause it to shatter.
l Never hold the halogen lamp bulb with a
bare hand, dirty glove, etc.
The oil from your hand could cause the bulb to break the next time the headlamps are op-
erated.
If the glass surface is dirty, it must be cleaned with alcohol, paint thinner, etc., and
refit it after drying it thoroughly.Position lamps
E01003702589
1. When replacing the bulb on the left side
of the vehicle in the case of diesel-pow-
ered vehicles, remove the bolt (A) hold-
ing down the relay box and move the re- lay box towards the rear of the vehicle.
*: Front of the vehicle
2. When replacing the bulb on the right
side of the vehicle in the case of diesel-
powered vehicles, remove the clips (B)
by prying with a straight blade (or mi- nus) screwdriver, and remove the side
cover.
*: Front of the vehicle
3. Turn the socket (C) anticlockwise to re-
move it.
*: Front of the vehicle
Replacement of lamp bulbs
10-31OGAE17E2Maintenance10