overheating MITSUBISHI COLT 2009 10.G Owners Manual
[x] Cancel search | Manufacturer: MITSUBISHI, Model Year: 2009, Model line: COLT, Model: MITSUBISHI COLT 2009 10.GPages: 273, PDF Size: 17.28 MB
Page 128 of 273
Downloaded from www.Manualslib.com manuals search engine CAUTIONlWhen leaving the vehicle, be sure to stop
the engine and remove the key from the
ignition switch. If you were to leave the en-
gine running with the allshift lever in the
“S” (Stand by) or “R” position, the trans-
mission’s creep effect could cause the ve-
hicle to move by itself. Also, the vehicle
could suddenly move if you accidentally
pressed the accelerator pedal when get-
ting back in the vehicle.
NOTE
l Sit in the correct position for driving even if
you plan to move just a short distance. Make
sure you are able to depress the brake pedal
and accelerator pedal properly.
l Reversing involves twisting to look rearward
in a position that makes operation of the ped-
als more difficult. Make sure you are able to
depress the brake pedal.
Braking E00607001801
All the parts of the brake system are critical to safe-
ty. We recommend you to have the vehicle
checked at regular intervals according to the serv-
ice booklet.CAUTIONl Avoid driving habits that cause heavy
braking and never “ride” the brakes by
resting your foot on the brake pedal
while driving.
It causes brake overheating and fade.
Brake system
The service brake is divided into two brake cir-
cuits. And your vehicle is equipped with power
brakes. If one brake circuit fails, the other is availa-
ble to stop the vehicle. If you should lose the pow-
er assist for some reason, the brakes will still work.
In these situations, even if the brake pedal moves
down to the very end of its possible stroke or re-
sists being depressed, keep depressing the brake ped-
al down harder and further than usual; stop driving
as soon as possible and have the brake system re-
paired.
WARNINGl Do not turn off the engine while your ve-
hicle is in motion. If you turn off the en-
gine while driving, the power assistance
for the braking system will stop working
and your brakes will not work effectively.WARNINGl If the power assist is lost or if either
brake hydraulic system stops working
properly, have your vehicle checked im-
mediately.
Warning lamp
The brake warning lamp illuminates to indicate a
fault in the braking system. Read “Brake warning
lamp” on page 3-17.
When brakes are wet
Check the brake system while driving at a low
speed immediately after starting, especially when
the brakes are wet, to confirm they work normally.
A film of water can be formed on the brake discs
or brake drums and prevent normal braking after
driving in heavy rain or through large puddles, or
after the vehicle is washed. If this occurs, dry the
brakes out by driving slowly while lightly depress-
ing the brake pedal.
When driving downhill
It is important to take advantage of the engine brak-
ing by shifting to a lower shift position while driv-
ing on steep downhill roads in order to prevent the
brakes from overheating.
Starting and driving
4-25
4
Page 132 of 273
Downloaded from www.Manualslib.com manuals search engine lThe ABS warning lamp can illuminate if the
battery voltage is insufficient when the en-
gine is started. In this case, it does not indi-
cate an ABS fault.
Charge the battery by allowing the engine to
idle for a while.
If the battery has been charged but the ABS
warning lamp continues to illuminate or illu-
minates intermittently, we recommend you
to consult a MITSUBISHI MOTORS Author-
ized Service Point.
If the ABS warning lamp and brake warning
lamp illuminate at the same time
l The brake force distribution function may
not work, so hard braking could make the ve-
hicle unstable.
Avoid hard braking and high-speed driving.
Stop the vehicle in a safe place and we rec-
ommend you to consult a MITSUBISHI
MOTORS Authorized Service Point.
NOTE l Immediately after the vehicle starts moving
after engine start up, a whining sound of a mo-
tor will be heard from the engine compart-
ment. If the brake pedal is depressed at that
moment, a brake pedal pulsating is felt.
This whining sound and pulsation are due to
the self-diagnosis operation of the ABS and
does not indicate a malfunction.
l After driving on snowy roads, remove any
snow and ice which may have become ad-
hered to the wheel areas.
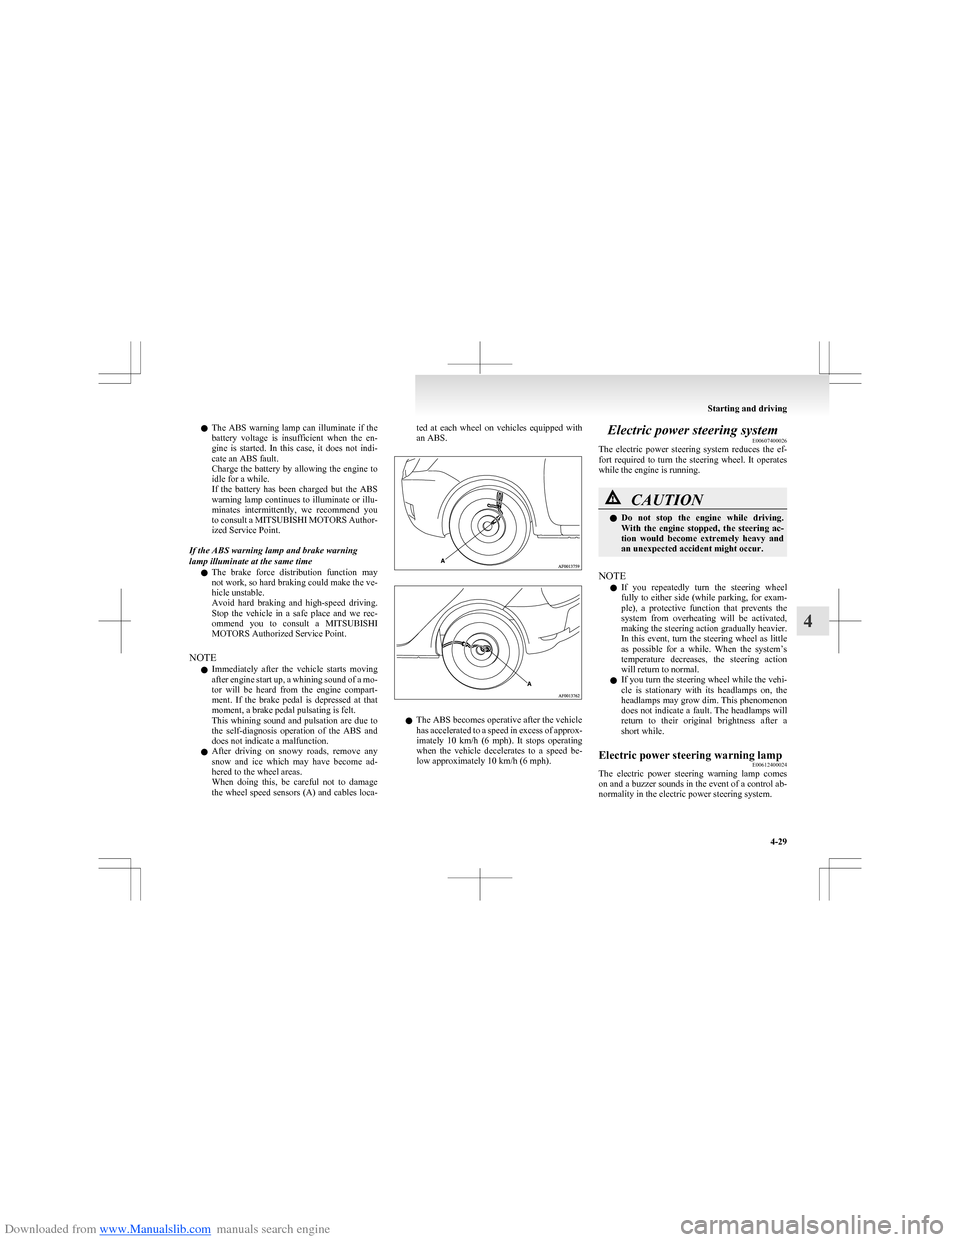
When doing this, be careful not to damage
the wheel speed sensors (A) and cables loca-ted at each wheel on vehicles equipped with
an ABS.
l The ABS becomes operative after the vehicle
has accelerated to a speed in excess of approx-
imately 10 km/h (6 mph). It stops operating
when the vehicle decelerates to a speed be-
low approximately 10 km/h (6 mph).
Electric power steering system E00607400026
The electric power steering system reduces the ef-
fort required to turn the steering wheel. It operates
while the engine is running.CAUTIONl Do not stop the engine while driving.
With the engine stopped, the steering ac-
tion would become extremely heavy and
an unexpected accident might occur.
NOTE
l If you repeatedly turn the steering wheel
fully to either side (while parking, for exam-
ple), a protective function that prevents the
system from overheating will be activated,
making the steering action gradually heavier.
In this event, turn the steering wheel as little
as possible for a while. When the system’s
temperature decreases, the steering action
will return to normal.
l If you turn the steering wheel while the vehi-
cle is stationary with its headlamps on, the
headlamps may grow dim. This phenomenon
does not indicate a fault. The headlamps will
return to their original brightness after a
short while.
Electric power steering warning lamp E00612400024
The electric power steering warning lamp comes
on and a buzzer sounds in the event of a control ab-
normality in the electric power steering system.
Starting and driving
4-29
4
Page 186 of 273
Downloaded from www.Manualslib.com manuals search engine If the vehicle breaks down............................................................ 6-02
Emergency starting ....................................................................... 6-02
Engine overheating ....................................................................... 6-04
Tools, jack and tyre repair kit* ..................................................... 6-06
Jacking up the vehicle...................................................................6-12
Spare wheel*.................................................................................6-13
How to change a tyre .................................................................... 6-15
Towing .......................................................................................... 6-18
Operation under adverse driving conditions .................................6-22For emergencies6
Page 188 of 273
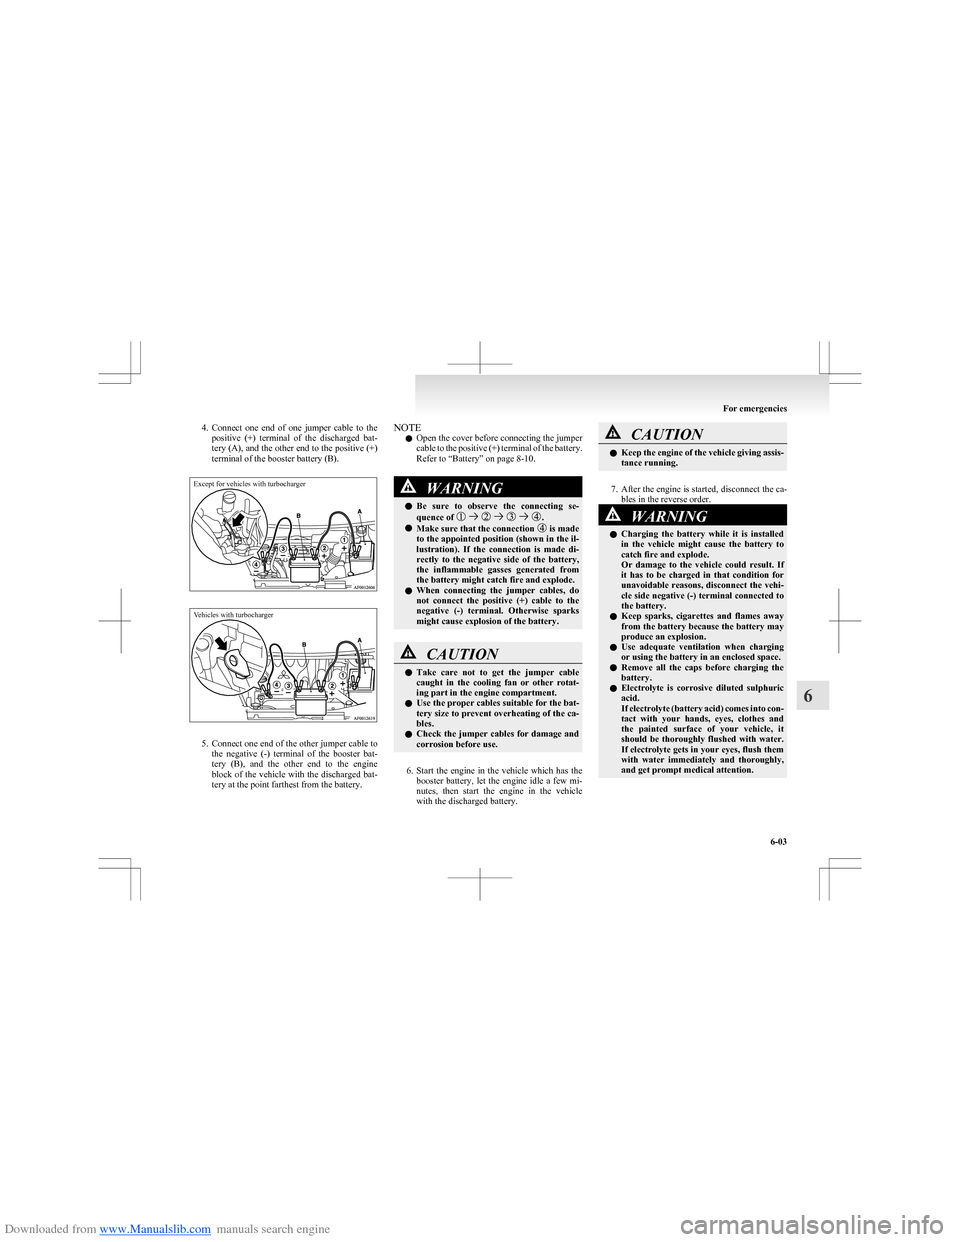
Downloaded from www.Manualslib.com manuals search engine 4.Connect one end of one jumper cable to the
positive (+) terminal of the discharged bat-
tery (A), and the other end to the positive (+)
terminal of the booster battery (B).Except for vehicles with turbochargerVehicles with turbocharger
5. Connect one end of the other jumper cable to
the negative (-) terminal of the booster bat-
tery (B), and the other end to the engine
block of the vehicle with the discharged bat-
tery at the point farthest from the battery.
NOTE
l Open the cover before connecting the jumper
cable to the positive (+) terminal of the battery.
Refer to “Battery” on page 8-10.WARNINGl Be sure to observe the connecting se-
quence of .
l Make sure that the connection is made
to the appointed position (shown in the il-
lustration). If the connection is made di-
rectly to the negative side of the battery,
the inflammable gasses generated from
the battery might catch fire and explode.
l When connecting the jumper cables, do
not connect the positive (+) cable to the
negative (-) terminal. Otherwise sparks
might cause explosion of the battery.
CAUTIONl Take care not to get the jumper cable
caught in the cooling fan or other rotat-
ing part in the engine compartment.
l Use the proper cables suitable for the bat-
tery size to prevent overheating of the ca-
bles.
l Check the jumper cables for damage and
corrosion before use.
6. Start the engine in the vehicle which has the
booster battery, let the engine idle a few mi-
nutes, then start the engine in the vehicle
with the discharged battery.
CAUTIONl Keep the engine of the vehicle giving assis-
tance running.
7. After the engine is started, disconnect the ca-
bles in the reverse order.
8.
WARNINGl Charging the battery while it is installed
in the vehicle might cause the battery to
catch fire and explode.
Or damage to the vehicle could result. If
it has to be charged in that condition for
unavoidable reasons, disconnect the vehi-
cle side negative (-) terminal connected to
the battery.
l Keep sparks, cigarettes and flames away
from the battery because the battery may
produce an explosion.
l Use adequate ventilation when charging
or using the battery in an enclosed space.
l Remove all the caps before charging the
battery.
l Electrolyte is corrosive diluted sulphuric
acid.
If electrolyte (battery acid) comes into con-
tact with your hands, eyes, clothes and
the painted surface of your vehicle, it
should be thoroughly flushed with water.
If electrolyte gets in your eyes, flush them
with water immediately and thoroughly,
and get prompt medical attention.
For emergencies
6-03
6
Page 189 of 273
Downloaded from www.Manualslib.com manuals search engine CAUTIONlDo not attempt to start the engine by pull-
ing or pushing the vehicle.
It could damage your vehicle.
l Always wear protective eye goggles when
working near the battery.
l Keep the battery out of the reach of chil-
dren.
NOTE
l If the vehicle is put in motion without fully
charging the battery, it might cause the loss
of smooth engine operation and the anti-lock
brake warning lamp to illuminate. Refer to
“ Anti-lock brake system (ABS)” on page
4-27.
l For Clear Tec models, press the “Auto Stop
& Go (AS&G) OFF” switch to deactivate the
Auto Stop & Go (AS&G) system and pre-
vent the engine from automatically stopping
before the battery is sufficiently charged. Re-
fer to “To deactivate” on page 4-16.
Engine overheating E00800601839
If the high coolant temperature warning lamp flash-
es during the engine is running, the engine may be
overheating. If this occurs, take the following cor-
rective measures: 1. Stop the vehicle in a safe place.
2. Check whether steam is coming from the en-
gine compartment.
[ If steam does not come from the engine com-
partment]
With the engine still running, raise the bon-
net to ventilate the engine compartment.
NOTE l For Clear Tec models, press the “Auto Stop
& Go (AS&G) OFF” switch to deactivate the
Auto Stop & Go (AS&G) system before stop-
ping the vehicle. Refer to “To deactivate” on
page 4-16.
[If steam is coming from the engine compart-
ment]
Stop the engine, and when the steam stops,
raise the bonnet to ventilate the engine com-
partment. Restart the engine.WARNINGl Do not open the bonnet while steam is com-
ing from the engine compartment. It
could cause steam or hot water to spurt
out, causing burns. Hot water could spurt
out even when there is no steam coming
out, and some parts will be very hot. Be
very careful when opening the bonnet.WARNINGl Be careful of hot steam, which could blow
off the reserve tank cap.
l Do not attempt to remove the radiator
cap while the engine is hot.
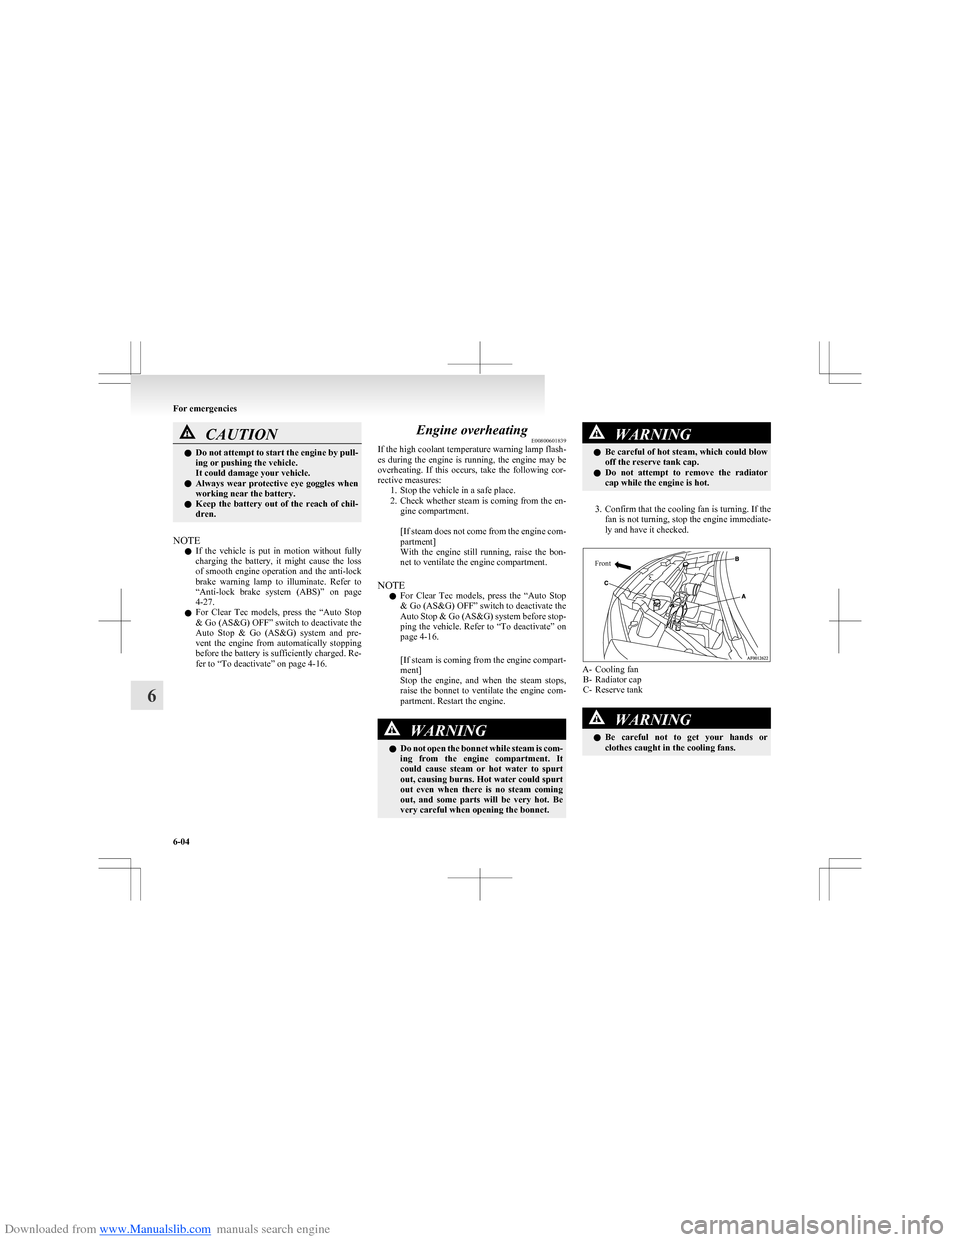
3. Confirm that the cooling fan is turning. If the
fan is not turning, stop the engine immediate-
ly and have it checked.
Front
A- Cooling fan B- Radiator cap
C- Reserve tank
WARNINGl Be careful not to get your hands or
clothes caught in the cooling fans.
For emergencies
6-04
6
Page 207 of 273
Downloaded from www.Manualslib.com manuals search engine Operation under adverse drivingconditions E00801701840
If your vehicle becomes stuck in sand,
mud or snow
If the vehicle becomes stuck in snow, sand, or
mud, it can often be moved by a rocking motion.
For vehicle with manual transmission, move the
gearshift lever alternately between 1 st
and Reverse,
while applying slight pressure to the accelerator ped-
al.
With an automated manual transmission vehicle,
place the allshift lever in the “A” (automatic mode)
position to select automatic mode or select 1 st
or
2 nd
gear in the manual mode or place the allshift lev-
er in the “R” (Reverse) position for reverse. Con-
firm that there is an “A”, “1”, “2” or “R” in the all-
shift indicator display, then gently press the acceler-
ator pedal. Do not press the accelerator pedal while
moving the allshift lever.
Avoid racing the engine or spinning the wheels. Pro-
longed efforts to free a stuck vehicle may result in
overheating and transmission failure. Allow the en-
gine to idle for a few minutes to let the transmis-
sion cool between rocking attempts.
If the vehicle remains stuck after several rocking at-
tempts, seek other assistance.WARNINGl When attempting to rock your vehicle out
of a stuck position, be sure that the area
around the vehicle is clear of people and
physical objects. The rocking motion may
cause the vehicle to suddenly launch for-
ward or backward, causing injury or dam-
age to nearby people or objects.
On a flooded road
l Avoid flooded roads. Water could enter the
brake discs, resulting in temporarily ineffec-
tive brakes. In such cases, lightly depress the
brake pedal to see if the brakes operate prop-
erly. If they do not, lightly depress the pedal
several times while driving in order to dry
the brake pads.
l When driving in rain or on a road with many
puddles a layer of water may form between
the tyres and the road surface.
This reduces a tyre’s frictional resistance on
the road, resulting in loss of steering stability
and braking capability.
To cope with this, observe the following items:
(a)Drive your vehicle at slow speed. (b)Do not drive on worn tyres. Always
maintain the specified tyre inflation
pressures.
On a snow-covered or frozen road
l When driving on a snow-covered or frozen
road, it is recommended that you use snow
tyres or tyre chains.
Refer to the “Snow tyres” and “Tyre chains”
sections.
l Avoid high-speed operation, sudden acceler-
ation, abrupt brake application and sharp cor-
nering.
l Depressing the brake pedal during travel on
snowy or icy roads may cause tyre slippage
and skidding. When traction between the
tyres and the road is reduced the wheels may
skid and the vehicle cannot readily be
brought to a stop by conventional braking
techniques. Braking will differ, depending
upon whether you have anti-lock brake sys-
tem (ABS). As your vehicle is equipped with
anti-lock brake system (ABS), brake by press-
ing the brake pedal hard, and keeping it press-
ed.
l Allow extra distance between your vehicle
and the vehicle in front of you, and avoid sud-
den braking.
On a bumpy or rutted road l Drive as slow as possible when driving on
bumpy or rutted roads.CAUTIONl The impact on tyres and/or wheels when
driving on a bumpy or rutted road can
damage the tyre and/or wheel.
For emergencies
6-22
6
Page 216 of 273
Downloaded from www.Manualslib.com manuals search engine The catalytic converter itself gets hot quickly, and
may be damaged if overheated. The following
points should be noted in order to prevent the igni-
tion of unburned petrol within the catalytic convert-
er.
l Use UNLEADED PETROL ONLY of the
type recommended in “Fuel selection” on
page 02.
l Do not drive with an extremely low fuel lev-
el; running out of fuel could cause damage to
the catalytic converter.
l Do not attempt to start the engine by pushing
the vehicle. If the battery is weak or dis-
charged, use another battery to start the en-
gine.
l Do not idle the engine with any spark plug
wires disconnected or removed such as per-
forming diagnostic tests.
l Do not idle the engine for prolonged periods
during very rough idle or malfunctioning op-
erating conditions.
l Do not race the engine when turning off the
ignition switch. This will cause the catalytic
converter to be damaged due to contact with
unburnt fuel.
l Stop driving the vehicle if you think the per-
formance is noticeably low, or if the engine
has a malfunction such as with the ignition,
etc.
If it is impractical to stop driving immediate-
ly, reduce the speed and drive for only a
short time. We recommend you to have your
vehicle inspected as soon as possible.l In unusual situations involving grossly mal-
functioning engine operation, a burnt smell
may indicate severe and abnormal catalyst
overheating.
If this occurs, the vehicle should be stopped
in a safe place, the engine switched off and
the vehicle allowed to cool. Once the engine
is cool, a service, including a tune-up to man-
ufacturer’s specifications, should be obtained
immediately.Bonnet E01000302470
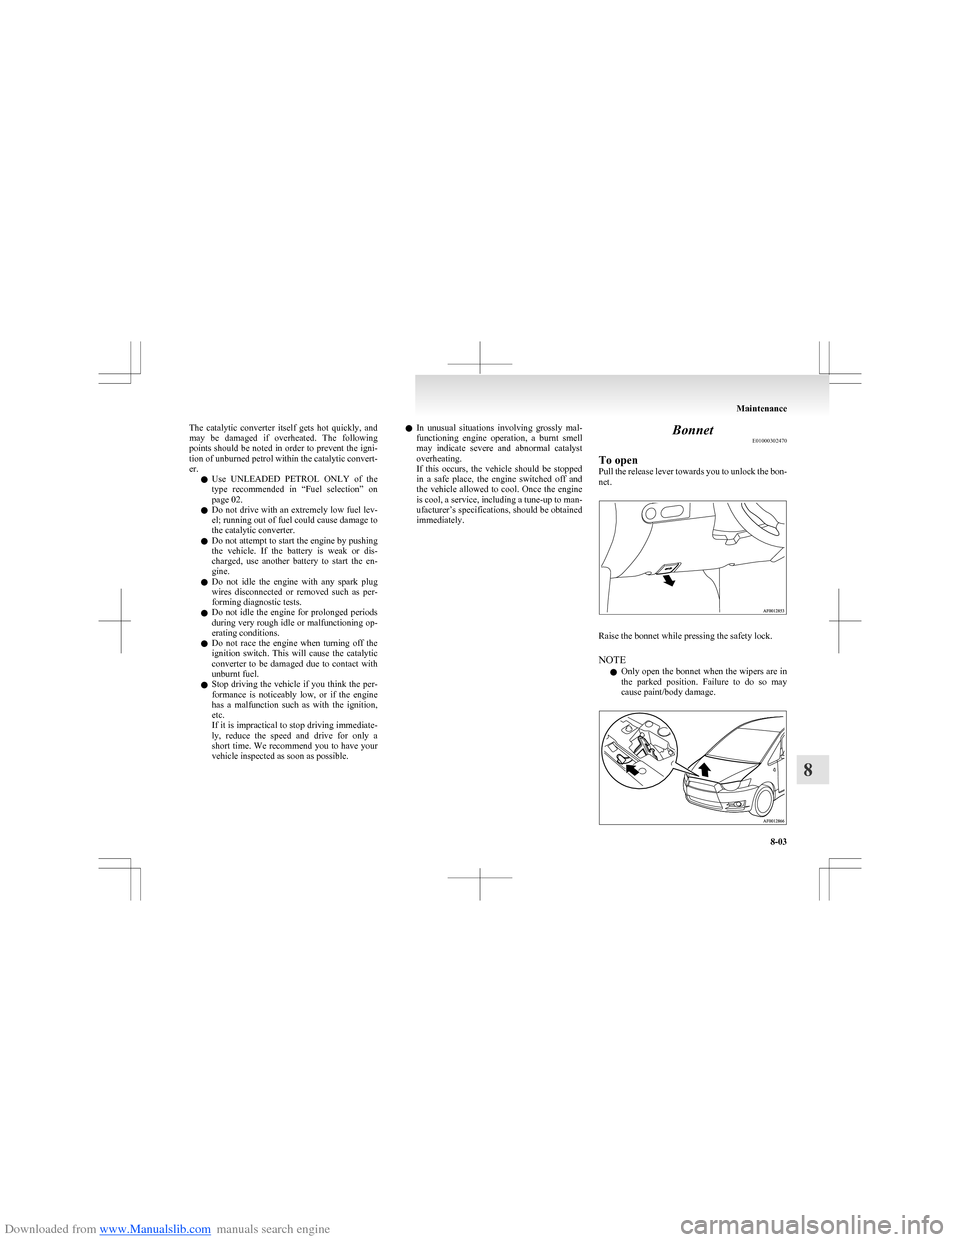
To open
Pull the release lever towards you to unlock the bon-
net.
Raise the bonnet while pressing the safety lock.
NOTE l Only open the bonnet when the wipers are in
the parked position. Failure to do so may
cause paint/body damage.
Maintenance
8-03
8
Page 264 of 273
Downloaded from www.Manualslib.com manuals search engine A
Accessory (Installation) 04
Accessory socket 5-37
Active stability control system (ASC) 4-30 Indication lamp 4-31
Additional equipment 8-18
Air conditioning Automatic air conditioning 5-07
Important operation tips for the air condition-
ing 5-11
Air purifier 5-12
Airbag 2-22
Front passenger’s airbag OFF indication
lamp 2-25
Front passenger’s airbag ON-OFF switch 2-25
Antenna 5-33
Anti-lock brake system (ABS) 4-27 Warning lamp 4-28
Audio Error codes 5-30
Handling of compact discs 5-32
LW/MW/FM electronic tuning radio with CD
player 5-12
Auto Stop & Go (AS&G) system 4-13
Automated manual transmission 4-19 Oil 9-16
Automatic air conditioning 5-07
B
Battery 8-10Charge warning lamp 3-19
Discharged battery (Emergency starting) 6-02
Specification 9-11
Bonnet 8-03
Brake Anti-lock brake 4-27
Brake assist system 4-27
Braking 4-25
Fluid 8-09,9-16
Parking brake 4-06
Parking brake lever stroke 8-16
Pedal free play 8-16
Warning lamp 3-17
Bulb capacity 8-23
C
Capacities 9-16
Cargo loads 4-36
Catalytic converter 8-02
Central door locks 1-07
Changing a fuse 8-21
Charge warning lamp 3-19
Chassis number 9-02
Check engine warning lamp 3-18
Child restraint 2-13
Child-protection rear doors 1-09
Cleaning Exterior of your vehicle 7-03
Genuine leather 7-02
Interior of your vehicle 7-02
Plastic, vinyl leather, etc 7-02
Clock 5-34
Clutch Fluid 8-09
Pedal free play 8-15
Coat hooks 5-43
Combination headlamps and dipper switch 3-20
Coming home light 3-22
Compact spare wheel 6-13
Cool box 5-39
Coolant (engine) 8-07,9-16
Cruise control 4-32
Cup holder 5-42
D
Dead Lock System 1-07
Demister (rear window) 3-29
Digital clock 5-34
Dipper (High/Low beam change) 3-21
Door ajar warning lamp 3-19
Doors Central door locks 1-07
Child-protection 1-09
Dead Lock System 1-07
Lock and unlock 1-05
Driving, alcohol and drugs 4-02
E
Economical driving 4-02
Electric power steering system 4-29
Electric remote-controlled outside rear-view mir-
rors 4-09
Electric window control 1-11
Electrical system 9-11
Electronic immobilizer (Anti-theft starting sys-
tem) 1-02
Emergency starting 6-02
Emergency stop signal system 4-26
Engine
Coolant 8-07,9-16
High coolant temperature warning lamp 3-19
Number 9-03
Oil 8-05
Oil and filter 9-16
Overheating 6-04
Specifications 9-09
Used engine oils safety instructions and disposal
information 05
Error codes 5-30
Exterior and interior lamp operation 8-18
Alphabetical index
1
Page 266 of 273
Downloaded from www.Manualslib.com manuals search engine Modification/alterations to the electrical or fuel sys-
tems 05
Multi-information display 3-04
O
Oil pressure warning lamp 3-19
Oil Automated manual transmission oil 9-16
Engine oil 8-05
Manual transmission oil 9-16
Operation under adverse driving conditions 6-22
Other specifications 9-13
Outside rear-view mirrors 4-08
Electric remote-controlled outside rear-view mir-
rors 4-09
Manual remote-controlled outside rear-view mir-
rors 4-09
Overheating 6-04
P
Parking 4-07Parking brake 4-06
Parking brake lever stroke 8-16
Position lamps Bulb capacity 8-24
Replacement 8-25
Power steering System 4-29
Precautions to observe when using wipers and wash-
ers 3-29
Pregnant women restraint 2-12
Puncture (Tyre changing) 6-15
R
Radio
LW/MW/FM electronic tuning radio with CD
player 5-12
Rain sensor 3-26
Rear combination lamps Bulb capacity 8-24
Replacement 8-27
Rear fog lamp Bulb capacity 8-24
Indication lamp 3-17
Replacement 8-27,8-29
Switch 3-24
Rear shelf panel 5-42
Rear turn-signal lamps Bulb capacity 8-24
Replacement 8-27
Rear window demister switch 3-29
Rear-view mirror Inside 4-08
Outside 4-08
Replacement of lamp bulbs 8-23
Reversing lamps Bulb capacity 8-24
Replacement 8-27,8-29
Room lamp 5-38
Room lamps & map lamps Bulb capacity 8-24
Replacement 8-31
Running-in recommendations 4-04
S
Safe driving techniques 4-03
Seat belt 2-10 Adjustable seat belt anchor 2-11
Child restraint 2-13
Inspection 2-22
Pregnant women restraint 2-12
Pretensioner 2-13
Seat belt reminder/warning lamp 2-11
Seat Adjustment 2-04
Arrangement 2-03
Front seat 2-04
Head restraints 2-06
Heated seats 2-06
Service precaution 8-02
Side turn-signal lamps Bulb capacity 8-24
Replacement 8-26
Snow tyres 8-14
Spare wheel 6-13
Spark plug 9-11
Specifications 9-02
Speedometer 3-03
Starting 4-11
Steering Power steering system 4-29
Steering wheel height adjustment 4-07
Steering wheel lock 4-11
Stop lamps Bulb capacity 8-23
Replacement 8-27
Storage spaces 5-39
Sun visors 5-36
Supplemental restraint system 2-22 Curtain airbag system 2-30
How the Supplemental Restraint System
works 2-25
Servicing 2-34
Side airbag system 2-30
Warning lamp 2-33
T
Tachometer 3-03
Tail lamp Bulb capacity 8-24
Replacement 8-27
Alphabetical index
3