ESP MITSUBISHI iMiEV 2015 (in English) Owner's Guide
[x] Cancel search | Manufacturer: MITSUBISHI, Model Year: 2015, Model line: iMiEV, Model: MITSUBISHI iMiEV 2015Pages: 262, PDF Size: 26.84 MB
Page 211 of 262
Operation under adverse driving conditions 8-14 For emergencies
8
When driving on a road covered with snow or ice, use snow tires. Tire chains cannot be used on your vehicle. There may be state or local regulations aboutusing snow tires. Always check the regu- lations in your local area before using them. Refer to the section entitled “Snowtires” on page 9-15 and “Tire chains” on page 9-16. Drive slowly. Do not make sudden starts or stops, sharp turns, or slam on the brakes. Allow extra distance
between your vehi-
cle and the vehicle in front of you, and avoid sudden braking. If a skid occurs when the accelerator pedal is depressed, take your foot off the pedal. Steer gently in the direction of theskid. Your vehicle is equippe
d with an anti-lock
braking system (ABS), hold the brakepedal down firmly and
keep it depressed.
Do not pump the brake pedal which will result in reduced braking performance. After parking on snowy or icy road, it may be difficult to move your vehicle due to freeze-up of the brake. Depress theaccelerator pedal little by little to move the vehicle after confirming safety of the vehicle.
Drive as slow as possible when driving on bumpy or rutted roads or over potholesetc.
On wet roads
CAUTION Do not drive on a flooded road. If you drive on a flooded road, not only the electric motorunit stops but also a fail
ure like electric leak-
age or short circuit may occur. If you inevitably had to run on a floodedroad and the vehicle was exposed to water, be sure to have your vehicle inspected by a certified i-MiEV dealer. When driving in rain, on water-covered roads, or through a car wash, water could getinto the brake discs and make them fail tem- porarily. In such cases, lightly press the brake pedal to see if they are working prop-erly. If they are not, press the pedal lightly several times while driving to dry the brake pads or linings, then check them again. When driving in rain, a layer of water may form between the tires and the road surface(aquaplaning). This l
oosens your tires’ grip
on the road, making it difficult to steer or brake properly. When driving on a wet road:• Drive your vehicle at a safe speed.• Do not drive on worn tires.• Always keep the tires at the correct infla-tion pressures.
On snowy or icy roads
CAUTION Do not depress the acce
lerator pedal rapidly.
The vehicle could start moving when itbreaks free from the ice, possibly resulting inan accident.
On a bumpy or rutted road
CAUTION Driving on bumpy, rutted roads or over pot- holes can damage the tires and wheels. Wheels with low-profiles tires or under- inflated tires are especially at risk for dam-age. The vehicle’s body, bumper, muffler and other parts may be dama
ged if the vehicle is:
• driven over a step (for example, at the entrance or exit of a parking lot);• parked too closely against a curb or parkingblock, or by the side of a road with curb-stones;• driven on a steep slope.
BK0209800US.book 14 ページ 2014年1月14日 火曜日 午前9時26分
Page 219 of 262
12V starter battery 9-8 Vehicle care and maintenance
9
N00901300054
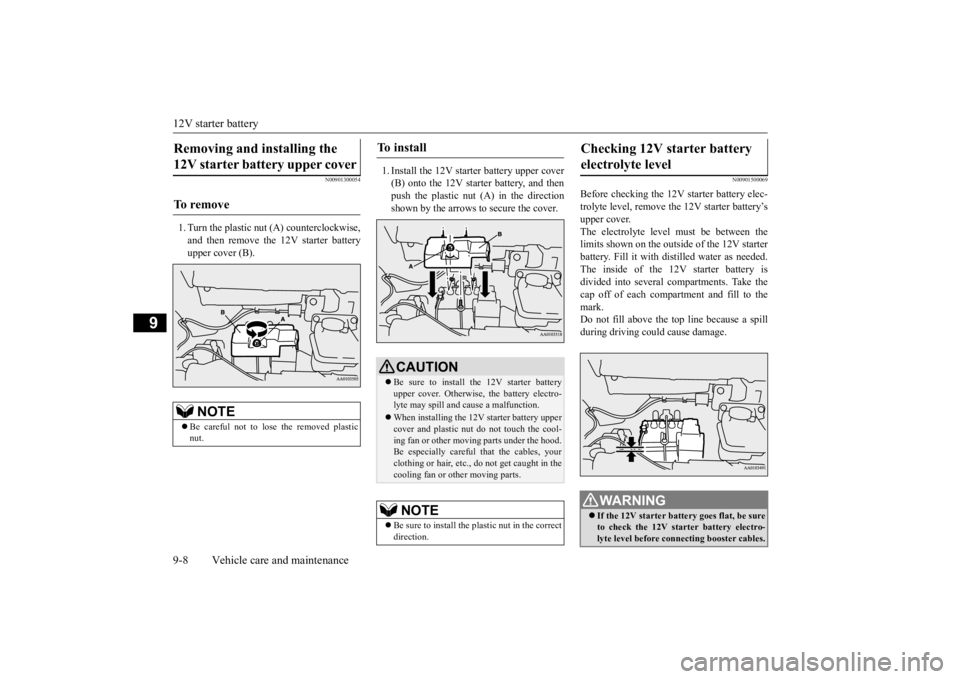
1. Turn the plastic nut (A) counterclockwise, and then remove the 12V starter battery upper cover (B).
1. Install the 12V starter battery upper cover (B) onto the 12V starter battery, and then push the plastic nut (A) in the direction shown by the arrows to secure the cover.
N00901500069
Before checking the 12V starter battery elec-trolyte level, remove th
e 12V starter battery’s
upper cover. The electrolyte level
must be between the
limits shown on the outside of the 12V starterbattery. Fill it with distilled water as needed. The inside of the 12V starter battery is divided into several compartments. Take the cap off of each compartment and fill to the mark.Do not fill above the t
op line because a spill
during driving could cause damage.
Removing and installing the 12V starter battery upper cover To r e m o v e
NOTE
Be careful not to lose the removed plastic nut.
To install
CAUTION Be sure to install the 12V starter battery upper cover. Otherwise,
the battery electro-
lyte may spill and
cause a malfunction.
When installing the 12V
starter battery upper
cover and plastic nut
do not touch the cool-
ing fan or other moving parts under the hood.Be especially carefu
l that the cables, your
clothing or hair, etc.,
do not get caught in the
cooling fan or ot
her moving parts.
NOTE
Be sure to install the plastic nut in the correct direction.
Checking 12V starter battery electrolyte level
WA R N I N G If the 12V starter battery goes flat, be sure to check the 12V star
ter battery electro-
lyte level before connecting booster cables.
BK0209800US.book 8 ページ 2014年1月14日 火曜日 午前9時26分
Page 220 of 262
12V starter battery
Vehicle care and maintenance 9-9
9
N00901600057
The 12V starter battery is weaker in cold tem- peratures. This has to do with its chemicaland physical propertie
s and is why a very
cold 12V starter battery, especially one with a
low charge, will have a hard time starting your vehicle.It is recommended that you have your 12V starter battery and charging system checked by a certified i-MiEV dealer before the startof cold weather. If necessary, have it charged. This will guarantee more reliable starting, and longer 12V starter battery life.
N00901701114
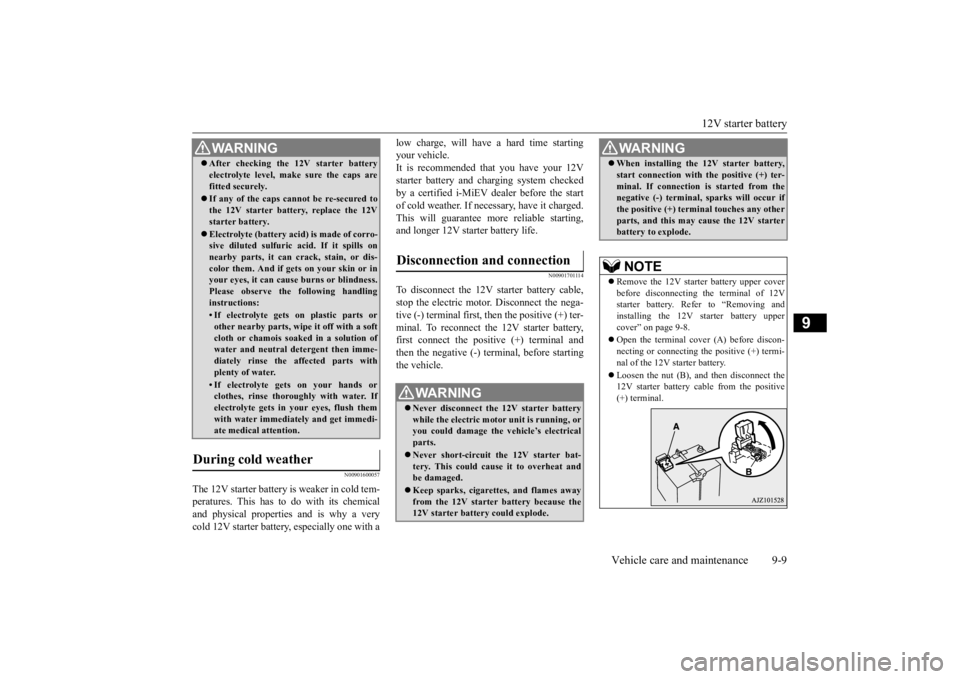
To disconnect the 12V starter battery cable,stop the electric motor.
Disconnect the nega-
tive (-) terminal first, then the positive (+) ter- minal. To reconnect th
e 12V starter battery,
first connect the positi
ve (+) terminal and
then the negative (-) terminal, before starting the vehicle.
After checking the 12V starter battery electrolyte level, make sure the caps arefitted securely. If any of the caps cannot be re-secured to the 12V starter battery, replace the 12Vstarter battery. Electrolyte (battery acid) is made of corro- sive diluted sulfuric acid. If it spills on nearby parts, it can crack, stain, or dis- color them. And if gets on your skin or inyour eyes, it can cause burns or blindness. Please observe the following handling instructions:• If electrolyte gets on plastic parts orother nearby parts, wi
pe it off with a soft
cloth or chamois soak
ed in a solution of
water and neutral detergent then imme- diately rinse the affected parts withplenty of water.• If electrolyte gets on your hands orclothes, rinse thoroughly with water. If electrolyte gets in your eyes, flush them with water immediat
ely and get immedi-
ate medical attention.
During cold weather
WA R N I N G
Disconnection and connection
WA R N I N G Never disconnect the
12V starter battery
while the electric motor unit is running, or you could damage the
vehicle’s electrical
parts. Never short-circuit
the 12V starter bat-
tery. This could cause it to overheat and be damaged. Keep sparks, cigarette
s, and flames away
from the 12V starter battery because the 12V starter battery could explode.
When installing the
12V starter battery,
start connection with the positive (+) ter-minal. If connection is started from thenegative (-) terminal,
sparks will occur if
the positive (+) termin
al touches any other
parts, and this may cause the 12V starterbattery to explode.NOTE
Remove the 12V starte
r battery upper cover
before disconnecting the terminal of 12V starter battery. Refer to “Removing and installing the 12V st
arter battery upper
cover” on page 9-8. Open the terminal cover (A) before discon- necting or connecting the positive (+) termi- nal of the 12V
starter battery.
Loosen the nut (B), and then disconnect the 12V starter batt
ery cable from the positive
(+) terminal.WA R N I N G
BK0209800US.book 9 ページ 2014年1月14日 火曜日 午前9時26分
Page 225 of 262
Tires 9-14 Vehicle care and maintenance
9
Safety Too little pressure increases flexing in thetire and can cause tire failure. Too much pressure can cause a tire to lose its ability to cushion shock. Objects on the road andpotholes could then cause tire damage that may result in tire failure. Economy The wrong tire pressure can cause uneven wear patterns in the tire tread. These abnormal wear patterns will reduce the tread life, and the tire will have to be replaced sooner.Too little pressure also makes it harder for the tire to roll, and this uses up more power. Ride comfort and vehicle stability The superior riding
experience built into
your vehicle partly depends on the correcttire pressure. Too mu
ch pressure gives an
uncomfortable and ja
rring ride. Too little
pressure feels as if your vehicle is slow torespond. Unequal tire pressures can make steering your vehicle uneven and unpredictable.
The correct tire pressure for your vehicle is listed on the placard attached to the sill of the driver’s door. (Refer to “Tire and loading information plac-ard” on page 11-3.)
The recommended inflation pressures should be used for the tires listed below. Tire pressures should be checked, and adjusted if necessary, at least once a month. Pressures should be checked more often whenever weather temperatures changeseverely, becaus
e tire pressures change with
outdoor temperatures. The pressures listed on the placard are always
“cold inflation pres-
sure”. Cold inflation pressure is measured after the vehicle has been parked
for at least three
hours or is driven less than 1 mile (1.6 km) after having been parked for three hours. Cold inflation pressure must not go above themaximum values molded into the tire side- wall. After driving se
veral miles, your tire
inflation pressure may increase 14 to 41 KPA,2 to 6 PSI from the cold inflation pressure. Do not let air out of the tires to get back to the specified cold pressure, or your tire pressurewill be too low. You should also take the following safety pre- cautions:
Keep your tires inflated to the recom- mended pressures. (See the tire and load-ing information placard attached to the sill of the driver’s door.) Stay within the recommended load limits. Make sure that the weight of any load in your vehicle is evenly distributed. Drive at safe speeds. After filling your tires to the correct pres- sure, check them for damage and air leaks. Be sure to reinstall the caps on the valve stems.
N00939600427
Tire size
Front
Rear
145/65R15
72H
250 KPA, 36 PSI
—
175/60R15
81H
—
250 KPA, 36 PSI
Replacing tires and wheels
CAUTION Avoid using different size tires and wheels from the ones listed, and avoid the combined use of different types
of tires and wheels.
Using different size or
type tires and wheels
may affect driving safety. Refer to “Tires and wheels” on page 11-5. Even if a wheel has the same rim size and offset as the specifie
d type of wheel, its
shape may prevent it
from being fitted cor-
rectly. Consult a certified i-MiEV dealer before
using wheels that you
have.
BK0209800US.book 14 ページ 2014年1月14日 火曜日 午前9時26分
Page 231 of 262
Fuses 9-20 Vehicle care and maintenance
9
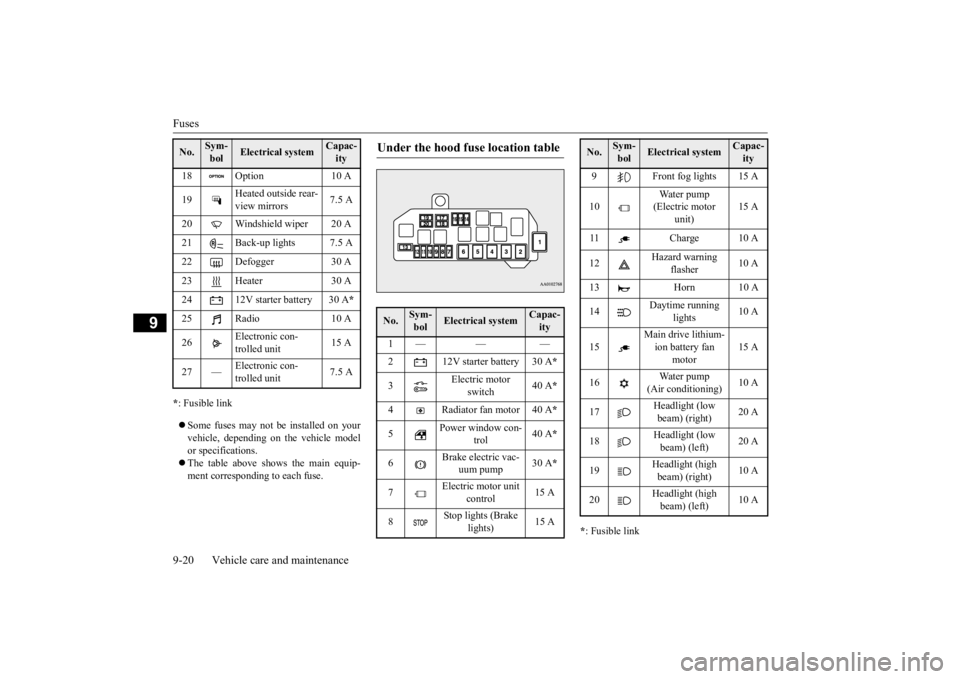
* : Fusible link Some fuses may not be installed on your vehicle, depending on the vehicle model or specifications. The table above shows the main equip- ment corresponding to each fuse.
* : Fusible link
18 Option 10 A 19
Heated outside rear- view mirrors
7.5 A
20 Windshield wiper 20 A 21 Back-up lights 7.5 A 22 Defogger 30 A23 Heater 30 A24 12V starter battery 30 A
*
25 Radio 10 A 26
Electronic con- trolled unit
15 A
27 —
Electronic con- trolled unit
7.5 A
No.
Sym- bol
Electrical system
Capac-ity
Under the hood fuse location table No.
Sym- bol
Electrical system
Capac-ity
1— — — 2 12V starter battery 30 A
*
3
Electric motor
switch
40 A
*
4 Radiator fan motor 40 A
*
5
Power window con-
trol
40 A
*
6
Brake electric vac-
uum pump
30 A
*
7
Electric motor unit
control
15 A
8
Stop lights (Brake
lights)
15 A
9 Front fog lights 15 A 10
Water pump (Electric motor
unit)
15 A
11 Charge 10 A 12
Hazard warning
flasher
10 A
13 Horn 10 A 14
Daytime running
lights
10 A
15
Main drive lithium- ion battery fan
motor
15 A
16
Water pump
(Air conditioning)
10 A
17
Headlight (low beam) (right)
20 A
18
Headlight (low beam) (left)
20 A
19
Headlight (high beam) (right)
10 A
20
Headlight (high beam) (left)
10 A
No.
Sym- bol
Electrical system
Capac-ity
BK0209800US.book 20 ページ 2014年1月14日 火曜日 午前9時26分
Page 232 of 262
Fuses
Vehicle care and maintenance 9-21
9
Some fuses may not be installed on your vehicle, depending on
the vehicle model
or specifications. The table above show
s the main equip-
ment corresponding to each fuse.
N00901100078 N00954900115
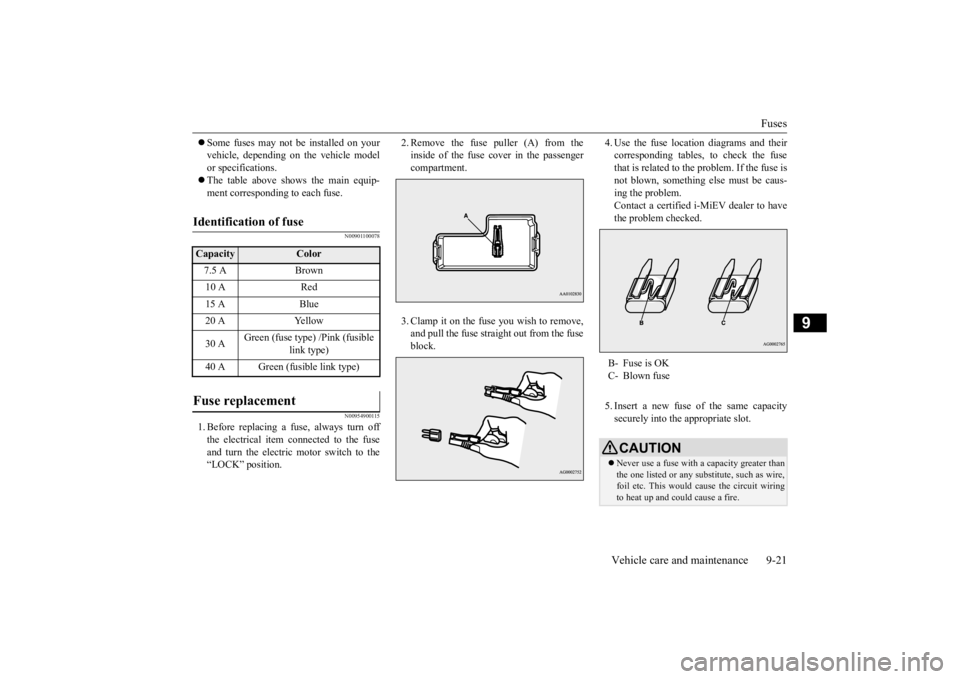
1. Before replacing a fuse, always turn off the electrical item connected to the fuse and turn the electric motor switch to the “LOCK” position.
2. Remove the fuse puller (A) from the inside of the fuse cover in the passengercompartment. 3. Clamp it on the fuse you wish to remove, and pull the fuse straight out from the fuseblock.
4. Use the fuse location diagrams and their corresponding tables, to check the fusethat is related to the problem. If the fuse is not blown, something
else must be caus-
ing the problem.Contact a certified i-
MiEV dealer to have
the problem checked. 5. Insert a new fuse of the same capacity securely into the appropriate slot.
Identification of fuse Capacity
Color
7.5 A Brown 10 A Red 15 A Blue 20 A Yellow 30 A
Green (fuse type) /Pink (fusible
link type)
40 A Green (fusible link type)
Fuse replacement
B- Fuse is OK C- Blown fuseCAUTION Never use a fuse with a capacity greater than the one listed or any substitute, such as wire,foil etc. This would
cause the circuit wiring
to heat up and could cause a fire.
BK0209800US.book 21 ページ 2014年1月14日 火曜日 午前9時26分