engine MITSUBISHI L200 2015 (in English) Manual PDF
[x] Cancel search | Manufacturer: MITSUBISHI, Model Year: 2015, Model line: L200, Model: MITSUBISHI L200 2015Pages: 418, PDF Size: 25.8 MB
Page 313 of 418
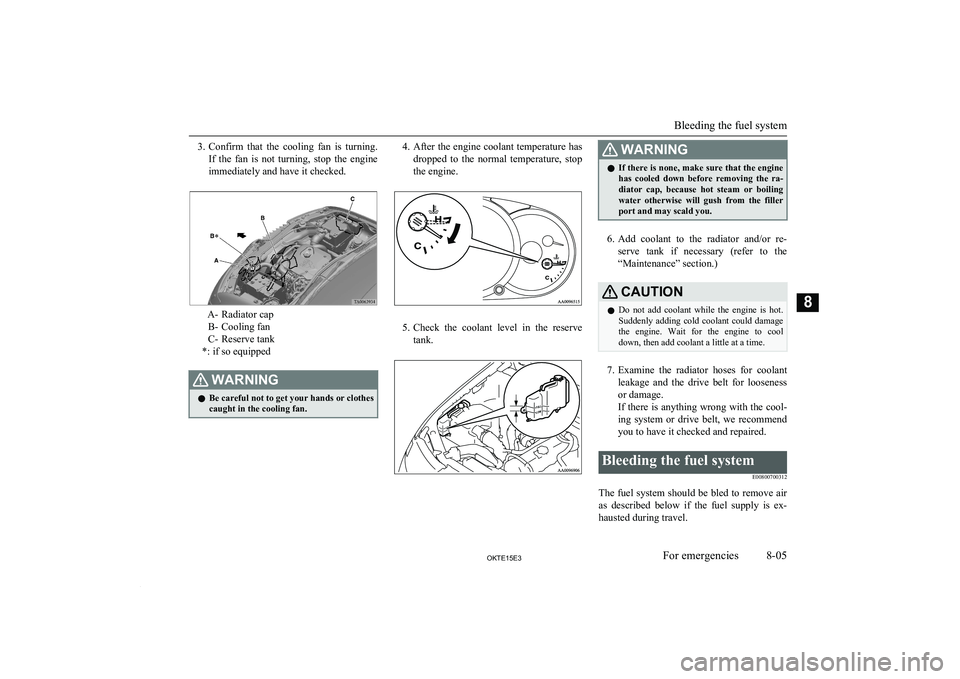
3.Confirm that the cooling fan is turning.
If the fan is not turning, stop the engine
immediately and have it checked.
A- Radiator cap B- Cooling fan
C- Reserve tank
*: if so equipped
WARNINGl Be careful not to get your hands or clothes
caught in the cooling fan.4. After the engine coolant temperature has
dropped to the normal temperature, stop the engine.
5. Check the coolant level in the reserve
tank.
WARNINGl If there is none, make sure that the engine
has cooled down before removing the ra-
diator cap, because hot steam or boiling water otherwise will gush from the fillerport and may scald you.
6. Add coolant to the radiator and/or re-
serve tank if necessary (refer to the
“Maintenance” section.)
CAUTIONl Do not add coolant while the engine is hot.
Suddenly adding cold coolant could damage
the engine. Wait for the engine to cool
down, then add coolant a little at a time.
7. Examine the radiator hoses for coolant
leakage and the drive belt for looseness
or damage.
If there is anything wrong with the cool-
ing system or drive belt, we recommend
you to have it checked and repaired.
Bleeding the fuel system
E00800700312
The fuel system should be bled to remove air
as described below if the fuel supply is ex- hausted during travel.
Bleeding the fuel system
8-05OKTE15E3For emergencies8
Page 314 of 418
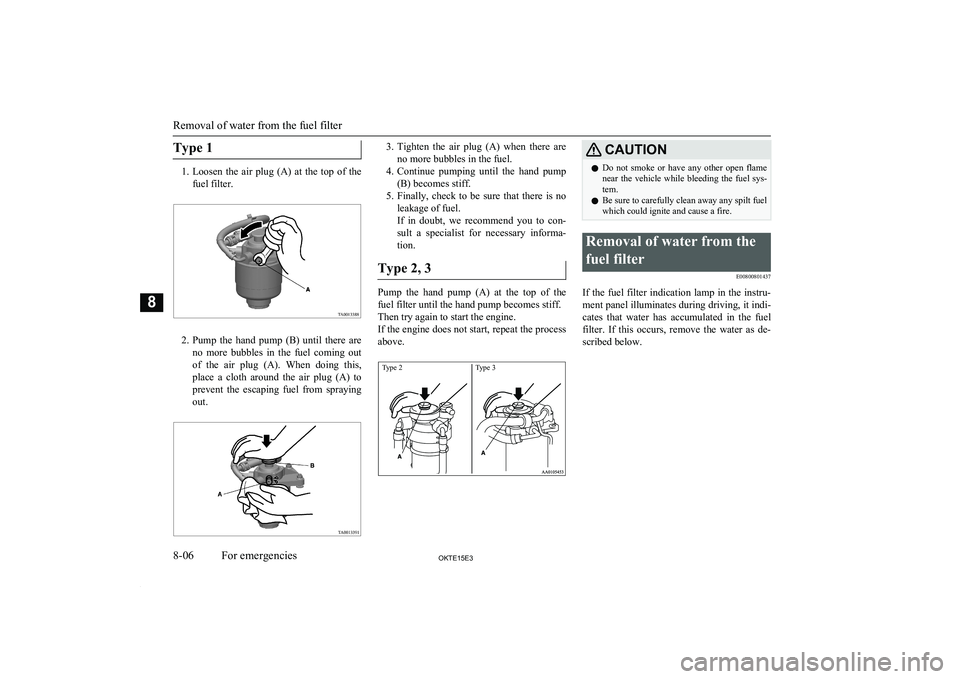
Type 1
1.Loosen the air plug (A) at the top of the
fuel filter.
2. Pump the hand pump (B) until there are
no more bubbles in the fuel coming out
of the air plug (A). When doing this, place a cloth around the air plug (A) toprevent the escaping fuel from spraying
out.
3. Tighten the air plug (A) when there are
no more bubbles in the fuel.
4. Continue pumping until the hand pump
(B) becomes stiff.
5. Finally, check to be sure that there is no
leakage of fuel.
If in doubt, we recommend you to con-
sult a specialist for necessary informa- tion.
Type 2, 3
Pump the hand pump (A) at the top of the fuel filter until the hand pump becomes stiff.Then try again to start the engine.
If the engine does not start, repeat the process
above.
Type 2Type 3
CAUTIONl Do not smoke or have any other open flame
near the vehicle while bleeding the fuel sys-
tem.
l Be sure to carefully clean away any spilt fuel
which could ignite and cause a fire.Removal of water from the
fuel filter E00800801437
If the fuel filter indication lamp in the instru-ment panel illuminates during driving, it indi-
cates that water has accumulated in the fuel filter. If this occurs, remove the water as de-
scribed below.
Removal of water from the fuel filter
8-06OKTE15E3For emergencies8
Page 315 of 418
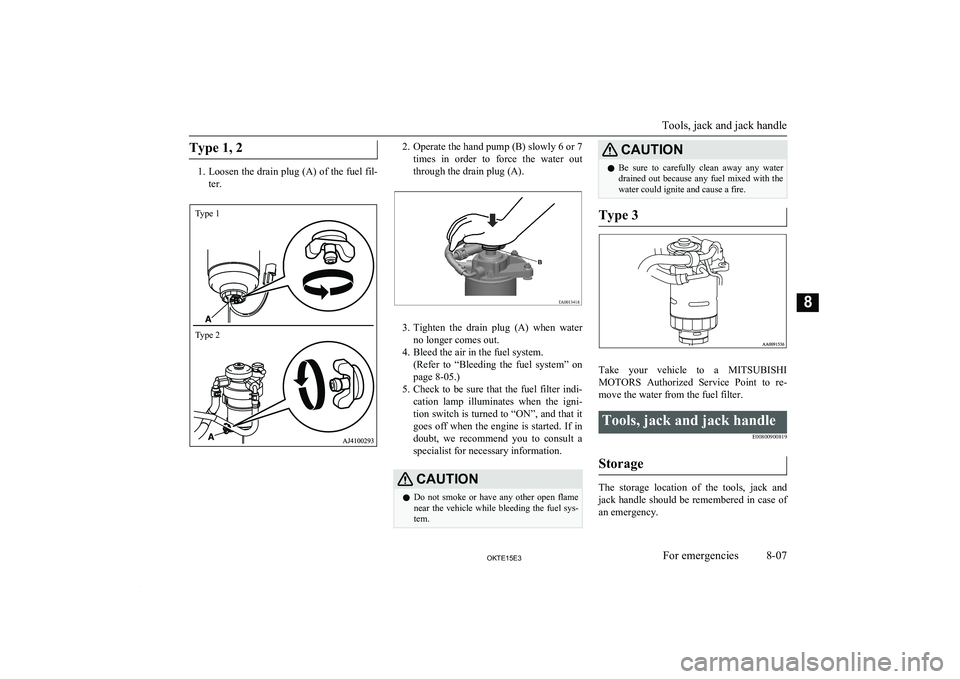
Type 1, 2
1.Loosen the drain plug (A) of the fuel fil-
ter.
2. Operate the hand pump (B) slowly 6 or 7
times in order to force the water out
through the drain plug (A).
3. Tighten the drain plug (A) when water
no longer comes out.
4. Bleed the air in the fuel system. (Refer to “Bleeding the fuel system” onpage 8-05.)
5. Check to be sure that the fuel filter indi-
cation lamp illuminates when the igni- tion switch is turned to “ON”, and that it
goes off when the engine is started. If in
doubt, we recommend you to consult a specialist for necessary information.
CAUTIONl Do not smoke or have any other open flame
near the vehicle while bleeding the fuel sys- tem.CAUTIONl Be sure to carefully clean away any water
drained out because any fuel mixed with the
water could ignite and cause a fire.
Type 3
Take your vehicle to a MITSUBISHI
MOTORS Authorized Service Point to re-
move the water from the fuel filter.
Tools, jack and jack handle
E00800900819
Storage
The storage location of the tools, jack andjack handle should be remembered in case ofan emergency.
Tools, jack and jack handle
8-07OKTE15E3For emergencies8Type 1
Type 2
Page 324 of 418
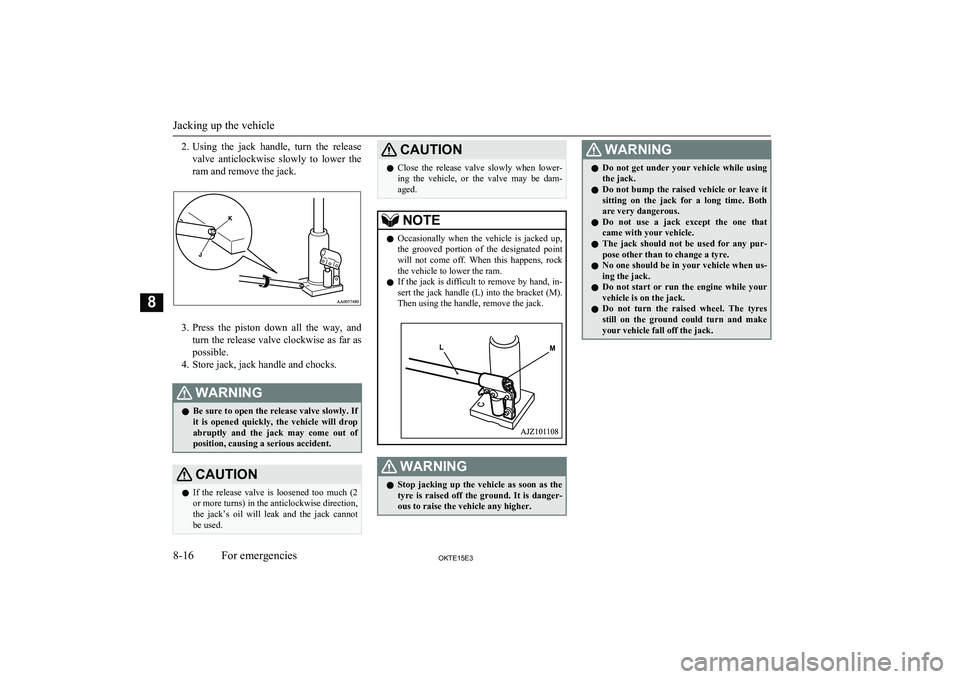
2.Using the jack handle, turn the release
valve anticlockwise slowly to lower theram and remove the jack.
3. Press the piston down all the way, and
turn the release valve clockwise as far as possible.
4. Store jack, jack handle and chocks.
WARNINGl Be sure to open the release valve slowly. If
it is opened quickly, the vehicle will drop
abruptly and the jack may come out of position, causing a serious accident.CAUTIONl If the release valve is loosened too much (2
or more turns) in the anticlockwise direction, the jack’s oil will leak and the jack cannot
be used.CAUTIONl Close the release valve slowly when lower-
ing the vehicle, or the valve may be dam-
aged.NOTEl Occasionally when the vehicle is jacked up,
the grooved portion of the designated pointwill not come off. When this happens, rock
the vehicle to lower the ram.
l If the jack is difficult to remove by hand, in-
sert the jack handle (L) into the bracket (M).
Then using the handle, remove the jack.WARNINGl Stop jacking up the vehicle as soon as the
tyre is raised off the ground. It is danger-
ous to raise the vehicle any higher.WARNINGl Do not get under your vehicle while using
the jack.
l Do not bump the raised vehicle or leave it
sitting on the jack for a long time. Both
are very dangerous.
l Do not use a jack except the one that
came with your vehicle.
l The jack should not be used for any pur-
pose other than to change a tyre.
l No one should be in your vehicle when us-
ing the jack.
l Do not start or run the engine while your
vehicle is on the jack.
l Do not turn the raised wheel. The tyres
still on the ground could turn and make your vehicle fall off the jack.
Jacking up the vehicle
8-16OKTE15E3For emergencies8
Page 330 of 418
CAUTIONlDo not mix one type of tyre with another or
use a different size from the one listed. This
would cause early wear and poor handling.Towing
E00801505107
If your vehicle needs to be tow-
ed
If towing is necessary, we recommend you to have it done by your MITSUBISHI
MOTORS Authorized Service Point or a
commercial tow truck service.
In the following cases, transport the vehicle
using a tow truck.
l The engine runs but the vehicle does not
move or abnormal noise is produced.
l Inspection of the vehicle’s underside re-
veals that oil or some other fluid is leak- ing.
If a wheel gets stuck in a ditch, do not try to tow the vehicle. Please contact your
MITSUBISHI MOTORS Authorized Service
Point or a commercial tow truck service for assistance.
Only when you cannot receive a towing serv-
ice from a MITSUBISHI MOTORS Author-
ized Service Point or commercial tow truck
service, tow your vehicle carefully in accord- ance with the instructions given in “Emer-gency towing” in this part.
The regulations concerning towing may dif-
fer from country to country. It is recommen-
ded that you obey the regulations of the area where you are driving your vehicle.Towing the vehicle by a tow
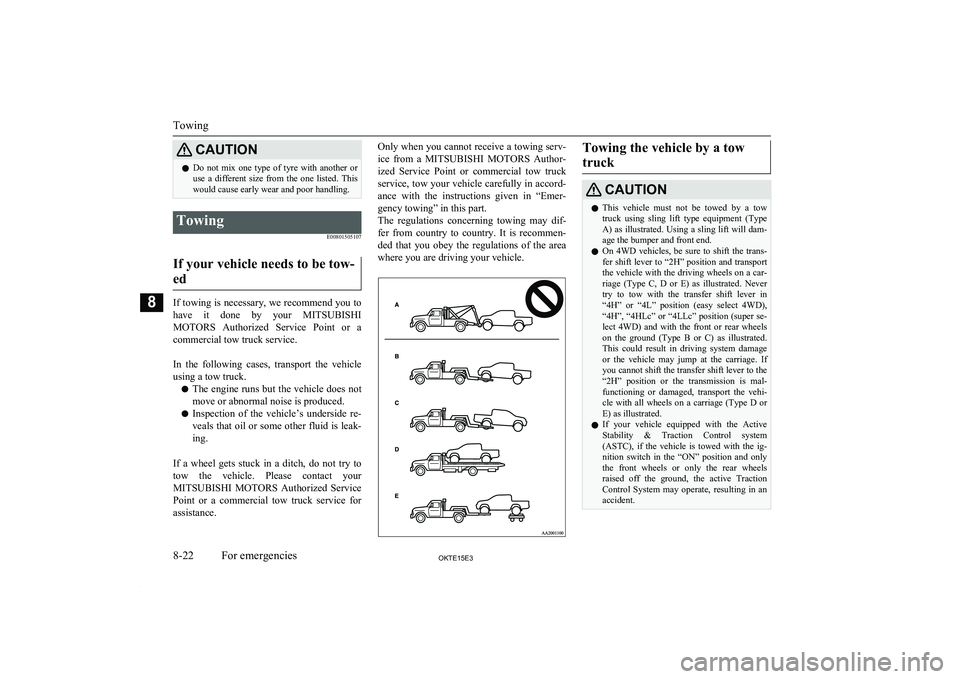
truckCAUTIONl This vehicle must not be towed by a tow
truck using sling lift type equipment (Type A) as illustrated. Using a sling lift will dam-age the bumper and front end.
l On 4WD vehicles, be sure to shift the trans-
fer shift lever to “2H” position and transport
the vehicle with the driving wheels on a car- riage (Type C, D or E) as illustrated. Never
try to tow with the transfer shift lever in
“4H” or “4L” position (easy select 4WD),
“4H”, “4HLc” or “4LLc” position (super se- lect 4WD) and with the front or rear wheels
on the ground (Type B or C) as illustrated.
This could result in driving system damage or the vehicle may jump at the carriage. If you cannot shift the transfer shift lever to the “2H” position or the transmission is mal-
functioning or damaged, transport the vehi- cle with all wheels on a carriage (Type D or E) as illustrated.
l If your vehicle equipped with the Active
Stability & Traction Control system
(ASTC), if the vehicle is towed with the ig-
nition switch in the “ON” position and only the front wheels or only the rear wheels
raised off the ground, the active Traction Control System may operate, resulting in an
accident.
Towing
8-22OKTE15E3For emergencies8
Page 332 of 418
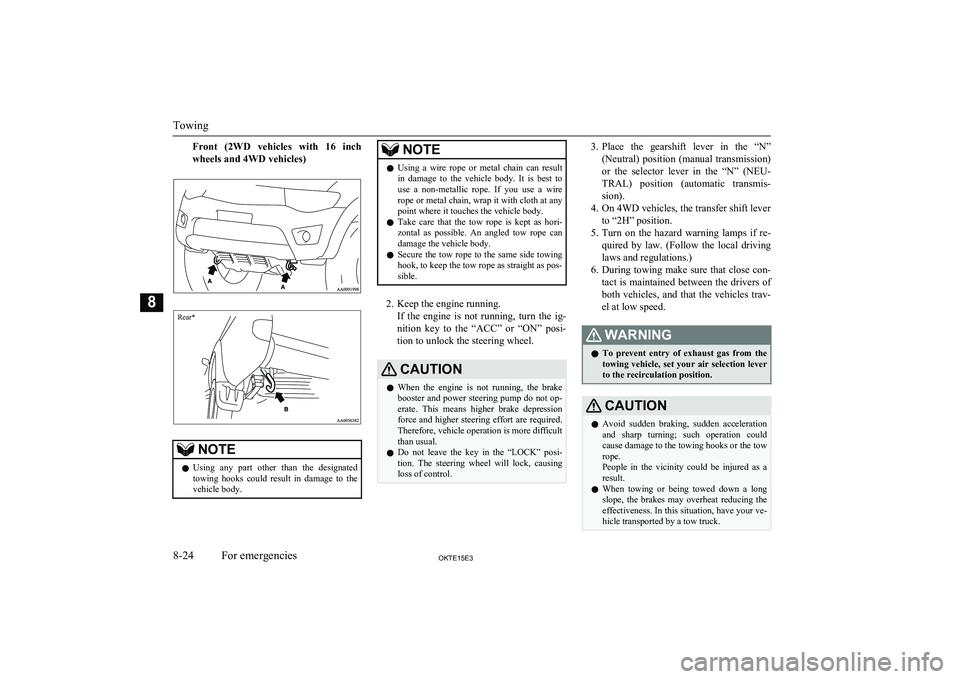
Front (2WD vehicles with 16 inchwheels and 4WD vehicles)Rear*
NOTEl Using any part other than the designated
towing hooks could result in damage to the
vehicle body.NOTEl Using a wire rope or metal chain can result
in damage to the vehicle body. It is best to use a non-metallic rope. If you use a wire
rope or metal chain, wrap it with cloth at any
point where it touches the vehicle body.
l Take care that the tow rope is kept as hori-
zontal as possible. An angled tow rope can
damage the vehicle body.
l Secure the tow rope to the same side towing
hook, to keep the tow rope as straight as pos-
sible.
2. Keep the engine running.
If the engine is not running, turn the ig-
nition key to the “ACC” or “ON” posi- tion to unlock the steering wheel.
CAUTIONl When the engine is not running, the brake
booster and power steering pump do not op- erate. This means higher brake depression
force and higher steering effort are required.
Therefore, vehicle operation is more difficult than usual.
l Do not leave the key in the “LOCK” posi-
tion. The steering wheel will lock, causing loss of control.3. Place the gearshift lever in the “N”
(Neutral) position (manual transmission) or the selector lever in the “N” (NEU-
TRAL) position (automatic transmis-
sion).
4. On 4WD vehicles, the transfer shift lever to “2H” position.
5. Turn on the hazard warning lamps if re-
quired by law. (Follow the local driving laws and regulations.)
6. During towing make sure that close con-
tact is maintained between the drivers of both vehicles, and that the vehicles trav-
el at low speed.WARNINGl To prevent entry of exhaust gas from the
towing vehicle, set your air selection lever to the recirculation position.CAUTIONl Avoid sudden braking, sudden acceleration
and sharp turning; such operation could
cause damage to the towing hooks or the tow
rope.
People in the vicinity could be injured as a
result.
l When towing or being towed down a long
slope, the brakes may overheat reducing the effectiveness. In this situation, have your ve-hicle transported by a tow truck.
Towing
8-24OKTE15E3For emergencies8
Page 334 of 418
Avoid racing the engine or spinning thewheels. Prolonged efforts to free a stuck ve-
hicle may result in overheating and transmis- sion failure. Allow the engine to idle for a
few minutes to let the transmission cool be-
tween rocking attempts.
If the vehicle remains stuck after several rocking attempts, seek other assistance.WARNINGl When attempting to rock your vehicle out
of a stuck position, be sure that the area
around the vehicle is clear of people and
physical objects. The rocking motion may cause the vehicle to suddenly launch for-ward or backward, causing injury or
damage to nearby people or objects.
On 2WD vehicles, it is recommended to start
the vehicle with parking brake partially, but
not completely, applied by slightly pulling the parking brake lever.
After the vehicle has become free, do not for-
get to release the parking brake.
NOTEl Depress the accelerator pedal gradually
when starting the vehicle.On a flooded road
l Avoid flooded roads. Water could enter
the brake discs, resulting in temporarily
ineffective brakes. In such cases, lightly
depress the brake pedal to see if the brakes operate properly. If they do not,
lightly depress the pedal several times while driving in order to dry the brake
pads.
l When driving in rain or on a road with
many puddles a layer of water may form between the tyres and the road surface.
This reduces a tyre’s frictional resistance
on the road, resulting in loss of steering stability and braking capability.
To cope with this, observe the following
items:
(a)Drive your vehicle at slow speed. (b)Do not drive on worn tyres. Al-
ways maintain the specified tyre
inflation pressures.On a snow-covered or frozen
road
l When driving on a snow-covered or fro-
zen road, it is recommended that you use snow tyres or tyre chains.
Refer to the “Snow tyres” and “Tyre
chains” sections.
l Avoid high-speed operation, sudden ac-
celeration, abrupt brake application and
sharp cornering.
l Depressing the brake pedal during travel
on snowy or icy roads may cause tyre
slippage and skidding. When traction be-
tween the tyres and the road is reduced the wheels may skid and the vehicle can-
not readily be brought to a stop by con- ventional braking techniques. Brakingwill differ, depending upon whether you
have anti-lock brake system (ABS). If you do have ABS, brake by pressing the brake system pedal hard, and keeping it
pressed. If you do not have ABS, pump
the brake pedal with short rapid jabs, each time fully applying and fully re-
leasing for greatest effect.
l Allow extra distance between your vehi-
cle and the vehicle in front of you, and avoid sudden braking.
Operation under adverse driving conditions
8-26OKTE15E3For emergencies8
Page 339 of 418
2.Clean the carpeting with a vacuum
cleaner and remove any stains with car- pet cleaner. Oil and grease can be re- moved by lightly dabbing with a cleancolourfast cloth and stain remover.Genuine leather*
E00900600817
1. Gently wipe off with gauze or other soft
cloth soaked with a 5 % aqueous solu-tion of neutral detergent.
2. Dip cloth in fresh water and wring it out
well. Using this cloth, wipe off the deter-
gent thoroughly.
3. Apply leather protecting agent to the
genuine leather surface.
NOTEl If genuine leather is wet with water or is
washed in water, wipe off water as quickly
as possible with a dry, soft cloth. If left damp, mildew may grow.
l The genuine leather surface may be dam-
aged if a nylon brush or synthetic fibre is
rubbed hard against it.
l Organic solvents such as benzine, kerosene,
alcohol and petrol, acid or alkaline solvents
may discolour the genuine leather surface. Be sure to use neutral detergents.
l Remove dirty patches or oil substances
quickly as they can stain genuine leather.NOTEl The genuine leather surface may harden and
shrink if it is exposed to direct sun for long
hours. When your vehicle is parked, place it in the shade as much as possible.
l When the temperature of the vehicle interior
rises in summer, vinyl products left on the
genuine leather seat may deteriorate and stick to the seat.Cleaning the exterior of
your vehicle E00900700010
If the following is left on your vehicle, it maycause corrosion, discolouration and stains, wash the vehicle as soon as possible.
l Seawater, anti-freeze for road use.
l Soot and dust, iron powder from facto-
ries, chemical substance (acids, alkalis,
coal-tar, etc.).
l Droppings from birds, carcasses of in-
sects, tree sap, etc.
Washing
E00900902016
Chemicals contained in the dirt and dust
picked up from the road surface can damagethe paint coat and body of your vehicle if left
in prolonged contact.
Frequent washing and waxing is the best way
to protect your vehicle from this damage.
This will also be effective in protecting it from environmental elements such as rain,snow, salt air, etc.
Do not wash the vehicle in direct sunlight.
Park the vehicle in the shade and spray it
with water to remove dust. Next, using an ample amount of clean water and a car wash- ing brush or sponge, wash the vehicle from
top to bottom.
Use a mild car washing soap if necessary.
Rinse thoroughly and wipe dry with a soft
cloth. After washing the vehicle, carefully clean the joints and flanges of the doors, bon-
net, etc., where dirt is likely to remain.CAUTIONl When washing the under side of your vehi-
cle or wheel, be careful not to injure your
hands.
l Refrain from using a car wash as its brushes
may scratch the paint surface, causing it to
lose its gloss.
Scratches will be especially visible on darker
coloured vehicles.
l Never spray or splash water on the electrical
components in the engine compartment, as
this may adversely affect engine starting.
Exercise caution also when washing the un- derbody; be careful not to spray water intothe engine compartment.
Cleaning the exterior of your vehicle
9-03OKTE15E3Vehicle care9
Page 341 of 418
Damaged paint
E00901200155
Small cracks and scratches in the paint coat
should be touched up as soon as possible
with MITSUBISHI touch-up paint to prevent
corrosion.
Check body areas facing the road or the tyres
carefully for damage to the paint coat caused
by flying stones, etc. The paint code number
for your vehicle can be found on the vehicle information code plate. (Refer to “Vehicle la-
beling” on page 11-02.)
Cleaning plastic parts
E00901300446
Use a sponge or chamois leather.
If a car wax adheres on a grey or black rough surface of the bumper, moulding or lamps, the surface becomes white. In such a case,
wipe it off using lukewarm water and soft cloth or chamois leather.
CAUTIONl Do not use a scrubbing brush or other hard
tools as they may damage the plastic part surface.
l Do not use wax containing compound (pol-
ishing powder) which may damage the plas-
tic part surface.CAUTIONl Do not bring the plastic parts into contact
with petrol, light oil, brake fluids, engine
oils, greases, paint thinners, and sulphuric acid (battery electrolyte) which may crack,stain or discolour the plastic parts.
If they touch the plastic parts, wipe them off
with soft cloth, chamois or the like and an aqueous solution of neutral detergent thenimmediately rinse the affected parts with
water.Chrome parts
E00901400014
In order to prevent spots and corrosion of
chrome parts, wash with water, dry thorough-
ly, and apply a special protective coating.
This should be done more frequently in win- ter.
Aluminium wheels*
E00901500116
1. Remove dirt using a sponge while sprin-
kling water on the vehicle.
2. Use neutral detergent on any dirt that
cannot be removed easily with water.
Rinse off the neutral detergent after
washing the vehicle.
3. Dry the vehicle thoroughly using a cha-
mois leather or a soft cloth.
CAUTIONl Do not use a brush or other hard implement
on the wheels.
Doing so could scratch the wheels.
l Do not use any cleaner that contains an abra-
sive substance or is acidic or alkaline. Doing
so could cause the coating on the wheels to peel or become discoloured or stained.
l Do not directly apply hot water using a
steam cleaner or by any other means.
l Contact with seawater and road deicer can
cause corrosion. Rinse off such substances as soon as possible.Window glass
E00901600058
The window glass can normally be cleaned
using only a sponge and water.
Glass cleaner can be used to remove oil, grease, dead insects, etc. After washing the
glass, wipe dry with a clean, dry, soft cloth. Never use the same cloth to wipe the window glass as would be used to wipe the paint-
work; wax from the painted surfaces could
adhere to the glass and reduce its transparen-
cy and visibility.
Cleaning the exterior of your vehicle
9-05OKTE15E3Vehicle care9
Page 342 of 418
NOTElTo clean the inside of the rear window, al-
ways use a soft cloth and wipe the window
glass along the demister heater element so as not to cause damage.Wiper blades
E00901700017
Use a soft cloth and glass cleaner to remove
grease, dead insects, etc., from the wiper blades. Replace the wiper blades when they
no longer wipe properly. (Refer to page “Wiper blades” on page 10-17.)
Cleaning the sunroof*
E00901800180
Clean the inside of the sunroof with a soft cloth. Hard deposits should be wiped away
with a cloth dipped in warm, neutral deter- gent solution. Wipe away the solution with a
sponge dipped in fresh water.
NOTEl The surface treatment on the inside of the
glass may be removed if hard cloth or organ-
ic solvent (benzine, kerosene, thinner, etc.) is used.Engine compartment
E00902100265
Clean the engine compartment at the begin-
ning and end of winter. Pay particular atten- tion to flanges, crevices and peripheral parts where dust containing road chemicals and
other corrosive materials might collect.
If salt and other chemicals are used on the roads in your area, clean the engine compart- ment at least every three months.
Never spray or splash water on the electrical
components in the engine compartment, as
this may cause damage.
Do not bring the nearby parts, the plastic parts and so on into contact with sulphuric
acid (battery electrolyte) which may crack,
stain or discolour them.
If they are in contact, wipe off with soft cloth, chamois or the like and an aqueous sol-
ution of neutral detergent then immediately rinse the affected parts with plenty of water.
Cleaning the exterior of your vehicle
9-06OKTE15E3Vehicle care9